KC4815Z
English
繁體中文
4
9

2
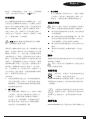
FIG. A
FIG. B
1
4
5
6
7
10
8
9
2
3

FIG. C
FIG. D

4
ENGLISH
SAFETY INSTRUCTIONS
General power tool safety warnings
@
Warning! Read all safety warnings and all
instructions. Failure to follow the warnings and
instructions listed below may result in electric
shock, re and/or serious injury.
Save all warnings and instructions for future reference.
The term “power tool” in all of the warnings listed below
refers to your mains operated (corded) power tool or battery
operated (cordless) power tool.
1. Work area safety
a. Keep work area clean and well lit. Cluttered or dark
areas invite accidents.
b. Do not operate power tools in explosive
atmospheres, such as in the presence of ammable
liquids, gases or dust. Power tools create sparks
which may ignite the dust or fumes.
c. Keep children and bystanders away while operating
a power tool. Distractions can cause you to lose
control.
2. Electrical safety
a. Power tool plugs must match the outlet. Never
modify the plug in any way. Do not use any adapter
plugs with earthed (grounded) power tools.
Unmodied plugs and matching outlets will reduce risk
of electric shock.
b. Avoid body contact with earthed or grounded
surfaces such as pipes, radiators, ranges and
refrigerators. There is an increased risk of electric
shock if your body is earthed or grounded.
c. Do not expose power tools to rain or wet
conditions. Water entering a power tool will increase
the risk of electric shock.
d. Do not abuse the cord. Never use the cord for
carrying, pulling or unplugging the power tool. Keep
cord away from heat, oil, sharp edges or moving
parts. Damaged or entangled cords increase the risk of
electric shock.
e. When operating a power tool outdoors, use an
extension cord suitable for outdoor use. Use of a
cord suitable for outdoor use reduces the risk of electric
shock.
f. If operating a power tool in a damp location is
unavoidable, use a residual current device (RCD)
protected supply. Use of an RCD reduces the risk of
electric shock.
3. Personal safety
a. Stay alert, watch what you are doing and use
common sense when operating a power tool. Do not
use a power tool while you are tired or under the
inuence of drugs, alcohol or medication. A moment
of inattention while operating power tools may result in
serious personal injury.
b. Use personal protective equipment. Always wear
eye protection. Protective equipment such as dust
mask, non-skid safety shoes, hard hat, or hearing
protection used for appropriate conditions will reduce
personal injuries.
c. Prevent unintentional starting. Ensure the switch is
in the off-position before connecting to power
source and/or battery pack, picking up or carrying
the tool. Carrying power tools with your nger on the
switch or energising power tools that have the switch on
invites accidents.
d. Remove any adjusting key or wrench before turning
the power tool on. A wrench or a key left attached to a
rotating part of the power tool may result in personal
injury.
e. Do not overreach. Keep proper footing and balance
at all times. This enables better control of the power
tool in unexpected situations.
f. Dress properly. Do not wear loose clothing or
jewellery. Keep your hair, clothing and gloves away
from moving parts. Loose clothes, jewellery or long
hair can be caught in moving parts.
g. If devices are provided for the connection of dust
extraction and collection facilities, ensure these are
connected and properly used. Use of dust collection
can reduce dust-related hazards.
Screwdriver KC4815Z
Rated Voltage V
dc
4.8
No load speed /min(rpm) 200
Max. Torque Nm 4
Weight kg 0.4
Charger HY-06
Input Voltage V 110
Output Voltage V
dc
6
Current mA 300
Charging Time h 3
KC4815Z
SCREWDRIVER
Technical data

5
ENGLISH
4. Power tool use and care
a. Do not force the power tool. Use the correct power
tool for your application. The correct power tool will
do the job better and safer at the rate for which it was
designed.
b. Do not use the power tool if the switch does not
turn it on and off. Any power tool that cannot be
controlled with the switch is dangerous and must be
repaired.
c. Disconnect the plug from the power source and/or
the battery pack from the power tool before making
any adjustments, changing accessories, or storing
power tools. Such preventive safety measures reduce
the risk of starting the power tool accidentally.
d. Store idle power tools out of the reach of children
and do not allow persons unfamiliar with the power
tool or these instructions to operate the power tool.
Power tools are dangerous in the hands of untrained
users.
e. Maintain power tools. Check for misalignment or
binding of moving parts, breakage of parts and any
other condition that may affect the power tools
operation. If damaged, have the power tool repaired
before use. Many accidents are caused by poorly
maintained power tools.
f. Keep cutting tools sharp and clean. Properly
maintained cutting tools with sharp cutting edges are
less likely to bind and are easier to control.
g. Use the power tool, accessories and tool bits etc. in
accordance with these instructions, taking into
account the working conditions and the work to be
performed. Use of the power tool for operations
different from those intended could result in a
hazardous situation.
5) Battery tool use and care
a. Recharge only with the charger specied by the
manufacturer. A charger that is suitable for one type of
battery pack may create a risk of re when used with
another battery pack.
b. Use power tools only with specically designated
battery packs. Use of any other battery packs may
create a risk of injury and re.
c. When battery pack is not in use, keep it away from
other metal objects, like paper clips, coins, keys,
nails, screws or other small metal objects, that can
make a connection from one terminal to another.
Shorting the battery terminals together may cause burns
or a re.
d. Under abusive conditions, liquid may be ejected
from the battery; avoid contact. If contact
accidentally occurs, ush with water. If liquid
contacts eyes, additionally seek medical help. Liquid
ejected from the battery may cause irritation or burns.
6. Service
a. Have your power tool serviced by a qualied repair
person using only identical replacement parts. This
will ensure that the safety of the power tool is
maintained.
7. Electrical safety
Your charger is double insulated; therefore no
earth wire is required. Always check that the
main voltage corresponds to the voltage on the
rating plate.
Warning! If the power cord is damaged, it must
be replaced by the manufacturer, authorized
BLACK+DECKER Service Center or an equally
qualified person in order to avoid damage or
injury. If the power cord is replaced by an equally
qualified person, but not authorized by
BLACK+DECKER, the warranty will not be valid.
8. Labels on tool
The label on your tool may include the following
symbols:
Read
Instructions
Manual
Use Eye
Protection
Use Ear
Protection
V ........ Volts
A ........ Amperes
Hz ....... Hertz
W ........ Watts
min ..... minutes
..... Alternating
Current
..... Direct
Current
n
0
....... No-Load
Speed
...... Class II
Construction
.... Earthing
Terminal
.... Safety Alert
Symbol
.../min.. Revolutions
or Recipro-
cation per
minute
SPECIAL SAFETY ADVICE FOR SCREWDRIVER
f Hold power tool by insulated gripping surfaces,
when performing an operation where the fastener
may contact hidden wiring. Fasteners contacting
a “live” wire may make exposed metal parts of the
powertool “live” and could give the operator an electric
shock.
f Use clamps or another practical way to secure and
support the workpiece to a stable platform. Holding
the work by hand or against your body leaves it
unstable and may lead to loss of control.
f This tool is not intended for use by persons (including
children) with reduced physical, sensory or mental
capa-bilities, or lack of experience and knowledge,
unless they have been given supervision or instruction
concerning use of the appliance by a person responsible
for their safety. Children should be supervised to
ensure that they do not play with the appliance.
f The intended use is described in this instruction
manual. The use of any accessory or attachment

6
ENGLISH
or performance of any operation with this tool other
than those recom-mended in this instruction manual
may present a risk of personal injury and/or damage
to property.
Only plug the Battery Charger in mains. Recharge the
Battery only with the provided charger. Before starting
any work on walls, floors or similar, make sure that all
power lines in the work area are switched off at the main
switchboard. Inspect the proposed drill hole location for
any utility lines (e.g. water, gas, power) before drilling.
Use a suitable device such as a metal or electricity line
detecting device. If in doubt contact a qualified electrician
or your utility provider. Both tools and work-pieces can
heat up considerably during the drilling operation. Allow
a sufficient period of cooling before handling. Wear
appropriate gloves.
Warning! Impact wrenches are not torque wrenches.
Do not use this tool for tightening fasteners to specified
torques. An independent, calibrated torque measurement
device such as a torque wrench should be used when
under tightened or over tightened fasteners can lead to the
failure of the joint.
SAFETY ADVICE FOR CHARGER
Important! Danger! There are 4 pcs 1.2V Ni-cd battery
in screwdriver,Never short-circuit the battery or expose it
to moisture.Do not store it together with any metal parts
which could short-circuit the contacts.the machine could
overheat,start burning or explode.
Warning!
f This appliance is not intended for use by persons
(including children) with reduced physical, sensory or
mental capabilities, or lack of experience and
knowledge, unless they have been given supervision
or instruction concerning use of the appliance by a
person responsible for their safety.
f Do not recharge non-rechargeable batteries.
f Children should be supervised to ensure that they do
not play with the appliance.
f Use your BLACK+DECKER charger only to charge
the battery in the tool with which it was supplied.
Other batteries could burst, causing personal injury
and damage.
f Never attempt to charge non-rechargeable batteries.
f Have defective cords replaced immediately.
f Do not expose the charger to water.
f Do not open the charger.
f Do not probe the charger.
ADDITIONAL SAFETY INSTRUCTIONS FOR
BATTERIES
f Turning the LED light off when not in use as this will
drain the battery.
f Never attempt to open for any reason.
f Do not expose the battery to water.
f Do not store in locations where the temperature may
exceed 40 °C.
f Charge only at ambient temperatures between 10 °C
and 40 °C.
f Charge only using the charger provided with the tool.
f When disposing of batteries, follow the instructions
given in the section “Protecting the environment”.
f Do not attempt to charge damaged batteries.
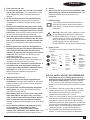
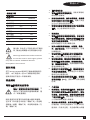
FEATURES (FIG. A)
1. Keyless chuck
2. Gear box
3. LED
4. LED switch
5. Housing
6. Switch
7. Everse-Rotation lever
8. Handle
9. Pivot release button
10. Charging hole
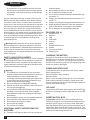
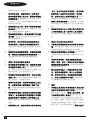
CHARGING THE BATTERY
Charging as shown,Must turn off the screwdriver. Only
Red lights up on the power indicator when you charging.
Charging time: 3 - 5 Hours. The charger wire plug-in The
position of the machine round hole,The charger plug in the
socket. As shown in the Fig. B.
POWER INDICATOR LIGHT
Three different colors of light (From Left: Green. Yellow.
Red) Charging State:
Only Red lights up when charging.
Operation State:
Green. Yellow and red light will light up at the same time,
With continued working, the battery voltage drops, and
when the Red light turns off, this implies that the battery is
used up and needs charging.
LED LIGHT
Just press the LED switch button gently, and the LED light
will turn on. Pressing the button again will turn off the LED
lights.
INSERTING TOOL BITS
Important! Always Turn off the machine before you
change the screw bit to avoid unintentional starting of the
machine.On/Off Trigger. In the use of driver, After make
sure align Outside the six-party of bit and hexagon hole of
output shaft. Keep it not fall off. If need to change bit, Turn
off the screwdriver. Pull out bit from hexagon hole of output
shaft by hand and change another one.

7
ENGLISH
On/Off Trigger
Use the On/Off trigger to start the machine and keep
holding it for continuous operation.
REVERSE-ROTATION LEVER
Important! This is a can foldable cordless screwdriver,
The machine has to come to a complete stop before the
reverse rotation lever can be used.otherwise the machine
may be damaged.
Use the reverse-rotation lever to switch between clockwise
(normal) and anticlockwise rotation or vice-versa. With
the reverse-rotation lever in the central position the
trigger switch is locked and cannot be depressed .Put
the reverse-rotation lever in the central position before
you put the machine down,to avoid unintentional starting.
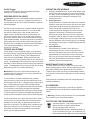
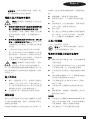
Right handhold handle, Left hand hold front of screwdriver.
At the same time left thumb press the black button (with
printed “Press”). Handle part rotated forwards 90 degrees.
Then will become straighten. Same way,If you want
curved. Do it like this.
TORQUE ADJUSTMENT
Torque setting 8 torque+1drilling setting. You can control
the maximum torque applied to the drill bit with the torque
control knob. 8 Torque+1 Drilling. This Drilling does not
mean this unit have drillability. Drilling means unit have
Locked-rotor set. For the duration of the run unit. During 1-8
torque. The magnitude of the running over the unit can bear.
Will make a “da-da-da”noise. when running in the maximum
torque. The magnitude of the running over the unit can bear.
Will protect the unit, Do not allow the tripping.
Attention! The torque control knob should only be
operated when the machine is not running; otherwise the
machine may be damaged.
To set the drill to the lowest available torque setting,
twist the torque control knob until the small arrow on the
drill-housing points to the “1” stamped on the torque control
knob. In this position the torque clutch will slip with light
drilling resistance. The higher the number the arrow points
to on the torque control knob, the larger the maximum
torque that can be applied before the torque clutch will slip.
To set the machine to maximum available torque twist the
torque control knob until the arrow points to the drill symbol.
In this position there is no slip in the torque clutch. Select
a lower torque for insertion/removal of screws to avoid
damage to the work-piece (in particular wooden work-
pieces) or to the screw. For drilling select a higher torque
setting. Do a test first on an item which is not your final
work-piece and adjust the desired torque accordingly
before you start the actual work.
OPERATION FOR WORKING
1. Using the Screwdriver as a Screw-driver Before using
the machine check whether the screw-bit is inserted
correctly. Avoid over-tightening screws, otherwise the
screw head may be damaged or stripping of the
threads may occur.
2. Screw Insertion
Set the direction of rotation of the drill to the clockwise
direction. Insert the screw-bit into the slot in the head
of the screw. Hold the screw bit perpendicular to the
head of the screw, otherwise the screw or the
screw head may be damaged. Press the screw bit
against the screw with a constant pressure while
driving in the screw. When the screw is completely
screwed in, hold the machine firmly and release the
On/Off trigger, otherwise the screw or the screw head
may be damaged. If the On/Off trigger is not released
immediately a high torque could also damage the drill
bit or the drill.
3. Screw Removal
Set the direction of rotation of the drill to the
anticlockwise direction. Insert the screw-bit into
the slot in the head of the screw. Hold the screw-bit
perpendicular to the head of the screw, otherwise
the screw or the screw head may be damaged. Press
the screw bit against the screw with a constant
pressure while removing the screw.
MAINTENANCE AND CLEANING
To clean, always use a dry or moist, but not wet, towel.
Many cleaning agents contain chemical substances which
may cause damage to the plastic parts of the machine.
Therefore do not use any strong or inflammable cleaners
such as petrol, paint thinner, turpentine or similar cleaning
agents.
Always keep air ventilation holes free of dust deposits to
prevent overheating.
ACCESSORIES
Recommended accessories for use with your product
are available from your local dealer or authorized service
center.
Warning! The use of any accessory not recommended
for use with this tool could be hazardous.
PROTECTING THE ENVIRONMENT
Separate collection. This product must not be
disposed of with normal household waste.
Should you find one day that your
BLACK+DECKER product needs replacement, or
if it is of no further use to you, do not dispose of it
with household waste. Make this product available

8
ENGLISH
Service Information
Black & Decker offers a full network of company-owned
and authorized service locations throughout with trained
personnel to provide customers with efficient and reliable
power tool service. Whether you need technical advice,
repair, or genuine factory replacement parts, contact the
Black & Decker location nearest to you.
Notes
f Black & Decker’s policy is one of continuous
improvement to our products and, as such, we
reserve the right tochange product specifications
without prior notice.
f Standard equipment and accessories may vary by
county.
f Product specifications may differ by country.
f Complete product range may not be available in all
countries.
f Contact your local Black & Decker dealers for range
availability.
for separate collection.
Separate collection of used products and packaging
allows materials to be recycled and used again.
Re-use of recycled materials helps prevent
environmental pollution and reduces the demand
for raw materials. Local regulations may provide for
separate collection of electrical products from the
household, at municipal waste sites or by the
retailer when you purchase a new product.
BATTERIES
BLACK+DECKER batteries can be recharged
many times. The unit has no user serviceable
parts, at the end of its useful life the unit must be
returned to an authorised centre for the removal
and disposal of batteries.

9
繁體中文
KC4815Z
螺
絲起子機
技術資料
型號
KC4815Z
額定電壓
V, DC 4.8
輸入電壓
V 110
空載轉速
rpm 200
重量
kg 0.4
最大扭力
Nm 4
充電器
HY-06
輪出電壓
V, DC 6
電流
mAh 300
充電時間
小時
3
請注意! 各地區上市產品/配件不盡相
同, 請依台灣繁體中文說明書的內容
為主。
Warning! Aachments and accessories
are not the same in each region, please
only refer to Taiwan Tradional Chinese
descripon in this manual.
設計用途
您� BLACK+DECKER 螺絲起子機為螺旋應用而
設計。本工具僅供一般 DIY 消費者家庭使用,
營業使用者不適用一年保修條款。
安全說明
電
動工具通用安全警告
警告!閱讀所有警告和所有說明。不
遵照以下警告和說明會導致電擊、著
火/或嚴重傷害。
請妥善保存所有警告及說明書以備將來查閱。
在所有下列的警告中術語「電動工具」是指電
源驅動(插電)電動工具,或者電池驅動(充
電)電動工具。
1. 工
作場地安全
a. 保持工作場地清潔和明亮。混亂或黑暗的
場杝會引發事故。
b. 請
勿在易爆環境,如有易燃液體、氣體或
粉塵的環境中操作電動工具。電動工具產
生的火花會點燃粉塵或氣體。
c. 請
等待兒童和旁觀者離開之後才操縱電動
工具。分心會導致您疏於控制。
2. 電
氣安全
a. 電動工具插頭必須與插座相符。切勿以任
何方式改裝插頭。需接地的電動工具不能
使用任何配接器插頭。未經改裝的插頭和
相符的插座可以減少觸電危險。
b. 避
免人體接觸接地表面,如管道、散熱
片、爐灶和冰箱。若您的身體接地,可增
加觸電危險。
c. 請
勿將電動工具暴露在雨中或潮濕環境
中。水進入電動工具會增加觸電危險。
d. 請
勿濫用電線。請勿使用電線來搬運、拉
動電動工具或拔出插頭。讓電線遠離熱、
油、銳邊和活動部件。受損或纏繞的電線
會增加觸電危險。
e. 若
要在戶外使用電動工具,請使用適合戶
外使用的延長電纜。使用適合戶外使用的
電線可減少觸電危險。
f. 若
必須在潮濕場合使用電動工具,請使用
漏電保護器(RCD)。使用 RCD 可降低觸電
危險。
3. 人
身安全
a. 保持警覺;在操作電動工具時,請留意所
執行的操作並按照一般的程式執行。請勿
在疲倦,或受到藥物、酒精或治療的影響
下操作電動工具。操作電動工具期間注意
力分散會導致嚴重人身傷害。
b. 使
用個人防護裝置。如終佩戴護目裝備。
防護裝置,例如在適當條件下可使用的防
塵面具、防滑安全鞋、安全帽或聽力保護

10
繁體中文
等裝置可減少人身傷害。
c. 避
免意外啟動。連接電源及/或電池組、
撿取或搬運電動工具之前,請確定開關處
於關閉位置。搬運電動工具時若將手指放
在開關上,或是在接通開關電源時插入插
頭都會引發危險。
d. 接
通電動工具之前,請卸下所有的調整鑰
匙或扳手。遺留在電動工具旋轉部件上的
扳手或鑰匙會導致人身傷害。
e. 請
勿過度伸張雙手。時刻注意腳下與身體
的平衡。如此即可在發生意外的情況下更
好地控制電動工具。
f. 適
當穿著。請勿穿寬鬆衣服或佩戴飾品。
讓您的頭髮、衣服和手套遠離活動部件。
寬鬆衣服、佩飾和長髮可能會捲入活動部
件。
g. 若
配備用於連接排屑裝置、集塵設備的裝
置,請確定正確連接和使用這些裝置。使
用集塵設備可減少與粉塵有關的危險。
4. 電
動工具的使用與注意事項
a. 請
勿超負荷使用電動工具。根據您的用途
使用適當的電動工具。使用適當的電動工
具、讓它在設計可負荷的應用內運轉,會
讓您更有效、更安全地執行工作。
b. 若
開關不能開啟或關閉電源,請勿使用該
電動工具。不能用開關來控制的電動工具
將存在危險,必須進行維修。
c. 在
執行任何調整、更換配件或儲存工具之
前,必須從電源上拔掉插頭/或卸下池
組。這類防護性措施可降低電動工具意外
啟動的風險。
d. 請
將閒置的電動工具儲存在兒童無法接觸
的地方,並且請勿讓不熟悉電動工具或對
這些使用指示不瞭解的人員作電動工具。
電動工具在未經培訓的使用者手中會發生
危險。
e. 維
護電動工具。檢查活動部件是否對準或
卡住、是否存在任何破損情況,或任何能
影響電動工具運行的其他情況。若有損
毀,必須在使用之前修理電動工具。許多
事故都是由於電動工具欠缺維護所導致。
f. 保
持刀具鋒利和清潔。妥善維護、切削鋒
利的切割工具不會輕易卡住並可更輕鬆控
制。
g. 導
循使用指示以及工作條件和所要執行的
工作使用電動工具、配件和工具刀頭等。
不按照設計目的使用電動工具將會導致危
險。
5. 電
池工具的使用與注意事項
a. 只
能使用製造廠商指定的充電器為電池充
電。使用僅適合一種電池組的充電器為其
他類型的電池組充電會導致火災危險。
b. 請
使用原廠的電動工具電池組。使用其他
非原廠的電池組會導致人身傷害和火災危
險。
c. 不
使用電池組時,請將其遠離如迴紋針、
硬幣、鑰匙、釘子、螺絲以及其他可能連
通電池兩極的金屬物品。將電池兩極短路
會導致灼傷或火災。
d. 濫
用電池的情況下,液體會從電池中噴
出;避免與液體接觸。若不小心接觸液
體,請用清水沖洗。若液體噴濺到眼睛
上,沖洗之後還要進行治療。從電池噴出
的液體會刺激皮膚或造成灼傷。
6. 檢
修
a. 本
電動工具必須由合格的維修人員並只採
用相同的原廠部件來執行檢修。這將確保
電動工具的安全性。電
動工具之修理,僅
可由認證的技術人員執行。請勿交由非百
得認證服務中心的認證技術人員進行修
理、維護、調整。若產品經由非百得認證
的維修工程師拆解、組裝、調整,恕無法
適用百得一年家用保修條款。請
務必使用

11
繁體中文
正廠零件。為充份發揮其功能,修理、維
護、調整請務必使用正廠零件。
電動工具之附加安全警告
警告!螺絲起子與震動扳手之附加安
全警告。
若
在執行操作時扣件可能會接觸隱藏的電
線,請從絕緣手柄表面握住電動工具。若
扣件接觸到「帶電」導線,電動工具金屬
部件表面就會「帶電」,從而導致操作人
員觸電。
使
用夾具或採取其他可行的方法,將工作
固定、支撐到穩定的平台上。手持工件或
用身體抵住工件會使工件不穩定並可能導
致失控。
工具的設計用途在本使用手冊中有所描
述。使用非本使用手冊所建議的任何其他
配件或附件,或使用本工具執行非本使手
手冊中所建議的任何其他操作,可能會有
人身傷害及/或財產損失的風險。
警
告!衝擊扳手並非扭矩扳手。請勿
使用此工具用於以特定扭矩擰緊扣
件。扣件擰得過鬆或過緊會導致連接失效,這
時必須單獨使用已校準的扭矩測量裝置(例如
扭矩扳手)。
他人的安全
體力、感覺或智力不足,或者缺乏經驗及
知識的人員(包括小孩)不適合使用本工
具,除非負責他們安全的人員已經為他們
提供關於使用此工具的監督或指示。
必須監督小孩,確保他們沒有耍玩器具。
剩餘風險
使用工具時可能會出現未包括在隨附的安全警
告中的其他剩餘風險。濫用、長時間使用等也
會導致這些風險。
即使應用有關的安全規定並採用安全裝置,仍
然還有一些無法避免的剩餘風險。此類風險包
括:
接觸旋轉/活動部件引起的傷害。
更換任何部件、刀片或配件時引起的傷
害。
長時間使用工具引起的傷害。長時間使用
任何工具時,請確保定期休息。
聽力受損。
吸入使用工具時產生的塵埃引起的健康危
害。(譬如:在木材上使用時,尤其是櫟
木、山毛欅和中密度纖維板(MDF))。
工具上的標籤
工具上可能會帶下列符號:
警
告!為了降低受傷的風險,使用者
必須仔細閱讀使用手冊。
電池和充電器之附加安全指示
電池
關閉未使用的 LED 指示燈,因為這會將電
池電力耗盡。
若長時間未使用電池(1 年以上), 請每 6 個
月為電池充電一次, 以確保電池壽命。
不論是因為任何理由,都請勿嘗試打開電
池。
請勿將電池暴露在水中。不要將電池儲存
在溫度可能超過 40
。
C 的地方。
只在環境溫度介於 10
。
C 和 40
。
C 之間的
情況下充電。
只能使用本工具隨附的充電器為電池充
電。
處置電池時,請遵循「保護環境」部份所
提供的指示執行。
充
電器
只能使用工具隨附的 BLACK+DECKER 充電
器為工具內的電池充電。其他非原廠電池
可能會爆裂,導致人身傷害和損害。
切勿嘗試為不可再充電的電池充電。

12
繁體中文
立即更換損壞的電線。
請勿將充電器暴露在水中。
請勿打開充電器。
請勿刺破充電器。
電氣安全
您的充電器採用雙重絕緣,因此不需
要使用接地線。請務必檢查主電壓是
否與銘牌一致。切勿嘗試使用一般的電源插頭
取代充電器裝置。
若電源線損壞,必須送往製造廠商或授權
的 BLACK+DECKER 服務中心更換以避免發
生危險。
警
告!切勿嘗試使用一般的電源插頭取代充電
器裝置。
功能部件(圖 A)
1. 螺絲夾頭
2. 扭力調整環
3. LED 燈
4. LED 燈開關
5. 外殼
6. 電源開關
7. 正/反轉按鈕
8. 手柄
9. 折疊鎖定鈕
10. 充電孔
為電池充電
如圖所示充電,必須關閉起子機。充電時,僅
紅色電源指示燈亮起。充電時間約 3 小時,將
充電器電線插入機器的充電孔位置,充電器插
入插座。如圖
B 所示。
電源指示燈
三種不同的指示燈顏色(從左至右:綠色,黃
色,紅色)充電狀態:
充電時,僅紅燈亮起
滿電時綠燈、黃燈和紅燈同時亮起,持續工作
後會使電壓下降,燈號會依序從綠燈、黃燈、
紅燈熄滅,直到最後紅燈熄滅時表示電池已耗
盡,需要充電。
LED 指示燈
只需輕輕按下 LED 開關按鈕,LED 指示燈就會
亮起。再次按下該按鈕會關閉 LED 指示燈。
插入起子頭
重要!請始終先關閉機器,再更換起子
頭,以免意外啟動機器,觸發開關。在使用起
子機之前,請先確保起子頭的外六角與夾頭的
六角孔對齊。確保其不會掉落。如果需要更換
起子頭,請關閉起子機,用手將起子頭從夾頭
的六角孔中拉出,然後更換新的起子頭。
啟動開關
觸發開關後將啟動機器,並握住它以便持續操
作。
正/反轉開關
重要!這是一支可以折疊的充電螺絲機子
機,要使用正/反轉功能時需先完全停止機
器,否則機器可能會受損。
使用正/反轉開關,可在順時針(鎖入)和逆
時針(旋出)之間切換;將正/反轉開關置於
中間位置時,電源開關將被鎖定,無法按下。
在停止機器前請先將正/反轉開關置於中間位
置,以免意外啟動機器。
折疊鎖定鈕
右手握住手柄,左手握住電動螺絲起子機前
端,同時用左手大拇指按住黑色按鈕(印有
“Press”),如圖
C 所示。將手柄部份朝前旋轉
本充電器僅供室內使用。
使用前請閱讀使用手冊。

13
繁體中文
90 度,手柄就會變直。同樣,反之,若要彎曲
手柄,也以相同方式操作。如圖
D 所示。
扭矩調整
扭力調整環設置 8 種扭矩+1 種鑽孔設計。您可
以使用扭力調整環來空制扭力;此鑽孔扭矩設
置並不表示本機具有鑽孔功能,而是意昧著本
機具有鎖緊轉子裝置。適用於本機操作期間,
扭矩在 1-8 之間,本機可以承受的運行量級。
在最大扭力下運行時,會發出「嗒嗒嗒」的噪
音,可保護本機,不會跳閘。
注
意!僅在機器未啟動時使用扭力調整
環;否則機器可能會受損。
要將扭力調整為最低的扭力值,請旋轉扭力調
整環,直到起子機外殼上的小箭頭指向扭力調
整環上印有的「1」,在此位置,扭矩離合器會
在輕微的阻力下滑動;箭頭所指向的扭力數字
越高,在扭矩離合器滑動前可以施加的最大扭
矩越大。要將機器設定為最大可用扭矩,請將
箭頭轉向鑽孔符號,在此位置,扭矩離合器不
會滑動。選擇較低的扭矩以便鎖入/取出螺
絲,以免損壞工件(特別是木材)或螺絲;先
在其他物品上進行測試,然後相應調整所需的
扭力,接著再真正開始工作。
作業程序
1. 在使用鎖螺絲功能之前,請先檢查螺絲是
否有正確的置入夾頭內;操作時請勿過度
擰緊螺絲,否則會造成螺絲頭損壞或是螺
紋被破壞造成滑牙。
2. 鎖
入螺絲
按下正轉開關(順時針方向),將起子頭插
入夾頭內,握住起子機並使起子頭與工件
面垂直,以穩定的壓力將螺絲下壓鎖入。
完全旋入後,放開開關,否則螺絲或起子
頭可能會受損;如果沒有立即釋放開關,
高扭矩也可能會損壞起子機。
3. 取
出螺絲
按下反轉開關(逆時針方向),將起子頭插
入夾頭內,握住起子機並使起子頭與工件
面垂直,以穩定的壓力將螺絲慢慢旋出。
維護與清潔
警告!在對工具執行任何維護以及清潔之
前,請拔下充電器的插頭並關閉起子機電源。
請定期使用軟刷或乾布清潔工具和充電器
內的通風槽。
請定期使用濕布清潔電動機外殼。請不要
使用任何劇烈或易燃的清潔劑,如汽油、
涂料稀釋劑、松節油或類似清潔劑。
請定期打開夾頭並輕敲以去除內部的任何
塵埃。
請始終保持通風孔無塵屑堆積,以防過
熱。
附件
建議與您的產品配套使用的附件可以從當地經
銷商處另行購買。
警告!使用任何不建議與本工具配合使用
的附件會導致危險。
保護環境
分類回收。本產品不得與普通家庭垃圾
一同處理。如果您發現您的
BLACK+DECKER 產品需要進行替換,或您已經不
再需要使用這些產品,請勿將他們與家庭垃圾
一起處理。
分類收集用過的產品和包裝充許材料
循環再生利用。重新使用回收的材料
有助於防止環境污染,並降低對原材料的需
求。
服務訊息
BLACK+DECKER 為客戶提供高效可靠的電動工具

14
繁體中文
服務。不論您是需要技術建議、維修或原廠替
換部件,請聯系最靠近您的 BLACK+DECKER 經
銷商或授權的服務中心。
備註
BLACK+DECKER 持續改進我們的產品,因
此我們保留隨時更改產品規格的權利,恕
不另行通知。
標準設備和附件可能會因為不同的國家/
地區而有所不同。
產品規格可能會因為不同的國家/地區而
有所不同。
並非所有國家/地區均可提供完整的產品
系列及附件。
有關各產品系列的供貨情況,請聯系您當
地的 BLACK+DECKER 經銷商。
經銷商: 特力股份有限公司
地址: 台北市內湖區新湖三路 23 號 1.2.5 樓
電話: 0800-552888
進口/委製廠商: 新加坡商百得電動工具(股)公
司台灣分公司
地址: 台北市北投區裕民六路 120 號 4 樓
電話: 02-2820-1065


11/2015
-
 1
1
-
 2
2
-
 3
3
-
 4
4
-
 5
5
-
 6
6
-
 7
7
-
 8
8
-
 9
9
-
 10
10
-
 11
11
-
 12
12
-
 13
13
-
 14
14
-
 15
15
-
 16
16


他の言語で
- English: Black & Decker KC4815Z User manual
関連論文
-
BLACK+DECKER ISD72 ユーザーマニュアル
-
-
-
BLACK+DECKER BDCDD12 ユーザーマニュアル
-
BLACK+DECKER KTC12 ユーザーマニュアル
-
-
BLACK+DECKER BDCHD12S1 ユーザーマニュアル
-
BLACK+DECKER AS36LN ユーザーマニュアル
-
-