
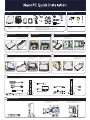
All images are for reference only, please refer to the physical NanoPC for detail.P/N:3A251KH00-000-G
1. On tabletop 2. In Seatbase
7
Placement of NanoPC
3. On display back
3.1. Use four screws to fasten the VESA Mount
onto the display back.
3.2. Fit the NanoPC into the VESA Mount with power
button locating at the top for easy touch.
1 2 3
1. Unscrew four screws (A) on the top
cover.
2. Put an Opening Tool between the
cover and case then move it to the
other side to remove the top cover.
3. Fasten it with one screw (A). 1. Fasten Mini PCIe add-on Card to
Mini PCle Half Card Support.
2. Plug the pin side of the Mini PCIe
add-on Card into the socket
slantwise, then press it down gently.
Install Mini PCIe add-on Card
1. Plug the pin side of the memory
module into the socket slantwise.
2. Press it down firmly.
Install memoryOpen the case
6
Connection of NanoPC
SD/MMC/MS
Please refer to the diagram to connect devices to NanoPC.
1. HDD
2. HDD Bracket
3. Mini PCIe Half Card Support
4. Mini PCIe add-on Card
5. Memory
6. Screw cover
7. Magnet Rubber Foot
8. Seatbase
9. VESA Mount
10. DVI to VGA Adapter(Optional)
11. Power Cord
12. Power Adapter
13. Screw(A, B, C, D)
A. M2.43X4.85 mm (9x): To fasten HDD Bracket and Case
B. M2.92X2.85 mm (3x): To fasten HDD to HDD Bracket
C. M2.42X2.85 mm (1x): To fasten Mini PCIe add-on Card to Mini PCIe Half Card Support
D. M3.90X9.70 mm (4x): To fasten VESA Mount to display
14. USB Flash Disk(With Driver, Utility, User’s Manual and Easy Guide in it)
Components
1. ESD Wrist Strap
2. ESD Gloves
3. Opening Tool
Tools Needed
4 5
2. Fasten the top cover with four screws
(A) . Stick the screw cover on the four
screw holes.
1. Install the top cover.
2. Fasten them with three screws (B). 3. Install HDD into the socket on the
motherboad gently.
4. Fasten the HDD bracket with four
screws (A).
Install Hard Disk Drive (HDD)
1. Insert the HDD into the HDD bracket
slantwise first, then press it down.
Install the case
USB Keyboard
Display
LAN
Power adapter
Microphone
Headphone
USB devices
USB Mouse
HD TV
Speaker device
USB Flash Disk
Memory card
A
A
B
A
B
B
A
B
A
B
A
B
5
6
7
8
9
10
11
12
13
14
A
B
C
D

简体中文 繁體中文
1> 打开机壳
1. 将上盖的四颗螺丝(A)拧开。
2. 将开盒器插入机壳与上盖之间,然后将其划向另一侧打开上盖
。
2> 安装内存
1. 将内存条倾斜的插入内存插槽内。
2. 向下按压内存条,使其固定。
3> 安装Mini PCIe 附加卡
1. 将
Mini PCIe
附加卡固定于
Mini PCle 半卡支架上。
2. 将
Mini PCIe
附加卡倾斜的插入插槽内,然后向下轻轻按压,使其固定。
3. 将Mini PCIe 半卡支架用一颗螺丝(A)固定在主板上。
4> 安装硬盘(HDD)
1.
先将
硬盘
倾斜的插入硬盘支架内,然后向下按压,使其固定。
2. 用三颗螺丝(B)将硬盘与硬盘支架锁定。
3. 将硬盘支架轻轻装入主板上的硬盘插槽内。
4. 将硬盘支架用四颗螺丝固定(A)。
5> 安装机壳
1. 安装上盖。
2. 将上盖用四颗螺丝(A)锁定。将螺丝盖贴在四个螺丝孔位处。
6> NanoPC的连接
请参阅NanoPC连接装置示意图。
7> NanoPC的放置方式
1. 放置于桌面
2. 安置于底座上
3. 安装于显示器背面
3.1. 将挂架用四颗螺丝(D) 固定在显示器背面。
3.2. 将 NanoPC 固定在挂架中,为方便使用将电源按钮置于上方。
1> 打開機殼
1. 將上蓋的四顆螺絲(A)擰開。
2. 將開盒器插入機殼與上蓋之間,然後將其劃向另一側打開上蓋。
2> 安裝記憶體
1. 將記憶體傾斜的插入插槽內。
2. 向下按壓記憶體,使其固定。
3> 安裝Mini PCIe 附加卡
1. 將Mini PCIe 附加卡固定於Mini PCle 半卡支架上。
2. 將Mini PCIe 附加卡傾斜的插入插槽內,然後向下輕輕按壓,使其固定。
3. 將Mini PCIe 半卡支架用一顆螺絲(A)固定在主機板上。
4> 安裝硬碟(HDD)
1. 先將硬碟傾斜的插入硬碟支架內,然後向下按壓,使其固定。
2. 用三顆螺絲(B)將硬碟與硬碟支架鎖定。
3. 將硬碟支架輕輕裝入主機板上的硬碟插槽內。
4. 將硬碟支架用四顆螺絲固定(A)。
5> 安裝機殼
1. 安裝上蓋。
2. 將上蓋用四顆螺絲(A)鎖定。將螺絲蓋貼在四個螺絲孔位處。
6> NanoPC的連接
請參閱NanoPC連接裝置示意圖。
7> NanoPC的放置方式
1. 放置於桌面
2. 安置於底座上
3. 安裝於顯示器背面
3.1. 將掛架用四顆螺絲(D) 固定在顯示器背面。
3.2. 將 NanoPC 固定在掛架中,為方便使用將電源按鈕置於上方。
Português
日本語
Italiano
Français Türkçe
Español Slovenščina
Deutsch Русский Polski
ﺔﻴﺑﺮﻌﻟﺍ
-
 1
1
-
 2
2


