A-mount
–1
(1) (2)
A
ZEISS A
ZEISS ZEISS
E
E
1
Vario-Sonnar T 16-35mm F2.8 ZA SSM II
1 2 3
4 5 6
7 8 9
10 11
(
–
)
1
(1) (2) 2
(2)
2
(
–
)
( )
AF( ) MF( )
AF( : ) MF(
: )
AF AF
MF MF
(
-
)
AF MF
MF
(
-
)
AF/MF
AF MF AF
AF/MF
MF AF MF AF
AF/MF
(DMF)
AF (AF-A) AF(AF-S)
DMF
DMF
– AF(AF-C)
–
– AF-A 2
MF
( )
MF
(
)
–2
English
You will find information on using each lens in this manual. Precautions
common to lenses, such as notes on use will be found in “Precautions
before using” on a separate sheet. Be sure to read both documents before
using the lens.
This manual is for use with several different lenses.
This lens is designed for A-mount, which can be used on Sony α cameras.
This lens was developed jointly by ZEISS and Sony Corporation and designed
for Sony A mount cameras. This lens is produced according to the strict
standards and quality assurance system of ZEISS.
Notes on use
When using this lens with an E-mount camera, attach a separately sold Mount
Adaptor. Do not attach the lens directly to the E-mount camera or you may
damage both.
When you carry the camera with the lens attached, make sure to hold both the
camera and the lens steadily.
Do not hold by any part of the lens that protrudes when zooming.
This lens is not water-proof, although designed with dust-proofness and splash-
proofness in mind. If using in the rain etc., keep water drops away from the lens.
Precaution for flash use
When using a built-in camera flash, make sure to remove the lens hood and
shoot from at least 1 m (3.3 feet) away from your subject. With certain of lens/
flash combinations, the lens may partially block the light of the flash, resulting in
a shadow at the bottom of the picture.
When a built-in camera flash is used, the corners of the screen may appear
darker at wide-angle position. Check the focal length according to the built-in
flash on your camera (Vario-Sonnar T 16-35mm F2.8 ZA SSM II only).
Vignetting
When you use lens, the corners of the screen become darker than the center.
To reduce this phenomena (called vignetting), close the aperture by several
stops.
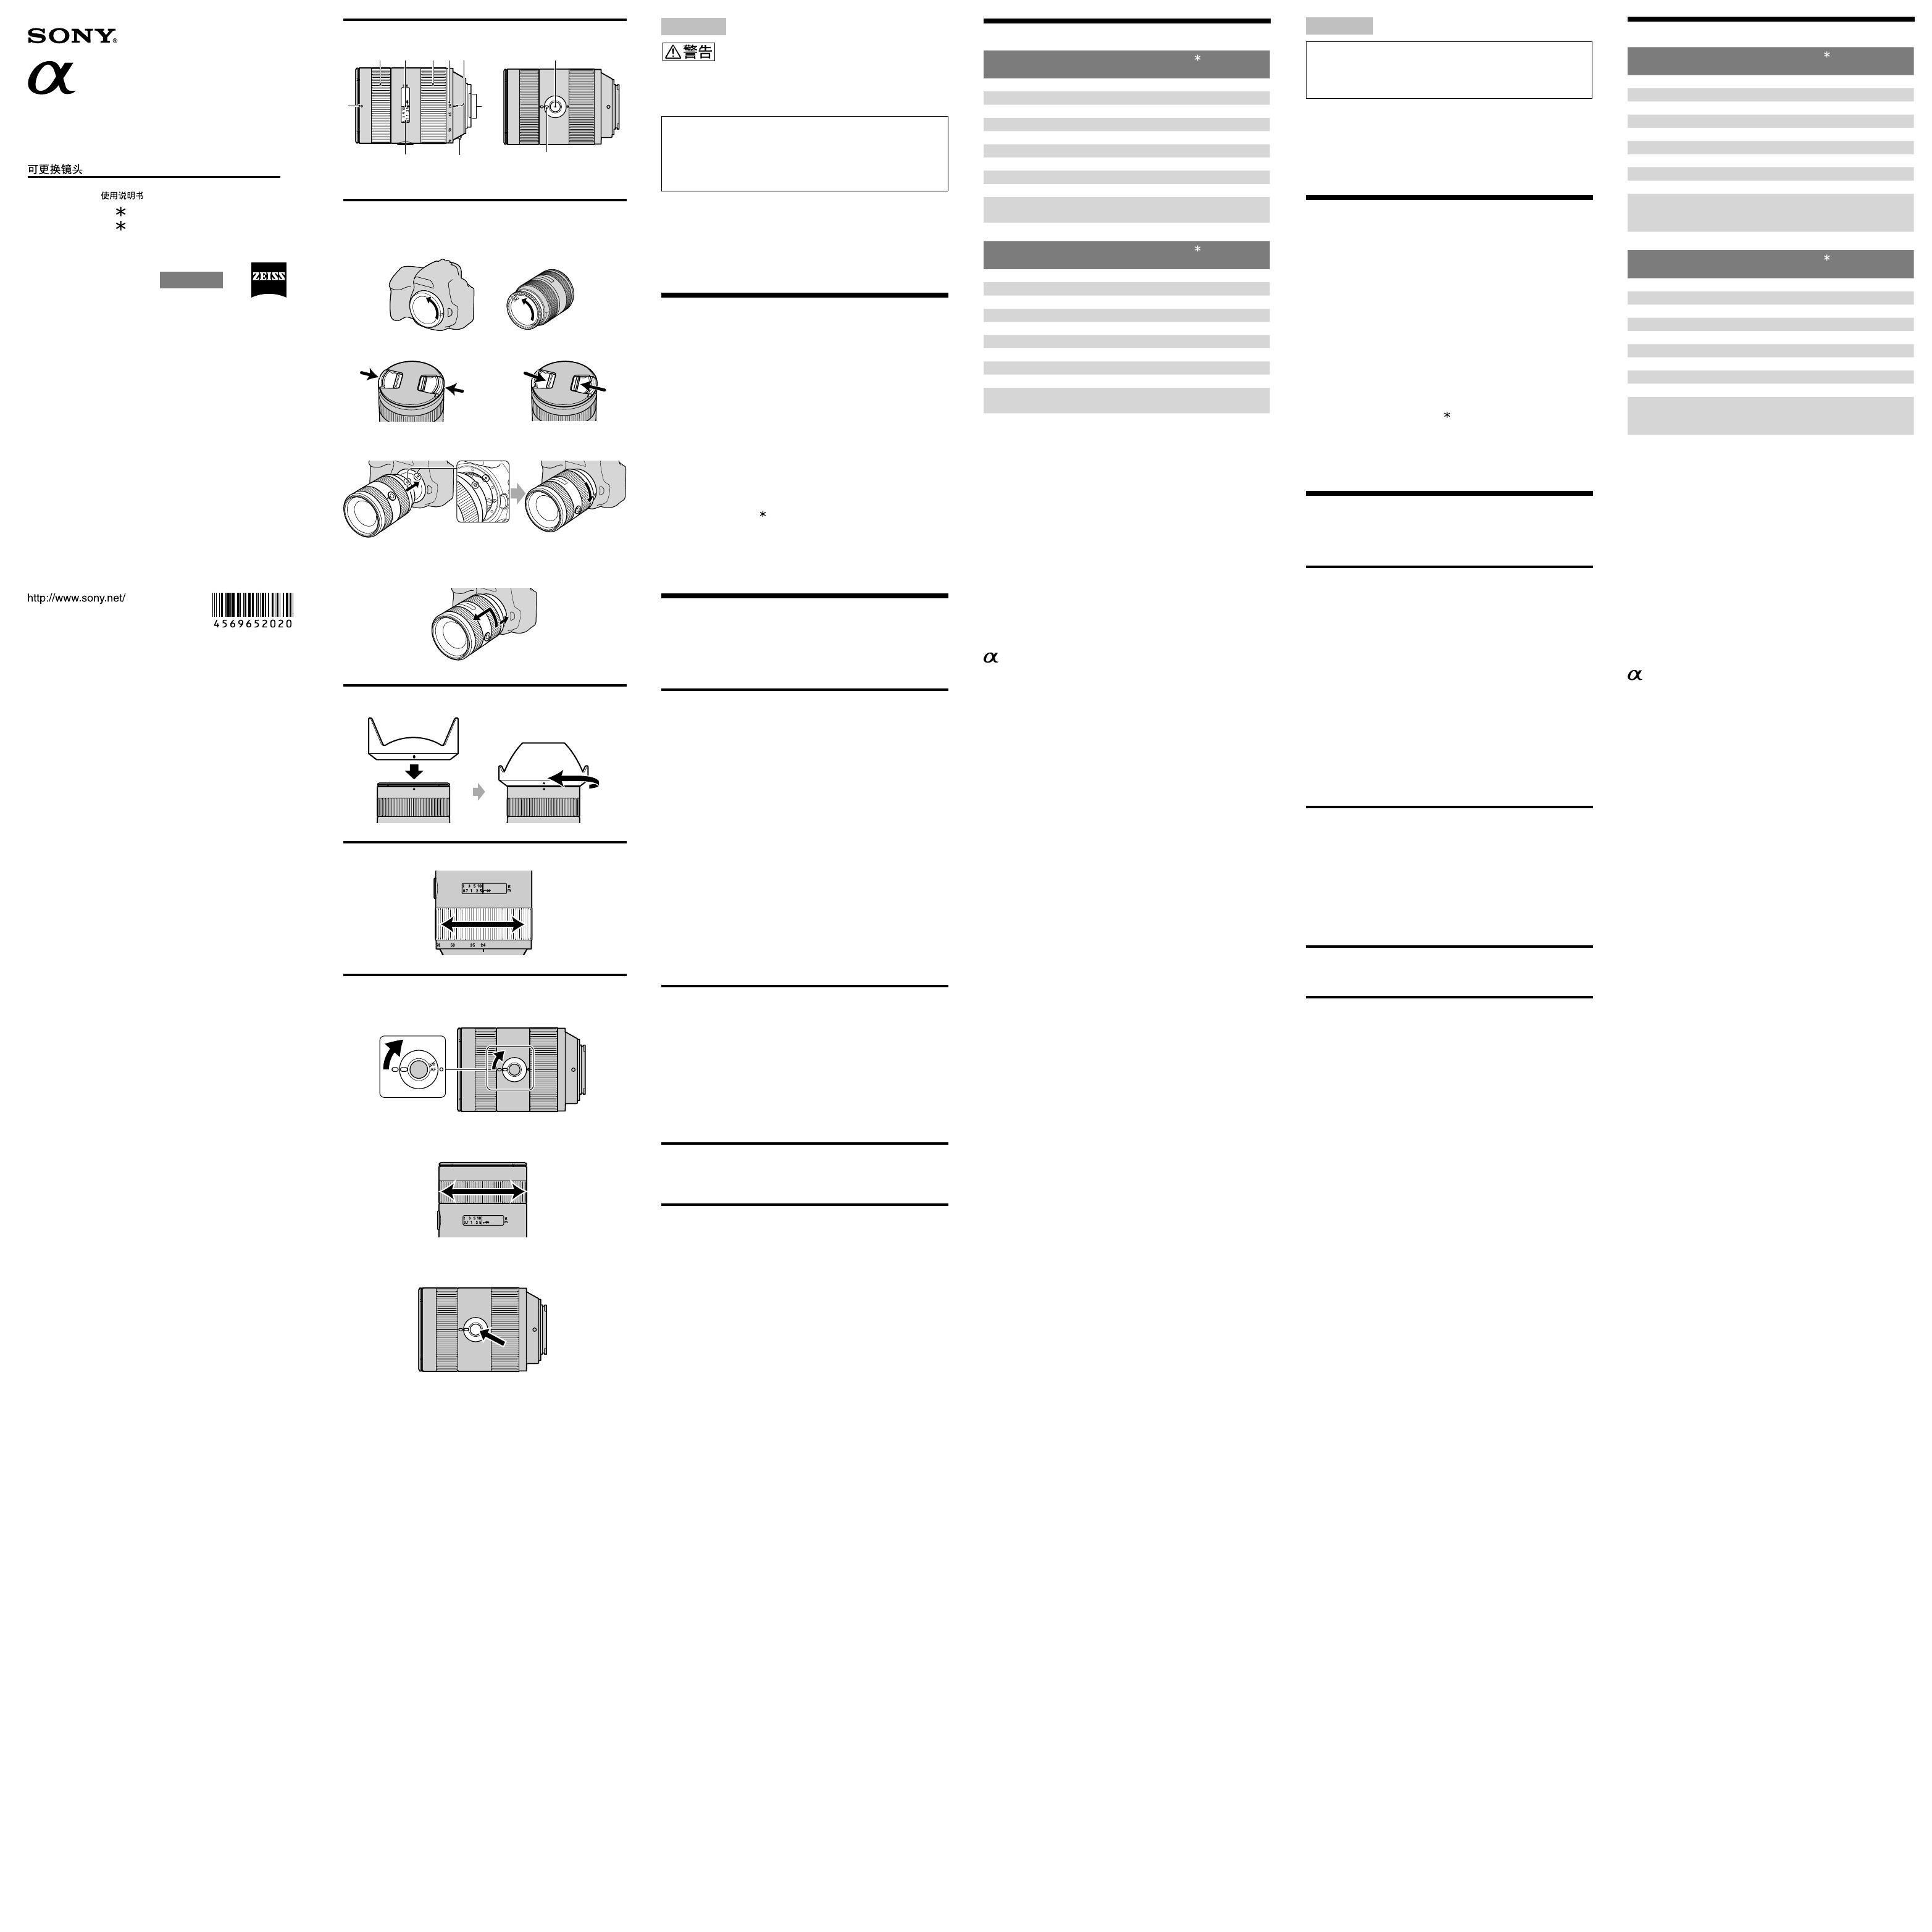
Names of parts
1···Lens hood index 2···Focusing ring 3···Distance index 4···Zooming ring
5···Focal-length scale 6...Focal-length index 7···Lens contacts 8···Mounting
index 9···Distance scale 10···Focus-hold button 11···Focus-mode switch
Attaching/detaching the lens
To attach the lens (See illustration –.)
1 Remove the rear and front lens caps and the camera body cap.
You can attach/detach the lens front cap in two ways, (1) and (2). When you
attach/detach the lens cap with the lens hood attached, use method (2).
2 Align the orange index on the lens barrel with the orange index
on the camera (mounting index), then insert the lens into the
camera mount and rotate it clockwise until it locks.
Do not press the lens release button on the camera when mounting the lens.
Do not mount the lens at an angle.
To remove the lens (See illustration –.)
While pressing and holding the lens release button on the camera,
rotate the lens counterclockwise until it stops, then detach the lens.
Attaching lens hood
It is recommended that you use a lens hood to reduce flare and ensure
maximum image quality.
Align the red line on the lens hood with the red dot on the lens (Lens
hood index). Turn the hood clockwise until the red dot on the lens
meets the red dot on the hood and it clicks into place.
Attach the lens hood properly. Otherwise, the lens hood may interfere with the
desired effect or may appear in pictures.
When storing, turn over the lens hood and place it onto the lens backwards.
Zooming
Rotate the zooming ring to the desired focal length.
Focusing
To switch AF (auto focus)/MF (manual focus)
The focus mode can be switched between AF and MF on the lens.
For AF photography, both the camera and lens should be set to AF. For MF
photography, either or both the camera or lens should be set to MF.
To set the focus mode on the lens (See illustration -.)
Slide the focus-mode switch to the appropriate mode, AF or MF.
In MF, turn the focusing ring to adjust the focus while looking through the
viewfinder, etc.(See illustration -).
To use a camera equipped with an AF/MF control button
Press the AF/MF control button to switch AF to MF when both the camera and
lens are set to AF.
Press the AF/MF control button to switch MF to AF when the camera is set to
MF and the lens is set to AF.
Direct manual focus (DMF)
Rotate the focusing ring to set correct DMF when the focus is locked in AF-A
(automatic auto focus) or AF-S (single-shot auto focus).
DMF is not available in the following cases:
– When the image is out of focus
– When AF-C (continuous auto focus) is selected
– When the focus is confirmed for the second photo during continuous
recording in AF-A
Shooting at infinity in MF
The focusing mechanism turns slightly past infinity to provide accurate
focusing under various operating temperatures. Always confirm the image
sharpness through the viewfinder, etc., especially when the lens is focused
near infinity.
Focus-hold button (See illustration –.)
While the focus-hold button is pressed, auto focus function is suspended and
the focus is fixed for shooting.
The function of the focus-hold button can be changed on cameras with custom
function capability. Refer to the camera manuals for details.
4-569-652-02(1)
©2015 Sony Corporation
SAL1635Z2/SAL2470Z2
/
Interchangeable Lens/
Objectif interchangeable/
Vario-Sonnar T 16-35mm F2.8 ZA SSM II
Vario-Sonnar T
24-70mm F2.8 ZA SSM II
/Operating Instructions/Mode d'emploi/Manual
de instrucciones/
Printed in Japan
Vario-Sonnar T 16-35mm
F2.8 ZA SSM II (SAL1635Z2)
mm 16-35
*
1
mm 24-52.5
13-17
1*
2
107 -63
2*
2
83 -44
*
3
m 0.28
0.24
F22
mm 77
mm
83 114
g 872
Vario-Sonnar T 24-70mm
F2.8 ZA SSM II (SAL2470Z2)
mm 24-70
*
1
mm 36-105
13-17
1*
2
84 -34
2*
2
61 -23
*
3
m 0.34
0.25
F22
mm 77
mm
83 111
g 974
*
1
APS-C
35mm
*
2
1 35mm 2 APS-C
*
3
ADI ADI
1 1
1 1 1
Specifications
Name (Model name)
Vario-Sonnar T 16-35mm
F2.8 ZA SSM II (SAL1635Z2)
Focal length (mm)
16-35
35mm equivalent focal length*
1
(mm)
24-52.5
Lens groups-elements
13-17
Angle of view 1*
2
107°-63°
Angle of view 2*
2
83°-44°
Minimum focus*
3
(m (feet))
0.28 (0.92)
Maximum magnification (×)
0.24
Minimum f-stop
f/22
Filter diameter (mm)
77
Dimensions (maximum
diameter × height)
(Approx., mm (in.))
83×114 (3 3/8×4 1/2)
Mass (Approx., g (oz))
872 (30.8)
Name (Model name)
Vario-Sonnar T 24-70mm
F2.8 ZA SSM II (SAL2470Z2)
Focal length (mm)
24-70
35mm equivalent focal length*
1
(mm)
36-105
Lens groups-elements
13-17
Angle of view 1*
2
84°-34°
Angle of view 2*
2
61°-23°
Minimum focus*
3
(m (feet))
0.34 (1.1)
Maximum magnification (×)
0.25
Minimum f-stop
f/22
Filter diameter (mm)
77
Dimensions (maximum
diameter × height)
(Approx., mm (in.))
83×111 (3 3/8×4 3/8)
Mass (Approx., g (oz))
974 (34.4)
*
1
This is the equivalent focal length in 35mm format when
mounted on an
Interchangeable Lens Digital Camera equipped with an APS-C sized image
sensor.
*
2
The value of angle of view 1 is based on 35mm-format cameras, and that of
angle of view 2 is based on Interchangeable Lens Digital Cameras equipped with
an APS-C sized image sensor.
*
3
Minimum focus is the distance from the image sensor to the subject.
This lens is equipped with a distance encoder. The distance encoder allows more
accurate measurement (ADI) by employing a flash for the process.
Depending on the lens mechanism, the focal length may change with any change
of the shooting distance. The focal length assumes the lens is focused at infinity.
Included items
Lens (1), Lens front cap (1), Lens rear cap (1), Lens hood (1), Lens case (1),
Set of printed documentation
Design and specifications are subject to change without notice.
is a trademark of Sony Corporation.
Company names and company product names are trademarks or registered
trademarks of those companies.
