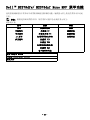
Dell B2375dfw Mono Multifunction Printer ユーザーガイド
- カテゴリー
- 多機能
- タイプ
- ユーザーガイド

Dell ™ B2375dfw Mono MFP
Dell ™ B2375dnf Mono MFP
用户指南

- 1 -
Dell ™ B2375dfw/B2375dnf Mono MFP 用户指
南
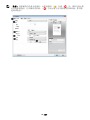
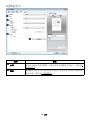
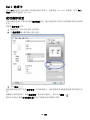
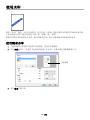
单击左侧链接可获得有关打印机功能、选项和操作的相关信息。有关打印机随附
的其他文档的相关信息,请参见 " 查找信息 "。
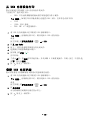
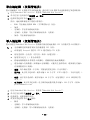
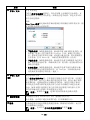
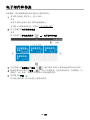
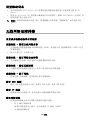
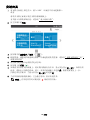
要从 Dell 订购替换墨粉盒或耗材:
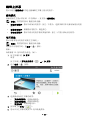
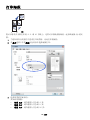
1
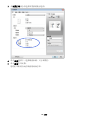
双击桌面上的 Dell B2375dnf Mono MFP Dell 耗材订购实用程序或 Dell
B2375dfw Mono MFP Dell 耗材订购实用程序 图标。
或者
2
访问 Dell 网站。
http://www.dell.com/supplies
与 Dell 联系
注意 : 如果您没有可用的 Internet 连接,则可以在购买发票、装箱单、帐单
或 Dell 产品目录找到联系信息。
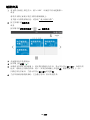
Dell 提供了几种在线和电话支持及服务选项。这些选项是否可用因国家 / 地区及产品
而异,并且在您所在的地区可能不提供某些服务。要联系 Dell 以解决销售、技术支持
或客户服务问题:
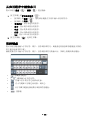
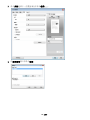
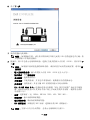
1
访问 www.dell.com/support
2
确认页面底部的
Choose A Country/Region
下拉菜单中您所在的国家或地
区。
3
单击页面左侧的
Contact Us
。
4
根据您的需要,选择合适的服务或支持链接。
5
选择您最方便的 Dell 联系方式。

- 2 -
说明、注意事项和警告
注意 : 说明表示可以帮助您更好地使用打印机的重要信息。
通知 : 注意事项表示可能对硬件造成损坏或数据丢失,并告诉您如何避免这类
问题。
警告 : 警告表示可能造成财务损坏、人员伤亡。
____________________
本文中的信息如有更改,恕不另行通知。
2013 Dell Inc. 保留所有权利。
未经 Dell 公司书面许可严禁以任何方式复制这些材料。
本文中使用的商标:Dell、DELL 徽标、Inspiron、Dell Precision、Dimension、
OptiPlex、
Latitude、PowerEdge、PowerVault、PowerApp、Dell OpenManage 和 YOURS IS HERE
徽标是 Dell Inc. 的商标; Intel、Pentium 和 Celeron 是 Intel Corporation 在美
国和其他国家 / 地区注册商标; Microsoft、Windows、Windows Server、MS-DOS、
Windows Vista、Windows 7、Windows8 是 Microsoft Corporation 在美国和 / 或其他
国家 / 地区的商标或注册商标。
本文中可能使用的其他商标和商品名称用于指代拥有商标和名称的实体或其产品。Dell
公司否认任何其他商标和商品名称中的权益 (其自身拥有的商标和商品名称除外)。
Google Cloud Print 是 Google Inc. 的商标。
Google、Picasa、Google Docs、Android 和 Gmail 是 Google Inc. 的注册商标或商
标。
iPad、iPhone、iPod touch、Mac 和 Mac OS 是 Apple Inc. 在美国和其他国家 / 地区
的注册商标。
Wi-Fi Direct™、Wi-Fi Protected Setup ™ 和 WPA2™ 徽标是 Wi-Fi Alliance 的商标。
所有其他品牌或产品名称为其各自公司或组织的商标。
请参阅所提供 CD-ROM 中的 “LICENSE.txt”文件,以取得有关开放源代码的许可信
息。
Rev.1.00
____________________
ã

- 3 -
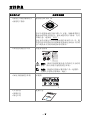
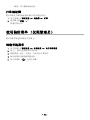
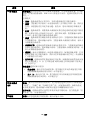
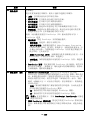
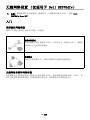
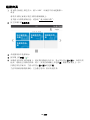
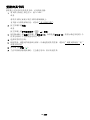
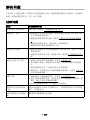
查找信息
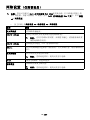
您在找什么? 此处可以找到
• 我的打印机的驱动程序
• 我的用户指南
驱动程序和文档 CD
您可以使用驱动程序和文档 CD 安装、卸载或重新安
装驱动程序和实用程序,或访问您的用户指南。有关
详细信息,请参见 "
软件 "。
自述文件可能包含在您的驱动程序和文档 CD 中,提
供您的打印机技术变化的最新更新或适合经验丰富的
用户或技术人员的高级技术参考资料。
• 如何使用我的打印机
快速参考指南
警告 : 阅读并按照重要信息中的所有安全说明
操作,然后安装并使用您的打印机。
注意 : 快速参考指南可能不随产品一起提供,
这取决于您所在的国家 / 地区。
•
如何安装我的打印机 安装图
• 安全信息
• 保修信息
• 规定声明
重要信息
Dell™ B2375dfw / B2375dnf Mono MFP
Quick Reference Guide
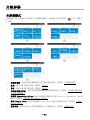
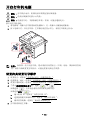
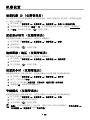
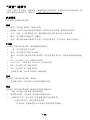
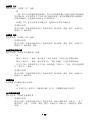
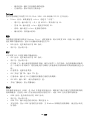
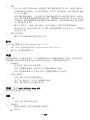
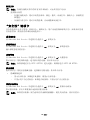
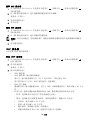
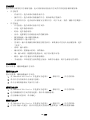
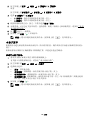
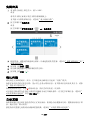
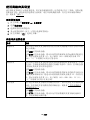
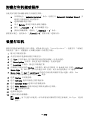
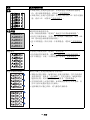
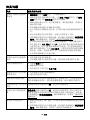
About Your Printer
Locating the Service Tag
Operator Panel Button Functions
Understanding the Status LED
12 345
12 4356
11 10 9 8 7
1011121314 9 8 7 6
1 Operator Panel
3 Document Width Guide
5 Document Output Tray
7 Control Board Cover
9 Output Tray
11 Tray 1
13 Paper Output Extension
2 Duplex Automatic Document Feeder (DADF)
4 Document Input Tray
6 Document Glass
8 USB Memory Port
10 Front Cover
12 Multipurpose Feeder (MPF)
14 Toner Cartridge
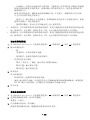
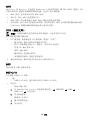
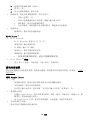
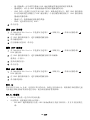
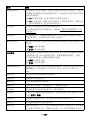
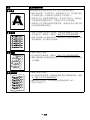
1 Home Go to home screen.
2 Log In/Out You can log in or log out.
3 Status LED Status LED indicates the status of your machine.
4 Redial/Pause Redials the recently sent fax number or received caller ID in ready mode,
or inserts a pause(-) into a fax number in edit mode.
5 Copy Start copy job using copy default setting regardless of which screen
the user is in if it is selected.
6 Power Saver You can enter or exit Power Save mode.
7 Speed Dial1 Fax image to destination from stored speed dial1.
8 Speed Dial2 Fax image to destination from stored speed dial2.
9 Wi-Fi/WPS Configures the wireless network connection easily without a computer.
(Dell B2375dfw Mono MFP only)
10 Job Status Job status shows the jobs currently running and in queue.
11 Info Gives detailed information about product feature guide machine’s info.
reports, troubleshooting guide, and quick reference guide.
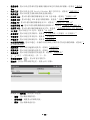
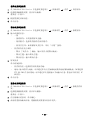
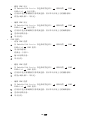
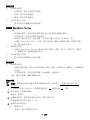
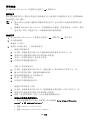
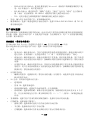
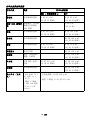
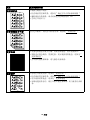
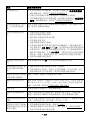
LED
Status
Wireless
Status
O
Green
Orange
Blue
Blinking
On
Blinking
Blinking
On
O
Description
• The machine is o-time.
• The machine is in power save mode. When data is received,
or any button is pressed, it switches to on-line automatically.
The machine is warming up or ready to receive the data.
The machine is on-line and can be used.
• A minor error has occurred and the machine is waiting for the error to be
cleared. Check the display message. When the problem is cleared, the
machine resumes operation.
• The toner cartridge is low. Order a new toner cartridge.
You can temporarily improve print quality by redistribution.
• The toner cartridge is totally empty. Remove the old toner cartridge and
install a new one.
• A paper jam has occurred.
• There is no paper in the tray. Load paper in the tray.
• The machine has stopped due to a major error. Check the display message.
• The machine is connecting to a wireless network.
• The machine is connected to a wireless network.
• The machine is disconnected from a wireless network.
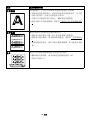
HMCWMA01
JC68-03031A00
Service Tag XXXXXXX
Service Tag
XXXXXXX
000 000 000 00
Express Service Code
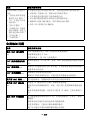
Dell 2355dn MFP Quick Reference Guide
lenaP rotarepO
Touch Screen
Front
Back
Quick Reference Guide
Quick Reference Guide
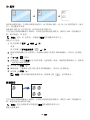
Front
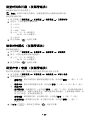
1. LCD: Display.
2. Status LED: Shows the status of your machine.
3. Job Status button: Shows the jobs.
4. M/C Setup button: Leads you to the machine setup and advanced settings.
5 Start button: Initiate operation.
6. Cancel button: Cancel displayed operation.
1. LCD: Display.
2. Status LED: Shows the status of your machine.
3. Job Status button: Shows the jobs.
4. M/C Setup button: Leads you to the machine setup and advanced settings.
5 Start button: Initiate operation.
6. Cancel button: Cancel displayed operation.
1. LCD: Display.
2. Status LED: Shows the status of your machine.
3. Job Status button: Shows the jobs.
4. M/C Setup button: Leads you to the machine setup and advanced settings.
5 Start button: Initiate operation.
6. Cancel button: Cancel displayed operation.
1. USB port
2. Locking slot
3. Network port
4. Optional tray 2 cable
connector
5. Telephone line socket (Line)
6. Extension telephone socket (EXT)
7. Rear door
8. Power receptacle
9. Power switch
10. Express ervice code
11. Optional memory
12. Optional wireless card
1.
Copy: Enters the copy menu.
2. Fax: Enters the fax menu.
3. Scan: Enters the scan menu.
4. Setup: Enters the advanced settings.
5. None: You can set the option which is frequently uses on
main screen. Also you can change shortcut name as well.
6. : Shows the main screen.
7. : Enters the LCD brightness, the USB memory,
language, and job status.
8. : Return to the upper menu.
9. : Scroll through available options.
10. : Start a job.
Front
Front
Operator Panel
Operator Panel
Touch Screen
Touch Screen
13
1
7
1
3
4
7
8
5
2
6
9
10
11
12
14
15
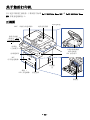
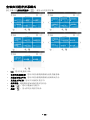
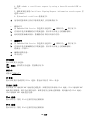
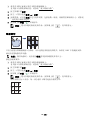
1. DADF
2. Document width guides
3. Document input tray
4. Document output tray
5. Operator panel
6. Output tray (face down)
7. MPF (Multi purpose feeder)
8. Front cover
9. Tray 1
10. Optional tray 2
11. USB memory port
12. Paper output extension
13. Document glass
14. Toner cartridge
15. Express ervice code
Back
Back
1
2
3
5
4
6
8
9
10
11
12
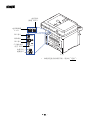
1. USB port
2. Locking slot
3. Network port
4. Optional tray 2 cable
connector
5. Telephone line socket (Line)
6. Extension telephone socket (EXT)
7. Rear door
8. Power receptacle
9. Power switch
10. Express ervice code
11. Optional memory
12. Optional wireless card
1. USB port
2. Locking slot
3. Network port
4. Optional tray 2 cable
connector
5. Telephone line socket (Line)
6. Extension telephone socket (EXT)
7. Rear door
8. Power receptacle
9. Power switch
10. Express ervice code
11. Optional memory
12. Optional wireless card
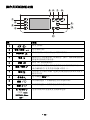
1.
Copy: Enters the copy menu.
2. Fax: Enters the fax menu.
3. Scan: Enters the scan menu.
4. Setup: Enters the advanced settings.
5. None: You can set the option which is frequently uses on
main screen. Also you can change shortcut name as well.
6. : Shows the main screen.
7. : Enters the LCD brightness, the USB memory,
language, and job status.
8. : Return to the upper menu.
9. : Scroll through available options.
10. : Start a job.
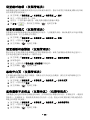
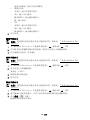
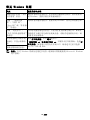
Dell™ B2375dfw / B2375dnf Mono MFP
1
3 4
2
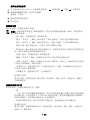
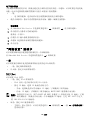
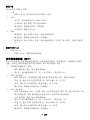
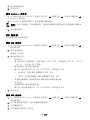
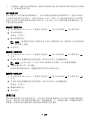
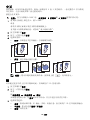
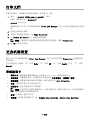
Setting Up Your Printer
Configuration de votre imprimante | Configurazione della stampante
Einrichten des Druckers | Configuración de la impresora
Verify the contents of the box
Vérifiez le contenu de votre carton
Verificare il contenuto della confezione
Überprüfen Sie den Inhalt der Box
Compruebe el contenido de la caja
Remove the packing material
Retirez les matériaux d’emballage
Rimuovere il materiale di imballo
Entfernen Sie das Verpackungsmaterial
Retire el material de embalaje
(For Ethernet connection only)
Insert Ethernet cable
(Uniquement pour la connexion Ethernet) Insérez le câble Ethernet
(solo per la connessione Ethernet) Inserire il cavo Ethernet
(Nur für Ethernet-Verbindung) Schließen Sie das Ethernet-Kabel an
(Solamente para la conexión Ethernet) Inserte el cable Ethernet
Mettez l’imprimante sous tension
Accendere la stampante
Schalten Sie den Drucker ein
Encienda la impresora
Set the language, country, time zone, date, and time.
Wait until "Ready" appears on the screen.
Réglez la langue, le pays, le fuseau horaire, la date et l’heure. Patientez jusqu’à ce que "Prêt" s’ache à l’écran.
Impostare la lingua, il paese, il fuso orario, la data e l’ora. Attendere finché non viene visualizzato "Pronto" sullo
schermo.
Legen Sie Sprache, Land, Zeitzone, Datum und Uhrzeit fest. Warten Sie, bis "Bereit" im Display angezeigt wird.
Configure el idioma, el país, la zona horaria, la fecha y la hora. Espere hasta que aparezca "Lista" en la pantalla.
Turn on the printer

- 4 -
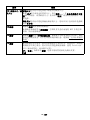
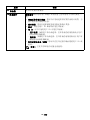
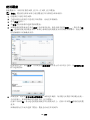
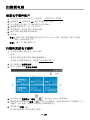
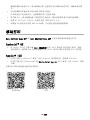
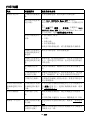
快速服务代码和服务标签 快速服务代码和服务标签
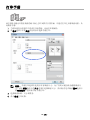
当您使用 www.dell.com/support 或联系技术支持
时,快速确定您的打印机身份。
输入快速服务代码和服务标签,当您联系技术支持时
为您转接电话。并非所有国家 / 地区都提供快速服务
代码。
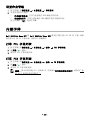
• 我的打印机的最新驱动程序
• 技术服务和支持问题的解答
• 我的打印机的文档
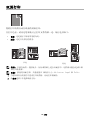
Dell 支持网站:www.dell.com/support
Dell 支持网站提供多个在线工具,包括:
• 解决方案 - 故障排除提示和技巧、技术人员文章以
及在线课程
• 升级 - 内存等组件的升级信息
• 客户关怀 - 联系信息、订单状态、保修和维修信息
• 下载 - 驱动程序
• 参考 - 打印机文档和产品规格
您可以通过 www.dell.com/support 访问 Dell 支
持。在 “WELCOME TO DELL SUPPORT”页面上选择您
所在的区域,然后填写要求的详细信息以访问帮助工
具和信息。
您在找什么? 此处可以找到

- 5 -
目录
Dell ™ B2375dfw/B2375dnf Mono MFP 用户指南. . . . . . . . . . . 1
与 Dell 联系 . . . . . . . . . . . . . . . . . . . . . . . . . 1
查找信息 . . . . . . . . . . . . . . . . . . . . . . . . . . . 3
关于 . . . . . . . . . . . . . . . . . . . . . . 17
打印机开箱 . . . . . . . . . . . . . . . . . . . . . . . . . 18
关于您的打印机 . . . . . . . . . . . . . . . . . . . . . . . 20
正视图 . . . . . . . . . . . . . . . . . . . . . . . . . 20
后视图 . . . . . . . . . . . . . . . . . . . . . . . . . 21
操作员面板按钮功能 . . . . . . . . . . . . . . . . . . . 22
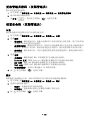
介绍屏幕 . . . . . . . . . . . . . . . . . . . . . . . . . . 24
主屏幕模式 . . . . . . . . . . . . . . . . . . . . . . . 24
全部应用程序屏幕模式 . . . . . . . . . . . . . . . . . . 26
编辑主屏幕 . . . . . . . . . . . . . . . . . . . . . . . 27
从应用程序中搜索条目 . . . . . . . . . . . . . . . . . . 28
理解键盘 . . . . . . . . . . . . . . . . . . . . . . . . 28
用户配置文件 . . . . . . . . . . . . . . . . . . . . . . 29
登录 . . . . . . . . . . . . . . . . . . . . . . . . . . 29
设置作业管理 . . . . . . . . . . . . . . . . . . . . . . 30
内部字体 . . . . . . . . . . . . . . . . . . . . . . . . . . 30
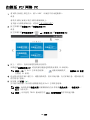
打印 PCL 字体列表 . . . . . . . . . . . . . . . . . . . . 30
打印 PS3 字体列表 . . . . . . . . . . . . . . . . . . . . 30
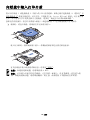
安装硬件 . . . . . . . . . . . . . . . . . . . . . . . . . . 31
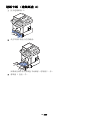
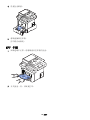
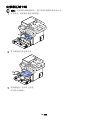
安装墨粉盒 . . . . . . . . . . . . . . . . . . . . . . . . . 32
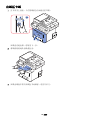
装纸 . . . . . . . . . . . . . . . . . . . . . . . . . . . . 35
连接 . . . . . . . . . . . . . . . . . . . . . . . . . . . . 39
连接电话线 . . . . . . . . . . . . . . . . . . . . . . . 39
连接打印机电缆 . . . . . . . . . . . . . . . . . . . . . 42
开启打印机电源 . . . . . . . . . . . . . . . . . . . . . . . 44
设置传真设置引导顺序 . . . . . . . . . . . . . . . . . . 44

- 6 -
使用 USB 内存设备 . . . . . . . . . . . . . . . . . . . . . . 45
关于 USB 内存 . . . . . . . . . . . . . . . . . . . . . . 45
插入 USB 内存设备 . . . . . . . . . . . . . . . . . . . . 45
直接 USB . . . . . . . . . . . . . . . . . . . . . . . . 46
扫描至 USB . . . . . . . . . . . . . . . . . . . . . . . 46
更改扫描功能设置 . . . . . . . . . . . . . . . . . . . . 47
管理 USB 内存 . . . . . . . . . . . . . . . . . . . . . . . . 48
删除图像文件 . . . . . . . . . . . . . . . . . . . . . . 48
从 USB 内存设备打印 . . . . . . . . . . . . . . . . . . . 49
查看 USB 内存状态 . . . . . . . . . . . . . . . . . . . . 49
导入 (仅限管理员) . . . . . . . . . . . . . . . . . . . 50
导出 (仅限管理员) . . . . . . . . . . . . . . . . . . . 50
设置地址簿 . . . . . . . . . . . . . . . . . . . . . . . . . 51
存储个人地址 . . . . . . . . . . . . . . . . . . . . . . 51
使用速拨号码 . . . . . . . . . . . . . . . . . . . . . . 51
存储组地址 . . . . . . . . . . . . . . . . . . . . . . . 52
编辑组拨号码 . . . . . . . . . . . . . . . . . . . . . . 52
从地址薄中搜索条目 . . . . . . . . . . . . . . . . . . . 52
导出地址簿 (仅限管理员) . . . . . . . . . . . . . . . . 53
导入地址簿 (仅限管理员) . . . . . . . . . . . . . . . . 53
打印地址簿 . . . . . . . . . . . . . . . . . . . . . . . 54
使用偏好菜单 (仅限管理员) . . . . . . . . . . . . . . . . . 54
创建首选菜单 . . . . . . . . . . . . . . . . . . . . . . 54
电子邮件设置 (仅限管理员) . . . . . . . . . . . . . . . . . 55
设置电子邮件 . . . . . . . . . . . . . . . . . . . . . . 55
菜单概述 . . . . . . . . . . . . . . . . . . . . 56
Dell ™ B2375dfw/ B2375dnf Mono MFP 菜单功能 . . . . . . . . . 57
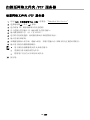
打印打印机设置和操作员面板菜单设置 . . . . . . . . . . . . . 59
打印打印机设置 . . . . . . . . . . . . . . . . . . . . . 59
打印操作员面板菜单设置 . . . . . . . . . . . . . . . . . 59
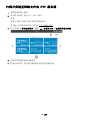
访问 Google Drive . . . . . . . . . . . . . . . . . . . . . . 59
扫描至 Google Drive . . . . . . . . . . . . . . . . . . . 60
从 Google Drive 打印 . . . . . . . . . . . . . . . . . . 60
扫描至 SharePoint Online . . . . . . . . . . . . . . . . . . 61

- 7 -
扫描至 SharePoint ® Online. . . . . . . . . . . . . . . . 61
我的文件 . . . . . . . . . . . . . . . . . . . . . . . . . . 62
创建我的文件 . . . . . . . . . . . . . . . . . . . . . . 62
使用我的文件 . . . . . . . . . . . . . . . . . . . . . . 62
我的表单 . . . . . . . . . . . . . . . . . . . . . . . . . . 63
扫描表单 . . . . . . . . . . . . . . . . . . . . . . . . 63
浏览以打印 . . . . . . . . . . . . . . . . . . . . . . . 63
我的日历 . . . . . . . . . . . . . . . . . . . . . . . . . . 65
机器设置 . . . . . . . . . . . . . . . . . . . . . . . . . . 66
设置机器 ID (仅限管理员). . . . . . . . . . . . . . . . 66
更改显示语言 (仅限管理员) . . . . . . . . . . . . . . . 66
选择国家 / 地区 (仅限管理员) . . . . . . . . . . . . . . 66
设置夏令时 (仅限管理员) . . . . . . . . . . . . . . . . 66
节能模式 (仅限管理员) . . . . . . . . . . . . . . . . . 66
设置时间和日期 (仅限管理员) . . . . . . . . . . . . . . 67
设置时钟模式 (仅限管理员) . . . . . . . . . . . . . . . 67
设置声音 / 音量 (仅限管理员) . . . . . . . . . . . . . . 67
设置超时选项 (仅限管理员) . . . . . . . . . . . . . . . 68
设置省墨模式 (仅限管理员) . . . . . . . . . . . . . . . 68
设置墨粉状态警报 (仅限管理员) . . . . . . . . . . . . . 68
忽略空白页 (仅限管理员) . . . . . . . . . . . . . . . . 68
忽略墨粉不足信息 (仅限传真)(仅限管理员). . . . . . . . 68
设置语言 (仅限管理员) . . . . . . . . . . . . . . . . . 69
设置速拨 (仅限管理员) . . . . . . . . . . . . . . . . . 69
设置媒体覆盖 (仅限管理员) . . . . . . . . . . . . . . . 69
更改管理员密码 (仅限管理员) . . . . . . . . . . . . . . 70
设置安全性 (仅限管理员) . . . . . . . . . . . . . . . . 70
设置高度调整 (仅限管理员) . . . . . . . . . . . . . . . . 71
检查固件版本 (仅限管理员) . . . . . . . . . . . . . . . . 71
报告 . . . . . . . . . . . . . . . . . . . . . . . . . . . 71
设置应用程序管理 (仅限管理员) . . . . . . . . . . . . . 73
出厂重置 (仅限管理员) . . . . . . . . . . . . . . . . . 74
软件 . . . . . . . . . . . . . . . . . . . . . . 75
软件概述 . . . . . . . . . . . . . . . . . . . . . . . . . . 76
在 Microsoft
®
Windows
®
操作系统中安装软件 . . . . . . . . . . 77

- 8 -
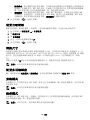
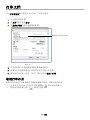
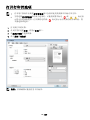
安装 Dell 软件进行本地打印 . . . . . . . . . . . . . . . 78
访问管理工具 . . . . . . . . . . . . . . . . . . . . . . . . 80
固件更新实用程序 . . . . . . . . . . . . . . . . . . . . . . 80
使用 Dell 耗材订购实用程序 . . . . . . . . . . . . . . . . . 81
使用 Dell 打印机管理器 . . . . . . . . . . . . . . . . . . . 82
理解 Dell 打印机管理器 . . . . . . . . . . . . . . . . . 82
高级设置用户界面概述 . . . . . . . . . . . . . . . . . . 84
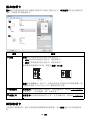
使用 Dell 打印机状态 . . . . . . . . . . . . . . . . . . . . 85
Dell 打印机状态概述 . . . . . . . . . . . . . . . . . . . 85
使用无线设置实用程序 . . . . . . . . . . . . . . . . . . . . 87
卸载软件 . . . . . . . . . . . . . . . . . . . . . . . . . . 88
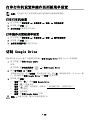
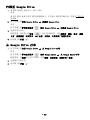
Embedded Web Service . . . . . . . . . . . . . . 89
Embedded Web Service . . . . . . . . . . . . . . . . . . . . 90
什么是 Embedded Web Service . . . . . . . . . . . . . . . . . 90
必需的 Web 浏览器 . . . . . . . . . . . . . . . . . . . . . . 90
登录 Embedded Web Service . . . . . . . . . . . . . . . . . . 90
Embedded Web Service 概述 . . . . . . . . . . . . . . . . . . 91
“信息”选项卡. . . . . . . . . . . . . . . . . . . . . . 91
“地址簿”选项卡. . . . . . . . . . . . . . . . . . . . . 92
“设置”选项卡. . . . . . . . . . . . . . . . . . . . . . 95
“网络设置”选项卡. . . . . . . . . . . . . . . . . . . . 100
“安全性”选项卡. . . . . . . . . . . . . . . . . . . . . 111
“维护”选项卡. . . . . . . . . . . . . . . . . . . . . . 121
纸张处理 . . . . . . . . . . . . . . . . . . . 123
打印介质使用准则 . . . . . . . . . . . . . . . . . . . . . . 124
纸张 . . . . . . . . . . . . . . . . . . . . . . . . . . 124
透明胶片 . . . . . . . . . . . . . . . . . . . . . . . . 127
信封 . . . . . . . . . . . . . . . . . . . . . . . . . . 127
标签纸 . . . . . . . . . . . . . . . . . . . . . . . . . 129
卡片纸 . . . . . . . . . . . . . . . . . . . . . . . . . 129

- 9 -
存储打印介质 . . . . . . . . . . . . . . . . . . . . . . . . 129
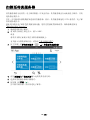
确定打印介质来源和规格 . . . . . . . . . . . . . . . . . . . 130
选择输出位置 . . . . . . . . . . . . . . . . . . . . . . . . 134
打印到出纸盘 (正面朝下) . . . . . . . . . . . . . . . . 135
打印到后门 (正面朝上) . . . . . . . . . . . . . . . . . 135
向纸盘中装入打印介质 . . . . . . . . . . . . . . . . . . . . 136
使用 MPF (多用途进稿器) . . . . . . . . . . . . . . . . . . 137
设置纸张尺寸 . . . . . . . . . . . . . . . . . . . . . . . . 140
设置纸张类型 . . . . . . . . . . . . . . . . . . . . . . . . 140
设置纸张边距 . . . . . . . . . . . . . . . . . . . . . . . . 140
设置纸盘 . . . . . . . . . . . . . . . . . . . . . . . . . . 141
设置纸盘链接 . . . . . . . . . . . . . . . . . . . . . . 141
替换纸盘 . . . . . . . . . . . . . . . . . . . . . . . . 141
设置默认纸盘 . . . . . . . . . . . . . . . . . . . . . . 141
设置送纸流 . . . . . . . . . . . . . . . . . . . . . . . 141
设置自动送纸 . . . . . . . . . . . . . . . . . . . . . . 142
替换尺寸 . . . . . . . . . . . . . . . . . . . . . . . . 142
配置多用途纸盘 . . . . . . . . . . . . . . . . . . . . . 142
旁路模式 . . . . . . . . . . . . . . . . . . . . . . . . 142
纸盘模式 . . . . . . . . . . . . . . . . . . . . . . . . 142
正在打印 . . . . . . . . . . . . . . . . . . . 143
打印文档 . . . . . . . . . . . . . . . . . . . . . . . . . . 144
取消打印作业 . . . . . . . . . . . . . . . . . . . . . . 144
打开打印首选项 . . . . . . . . . . . . . . . . . . . . . . . 145
基本选项卡 . . . . . . . . . . . . . . . . . . . . . . . 146
纸张选项卡 . . . . . . . . . . . . . . . . . . . . . . . 146
图形选项卡 . . . . . . . . . . . . . . . . . . . . . . . 150
Dell 选项卡 . . . . . . . . . . . . . . . . . . . . . . . 155
使用偏好设置 . . . . . . . . . . . . . . . . . . . . . . 155
使用帮助 . . . . . . . . . . . . . . . . . . . . . . . . 156
在一张纸上打印多页 . . . . . . . . . . . . . . . . . . . . . 156
更改文档的比例 . . . . . . . . . . . . . . . . . . . . . . . 158

- 10 -
打印海报 . . . . . . . . . . . . . . . . . . . . . . . . . . 159
打印手册 . . . . . . . . . . . . . . . . . . . . . . . . . . 161
双面打印 . . . . . . . . . . . . . . . . . . . . . . . . . . 162
使用水印 . . . . . . . . . . . . . . . . . . . . . . . . . . 164
使用现有水印 . . . . . . . . . . . . . . . . . . . . . . 164
创建水印 . . . . . . . . . . . . . . . . . . . . . . . . 165
编辑水印 . . . . . . . . . . . . . . . . . . . . . . . . 165
删除水印 . . . . . . . . . . . . . . . . . . . . . . . . 165
使用覆盖 . . . . . . . . . . . . . . . . . . . . . . . . . . 166
什么是覆盖页? . . . . . . . . . . . . . . . . . . . . . 166
创建新的覆盖页 . . . . . . . . . . . . . . . . . . . . . 166
使用覆盖 . . . . . . . . . . . . . . . . . . . . . . . . 169
删除覆盖 . . . . . . . . . . . . . . . . . . . . . . . . 170
复印 . . . . . . . . . . . . . . . . . . . . . 171
装入复印纸 . . . . . . . . . . . . . . . . . . . . . . . . . 172
选择纸盘 . . . . . . . . . . . . . . . . . . . . . . . . . . 172
准备文档 . . . . . . . . . . . . . . . . . . . . . . . . . . 172
装入原始文档 . . . . . . . . . . . . . . . . . . . . . . . . 173
复印 . . . . . . . . . . . . . . . . . . . . . . . . . . . . 176
使用复印和设置选项 . . . . . . . . . . . . . . . . . . . . . 176
份数 . . . . . . . . . . . . . . . . . . . . . . . . . . 176
双面 . . . . . . . . . . . . . . . . . . . . . . . . . . 176
缩放 . . . . . . . . . . . . . . . . . . . . . . . . . . 177
暗度 . . . . . . . . . . . . . . . . . . . . . . . . . . 177
原始尺寸 . . . . . . . . . . . . . . . . . . . . . . . . 177
原稿类型 . . . . . . . . . . . . . . . . . . . . . . . . 178
纸盘 . . . . . . . . . . . . . . . . . . . . . . . . . . 178
布局 . . . . . . . . . . . . . . . . . . . . . . . . . . 178
分页 . . . . . . . . . . . . . . . . . . . . . . . . . . 183
戳 . . . . . . . . . . . . . . . . . . . . . . . . . . . 183
水印 . . . . . . . . . . . . . . . . . . . . . . . . . . 184
环保复印 . . . . . . . . . . . . . . . . . . . . . . . . 184
更改默认设置 . . . . . . . . . . . . . . . . . . . . . . . . 184

- 11 -
扫描 . . . . . . . . . . . . . . . . . . . . . 185
扫描概述 . . . . . . . . . . . . . . . . . . . . . . . . . . 186
扫描到电邮 . . . . . . . . . . . . . . . . . . . . . . . . . 187
设置电子邮件帐户 . . . . . . . . . . . . . . . . . . . . 187
扫描和发送电子邮件 . . . . . . . . . . . . . . . . . . . 187
扫描至 PC/ 网络 PC . . . . . . . . . . . . . . . . . . . . . . 188
扫描至网络文件夹 /FTP 服务器 . . . . . . . . . . . . . . . . . 189
设置网络文件夹 /FTP 服务器. . . . . . . . . . . . . . . . 189
扫描并发送至网络文件夹 /FTP 服务器. . . . . . . . . . . . 190
扫描至传真服务器 . . . . . . . . . . . . . . . . . . . . . . 191
扫描至 WSD . . . . . . . . . . . . . . . . . . . . . . . . . 192
安装 WSD 打印机驱动程序 . . . . . . . . . . . . . . . . . 192
使用 WSD 功能扫描 . . . . . . . . . . . . . . . . . . . . 192
电子邮件和传真 . . . . . . . . . . . . . . . . . . . . . . . 193
从图像编辑程序扫描 . . . . . . . . . . . . . . . . . . . . . 194
使用 WIA 驱动程序扫描 . . . . . . . . . . . . . . . . . . . . 195
联网 . . . . . . . . . . . . . . . . . . . . . 196
网络设置 (仅限管理员) . . . . . . . . . . . . . . . . . . . 197
实用网络程序 . . . . . . . . . . . . . . . . . . . . . . . . 198
Dell 打印机配置 Web 工具 . . . . . . . . . . . . . . . . 198
SetIP 有线网络设置 . . . . . . . . . . . . . . . . . . . 198
打印网络配置报告 . . . . . . . . . . . . . . . . . . . . 198
通过网络打印 . . . . . . . . . . . . . . . . . . . . . . 198
设置 IP 地址 . . . . . . . . . . . . . . . . . . . . . . . . 199
使用 SetIP 进行 IPv4 配置 . . . . . . . . . . . . . . . . 199
通过网络安装驱动程序 . . . . . . . . . . . . . . . . . . . . 200
IPv6 配置 . . . . . . . . . . . . . . . . . . . . . . . . . . 203
使用控制面板 . . . . . . . . . . . . . . . . . . . . . . 203
激活 IPv6 . . . . . . . . . . . . . . . . . . . . . . . . 203
设置 IPv6 地址 . . . . . . . . . . . . . . . . . . . . . 204
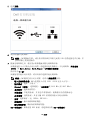
无线网络设置 (仅适用于 Dell B2375dfw) . . . . . . . . . . . 205

- 12 -
入门 . . . . . . . . . . . . . . . . . . . . . . . . . . 205
介绍无线网络设置方法 . . . . . . . . . . . . . . . . . . 206
使用 WPS 按钮 (仅限 Dell B2375dfw Mono MFP) . . . . . . . . 206
准备事项 . . . . . . . . . . . . . . . . . . . . . . . . 207
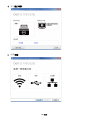
选择类型 . . . . . . . . . . . . . . . . . . . . . . . . 207
使用菜单按钮 . . . . . . . . . . . . . . . . . . . . . . 208
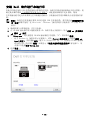
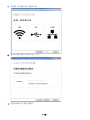
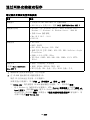
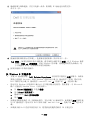
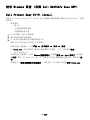
使用 Windows 设置 (仅限 Dell B2375dfw Mono MFP) . . . . . . 209
Dell Printer Easy Wi-Fi Install . . . . . . . . . . . . . 209
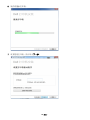
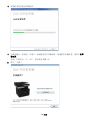
Windows 中的接入点 (通过 USB 电缆). . . . . . . . . . . 213
Windows 中的点对点 (通过 USB 电缆). . . . . . . . . . . 218
使用网络电缆 . . . . . . . . . . . . . . . . . . . . . . 221
打开 / 关闭 Wi-Fi 网络 (仅限 Dell B2375dfw Mono MFP) . . . . 222
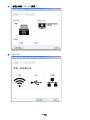
为移动打印设置 Wi-Fi Direct . . . . . . . . . . . . . . . . . 223
设置无线直连 . . . . . . . . . . . . . . . . . . . . . . 223
设置移动设备 . . . . . . . . . . . . . . . . . . . . . . 224
无线网络故障排除 . . . . . . . . . . . . . . . . . . . . . . 224
其他问题 . . . . . . . . . . . . . . . . . . . . . . . . 225
移动打印 . . . . . . . . . . . . . . . . . . . . . . . . . . 226
Android ™ OS. . . . . . . . . . . . . . . . . . . . . . . 226
Apple ® iOS . . . . . . . . . . . . . . . . . . . . . . . 226
AirPrint . . . . . . . . . . . . . . . . . . . . . . . . . . 227
设置 AirPrint . . . . . . . . . . . . . . . . . . . . . . 227
通过 AirPrint 打印 . . . . . . . . . . . . . . . . . . . 227
Google Cloud Print ™. . . . . . . . . . . . . . . . . . . . . 228
向打印机注册您的 Google 帐户 . . . . . . . . . . . . . . 228
使用 Google Cloud Print ™ 打印. . . . . . . . . . . . . . 229
传真 . . . . . . . . . . . . . . . . . . . . . 230
设置打印机 ID . . . . . . . . . . . . . . . . . . . . . . . . 231
设置传真系统 . . . . . . . . . . . . . . . . . . . . . . . . 231
更改传真设置选项 . . . . . . . . . . . . . . . . . . . . 231
可用传真默认值选项 . . . . . . . . . . . . . . . . . . . 231
测试传真线路连接 . . . . . . . . . . . . . . . . . . . . 232

- 13 -
发送传真 . . . . . . . . . . . . . . . . . . . . . . . . . . 233
调整文档暗度 . . . . . . . . . . . . . . . . . . . . . . 233
调整文档质量 . . . . . . . . . . . . . . . . . . . . . . 233
发送传真 . . . . . . . . . . . . . . . . . . . . . . . . 234
速拨传真 . . . . . . . . . . . . . . . . . . . . . . . . 235
组拨传真 . . . . . . . . . . . . . . . . . . . . . . . . 236
免提传真 . . . . . . . . . . . . . . . . . . . . . . . . 237
确认传输 . . . . . . . . . . . . . . . . . . . . . . . . 237
自动重拨 . . . . . . . . . . . . . . . . . . . . . . . . 237
重拨传真号码 . . . . . . . . . . . . . . . . . . . . . . 238
接收传真 . . . . . . . . . . . . . . . . . . . . . . . . . . 239
关于接收模式 . . . . . . . . . . . . . . . . . . . . . . 239
为接收传真装入纸张 . . . . . . . . . . . . . . . . . . . 239
在传真模式中自动接收 . . . . . . . . . . . . . . . . . . 239
在应答 / 传真模式下自动接收 . . . . . . . . . . . . . . . 239
使用电话分机手动接收 . . . . . . . . . . . . . . . . . . 239
使用 DRPD 模式接收传真 . . . . . . . . . . . . . . . . . 240
把传真接收到内存中 . . . . . . . . . . . . . . . . . . . 240
自动拨号 . . . . . . . . . . . . . . . . . . . . . . . . . . 241
速拨 . . . . . . . . . . . . . . . . . . . . . . . . . . 241
组 . . . . . . . . . . . . . . . . . . . . . . . . . . . 242
其他传真方式 . . . . . . . . . . . . . . . . . . . . . . . . 243
发送计算机中的传真 . . . . . . . . . . . . . . . . . . . 243
发送延迟传真 . . . . . . . . . . . . . . . . . . . . . . 243
传真转发到电子邮件地址 . . . . . . . . . . . . . . . . . 244
其它功能 . . . . . . . . . . . . . . . . . . . . . . . . . . 244
节省话费模式 (仅限管理员) . . . . . . . . . . . . . . . 244
使用安全接收模式 (仅限管理员) . . . . . . . . . . . . . 245
使用高级传真设置 . . . . . . . . . . . . . . . . . . . . 246
Mac . . . . . . . . . . . . . . . . . . . . . 250
安装用于 Mac 的软件 . . . . . . . . . . . . . . . . . . . . . 251
安装打印机驱动程序 . . . . . . . . . . . . . . . . . . . 251
重新安装打印机驱动程序 . . . . . . . . . . . . . . . . . 252
通过网络安装驱动程序 . . . . . . . . . . . . . . . . . . 252
打印 . . . . . . . . . . . . . . . . . . . . . . . . . . . . 253

- 14 -
打印文档 . . . . . . . . . . . . . . . . . . . . . . . . 253
更改打印机设置 . . . . . . . . . . . . . . . . . . . . . 253
在一张纸上打印多页 . . . . . . . . . . . . . . . . . . . 253
在纸张的双面上打印 . . . . . . . . . . . . . . . . . . . 253
扫描 . . . . . . . . . . . . . . . . . . . . . . . . . . . . 255
无线网络设置 . . . . . . . . . . . . . . . . . . . . . . . . 255
Mac 中的接入点 (通过 USB 电缆). . . . . . . . . . . . . 255
Mac 中的点对点 (通过 USB 电缆). . . . . . . . . . . . . 257
Linux . . . . . . . . . . . . . . . . . . . . 259
入门 . . . . . . . . . . . . . . . . . . . . . . . . . . . . 260
安装 MFP 驱动程序 . . . . . . . . . . . . . . . . . . . . . . 260
系统要求 . . . . . . . . . . . . . . . . . . . . . . . . 260
安装 MFP 驱动程序 . . . . . . . . . . . . . . . . . . . . 260
重新安装 MFP 驱动程序 . . . . . . . . . . . . . . . . . . 261
通过网络安装驱动程序 . . . . . . . . . . . . . . . . . . . . 262
安装 Linux 驱动程序并添加网络打印机 . . . . . . . . . . . 262
添加网络打印机 . . . . . . . . . . . . . . . . . . . . . 262
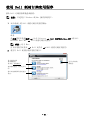
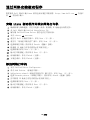
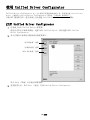
使用 Unified Driver Configurator . . . . . . . . . . . . . . 263
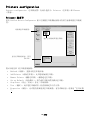
Printers configuration . . . . . . . . . . . . . . . . . 264
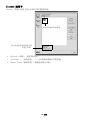
MFP 端口配置 . . . . . . . . . . . . . . . . . . . . . . 266
打印文档 . . . . . . . . . . . . . . . . . . . . . . . . . . 267
从应用程序打印 . . . . . . . . . . . . . . . . . . . . . 267
打印文件 . . . . . . . . . . . . . . . . . . . . . . . . . . 267
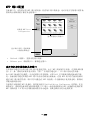
配置打印机属性 . . . . . . . . . . . . . . . . . . . . . . . 268
扫描文档 . . . . . . . . . . . . . . . . . . . . . . . . . . 269
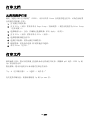
使用 Image Manager 编辑图像 . . . . . . . . . . . . . . . 271
Unix . . . . . . . . . . . . . . . . . . . . . 272
通过网络安装驱动程序 . . . . . . . . . . . . . . . . . . . . 273
系统要求 . . . . . . . . . . . . . . . . . . . . . . . . 273
安装 Unix 驱动程序并添加网络打印机 . . . . . . . . . . . 273

- 15 -
卸载打印机驱动程序 . . . . . . . . . . . . . . . . . . . . . 274
设置打印机 . . . . . . . . . . . . . . . . . . . . . . . . . 274
打印文档 . . . . . . . . . . . . . . . . . . . . . . . . . . 275
更改机器设置 . . . . . . . . . . . . . . . . . . . . . . . . 275
常规选项卡 . . . . . . . . . . . . . . . . . . . . . . . 275
图像选项卡 . . . . . . . . . . . . . . . . . . . . . . . 276
文本选项卡 . . . . . . . . . . . . . . . . . . . . . . . 276
边距选项卡 . . . . . . . . . . . . . . . . . . . . . . . 276
打印机特定设置选项卡 . . . . . . . . . . . . . . . . . . 276
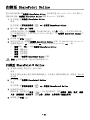
维护 . . . . . . . . . . . . . . . . . . . . . 277
清除打印机 NVRAM . . . . . . . . . . . . . . . . . . . . . . 278
备份数据 . . . . . . . . . . . . . . . . . . . . . . . . . . 279
备份数据 . . . . . . . . . . . . . . . . . . . . . . . . 279
恢复数据 . . . . . . . . . . . . . . . . . . . . . . . . 279
清洁打印机 . . . . . . . . . . . . . . . . . . . . . . . . . 280
清洁外部 . . . . . . . . . . . . . . . . . . . . . . . . 280
清洁内部 . . . . . . . . . . . . . . . . . . . . . . . . 280
清洁扫描仪 . . . . . . . . . . . . . . . . . . . . . . . 282
维护墨粉盒 . . . . . . . . . . . . . . . . . . . . . . . . . 283
存放墨粉盒 . . . . . . . . . . . . . . . . . . . . . . . 283
摇匀墨粉 . . . . . . . . . . . . . . . . . . . . . . . . 283
更换墨粉盒 . . . . . . . . . . . . . . . . . . . . . . . 285
清洁硒鼓 . . . . . . . . . . . . . . . . . . . . . . . . 286
备件 . . . . . . . . . . . . . . . . . . . . . . . . . . . . 287
订购耗材 . . . . . . . . . . . . . . . . . . . . . . . . . . 288
故障排除 . . . . . . . . . . . . . . . . . . . 289
清除 DADF 中的卡纸 . . . . . . . . . . . . . . . . . . . . . 290
清除纸盘中的卡纸 . . . . . . . . . . . . . . . . . . . . . . 294
进纸卡纸 (纸盘 1) . . . . . . . . . . . . . . . . . . . 294
进纸卡纸 (选装纸盘 2) . . . . . . . . . . . . . . . . . 296
MPF 卡纸 . . . . . . . . . . . . . . . . . . . . . . . . 297

- 16 -
定影器区域卡纸 . . . . . . . . . . . . . . . . . . . . . 298
出纸区卡纸 . . . . . . . . . . . . . . . . . . . . . . . 299
双面卡纸 . . . . . . . . . . . . . . . . . . . . . . . . 302
避免卡纸的提示 . . . . . . . . . . . . . . . . . . . . . 304
清除 LCD 错误信息 . . . . . . . . . . . . . . . . . . . . . . 304
解决问题 . . . . . . . . . . . . . . . . . . . . . . . . . . 308
进纸问题 . . . . . . . . . . . . . . . . . . . . . . . . 308
打印问题 . . . . . . . . . . . . . . . . . . . . . . . . 309
打印质量问题 . . . . . . . . . . . . . . . . . . . . . . 311
传真问题 . . . . . . . . . . . . . . . . . . . . . . . . 316
复印问题 . . . . . . . . . . . . . . . . . . . . . . . . 318
扫描问题 . . . . . . . . . . . . . . . . . . . . . . . . 318
全局地址问题 . . . . . . . . . . . . . . . . . . . . . . 319
常见 Windows 问题 . . . . . . . . . . . . . . . . . . . . 320
常见 Linux 问题 . . . . . . . . . . . . . . . . . . . . . 321
常见 Mac 问题 . . . . . . . . . . . . . . . . . . . . . . 323
排除 PostScript (PS) 错误 . . . . . . . . . . . . . . . . 324
安装配件 . . . . . . . . . . . . . . . . . . . 325
安装打印机配件 . . . . . . . . . . . . . . . . . . . . . . . 326
安装选装纸盘 2 . . . . . . . . . . . . . . . . . . . . . . . 326
规格 . . . . . . . . . . . . . . . . . . . . . 330
一般规格 . . . . . . . . . . . . . . . . . . . . . . . . . . 331
Dell 技术支持策略 . . . . . . . . . . . . . . . . . . . . . . 332
与 Dell 联系 . . . . . . . . . . . . . . . . . . . . . . . . 332
仅限中国 . . . . . . . . . . . . . . . . . . . . . . . . . . 332
保修和退货策略 . . . . . . . . . . . . . . . . . . . . . . . 333


- 18 -
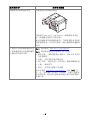
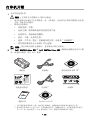
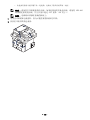
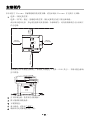
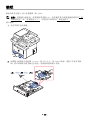
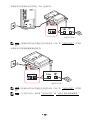
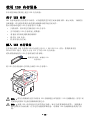
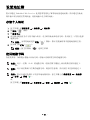
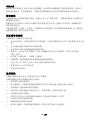
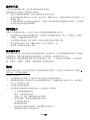
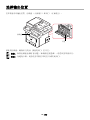
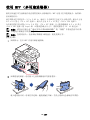
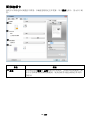
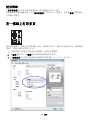
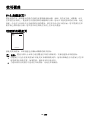
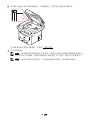
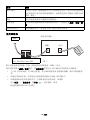
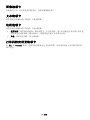
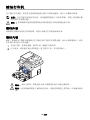
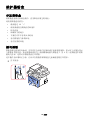
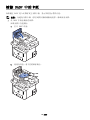
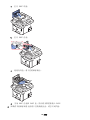
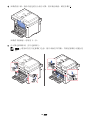
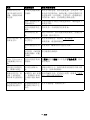
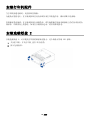
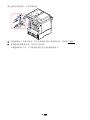
打印机开箱
1
为打印机选择位置。
警告 : 打印机至少需要两人才能安全抬起。
• 留出足够的空间来打开打印机纸盘、盖、门和选件。还必须为打印机周围留出充足的
空间,保证适当的通风。
• 提供适合的环境:
• 表面坚固、平整。
• 远离空调、散热器或通风设备的直接气流。
• 远离阳光、高湿或温度骤变。
• 清洁、干燥、无灰的位置。
• 选择一个平坦、稳定、宽敞通风的位置。请参见
" 安装硬件 "。
• 切勿将机器放在办公桌或工作台边缘。
注意 : 将打印机存放在包装箱中,直至准备安装它时取出。
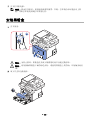
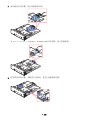
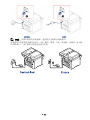
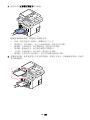
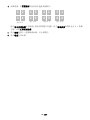
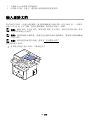
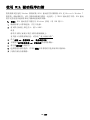
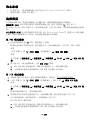
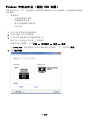
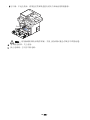
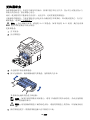
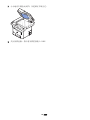
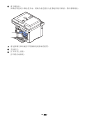
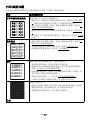
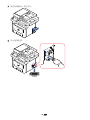
2
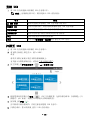
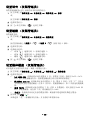
除了
Dell B2375dfw Mono MFP
或
Dell B2375dnf Mono MFP
,请确保包装箱内还有以下物
品。如果缺少物品,请与 Dell 联系:
墨粉盒
电源线
a
a 基于您所处的国家和 (或)地区的不同规格,电源线和电话线外观可能会有差异。
驱动程序和文档 CD
b
b 驱动程序和文档 CD 包含 Dell 打印机驱动程序、扫描驱动程序、打印机设置实用程序、
Set IP、Mac 驱动程序、Linux 驱动程序、Dell 墨粉管理系统和用户指南。
快速参考指南
c
电话线
a
安装图
重要信息
PaperPort14 CD
Dell™ B2375dfw / B2375dnf Mono MFP
Quick Reference Guide
About Your Printer
Locating the Service Tag
Operator Panel Button Functions
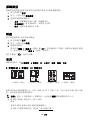
Understanding the Status LED
12 345
12 4356
11 10 9 8 7
1011121314 9 8 7 6
1 Operator Panel
3 Document Width Guide
5 Document Output Tray
7 Control Board Cover
9 Output Tray
11 Tray 1
13 Paper Output Extension
2 Duplex Automatic Document Feeder (DADF)
4 Document Input Tray
6 Document Glass
8 USB Memory Port
10 Front Cover
12 Multipurpose Feeder (MPF)
14 Toner Cartridge
1 Home Go to home screen.
2 Log In/Out You can log in or log out.
3 Status LED Status LED indicates the status of your machine.
4 Redial/Pause Redials the recently sent fax number or received caller ID in ready mode,
or inserts a pause(-) into a fax number in edit mode.
5 Copy Start copy job using copy default setting regardless of which screen
the user is in if it is selected.
6 Power Saver You can enter or exit Power Save mode.
7 Speed Dial1 Fax image to destination from stored speed dial1.
8 Speed Dial2 Fax image to destination from stored speed dial2.
9 Wi-Fi/WPS Configures the wireless network connection easily without a computer.
(Dell B2375dfw Mono MFP only)
10 Job Status Job status shows the jobs currently running and in queue.
11 Info Gives detailed information about product feature guide machine’s info.
reports, troubleshooting guide, and quick reference guide.
LED
Status
Wireless
Status
O
Green
Orange
Blue
Blinking
On
Blinking
Blinking
On
O
Description
• The machine is o-time.
• The machine is in power save mode. When data is received,
or any button is pressed, it switches to on-line automatically.
The machine is warming up or ready to receive the data.
The machine is on-line and can be used.
• A minor error has occurred and the machine is waiting for the error to be
cleared. Check the display message. When the problem is cleared, the
machine resumes operation.
• The toner cartridge is low. Order a new toner cartridge.
You can temporarily improve print quality by redistribution.
• The toner cartridge is totally empty. Remove the old toner cartridge and
install a new one.
• A paper jam has occurred.
• There is no paper in the tray. Load paper in the tray.
• The machine has stopped due to a major error. Check the display message.
• The machine is connecting to a wireless network.
• The machine is connected to a wireless network.
• The machine is disconnected from a wireless network.
HMCWMA01
JC68-03031A00
Service Tag XXXXXXX
Service Tag
XXXXXXX
000 000 000 00
Express Service Code
Dell 2355dn MFP Quick Reference Guide
lenaP rotarepO
Touch Screen
Front
Back
Quick Reference Guide
Quick Reference Guide
Front
1. LCD: Display.
2. Status LED: Shows the status of your machine.
3. Job Status button: Shows the jobs.
4. M/C Setup button: Leads you to the machine setup and advanced settings.
5 Start button: Initiate operation.
6. Cancel button: Cancel displayed operation.
1. LCD: Display.
2. Status LED: Shows the status of your machine.
3. Job Status button: Shows the jobs.
4. M/C Setup button: Leads you to the machine setup and advanced settings.
5 Start button: Initiate operation.
6. Cancel button: Cancel displayed operation.
1. LCD: Display.
2. Status LED: Shows the status of your machine.
3. Job Status button: Shows the jobs.
4. M/C Setup button: Leads you to the machine setup and advanced settings.
5 Start button: Initiate operation.
6. Cancel button: Cancel displayed operation.
1. USB port
2. Locking slot
3. Network port
4. Optional tray 2 cable
connector
5. Telephone line socket (Line)
6. Extension telephone socket (EXT)
7. Rear door
8. Power receptacle
9. Power switch
10. Express ervice code
11. Optional memory
12. Optional wireless card
1.
Copy: Enters the copy menu.
2. Fax: Enters the fax menu.
3. Scan: Enters the scan menu.
4. Setup: Enters the advanced settings.
5. None: You can set the option which is frequently uses on
main screen. Also you can change shortcut name as well.
6. : Shows the main screen.
7. : Enters the LCD brightness, the USB memory,
language, and job status.
8. : Return to the upper menu.
9. : Scroll through available options.
10. : Start a job.
Front
Front
Operator Panel
Operator Panel
Touch Screen
Touch Screen
13
1
7
1
3
4
7
8
5
2
6
9
10
11
12
14
15
1. DADF
2. Document width guides
3. Document input tray
4. Document output tray
5. Operator panel
6. Output tray (face down)
7. MPF (Multi purpose feeder)
8. Front cover
9. Tray 1
10. Optional tray 2
11. USB memory port
12. Paper output extension
13. Document glass
14. Toner cartridge
15. Express ervice code
Back
Back
1
2
3
5
4
6
8
9
10
11
12
1. USB port
2. Locking slot
3. Network port
4. Optional tray 2 cable
connector
5. Telephone line socket (Line)
6. Extension telephone socket (EXT)
7. Rear door
8. Power receptacle
9. Power switch
10. Express ervice code
11. Optional memory
12. Optional wireless card
1. USB port
2. Locking slot
3. Network port
4. Optional tray 2 cable
connector
5. Telephone line socket (Line)
6. Extension telephone socket (EXT)
7. Rear door
8. Power receptacle
9. Power switch
10. Express ervice code
11. Optional memory
12. Optional wireless card
1.
Copy: Enters the copy menu.
2. Fax: Enters the fax menu.
3. Scan: Enters the scan menu.
4. Setup: Enters the advanced settings.
5. None: You can set the option which is frequently uses on
main screen. Also you can change shortcut name as well.
6. : Shows the main screen.
7. : Enters the LCD brightness, the USB memory,
language, and job status.
8. : Return to the upper menu.
9. : Scroll through available options.
10. : Start a job.
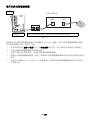
Dell™ B2375dfw / B2375dnf Mono MFP
1
3 4
2
Setting Up Your Printer
Configuration de votre imprimante | Configurazione della stampante
Einrichten des Druckers | Configuración de la impresora
Verify the contents of the box
Vérifiez le contenu de votre carton
Verificare il contenuto della confezione
Überprüfen Sie den Inhalt der Box
Compruebe el contenido de la caja
Remove the packing material
Retirez les matériaux d’emballage
Rimuovere il materiale di imballo
Entfernen Sie das Verpackungsmaterial
Retire el material de embalaje
(For Ethernet connection only)
Insert Ethernet cable
(Uniquement pour la connexion Ethernet) Insérez le câble Ethernet
(solo per la connessione Ethernet) Inserire il cavo Ethernet
(Nur für Ethernet-Verbindung) Schließen Sie das Ethernet-Kabel an
(Solamente para la conexión Ethernet) Inserte el cable Ethernet
Mettez l’imprimante sous tension
Accendere la stampante
Schalten Sie den Drucker ein
Encienda la impresora
Set the language, country, time zone, date, and time.
Wait until "Ready" appears on the screen.
Réglez la langue, le pays, le fuseau horaire, la date et l’heure. Patientez jusqu’à ce que "Prêt" s’ache à l’écran.
Impostare la lingua, il paese, il fuso orario, la data e l’ora. Attendere finché non viene visualizzato "Pronto" sullo
schermo.
Legen Sie Sprache, Land, Zeitzone, Datum und Uhrzeit fest. Warten Sie, bis "Bereit" im Display angezeigt wird.
Configure el idioma, el país, la zona horaria, la fecha y la hora. Espere hasta que aparezca "Lista" en la pantalla.
Turn on the printer

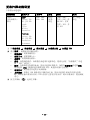
- 19 -
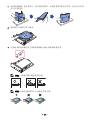
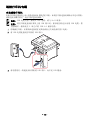
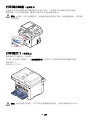
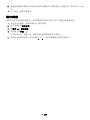
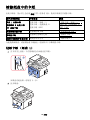
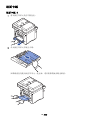
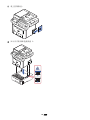
注意 : 请使用打印机随附的电话线。如果选择使用其他电话线,请使用 AWG #26
或规格更低的电话线,并且长度不超过 250 厘米 (98 英寸)。
注意 : 电源线必须插在接地的插座上。
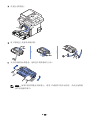
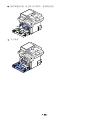
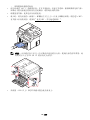
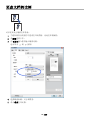
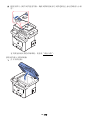
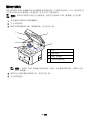
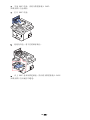
3
请勿丢弃纸箱和包装材料,因为可能需要重新装回打印机。
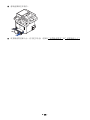
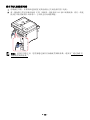
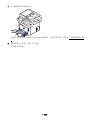
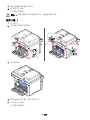
4
拆掉打印机四周的包装带。
c 快速参考指南可能不随产品一起提供,这取决于您所在的国家 / 地区。
ページが読み込まれています...
ページが読み込まれています...
ページが読み込まれています...
ページが読み込まれています...
ページが読み込まれています...
ページが読み込まれています...
ページが読み込まれています...
ページが読み込まれています...
ページが読み込まれています...
ページが読み込まれています...
ページが読み込まれています...
ページが読み込まれています...
ページが読み込まれています...
ページが読み込まれています...
ページが読み込まれています...
ページが読み込まれています...
ページが読み込まれています...
ページが読み込まれています...
ページが読み込まれています...
ページが読み込まれています...
ページが読み込まれています...
ページが読み込まれています...
ページが読み込まれています...
ページが読み込まれています...
ページが読み込まれています...
ページが読み込まれています...
ページが読み込まれています...
ページが読み込まれています...
ページが読み込まれています...
ページが読み込まれています...
ページが読み込まれています...
ページが読み込まれています...
ページが読み込まれています...
ページが読み込まれています...
ページが読み込まれています...
ページが読み込まれています...
ページが読み込まれています...
ページが読み込まれています...
ページが読み込まれています...
ページが読み込まれています...
ページが読み込まれています...
ページが読み込まれています...
ページが読み込まれています...
ページが読み込まれています...
ページが読み込まれています...
ページが読み込まれています...
ページが読み込まれています...
ページが読み込まれています...
ページが読み込まれています...
ページが読み込まれています...
ページが読み込まれています...
ページが読み込まれています...
ページが読み込まれています...
ページが読み込まれています...
ページが読み込まれています...
ページが読み込まれています...
ページが読み込まれています...
ページが読み込まれています...
ページが読み込まれています...
ページが読み込まれています...
ページが読み込まれています...
ページが読み込まれています...
ページが読み込まれています...
ページが読み込まれています...
ページが読み込まれています...
ページが読み込まれています...
ページが読み込まれています...
ページが読み込まれています...
ページが読み込まれています...
ページが読み込まれています...
ページが読み込まれています...
ページが読み込まれています...
ページが読み込まれています...
ページが読み込まれています...
ページが読み込まれています...
ページが読み込まれています...
ページが読み込まれています...
ページが読み込まれています...
ページが読み込まれています...
ページが読み込まれています...
ページが読み込まれています...
ページが読み込まれています...
ページが読み込まれています...
ページが読み込まれています...
ページが読み込まれています...
ページが読み込まれています...
ページが読み込まれています...
ページが読み込まれています...
ページが読み込まれています...
ページが読み込まれています...
ページが読み込まれています...
ページが読み込まれています...
ページが読み込まれています...
ページが読み込まれています...
ページが読み込まれています...
ページが読み込まれています...
ページが読み込まれています...
ページが読み込まれています...
ページが読み込まれています...
ページが読み込まれています...
ページが読み込まれています...
ページが読み込まれています...
ページが読み込まれています...
ページが読み込まれています...
ページが読み込まれています...
ページが読み込まれています...
ページが読み込まれています...
ページが読み込まれています...
ページが読み込まれています...
ページが読み込まれています...
ページが読み込まれています...
ページが読み込まれています...
ページが読み込まれています...
ページが読み込まれています...
ページが読み込まれています...
ページが読み込まれています...
ページが読み込まれています...
ページが読み込まれています...
ページが読み込まれています...
ページが読み込まれています...
ページが読み込まれています...
ページが読み込まれています...
ページが読み込まれています...
ページが読み込まれています...
ページが読み込まれています...
ページが読み込まれています...
ページが読み込まれています...
ページが読み込まれています...
ページが読み込まれています...
ページが読み込まれています...
ページが読み込まれています...
ページが読み込まれています...
ページが読み込まれています...
ページが読み込まれています...
ページが読み込まれています...
ページが読み込まれています...
ページが読み込まれています...
ページが読み込まれています...
ページが読み込まれています...
ページが読み込まれています...
ページが読み込まれています...
ページが読み込まれています...
ページが読み込まれています...
ページが読み込まれています...
ページが読み込まれています...
ページが読み込まれています...
ページが読み込まれています...
ページが読み込まれています...
ページが読み込まれています...
ページが読み込まれています...
ページが読み込まれています...
ページが読み込まれています...
ページが読み込まれています...
ページが読み込まれています...
ページが読み込まれています...
ページが読み込まれています...
ページが読み込まれています...
ページが読み込まれています...
ページが読み込まれています...
ページが読み込まれています...
ページが読み込まれています...
ページが読み込まれています...
ページが読み込まれています...
ページが読み込まれています...
ページが読み込まれています...
ページが読み込まれています...
ページが読み込まれています...
ページが読み込まれています...
ページが読み込まれています...
ページが読み込まれています...
ページが読み込まれています...
ページが読み込まれています...
ページが読み込まれています...
ページが読み込まれています...
ページが読み込まれています...
ページが読み込まれています...
ページが読み込まれています...
ページが読み込まれています...
ページが読み込まれています...
ページが読み込まれています...
ページが読み込まれています...
ページが読み込まれています...
ページが読み込まれています...
ページが読み込まれています...
ページが読み込まれています...
ページが読み込まれています...
ページが読み込まれています...
ページが読み込まれています...
ページが読み込まれています...
ページが読み込まれています...
ページが読み込まれています...
ページが読み込まれています...
ページが読み込まれています...
ページが読み込まれています...
ページが読み込まれています...
ページが読み込まれています...
ページが読み込まれています...
ページが読み込まれています...
ページが読み込まれています...
ページが読み込まれています...
ページが読み込まれています...
ページが読み込まれています...
ページが読み込まれています...
ページが読み込まれています...
ページが読み込まれています...
ページが読み込まれています...
ページが読み込まれています...
ページが読み込まれています...
ページが読み込まれています...
ページが読み込まれています...
ページが読み込まれています...
ページが読み込まれています...
ページが読み込まれています...
ページが読み込まれています...
ページが読み込まれています...
ページが読み込まれています...
ページが読み込まれています...
ページが読み込まれています...
ページが読み込まれています...
ページが読み込まれています...
ページが読み込まれています...
ページが読み込まれています...
ページが読み込まれています...
ページが読み込まれています...
ページが読み込まれています...
ページが読み込まれています...
ページが読み込まれています...
ページが読み込まれています...
ページが読み込まれています...
ページが読み込まれています...
ページが読み込まれています...
ページが読み込まれています...
ページが読み込まれています...
ページが読み込まれています...
ページが読み込まれています...
ページが読み込まれています...
ページが読み込まれています...
ページが読み込まれています...
ページが読み込まれています...
ページが読み込まれています...
ページが読み込まれています...
ページが読み込まれています...
ページが読み込まれています...
ページが読み込まれています...
ページが読み込まれています...
ページが読み込まれています...
ページが読み込まれています...
ページが読み込まれています...
ページが読み込まれています...
ページが読み込まれています...
ページが読み込まれています...
ページが読み込まれています...
ページが読み込まれています...
ページが読み込まれています...
ページが読み込まれています...
ページが読み込まれています...
ページが読み込まれています...
ページが読み込まれています...
ページが読み込まれています...
ページが読み込まれています...
ページが読み込まれています...
ページが読み込まれています...
ページが読み込まれています...
ページが読み込まれています...
ページが読み込まれています...
ページが読み込まれています...
ページが読み込まれています...
ページが読み込まれています...
ページが読み込まれています...
ページが読み込まれています...
ページが読み込まれています...
ページが読み込まれています...
ページが読み込まれています...
ページが読み込まれています...
ページが読み込まれています...
ページが読み込まれています...
ページが読み込まれています...
ページが読み込まれています...
ページが読み込まれています...
ページが読み込まれています...
ページが読み込まれています...
ページが読み込まれています...
ページが読み込まれています...
ページが読み込まれています...
ページが読み込まれています...
ページが読み込まれています...
ページが読み込まれています...
ページが読み込まれています...
ページが読み込まれています...
ページが読み込まれています...
ページが読み込まれています...
ページが読み込まれています...
ページが読み込まれています...
ページが読み込まれています...
ページが読み込まれています...
ページが読み込まれています...
ページが読み込まれています...
ページが読み込まれています...
ページが読み込まれています...
ページが読み込まれています...
ページが読み込まれています...
ページが読み込まれています...
ページが読み込まれています...
ページが読み込まれています...
ページが読み込まれています...
ページが読み込まれています...
ページが読み込まれています...
ページが読み込まれています...
ページが読み込まれています...
ページが読み込まれています...
ページが読み込まれています...
ページが読み込まれています...
ページが読み込まれています...
ページが読み込まれています...
ページが読み込まれています...
ページが読み込まれています...
-
 1
1
-
 2
2
-
 3
3
-
 4
4
-
 5
5
-
 6
6
-
 7
7
-
 8
8
-
 9
9
-
 10
10
-
 11
11
-
 12
12
-
 13
13
-
 14
14
-
 15
15
-
 16
16
-
 17
17
-
 18
18
-
 19
19
-
 20
20
-
 21
21
-
 22
22
-
 23
23
-
 24
24
-
 25
25
-
 26
26
-
 27
27
-
 28
28
-
 29
29
-
 30
30
-
 31
31
-
 32
32
-
 33
33
-
 34
34
-
 35
35
-
 36
36
-
 37
37
-
 38
38
-
 39
39
-
 40
40
-
 41
41
-
 42
42
-
 43
43
-
 44
44
-
 45
45
-
 46
46
-
 47
47
-
 48
48
-
 49
49
-
 50
50
-
 51
51
-
 52
52
-
 53
53
-
 54
54
-
 55
55
-
 56
56
-
 57
57
-
 58
58
-
 59
59
-
 60
60
-
 61
61
-
 62
62
-
 63
63
-
 64
64
-
 65
65
-
 66
66
-
 67
67
-
 68
68
-
 69
69
-
 70
70
-
 71
71
-
 72
72
-
 73
73
-
 74
74
-
 75
75
-
 76
76
-
 77
77
-
 78
78
-
 79
79
-
 80
80
-
 81
81
-
 82
82
-
 83
83
-
 84
84
-
 85
85
-
 86
86
-
 87
87
-
 88
88
-
 89
89
-
 90
90
-
 91
91
-
 92
92
-
 93
93
-
 94
94
-
 95
95
-
 96
96
-
 97
97
-
 98
98
-
 99
99
-
 100
100
-
 101
101
-
 102
102
-
 103
103
-
 104
104
-
 105
105
-
 106
106
-
 107
107
-
 108
108
-
 109
109
-
 110
110
-
 111
111
-
 112
112
-
 113
113
-
 114
114
-
 115
115
-
 116
116
-
 117
117
-
 118
118
-
 119
119
-
 120
120
-
 121
121
-
 122
122
-
 123
123
-
 124
124
-
 125
125
-
 126
126
-
 127
127
-
 128
128
-
 129
129
-
 130
130
-
 131
131
-
 132
132
-
 133
133
-
 134
134
-
 135
135
-
 136
136
-
 137
137
-
 138
138
-
 139
139
-
 140
140
-
 141
141
-
 142
142
-
 143
143
-
 144
144
-
 145
145
-
 146
146
-
 147
147
-
 148
148
-
 149
149
-
 150
150
-
 151
151
-
 152
152
-
 153
153
-
 154
154
-
 155
155
-
 156
156
-
 157
157
-
 158
158
-
 159
159
-
 160
160
-
 161
161
-
 162
162
-
 163
163
-
 164
164
-
 165
165
-
 166
166
-
 167
167
-
 168
168
-
 169
169
-
 170
170
-
 171
171
-
 172
172
-
 173
173
-
 174
174
-
 175
175
-
 176
176
-
 177
177
-
 178
178
-
 179
179
-
 180
180
-
 181
181
-
 182
182
-
 183
183
-
 184
184
-
 185
185
-
 186
186
-
 187
187
-
 188
188
-
 189
189
-
 190
190
-
 191
191
-
 192
192
-
 193
193
-
 194
194
-
 195
195
-
 196
196
-
 197
197
-
 198
198
-
 199
199
-
 200
200
-
 201
201
-
 202
202
-
 203
203
-
 204
204
-
 205
205
-
 206
206
-
 207
207
-
 208
208
-
 209
209
-
 210
210
-
 211
211
-
 212
212
-
 213
213
-
 214
214
-
 215
215
-
 216
216
-
 217
217
-
 218
218
-
 219
219
-
 220
220
-
 221
221
-
 222
222
-
 223
223
-
 224
224
-
 225
225
-
 226
226
-
 227
227
-
 228
228
-
 229
229
-
 230
230
-
 231
231
-
 232
232
-
 233
233
-
 234
234
-
 235
235
-
 236
236
-
 237
237
-
 238
238
-
 239
239
-
 240
240
-
 241
241
-
 242
242
-
 243
243
-
 244
244
-
 245
245
-
 246
246
-
 247
247
-
 248
248
-
 249
249
-
 250
250
-
 251
251
-
 252
252
-
 253
253
-
 254
254
-
 255
255
-
 256
256
-
 257
257
-
 258
258
-
 259
259
-
 260
260
-
 261
261
-
 262
262
-
 263
263
-
 264
264
-
 265
265
-
 266
266
-
 267
267
-
 268
268
-
 269
269
-
 270
270
-
 271
271
-
 272
272
-
 273
273
-
 274
274
-
 275
275
-
 276
276
-
 277
277
-
 278
278
-
 279
279
-
 280
280
-
 281
281
-
 282
282
-
 283
283
-
 284
284
-
 285
285
-
 286
286
-
 287
287
-
 288
288
-
 289
289
-
 290
290
-
 291
291
-
 292
292
-
 293
293
-
 294
294
-
 295
295
-
 296
296
-
 297
297
-
 298
298
-
 299
299
-
 300
300
-
 301
301
-
 302
302
-
 303
303
-
 304
304
-
 305
305
-
 306
306
-
 307
307
-
 308
308
-
 309
309
-
 310
310
-
 311
311
-
 312
312
-
 313
313
-
 314
314
-
 315
315
-
 316
316
-
 317
317
-
 318
318
-
 319
319
-
 320
320
-
 321
321
-
 322
322
-
 323
323
-
 324
324
-
 325
325
-
 326
326
-
 327
327
-
 328
328
-
 329
329
-
 330
330
-
 331
331
-
 332
332
-
 333
333
-
 334
334
-
 335
335
-
 336
336


Dell B2375dfw Mono Multifunction Printer ユーザーガイド
- カテゴリー
- 多機能
- タイプ
- ユーザーガイド
関連論文
-
Dell B2375dnf Mono Multifunction Printer クイックスタートガイド
-
-
-
-
-
-
Dell B2360dn Mono Laser Printer ユーザーガイド
-
-
-
その他のドキュメント
-
Samsung SCX-6345NG 取扱説明書
-
HP LASERJET 3030 ALL-IN-ONE PRINTER ユーザーガイド
-
HP LaserJet M4345 Multifunction Printer series クイックスタートガイド
-
-
Samsung SCX-4833FD 取扱説明書
-
-
HP LaserJet 8150 Multifunction Printer series クイックスタートガイド
-
HP Color LaserJet 9500 Multifunction Printer series クイックスタートガイド
-
Samsung SL-C1454N 取扱説明書