Samsung QP98R-8K クイックセットアップガイド

タイプ
クイックセットアップガイド

このマニュアルも適しています

Samsung QP98R-8K は、4K QLED ディスプレイと Tizen オペレーティングシステムを搭載した 98 インチのスマートテレビです。 Quantum HDR 32x により、よりリアルで鮮やかな視聴体験を提供します。また、オブジェクト トラッキング サウンドと Q-Symphony により、没入感のあるオーディオ体験が得られます。さらに、スマートハブを搭載しており、お気に入りのストリーミングアプリやゲームに簡単にアクセスできます。Samsung QP98R-8K は、映画、テレビ番組、ゲームを楽しむのに最適なテレビです。

  • 量子ドット技術により、純粋な色と深い黒を表現し、より豊かでリアルな画像を実現します。
  • 量子プロセッサー 4Kにより、あらゆるコンテンツを自動的に高画質に変換します。
  • オブジェクト トラッキング サウンドにより、画面上のオブジェクトの位置に応じて音が移動し、まるで映画館にいるかのような臨場
* Recommended hours of use per day of this product is under 16 hours. If the product is used for longer than 16 hours a
day, the warranty may be void.
* The colour and the appearance may differ depending on the product, and the content in the manual is subject to change
without prior notice to improve the performance.
* Download the user manual from the website for further details.
http://www.samsung.com/displaysolutions
* Il est recommandé d'utiliser ce produit moins de 16 heures par jour. L'utilisation quotidienne du produit pendant une
durée supérieure à 16 heures peut entraîner l'annulation de la garantie.
* La couleur et l’aspect du produit peuvent varier en fonction du modèle, et le contenu dans le manuel peut être modifié
sans préavis pour des raisons d’amélioration des performances.
* Téléchargez le manuel utilisateur du site Web pour obtenir plus de détails.
The terms HDMI and HDMI High-Definition Multimedia
Interface, and the HDMI Logo are trademarks or registered
trademarks of HDMI Licensing LLC in the United States
and other countries.
BN68-09675K-00
Quick Setup Guide
Guide de configuration rapide
Warranty card
(Not available in some locations)
Carte de garantie
(Non disponible dans certains pays)
Regulatory guide
Guide réglementaire
Batteries (AAA x 2)
(Not available in some locations)
Batteries (AAA x 2)
(Non disponible dans certains pays)
Remote Control
Télécommande
RS232C adapter
Adaptateur RS232C
Holder-Ring (For Wall Mount) x 4
Anneau de maintien (pour montage mural) x 4
Stand / Screw (M4 x L14) x 4
(Supported models: QP82R-8K)
Socle / Vis (M4 x L14) x 4
(Modèles pris en charge: QP82R-8K)
Stand / Screw (M4 x L20) x 4
(Supported models: QP98R-8K)
Socle / Vis (M4 x L20) x 4
(Modèles pris en charge: QP98R-8K)
One Connect
One Connect Power Cable
Câble d'alimentation One Connect
One Invisible Connection
(Supported models: QP82R-8K)
One Invisible Connection
(Modèles pris en charge: QP82R-8K)
One Invisible Connection / Screw (M4 x L12)
(Supported models: QP98R-8K)
One Invisible Connection / Vis (M4 x L12)
(
Modèles pris en charge
: QP98R-8K)
HOLDER-CABLE
PORTE-CÂBLE
Bending Cover
Protection pliante
English
Contact the vendor where you purchased the product if
any components are missing.
The pictures may look different from the actual components.
Français
S’il manque le moindre composant, contactez le revendeur
auprès duquel vous avez acheté le produit.
Les représentations peuvent ne pas correspondre aux
composants.
Português
Contacte o vendedor onde adquiriu o produto caso haja
componentes em falta.
As imagens podem ter um aspeto diferente dos
componentes reais.
Tiếng Việt



繁體中文
如有任何元件遺漏,請聯絡您購買產品的供應商。
圖片看起來可能和實際元件不盡相同。



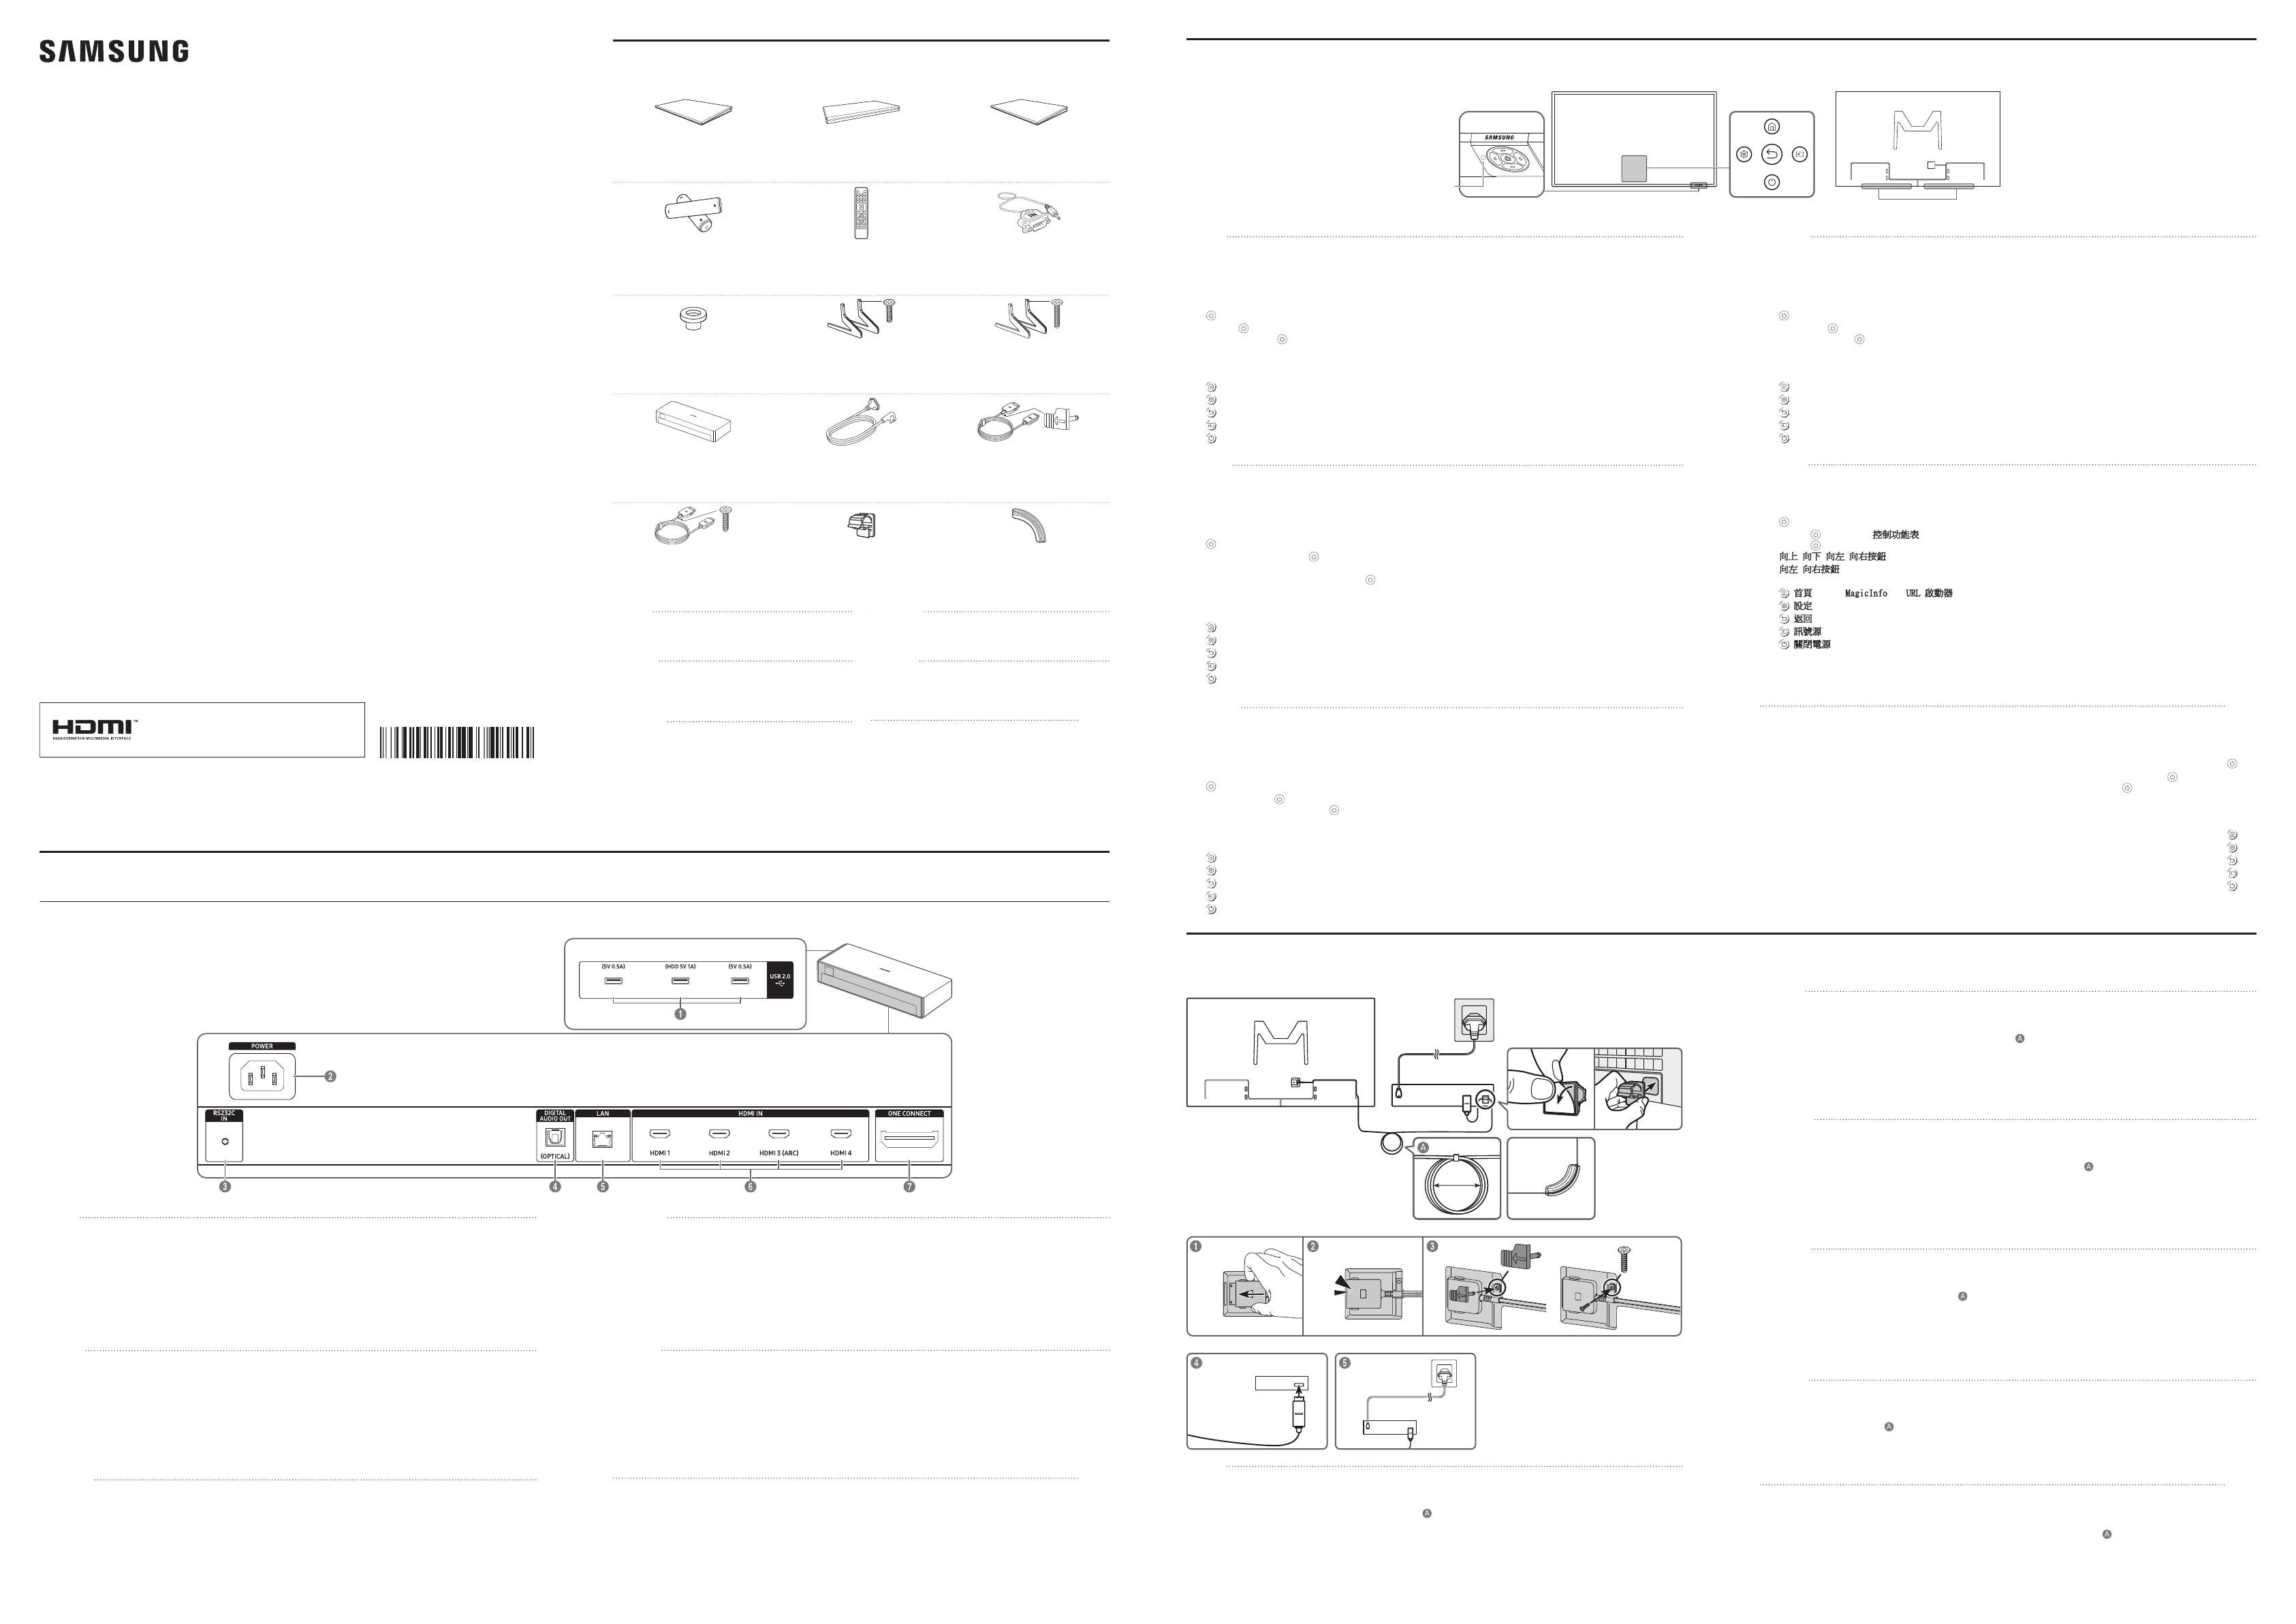
Checking the Components
Verification des composants
Français
Connectez le produit et One Connect en vous reportant à l’image.
1 En suivant les étapes
1
-
4
sur l'image, utilisez One Invisible Connection pour connecter le produit et One Connect.

5
.
* Lorsque vous fixez le câble restant, reportez-vous à la figure
pour connaître la disposition correcte.

Attention - Rayonnement laser invisible en cas d’ouverture. Ne fixez pas le faisceau du regard.
- Ne pliez pas le câble One Invisible Connection de façon excessive. Ne coupez pas le câble. Ne placez pas d’objets
lourds sur le câble. Ne démontez aucun des connecteurs de câbles.
Attention - Le non-respect des commandes, réglages ou performances (procédures) mentionnés dans le présent
document peut entraîner une exposition dangereuse aux radiations.
Quick Setup Guide
Guide de conguration rapide
QP82R-8K QP98R-8K
One Connect
10 cm
Bending Cover
QPR-8K
QPR-8K
(M4 x L12)
x 1
One Connect
One Connect
One Connect
Connecting the product to the One Connect
Connexion du produit au One Connect
English
Connect the product and One Connect referring to the image.
1 Following the steps
1
-
4
in the image, use One Invisible Connection to connect the product and One Connect.
2 Use the power cable to connect One Connect to a wall outlet as shown in step
5
.
* When arranging the remaining cable, refer to the figure
for the correct arrangement.
CLASS 1 LASER PRODUCT (One Invisible Connection)
Caution - Invisible laser radiation when open. Do not stare into beam.
- Do not bend the One Invisible Connection cable excessively. Do not cut the cable. Do not place heavy objects on the
cable. Do not disassemble either of the cable connectors.
Caution - Use of controls, adjustments, or the performance of procedures other than those specified herein may result
in hazardous radiation exposure.
繁體中文
1 參考圖片連接產品和 One Connect。
2 按照圖中的步驟
1
-
4
,使用 One Invisible Connection 連接產品和 One Connect。
使用電源線將 One Connect 連接至牆壁插座,如步驟
5
中所示。
*
整理其他纜線時,請參照圖
以正確整理。
1 類雷射產品 (One Invisible Connection)
注意 - 開啟時會有看不見的雷射輻射線。切勿直視光束。
-
切勿過度彎折One Invisible Connection線纜。切勿切割纜線。切勿將重物壓在線纜上。切勿拆解任何纜線的接頭。
注意 - 進行此處所述以外的控制、調整或程序,可能導致暴露於危險的輻射當中。


.411
.52


)

-

Tiếng Việt


1
-
4


5
.
* 



- 



Português
Ligue o produto e o One Connect, consultando a imagem.

1
a
4
na imagem, utilize a One Invisible Connection para ligar o produto e o One Connect.

5
.
* 
.
PRODUTO LASER DE CLASSE 1 (One Invisible Connection)

- 



Ports
Ports
繁體中文
1
連接至 USB 記憶裝置。
2
連接電源線。
3
使用 RS232C 轉接器連接至 MDC。
4
使用光纖 (數位) 纜線連接至音訊裝置。
5
使用 LAN 纜線連接至網路。(10/100 Mbps)
使用 LAN 纜線連接至 MDC。
6
使用 HDMI 纜線或 HDMI-DVI 纜線連接至訊號源裝置。
7
使用提供的 One Invisible Connection 連接產品和 One Connect。

1 .USB
2 
3 .

4 
5 10/100LAN
.LAN
6 .
7 .
Tiếng Việt
1

2

3

4

5


6

7

Português
1

2

3
Liga-se a um MDC utilizando um adaptador RS232C.
4

5
Ligue a uma rede através de um cabo LAN. (10/100 Mbps)
Ligue ao MDC através de um cabo LAN.
6
Liga-se a um dispositivo de entrada utilizando um cabo HDMI ou HDMI-DVI.
7
Use a One Invisible Connection fornecida para ligar o produto e o One Connect.
Français
1
Permet de se connecter à un périphérique de mémoire USB.
2
Permet de connecter le câble d'alimentation.
3
Connexion au MDC grâce à un adaptateur RS232C.
4
Permet la connexion à un périphérique audio à l'aide du câble optique (numérique).
5
Permet la connexion à un réseau via le câble LAN. (10/100 Mbit/s)
Permet de se connecter au MDC à l'aide d'un câble LAN.
6
Connexion à un périphérique source à l'aide d'un câble HDMI ou HDMI-DVI.
7
Utilisez le One Invisible Connection fourni pour connecter le produit et One Connect.
English
1
Connect to a USB memory device.
2
Connect the power cable.
3
Connects to MDC using an RS232C adapter.
4
Connects to a audio device using the optical(digital) cable.
5
Connect to a network using the LAN cable. (10/100 Mbps)
Connect to MDC using the LAN cable.
6
Connects to a source device using a HDMI cable or HDMI-DVI cable.
7
Use the provided One Invisible Connection to connect the product and One Connect.
English
1
Remote sensor
Press a button on the remote control pointing at the bottom of the product face to perform the function. The remote
control sensor is located on the bottom of the product.
* Using other display devices in the same space as the remote control of this product can cause the other display
devices to be inadvertently controlled.
2
Control button
button: Turns the product on.
- Press
button: Display the Control menu. / Select or run a focused item on the menu.
- Press and hold
button: The running function is terminated.
Up/Down/Left/Right Button: Move the menu.
Left/Right Button: Changes the volume.
3
Control menu
Home: Enter MagicInfo or URL Launcher mode.
Settings: Display the OSD menu.
Return: Exit the control menu.
Source: Select the connected input source.
Power off: Power off the product.
4
Power indicator
Parts
Pièces
Français
1
Capteur de la télécommande
Appuyez sur un bouton de la télécommande tout en pointant la base de la face du produit pour exécuter la fonction.
Le capteur de télécommande se trouve à la base du produit.
* Si vous utilisez la télécommande de ce produit dans le même espace que d’autres périphériques d’affichage, il se
peut que ces derniers soient commandés par mégarde.
2
Bouton de commande
Bouton
- Appuyez sur le bouton
Menu de commande. / Sélectionne ou exécute un élément mis en évidence
sur le menu.
- Appuyez et tenez enfoncé le bouton

Bouton haut/bas/gauche/droite
Bouton gauche/droite
3
Menu de commande
Accueil : Saisissez le mode MagicInfo ou Lancement de l’URL.
Paramètres : Affichez le menu OSD.
Retour
Source
Eteindre : Met lappareil hors tension.
4
Indicateur d'alimentation
Português
1
Sensor do telecomando


* 
controlar estes outros dispositivos acidentalmente.
2

Botão: Liga o produto.
- 
: Apresenta o Menu de controlo. / Seleciona ou executa um item em foco no menu.
- 

Botão Cima/Baixo/Esquerda/Direita: Mover o menu.
Botão Esquerda/Direita: Altera o volume.
3
Menu de controlo
Página Principal: Entra no modo MagicInfo ou Iniciador URL.
Definições: Apresenta o menu OSD.
Regres.: Para sair do menu de controlo.
Fonte: Para seleccionar a fonte de entrada ligada.
Desligar: Para desligar o produto.
4
Indicador de corrente
Tiếng Việt
1



* 

2

Nút
- 
Trnh đơn điu khin
- 

Nút Lên/Xuống/Trái/Phải
Nút Trái/Phải
3

HomeMagicInfoURL Launcher.
Settings
Return
Source
Power off
4

繁體中文
1
遙控感測器
對著產品正面的底部按下遙控器上的按鈕,執行相應功能。遙控器感測器位於產品的底部。
* 在相同地點與本產品的遙控器一併使用其他顯示裝置,可能會導致其他顯示裝置發生未能如預期受控制。
2
控制按鈕
按鈕:開啟產品。
-
按下
按鈕:顯示
控制功能表
。/ 在功能表上選擇或執行焦點項目。
-
按住
按鈕:執行功能已終止。
向上
/
向下
/
向左
/
向右按鈕
:移動功能表。
向左
/
向右按鈕
:變更音量。
3
控制功能表
首頁
:輸入
MagicInfo
URL 啟動器
模式。
設定
:顯示 OSD 功能表。
返回
:結束控制功能表。
訊號源
:選擇已連接的輸入來源。
關閉電源
:關閉產品的電源。
4
電源指示燈

1 






2 

- 
-

///
/
3 
.URLMagicInfo




4 
Speaker
Haut-parleur
1,2
4
3
One Connect
QP82R-8K QP98R-8K
Connecting and Using a Source Device
Connexion et utilisation d'un périphérique source
Français
Spécifications du kit de montage mural (VESA)
Lors de l'installation d'un kit de montage mural, nous vous recommandons de fixer les quatre vis VESA.
Si vous souhaitez installer un kit de montage mural qui se fixe au mur au moyen de deux vis supérieures uniquement, veillez
à utiliser un kit de montage mural Samsung compatible avec ce type d'installation. (Il se peut que ce type de kit de montage
mural ne soit pas disponible à l'achat dans certaines régions.)
Nom du modèle
Spécifications des
trous de vis VESA
(A * B) en millimètres
Profondeur de vis Vis standard Quantité
QP82R-8K
600 x 400 19-21 M8 4
QP98R-8K
Caractéristiques technique
s
Nom du modèle QP82R-8K QP98R-8K
Panneau
Taille Classe 82 (81,5 pouces / 207,1 cm) Classe 98 (97,5 pouces / 247,7 cm)
Surface d'affichage 1805,4 mm (H) x 1015,5 mm (V) 2158,848 mm (H) x 1214,352 mm (V)
Alimentation
AC100-240V~ 50/60Hz
* Reportez-vous à l'étiquette apposée au dos du produit, car la tension
standard peut varier en fonction du pays.
* Sur les modèles One Connect, l’étiquette est attachée sous le One Connect.
Considérations
environnementales
Fonctionnement
Température: 0 °C – 40 °C (32 °F – 104 °F)
Humidité: 10% à 80 %, sans condensation
Stockage
Température: -20 °C – 45 °C (-4 °F – 113 °F)
Humidité: 5% à 95%, sans condensation
* 
* Pour les spécifications détaillées de l'appareil, veuillez visiter le site Web de Samsung Electronics.
Português
Especificações do kit de montagem na parede (VESA)
Quando instalar um kit de montagem na parede recomendamos que aperte os quatros parafusos VESA.
Se quiser instalar um kit de montagem que se fixa à parede apenas com dois parafusos na parte superior, utilize um kit


Nome do modelo
Especificações para os

VESA (A * B) em

Profundidade do
parafuso
 Quantidade
QP82R-8K
600 x 400 19-21 M8 4
QP98R-8K
Características té
cnicas
Nome do modelo QP82R-8K QP98R-8K
Painel
Tamanho 82 (81,5
polegadas
/ 207,1 cm)  98 (97,5
polegadas
/ 247,7 cm)
 1805,4 mm (H) x 1015,5 mm (V) 2158,848 mm (H) x 1214,352 mm (V)

AC100-240V~ 50/60Hz
* 

* Nos modelos do One Connect, a etiqueta encontra-se na parte inferior do One Connect.

ambientais
Funcionamento
Temperatura: 0 °C - 40 °C (32 °F - 104 °F)

Armazenamento
Temperatura: -20 °C - 45 °C (-4 °F - 113 °F)

* Este dispositivo é um aparelho digital de Classe B.
* Para obter mais informações sobre as especificações do dispositivo, visite o website da Samsung Electronics.
Tiếng Việt
Thông số k thut ca b giá treo tưng (VESA)






  
QP82R-8K
600 x 400 19-21 M8 4
QP98R-8K
Các thông số k thut
 QP82R-8K QP98R-8K
Màn hình
  
 1805,4 mm (H) x 1015,5 mm (V) 2158,848 mm (H) x 1214,352 mm (V)

AC100-240V~ 50/60Hz
* 

* 








* 
* 
繁體中文
掛牆套件規格 (VESA)
安裝壁掛架組時,建議將四個 VESA 螺絲鎖緊。
如果您只要使用兩個上方螺絲安裝壁掛架組,請務必使用支援此類安裝的 Samsung 壁掛架組 (依地理位置而定,您可能無
法購買此型的壁掛架組)。
型號名稱
VESA 螺絲孔規格
(A * B)(公釐)
螺絲深度 標準螺絲 數量
QP82R-8K
600 x 400 19-21 M8 4
QP98R-8K
規格
型號名稱 QP82R-8K QP98R-8K
指定型號名稱
LH82QPR8 LH98QPR8
面板
大小
(
需沿屏幕表面测量对角
)
81.5 英吋 (207.1 公分) 97.5 英吋 (247.7 公分)
可視面積
(
需沿屏幕表面测量
)
1805.4 公釐 (水平) x
1015.5 公釐 (垂直)
2158.848 公釐 (水平) x
1214.352 公釐 (垂直)
電源
AC100-240V~ 50/60Hz
*
請參閱產品後方的標籤,不同國家地區的標準電壓不盡相同。
*
在 One Connect 型號上,標籤貼在 One Connect 的底部。
環境因素
工作
溫度: 0 °C - 40 °C (32 °F - 104 °F)
濕度: 10% - 80%,無冷凝
存放
溫度: -20 °C - 45 °C (-4 °F - 113 °F)
濕度: 5% - 95%,無冷凝
*
此裝置為 B 類數位設備。
*
如需詳細的裝置規格,請造訪三星電子網站。
*
QP82R-8K:耗電量 (額定):
565
W
QP98R-8K:耗電量 (額定):815 W

(VESA)





  



2119M8
QP98R-8K

QP98R-8K
 
247.797.598 207.181.582 

1214.3522158.848 1015.51805.4 




.


320



113





.

English
Wall Mount Kit Specifications (VESA)
When installing a wall mount kit, we recommend you fasten all four VESA screws.
If you want to install a wall mount kit that attaches to the wall using two top screws only, be sure to use a Samsung wall
mount kit that supports this type of installation. (You may not be able to purchase this type of wall mount kit, depending on
the geographical region.)
Model Name
VESA screw hole
specs (A * B) in
millimetres
Screw Depth Standard Screw Quantity
QP82R-8K
600 x 400 19-21 M8 4
QP98R-8K
Specifications
Model Name QP82R-8K QP98R-8K
Panel
Size 82 CLASS (81.5 inches / 207.1 cm) 98 CLASS (97.5 inches / 247.7 cm)
Display area 1805.4 mm (H) x 1015.5 mm (V) 2158.848 mm (H) x 1214.352 mm (V)
Power Supply
AC100-240V~ 50/60Hz
* Refer to the label at the back of the product as the standard voltage can vary in
different countries.
* On One Connect models, the label is attached to the bottom of the One Connect.
Environmental
considerations
Operating
Temperature: 0 °C – 40 °C (32 °F – 104 °F)
Humidity: 10% – 80%, non-condensing
Storage
Temperature: -20 °C – 45 °C (-4 °F – 113 °F)
Humidity: 5% – 95%, non-condensing
* This device is a Class B digital apparatus.
* For detailed device specifications, visit the Samsung Electronics website.

 
 
No Signal



HDMI Hot PlugOn.
Troubleshooting Guide
Guide de depannage
Français
Problèmes Solutions
Lécran s’allume et s’éteint continuellement. Vérifiez que le câble entre le produit et le PC est connecté correctement.
Aucun signal s’affiche à l’écran.
Vérifiez que l’appareil est connecté correctement à l’aide d’un câble.
Assurez-vous que le périphérique source connecté au produit est sous tension.
Selon le type de périphérique externe, l'écran peut ne pas s'afficher correctement.
Dans ce cas, connectez-le avec la fonction Connexion HDMI mise sur Activé.
English
Issues Solutions
The screen keeps switching on and off.
Check that the cable between the product and the PC is connected correctly.
No Signal is displayed on the screen.
Check that the product is connected correctly with a cable.
Check that the source device connected to the product is powered on.
Depending on the type of external device, the screen may not display
properly. In this case, connect it with the HDMI Hot Plug function turned On.
繁體中文
問題 解決方案
螢幕不斷開啟和關閉。 檢查產品與電腦之間的纜線是否正確連接。
螢幕上顯示
無訊號
檢查產品是否已經使用纜線正確連接。
檢查連接至產品的來源裝置是否已經開啟電源。
根據外部裝置類型,螢幕可能無法正常顯示。
在此情況下,請於
HDMI 熱插拔
功能為
開啟
時進行連接。
Português
Problemas Soluções


A mensagem Sem sinal



Lig.Instantânea HDMI
definida como Ligado.

 
 





.HDMI
Connecting to a PC
Connexion à un PC
Connecting to a Video Device
Connexion à un appareil vidéo
Connecting to MDC
Connexion à MDC
English
For details on how to use the MDC programme,
refer to Help after installing the programme.
The MDC programme is available on the
website.
http://www.samsung.com/displaysolutions
Français
Pour obtenir des détails sur la manière
d'utiliser le programme MDC, reportez-vous à
l'Aide après avoir installé le programme.
Le programme MDC est disponible sur le site Web.
Português
Para obter detalhes sobre como usar o programa MDC,
consulte a Ajuda depois de instalar o programa.

Tiếng Việt




繁體中文
關於如何使用 MDC 程式的詳細資訊,請在
安裝該程式後參見說明。
MDC 程式可在網站上取得。





HDMI 1, HDMI 2, HDMI 3 (ARC), HDMI 4
DP IN
DVI/MAGICINFO IN
DVI/HDMI AUDIO IN
HDMI 1, HDMI 2, HDMI 3 (ARC), HDMI 4
DVI/HDMI AUDIO IN
DVI/PC/MAGICINFO IN
DVI/HDMI AUDIO IN
HDMI 1, HDMI 2, HDMI 3 (ARC), HDMI 4
DP IN
DVI/MAGICINFO IN
DVI/HDMI AUDIO IN
HDMI 1, HDMI 2, HDMI 3 (ARC), HDMI 4
DVI/HDMI AUDIO IN
DVI/PC/MAGICINFO IN
DVI/HDMI AUDIO IN
HDMI 1, HDMI 2, HDMI 3 (ARC), HDMI 4
DP IN
DVI/MAGICINFO IN
DVI/HDMI AUDIO IN
HDMI 1, HDMI 2, HDMI 3 (ARC), HDMI 4
DVI/HDMI AUDIO IN
DVI/PC/MAGICINFO IN
DVI/HDMI AUDIO IN
HDMI 1, HDMI 2, HDMI 3 (ARC), HDMI 4
AUDIO OUT
White
Red
DVI/HDMI AUDIO IN
White
Red
RS232C OUT
LAN
RS232C IN
RS232C OUT
LAN
HUB
RS232C OUT
LAN
RS232C IN
RS232C OUT
LAN
HUB
RS232C OUT
LAN
RS232C IN
RS232C OUT
LAN
HUB
Connecting the LAN Cable
Connexion du câble LAN
English
Use Cat7(*STP Type) cable for the
connection. (10/100 Mbps)
*Shielded Twist Pair
Français
Utilisez le câble Cat 7(type *STP) pour la
connexion. (10/100 Mbit/s)
Português
Utilize um cabo Cat 7 (*tipo STP) para a

Tiếng Việt

(10/100 Mbps)
繁體中文
使用 Cat 7(*STP 類型)纜線進行連接。
(10/100 Mbps)


10/100(
LAN
設備名稱:彩色顯示器
Equipment name
型號(型式):
QP82R-8K / QP98R-8K
Type designation (Type)
單元
Unit
限用物質及其化學符號
Restricted substances and its chemical symbols
Lead
(Pb)
Mercury
(Hg)
Cadmium
(Cd)
六價鉻
Hexavalent
chromium
(Cr
+6
)
多溴聯苯
Polybrominated
biphenyls
(PBB)
多溴二苯醚
Polybrominated
diphenyl ethers
(PBDE)
電路板
O O O O O
外殼
O O O O O
金屬零件
O O O O O
玻璃面板
O O O O O
揚聲器
O O O O O O
配件
(例:線材,
遙控器)
O O O O O
備考1.〝
O
〞係指該項限用物質之百分比含量未超出百分比含量基準值。

of presence.
備考2.〝
〞係指該項限用物質為排除項目。
N

RoHS
Web site: http://www.samsung.com
Contact SAMSUNG WORLD WIDE
Comment contacter Samsung dans le monde
Area Customer Care Centre
ALGERIA 3004
AUSTRALIA 1300 362 603
BAHRAIN 8000-GSAM (8000-4726)
BANGLADESH
09612300300
08000300300 (Toll free)
CAMBODIA
+855-23-993232
1800-20-3232 (Toll free)
CAMEROON 67095 0077
COTE D’ IVOIRE 8000 0077
DRC 499 999
EGYPT
08000-7267864
16580
GHANA 0800 100 077
HONG KONG 3698 4698
INDIA 1800 40 SAMSUNG (1800 40 7267864) (Toll-Free)
INDONESIA
021-5699-7777
0800-112-8888 (Toll Free)
IRAN 021-8255
IRAQ 80010080
ISRAEL *6963
Area Customer Care Centre
JORDAN
0800-22273
06 5777444
KENYA 0800 545 545
KUWAIT 183-CALL (183-2255)
LAOS +856-214-17333
LEBANON 1299
MACAU 0800 333
MALAYSIA
1800-88-9999
+603-7713 7420 (Overseas contact)
MAURITIUS 800 2550
MOROCCO 080 100 22 55
MOZAMBIQUE 84 726 7864
MYANMAR +95-1-2399-888
 
NEPAL
16600172667 (Toll Free for NTC Only)
9801572667
NEW ZEALAND 0800 726 786
NIGERIA 0800 726 7864
OMAN 800-SAM CS (800-72627)
PAKISTAN 0800-Samsung (72678)
Area Customer Care Centre
PHILIPPINES
1-800-10-726-7864 [PLDT Toll Free]
1-800-8-726-7864 [Globe Landline and Mobile]
02- 422-2111 [Standard Landline]
QATAR 800-CALL (800-2255)
 
RWANDA 9999
SAUDI ARABIA (+966) 8002474357 (800 24/7 HELP)
SENEGAL 800 00 0077
SINGAPORE 1800 7267864 | 1800-SAMSUNG
SOUTH AFRICA 0860 SAMSUNG (726 7864)
SRI LANKA +9411SAMSUNG (+94117267864)
SUDAN 1969
TAIWAN
0800-32-9999
0809-00-5237 (B2B / Dealer)
TANZANIA 0800 780 089
THAILAND
0-2689-3232
1800-29-3232 (Toll free)
TUNISIA 80 100 012
U.A.E 800-SAMSUNG (800 - 726 7864)
UGANDA 0800 300 300
VIETNAM 1800 588 889
ZAMBIA 0211 350 370
One Connect
  • Page 1 1
  • Page 2 2

Samsung QP98R-8K クイックセットアップガイド

タイプ
クイックセットアップガイド
このマニュアルも適しています

Samsung QP98R-8K は、4K QLED ディスプレイと Tizen オペレーティングシステムを搭載した 98 インチのスマートテレビです。 Quantum HDR 32x により、よりリアルで鮮やかな視聴体験を提供します。また、オブジェクト トラッキング サウンドと Q-Symphony により、没入感のあるオーディオ体験が得られます。さらに、スマートハブを搭載しており、お気に入りのストリーミングアプリやゲームに簡単にアクセスできます。Samsung QP98R-8K は、映画、テレビ番組、ゲームを楽しむのに最適なテレビです。

  • 量子ドット技術により、純粋な色と深い黒を表現し、より豊かでリアルな画像を実現します。
  • 量子プロセッサー 4Kにより、あらゆるコンテンツを自動的に高画質に変換します。
  • オブジェクト トラッキング サウンドにより、画面上のオブジェクトの位置に応じて音が移動し、まるで映画館にいるかのような臨場