
EN
ZH
MS
TH
Spherical Pot Rice Cooker IH

1 5 6
7
14
9
11
2
3
4
10
15
8
13
12
Fig.1 Fig.2 Fig.3aFig.3b
Fig.4 Fig.5 Fig.6 Fig.7
Fig.12Fig.13Fig.14Fig.15
Fig.16Fig.17Fig.18
Fig.8 Fig.9 Fig.10Fig.11
a
b
MAX.
10cups
10
cups
MAX.
a
b

Fig.1 Fig.2 Fig.3
aF
ig.3b
Fig.4 Fig.5 Fig.6 Fig.7
Fig.12Fig.13Fig.1
4F
ig.15
Fig.16Fig.17Fig.18
Fig.8 Fig.9 Fig.1
0F
ig.11
a
b
MAX.
10cups
10
cups
MAX.
a
b

1
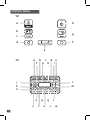
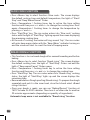
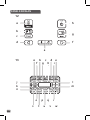
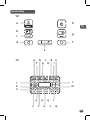
CONTROL PANEL
a
j
k
n
b
c
d
e
h
g
o p q r
s t u v w
c d ea
12
13 b
h if
f
l
m
g

2
EN
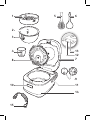
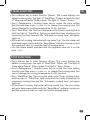
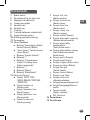
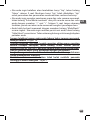
DESCRIPTION
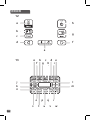
1 Steam basket
2 Graduation for water and rice
3 Removable pot
4 Measuring cup
5 Rice spoon
6 Soup spoon
7 Lid
8 Removable inner lid
9 Micro pressure valve
10 Lid opening button
11 Handle
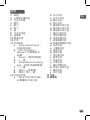
12 Control panel
a “Keep warm/Cancel” key
b “Rice type / Rice texture”
key
c “Preset” key
d “<” key
e “Temperature/Cooking
time” key
f “>” key
g “Menu” key
h “Start/Stop” key
13 Function indicators
a “RICE TYPE/TEXTURE“
function
b White rice function
c Japanese rice function
d Glutinous rice function
e Brown rice function
f Soft rice function
g Normal rice function
h Hard rice function
i Crispy rice function
j Preset function
k Automatic cooking function
l Adjustable temperature
function
m Adjustable cooking time
function
n Quick function
o Small quantity function
p Congee function
q Porridge function
r Clay pot function
s Steam function
t Soup function
u Slow cook function
v Bread rising function
w Baking/Dessert function
x Reheat function
y DIY function
14 Housing
15 Power cord
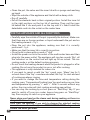
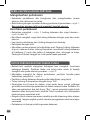
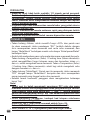
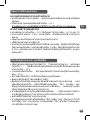
BEFORE THE FIRST USE
Unpack the appliance
• Remove the appliance from the packaging and unpack all the accessories
and printed documents.
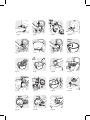
• Open the lid by pushing the opening button on the housing – fig.1.
Read the Instructions and carefully follow the operation method.
Clean the appliance
• Remove the pot – fig.2, the inner lid and the pressure valve – fig.3a and
3b.

3
• Clean the pot, the valve and the inner lid with a sponge and washing
up liquid.
• Wipe the outside of the appliance and the lid with a damp cloth.
• Dry off carefully.
• Put all the elements back in their original position. Install the inner lid
in the right positions on the top lid of machine. Then, put the inner
lid behind the 2 ribs and push it on the top until it’s fixed. Install the
detachable cord into the socket on the cooker base.
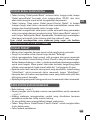
FOR THE APPLIANCE AND ALL FUNCTIONS
• Carefully wipe the outside of the pot (especially the bottom). Make sure
that there are no foreign residues or liquid underneath the pot and on
the heating element – fig.5.
• Place the pot into the appliance, making sure that it is correctly
positioned – fig.6.
• Make sure that the inner lid is correctly in position.
• Close the lid in place with a sound of “click”.
• Install the power cord into the socket of the multicooker base and then
plug into the power outlet. The appliance will ring two sounds “Bip”, all
the indicators on the control box will light up for an instant. The rice
cooking mode is set the default cooking program.
• Do not touch the heating element when the product is plugged or after
cooking. Do not carry the product in use or just after cooking.
• This appliance is only intended for indoor use.
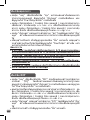
• If you want to cancel or add the “bip” sound, press “Menu” key for 5
seconds. Even if the “bip” sound are cancelled, the “bip” for start and end
of cooking are always ringing.
• If you want to change the time and temperature setting during the
cooking, press “Temperature/Cooking time” key and rechoose your time
and temperature by pressing “<” and “>”. After 5 seconds without any
action, the rice cooker will start cooking according new setting.
• You can stop the cooking by a short press on “Start/Stop” key. If you
want to switch off your rice cooker, have a long press on “Start/Stop”
key. Press any key to switch on your appliance.
Never place your hand on the steam vent during cooking, as there is a
danger of burns – fig.10.
After start the cooking, if you wish to change the selected cooking
menu because of an error, press «KEEP WARM/CANCEL» key and re-
choose the menu you want.

4
EN
Only use the inner pot provided with the appliance.
Do not pour water or put ingredients in the appliance without the pot
inside.
The maximum quantity of water + ingredient should not exceed the
highest mark inside the pot - fig.7.
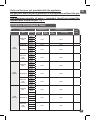
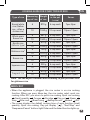
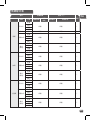
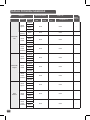
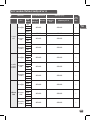
COOKING PROGRAMME TABLE
Programs Cooking Time
Temperature (°C)
Keep
warm
Rice Texture
Default
time
Time
setting
T°C
Default
T°C setting
Rice
cooking
Japanese
Rice
Soft
auto auto *
normal
hard
crispy
Brown rice normal auto auto *
Normal Rice
Soft
auto auto *
normal
hard
crispy
Glutinous
Rice
(sticky)
Soft
auto auto *
normal
hard
crispy
Quick
Cooking
Japanese
Rice
Soft
auto auto *
normal
hard
crispy
Normal Rice
Soft
auto auto *
normal
hard
crispy
Glutinous
Rice
(sticky)
Soft
auto auto *
normal
hard
crispy
Small
quantity
Japanese
Rice
Soft
auto auto *
normal
hard
crispy
Normal Rice
Soft
auto auto *
normal
hard
crispy
Glutinous
Rice
(sticky)
Soft
auto auto *
normal
hard
crispy

5
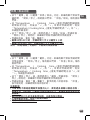
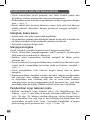
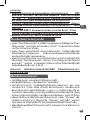
• Before cooking, measuring the rice with measuring cup and rinse it
except risotto rice.
• Put the rinsed rice well distributed around the whole surface of the pot.
Fill it with water to the corresponding water level (The graduations in
cups).
• When the rice is ready, when the “Keep Warm” indicator light is on, stir
the rice and then leave it in the rice cooker for a few minutes longer in
order to get perfect rice with separated grains.
This table below gives a guide to cook rice :
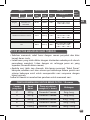
RECOMMENDATIONS FOR BEST RICE COOKING
COOKING GUIDE FOR WHITE RICE - 10 cups
Measuring
cups
Weight of
rice
Water level in the
pot (+ rice)
Serves
2 300 g 2 cup mark 3pers.-4pers.
4 600 g 4 cup mark 5pers.-6pers.
6 900 g 6 cup mark 8pers.-10pers.
8 1200 g 8 cup mark 13pers.-14pers.
10 1500 g 10 cup mark 16pers.-18pers.
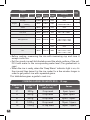
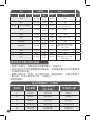
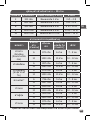
Programs Cooking Time
Temperature (°C)
Keep
warm
Rice Texture
Default
time
Time
setting
T°C
Default
T°C setting
Congee 60min
10min-2h
auto auto *
Porridge
1h30min
5min-2h auto auto *
Claypot
stir fry + automatic rice
cooking
10min 2-20min 120°C
100°C/110°C/120°C/
130°C/140°C/150°C
*
Steam 30min
5min -3h
auto auto *
Soup 50min
10min-3h
auto auto *
Slow cook 60min
20min-9h
90°C 80°C / 90°C /100°C *
Bread rising 30min 5min-9h auto auto
Baking/Dessert 45min 5min-9h 130°C
40°C / 60°C /80°C /100°C
110°C/120°C / 130°C
140°C / 150°C / 160°C
Reheat
20min 5min-1h
100°C
80°C / 100°C *
Keep warm auto auto
auto auto *
DIY
30min 5min-9h
100°C
40°C / 60°C /80°C /100°C
110°C/120°C / 130°C
140°C / 150°C / 160°C

6
EN
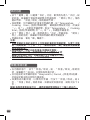
• When the appliance is plugged, the rice cooker is on rice cooking
function. When you press Menu key, the rice cooker select quick rice
cooking. After DIY, you return to quick rice cooking. Quick rice cooking
Small quantity Congee Porridge Clay pot Steam
Soup Slow cook Bread rising Baking/Dessert Reheat DIY
• The screen displays the default cooking time of each function (Small
quantity, Quick rice cooking, Clay pot display “ ”), “Start/Stop” and
“Keep warm/Cancel” buttons light flicker and the linked function lights up.
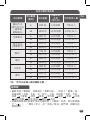
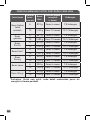
* Note : You can adjust the water level according to your personal taste
for glutinous rice.
MENU KEY
COOKING GUIDE FOR OTHER TYPES OF RICE
Type of rice
Measuring
cup of rice
Weight
of rice
Water level
in the pot
(+ rice)
Serves
Round white
rice (Italian
rice - often a
stickier rice)
6 870 g 6 cup mark 7per.-8per.
10 1450 g 10 cup mark 10pers-12pers
Whole grain
Brownrice
6 887 g 6 cup mark 7per.-8per.
10 1480 g 10 cup mark 10pers-12pers
Risotto rice
(Arboriotype)
6 870 g 6 cup mark 7per.-8per.
10 1450 g 10 cup mark 10pers-12pers
Glutinous rice*
6 736 g 5 cup mark 7per.-8per.
10 1227 g 9 cup mark 10pers-12pers
Brown rice
6 840 g 6 cup mark 7per.-8per.
10 1400 g 10 cup mark 10pers-12pers
Japanese rice
6 900 g 6 cup mark 7per.-8per.
10 1500 g 10 cup mark 10pers-12pers
Fragrant rice
6 870 g 6 cup mark 7per.-8per.
10 1450 g 10 cup mark 10pers-12pers

7
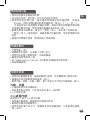
• Place the appliance on a flat, stable, heat-resistant work surface away
from water splashes and any other sources of heat.
• The rice function is set as the default function when the appliance is
plugged. The screen displays “ ” and the light of “Start/Stop” and
“Keep warm/Cancel” flicker.
• Pour the required quantity of rice into the pot using the measuring cup
provided – fig.8. Then fill with cold water up to the corresponding «CUP»
mark printed in the pot – fig.9.
• Close the lid.
Note: Always add the rice first otherwise you will have too much water.
A type of rice can be selected for rice cooking function: Japanese rice,
White rice, Glutinous rice and Brown rice.
• Press the “Rice type/Rice texture” key to enter into rice type selection.
Then press “<” and “>” to choose the desired type of rice. The text will
flash accordingly;
• The default rice type is White rice if you do not set one.
• If you need to change the rice texture, press again the “Rice type/Rice
texture” key to enter into rice texture selection. Press «<» and «>» to
change the rice texture.
A texture of rice can be selected for rice cooking functions: Soft, Normal,
Hard and Crispy. For Brown rice, only normal texture is available.
• The default rice texture is Normal if you do not set one.
Press “Start/Stop” key, the rice cooker enters into «Rice» cooking status,
the light of «Start» lights up, the screen flickers “ ”. The “Automatic
cooking” pictogram lights up.
• At the end of cooking, the buzzer will ring several “bip”, the rice cooker
will enter keep warm status with the “Keep Warm” indicator turning on
and the screen will start to count the time of keeping warm.
RICE COOKING FUNCTION : RICE TYPE / RICE TEXTURE KEYS
QUICK FUNCTION
• Press «Menu» key to select function «Quick». The screen displays “ ”,
the light of “Start/Stop” and “Keep warm/Cancel” flicker. The default rice
type is White rice. You can change it by pressing “Rice type” key and
“<” or “>” to select the rice type. You can also change the texture by
pressing again “Rice type/ Rice Texure” key and “<” or “>”. Then press
“Start/Stop” key. The rice cooker enters into «Quick» cooking status, the
light of “Start/Stop” lights up, the screen flickers “ ”.

8
EN
SMALL QUANTITY
• Press «Menu» key to select function «Small quantity». The screen displays
“ ”, the light of “Start/Stop” and “Keep warm/Cancel” flicker. The default
rice type is White rice. You can change it by pressing “Rice type” key and “<”
or “>” to select the rice type. You can also change the texture by pressing
again “Rice type/ Rice Texure” key and “<” or “>”. Then press “Start/Stop”
key. The rice cooker enters into «Small quantity» cooking status, the light of
“Start/Stop” lights up, the screen flickers “ ”.
• At the end of cooking, the buzzer will ring three “bip”, the rice cooker will
enter keep warm status with the “Keep Warm” indicator turning on and
the screen will start to count the time of keeping warm.
Brown rice is not available for “Small quantity” function.
CONGEE FUNCTION
• Press «Menu» key to select function «Congee». The screen displays the
default cooking time, the light of “Start/Stop” flickers red. The light of
“Keep warm/Cancel” flickers green. The light of “Congee” flickers.
• Press «Temperature / Cooking time» key to active the time setting
function and then press «<» and «>» to change the cooking time. You
cannot change the cooking temperature for this function.
• Press “Start/Stop” key. The rice cooker enters into «Congee» cooking
status with the light of “Start/Stop” lighting up and the screen
displaying the remaining cooking time and the “Automatic cooking
time” pictogram lights up.
• At the end of cooking, the buzzer will ring several “bip”, the rice cooker
will enter keep warm status with the “Keep Warm” indicator turning on
and the screen will start to count the time of keeping warm.
• At the end of cooking, the buzzer will ring several “bip”, the rice cooker
will enter keep warm status with the “Keep Warm” indicator turning on
and the screen will start to count the time of keeping warm.
Brown rice is not available for “Quick” function.

9
CLAYPOT FUNCTION
• This function have 2 steps of cooking.
– First step is to stir fry meat or vegetable
– Second step is an automatic rice cooking
• Press menu key to select Clay pot. The screen show the default time and
default temperature of the first step of cooking, the light of «Start/Stop»
and “Keep Warm/Cancel” flicker.
• If needed, press «Temperature/Cooking time» key to active the time
setting function of stir fry and then press «<» and «>» to change the
cooking time. Press again «Temperature/Cooking time» to change the
temperature by pressing «<» and «>». Then press «Start/Stop» key. The
rice cooker enters into «Clay pot» cooking status with the light of «Start/
Stop» lighting up and the screen displaying the remaining cooking time
and the cooking temperature.
• At the end of stir fry, the rice cooker bip several times, the light of “Start/
Stop” flickers and the screen displays “ ”.
• Then put the rice in the bowl, close the lid and press “Start/Stop” key,
the rice cooker enters into automatic rice cooking status. The light of
“Start/Stop” lights up, the “ ” flickers and the “Automatic cooking
time” pictogram lights up.
• At the end of cooking, the buzzer will ring several “bip”, the rice cooker
will enter keep warm status with the “Keep Warm” indicator turning on
and the screen will start to count the time of keeping warm.
PORRIDGE FUNCTION
• Press «Menu» key to select function “Porridge”. The screen displays the
default cooking time, the light of “Start/Stop” flickers red. The light of
“Keep warm/Cancel” flickers green. The light of “Porridge” flickers.
• Press «Temperature / Cooking time» key to active the time setting
function and then press «<» and «>» to change the cooking time. You
cannot change the cooking temperature for this function.
• Press “Start/Stop” key. The rice cooker enters into «Porridge» cooking
status with the light of “Start/Stop” lighting up and the screen
displaying the remaining cooking time and the “Automatic cooking
time” pictogram lights up.
• At the end of cooking, the buzzer will ring several “bip”, the rice cooker
will enter keep warm status with the “Keep Warm” indicator turning on
and the screen will start to count the time of keeping warm.

10
EN
STEAM FUNCTION
SOUP FUNCTION
• Press «Menu» key to select function “Steam”. The screen displays the
default cooking time, the light of “Start/Stop” flickers red and the light
of “Keep warm/Cancel” flickers green. The light of “Steam” flickers.
• Press «Temperature / Cooking time» key to active the time setting
function and then press «<» and «>» to change the cooking time. You
cannot change the cooking temperature for this function.
• Press “Start/Stop” key. The rice cooker enters into «Steam» cooking status
with the light of “Start/Stop” lighting up and the screen displaying the
remaining cooking time and the “Automatic cooking time” pictogram
lights up.
• At the end of cooking, the buzzer will ring sevral “bip”, the rice cooker will
enter keep warm status with the “Keep Warm” indicator turning on and
the screen will start to count the time of keeping warm.
• Use the steam basket provided with the appliance and put it on the
bowl - fig.4.
• Press «Menu» key to select function «Soup». The screen displays the
default cooking time, the light of “Start/Stop” flickers red. The light of
“Keep warm/Cancel” flickers green. The light of “Soup” flickers.
• Press «Temperature / Cooking time» key to active the time setting
function and then press «<» and «>» to change the cooking time. You
cannot change the cooking temperature for this function.
• Press “Start/Stop” key. The rice cooker enters into «Soup» cooking status
with the light of “Start/Stop” lighting up and the screen displaying the
remaining cooking time and the “Automatic cooking time” pictogram
lights up.
• At the end of cooking, the buzzer will ring several “bip”, the rice cooker
will enter keep warm status with the “Keep Warm” indicator turning on
and the screen will start to count the time of keeping warm.

11
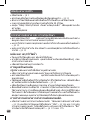
BREAD RISING FUNCTION
• This function is to rise bread dough after manual kneading and before
baking.
• Press «Menu» key to select function “Bread rising”. The screen displays
the default cooking time, the light of “Start/Stop” flickers red and the
light of “Keep warm/Cancel” flickers green.
• Press «Temperature / Cooking time» key to active the time setting
function and then press «<» and «>» to change the cooking time.
• Press “Start/Stop” key. The rice cooker enters into “Bread rising” cooking
status, the light of “Start/Stop” lights up and the screen displays the
remaining time.
• Recommendations Dough proofing (Bread rising): To prepare the dough
separately and put it in the inner bowl, close the lid and select «Bread
rising» function.
• Once your dough is ready, you can use “Baking/Dessert” function at
160°C to bake for 20-25 minutes. Then turn it on other side for another
25 minutes approximate (depending on quantity of ingredients).
Automatic keep warm is not available for “Bread rising” function.
SLOW COOK FUNCTION
• Press «Menu» key to select function «Slow cook». The screen displays
the default cooking time and default temperature, the light of “Start/
Stop” and “Keep Warm/Cancel” flicker.
• Press «Temperature / Cooking time» key to active the time setting
function and then press «<» and «>» to change the cooking time. Press
again «Temperature / Cooking time» to change the temperature by
pressing «<» and «>».
• Press “Start/Stop” key. The rice cooker enters into “Slow cook” cooking
status with the light of “Start/Stop” lighting up and the screen displaying
the remaining cooking time.
• At the end of cooking, the buzzer will ring several “bip”, the rice cooker
will enter keep warm status with the “Keep Warm” indicator turning on
and the screen will start to count the time of keeping warm.

12
EN
REHEAT FUNCTION
• Press «Menu» key to select function «Reheat». The screen displays the
default cooking time and default temperature, the light of “Start/Stop”
flickers red and the light of “Keep warm/Cancel” flickers green.
• Press «Temperature / Cooking time» key to active the time setting function and
then press «<» and «>» to change the cooking time. Press again «Temperature
/ Cooking time» to change the temperature by pressing «<» and «>».
• Press “Start/Stop” key. The rice cooker enters into “Reheat” cooking
status with the light of “Start/Stop” lighting up and the screen displaying
the remaining cooking time and the cooking temperature.
• At the end of cooking, the buzzer will ring several “bip”, the rice cooker
will enter keep warm status with the “Keep Warm” indicator turning on
and the screen will start to count the time of keeping warm.
CAUTION
• The cold food should not exceed 1/2 of the cooker’s volume. Too
much food cannot be thoroughly heated. Repeated use of “Reheat”
or too little food will lead to burnt food and hard layer at the bottom.
• It is recommended not to reheat thick porridge, or it may become pasty.
• Do not reheat long-stored cold food to avoid smell.
• It is recommended to stir the food during reheat.
BAKING/DESSERT FUNCTION
• Press «Menu» key to select function “Baking/Dessert”. The screen
displays the default cooking time, the light of “Start/Stop” flickers red
and the light of “Keep warm/Cancel” flickers green.
• Press «Temperature / Cooking time» key to active the time setting
function and then press «<» and «>» to change the cooking time. Press
again «Temperature / Cooking time» to change the temperature by
pressing «<» and «>».
• Press “Start/Stop” key. The rice cooker enters into “Baking/Dessert”
cooking status with the light of “Start/Stop” lighting up and the screen
displaying the remaining cooking time and the cooking temperature.
• At the end of cooking, the buzzer will ring several “bip”.
• Between 40-100°C, the cooking time range is 5min -9h
• Between 110-160°C, the cooking time range is 5min -2h
Automatic keep warm is not available for “Baking/Dessert” function.

13
DIY FUNCTION
• Press “Keep warm/Cancel” key under standby status, the light of “Keep
warm/Cancel” lights up, the screen shows “00:00” and the screen will
start to count the time of keeping warm.
• Press “Keep warm/Cancel” key under function setting or cooking status
will cancel all setting data and back to standby status.
• You can remove the automatic keep warm for the next cooking only by
pressing the “Keep warm/Cancel” key for 5 seconds. The light of “Keep
warm/ Cancel” light off. If you want to set automatic keep warm, press
again the key for 5 seconds.
Recommendation: in order to keep the food in good taste, please limit
the holding time within 12h.
KEEP WARM/CANCEL FUNCTION
• Press «Menu» key to select function «DIY» and the rice cooker will first
enter “DIY” setting status with the screen displaying the default cooking
time and the cooking temperature, and the light of “Start/Stop” flickers
red and the light of “Keep warm/Cancel” flickers green.
• You can adjust a constant temperature level and cooking time if
needed. Press «Temperature / Cooking time» key to active the time
setting function and then press «<» and «>» to change the cooking time.
Press again «Temperature / Cooking time» to change the temperature
by pressing «<» and «>».
• Press “Start/Stop” key. The rice cooker enters into “DIY” cooking status
with the light of “Start/Stop” lighting up and the screen displaying the
remaining cooking time and the cooking temperature.
• At the end of cooking, the buzzer will ring several “bip”.
Note:
• The rice cooker can memorize the last temperature and cooking
time DIY setting for your next use. After a simultaneous long press
on both “<” and “>” the rice cooker “bip” and come back to default
temperature and default cooking time.
• To protect the appliance, there is a temperature/time setting
restriction in DIY function :
Between 40-100°C, the cooking time range is 5min -9h
Between 110-160°C, the cooking time range is 5min -2h
• Temperature (variances +/-10°C) can be expected at times.

14
EN
• To ensure the rice cooker is unplugged and completely cooled down
before cleaning and maintenance.
• It is strongly advised to clean the appliance after each use with a
sponge – fig.12.
• The pot, the steam basket, the inner lid, the cup and the rice and soup
spoons are dishwasher safe - fig.13.
Pot, steam basket
• Scouring powders and metal sponges are not recommended.
• If food has stuck to the bottom, you may put water in the pot to soak
for a while before washing.
• Dry the pot carefully.
CLEANING AND MAINTENANCE
• The preset time corresponds to the time for end of cooking.
• This function is available for all functions except “Clay pot”.
• To use the preset function, choose a cooking program and the cooking
time first. Then, press the key «Preset» and choose the delayed time.
Each press of «<» and «>» key can increase or decrease delayed start
time. The default preset time will change depending on the selected
cooking time. The Range of preset is from 1 up to 24 hours.
• When you have chosen the required preset time, press the “Start/Stop”
key to enter cooking status, the light of “Start/Stop” lights up and screen
will display the number of time you have chosen and preset pictogram
lights up.
• When preset pictogram diseappears the rice cooker enters into cooking
status.
PRESET FUNCTION
• Open the lid – fig.1.
• Glove must be used when manipulating the cooking pot – fig.11.
• Serve the food using the spoon provided with your appliance and reclose
the lid.
• 24 hours is the maximum keeping warm time.
• Press “Keep warm/Cancel” to stop the keep warm status.
• Unplug the appliance.
ON COMPLETION OF COOKING

15
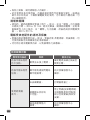
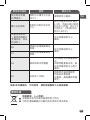
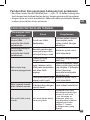
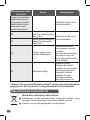
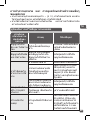
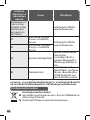
TECHNICAL TROUBLESHOOTING GUIDE
Malfunction
description
Causes Solutions
Any indicator lamp
off and no heating.
Rice cooker not plugged.
Verify the main plug is well
engaged in the product body.
Any indicator lamp
off and heating.
Problem of the connection
of the indicator lamp or
indicator lamp is damaged.
Send to authorized service
center for repair.
Steam leakage
during using.
Lid is badly closed. Open and close again the lid.
Micro pressure valve
not well positioned or
uncomplete.
Stop the cooking (unplug the
product) and check the valve
is complete (2parts locked
together) and well positioned.
Lid or micro pressure valve
gasket is damaged.
Send to authorized service
center for repair.
Taking care of the pot
For the pot, carefully follow the instructions below:
• To ensure the maintenance of pot quality, it is recommended not to cut
food in it.
• Make sure you put the pot back into the rice cooker.
• Use the plastic spoon provided or a wooden spoon and not a metal type
so as to avoid damaging the pot surface – fig.14.
• To avoid any risk of corrosion, do not pour vinegar into the pot.
• The color of the pot surface may change after using for the first time or
after longer use. This change in color is due to the action of steam and
water and does not have any effect on the use of the rice cooker, nor
is it dangerous for your health. It is perfectly safe to continue using it.
Cleaning the micro pressure valve
• When clean the micro-pressure valve, please remove it from the lid –
fig.15 and open it by rotating in the direction of “open” – fig.16a and
16b. After cleaning it, please wipe dry it and meet the two triangle in
the two parts together and rotate it in the direction of “close”, then put
it back to the lid of the rice cooker – fig.17a and 17b.
Cleaning and care of the other parts of the appliance
• Clean the outside of the Rice Cooker – fig.18, the inside of the lid and
the cord with a damp cloth and wipe dry. Do not use abrasive products.
• Do not use water to clean the interior of the appliance body as it could
damage the heat sensor.

16
EN
Malfunction
description
Causes Solutions
Rice half cooked or
overtime cooking.
Too much or not enough water
compared to rice quantity.
Refer to table for water
quantity.
Glutinous rice not
enough cooked.
Rice has been opened for a
long time.
Soak the quantity of rice
wished separately during
30 minutes to 1hour, remove
the water of soaking, put the
soaked rice into the bowl and
put 1.1 cup of water by cup
of rice wished in the bowl.
Automatic warm-
keeping fails
(product stay in
cooking position,
or no heating).
Send to the authorized
service center for repair.
E0
The sensor on the top
open circuit or short circuit.
Send to the authorized
service center for repair.
E1
The sensor on the bottom
open or short circuit.
E4
High or low voltage
detected.
Stop the appliance and
restart the program.
If the problem repeats,
please send to the authorized
service center for repair
E5 Missing bowl.
Put the inner pot inside the
appliance, then unplug and
re-plug the appliance and
finally restart the program.
ENVIRONMENTAL PROTECTION
Help protect the environment!
Your appliance contains a number of materials that may be
recovered or recycled.
Leave it at a local civic waste collection point.
Remark: If inner pot is deformed, do not use it anymore and get a
replacement from the authorized service center for repair.

17
控制版面
a
j
k
n
b
c
d
e
h
g
o p q r
s t u v w
c d ea
12
13 b
h if
f
l
m
g
ページが読み込まれています...
ページが読み込まれています...
ページが読み込まれています...
ページが読み込まれています...
ページが読み込まれています...
ページが読み込まれています...
ページが読み込まれています...
ページが読み込まれています...
ページが読み込まれています...
ページが読み込まれています...
ページが読み込まれています...
ページが読み込まれています...
ページが読み込まれています...
ページが読み込まれています...
ページが読み込まれています...
ページが読み込まれています...
ページが読み込まれています...
ページが読み込まれています...
ページが読み込まれています...
ページが読み込まれています...
ページが読み込まれています...
ページが読み込まれています...
ページが読み込まれています...
ページが読み込まれています...
ページが読み込まれています...
ページが読み込まれています...
ページが読み込まれています...
ページが読み込まれています...
ページが読み込まれています...
ページが読み込まれています...
ページが読み込まれています...
ページが読み込まれています...
ページが読み込まれています...
ページが読み込まれています...
ページが読み込まれています...
ページが読み込まれています...
ページが読み込まれています...
ページが読み込まれています...
ページが読み込まれています...
ページが読み込まれています...
ページが読み込まれています...
ページが読み込まれています...
ページが読み込まれています...
ページが読み込まれています...
ページが読み込まれています...
ページが読み込まれています...
ページが読み込まれています...
ページが読み込まれています...
ページが読み込まれています...
ページが読み込まれています...
ページが読み込まれています...
ページが読み込まれています...
ページが読み込まれています...
-
 1
1
-
 2
2
-
 3
3
-
 4
4
-
 5
5
-
 6
6
-
 7
7
-
 8
8
-
 9
9
-
 10
10
-
 11
11
-
 12
12
-
 13
13
-
 14
14
-
 15
15
-
 16
16
-
 17
17
-
 18
18
-
 19
19
-
 20
20
-
 21
21
-
 22
22
-
 23
23
-
 24
24
-
 25
25
-
 26
26
-
 27
27
-
 28
28
-
 29
29
-
 30
30
-
 31
31
-
 32
32
-
 33
33
-
 34
34
-
 35
35
-
 36
36
-
 37
37
-
 38
38
-
 39
39
-
 40
40
-
 41
41
-
 42
42
-
 43
43
-
 44
44
-
 45
45
-
 46
46
-
 47
47
-
 48
48
-
 49
49
-
 50
50
-
 51
51
-
 52
52
-
 53
53
-
 54
54
-
 55
55
-
 56
56
-
 57
57
-
 58
58
-
 59
59
-
 60
60
-
 61
61
-
 62
62
-
 63
63
-
 64
64
-
 65
65
-
 66
66
-
 67
67
-
 68
68
-
 69
69
-
 70
70
-
 71
71
-
 72
72
-
 73
73


