
使用说明 ..................................... 5
Operating Instructions .............. 10
SB 710
SBE 701 SP
SBE 710
SBE 751
SBE 900 Impuls
SBE 1000
SBE 1100 Plus
170 26 9710 - 0610
IP3099_SB710_SBE701SP_Cov_01_1001 1IP3099_SB710_SBE701SP_Cov_01_1001 1 2010-6-9 10:50:172010-6-9 10:50:17

2
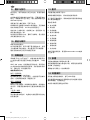
EN 60745
2006/42/EG, 2004/108/EG
SB 710
SBE 701 SP
SBE 710
SBE 751
SBE 900 Impuls
SBE 1000
SBE 1100 Plus
P
1
W
710 710 750 900 1000 1100
P
2
W
420 420 450 550 620 660
n
1
/min
1
1000 0-1000 0-800 0-900
2
3100 0-3100 0-2700 0-2800
n
2
/min
1
600 800 800 900
2
1800 2300 2700 2800
ø max.
mm
(in)
2
20
(3/4“)
s max.
/min.
bpm
2
59000 51000 53000
ø max.
mm
(in)
1
40 (1 9/16“)
2
25
(1“)
ø max.
mm
(in)
1
13
(1/2“)
16
(5/8“)
16
(5/8“)
2
8
(5/16“)
b
mm
(in)
1,5-13
(1/16“-
1/2“)
1,0-13
(1/32“-
1/2“)
1,5-13
(1/16“-
1/2“)
1,0-13
(1/32“-
1/2“)
G
UNF
(in)
1/2“-20
H
mm
(in)
6,35
(1/4“)
m
kg
lbs
2,5
(5.5)
2,6
(5.7)
2,7
(5.9)
2,8
(6.1)
D
mm
(in)
43
(1 11/16“)
a
h,ID
/k
h,ID
m/s
2
18/1,5 18/1,5 18/1,5 18/1,5 18/1,5 18/1,5
a
h,D
/k
h,D
m/s
2
4/1,5 4/1,5 4/1,5 4/1,5 4/1,5 4/1,5
L
pA
/K
pA
dB(A)
100 / 3 100 / 3 100 / 3 100 / 3 100 / 3 100 / 3
L
WA
/K
WA
dB(A)
111 / 3 111 / 3 111 / 3 111 / 3 111 / 3 111 / 3
Director Innovation, Research and Development
Responsible Person for Documentation
© 2010 Metabowerke GmbH, 72622 Nürtingen, Germany
Volker Siegle
14
IP3099_SB710_SBE701SP_Cov_01_1002 2IP3099_SB710_SBE701SP_Cov_01_1002 2 2010-6-9 10:50:182010-6-9 10:50:18

3
1
min
1
min
1
min
L
R
0
1
2
3
4
5
6
7
8
8
8910
11
12
13
SBE 900 Impuls
SBE 1100 Plus
SBE 1000
SB 710
SBE 701 SP
SBE 710
SBE 751
SBE 701 SP
SBE 710
SBE 751
B
A
C
-3-
-3-
-3-
-3-
-1-
-1-
-1-
-1-
-2-
-1-
-2-
-2-
-3-
-3-
-3--1-
-1-
IP3099_SB710_SBE701SP_Cov_01_1003 3IP3099_SB710_SBE701SP_Cov_01_1003 3 2010-6-9 10:50:182010-6-9 10:50:18

4
A B C D E F G
1000 1200 1500 1800 2100 2400 2700
300 400 500 600 700 750 800
±50 ±40 ±30 ±20 ±15 ±10 ±10 %
A B C D E F
700 1000 1500 2000 2500 3100
250 350 500 650 800 1000
±50 ±40 ±30 ±20 ±15 ±10 %
A B C D E F G
1000 1200 1500 1800 2100 2400 2700
300 400 500 600 700 750 800
±50 ±40 ±30 ±20 ±15 ±10 ±10 %
A B C D E F G
450 700 1000 1500 2000 2500 2800
150 200 350 500 600 750 900
±50 ±40 ±30 ±20 ±15 ±10 ±10 %
ø
mm
4 G G F F
6 E F F F
8 E E F F
10 D D F F
13 C G F F
16 F F
20 F
30 F
40 F
ø
mm
4 G G F F
6 E F F F
8 E E F F
10 D D F F
13 C G F F
16 F F
20 F
30 F
40 F
ø
mm
ø
mm
4 F F F F
6 E F F F
8 E E F F
10 D D F F
13 C F F F
16 F F
20 F
30 F
40 F
ø
mm
4 G G F F
6 E F F F
8 E E F F
10 D D F F
13 C G F F
16 F F
20 F
30 F
40 F
ø
mm
4 G G F F
6 E F F F
8 E E F F
10 D D F F
13 C G F F
16 F F
20 F
30 F
40 F
SBE 900 Impuls
SBE 701 SP
SBE 710
SBE 751
SBE 1000
SBE 1100 Plus
6.23598 6.31078 6.27608
6.30554
6.30550
6.30551
a=80 mm
b=80 mm
6.27106
a=100
b=100
6.12001
a=86
b=80
6.12003
6.30552
6.30553
50 x 20 mm: 6.31110
60 x 30 mm: 6.31111
60 x 40 mm: 6.31112
6.31281
6.00890
l = 1,2 m
SBE 900 Impuls
SBE 701 SP
SBE 710
SBE 751
SBE 1100 Plus
SBE 1000
D
C
B
A
E
G
H
I
J
F
IP3099_SB710_SBE701SP_Cov_01_1004 4IP3099_SB710_SBE701SP_Cov_01_1004 4 2010-6-9 10:50:182010-6-9 10:50:18

5
目录
1 一致性声明
2 规定用途
3 一般安全规则
4 特殊安全规则
5 概述
6 产品特性
7 初始操作
8 使用
9 提示与技巧
10 清洁与维护
11 故障排除
12 配件
13 修理
14 环境保护
15 技术规格
1 一致性声明
作为唯一责任人,我们特此声明,本产品符合第
2页所列指令和标准。
2 规定用途
该机器适用于对金属、木材、塑料及类似材料的非
冲击式钻孔,及混凝土、石材及其它类似材料的
冲击式钻孔。此外,还适用于攻丝、钉入螺钉(SB
710除外)。
因使用不当造成的损坏责任由用户自负。
必须遵守通用事故预防规章和随附的安全资料。
3 一般安全规则
警告-仔细阅读该使用说明可减少损伤危
险。
警告-请仔细阅读所有安全警告及说明。
若不遵守,可引起电击、火灾和/或严重
损伤。
使用说明
亲爱的用户:
感谢您对本公司的信任,购买麦太保电动工具!每一台麦太保电动工具都已经过麦太保质保部门详细的检
验测试及严格的质量控制。然而,电动工具的使用寿命与您如何来使用它是息息相关的。因此请您务必注
意本说明书及随附文件所提供的信息。当您使用麦太保电动工具时越细心、越得法,它为您效力的时间也
就越长。
请妥善保存所有安全说明以备日后参考。
在使用本电动工具前,请先仔细通读和熟悉随附的
所有安全资料和使用说明。妥善保管所有随附文件
以备日后参考,如需转交电动工具,必须将这些文
件一同转交。
4 特殊安全规则
为了您的安全及保护您的电动工具,请
特别注意有此警示标志的地方!
使用冲击钻时必须戴护耳器。暴露于噪音环境中可
能会导致失聪。
必须使用随附的辅助手柄。工具失控会导致人员伤
害。
如果工作时使用的切割配件有可能接触隐藏电线或
工具本身的电线时,一定要握着绝缘手柄操作工
具。若切割配件接触了“带电”的线路,可能导致
电动工具的金属部位也“带电”,并可能使操作者
遭到电击。
在进行任何调整或维修工作前,先从插座中拔出插
头。
避免无意启动:在工具没有插上电源或断电的情
况下,始终断开触发开关。SBE1000,SBE1100
Plus(带重启保护功能)的无此要求。
确保您要使用本工具的地方没有铺设电源电缆,煤
气管道或水管(例如:可使用金属探测器检测)。
固定小工件(例如,可使用老虎钳夹紧或用螺丝钳
固定于工作台),避免钻头钻孔时小工件发生移
动。
请勿用双手接触正在旋转的电动工具!只可在机器
静止时清理碎屑和类似物质。
麦太保S自动安全离合器。如果安全离合器发出信
号,请立即关闭电动工具!如果插入的工具阻塞或
卡住,发动机的电流大小将会被限制。由于此时会
产生巨大扭力,请始终用双手紧握机器的手柄处,
站稳,专心工作。
麦太保S自动安全离合器不可用于扭矩控制。
IP3099_SB710_SBE701SP_Chi_02_1005 5IP3099_SB710_SBE701SP_Chi_02_1005 5 2010-6-8 14:29:522010-6-8 14:29:52

6
将螺钉钉入硬质材料(将米制或英制螺钉钉入钢材
内)时,必须特别小心!因为螺钉头部可能会断
裂,手柄处也可能会产生很大的反向扭矩。
含铅的涂漆材料、特定品种的木材、矿物材料和金
属产生的粉尘对人体健康有害。接触或吸入此类粉
尘,可能导致操作者或旁观者发生过敏反应,和/
或引起呼吸道疾病。某些粉尘属于致癌物质,如橡
木和山毛榉粉尘,尤其当混合使用了处理木材的添
加剂时(如:铬酸盐、木材防腐剂)。含有石棉的材
料必须由专业人员使用。
- 工作场所若能安装吸尘装置,请务必安装。
- 工作区域需保持良好通风。
- 推荐使用过滤等级P2的防尘口罩。
您所处理的材料,如有相关国家规定,请务必遵
循。
5 概述
参见第3页(请翻到此页)。
1 拇指旋轮(变档选择)
2 辅助手柄/带减振功能的辅助手柄*
3 限深器
4 齿轮夹头*
5 Futuro Plus自紧式夹头*
6 Futuro Top自紧式夹头*
7 滑动开关(在正常钻/冲击钻之间切换)
8 速度预选设定轮*
9 设定轮(设定扭矩控制和脉冲功能)*
10 电信号指示灯*
11 旋转方向选择器开关*
12 持续启动锁定按钮
13 触发开关
* 依机器型号而定
6 产品特性
麦太保S自动安全离合器:
如果插入的工具阻塞或卡住,发动机的电流大小将
会被限制。由于此时会产生巨大扭力,请始终用双
手紧握机器的手柄处,站稳,专心工作。
自动停止碳刷:
当碳刷完全磨损时,机器将自动关闭。
SBE 1100 Plus:当碳刷完全磨损时,LED灯将发出
警告。
重启保护:
(SBE 1100 Plus, SBE 1000)
重启保护功能可以防止工具重新插入电源及断电后
恢复电源时无意启动。
过载保护装置:
(SBE 1100 Plus)
即将过载时,过载保护指示灯会发出警告。
麦太保脉冲模式:
(SBE 900 Impuls)
可轻松旋出卡住螺钉,即使螺丝头损坏。可对瓷
砖、铝或其它材料进行准确定心,无需中心冲孔。
电扭矩控制:
(SBE 900 Impuls)
当使用小直径丝锥钉入小螺钉或攻丝时,扭矩可减
小到适合当前工作的值。
7 初始操作
在接上电源前,请查看额定主电压及主频率
(标示在额定值标签上)是否与供应电源相吻
合。
7.1 安装辅助手柄(2)
为保证安全,请始终使用提供的辅助手柄。
逆时针旋转辅助手柄(2),以打开卡环。将辅助手柄
安装在机器的轴环上。插入限深器(3)。将辅助手柄
充分向前滑动到位,直至手柄可以转动。将辅助手
柄调整到所需角度并拧紧。
8 使用
8.1 调整限深器
松开辅助手柄(2)。设置限深器(3)至所需的钻孔深
度,然后重新紧固辅助手柄(2)。
8.2 旋转方向选择,运转锁定(开启状态锁定)
(SB 710除外)
除非电机完全停止,否则不得触发旋转选择
器开关(11)。
参见第3页(请翻到此页)。
R = 顺时针设定
L = 逆时针设定
0 = 中央位置:运转锁定设定(开启状态锁定)
8.3 设定正常钻和冲击钻
按滑动开关(7)。
= 冲击钻
= 正常钻(非冲击钻)
IP3099_SB710_SBE701SP_Chi_02_1006 6IP3099_SB710_SBE701SP_Chi_02_1006 6 2010-6-8 14:29:532010-6-8 14:29:53

7
注: 冲击钻和正常钻只可选择顺时针方向旋转
注: 冲击钻时,选择高速度:请通过拇指旋轮
(1)选择二档。
8.4 档位选择
转动拇指旋轮(1),选择所需档位。
只有机器完全静止时才能改变档位(再立即重新启
动)。
档位(低速,高扭矩)例如钉入螺钉,正常钻
档位(高速)例如正常钻、冲击钻
8.5 速度预选
(SB 710除外)
使用设定轮(8)预选最大转速。参见第4页推荐钻
速。
8.6 扭矩控制设定
(SBE 900 Impuls)
一达到预设扭矩,电机就会自动停止。通过设定轮
(9)进行调整(位置1-6):
1 = 一达到某一低扭矩,电机就会自动停止
6 = 一达到某一高扭矩,电机就会自动停止
+ = 电钻设定 — 无扭矩限制(最大扭矩时)
8.7 开启脉冲功能
(SBE 900 Impuls)
通过设定轮(9)进行调整:
= 脉冲功能始终开启
+ = 脉冲功能关闭(钻孔时)
8.8 接通和切断,改变速度
接通,速度:按触发开关(13)启动机器。
可用触发开关改变速度。
电软启动后,机器连续加速直至预设速度(取决于
设备)。
松开触发开关,关闭机器。
持续启动:按下触发开关(13)的同时按下持续启动
锁定按钮(12)进行锁定,然后松开触发开关。再次
按触发开关(13)即可停止操作。
连续工作中,如工具脱手,它会仍然处于运
作状态。因此,双手必须始终握住工具的手
柄,站稳,专心工作。
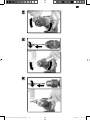
8.9 使用Futuro Top自紧式夹头(6)更换工具
参见第3页的图示A。
松开夹头:一只手紧握卡环,另一只手沿箭头-1-所
示方向旋转轴套。
夹紧工具:完全插入工具-2-。一只手紧握卡环,另
一只手沿沿箭头-3-所示方向旋转轴套直至转不动为
止。
8.10 使用Futuro Plus自紧式夹头(5)更换工具
参见第3页的图示B。
松开夹头:
一只手紧握卡环,另一只手沿箭头-1-所示方向旋转
轴套。
打开电钻夹头时会听到摩擦的声音(取决于功能),
在逆向旋转轴套时声音消失。
若钻头已充分紧固,此时断开电源。用开口扳手开
口处夹住电钻夹头,然后沿箭头-1-所示方向用力旋
转袖套。
夹紧工具:
- 完全插入工具-2-。
- 一只手紧握卡环,另一只手沿箭头-3-所示方向
旋转轴套直至感觉不到机械阻力为止。
- 注意!此时钻头尚未充分紧固!继续旋转(旋转
时会发出“咔嚓”声),直到旋不动为止,此时
工具才充分紧固。
使用软钻杆时,机器每运行一段时间就必须重新紧
固夹头。
8.11 用齿轮夹头(4)更换工具
参见第3页的图示C。
松开夹头:用夹头钥匙-1-打开齿轮夹头。
夹紧工具:完全插入工具-2-,用夹头钥匙-3-均匀
夹紧3孔。
8.12 卸下夹头
Futuro Top自紧式夹头(6)
(参见倒数第
2页的图示X)
用两把开口扳手将电钻夹头卸下。
Futuro Plus自紧式夹头(5)
(参见倒数第2页的图示Y))
卸下锁定螺钉。注意:左旋螺纹!
用开口扳手夹住机器主轴。用橡胶锤轻轻敲打夹住
夹头的L型内六角扳手以松动夹头。
齿轮夹头(4)
(参见倒数第2页的图示Z)
卸下锁定螺钉。注意:左旋螺纹!
用开口扳手夹住机器主轴。用橡胶锤轻轻敲打插入
的扳手以松动夹头,然后将其取下。
IP3099_SB710_SBE701SP_Chi_02_1007 7IP3099_SB710_SBE701SP_Chi_02_1007 7 2010-6-8 14:29:532010-6-8 14:29:53

8
9 提示与技巧
钻深孔时,请不时将钻头从孔中拉出,清理石粉或
碎屑。
在瓷砖或其它脆性材料中钻孔时,不要使用冲击
钻孔。若要使用不定心钻孔,请开启脉冲模式(仅
SBE 900 Impuls)。
若要进行钉入螺钉操作,可取下钻头。
将螺丝钻头直接插入钻轴的六角形槽中。可安装螺
丝钻头轴衬(订单号:6.31281)以将其固定。
攻丝(SB 710除外)时,在丝锥上加一些切削油。选
择低速并设置为一档。
攻丝时设为顺时针方向,要卸下丝锥时,停止机器
并切换到逆时针方向。
10 清洁与维护
自紧式夹头的清洁:
在长时间使用后,请开口朝下垂直握住夹头,并用
力拧紧和旋开夹头数次。积尘便会从开口处掉落。
建议定期对夹头及其开口处进行清洁。
11 故障检修
若触发开关(13)无法按下,检查旋转选择器开关
(11)的方向是否完全置于右或左的位置(SB 710除
外)。
SBE 900 pulse: 当机器在运行状态时,若设定轮
(9)从脉冲功能切换到扭矩控制,则机器会自动关
闭。切断工具,然后重新开启。
电信号指示灯(10)
快闪-重启保护
(SBE 1000, SBE 1100 Plus)
电源断电恢复后,为安全起见,此时机器不会自动
启动。先关掉机器电源,再重新打开。
慢闪-碳刷磨损
(SBE 1100 Plus)
碳刷几乎完全磨损。当碳刷完全磨损时,机器将自
动关闭。请使用授权维修中心提供的碳刷进行更
换。
一直亮-过载
(SBE 1100 Plus)
若机器过载时间过长,电源输入就会受限以防止电
机温度过高。
12 配件
只能使用麦太保原厂配件。
如果您需要任何配件,请与您的经销商协商。
为了购买正确的配件,请告知经销商您所拥有的电
动工具的准确型号。
请参见第4页。
A 麦太保箱
B 转向器
C 传动软轴
D 翼片打磨砂轮
E 电钻台架
F 机用虎钳
G 钢丝笔刷
H 钢丝杯刷
I 钢丝轮刷
J 钻头袖衬
如需了解全部配件,请登录www.metabo.com或参
见主目录。
13 修理
只能由合格的电工修理电动工具!
任何需要修理的麦太保电动工具,都可送到备用零
件清单上列的地址。
请随电动工具附上一份故障说明。
14 环境保护
所有麦太保的包装材料,皆可100%回收。
达到使用寿命的电动工具和配件含有大量有价值的
材料和塑胶,可回收再生。
本说明书使用无氯再生纸印刷。
IP3099_SB710_SBE701SP_Chi_02_1008 8IP3099_SB710_SBE701SP_Chi_02_1008 8 2010-6-8 14:29:542010-6-8 14:29:54

9
15 技术规格
解释性说明信息在第2页上的规格中。保留因技术
发展而进行变更的权利。
P
1
= 额定输入功率
P
2
= 输出功率
n
1
= 空载转速
n
2
= 负载转速
ø max = 钻头最大直径
s max = 最大冲击速率
b = 夹头装夹能力
G = 钻轴螺纹
H = 钻轴六角槽
m = 重量
D = 轴套直径
依照EN 60745规定的振动总值(三个方向上的矢量
和):
a
h,ID
= 振动排放值(对混凝土冲击钻)
a
h,D
= 振动排放值(钻击金属)
K
h,ID
,K
h,D
= 不确定(振动)
本信息单中所指的振动值已经根据 EN 60745 规定的
标准化测试进行了测量,且可以用于在工具间进行
比较。也可用于估计振动负载。
上述的振动等级,适用于电动工具的主要用途。但
是,如果将本工具用于其它用途,使用不同配件或
维护不当,则振动值可能有所不同。在整个操作期
间,振动负载可能大幅增加。
估算振动暴露等级时,应把工具关闭和在运转但实
际上没有工作的时间考虑在内。这可能大幅减少整
个工作时间的暴露等级。
应该采取可以保护操作人员不受振动影响的安全措
施,例如:维护工具和配件、保持双手温暖、组织
工作方式等。
有效A荷重声音水平:
L
pA
= 声压等级
L
WA
= 声压功率等级
K
pA
, K
WA
= 不确定(噪音等级)
戴护耳器!
测量值依照EN 60745确定。
本工具属于保护等级Ⅱ
引用的技术资料皆含有公差值在内(依照相关有效
标准)。
IP3099_SB710_SBE701SP_Chi_02_1009 9IP3099_SB710_SBE701SP_Chi_02_1009 9 2010-6-8 14:29:542010-6-8 14:29:54

10
1 Declaration of Conformity
2 Specified Use
3 General Safety Instructions
4 Special Safety Instructions
5Overview
6 Special Product Features
7 Initial Operation
8Use
9 Tips and Tricks
10 Cleaning, Maintenance
11 Troubleshooting
12 Accessories
13 Repairs
14 Environmental Protection
15 Technical Specifications
We, being solely responsible, hereby declare that
this product conforms to the standards and direc-
tives specified on page 2.
The impact drill is suitable for drilling, without
impact, in metal, wood, plastic and similar mate-
rials and for impact drilling into concrete, stone
and similar materials. In addition, the machine is
suitable for thread tapping and screwdriving
(except SB 710).
The user bears sole responsibility for any damage
caused by improper use.
Generally accepted accident prevention regula-
tions and the enclosed safety information must be
observed.
WARNING
– Reading the operating
instructions will reduce the risk of injury.
WARNING Read all safety warnings and
instructions.
Failure to follow all safety warn-
ings and instructions may result in electric shock,
fire and/or serious injury.
Keep all safety instructions and information for
future reference.
Before using the power tool, carefully read through
and familiarise yourself with all the enclosed safety
information and the Operating Instructions. Keep
all enclosed documentation for future reference,
and pass on your power tool only together with this
documentation.
For your own protection and for the
protection of your power tool, pay
attention to all parts of the text that are
marked with this symbol!
Wear ear protectors when using impact drills.
Exposure to noise can cause hearing loss.
Use the additional handle supplied with the
tool.
Loss of control can cause personal injury.
Hold the power tool by insulated gripping
surfaces, when performing an operation where
the cutting accessory may contact hidden
wiring or its own cord.
Cutting accessory
contacting a “live” wire may make exposed metal
parts of the power tool “live” and could give the
operator an electric shock.
Pull the plug out of the plug socket before any
adjustments or servicing are performed.
Avoid inadvertent starts by always unlocking the
switch when the plug is removed from the mains
socket or in case of a power cut. This is not neces-
sary in the case of SBE 1000, SBE 1100 Plus (with
restart protection).
Ensure that the spot where you wish to work is free
of
power cables, gas lines or water pipes
(e.g.
using a metal detector).
Smaller workpieces must be secured such that
they are not carried along with the drill bit when
drilling (e.g. by clamping in a vice or on a work
bench with screw clamps).
Keep hands away from the rotating tool! Remove
chips and similar material only when the machine
is not in operation.
Metabo S-automatic safety clutch. When the
safety clutch responds, switch off the machine
immediately! If the tool jams or catches, the power
supply to the motor is restricted. Due to the strong
force which can arise, always hold the machine
Original instructions
Dear Customer,
Thank you for the trust you have placed in us by buying a Metabo power tool. Each Metabo power tool
is carefully tested and subject to strict quality controls by Metabo's quality assurance. Nevertheless, the
service life of a power tool depends to a great extent on you. Please observe the information contained
in these instructions and the enclosed documentation. The more carefully you treat your Metabo power
tool, the longer it will provide dependable service.
Contents
1 Declaration of Conformity
2 Specified Use
3 General Safety Instructions
4 Special Safety Instructions
IP3099_SB710_SBE701SP_Eng_00_10010 10IP3099_SB710_SBE701SP_Eng_00_10010 10 2010-6-1 14:09:482010-6-1 14:09:48

11
with both hands using the handles provided, stand
securely and concentrate.
The Metabo S-automatic safety clutch must not be
used for torque control.
Caution must be exercised when driving screws
into hard materials (driving screws with metric or
imperial threads into steel)! The screw head may
break, or a high reverse torque may build up on the
handle.
Dust from material such as paint containing lead,
some wood species, minerals and metal may be
harmful. Contact with or inhalation of the dust may
cause allergic reactions and/or respiratory
diseases to the operator or bystanders.
Certain kinds of dust are classified as carcinogenic
such as oak and beech dust especially in conjunc-
tion with additives for wood conditioning (chro-
mate, wood preservative). Material containing
asbestos must only be treated by specialists.
- Where the use of a dust extraction device is
possible it shall be used.
- The work place must be well ventilated.
- The use of a dust mask of filter class P2 is
recommended.
Follow national requirements for the materials you
want to work with.
See page 3 (please unfold).
1 Thumbwheel for gear selection
2 Additional handle / Additional handle with
vibration damping *
3Depth stop
4 Geared chuck*
5 Futuro Plus keyless chuck *
6 Futuro Top keyless chuck*
7 Slide switch (drilling/impact drilling)
8 Speed preselection setting wheel*
9 Setting wheel for setting torque control and
impulse function *
10 Electronic signal indicator*
11 Rotation selector switch *
12 Locking button for continuous activation
13 Trigger switch
* depending on equipment
Metabo S-automatic safety clutch:
If the tool jams or catches, the power supply to the
motor is restricted. Due to the strong force which
can arise, always hold the machine with both
hands using the handles provided, stand securely
and concentrate.
Auto-stop carbon brushes:
If the carbon brushes are completely worn, the
machine switches off automatically. SBE 1100
Plus: An LED lights up before the carbon brushes
wear out completely.
Restart protection:
(SBE 1100 Plus, SBE 1000)
Restart protection prevents the unintentional start-
up of the machine when it is reconnected to the
mains or when power returns following a power
failure.
Overload protection display:
(SBE 1100 Plus)
The overload protection display indicates if the
machine is overloaded.
Metabo impulse function:
(SBE 900 Impuls)
For effortless driving and removal of stubborn
screws, even with damaged heads. For spotlessly
clean drilling without a centre punch - in tiles,
aluminium or other materials.
Electronic torque control:
(SBE 900 Impuls)
When driving small screws and when thread
tapping with taps of small diameter, the torque
may be reduced to a value appropriate to the work
being carried out.
Before plugging in, check that the rated
mains voltage and mains frequency, as
stated on the rating label, match with your power
supply.
7.1 Assembly of additional handle (2)
For safety reasons, always use the additional
handle supplied.
Open the clamping ring by turning the additional
handle (2) counter-clockwise. Push the additional
handle onto the collar of the machine. Insert depth
stop
(3)
. Slide the additional handle far enough
forward so that it can be turned. At the desired
angle, pull it back and tighten firmly.
8.1 Adjusting depth stop
Release additional handle (2). Set depth stop
(3)
to
the desired drilling depth and retighten additional
handle. (2)
5Overview
6 Special Product Features
7 Initial Operation
8Use
IP3099_SB710_SBE701SP_Eng_00_10011 11IP3099_SB710_SBE701SP_Eng_00_10011 11 2010-6-1 14:09:482010-6-1 14:09:48

12
8.2 Setting direction of rotation, transport
lock (switch-on lock)
(except SB 710)
Do not activate the rotation selector switch
(11) unless the motor has completely
stopped.
See page 3 (please unfold).
R = Clockwise setting
L = Counter-clockwise setting
0 = Central position: transport lock setting
(switch-on lock)
8.3 Setting up drilling, impact drilling
Press the slide switch (7).
= Impact drilling
= Normal drilling without impact
Note:
Impact drilling and drilling, only in clock-
wise direction
Note:
When impact drilling, use a high speed:
Select 2nd gear on thumbwheel (1).
8.4 Selecting a gear
Select the desired gear by turning the thumbwheel
(1)
.
Change speed only when the machine is in the
process of running down (briefly switch it on and
off).
1st gear (low speed, high torque) e.g. for
screwdriving, drilling
2nd gear (high speed) e.g. for drilling, impact
drilling
8.5 Preselect speed
(except SB 710)
Use the setting wheel (8) to preselect the
maximum speed. See page 4 for recommended
drilling speeds.
8.6 Setting up torque control
(SBE 900 Impuls)
Set using setting wheel (9) (position 1 - 6). When
the preselected torque is reached, the motor
stops.
1
= When a low torque is reached, the motor
stops.
6
= When a high torque is reached, the motor
stops.
+
= Drill setting - not torque control (for max.
torque)
8.7 Switching on impulse function
(SBE 900 Impuls)
Set using setting wheel (9).
= Impulse function always switched on
+
= Impulse function off (for drilling)
8.8 Switching on/off, changing speed
Switching on, speed:
press the trigger (13).
The speed can be changed by pressing in the
trigger.
The electronic soft start means that the
machine accelerates continuously until the
preselected speed is reached (depends on
equipment).
Release the trigger to switch off.
Continuous activation:
While pressing on the
trigger (13), press in the locking button (12) and
then release the trigger. To switch off, press
and release the trigger (13) again.
In continuous operation, the machine
continues running if it is forced out of
your hands. Therefore, always hold the
machine with both hands using the handles
provided, stand in a safe position and concen-
trate.
8.9 Tool change with Futuro Top keyless
chuck (6)
See illustrations A on page 3.
Opening the chuck:
Grip the retaining ring and,
using the other hand, rotate the sleeve in the direc-
tion of the arrow -1-.
Clamping the tool:
Insert tool -2- as far as it will
go. Grip the retaining ring and, using the other
hand, firmly rotate the sleeve as far as it will go in
the direction of the arrow -3-.
8.10 Tool change with
Plus (5) chuck
See illustrations B on page 3.
Opening the drill chuck:
Grip the retaining ring and, using the other hand,
rotate the sleeve in the direction of the arrow -1-.
The grating sound (depending on function) which
may be heard after opening the drill chuck is
IP3099_SB710_SBE701SP_Eng_00_10012 12IP3099_SB710_SBE701SP_Eng_00_10012 12 2010-6-1 14:09:492010-6-1 14:09:49

13
stopped by turning the sleeve in the opposite
direction.
If the chuck is very tightly secured,
disconnect
from mains. Hold the chuck using an open-end
spanner at the flats on its head, and turn the sleeve
vigourously in the direction of the arrow -1-.
Clamping the tool
- Insert the tool -2- as far as it will go.
- Grip the retaining ring and, using the other hand,
rotate the sleeve in the direction of the arrow -3-
until the mechanical resistance which can be felt
is overcome.
-
Caution! The tool is not yet fully clamped!
Keep turning the sleeve (
it must "click" when
turning
) until it cannot be turned any further -
only now
is the tool
securely
clamped.
In the case of a soft tool shank, retightening may
be required after a short period of drilling.
8.11 Tool change with a geared chuck (4)
See illustrations C on page 3.
Opening the chuck:
Opening a geared chuck with
the chuck key -1-.
Clamping the tool:
Insert tool -2- as far as it will
go and tighten equally in all 3 bores using the
chuck key -3-.
8.12 Unscrewing the chuck
Futuro Top keyless chuck
(6)
(see illustration X on second to last page)
Unscrew the drill chuck with two open-end span-
ners.
Futuro Plus keyless chuck (5)
(see illustrations Y on second to last page)
Undo the locking screw. Caution! Left-handed
thread!
Grip the drill spindle using an open-end spanner.
Insert an Allen key into the chuck, tap on it with a
rubber hammer to loosen the chuck, and then
unscrew.
Geared chuck
(4)
(see illustrations Z on second to last page)
Undo the locking screw. Caution! Left-handed
thread!
Grip the drill spindle using an open-end spanner.
Insert the chuck key into the chuck, tap on it with
a rubber hammer to loosen the chuck, and then
unscrew.
In the case of deep bores pull the drill bit out of the
bore from time to time in order to remove the stone
dust or shavings.
Drill tiles and other brittle materials without impact.
Switch on the impulse function (SBE 900 Impuls
only) for drilling without a centre punch.
The drill chuck can be removed for screwdriving.
Insert screwdriver bit directly into the spindle's
hexagon socket. If a bit clamping bush (order no.
6.31281) is fitted, the screwdriver bit is held in
position.
For thread tapping (except SB 710), apply some oil
to the tap. Select a low speed and the first gear.
Start cutting in clockwise direction, stop and turn
out in counter-clockwise direction.
Cleaning the keyless chuck:
After prolonged use hold the chuck vertically, with
the opening facing down, and fully open and close
it several times. The dust collected falls from the
opening. Regular use of cleaning spray on the jaws
and jaw openings is recommended.
If it is not possible to press in the trigger (13), check
if the rotation selector switch (11) is fully at position
R or L (except SB 710).
SBE 900 Impuls: If the setting wheel (9) is moved
from impulse function to torque control while the
machine is switched on, the machine switches off
automatically. Switch the machine off and then
back on again.
Electronic signal display (10)
Rapid flashing - restart protection
(SBE 1000, SBE 1100 Plus)
When power is restored after a power failure, the
machine - which is still switched on - will not start
by itself for safety reasons. Switch machine on and
off again.
Slow flashing - carbon brushes worn
(SBE 1100 Plus)
The carbon brushes are almost completely worn. If
the brushes are completely worn, the machine
switches off automatically. Have the brushes
replaced by an authorised service centre.
Permanently lit - overload
(SBE 1100 Plus)
If the machine is subject to continuous overloading
for longer periods, the power input to the machine
is limited. This prevents additional unauthorised
heating of the motor.
9 Tips and Tricks
10 Cleaning, Maintenance
11 Troubleshooting
IP3099_SB710_SBE701SP_Eng_00_10013 13IP3099_SB710_SBE701SP_Eng_00_10013 13 2010-6-1 14:09:492010-6-1 14:09:49

14
Use only genuine Metabo accessories.
If you need any accessories, check with your
dealer.
The dealer needs to know the exact model of your
power tool in order to select the correct accessory.
See page 4.
AMetabox
B Angle drilling and screwdriving attachment
C Flexible shaft
D Flap sanding wheel
E Drill stand
F Machine vice
G Steel-wire end brush
H Steel-wire cup brush
I Steel-wire wheel brush
J Bit clamping bush
For the complete range of accessories, see
www.metabo.com or refer to the main catalogue.
Repairs to electrical tools must be carried out by
qualified electricians ONLY!
Any Metabo power tool in need of repair can be
sent to one of the addresses listed in the spare
parts list.
When returning the device for repair, please
enclose a description of the fault.
Metabo's packaging can be 100% recycled.
When they reach the end of their service life, power
tools and accessories contain considerable
amounts of valuable raw and plastic materials,
which can be recycled.
These instructions are printed on chlorine-free
bleached paper.
Only for EU countries: Never dispose of
power tools in your household waste! In
accordance with European Guideline 2002/
96/EC on used electronic and electric equipment
and its implementation in national legal systems,
used power tools must be collected separately
and handed in for environmentally compatible
recycling.
Explanatory notes on the information on page 2.
Changes due to technological progress reserved.
P
1
= Rated input
P
2
= Power output
n
1
= No-load speed
n
2
= Load speed
ø max = Max. drill diameter
s max = Max. impact rate
b = Chuck capacity
G = Drill spindle thread
H = Drill spindle with hexagon socket
m=Weight
D = Collar diameter
Vibration total value (vector sum of three
directions) determined in accordance with EN
60745:
a
h, ID
= Vibration emission value (impact
drilling into concrete)
a
h, D
= Vibration emission value (drilling into
metal)
K
h,ID
,K
h,D
= Uncertainty (vibration)
The vibration level specified in these instructions
has been measured using a procedure standard-
ised in EN 60745 and can be used for comparing
power tools with one another. It is also suitable for
a provisional estimate of the vibratory load.
The specified vibration level applies to the main
applications of the power tool. However, if the tool
is used for other applications, with different acces-
sories or is poorly maintained, the vibration level
may vary. This may significantly increase the vibra-
tory load over the entire working period.
An accurate estimate of the vibratory load should
also take into account the times when the tool is
shut down or when it is running but not actually in
use. This may significantly reduce the vibratory
load over the total working period.
Identify additional safety measures to protect the
operator from the effects of vibration such as:
maintain the tool and the accessories, keep the
hands warm, organisation of work patterns.
A-effective perceived sound levels:
L
pA
= Sound pressure level
L
WA
= Acoustic power level
K
pA
, K
WA
= Uncertainty (sound level)
Wear ear protectors!
Measured values determined in conformity with
EN 60745.
Machine in protection class II
The technical specifications quoted are subject to
tolerances (in compliance with the relevant valid
standards).
12 Accessories
13 Repairs
14 Environmental Protection
15 Technical Specifications
IP3099_SB710_SBE701SP_Eng_00_10014 14IP3099_SB710_SBE701SP_Eng_00_10014 14 2010-6-1 14:09:492010-6-1 14:09:49

YY
Y
XX
X
ZZ
Z
IP3099_SB710_SBE701SP_Eng_00_10015 15IP3099_SB710_SBE701SP_Eng_00_10015 15 2010-6-1 14:09:492010-6-1 14:09:49

麦太保电动工具(中国)有限公司
上海闵行区浦江工业园区三鲁路3585号7幢
www.metabo.com.cn
IP3099_SB710_SBE701SP_Cov_01_1005 5IP3099_SB710_SBE701SP_Cov_01_1005 5 2010-6-9 10:50:192010-6-9 10:50:19
-
 1
1
-
 2
2
-
 3
3
-
 4
4
-
 5
5
-
 6
6
-
 7
7
-
 8
8
-
 9
9
-
 10
10
-
 11
11
-
 12
12
-
 13
13
-
 14
14
-
 15
15
-
 16
16


