G700SE
G700SE
IEC60825-1:2007 JIS C6802:2005
InGaAIP
12 mW
655 nm
1
(e)
JIS 4
• BR-1 • 2 • •
•
© 2010 RICOH CO.,LTD.
English
Thank you for buying RICOH products. Read this manual thoroughly
before use and keep it handy when using the product.
This barcode reader unit is for use exclusively with RICOH G700SE
cameras. When connected to the camera, this barcode reader unit can
be used to read linear barcodes for use in camera memos.
Safety Precautions
Warning Symbols
Various symbols are used throughout this instruction manual and on
the product to prevent physical harm to you or other people and dam-
age to property. The symbols and their meanings are explained below.
WARNING: This symbol indicates matters that may lead to death or
serious injury if ignored or incorrectly handled.
CAUTION: This symbol indicates matters that may lead to injury or
physical damage if ignored or incorrectly handled.
The following symbols may also be used:
This icon indicates prohibited actions. The item inside the circle
depicts the action that must not be performed (e.g., a icon
indicates that the product must not be disassembled).
This icon indicates actions that must be performed.
Observe the following precautions to ensure safe use of this equipment.
WARNINGS
Do not look directly at the laser beam or into the laser window.
Do not direct the laser into the eyes of others.
Do not disassemble or modify. Failure to observe this precaution
could result in injury.
Do not touch the internal components of the equipment if they
become exposed as a result of being dropped or damaged. Fail-
ure to observe this precaution could result in injury. Cease use
immediately and take the product to the point of purchase or to
one of the RICOH service centers listed in the camera manual.
Do not use the equipment near flammable gases, gasoline, ben-
zene, thinner or similar substances to avoid the risk of explosion,
fire or burns.
Do not use it in a high temperature environment such as next to
a fire or inside a car, or abandon it. Failure to observe this precau-
tion could cause fire.
Do not use in airplanes or anywhere use is prohibited or restrict-
ed. Radio-frequency interference emitted by this device could
cause accidents. Follow the directions of hospital staff when us-
ing this device in the vicinity of medical equipment.
CAUTION
Keep out of reach of children. Failure to observe this precaution
could result in injury. Do not allow children to use this product.
Laser Safety
This machine complies with the requirements of IEC60825-1:2007
(EN60825-1:2007)/IEC60825-1:1993+A1:1997+A2:2001 for class 1 laser
product. This equipment is considered a class 1 laser device. This equip-
ment contains Optical Output Power (Absolute Maximum Rating): 12 mW
(Max.), Wavelength: 655 nm (Typ.), InGaAIP Laser Diode. The following
Label (e) is attached on the back of this equipment.
or
Caution: Use of controls or adjustments or performance of procedures oth-
er than those specified herein may result in hazardous radiation exposure.
Precautions for Use
Do not drop or subject to strong physical shocks or vibration. This
could damage the product or cause it to malfunction.
Rapid changes in temperature could cause condensation inside the
device, resulting in rust or mold. Protect the device by placing it in a
bag or other container.
This device is rated for JIS/IEC Class 4 water resistance only when
mounted on the camera. Observe caution when connecting the
device, as water may enter if it is not correctly attached.
Do not immerse the device or expose it to water when it is not at-
tached to the camera.
Do not handle the device with wet hands when it is not attached
to the camera.
Some countries may restrict import and use. Conform to all local
regulations when travelling internationally.
Package Contents
BR-1• Screws (×2)• Allen key• Warranty•
Instruction Manual (this manual)•
Attaching the BR-1
1
Remove the camera side cover (a).
Using the Allen key, remove the two screws holding the camera
side cover (a) in place. Keep the screws in a safe place (Step 1).
2
Connect the BR-1.
Insert the connector on the BR-1 (b) into the connector on the
camera with the read button (c) and status lamp (d) at the rear of
the camera (Step 2).
3
Attach the BR-1 to the camera using the two screws (f) supplied
with the BR-1.
Insert the long shaft of the Allen key into the head of the screw and
rotate the short shaft by hand to tighten the two screws (Step 3).
•
•
•
•
•
•
1.
(a)
(a) 2
( 1)
2.
BR-1
(b) BR-1
(c) (d)
( 2
3.
BR-1 (f)2
2 ( 3)
•
• BR-1
•
1.
BR-1
BR-1
(d)
BR-1
3 F
4:3 F
9999
9999
(d)
USB
2.
3.
BR-1 (c)
4.
1234567890
α
/SAMPLE
1/45
ON
• BR-1
BR-1
•
RICOH G700SE
Chinese 2 of 5, Codabar, Code 11, Code 32 (Italian
Pharma Code), Code 39, Code 39 Full ASCII, Code
93, Code 128, EAN-8, EAN-13, UCC/EAN128, MSI,
Interleaved 2 of 5, Discrete 2 of 5, UPC-A, UPC-E,
JAN/UPC/EAN, JAN/UPC/EAN with Supplementals
0.1016 mm 1.3970 mm
0.7 mW
655 nm
MRD
25% =650 nm
104 12 scans/sec
4100 lx
91000 lx
400 mW
42.5 mm 58.7 mm 35.0 mm
42.5 g
–10 + 40
20 90%
– 20 + 60
JIS/IEC 4 JIS/IEC 6
(IP64)
G700SE
BR-1
*L243 6971*
Jp
BR-1
En
BR-1 Barcode Reader Unit Instruction
Manual
De
BR-1 Strichcode-Lesegerät
Bedienungsanleitung
Fr
Mode d’emploi du lecteur de codes-
barres BR-1
1 / Step 1 / Schritt 1 / Étape 1
(a) /
Side camera cover/
Seitenabdeckung der Kamera/
Couvercle latéral de l'appareil
photo
/Screw supplied with camera/
Schraube wird mit der Kamera mitgeliefert/
Vis fournie avec l'appareil photo
2 / Step 2 / Schritt 2 / Étape 2
(d) /
Status lamp/Statuslampe/
Témoin d'état
(b)
/Connector/
Anschluss/Connecteur
(c)
/
Read button/Lesetaste/
Touche de lecture
/
Laser exit window/
Laserausgangsfenster/
Fenêtre de sortie du laser
(e)
/Laser Label/
Laseretikett/Étiquette du laser
3 / Step 3 / Schritt 3 / Étape 3
(f) BR-1 /Screw supplied with
BR-1/Schraube wird mit dem BR-1
mitgeliefert/Vis fournie avec le BR-1
/Threaded hole/
Gewindeloch/Filetage
de fixation
/Threaded hole/
Gewindeloch/
Filetage de fixation
:
BR-1
Caution: Be careful not to dislodge the
clock battery (circled) when connecting
or disconnecting the BR-1.
Warnung: Achten Sie beim Anschließen
oder Abtrennen des BR-1 darauf, nicht
die Uhrenbatterie (eingekreist) zu ent-
fernen.
Attention : Attention de ne pas déplacer
la pile de l’horloge (entourée d’un cer-
cle) lors de la connexion ou de la décon-
nexion du BR-1.
Cautions
Do not over-tighten. Tightening screws with the short shaft of the
Allen key inserted in the heads could strip the receiving threads.
Turn the camera off before connecting or disconnecting the BR-1.
Do not apply excessive force when connecting or disconnecting the
BR-1. Failure to observe this precaution could damage the camera.
Using the BR-1
1
Turn the camera on.
The BR-1 is not equipped with a
battery or on/off switch. When
the camera is turned on, power
is supplied to the BR-1, the status
lamp (d) turns green, and an icon
appears in the picture display.
See below for more examples of
the status lamp display.
3 F
4:3 F
9999
9999
Status lamp
Description
Steady
(green)
Camera on
Camera connected to other device via USB
•
•
Blinks (green)
Barcode read successfully
Barcode read time expired (time out)
•
•
Off Camera off
2
Display the camera “camera memo” dialog.
For more information, see “Software User Guide” supplied with the
camera.
3
Press the BR-1 read button (c).
The laser will light.
4
Read barcodes.
The scan direction should be at
a right angle to the lines in the
barcode.
Correct
Incorrect
The barcode data will be dis-
played in the camera memo dia-
log after scanning.
1234567890
Foundation work
Exterior
Beverly Beech
Gamma Company
Barcode
Const.type
Location
Supervisor
Affiliates
FileName/SAMPLE
Camera Memo
1/45
FILE LIST Memo On
See “Software User Guide” supplied with the camera for more infor-
mation on using barcodes.
Cautions
When the BR-1 is attached, the camera can only be used to read
password barcodes. Remove the BR-1 to read matrix barcodes.
The BR-1 can not be used to enter passwords. Use the camera to
read password barcodes.
Specifications
Supported cameras RICOH G700SE
Supported barcodes
(linear barcodes only)
Chinese 2 of 5, Codabar, Code 11,
Code 32 (Italian Pharma Code), Code 39,
Code 39 Full ASCII, Code 93, Code 128, EAN-8,
EAN-13, UCC/EAN128, MSI, Interleaved 2 of 5,
Discrete 2 of 5, UPC-A, UPC-E, JAN/UPC/EAN,
JAN/UPC/EAN with Supplementals
Resolution 0.1016 mm – 1.3970 mm
Light source Output: 0.7 mW
Wavelength: 655 nm
MRD value Min. 25% (wavelength = 650 nm)
Sampling frequency 104 ± 12 scans/sec
Ambient light Artificial light: 4100 lx
(excluding sodium-vapor lamps)
Sunlight: 91000 lx
Power consumption 400 mW
Dimension s (W × H × D) 42.5 × 58.7 × 35.0 mm
Weight 42.5 g
Operating temperature –10 °C to +40 °C
Operating humidity 20% – 90%
Storage temperature –20 °C to +60 °C
Water/dust resistance
(
*
)
JIS/IEC Class 4 water resistance, JIS/IEC Class 6
dust resistance (IP64)
Resistance to
disinfectant
Outer surface can be cleaned with ethanol
and liquid sodium hypochlorite disinfectants
(*) When mounted on RICOH G700SE
Notes on the BR-1
Do not transfer or sell the BR-1 to a third party.
The BR-1 is for commercial use only.
Be sure that you have read and understood the documentation and
all safety warnings provided with the BR-1 and related equipment.
Customer Service
See the camera manual for contact information.
Notices
© 2010 RICOH CO., LTD. All rights reserved. This publication may not
be reproduced in whole or in part without Ricoh’s express written
permission.
Ricoh reserves the right to change the contents of this document at
any time without prior notice.
•
•
•
•
•
•
•
•
•
•
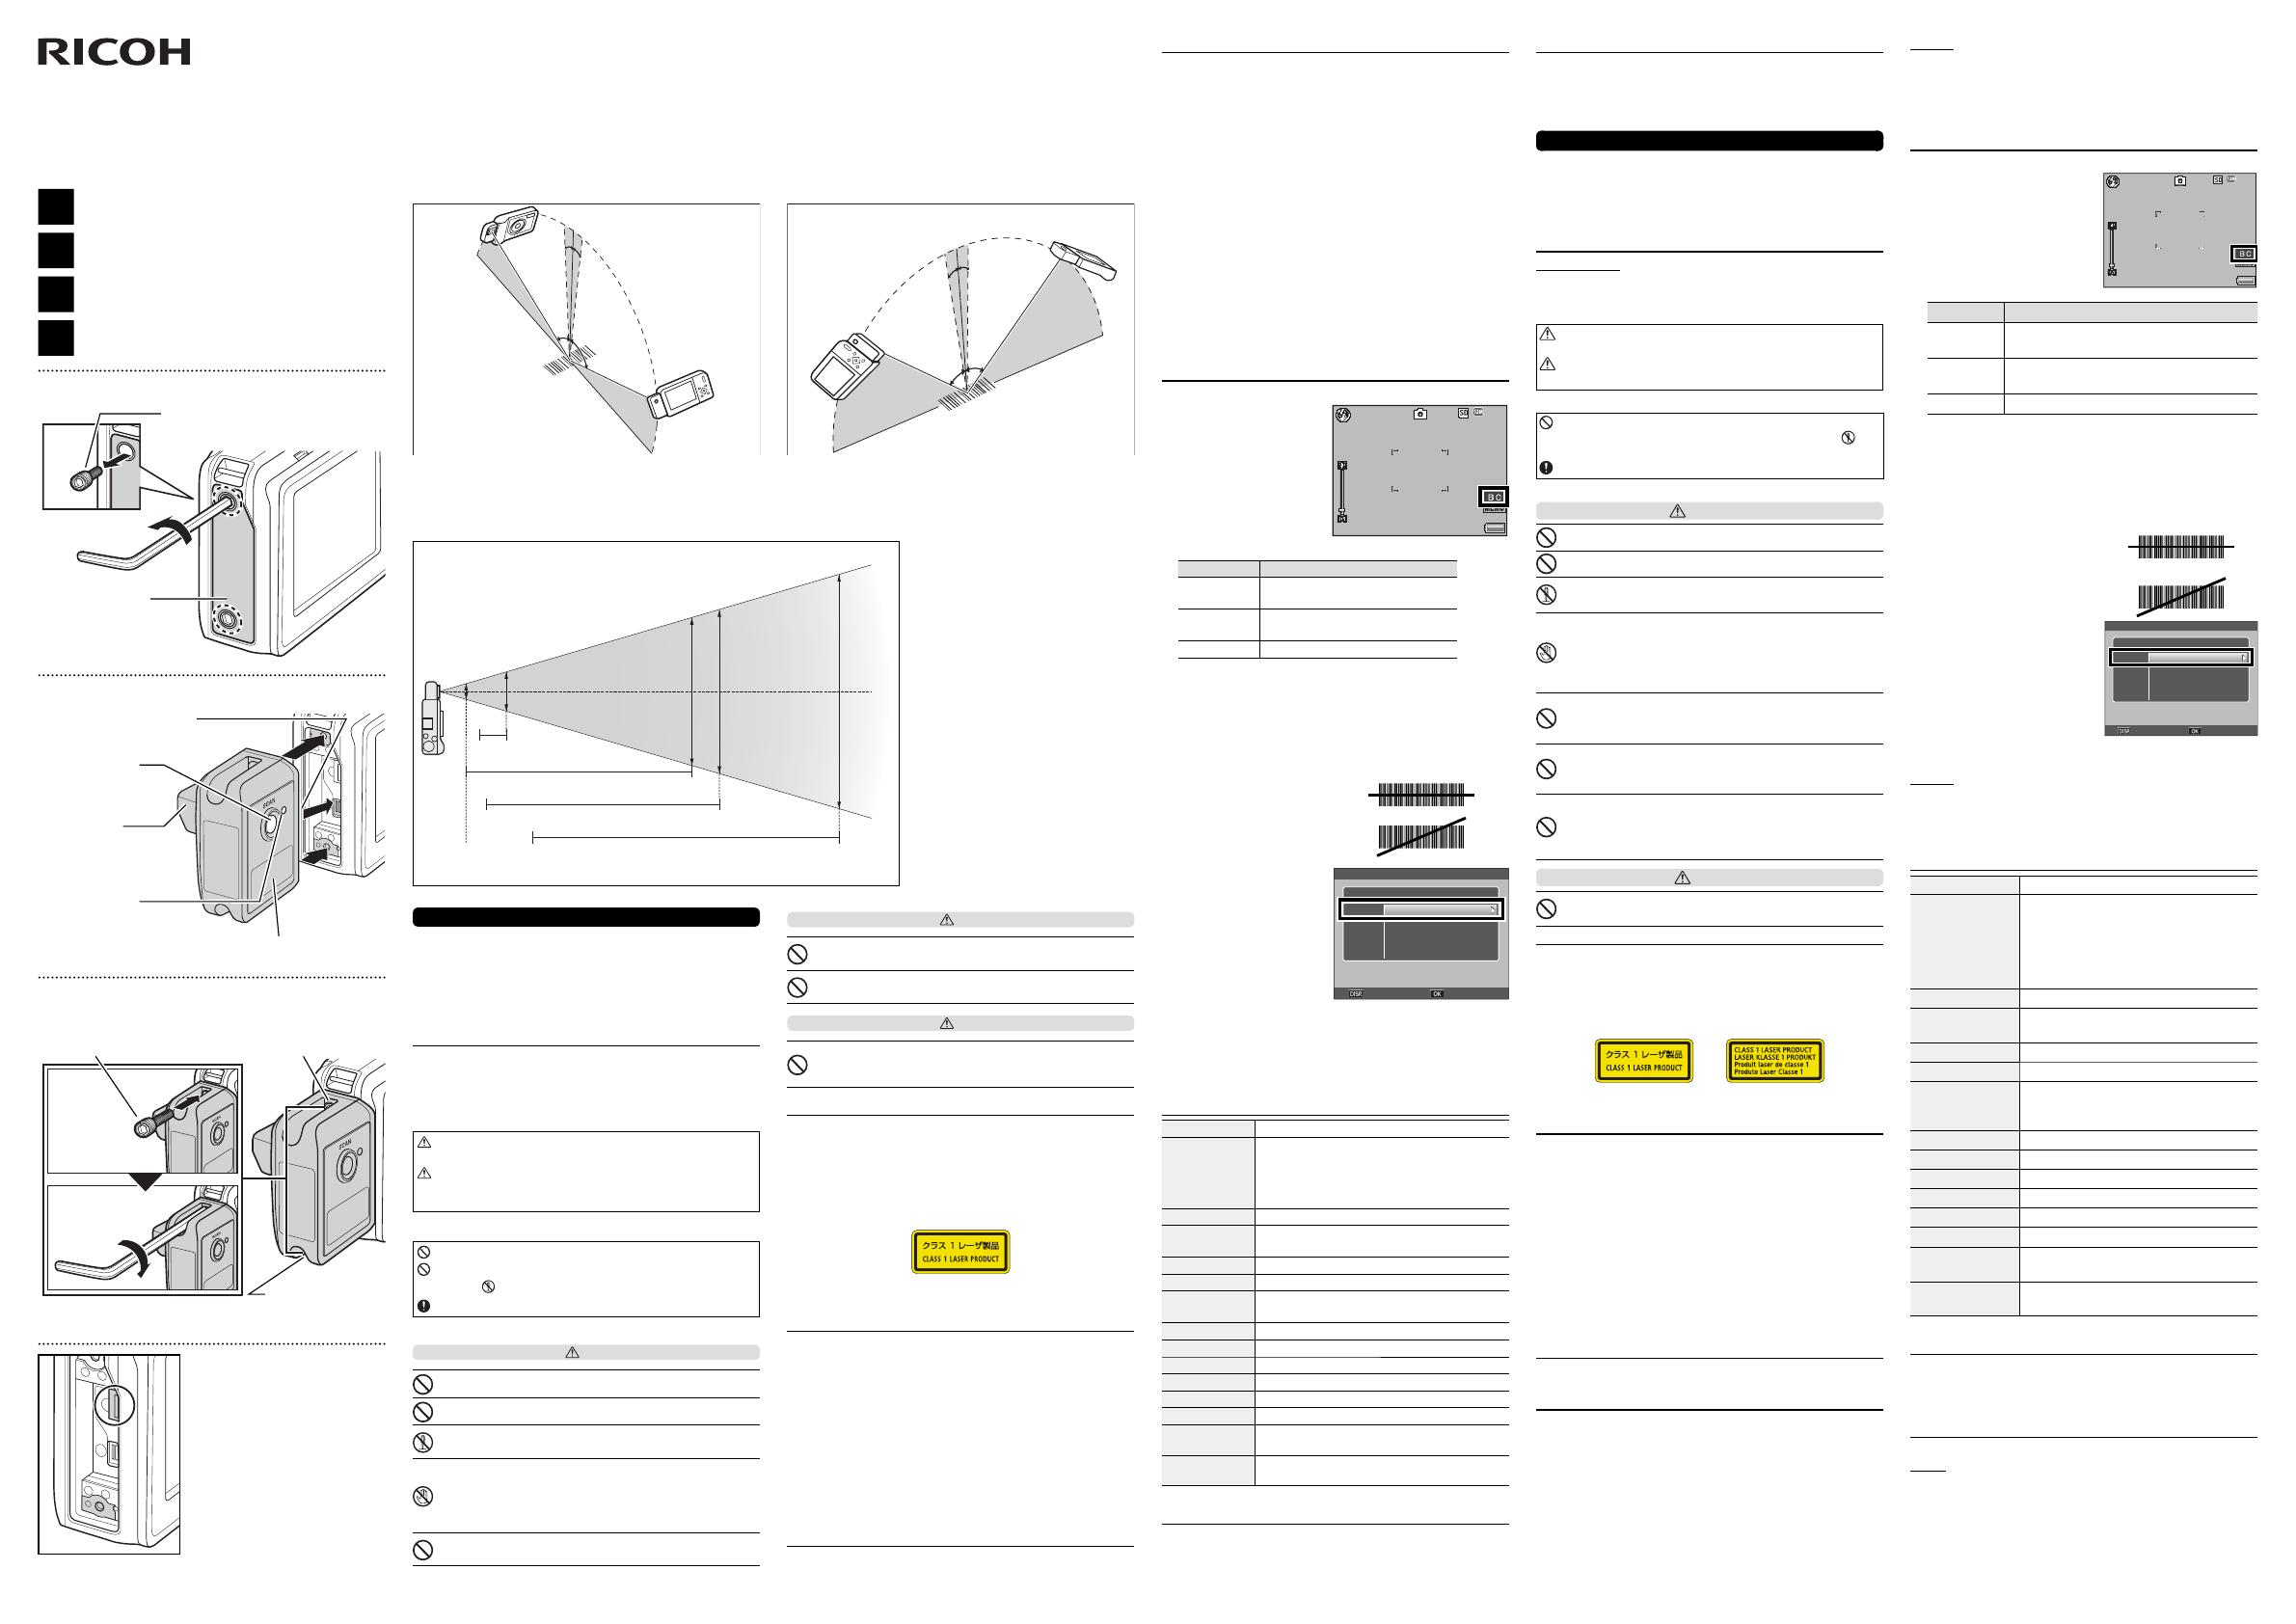
/ Scanning Range / Scanbereich / Portée du balayage
Barcode scanning range is shown below. All figures are approximate; results vary with barcode quality and ambient lighting conditions.
Der Strichcode-Scanbereich ist unten abgebildet. Alle Angaben sind Näherungswerte; die Ergebnisse variieren mit der Strichcode-Qualität und
den Bedingungen der Umgebungsbeleuchtung.
La portée du balayage des codes-barres est indiquée ci-dessous. Tous les chiffres sont approximatifs ; les résultats dépendent de la qualité du
code-barres et des conditions de lumière ambiante.
Pitch / Pitch angle / Steigungswinkel / Angle d'attaque Skew / Skew angle / Schrägwinkel / Angle d'inclinaison
2°
2°
65°
65°
2°
2°
50°
50°
116.63 mm UPC 100%
Conditions: Scan depth 116.63 mm, UPC 100% Bedingungen: Scantiefe 116.63 mm, UPC 100% Conditions : Profondeur de balayage 116.63 mm, UPC 100%
/ Scan width / Scanbreite / Largeur de balayage
NB=1.3970 [mm] Code39 2.2 : 1
140.0
(
*
2)
–529.4mm
NB=0.5080 [mm] Code39 2.2 : 1
50.0
(
*
2)
–399.8mm
NB=0.330 [mm] UPC 100%
(
*
1)
34.1–356.7mm
NB=0.1016 [mm] Code39 2.5 : 1
45.5–58.7mm
441.2mm
441.2mm
301.6mm
301.6mm
336.4mm
336.4mm
60.8mm
60.8mm
41.0mm
41.0mm
MRD 80% 650 nm
23 Pitch 10 Roll
0
Skew 0 1615 lx
Conditions: Barcode contrast MRD 80% (at 650 nm),
Ambient density 23 °C, Pitch angle 10 °, Roll angle
0 °, Skew angle 0 °, Ambient brightness 1615 lx
Bedingungen: Strichcode-Kontrast MRD 80% (bei
650 nm), Umgebungsdichte 23 °C, Steigungswin-
kel 10 °, Rollwinkel 0 °, Schrägwinkel 0 °, Umge-
bungshelligkeit 1615 lx
Conditions : Contraste du code-barres MRD 80%
(à 650 nm), Densité ambiante 23 °C, Angle d’atta-
que 10 °, Angle de roulis 0 °, Angle d’inclinaison 0 °,
Luminosité ambiante 1615 lx
*1 MRD 90%
*2
/ The widths of the gaps between barcode
characters are the width of a narrow bar. / Die
Lückenbreiten zwischen den Strichcode-Zeichen
ist die Breite eines schmalen Spalts. / Les largeurs
des espaces entre les caractères de codes-barres
sont égales à la largeur d'une barre étroite.

 HIKMICRO E1L ユーザーガイド
 Inateck BCST-33 ユーザーマニュアル
 Inateck BCST-70 ユーザーガイド
 Inateck P6 ユーザーガイド
 Stahl IS330.2 取扱説明書