
D
E
F
c5
d1
d2
e1
e2
C
c4
c3
c2
c1
A
B
EN
EN
EN
ZH
EN
VI
EN
MS
EN
TH
EN
KO
EN
EN
EN
ZH
EN
VI
EN
MS
EN
TH
EN
KO
p. 1 - 4
p. 5 - 8
p. 9 - 12
p. 13 - 16
p. 17 - 20
p. 21 - 24
500 W - 500 วัตต์
*Blade unit depending on model - *刀片視乎型號而定 - *Cụm lưỡi dao theo model
*Pisau blok berdasarkan model - *ใบมีดของโถปั่นขึ้นอยู่กับรุ่น - *모델별로 다른 칼날부
Ref. 8020000932

2
6
4
3
5
1
1
2
1
2
1
2
1
2
1
2
1
2
2
1
OK

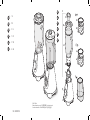
DESCRIPTION OF THE APPLIANCE
EN
EN
1
A
B
C
Motor unit
Speed selector
Blender unit:
- c1 Blade unit
- c2 Gasket
- c3 Graduated blender jug
- c4 Lid
- c5 Measuring cup
D
E
F
Herb chopper
(*accessory depending on model)
- d1 Gasket
- d2 Herb chopper blade unit
Spice grinder
(*accessory depending on model)
- e1 Gasket
- e2 Spice blade unit
Herb chopper and Spice
grinder bowl
The accessories contained in the model you have bought are represented on the
label on the top of the packaging.
CAUTION: the safety precautions are part of the appliance.
Read them carefully before using your new appliance for
the first time. Keep them in a place where you can find
and refer to them later on.
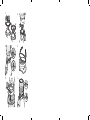
SAFETY LOCKING
USING FOR THE FIRST TIME
USING YOUR APPLIANCE
•
Moisten the gasket (c2) and position
it correctly on the blade unit (c1):
the 3 folds of the gasket must be
visible once it is in place. If it is
positioned in the other direction, you
will not be able to lock the blade unit
on the jug. (Fig. 1).
•
Place the assembly (c1+c2) on
The appliance can run only when the
jug (C) or accessories (D or E) are
correctly positioned and locked on
the motor unit (A).
• Before using your appliance for the
first time, clean all the accessories
(C, D, E, F) in warm soapy water,
except for the motor unit (A).
CAUTION: The blades are
extremely sharp; handle them
with caution when using or
cleaning the appliance.
• Make sure all the packaging has
been removed before operating
the appliance.
• Important note: Turn the speed
selector (B) to “0” before placing
the blender jug or accessories on
the motor unit.
• The appliance starts only if the jug
or accessory is correctly positioned
and locked on its body.
• Do not operate the blender if the
lid is not in place.

3
2
the base of the jug (c3). Lock it by
rotating the blade unit through a
quarter turn in the anticlockwise
direction. (Fig. 2).
•
Introduce the ingredients into the
assembled jug without exceeding
the maximum level indicated:
* 1.25L for thick mixtures
* 1L for liquid preparations.
•
Lock the lid (c4) on the jug. Place
the measuring cup (c5) in its recess
on the lid.
•
Place the blender jug assembly (C)
on the motor unit (A). The red lock
(open is aligned in the slot on the
motor unit. (Fig. 3 - position 1)
•
Then rotate the blender jug (C)
through a quarter turn until the green
lock (closed)
appears. (Fig. 3 -
position 2).
2 jug positions are possible: handle
on the right or left of the motor unit.
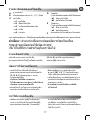
•
Do not use the blender for more than
three minutes at a time.
•
With the herb chopper (D) you can
chop ingredients like onions, garlic,
meat (cut into pieces) and dry fruits
in a few seconds, make crumbs
(rusk).
Do not use the herb chopper for
liquid preparations (fruit juices, etc.)
•
With the spice grinder (E) you can
grind spices in a few seconds:
coriander seeds, pepper, etc.
•
These accessories are equipped with
a bowl (F) that prevents access to
the blades during use.
1- Rotate the bowl (F) and pour the
ingredients.
2- Position the gasket (d1) or (e1)
in its recess on the blade unit (d2
or e2). (Fig. 4). Position the blade
unit on the bowl aligning both
the marks on the bowl and the
blade unit. Lock the accessory by
rotating the blade unit through a
quarter turn in the anticlockwise
direction. (Fig. 5).
Caution: leaks can occur if
the accessory is not locked
correctly.
3- Rotate the assembled assembly
(D or E) and position it on the
motor unit. The red lock (open)
is aligned in the slot on the motor
unit. (Fig 6 - position 1)
4- Then rotate the assembled
accessory (D or E) through a
quarter turn clockwise until the
green lock (closed)
appears.
(Fig. 6 - position 2).
5- Plug in the appliance and turn
the speed selector (B) to the
desired position or apply a few
pulses. Hold the bowl (F) when the
appliance is running. To stop the
appliance, turn the speed selector
(B) back to position “0”.
6- Unlock the accessory by rotating
it through a quarter turn in the
anticlockwise direction, until the
red lock (open) appears.
Remove the assembled accessory
(D, E) from the motor unit.
Turn it over on the worktop before
unlocking the blade unit (d2, e2)
from the bowl (F) in the reverse
order of the assembly. The blades
are very sharp: handle them with
caution to avoid injury.
You can then collect the
preparation in the bowl.
* The colour of the bowl may
change after blending certain
very hard ingredients: (cloves,
cinnamon, etc.).

3
2
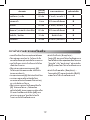
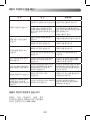
Ingredients
Quantities
(max.)
Operating time Accessory
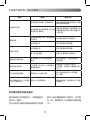
Apricots / figs 60 g 3 s / speed 2
D
Crumbs 1 rusk 10 seconds per pulse
D
Onions 60 g 6 sec / speed 1
D
Shelled almonds / hazelnuts 60 g 30 seconds per pulse
D
Parsley / fresh coriander 10 g In pulses
D
Coriander seeds 40 g 30 sec / speed 2
E
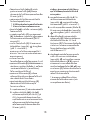
•
Unplug the appliance and remove
the accessories
•
Handle them with caution: the
blades on the blender jug and
accessories are sharp.
•
Remove the jug and rinse it and its lid
under running water.
•
To clean the motor unit (A), use a
moist cloth. Dry it carefully.
•
Never immerse the motor unit (A) in
running water.
•
For easy cleaning, be sure to wash
the removable parts in water and
a little washing-up liquid immediately
after use.
•
To clean the blender jug (C)
easily, unlock the blade unit (c1)
by rotating it through a quarter
turn in the anticlockwise direction.
Remove the gasket (c2) and clean
them under running water or in the
dishwasher.
•
GLASS BOWL VERSION (depending on
model):
The glass bowl
(C)
can be cleaned in
the dishwasher on the upper rack - use
the ‘ECO’ or ‘LOW SALT’ programme.
The accessories
(D, E)
cannot be
cleaned in the dishwasher.
•
PLASTIC BOWL VERSION (depending
on model):
The plastic bowl
(C)
and the
accessories
(D, E)
cannot be cleaned
in the dishwasher.
CLEANING YOUR APPLIANCE

54
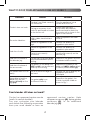
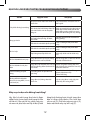
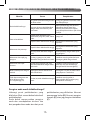
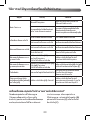
WHAT TO DO IF YOUR APPLIANCE DOES NOT WORK ?
Problems Causes Solutions
Product does not work.
The plug is not fitted correctly
into the socket .
Plug the appliance into a
socket and switch on.
The jug or accessory is not
correctly positioned or locked
on the motor unit.
Check that the jug or
accessories are correctly
positioned and locked onto
the motor unit as shown in the
figure in the manual.
Excessive vibrations.
The product is not placed on
a flat, stable, heat-resistant
surface.
Place the product on a flat
surface.
Volume of ingredients is too
high.
Reduce the quantity of
ingredients processed.
Leak from the lid.
Volume of ingredients is too
high.
Reduce the quantity of
ingredients processed.
The lid is not correctly
positioned.
Lock the lid correctly on the
blender jug.
Leak from the base of
the blender jug.
The blender jug gasket (c2) is
not positioned correctly or is
missing.
Reposition the gasket and lock
the blade holder correctly.
Leak from the base of
the accessories.
The gasket on the blade unit
(d2) or (e2) is not positioned
correctly or is missing.
Reposition the gasket on the
blade unit (d2) or (e2) and lock
it correctly onto the bowl (F).
The blade does not turn
easily.
Pieces of food too large or
too hard.
Reduce the size or quantity of
ingredients processed.
Add liquid
Impossible to lock the
blade unit with the
gasket (c1+c2) on the
jug (c3).
The gasket (c2) is not
positioned correctly.
Reposition the gasket, the
3 folds should be visible as
shown in Fig. 1.
Contact an approved service centre
(see list in service booklet).
You can customise your blender
and obtain the following accessories
from your usual dealer or from an
approved service centre: Herb
chopper accessory (D), Spice grinder
accessory (E), or an additional
blender jug (C).
Your blender still does not work?

54
本設備的説明
EN
ZH
A
B
C
馬達裝置
變速選擇器
攪拌器:
- c1 刀片
- c2 襯墊
- c3 量筒攪拌器
- c4 蓋子
- c5 量杯
D
E
F
切刀
(*配件視機型而定)
- d1 襯墊
- d2 切刀裝置
磨豆器
(*配件視機型而定)
- e1 襯墊
- e2 磨研裝置
切刀與磨研碗
您所購買的機型所附的配件在包裝最上方的標籤有標示。
警告:安全說明是設備的一部份。使用新設備前,
請細心閱讀。請妥善保存,以便日後作參考之用。
安全鎖
第一次使用
本設備只能在攬拌器(c)或配件(D或E)
的位置正確並固定在馬達裝置上(A)才
能運作。
•
第一次使用本設備之前,請用温肥皂
水清潔除馬達裝置(A)以外的所有配
件(C, D, E, F)。
•
注意:刀片極鋭利, 使用或清潔本
設備時請小心處理。
•
操作本設備之前,請確定已拆下所有
包裝。
•
重要事項:將攪拌器或配件放置在馬
達裝置上之前,請將變速選擇器(B)
轉到“0”。
•
本設備僅在攪拌器或配件在主機的位
置與固定正確時才會啟動。
•
不可在未蓋上蓋子時操作本攪拌器。

76
•
將襯墊弄逢(c2)並正確放置在刀片
(c1)上:襯墊在定位時,可以看到其
三個摺。如果放置在其他方向,您將
無法鎖住攪拌器上的刀片。(圖1)
•
將組件(c1+c2)放在攪拌器(c3)的底
座上。朝逆時針方向旋轉刀片四分之
一圈將其鎖住。 (圖2)
•
將材料倒入組合好的攪拌器內,但不
能超過指示的最大容量:
* M.25L濃混合物
* 1L液體
•
鎖上在攪拌器上的蓋子(c4)。將量杯
(c5)放在蓋子的凹槽中。
•
將攪拌器組件(C)放在馬達裝置(A)
上。紅色的鎖(開啟
)在馬達裝置
的溝槽中對齊。(圖3-位置1)
•
將攪拌器(C)旋轉四分之一圈,直到
顯示綠鎖 (已關閉)
>為止。
(圖3-位置2)
攪拌器有兩個可放置位置:馬達裝置右
側或左側的手把。
•
請遵守攪拌器最長使用時間為3 分鐘。
•
香草磨碎器 (D) 能讓你在幾秒之間
磨碎蔥、蒜,把肉類切片,切乾果,
及製作麵包屑。
不可使用切刀打液體(例如打果汁)
•
使用磨豆器(E)可以幾秒內研磨調味
料:芫荽籽、辣椒等。
•
這些配件配備有一個防止在使用時接
觸到刀片的碗(F)。
1- 將碗(F)旋轉並倒出內容物。
2- 將襯墊(d1)或(e1)放在刀片的凹槽
中(d2或e2)。(圖4)。將刀片裝置
放在與碗和刀片裝置的標記對齊的
碗上。朝逆時針方向旋轉刀片四分
之一圈將配件鎖住。(圖5)
注意:未正確鎖好配件可能導致外漏。
3- 旋轉組合後的配件(D或E),並將其
放在馬達裝置上。紅色的鎖
(開啟)
在馬達裝置的溝槽中
對齊。(圖6-位置1)
4- 將組合的配件(D或E)旋順時奸方向
旋轉四之分一圈,直到顯示綠鎖
(已關閉)
為止。 (圖6-位置2)
5- 將本設備的電源插頭插入電源插座
中,然後將變速 選擇器(B)轉到想
要的位置或讓攪拌器打幾下。在本
設備運作時固定碗(F)。若要使本
設備停止運作,請將變速選擇器
(B)調回位置“0”。
6- 依逆時針方向將配件旋轉四分之一
圈讓其解鎖,直到顯示紅鎖(開
啟)
為止。從馬達裝置上取下
組合的配件(D, E)。
依組合的相反順序從碗(F)上將刀片裝
置解鎖時,在工作台上將它上下顛倒翻
過來。刀片非常銳利:處理時請小心以
避免受傷。
你可以將調配物集中在碗中。
* 碗的顏色可能在攪拌某些非常硬的
內容物後變更:(目蓿、肉桂等)。
使用本設備

76
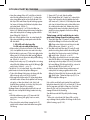
材料 最大容量 運轉時間 配件
杏仁/無花果 60 g
3秒/2速
D
麵包
1片
每時段10 秒
D
洋蔥
60 g
6秒/1速
D
剝殼的杏仁/樣果 60 g
每時段30 秒
D
荷蘭芹/新鮮的芫荽 10 g
打幾下
D
芫荽籽
40 g
30秒/2速
E
•
拔下本設備的電源插頭並取下配件。
•
請小心處理:攪拌器與配件的刀片非
常鋭利。
•
取下攪拌器,並在流水之下沖洗它及
其蓋子。
•
清潔馬達裝置(A)時,請使用溼布。
小心讓它乾燥。
•
絕不可將馬達裝置(A)浸入流動的水
之中。
•
為了方便清潔,請務必在使用後立即
用水和一點清潔液清洗可移動零件。
•
若要方便清潔攪拌器(C),依逆時針
方向將刀片裝置旋轉四分之一圈以將
其解鎖。取下襯墊(C2),然後用流水
或洗碗機清潔。
•
玻璃容器款式 (視乎型號而定) :
玻璃容器 (C) 可以放於洗碗碟機的
上層架並使用「節能」或「快洗」程
式清洗。配件(D, E) 不應用洗碗碟
機清洗。
•
塑膠容器款式 (視乎型號而定):
塑膠容器 (C) 及配件 (D, E) 不應
放在洗碗碟機清洗。
清潔本設備

98
本設備不操作時,我該怎麼辦?
問題 原因 解決方法
本產品不操作。
電源插頭未正確插入電源插頭中。
將本設備的電源插頭正確插入電源
插頭中並開啟電源。
攪拌器或配件在馬達裝置上的位置
錯誤或未正確鎖定。
檢查攪拌器或配件在馬達裝置上的
位置與鎖定是否如手冊中的圖所示
一樣正確°
震動過度。
未將本產品放在平坦、穩定與耐熱
的表面上。
將本產品放置在平坦表面上。
材料容量太多。 減少所處理材料的容量。
從蓋子滲漏。
材料容量太多。 減少所處理材料的容量。
蓋子的位置錯誤。 將蓋子正確鎖定在攪拌器上。
攪拌器的底座滲漏。
攪拌器襯墊(c2)的位置錯誤或
遺失。
重新放置襯墊,然後正確鎖住刀
片固定器。
配件的底座滲漏。
刀片裝置(d2)或(e2)上的襯墊位
置錯誤或遺失。
重新放置刀片裝置(d2)或(e2)
上的襯墊,然後將它正確鎖定在碗
(F)上。
刀片無法輕易轉動。 食物碎片太大塊或太硬。
減少所處理材料的大小或容量。
加入液體
無法用攪拌器(c3)上的襯墊
(c1+c2)鎖定刀片。
襯墊(c2)的位置錯誤。
重新放置襯墊,應如圖1所示 能看
到3個摺。
請洽詢經許可的服務中心(參閲服務手
冊中的一覽表)。
您可以從您光顧的經銷商或經許可的服
務中心處訂購或取得下列配件:切刀配
件(D)、磨研配件(E)或額外的攪拌器
(C)。
您的攪拌器仍然無法操作?
9

98 9
MÔ TẢ THIÉT BỊ
EN
VI
A
B
C
Bộ phận động cơ
Nut chọn tổc độ
Bộ phận xay:
- c1 Bộ phận dao cắt
- c2 Vòng đệm
- c3 Bình máy xay chia độ
- c4 Nẳp
- c5 Tách đo
D
E
F
Bộ phận cắt rau củ
(*phụ kiện tùy vào mẫu máy)
- d1 Vòng đệm
- d2
Bộ phận dao cắt rau củ
Bộ phận xay gia vị
(*phụ kiện tùy vảo mẫu máy)
- e1 Vòng đệm
- e2 Bộ phận dao căt gia vị
Tô của bộ phận cắt rau củ và Máy
xay gia vị
Phụ kiện có trong mẫu bạn đã mua được ghi trên nhãn ở mặt trên cùng cùa bao bì.
QUẢNG CÁO: Hướng dẫn an toàn là một phần quan trọng
trong tài liệu này. Vui lòng đọc kỹ trước khi sử dụng thiết bị
mới của bạn. Hãy đặt ở vị trí mà bạn có thể dễ dàng tìm thấy để
tham khảo trong những lần sau.
KHÓA AN TOÀN
SỬ DỤNG LẦN ĐẦU
hiết bị này chỉ có thể hoạt động khi bình
(C) hoặc các phụ kiện (D hoặc E) được lắp
chính xác và khóa vào bộ phận động CO’
(A).
• Trước khi sử dụng thiết bị của bạn lần
đầu tiên, hãy vệ sinh tất cả các phụ kiện
(C, D, E, F) bằng nước xà phòng ấm, trừ
bộ phận động CO’ (A).
• Đảm bảo đã tháo tất cả bao bì trước khi
vận hành thiết bị.
• THẬN TRỌNG: Các lirỡi dao rất sắc;
hãy cầm chúng một cách thận trọng
khi sử dụng hoặc vệ sinh thiết bị.
• Lưu ý quan trọng: Vặn nút chọn tốc
độ (B) đến vị trí “0” trước khi đặt bình
máy xay hoặc phụ kiện lên bộ phận
động cơ.
• Thiết bị chỉ khởi động nếu bình này
hoặc phụ kiện được lắp chính xác và
khóa vào thân của nó.
• Không được vận hành máy xay nếu
chưa đậy nẳp.

1110
•
Làm ẩm vòng đệm (c2) và đặt nó chính
xác lên bộ phận dao cắt (c1): 3 nếp gấp
cùa vòng đệm phải nhìn thấy được sau
khi lắp. Nếu nó được lắp ở hướng ngược
lại, bạn sẽ không thể khóa bộ phận dao
cat vào bình. (Hình 1).
•
Đặt bộ lắp ráp (c1+c2) lên bệ đỡ cùa
bình (c3). Khóa bằng cách xoay bộ phận
dao cắt một phần tư vòng ngược chiều
kim đồng hồ. (Hình 2).
•
Bỏ các thành phần thức ăn vào bình đã
lắp ráp mà không vượt quá mức tối đa
đã cho biết:
1.25L đốÍ với hỗn hợp đặc
1L đối với các chế phẩm lỏng.
•
Khóa nắp (c4) bên trên bình. Đặt tách đo
(c5) vào phần thụt vào cùa nó trên nắp.
•
Đặt bộ bình máy xay (C)lên trên bộ phận
động cơ (A). Khóa màu đỏ (mở được
căn chỉnh với cái khe trên bộ phận động
cơ. (Hình 3 - vị trí 1)
•
Xoay bình máy xay (C) một phần tư vòng
cho đến khi khóa màu xanh lá (đóng)
xuất hiện. (Hình 3 - vị trí 2)
Có thể có 2 vị trí cùa bình: tay cầm ở bên
phải hoặc trái cùa bộ phận động cơ.
•
Tuân thủ đúng thời gian sử dụng tối đa
đối với máy xay sinh tố là 3 phút.
•
Máy nghiền thảo mộc (D) cho phép bạn
cắt nhỏ một số loại thực phẩm chỉ trong
vài giây, ví dụ như hành, tỏi, thịt (cắt
thành từng miếng), trái cây sấy khô, cắt
lát bánh mì (bánh mì nướng).
Không được sử dụng bộ phận cắt rau cù
để cho các chế phẩm lỏng (nước trái cây,
v.v.).
•
Với bộ phận xay gia vị (E) bạn có thể
xay gia vị trong vài giây: hạt rau mùi,
tiêu, v.v.
•
Các phụ kiện này được trang bị tô (F)
giúp tránh chạm vào lưỡi dao trong khi
sử dụng.
1-
Xoay tô (F) và rót thành phần.
2-
Đặt vòng đệm (d1) hoặc (e1) vào phần
thụt vào cùa nó trên bộ phận dao cắt
(d2 hoặc e2). (Hình 4). Đặt bộ phận dao
cắt vào tô cho khớp với cả hai dấu trên
tô và bộ phận dao cắt. Khóa phụ kiện
bằng cách xoay bộ phận dao cắt một
phần tư vòng ngược chiều kim đồng
hồ. (Hình 5)
Thận trọng: có thể xuất hiện rò ri nếu
phụ kiện không đirợc khóa đúng cách.
3-
Xoay bộ lắp ráp (D hoặc E) và đặt nó lên
bộ phận động cơ. Khóa màu đỏ (mở)
được căn chỉnh với cái khe trên bộ
phận động cơ. (Hình 6 - vị trí 1)
4-
Sau đó xoay bộ lắp ráp (D hoặc E) một
phần tư vòng theo chiều kim đồng hồ
cho đến khi khóa màu xanh lá (đóng)
xuất hiện. (Hình 6 - vị trí 2).
5-
Cắm điện cho thiết bị và vặn nút chọn
tốc độ (B) đến vị trí mong muốn hoặc
áp dụng vài nhịp dập. Giữ tô (F) khi thiết
bị hoạt động. Để dừng thiết bị, vặn nút
chọn tốc độ (B) trở về vị trí “0”.
6-
Mở khóa phụ kiện bằng cách xoay nó
một phần tư vòng ngược chiều kim
đồng hồ cho đến khi khóa màu đỏ (mở)
xuất hiện. Tháo bộ lắp ráp (D, E) ra
khỏi bộ phận động cơ.
Lật nó lên một bề mặt trước khi mở khóa
bộ phận dao cắt (d2, e2) ra khỏi tô (F) theo
thứ tự ngược với thứ tự lắp ráp. Các lưỡi
dao rất sắc: xử lý chúng một cách thận
trọng để tránh bị thương.
Sau đó bạn có thể lấy chế phẩm trong
tô ra.
* Màu sắc cùa tô có thể thay đổi sau khi
xay những thành phần rất cứng nhất định:
(đinh hương, quế, V.V.).
SỬ DỤNG THIÉT BỊ CỦA BẠN

1110
Thành phần Số lượng (tối đa) Thời gian vận hành Phụ kiện
Quả mơ / vả 60 g 3 giây / tổc độ 2 D
Mẩu vụn 1 bánh bít cổt
10 s cho mỗi nhịp bấm
máy chạy
D
Hành 60 g 6 giây / tổc độ 1 D
Hạnh nhân còn vỏ / hạt phỉ 60 g
30 s cho mỗi nhịp bấm
máy chạy
D
Ngò tây / rau mùi tươi 10 g ở chế độ dập D
Hạt rau mùi 40 g 30 giây /tổc độ 2 E
• Rút phích cắm của thiết bị và tháo phụ
kiện
• Cầm chúng một cách thận trọng: các
lưỡi dao trên bình máy xay và các phụ
kiện rất sắc.
• Tháo bình và xả bình và nắp bình bằng
nước vòi.
• Để vệ sinh bộ phận động CO’ (A), sử
dụng vải ẩm. Để thật khô.
• Không được để cho bộ phận động CO’
(A) tiếp xúc với nước vòi.
• Để dễ vệ sinh, hãy nhớ rửa các bộ phận
tháo rời được trong nước và nước rửa
chén ngay sau khi sử dụng.
• Để vệ sinh bình máy xay (C) một cách
dễ dàng, hãy mở khóa bộ phận dao cắt
(c1) bằng cách xoay nó một phần tư
vòng ngược chiều kim đồng hồ. Tháo
vòng đệm (c2) và vệ sinh bằng nước vòi
hoặc trong máy rửa chén.
•
DÒNG MÁY VỚI CỐI THỦY TINH (theo
model) :
Có thể rửa cối thủy tinh (C) trong máy rửa
chén ở rổ trên bằng chương trình «ECO»
hoặc «PEU SALE». Không được rửa các phụ
kiện (D, E) bằng máy rửa chén.
•
DÒNG MÁY VỚI CỐI NHỰA (theo model) :
Không được rửa cối nhựa (C) và các phụ
kiện (D, E) bằng máy rửa chén.
VỆ SINH THIÉT BỊ CỦA BẠN

1312
BẠN PHẢI LÀM GÌ NÉU THIÉT BỊ CỦA BẠN KHÔNG HOẠT ĐỘNG?
Vấn đề Nguyên nhân Giải pháp
Sản phẩm không hoạt động.
Phích cắm chưa được cắm chính xác
vào ổ cắm.
Hãy cắm thiết bị vào một ổ cắm và
bật nguồn.
Bình hoặc phụ kiện không được lắp
hoặc khóa chỉnh xác iên bọ phận
động cơ.
Kiểm tra xem bình hoặc phụ kiện có
được lắp và khóa chính xác lên bộ
phận động cơ như minh hoa trong
hình ơtài liệu hướng dẫn hay không.
Rung quá mức.
Sản phẩm^không đựực lập đặt
trên một bề mặt phẳng, ổn định,
chịu nhiệt.
Hãy đặt sản phẩm lên một bề mặt
bằng phẳng.
Thể tích của các thành phần quá lớn.
Giảm sổ lượng thành phần được
xử lý.
Rò rỉ từ nắp.
Thể tích của các thành phần quá lớn.
Giảm sổ lượng thành phần được
xử lý.
Nắp không được lắp chính xác.
Khóa nắp chính xác lên bình máy
xay.
Rò rỉ từ bệ đỡ bình máy xay.
Vòng đệm bình máy xay(c2) không
được đặt chính xác hoặc thiếu.
Đặt lại vòng đệm và khóa bệ đỡ dao
cắt một cẩch chính xác.
Rò rỉ từ bệ đỡ của các phụ
kiện.
Vòng đệm trên bộ phận dao cắt (d2)
hoắc (e2) khổng được đặt chính xầc
hoạc thiểu.
Đặt lại vòng đệm trên bộ phận dao
cắt (d2) hoặc (e2) và khổà nổ vào tô (F)
một cách chính xác.
Lưỡi dao không xoay dễ
dàng.
Các miếng thức ăn quá lớn hoặc
quá cứng.
Giảm kích thước hoặc sổ lượng
thành phận được xử lỳ.
Thêm chất lỏng
Không thể khóa bộ phận
dao cat có vòng đềm (c1+c2)
vào bình (c3).
Vòng đệm (c2) không được đặt
chính xảc.
Lắp lại vòng đệm, 3 nếp gấp phải
nhìn thấy như trong Hình 1.
Hãy liên hệ một trung tâm bảo trì được
chấp thuận (xem danh sách trong tài liệu
về bảo trì). Bạn có thể tùy chỉnh máy xay
và mua các phụ kiện sau đây từ đại lý bán
hàng bình thường hoặc từ một trung tâm
bảo trì được chấp thuận: Phụ kiện dao
cắt rau củ (D), Phụ kiện máy xay gia vị (E),
hoặc một bình máy xay bổ sung (C).
Máy xay của bạn vẫn không hoạt động?

13
PENERANGAN
EN
MS
A
B
C
Unit motor
Pemilih kelajuan
Unit pengisar:
- c1 Unit bilah
- c2 Gasket
- c3 Jug pengisar bersenggat
- c4 Tudung
- c5 Cawan penyukat
D
E
F
Pencencang herba
(*aksesori bergantung pada model)
- d1 Gasket
- d2 Unit bilah pengisar
Pengisar rempah
(*aksesori bergantung pada model)
- e1 Gasket
- e2 Unit bilah rempah
Pencencang herba dan Mangkuk
pengisar rempah
Aksesori yang terdapat dalam model akan ditunjukkan pada bahagian atas bungkusan.
AMARAN: Arahan-arahan keselamatan adalah sebahagian
daripada perkakas. Sila baca dengan teliti sebelum
menggunakan perkakas baru anda. Simpan di tempat yang
mudah ditemui dan senang dirujuk pada masa depan.
SISTEM KESELAMATAN
MENGGUNAKAN UNTUK KALI PERTAMA
Perkakas hanya boleh beroperasi semasa
jug (C) atau aksesori (D atau E) diletakkan
dalam kedudukan yang betul dan
dikunci pada unit motor (A).
• Sebelum menggunakan perkakas anda
untuk kali pertama, cuci semua aksesori
(C, D, E, F) dalam air sabun suam,
kecuali untuk unit motor (A).
• Pastikan semua bungkusan telah
dikeluarkan sebelum mengoperasikan
perkakas.
LANGKAH BERJAGA-JAGA: Bilah
sangat tajam; gunakannya dengan
berhati-hati semasa menggunakan
atau mencuci perkakas.
• Nota penting: Putar pemilih kelajuan
(B) kepada “0” sebelum meletakkan jug
pengisar atau aksesori pada unit motor.
• Perkakas bermula hanya jika jug atau
aksesori diletakkan dengan betul dan
dikunci pada badannya.
• Jangan mengoperasikan pengisar
jika tudung tidak berada pada
tempatnya
12

1514
• Basahkan gasket (c2) dan letakkannya
dengan betul pada unit bilah (c1): 3
lipatan gasket mesti boleh dilihat sebaik
sahaja ia berada pada tempatnya. Jika
ia diletakkan dalam arah yang lain, anda
tidak boleh menguncinya pada unit bilah
pada jag. (Rjh. 1).
• Letakkan pemasangan (c1+c2) pada tapak
jug (c3). Kuncinya dengan memutar unit
bilah melalui putaran sukuan dalam arah
melawan jam. (Rjh. 2).
• Masukkan bahan ke dalam jug yang
dipasang tanpa melebihi paras maksimum
yang ditunjukkan:
* 1.25L untuk campuran tebal
* 1L untuk persediaan cecair.
• Letakkan i penutup (c4) pada jug . Letakkan
cawan penyukat (c5) dalam relungnya pada
penutup.
• Letakkan pemasangan jug pengisar (C)
pada unit motor (A). Kunci merah (buka
diselarikan dalam slot pada unit motor.
(Rjh. 3 - kedudukan 1)
• Kemudian, putar jug pengisar (C) melalui
putaran sukuan sehingga kunci hijau
(ditutup)
muncul. (Rjh. 3 - kedudukan 2)
2 kemungkinan kedudukan jag: pemegang
pada sebelah kanan atau kiri
unit motor.
• Masa penggunaan maksimum perkakas
selama 3 minit mesti dipatuhi.
• Dengan pencincang herba (D) anda boleh
mencincang bahan seperti bawang merah,
bawang putih, daging (dipotong dalam
bentuk kepingan) dan buah kering dalam
beberapa saat, serta membuat serbuk roti
(daripada roti panggang).
Jangan gunakan pencencang herba untuk
persediaan cecair (jus buah-buahan. dll.)
• Dengan pengisar rempah (E) anda boleh
mengisar rempah dalam beberapa saat: biji
ketumbar, lada hitam, dll.
• Aksesori ini dilengkapi dengan mangkuk (F)
yang mengelakkan capaian kepada bilah
semasa digunakan.
1- Putar mangkuk (F) dan tuangkan bahan.
2- Letakkan gasket (d1) atau (e1) dalam
relungnya pada unit bilah (d2 atau e2).
(Rjh. 4). Letakkan kedudukan unit bilah
pada mangkuk selari dengan tanda pada
mangkuk dan unit bilah. Kunci aksesori
dengan memutar unit bilah melalui
putaran sukuan dalam arah melawan jam.
(Rjh. 5).
Langkah berjaga-jaga: kebocoran boleh
berlaku jika aksesori tidak dikunci dengan
betul.
3- Putar pemasangan yang pasang (D atauE)
dan kedudukannya pada unit motor. Kunci
merah (buka) diselarikan dalam slot
pada unit motor. (Rjh. 6 - kedudukan 1)
4- Kemudian, putar aksesori yang dipasang
(D atau E) melalui putaran sukuan
sehingga kunci hijau (ditutup) muncul.
(Rjh. 6 - kedudukan 2)
5- Pasang plug perkakas dan putar pemilih
kelajuan (B) ke kedudukan yang
dikehendaki atau gunakan beberapa
denyutan. Pegang mangkuk (F) semasa
perkakas sedang digunakan. Untuk
menghentikan perkakas, putar pemilih
kelajuan (B) kembali ke kedudukan “0”.
6- Buka kunci aksesori dengan memutarnya
melalui putaran sukuan dalam arah
melawan jam, sehingga kunci merah
(buka) muncul. Tanggalkan aksesori
yang dipasang (D, E) dari unit motor.
Putar pada tempat kerja sebelum membuka
kunci unit bilah (d2, e2) dari mangkuk (F)
dalam susunan terbalik bagi pemasangan.
Bilah sangat tajam: gunakannya dengan
berhati-hati untuk mengelakkan kecederaan.
Kemundian, anda boleh mengambil
penyediaan dalam mangkuk.
* Warna mangkuk mungkin berubah selepas
mengisar beberapa bahan yang sangat
keras: (bunga cengkih, kulit kayu manis, dll.).
MENGGUNAKAN PERKAKAS ANDA

1514
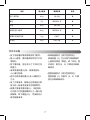
Bahan
Kuantiti
(maks.)
Masa operasi Aksesori
Aprikot / buah dalam tin 60 g 3 s / kelajuan 2 D
Serbuk 1 bánh bít cổt 10 saat setiap putaran D
Bawang 60 g 6 saat / kelajuan 1 D
Buah badam berkulit / kacang hazel 60 g 30 saat setiap putaran D
Pasli / ketumbar segar 10 g Dalam denyutan D
Biji ketumbar 40 g 30 saat / kelajuan 2 E
• Cabut plug perkakas dan tanggalkan
aksesori
• Gunakannya dengan berhati-hati: bilah
pada jug pengisar dan aksesori adalah
tajam.
• Tanggalkan jug dan bilaskannya bersama
penutup di bawah air yang mengalir.
• Untuk mencuci unit motor (A), gunakan
kain yang lembap. Keringkannya dengan
berhati-hati.
• Jangan tenggelamkan unit motor (A) dalam
air yang mengalir.
• Untuk pencucian mudah, pastikan
anda membasuh bahagian yang boleh
ditanggalkan dalam air dan sedikit
cecair pencucian serta-merta selepas
menggunakannya.
• Untuk mencuci jug pengisar (C) dengan
mudah, buka kunci unit bilah (c1) dengan
memutarnya melalui putaran sukuan dalam
arah melawan arah jam. Tanggalkan gasket
(c2) dan cucikannya di bawah air yang
mengalir atau dalam pencuci pinggan-
mangkuk.
•
JENIS MANGKUK KACA (berdasarkan
model) :
Mangkuk kaca (C) boleh dicuci dengan
menggunakan mesin pencuci pinggan
pada rak paling tinggi dengan program
«EKO» atau «KURANG KOTOR». Aksesori-
aksesori (D, E) tidak boleh dicuci dengan
menggunakan mesin pencuci pinggan.
•
JENIS MANGKUK PLASTIK (berdasarkan
model) :
Mangkuk plastik (C) dan aksesori-
aksesori (D, E) tidak boleh dicuci dengan
menggunakan mesin pencuci pinggan.
MENCUCI PERKAKAS ANDA

1716
APA YANG PERLU DILAKUKAN JIKA PERKAKAS ANDA TIDAK BERFUNGSI ?
Masalah Punca Penyelesaian
Produk tidak berfungsi.
Plug tidak dimuatkan dengan betul
ke dalam soket.
asang plug perkakas ke dalam soket
dan hidupkannya.
Jug atau aksesori tidak diletakkan
dengan betul atau dikunci pada
unit motor.
Periksa bahawa jug atau aksesori
diletakkan dengan betul dan
dikunci pada unit motor seperti
yang ditunjukkan dalam rajah dalam
manual.
Getaran berlebihan.
Produk tidak diletakkan pada
permukaan yang rata, stabil, tahan
haba.
Letakkan produk pada permukaan
yang rata.
Isipadu bahan adalah terlalu tinggi.
Kurangkan kuantiti bahan yang
diproses.
Kebocoran dari penutup.
Isipadu bahan adalah terlalu tinggi.
Kurangkan kuantiti bahan yang
diproses.
Penutup tidak diletakkan dengan
betul.
Kunci penutup dengan betul pada
jug pengisar.
Kebocoran dari tapak jug
pengisar
Gasket jug pengisar (c2) tidak
diletakkan dengan betul atau tiada.
Letakkan semula gasket dan kunci
pemegang bilah dengan betul.
Kebocoran dari tapak
aksesori.
Gasket pada unit bilah (d2) atau
(e2) tidak diletakkan dengan betul
atau tiada.
Letakkan semula gasket pada unit
bilah (d2) atau (e2) dan kuncinya
dengan betul ke atas mangkuk (F).
Bilah tidak berputar dengan
mudah.
Kepingan makanan terlalu besar
atau terlalu keras.
Kurangkan saiz atau kuantiti bahan
yang diproses. Tambah air
Tidak dapat mengunci unit
bilah dengan gasket
(c1+c2) pada jag (c3).
Gasket (c2) tidak diletakkan dengan
betul.
Letakkan semula gasket, 3
lipatan boleh dilihat seperti yang
ditunjukkan dalam Rjh. 1.
Hubungi pusat perkhidmatan yang
diluluskan (lihat senarai dalam buku kecil
perkhidmatan).
Anda boleh menyesuaikan pengisar
anda dan mendapatkan aksesori lain
dari pengedar biasa anda atau dari pusat
perkhidmatan yang diluluskan. Aksesori
pencencang herba (D), Aksesori pengisar
rempah (E), atau jag pengisar tambahan
(C).
Pengisar anda masih tidak berfungsi?

1716
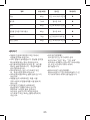
รายละเอียดของเครื่องปั่น
EN
TH
รายการอุปกรณ์เสริมต่าง ๆ ที่มีอยู่ในแต่ละรุ่นที่คุณซื้อจะแสดงอยู่บนป้ายที่ติดอยู่ตรงด้านบน ของบรรจุภัณฑ์
คำาเตือน : คำาแนะนำาเพื่อความปลอดภัยมาพร้อมกับเครื่อง
กรุณาอ่านละเอียดก่อนใช้กล้องถ่ายรูป
เก็บไว้ในที่ที่หาง่ายสำาหรับดูในคราวต่อไป
ระบบล็อคนิรภัย
ก่อนการใช้งานครั้งแรก
การใช้งานเครื่องปั่น
•
เช็ดซีลยางกันรั่วซึม (c2) ให้เปียกน้ำาพอ
หมาด ๆ แล้วใส่ให้เข้าที่บนชุดใบมีด (c1):
คุณจะต้องมองเห็นรอยพับ 3 ร่องของซีล
ยางกันรั่วซึมได้อย่างชัดเจนเมื่อใส่ซีลยาง
เข้าที่ดีแล้ว ถ้าคุณใส่ซีลยางกันรั่วซึมใน
ทิศทางอื่น คุณจะไม่สามารถล็อคชุดใบมีดบน
โถปั่นได้ (รูปที่ 1)
เครื่องปั่นจะสามารถทำางานได้ เมื่อ
ประกอบและล็อคโถปั่น (C) หรืออุปกรณ์เสริม
(D หรือ E) เข้าที่อย่างถูกต้องบนแท่น
มอเตอร์ (A) แล้วเท่านั้น
• ก่อนที่จะใช้งานเครื่องปั่นเป็นครั้งแรก
คุณควรทำาความสะอาดอุปกรณ์เสริมทุกชิ้น
(C, D,
E, F) ด้วยน้ำาสบู่อุ่น ๆ ยกเว้น
แท่นมอเตอร์ (A)
คำาเตือน: ใบมีดมีความคมมาก
ให้ใช้งานด้วยความระมัดระวังเมื่อใช้งาน
หรือทำาความสะอาดเครื่องปั่น
• ตรวจดูให้แน่ใจว่าได้แกะบรรจุภัณฑ์ทุกชิ้น
ออกแล้ว ก่อนที่จะเปิดทำางานเครื่องปั่น
• สิ่งสำาคัญที่ต้องจำา: หมุนปุ่มปรับระดับ
ความเร็ว (B) ไปที่ “0” ก่อนที่จะประกอบ
โถปั่น หรืออุปกรณ์เสริมบนแท่นมอเตอร์
• เครื่องปั่นจะเริ่มทำางานก็ต่อเมื่อคุณประกอบ
และล็อคโถปั่นหรืออุปกรณ์เสริมเข้าที่อย่าง
ถูกต้องแล้ว เท่านั้น
• ห้ามเปิดทำางานเครื่องปั่นหากยังปิด
ฝาไม่เข้าที่
A
B
C
ฐานมอเตอร์
สวิทช์ควบคุมการทำางาน 0 / 1 / 2 / Pulse
ชุดโถปั่น:
- c1 ชุดใบมีด
- c2 ซีลยางกันรั่วซึม
- c3 โถปั่นแบบมีขีดแสดงระดับ
- c4 ฝาปิด
- c5 ถ้วยตวง
D
E
F
โถบดสับ
(*อุปกรณ์เสริมจะแตกต่างกันไปในแต่ละรุ่น)
- d1 ซีลยางกันรั่วซึม
- d2 ชุดใบมีดของโถสับสับ
โถบดแห้ง
(*อุปกรณ์เสริมจะแตกต่างกันไปในแต่ละรุ่น)
- e1 ซีลยางกันรั่วซึม
- e2 ชุดใบมีดบดแห้ง
ฝาครอบสำาหรับโถบดสับและโถบดแห้ง

1918
•
ใส่ชุดประกอบโถปั่น (c1+c2) เข้ากับ
ฐานด้านล่างของโถปั่น (c3) ล็อคชุด
ประกอบเข้ากับ โถปั่นโดยหมุนทวนเข็มนาฬิกา
90 องศา (รูปที่ 2)
•
เทส่วนผสมลงในโถที่ประกอบแล้วโดยไม่
ให้เกินระดับสูงสุดที่กำาหนด:
* 1.25 ลิตรสำาหรับส่วนผสมที่เหนียวข้น
* 1 ลิตร สำาหรับการเตรียมของเหลว
•
ล็อคฝาปิด (c4) บนโถปั่น วางถ้วยตวง (c5)
ในช่องบนฝาปิด
•
วางชุดประกอบโถปั่น (C) บนแท่นมอเตอร์
(A) ตัวล็อคสีแดง (กุญแจเปิด)
จะอยู่ตรง
กันในช่องแสดงบนแท่นมอเตอร์ (รูปที่ 3 -
ตำาแหน่งที่ 1)
•
จากนั้น ให้หมุนโถปั่น (C) 90 องศาจนกว่า
ตัวล็อคสีเขียว (กุญแจปิด) ปรากฏขึ้นมา
(รูปที่ 3 - ตำาแหน่งที่ 2)
คุณสามารถวางโถปั่นบนแท่นมอเตอร์ได้ 2
ตำาแหน่ง: โดยวางทางด้านซ้ายหรือด้านขวา
ของแท่นมอเตอร์
•
ระวังเวลาในการปั่น
โดยเครื่องปั่นสามารถปั่นได้นานสูงสุด 3 นาที
•
คุณสามารถใช้โถบดสับ (D) เพื่อสับส่วนผสมต่าง ๆ
เช่น หัวหอม, กระเทียม (หั่นเป็นชิ้น ๆ), ผลไม้แห้ง
และทำาขนมปังชิ้นเล็ก ๆ (ขนมปังกรอบ)
ได้ในเวลาเพียงแค่ไม่กี่วินาที
•
คุณสามารถใช้โถบดแห้ง (E) เพื่อบด
เครื่องเทศได้ภายในเวลาเพียงแค่ไม่กี่วินาที:
เช่น เมล็ดผักชี พริกไทย เป็นต้น
•
ชุดอุปกรณ์เสริมเหล่านี้จะมีฝาครอบ (F)
เพื่อช่วยป้องกันไม่ให้ใบมีดบาดผู้ใช้
ในระหว่างการใช้งาน
1- หมุนฝาครอบออก (F) แล้วเทส่วนผสมลงไป
2- วางซีลยางกันรั่วซึม (d1) หรือ (e1)
ลงในร่องบนชุดใบมีด (d2 หรือ e2) (รูป
ที่ 4) ประกอบชุดใบมีดบนฝาครอบโดย
หมุนให้เครื่องหมาย บนฝาครอบตรงกันกับ
เครื่องหมายบนชุดใบมีด ล็อคอุปกรณ์
เสริมโดยหมุนชุดใบมีดทวนเข็มนาฬิกา
90 องศา (รูปที่ 5)
คำาเตือน: ส่วนผสมอาจรั่วซึมได้หาก
คุณไม่ได้ล็อคอุปกรณ์เสริมให้เข้าที่
อย่างถูกต้อง
3- หมุนชุดที่ประกอบแล้ว (D หรือ E) ให้
เข้าที่บนแท่นมอเตอร์ ตัวล็อคสีแดง
(กุญแจเปิด)
จะอยู่ตรงกันในสล็อต
บนแท่นมอเตอร์ (รูปที่ 6 - ตำาแหน่งที่ 1)
4- จากนั้น หมุนชุดที่ประกอบแล้ว (D หรือ E)
90 องศาจนกว่าตัวล็อคสีเขียว (กุญแจปิด)
จะปรากฏขึ้นมา (รูปที่ 6 - ตำาแหน่งที่ 2)
5- เสียบปลั๊กเครื่องปั่น แล้วหมุนปุ่มปรับ
ระดับความเร็ว (B) ไปยังตำาแหน่งที่ต้องการ
หรือใช้ฟังก์ชัน Pulse สัก 2-3 วินาที
จับฝาครอบ (F) ไว้ให้แน่นขณะที่เครื่องปั่น
กำาลังทำางาน หากต้องการหยุดเครื่องปั่น
ให้หมุนปุ่มปรับระดับความเร็ว (B)
กลับไปที่ตำาแหน่ง “0”
6- ปลดล็อคอุปกรณ์เสริมโดยหมุนทวนเข็ม
นาฬิกา 90 องศาจนกว่าตัวล็อคสีแดง
(กุญแจเปิด)
จะปรากฏขึ้นมา ถอด
ชุด
อุปกรณ์ที่ประกอบแล้ว (D, E) ออกจาก
แท่นมอเตอร์ วางหงายขึ้นบนพื้นเรียบ
ก่อนที่จะปลดล็อคชุดใบมีด (d2, e2) ออก
จากฝาครอบ (F) ในทิศทางตรงกันข้ามกับ
ตอนประกอบ คุณสามารถเก็บส่วนผสมที่
เตรียมไว้ในฝาครอบนั้นได้
* ฝาครอบอาจเปลี่ยนสีได้หากใช้บด
ส่วนผสมที่เป็นเนื้อแข็งบางอย่าง (เช่น
กานพลูหรืออบเชย เป็นต้น)
ページが読み込まれています...
ページが読み込まれています...
ページが読み込まれています...
ページが読み込まれています...
ページが読み込まれています...
ページが読み込まれています...
-
 1
1
-
 2
2
-
 3
3
-
 4
4
-
 5
5
-
 6
6
-
 7
7
-
 8
8
-
 9
9
-
 10
10
-
 11
11
-
 12
12
-
 13
13
-
 14
14
-
 15
15
-
 16
16
-
 17
17
-
 18
18
-
 19
19
-
 20
20
-
 21
21
-
 22
22
-
 23
23
-
 24
24
-
 25
25
-
 26
26


