Wall Mounting: Available only for models with wall-mounting
holes on the back.
Drill two holes on the wall at the appropriate distance apart.
Insert the wall plug and screws into the wall. Leave a wall gap as
shown on which to hang the NSG.
Align the holes on the back of the NSG with the screws on the
wall. Hang the NSG on the screws.
Wandbefestigung: Nur verfügbar für Modelle mit entsprechen-
den Lochungen auf der Rückseite:
Bohren Sie zwei Löcher mit dem notwenigen Abstand in die
Wand. Bringen Sie an der Wand die Verankerungen und Schra
ben entsprechend an. Lassen Sie ein Wandlücke wie abgebildet
und befestigen Sie die NSG.
Passen Sie die Lochungen auf der Rückseite der NSG an die
Schrauben in der Wand an. Hängen Sie die NSG an den Schra
ben befestigt auf.
Montage mural : disponible uniquement sur les modèles équipés
de trous de fixation sous l’équipement.
Percez 2 trous dans le mur, à une distance appropriée. Insérez
les chevilles et les vis dans le mur. Laissez un espace suffisant
pour fixer le NSG.
Alignez les trous du NSG avec les vis. Accrochez le NSG sur les
vis.
Installazione a parete: disponibile solo per i modelli con i fori sul
retro.
Effettuare due fori nella parete alla distanza corretta. Inserire
la staffa ed avvitarla al muro. Lasciare spazio come mostrato,
per agganziare l’NSG.
Allineare i fori sul retro dell’NSG alle viti sul muro ed append-
erlo.
Rack Mounting: Available only for models with rack mounting
holes.
Attach the mounting brackets to the NSG using a #2 Philips
screwdriver and M3 flat head screws.
Mount the NSG on a rack using a #2 Philips screwdriver and
M5 flat head screws.
Desktop Installation: Attach rubber feet to the NSG and place on
a desk.
Rackmontage-Zubehör: nur für Modelle mit Rack-Montage
Öffnungen verfügbar.
Bringen Sie die Montagehalterung mithilfe eines # 2
Kreuzschraubendrehers und den M3 Senkkopfschrauben an.
Bringen Sie die Montagehalterung mithilfe eines # 2
Kreuzschraubendrehers und den M5 Senkkopfschrauben an.
Tischinstallation: Befestigen Sie die Gummifüße am NSG und
stellen Sie ihn einfach auf den Schreibtisch.
Kit de montage rack : disponible uniquement pour les modèles
équipés de trous de montage de montage rack latéraux.
Fixez les supports de montage au NSG à l'aide d'un tournevis
cruciforme N°2 et de vis M5 à tête plate.
Fixez le NSG sur un rack à l'aide d'un tournevis cruciforme N°2
et de vis M5 à tête plate.
Installation de bureau : fixez les pieds en caoutchouc sur le NSG
et placez-le sur un bureau.
Kit di montaggio a rack: disponibile solo per i modelli con fori di
montaggio sul telaio.
Fissare le staffe di montaggio al NSG con un cacciavite a
croce n. 2 e viti a testa piatta M3.
Montare il NSG su un rack utilizzando un cacciavite a croce n.
2 e viti a testa piatta M5.
Installazione Desktop: Fissare i piedini di gomma al NSG e
posizionare su una scrivania.
Login
Sign In
Email
Password
Submit
myZyxel
2
1 1
2
NSG IP: 192.168.1.1
4
User Name
Password
Login
NSG
Series
NSG Series
Device Information System Status
http://192.168.1.1
PC IP: 192.168.1.2~192.168.1.254
Modem / Router
5
6
7
11 Hardware Connection1
Mounting
Optional
Desktop Installation
Rack Mounting Wall Mounting
11 Device Configuration
2 11 NCC Management3
NSG Series
Nebula Cloud Managed
Security Gateway
Quick Start Guide
ENGLISH | DEUTSCH | FRANÇAIS | ITALIANO
POWER
12V ,3A
Power Outlet
1
LAN/DMZ
WAN
2
LAN/DMZ
3
http://192.168.1.1
User Name: admin
Password: 1234
EN
DE
FR
IT
Copyright © 2018 Zyxel Communications Corp. All Rights Reserved.
EU Importer
Zyxel Communications A/S
Gladsaxevej 378, 2. th. 2860 Søborg, Denmark
http://www.zyxel.dk
US Importer
Zyxel Communications, Inc
1130 North Miller Street Anaheim, CA 92806-2001
http://www.us.zyxel.com
See the User's Guide at www.zyxel.com for more information,
including customer support and safety warnings.
http://nebula.zyxel.com
Device Back Label
S/N: XXXXXXXXXXXX
LAN MAC: XXXXXXXXXX
If you create a new site we can help
you configure it.
ORGANIZATION
Support Information
North America
USA
+ 1 800 255 4101
UK
+ 44 (0) 118 912 1700
Germany
+ 49 (0) 2405 - 69 09 69
France
+33 (0) 892 692 610
Italy
+ 39 011 2308000
1
2
1
2
1
2
1
2
Connect the power socket to an appropriate power source.
Connect your computer to the NSG's LAN port using an
Ethernet cable.
Schließen Sie den Netzadapter an eine geeignete
Stromquelle an.
Verbinden Sie Ihren Computer mit einem Ethernet-Kabel mit
dem LAN-Port des NSG.
Branchez la prise de courant à une source d'alimentation
appropriée.
Connectez votre ordinateur au port LAN du NSG à l'aide d’un
câble Ethernet.
Collega la presa di alimentazione a una sorgente di
alimentazione appropriata.
Collega il computer alla porta LAN del NSG utilizzando un
cavo Ethernet.
EN
DE
FR
IT
1
2
1
2
1
2
1
2
Launch your web browser and type http://192.168.1.1. Your
computer must have an IP address in the same subnet as the
NSG.
Enter admin as the user name and 1234 as the password.
Click Login and configure your WAN connection settings in
the Configuration > Interface screens. See the NSG User's
Guide for detailed information.
Starten Sie Ihren Webbrowsern, und geben Sie
http://192.168.1.1 ein. Die IP-Adresse des Computers muss sich
im selben Subnetz wie die des NSG befinden.
Geben Sie als Benutzername admin und als Passwort 1234
ein. Klicken Sie auf Login (anmelden), und konfigurieren Sie
die WAN-Verbindungseinstellungen im Bildschirm
Configuration > Interface (Konfiguration > Schnittstelle).
Ausführliche Informationen dazu finden Sie im
Benutzerhandbuch.
Lancez votre navigateur Web et tapez http://192.168.1.1. Votre
ordinateur doit disposer d'une adresse IP dans le même
sous-réseau que le NSG.
Entrez admin comme nom d'utilisateur et 1234 comme mot de
passe. Cliquez sur Login (ouverture de session) et configurez
vos paramètres de connexion WAN dans les écrans
Configuration > Interface (Configuration > Interface). Voir le
NSG Guide de l'utilisateur pour les informations détaillées.
Apri il browser e digita http://192.168.1.1. Il computer deve
avere un indirizzo IP nella stessa sottorete del NSG.
Immetti admin come nome utente e 1234 come password.
Clicca Login (accesso) e configura le tue impostazioni WAN
nelle schermate Configuration > Interface (Configurazione >
Interfaccia).Vedi la Guida per l’utente NSG per i dettagli.
EN
DE
FR
IT
3
4
3
4
3
4
3
4
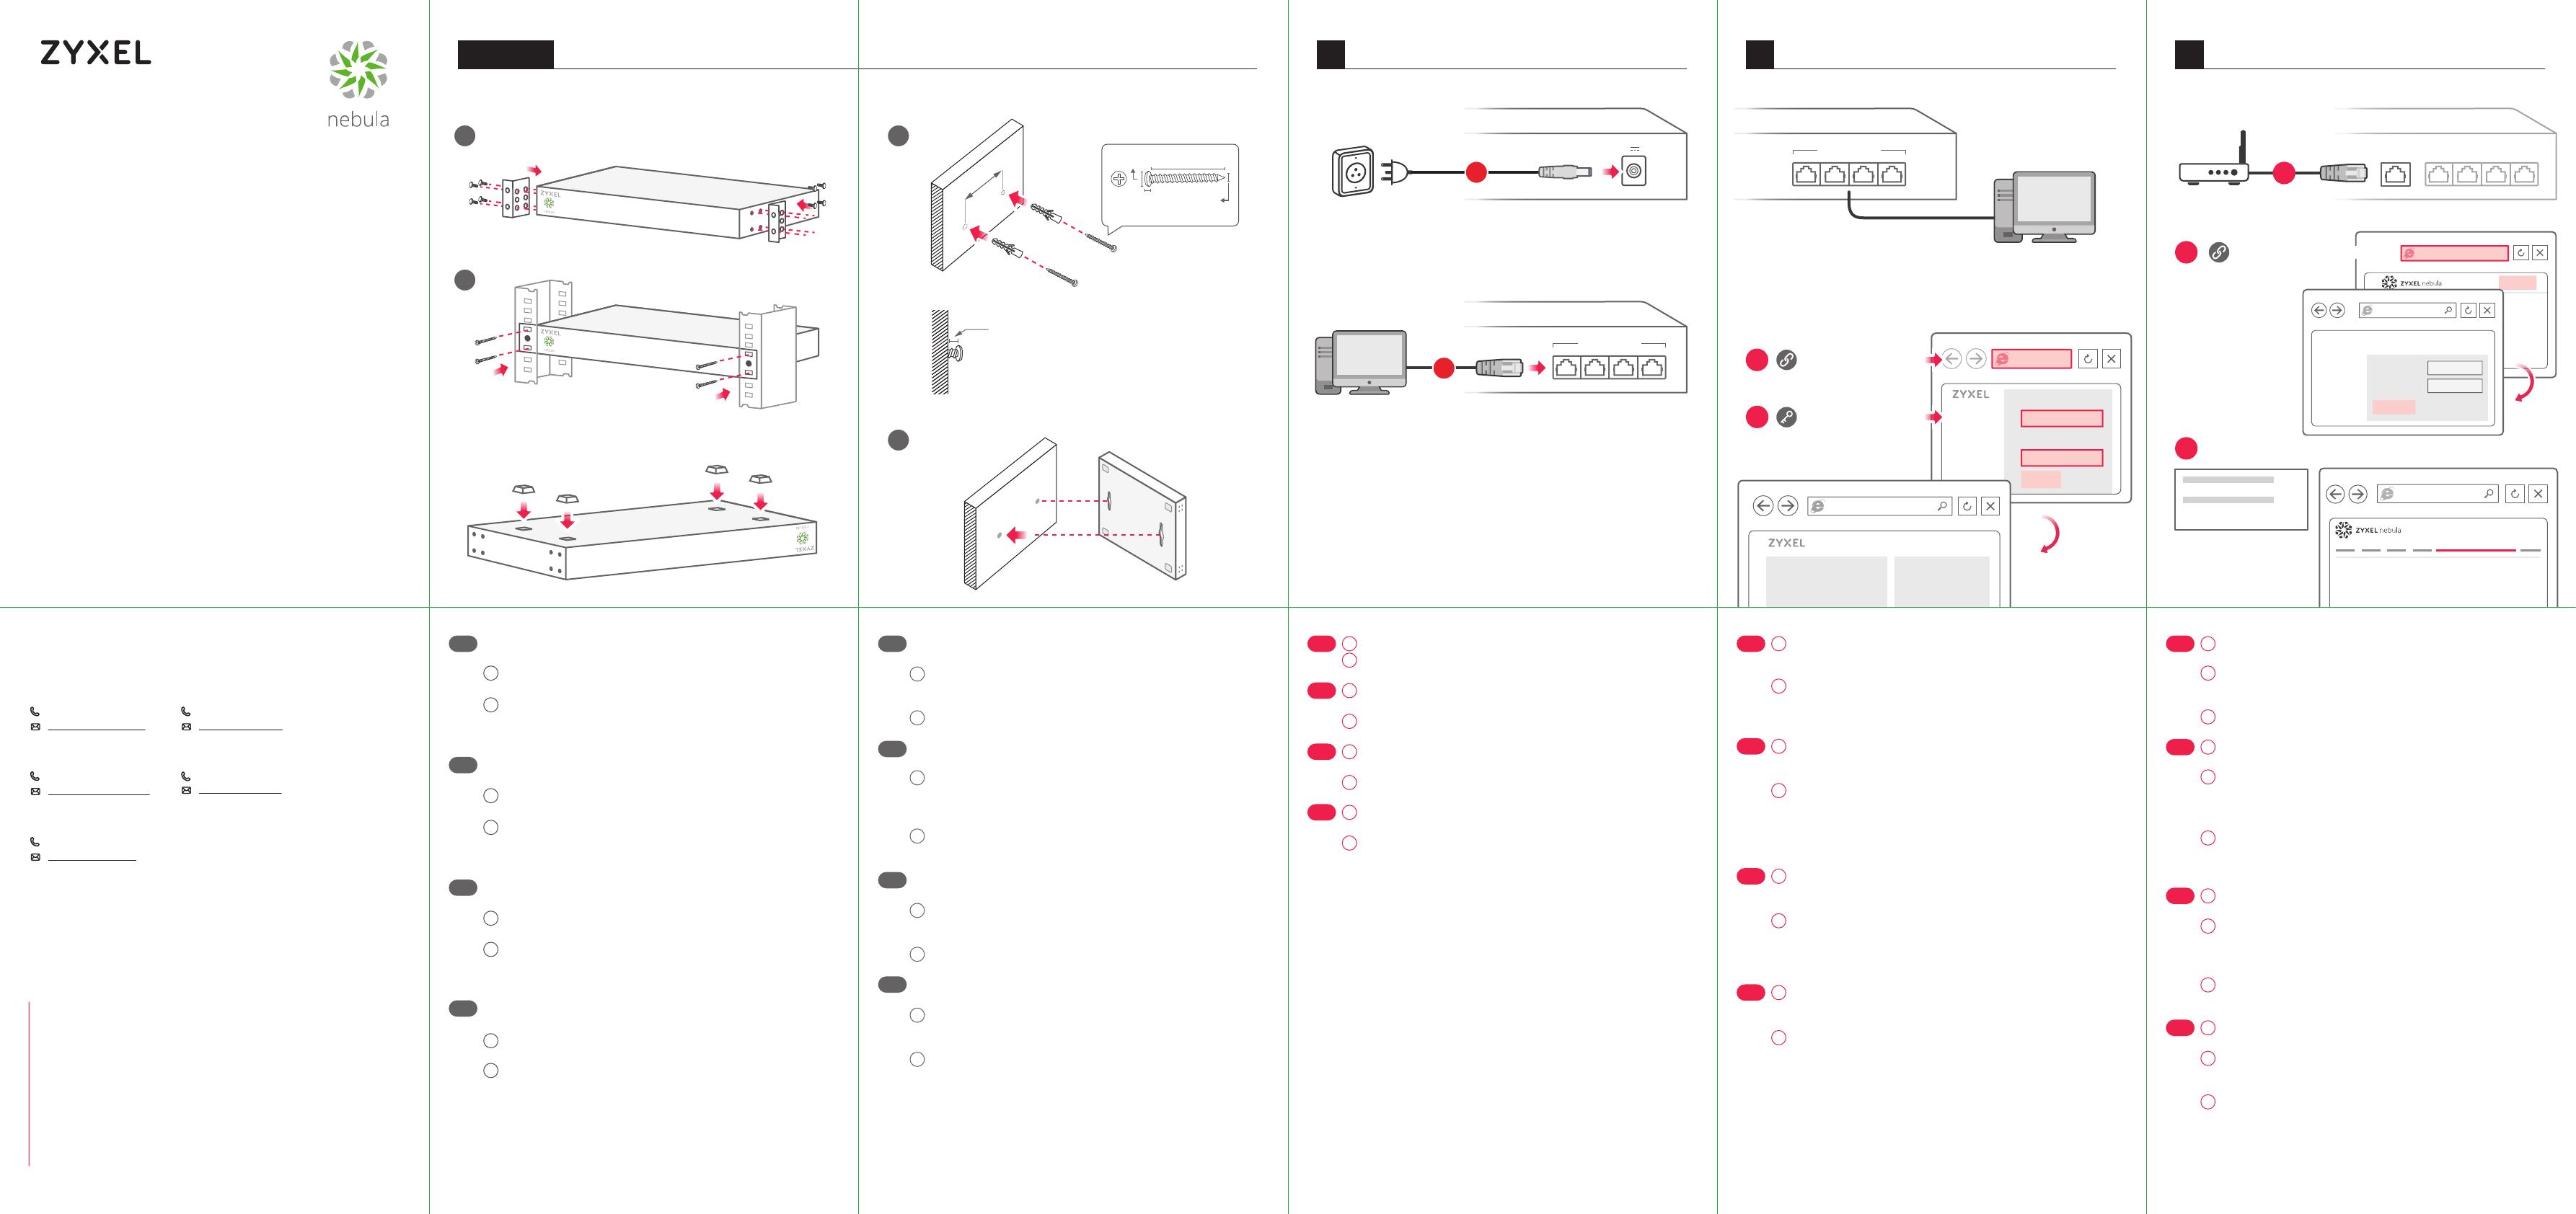
Connect the NSG's WAN port to a modem or router that has Internet
access.
Go to the Zyxel Nebula Control Center (NCC) website
(http://nebula.zyxel.com). Click Login and you will be redirected to the
myZyxel portal page. Create an myZyxel account and sign in.
Create an organization and a site (network). Use the NSG’s first MAC
address and serial number (S/N) to register and assign it to the site.
Verbinden Sie den WAN-Port des NSG mit einem Modem oder Router
mit Internetanschluss.
Gehen Sie auf die Zyxel Nebula Control Center (NCC) Webseite
(http://nebula.zyxel.com). Klicken Sie auf Anmelden/Login, um auf die
myZyxel Portalseite umgeleitet zu werden. Erstellen ein
myZyxel-Konto und melden sich damit an.
Erstellen Sie eine Organisation und einen Standort (Netzwerk).
Verwenden Sie die erste MAC-Adresse des NSG-Gateway und die
Seriennummer (S/N) um sich zu registrieren, und sie dem Standort
zuzuordnen.
Connectez le port WAN du NSG à un modem ou un routeur disposant
d'un accès Internet.
Allez sur le site Zyxel Nebula Control Center (NCC)
(http://nebula.zyxel.com). Cliquez sur Login (Connexion) et vous serez
redirigé vers la page du portail de myZyxel. Créez un compte myZyxel
et connectez-vous.
Créez une organisation et un site (réseau). Utilisez la première
adresse MAC de la passerelle NSG et un numéro de série (S/N) pour
l'enregistrer et l'attribuer au site.
Connetti la porta WAN del NSG a un modem o router con accesso
Internet.
Andare sul sito web Zyxel Centro di Controllo Nebula (NCC):
http://nebula.zyxel.com. Fare clic su login per accedere alla pagina
del portale myZyxel. Creare un account myZyxel sul portale.
Create un’organizzazione e un sito (rete). Utilizzare il primo indirizzo
MAC del Gateway NSG e il numero di serie (S/N) per registrare e
assegnarlo al sito.
EN
DE
FR
IT
5
6
7
5
6
7
5
6
7
5
6
7
EN
1
2
1
1
2
2
1
2
DE
FR
IT
1~1.5mm
Wall Gap
Unit: mm
20~30
3~4
6.5~7.5
1.5
Wall Mount Screw

