
ICD-TX50 QSG(CN)_CS/GB 4-300-040-52(1)
IC Recorder
Quick Start Guide
ICD-TX50
GB
CS
Let’s try out your new IC recorder
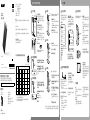
1. Power on.
IC recorder
USB connecting
cable
Computer
To (USB)
connector
To USB
port
Operation
indicator
Charge the IC recorder.
Connect the IC recorder to a running computer
with the supplied USB connecting cable;
Charging starts.
When the battery is fully charged, the battery
indicator will indicate “ .”
Disconnect the IC recorder from your
computer.
For details on how to disconnect the IC recorder
from your computer, refer to the manual supplied
with your computer.
Turn the power on.
Slide and hold the POWER•HOLD switch in the
direction of “POWER” until the window display
appears.
To turn the power off, slide and hold the
POWER•HOLD switch in the direction of “POWER” until
“关机” animation is displayed.
To prevent unintentional operations (HOLD)
To release the IC recorder from the HOLD status, slide the
POWER•HOLD switch towards the center.
2. Set the date and time.
When the confirmation message for
clock setting appears, press or
to select “是,” and then press
/ENT.
Press or to set the year,
and then press /ENT. Repeat this
procedure to set month, day, hour, and
minute in sequence.
When you set the minute and press /ENT, the
clock reflects the setting.
3. Select the menu language.
In the stop mode, press and hold BACK/
HOME to display the Home menu, then
select “ 设置” ”普通设置” ”语言
(Language),” and then press /ENT.
Press or to select the desired
language, and then press /ENT.
You can select the following languages:
(Chinese), English
Press STOP.
4. Record.
Recording
indicator/
Operation
indicator
Before you start using the IC recorder, make sure that
you slide the POWER•HOLD switch towards the center to
release the HOLD status.
Press REC/PAUSE.
Recording starts and the recording indicator and
operation indicator light in red.
You can pause recording by pressing REC/PAUSE.
Press REC/PAUSE again to restart recording.
Press STOP to stop recording.
Recording stops and the operation indicator
flashes in orange.
5. Listen.
Operation
indicator
Press /ENT.
Playback starts and the operation indicator lights
in green.
Adjust the volume by pressing VOL –/+.
Press STOP to stop playback.
6. Erase.
Once a file is erased, you cannot restore it.
In the stop mode, press and hold BACK/
HOME until the Home menu appears.
Press or to select “ 删除文
件,” and then press /ENT.
Select “删除文件,” and then press
/ENT.
“确定删除文件?” is displayed and the file to be
erased is played back for confirmation.
Select “是,” and then press /ENT.
“请稍候” is displayed while the selected file is
being erased.
Press STOP to exit the menu mode.
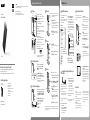
You can display the Home menu by pressing
and holding BACK/HOME.
The Home menu is the starting point of each
feature of the IC recorder, such as editing or
making various settings.
Home menu
The Home menu consists of the following
five items. Press or to select a
Home menu item, and then press /ENT to
confirm:
场景选择
选择文件
删除文件
编辑
设置
How to use the Home menu
When you press or to select
an item and then press /ENT, you can
display the menu window one-layer down.
Pressing BACK/HOME button returns to
the menu window one-layer up. Whichever
layer of a menu window you display, you
can go back directly to the Home “场景选
择” menu window by pressing and holding
BACK/HOME.
BACK: Press BACK/HOME.
HOME: Press and hold BACK/HOME.
To exit the Home menu, press STOP.
Home menu
Sub menu
Menu setting
Stop/Playback/Record window
/ENT
/ENT
About the Home menu
What to do next
The operating instructions explaining all the
features and functions of the IC recorder are
stored as PDF files in the built-in memory of
the IC recorder.
You can also download the operating
instructions from the Sony support home page:
http://www.sony-asia.com/support
Connect the IC recorder to your
computer.
Open the “Instructions” folder on
your computer.
On Windows: Click [我的电脑] or [计算
机] - [IC RECORDER] - [Instructions].
On Macintosh: Click [IC RECORDER] on
the finder - [Instructions].
Drag and drop the files of the
operating instructions from the
“Instructions” folder to the local
disk on your computer.
The file names of the operating
instructions are as follows:
Product name_language name_version.
pdf (e.g. ICD-TX50_English_111.pdf)
Disconnect the IC recorder from
your computer.
To read the operating instructions, double-click
the PDF file you want to read.
Copying the operating instructions to your
computer
On power
Operate the unit only on 3.7 V DC with the
built-in rechargeable lithium-ion battery.
On safety
Do not operate the unit while driving, cycling
or operating any motorized vehicle.
On handling
Do not leave the unit in a location near
heat sources, or in a place subject to direct
sunlight, excessive dust or mechanical
shock.
Should any solid object or liquid fall into
the unit, have the unit checked by qualified
personnel before operating it any further.
If you have any questions or problems
concerning your unit, please consult your
nearest Sony dealer.
Precautions
WARNING
Do not expose the batteries (battery pack or batteries installed) to excessive heat such as
sunshine, fire or the like for a long time.
Capacity (User available capacity)
4 GB (approx. 3.60 GB = 3,865,470,566 Byte)
A part of the memory capacity is used as a management area.
IC Recorder (1)
Noise damper (1)
Stereo headphones (1)
USB connecting cable (1)
Carrying pouch (1)
Application software, Sound Organizer
(CD-ROM) (1)
Operating Instructions (Stored in the
built-in memory)
Quick Start Guide
Check the supplied items.
Congratulations! You have set up your IC recorder and enjoyed your first recording. Let’s step
up to the next stage. There are some more useful functions and information that you can use to
fully utilize your IC recorder.
For details on each operation, refer to the
PDF operating instructions copied to your
computer.
BACK/HOME
T-MARK
, /ENT,
For menu operations
Scene selection
You can select a scene in the menu for
recording with the most appropriate settings
according to various recording scenes*.
Effect
You can select an effect in the menu for
reducing noise or selecting a sound effect
that suits the playback sound.
T-MARK
Adds a track mark to set the starting point
when recording or playing back a file.
DPC (Digital Pitch Control)
You can adjust the playback speed in the
menu.
BACK/HOME
Displays the menu mode to set various menu
items, such as “录音模式,” “话筒灵敏度,” etc.
*Using the “衬衣口袋” scene
To record with the IC recorder in a shirt pocket,
place the IC recorder in the pocket, secured with
the clip.
More advanced features
Sound Organizer (PC application
software**)
Various operations can be performed using
Sound Organizer on your computer. You can
import files recorded with the IC recorder
into Sound Organizer to edit. You can import
music files of a music CD or podcast files to
transfer to the IC recorder. You can also burn
CDs of the music you like.
** for Windows only
USB AC adaptor AC-NWUM50
Optional accessories
Welcome to your new Sony IC recorder!
This is the Quick Start Guide, which provides you with instructions on the
basic operations of the IC recorder.
Please read it carefully. We hope you enjoy using your new Sony IC recorder.


 1
1
 2
2

