
HW-M360
USER MANUAL

ENG - ii
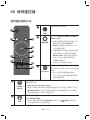
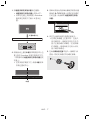
SAFETY INFORMATION
SAFETY WARNINGS
TO REDUCE THE RISK OF ELECTRIC SHOCK, DO
NOT REMOVE THE COVER (OR BACK).
NO USER-SERVICEABLE PARTS ARE INSIDE.
REFER SERVICING TO QUALIFIED SERVICE
PERSONNEL.
CAUTION
RISK OF ELECTRIC SHOCK.
DO NOT OPEN.
This symbol indicates that high voltage
is present inside. It is dangerous to make
any kind of contact with any internal
part of this product.
This symbol indicates that this product
has included important literature
concerning operation and maintenance.
Class II product : This symbol indicates
that it does not require a safety
connection to electrical earth (ground).
AC voltage : This symbol indicates that
the rated voltage marked with the
symbol is AC voltage.
DC voltage : This symbol indicates that
the rated voltage marked with the
symbol is DC voltage.
Caution, Consult instructions for use :
This symbol instructs the user to consult
the user manual for further safety
related information.
WARNING
• To reduce the risk of re or electric shock, do
not expose this appliance to rain or moisture.
CAUTION
• TO PREVENT ELECTRIC SHOCK, MATCH WIDE
BLADE OF PLUG TO WIDE SLOT, FULLY
INSERT.
• This apparatus shall always be connected to a
AC outlet with a protective grounding
connection.
• To disconnect the apparatus from the mains,
the plug must be pulled out from the mains
socket, therefore the mains plug shall be
readily operable.
• Do not expose this apparatus to dripping or
splashing. Do not put objects lled with
liquids, such as vases on the apparatus.
• To turn this apparatus off completely, you
must pull the power plug out of the wall
socket. Consequently, the power plug must
be easily and readily accessible at all times.

ENG - iii
PRECAUTIONS
1. Ensure that the AC power supply in your
house complies with the power
requirements listed on the identication
sticker located on the back of your product.
Install your product horizontally, on a
suitable base (furniture), with enough space
around it for ventilation (7~10 cm). Make sure
the ventilation slots are not covered. Do not
place the unit on ampliers or other
equipment which may become hot. This unit
is designed for continuous use. To fully turn
off the unit, disconnect the AC plug from the
wall outlet. Unplug the unit if you intend to
leave it unused for a long period of time.
2. During thunderstorms, disconnect the AC
plug from the wall outlet. Voltage peaks due
to lightning could damage the unit.
3. Do not expose the unit to direct sunlight or
other heat sources. This could lead to
overheating and cause the unit to
malfunction.
4. Protect the product from moisture (i.e.
vases), and excess heat (e.g. a replace) or
equipment creating strong magnetic or
electric elds. Unplug the power cable from
the AC wall socket if the unit malfunctions.
Your product is not intended for industrial
use. It is for personal use only. Condensation
may occur if your product has been stored in
cold temperatures. If transporting the unit
during the winter, wait approximately
2 hours until the unit has reached room
temperature before using.
5. The battery used with this product contains
chemicals that are harmful to the
environment. Do not dispose of the battery
in the general household trash. Do not
expose the battery to excess heat, direct
sunlight, or re. Do not short circuit,
disassemble, or overheat the battery.
Danger of explosion if the battery is replaced
incorrectly. Replace only with the same or
equivalent type.
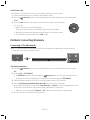
ABOUT THIS MANUAL
The user manual has two parts: this simple paper
USER MANUAL and a detailed FULL MANUAL you
can download.
USER MANUAL
See this manual for safety instructions,
product installation, components,
connections, and product specications.
FULL MANUAL
You can access the customer support centre
by scanning the QR code. To see the manual on
your PC or mobile device, download the
manual in document format from the website.
(http://www.samsung.com/support)
Design and specications are subject to change
without prior notice.

ENG - iv
CONTENTS
01 Checking the Components 2
Inserting Batteries before using the Remote Control (AA batteries X 2) ------------------------- 2
02 Product Overview 3
Front Panel / Right Side Panel of the Soundbar ------------------------- 3
Bottom Panel of the Soundbar ------------------------- 3
03 Connecting the Soundbar 4
Connecting Electrical Power
-------------------------
4
Connecting the Soundbar to the Subwoofer
-------------------------
5
– Automatic connection between the subwoofer and the Soundbar
-------------------------
5
– Manually connecting the subwoofer if automatic connection fails
-------------------------
6
04 Connecting to your TV 7
Method 1. Connecting with a Cable
-------------------------
7
– Connecting using an Optical Cable
-------------------------
7
Method 2. Connecting Wirelessly
-------------------------
8
– Connecting a TV via Bluetooth
-------------------------
8
05 Connecting an External Device 10
Connecting using an Optical or Analogue Audio (AUX) Cable
-------------------------
10
06 Connecting a USB 11
Software Update
-------------------------
11

ENG - v
07 Connecting a Mobile Device 12
Connecting via Bluetooth
-------------------------
12
08 Using the Remote Control 13
How to Use the Remote Control
-------------------------
13
Adjusting the Soundbar volume with a TV remote control ------------------------- 15
09 Installing the Wall Mount 16
Installation Precautions
-------------------------
16
Wallmount Components
-------------------------
16
Detaching the Soundbar from the Wall
-------------------------
19
10 Troubleshooting 20
11 Licence 21
12 Open Source Licence Notice 21
13 Important Notes About Service 21
14 SpecicationsandGuide 22
Specications
-------------------------
22

ENG - 2
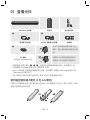
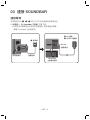
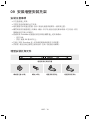
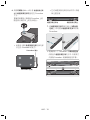
01 CHECKING THE COMPONENTS
Surround
VOL WOOFER
SOUNDBAR
SOUND
MODE
Bluetooth
POWER
Soundbar Main Unit Subwoofer Remote Control / Batteries
1 3
Power Cord (Subwoofer) AC/DC Adapter (Main Unit) Optical Cable
2
Connect the AC plug to the adapter
until you hear a “snapping” sound to
ensure they are securely fastened.
AC Plug
(Depending on the country and
model)
Do not detach the AC plug from the
adapter (it will not be removed once it
has been attached).
• The power connection steps are labelled (1, 2, 3). For more information about power
connections, see page 4.
• For Soundbar wall mounting components, see page 16.
• Micro USB to USB adapter Cable is sold separately. To purchase, contact a Samsung Service Centre
or Samsung Customer Care.
• Depending on the region, the AC plug may vary in appearance, or it may be supplied integrated with
the AC/DC adapter.
Inserting Batteries before using the Remote Control (AA batteries X 2)
Slide the battery cover in the direction of the arrow until it is completely removed. Insert 2 AA batteries
(1.5V) oriented so that their polarity is correct. Slide the battery cover back into position.

ENG - 3
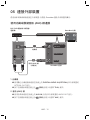
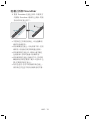
02
PRODUCT OVERVIEW
Front Panel / Right Side Panel of the Soundbar
Right Side of the Soundbar
Display
Volume
Power
Position the product so
that the SAMSUNG logo
is located on the top.
Bottom Panel of the Soundbar
USB (5V 0.5A)
AUX IN
DIGITAL AUDIO IN
(OPTICAL)
DC 19V
DIGITAL AUDIO IN
(OPTICAL)
USB (5V 0.5A)
AUX IN
DC 19V
Source
Selects the source input mode. (D.IN / AUX / BT / USB)
• To turn on “BT PAIRING” mode, change the source to “BT” mode, and then press and
hold the (Source) button for more than 5 seconds.
D.IN Connect to the digital (optical) output of an external device.
USB Connect a USB device here to play music les on the USB device through the Soundbar.
AUX Connect to the Analogue output of an external device.
DC 19V Connect the AC/DC power adapter. (Power Supply In)

ENG - 4
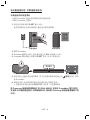
03 CONNECTING THE SOUNDBAR
Connecting Electrical Power
Use the power components (1, 2, 3) to connect the units to electrical outlets in the following order:
1.) Subwoofer 2.) Soundbar Main Unit. See the illustrations below.
• For more information about the required electrical power and power consumption, refer to the
label attached to the product. (Label : Bottom of the Soundbar Main Unit)
ID SET
POWER
POWER
Rear of Subwoofer
1 Power Cord
Connecting
Electrical Power
DC 19V
DC 19V
Bottom of the
Soundbar Main Unit
DC 19V
(Power Jack)
3 AC/DC Adapter
2 AC Plug

ENG - 5
Connecting the Soundbar to the Subwoofer
When the subwoofer is connected, you can enjoy rich bass sound.
Automatic connection between the subwoofer and the Soundbar
When you turn the power on after connecting the power cables to the Soundbar and subwoofer, the
subwoofer is automatically connected to the Soundbar.
• When auto pairing is complete, the blue indicators at the top of the subwoofer turn on.
LED Indicator Lights on the Top of Subwoofer
LED Status Description Resolution
Blue
On
Successfully connected
(normal operation)
-
Blinking Recovering the connection
Check if the power cable to the main
Soundbar unit is connected properly or
wait for a while. (If blinking persists, try
manually connecting the subwoofer.
See page 6.)
Red On
Standby (with the Soundbar
main unit turned off)
Check if the power cable to the main
Soundbar unit is connected properly.
Connection failed
Connect again. See the instructions for
manual connection on page 6.
Red and
blue
Blinking Malfunction
See the contact information for the
Samsung Service Centre in the manual.

ENG - 6
Manually connecting the subwoofer if automatic connection fails
Check before performing the manual connection
• Check whether the power cables for the Soundbar and subwoofer are connected properly.
• Make sure that the Soundbar is turned on.
1. Press and hold ID SET on the rear of the subwoofer for at least 5 seconds.
The red indicator on the top of the subwoofer turns off and the blue indicator blinks.
ID SET
POWER
ID SET
5 Sec
Rear of the Subwoofer Top of the Subwoofer
2. Turn off the Soundbar.
3. Press and hold the VOL button on the remote control for at least 5 seconds with the Soundbar
turned off (OFF).
4. The ID SET message appears on the display of the Soundbar for 1.3 seconds, and then disappear.
Surround
SOUND
MODE
Bluetooth
POWER
VOL
WOOFER
SOUNDBAR
5 Sec
ID SET
5. When the blue indicator on the subwoofer blinks, turn on the Soundbar’s power by pressing
(Power) button on the right side of the main unit or on the remote control.
6. When the connection is successfully established, the blue indicator on the top of the subwoofer
stops blinking and glows continuously.
• If the connection process fails, the blue indicator will ash continuously. Go to Step 1 and start again.
Expand to true wireless surround sound by connecting the Samsung Wireless Rear Speaker
Kit (SWA-8500S) to your Soundbar (Sold separately). For more information, see the
Samsung Wireless Rear Speaker Kit manual.

ENG - 7
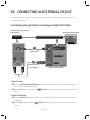
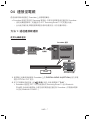
04 CONNECTING TO YOUR TV
Hear TV sound from your Soundbar through wired or wireless connections.
• When the Soundbar is connected to a selected Samsung TVs, the Soundbar can be controlled using
the TV’s remote control.
– When using optical cable, this feature can be supported by 2017 Samsung Smart TVs that
support Bluetooth.
– This function also allows you to use the TV menu to adjust the sound eld and various settings
as well as the volume and mute.
Method 1. Connecting with a Cable
Connecting using an Optical Cable
DIGITAL AUDIO IN
(OPTICAL)
USB (5V 0.5A)
AUX IN
OPTICAL OUT
Optical Cable
Bottom of the Soundbar
D.IN
Right Side of the Soundbar
1. Connect the DIGITAL AUDIO IN (OPTICAL) jack on the Soundbar to the OPTICAL OUT jack of the TV
with a digital optical cable.
2. Press the (Source) button on the right side panel or remote control, and then select mode
“D.IN”.
• When the Soundbar is connected to a Samsung smart TV released in 2017 or later, the
Bluetooth POWER function automatically turns on to enable the Soundbar to be controlled with
the TV remote control. (See page 14 for details on Bluetooth POWER.)

ENG - 8
Auto Power Link
Auto Power Link automatically turns on the Soundbar when the TV is turned on.
1. Connect the Soundbar and a TV with a digital optical cable.
2. Press the (Source) button on the right side panel or on the remote control, and then select
“D.IN”.
3. Press the Left button on the remote control for 5 seconds to turn Auto Power
Link on or off.
• Auto Power Link is set to ON by default.
(To turn off this function, turn off Auto Power using the Soundbar.)
• Depending on the connected device, Auto Power Link may not function.
• This function is only available in the “D.IN” mode.
Method 2. Connecting Wirelessly
Connecting a TV via Bluetooth
When a TV is connected using Bluetooth, you can hear stereo sound without the hassle of cabling.
• Only one TV can be connected at a time.
The initial connection
1. Press the (Source) button on the right side panel or on the remote control, and then select
“BT”.
2. Change “BT” to “BT PAIRING”.
• If “BT READY” appears, press and hold the (Source) button on the right side panel of the
Soundbar or on the remote control for more than 5 seconds to display “BT PAIRING”.
3. Select Bluetooth mode on the TV. (For more information, see the TV’s manual.)
4. Select “[AV] Samsung Soundbar Mxxx M-Series” from the list on TV’s screen.
An available Soundbar is indicated with “Need Pairing” or “Paired” on the TV Bluetooth device list.
To connect to the Soundbar, select the message and establish a connection.
• When the TV is connected, [TV Name] → “BT” appears on the Soundbar’s front display.
5. You can now hear TV sound from the Soundbar.

ENG - 9
If the device fails to connect
• If the previously connected Soundbar listing (e.g. “[AV] Samsung Soundbar Mxxx M-Series”)
appears in the list, delete it.
• In “BT” mode, press and hold the (Source) button for more than 5 seconds on the right side
panel of the Soundbar or on the remote control to switch to “BT PAIRING” mode.
Then, select “[AV] Samsung Soundbar Mxxx M-Series” from the TV’s search list.
What are the BT READY and BT PAIRING statuses?
• BT READY : In this mode, you can search for previously connected TVs or connect to the Soundbar
from a previously connected mobile device.
• BT PAIRING : In this mode, you can connect to a new device. (While in “BT” mode, press and hold the
(Source) button for more than 5 seconds on the right side of the Soundbar or on the remote
control.)
NOTES
• If asked for a PIN code when connecting a Bluetooth device, enter <0000>.
• In Bluetooth connection mode, the Bluetooth connection will be lost if the distance between the
Soundbar and the Bluetooth device exceeds 10 meters.
• The Soundbar automatically turns off after 5 minutes in the Ready state.
• The Soundbar may not perform Bluetooth search or connection correctly under the following
circumstances:
– If there is a strong electrical eld around the Soundbar.
– If several Bluetooth devices are simultaneously paired with the Soundbar.
– If the Bluetooth device is turned off, not in place, or malfunctions.
• Electronic devices may cause radio interference. Devices that generate electromagnetic waves
must be kept away from the Soundbar main unit - e.g., microwaves, wireless LAN devices, etc.
Disconnecting the Soundbar from the TV
Press the (Source) button on the right side panel or on the remote control and switch to any mode
but “BT”.
• Disconnecting takes time because the TV must receive a response from the Soundbar.
(The time required may differ, depending on the TV model.)
• To cancel automatic Bluetooth connection between the Soundbar and TV, press the
p (Play/Pause) button on the remote control for 5 seconds in “BT READY” status. (Toggle On → Off)

ENG - 10
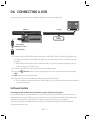
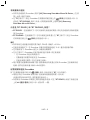
05 CONNECTING AN EXTERNAL DEVICE
Connect to an external device via a wired or wireless network to play the external device’s sound
through the Soundbar.
Connecting using an Optical or Analogue Audio (AUX) Cable
DIGITAL AUDIO IN
(OPTICAL)
USB (5V 0.5A)
AUX IN
OPTICAL OUT
- AUDIO -
R L
Optical Cable
Audio (AUX) Cable
(not supplied)
Bottom of the Soundbar
BD / DVD player / Set-top box /
Game console
Right Side of the Soundbar
1 Optical Cable
X Connect DIGITAL AUDIO IN (OPTICAL) on the main unit to the OPTICAL OUT jack of the Source
Device using a digital optical cable.
Y Select “D.IN” mode by pressing the (Source) button on the right side panel or on the remote
control.
2 Audio (AUX) Cable
X Connect AUX IN (Audio) on the main unit to the AUDIO OUT jack of the Source Device using an
audio cable.
Y Select “AUX” mode by pressing (Source) button on the right side panel or on the remote
control.

ENG - 11
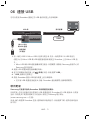
06 CONNECTING A USB
You can play music les located on USB storage devices through the Soundbar.
Display
USB port
USB (5V 0.5A)
AUX IN
DIGITAL AUDIO IN
(OPTICAL)
DC 19V
USB (5V 0.5A)
Micro USB to
USB adapter Cable
(not supplied)
USB
1. Connect a Micro USB to USB adapter cable with a male USB 2.0 Micro USB plug (Type B) on one
end and a standard female 2.0 USB jack (Type A) on the other end to the micro USB jack on your
Soundbar.
• Micro USB to USB adapter Cable is sold separately. To purchase, contact a Samsung Service
Centre or Samsung Customer Care.
2. Connect your USB device to the female end of the adapter cable.
3. Press the (Source) button on the right side panel or on the remote control, and then select
“USB”.
4. “USB” appears in the display screen.
5. Play music les from the USB storage device through the Soundbar.
• The Soundbar automatically turns off (Auto Power Off) if no USB device has been connected for
more than 5 minutes.
Software Update
SamsungmayofferupdatesfortheSoundbar’ssystemrmwareinthefuture.
If an update is offered, you can update the rmware by connecting a USB device with the rmware
update stored on it to the USB port on your Soundbar. For more information about how to download
update les, go to the Samsung Electronics website at (www.samsung.com
Support).
Then, enter or select the model of your Soundbar, select Software & Apps, and then Downloads.
The option name can vary.

ENG - 12
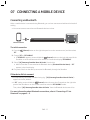
07 CONNECTING A MOBILE DEVICE
Connecting via Bluetooth
When a mobile device is connected using Bluetooth, you can hear stereo sound without the hassle of
cabling.
• You cannot connect more than one Bluetooth device at a time.
Bluetooth device
The initial connection
1. Press the (Source) button on the right side panel or on the remote control, and then select
“BT”.
2. Change “BT” to “BT PAIRING”.
• If “BT READY” appears, press and hold the (Source) button on the right side panel of the
Soundbar or on the remote control for more than 5 seconds to display “BT PAIRING”.
3. Select “[AV] Samsung Soundbar Mxxx M-Series” from the list.
• When a Soundbar is connected to the Bluetooth device, [Bluetooth Device Name] → “BT”
appears in the front display.
4. Play music les from the device, connected via Bluetooth, through the Soundbar.
If the device fails to connect
• If the previously connected Soundbar listing (e.g. “[AV] Samsung Soundbar Mxxx M-Series”)
appears in the list, delete it.
• In “BT” mode, press and hold the (Source) button for more than 5 seconds on the right side
panel of the Soundbar or on the remote control to switch to “BT PAIRING” mode.
Then, select “[AV] Samsung Soundbar Mxxx M-Series” from the Bluetooth device search list.
For more information about Bluetooth connections, refer to “Connecting a TV via
Bluetooth” on pages 8 ~ 9.

ENG - 13
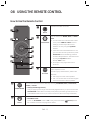
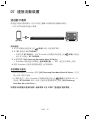
08 USING THE REMOTE CONTROL
How to Use the Remote Control
Surround
VOL WOOFER
SOUNDBAR
SOUND
MODE
Bluetooth
POWER
Power
Surround
VOL WOOFER
SOUND
MODE
Bluetooth
POWER
Turns the Soundbar on and off.
Sound Control
Surround
VOL WOOFER
SOUND
MODE
Bluetooth
POWER
You can select from TREBLE, BASS, or AUDIO
SYNC.
• To control the volume of the treble or bass
sound, select TREBLE or BASS in Sound
Settings, and then adjust the volume
between -6~+6 by using the Up/Down
buttons.
• If the video and audio between the TV and
your Soundbar are not synchronized, select
AUDIO SYNC in Sound Settings, and then
set audio delay between 0~300 milliseconds
by using the Up/Down buttons.
(Except “USB” mode)
• Audio Sync is only supported in some
functions.
Surround
Surround
VOL WOOFER
SOUND
MODE
Bluetooth
POWER
The Surround Sound function adds depth and a
sense of space to sound.
Each time you press this button, ON and OFF
alternate.
• ON : Play sound over all the speakers.
• OFF : You can hear the sound of the original
source channel from several speakers.
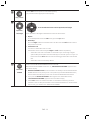
SOUND MODE
Surround
VOL WOOFER
SOUND
MODE
Bluetooth
POWER
You can select the desired sound effect by choosing STANDARD, MUSIC, CLEAR VOICE,
SPORTS, or MOVIE.
• DRC (Dynamic Range Control)
Lets you apply dynamic range control to Dolby Digital tracks. If you press and hold the
SOUND MODE button while in standby mode, DRC (Dynamic Range Control) turns on
or off. With the DRC turned on, loud sound is reduced. (The sound may be distorted.)
Surround
VOL WOOFER
SOUND
MODE
Bluetooth
POWER
Source
Press to select a source connected to the Soundbar.
• BT PAIRING mode
To turn on “BT PAIRING” mode in “BT” mode, press and hold the (Source) button
for more than 5 seconds. See page 12 for details.

ENG - 14
Play / Pause
Surround
VOL WOOFER
SOUND
MODE
Bluetooth
POWER
Press the p button to pause a music le temporarily.
If you press the button again, the music le plays.
Surround
VOL WOOFER
SOUND
MODE
Bluetooth
POWER
Up/Down/
Left/Right
Press the indicated areas to select Up/Down/Left/Right.
Press Up/Down/Left/Right on the button to select or set functions.
• Repeat
To use the Repeat function in “USB” mode, press the Up button.
• Music Skip
Press the Right button to select the next music le. Press the Left button to select
the previous music le.
• Auto Power Link
You can turn Auto Power Link on or off.
Auto Power Link is controlled by the Right and Left buttons respectively.
– Auto Power Link : If the Soundbar is connected to your TV through a digital
optical cable, the Soundbar can automatically turn on when you turn on your TV.
Press and hold the Left button for 5 seconds to toggle Auto Power Link ON and
OFF.
– Auto Power Link is set to ON by default.
Surround
VOL WOOFER
SOUND
MODE
Bluetooth
POWER
Bluetooth
POWER
Press to turn the Bluetooth POWER function on and off.
When the Bluetooth POWER function is on, “ON-BLUETOOTH POWER” appears in the
Soundbar’s display.
• Bluetooth POWER function : If the Soundbar is in standby mode and the Bluetooth
POWER function is On, when you turn on a previously connected Bluetooth device,
the Soundbar automatically turns on and connects via Bluetooth to the device.
• If you press the Bluetooth POWER button again to turn off the BT function,
“OFF-BLUETOOTH POWER” appears in the Soundbar’s display.
• If the “D.IN” mode is on and the Soundbar is connected to a Samsung smart TV
released in 2017 or later, the Soundbar can be controlled with the TV remote control.
In this mode, you cannot to turn off Bluetooth POWER.

ENG - 15
Surround
VOL WOOFER
SOUND
MODE
Bluetooth
POWER
WOOFER
Surround
SOUND
MODE
Bluetooth
POWER
VOL
WOOFER
SOUNDBAR
Surround
SOUND
MODE
Bluetooth
POWER
VOL
WOOFER
SOUNDBAR
Surround
SOUND
MODE
Bluetooth
POWER
VOL
WOOFER
SOUNDBAR
Surround
SOUND
MODE
Bluetooth
POWER
VOL
WOOFER
SOUNDBAR
Push the button up or down to adjust the volume of the subwoofer to -12 or -6 to +6.
Pressing the button reverts the subwoofer volume to level 0.
Surround
VOL WOOFER
SOUND
MODE
Bluetooth
POWER
VOL
Surround
SOUND
MODE
Bluetooth
POWER
VOL
WOOFER
SOUNDBAR
Surround
SOUND
MODE
Bluetooth
POWER
VOL
WOOFER
SOUNDBAR
Surround
SOUND
MODE
Bluetooth
POWER
VOL
WOOFER
SOUNDBAR
Surround
SOUND
MODE
Bluetooth
POWER
VOL
WOOFER
SOUNDBAR
Push the button up or down to adjust the volume.
• Mute
Press the VOL button to mute the sound. Press it again to unmute the sound.
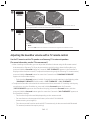
Adjusting the Soundbar volume with a TV remote control
Use the TV menu to set the TV speaker on a Samsung TV to external speakers.
(For more information, see the TV’s user manual.)
• After installing the Soundbar, you can adjust the Soundbar’s volume using the IR remote control
that came with a Samsung TV. (If you do not want to use this function, when the Soundbar is on,
press and hold the Surround button for 5 seconds. “OFF-TV REMOTE” appears in the Soundbar’s
display and the function turns off.) To adjust the volume using only the Samsung TV remote control,
press and hold the Surround button for more than 5 seconds until “SAMSUNG-TV REMOTE”
appears in the Soundbar display.
– Each time the Surround button is held for 5 seconds, the mode switches in the following order:
“SAMSUNG-TV REMOTE” (Default mode) → “OFF-TV REMOTE” → “ALL-TV REMOTE”.
• To adjust the Soundbar volume with the remote control that came with a TV made by a third party
manufacturer, turn the Soundbar on, press and hold the Surround button for 5 seconds
(“OFF-TV REMOTE” appears on the Soundbar’s display), release the Surround button, and then
press and hold the Surround button again for more than 5 seconds. (“ALL-TV REMOTE” appears on
the Soundbar’s display.)
– This function may not be available, depending on the remote control.
– For manufacturers that support this feature, refer to the FULL MANUAL
(www.samsung.com/support).
– This volume control function works with IR TV remotes only. It does not work with Bluetooth
TV remotes (remotes that require pairing).

ENG - 16
09 INSTALLING THE WALL MOUNT
Installation Precautions
• Install on a vertical wall only.
• Do not install in a place with high temperature or humidity.
• Verify whether the wall is strong enough to support the product’s weight. If not, reinforce the wall
or choose another installation point.
• Purchase and use the xing screws or anchors appropriate for the kind of wall you have (plaster
board, iron board, wood, etc.). If possible, x the support screws into wall studs.
• Purchase wall mounting screws according to the type and thickness of the wall you want to mount
the Soundbar on.
– Diameter: M5
– Length: 35 mm or longer recommended.
• Connect cables from the unit to external devices before you install the Soundbar on the wall.
• Make sure the unit is turned off and unplugged before you install it. Otherwise, it may cause an
electric shock.
Wallmount Components
Wall Mount Guide
Holder-Screw (2 EA) Screw (2 EA) Bracket-Wall Mount L Bracket-Wall Mount R
ページが読み込まれています...
ページが読み込まれています...
ページが読み込まれています...
ページが読み込まれています...
ページが読み込まれています...
ページが読み込まれています...
ページが読み込まれています...
ページが読み込まれています...
ページが読み込まれています...
ページが読み込まれています...
ページが読み込まれています...
ページが読み込まれています...
ページが読み込まれています...
ページが読み込まれています...
ページが読み込まれています...
ページが読み込まれています...
ページが読み込まれています...
ページが読み込まれています...
ページが読み込まれています...
ページが読み込まれています...
ページが読み込まれています...
ページが読み込まれています...
ページが読み込まれています...
ページが読み込まれています...
ページが読み込まれています...
ページが読み込まれています...
ページが読み込まれています...
ページが読み込まれています...
ページが読み込まれています...
ページが読み込まれています...
ページが読み込まれています...
ページが読み込まれています...
-
 1
1
-
 2
2
-
 3
3
-
 4
4
-
 5
5
-
 6
6
-
 7
7
-
 8
8
-
 9
9
-
 10
10
-
 11
11
-
 12
12
-
 13
13
-
 14
14
-
 15
15
-
 16
16
-
 17
17
-
 18
18
-
 19
19
-
 20
20
-
 21
21
-
 22
22
-
 23
23
-
 24
24
-
 25
25
-
 26
26
-
 27
27
-
 28
28
-
 29
29
-
 30
30
-
 31
31
-
 32
32
-
 33
33
-
 34
34
-
 35
35
-
 36
36
-
 37
37
-
 38
38
-
 39
39
-
 40
40
-
 41
41
-
 42
42
-
 43
43
-
 44
44
-
 45
45
-
 46
46
-
 47
47
-
 48
48
-
 49
49
-
 50
50
-
 51
51
-
 52
52


