
Caution
- This appliance is not washable.
Never rinse the appliance in water
or rinse it under the tap (Fig. 2).
- Always check the appliance before
you use it. Do not use the appliance
or any other part if it is damaged,
as this may cause injury. Always
replace a damaged part with one of
the original type.
- Only use this appliance for its
intended purpose as shown in the
user manual.
- Never use compressed air, scouring
pads, abrasive cleaning agents or
aggressive liquids such as petrol or
acetone to clean the appliance.
- Use and store the appliance at a
temperature between 5°C and 35°C.
Electromagnetic elds (EMF)
This Philips device complies with all
applicable standards and regulations
regarding exposure to electromagnetic
elds.
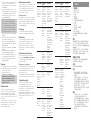
Using the appliance
1 Make sure travel lock is in ‚unlock‘
position (Fig. 3). (See chapter‚
Travel lock‘ about the usage of
travel lock.)
2 Press the on/o button to switch on
the shaver (Fig. 4).
3 Move the shaving heads over your
skin. Make both straight and circular
movements (Fig. 5).
Note: Shave on a dry face only.
Do not use the shaver in
combination with shaving gel,
shaving foam or water.
Note: Your skin may need 2 or 3
weeks to get accustomed to the
Philips shaving system.
4 Press the on/o button to switch o
the shaver.
Activate travel lock after every
shave to prevent the shaver from
being switched on by accident.
5 Clean the shaver after every
shave. See chapter ‚Cleaning and
maintenance‘.
Travel lock
You can lock the appliance when you
are going to travel. The travel lock
prevents the appliance from being
switched on by accident.
ENGLISH
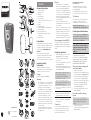
General description
1 Shaving heads
2 Shaving unit
3 Bracket
4 Hair chamber
5 On/o button
6 Travel lock ring & Travel Lock Icon
7 Guard
8 Cutter
9 Retaining frame
10 Central spring of retaining frame
11 Cleaning brush
12 Non-washable logo
13 Philips Cleaning spray (HQ110)
(optional)
14 Travel pouch
Introduction
Congratulations on your purchase and
welcome to Philips! To fully benet from
the support that Philips oers, register
your product at www.philips.com/
welcome.
Please read this user manual, as it
contains information about the features
of this shaver as well as some tips to
make shaving easier and more enjoyable.
Important safety
information
Read this important information
carefully before you use the appliance
and save it for future reference.
Danger
Keep the appliance dry (Fig. 2).
Warning
- The appliance is non-rechargeable.
Do not attempt to open, modify or
reassemble the appliance. Do not
attempt to replace the battery.
- The appliance is not intended for
use by persons (including children)
with reduced physical, sensory
or mental capabilities, or lack of
experience and knowledge, unless
they have been given supervision
or instruction concerning use of the
appliance by a person responsible
for their safety.
- Children should be supervised to
ensure that they do not play with
the appliance.
Activating/Deactivating
the travel lock
Activating: Switch travel lock ring
clockwise to lock position until you
hear ‚click‘ (Fig. 3).
Deactivating: Switch travel lock ring
counterclockwise to unlock position.
The battery
The shaver has a life of 430 minutes
of active use. Battery life varies,
depending on use and other factors.
Caution: The battery is non-
rechargeable and non-replaceable.
Cleaning and maintenance
Note: The accessories supplied may
vary for dierent products. The box
shows the accessories that have been
supplied with your appliance.
Warning: Never use scouring
pads, abrasive cleaning agents or
aggressive liquids such as alcohol,
petrol or acetone to clean the
appliance.
Clean the shaver after every shave
to guarantee optimal shaving
performance. For the best cleaning
result, we advise you to use Philips
Cleaning Spray (HQ110). Ask your
Philips dealer for information.
After every shave: shaving unit
and hair chamber
1 Switch o the shaver.
2 Clean the top of the appliance with
the cleaning brush supplied (Fig. 6).
3 Pull the shaving unit straight up to
remove it from the shaver (Fig. 7).
4 Clean the inside of the shaving unit
with the cleaning brush (Fig. 8).
5 Clean the hair chamber with the
cleaning brush (Fig. 9).
6 Put the shaving unit back onto the
shaver (Fig. 18).
Every two months: shaving
heads
Note: Do not use cleaning agents or
alcohol to clean the shaving heads.
Only use Philips Cleaning Spray
(HQ110).
1 Switch o the shaver.
2 Pull the shaving unit straight o the
shaver (Fig. 7).
4222.002.5916.1
www.philips.com
>75% recycled paper
S210, S205
2 3 4
5 6 7
8 9
2
1
10
11 12 13
14 15 16
17 18 19
4
5
6
2
1
8
7
11
13
9
3
14
10
12
1

Problem Possible
cause
Solution
The
shaver
does not
shave as
well as it
used to.
The shaving
heads are
dirty. You
have not
cleaned the
shaver well
enough or
you have
not cleaned
it for a long
time.
Clean the
shaver
thoroughly
before you
continue
shaving.
See chapter
'Cleaning and
maintena nce'.
Long hairs
obstruct
the
shaving
heads.
Clean the
cutters and
guards with
the cleaning
brush
supplied.
See chapter
'Cleaning and
maintena nce',
section 'Every
month:
shaving
heads'.
The
shaving
heads are
damaged
or worn.
Replace
the shaving
heads. See
chapter
'Replace-
ment'.
The
battery
is almost
empty.
Replace the
shaver.
The
shaver
does
not work
when I
push the
on/o
button
The
battery is
empty.
Replace the
shaver.
The travel
lock is
in 'lock'
position
Turn travel
lock to '
unlock'
position.
See chapter '
Travel lock'.
My skin is
irritated
after
shaving.
Your skin
needs
time to get
used to
the Philips
shaving
system.
Skin irritation
during the
rst 2-3
weeks of use
is possible.
After this
period, the
skin irritation
usually
disappea rs.
3 Push the sides of the central spring
towards each other and lift the
retaining frame out of the shaving
unit (Fig. 10).
4 Slide the shaving heads out of the
retaining frame. Remove and clean
one shaving head at a time. Each
shaving head consists of a cutter
and a guard (Fig. 11).
Note: Do not clean more than
one cutter and shaving guard at
a time, they are all matching sets.
If you accidentally put a cutter in
the wrong shaving guard, it may
take several weeks before optimal
shaving performance is restored.
5 Remove the guard from the cutter
(Fig. 12).
6 Clean the cutter with the cleaning
brush. Brush carefully in the
direction of the arrows (Fig. 13).
7 Clean the guard with the cleaning
brush (Fig. 14).
8 Put the cutter back into the guard
(Fig. 15).
9 Slide the shaving heads back into
the retaining frame (Fig. 16).
10 Put the retaining frame back into
the shaving unit (‘click’ (Fig. 17)).
11 Put the shaving unit back onto the
shaver (Fig. 18).
Storage
Store the appliance in a safe, dry place
at a temperature between 5°C and 35°C.
1 Switch o the shaver.
2 Activate travel lock.
Caution: To avoid battery
performance loss in extremely
high or low temperature, it is
not recommended to store the
appliance in a car.
Replacement
Replace the shaving heads every
two years for optimal shaving results.
Replace damaged or worn shaving
heads with Philips shaving heads only
(HQ4+ for China or HQ56 for the rest of
the world).
For instructions on how to remove the
shaving heads, see chapter‚ Cleaning
and maintenance‘, section‚ Every
month: shaving heads‘.
Problem Possible
cause
Solution
The
rotation
speed
of the
shaving
heads is
slower
than
usual.
Too much
dirt has
collected
in the
shaving
heads.
Clean the
shaving
heads. See
chapter
'Cleaning and
maintena nce'.
The
battery is
empty.
Replace the
shaver.
The ap-
pliance
makes a
strange
noise.
Too much
dirt has
collected
in the
shaving
heads.
Clean the
shaving
heads. After
cleaning,
lubricate the
central point
on the inside
of the guards
with Philips
Cleaning
Spray(HQ110).
See chapter
'Cleaning and
maintena nce'.
The
shaving
heads are
damaged
or worn.
Replace
the shaving
heads. See
chapter
'Replace-
ment'.
Shaver
provides
less than
430min
shaving
minutes.
If you have
a heavy
beard, the
shaver may
provide less
than 430
shaving
minutes.
The
number
of shaving
minutes
may also
vary over
time,
depending
on your
shaving
behavior,
cleaning
habits and
beard type.
Ordering accessories
To buy accessories or spare parts, visit
www.shop.philips.com/service or go
to your Philips dealer. You can also
contact the Philips Consumer Care
Centre in your country.
Shaving heads
We advise you to replace your shaving
heads every two years. Always replace
them with Philips shaving heads only.
(HQ4+ for China or HQ56 for the rest of
the world (Fig. 19)).
Cleaning
Use Philips Cleaning spray (HQ110)
to clean the shaving heads thoroughly.
Recycling
Do not throw away the product with
the normal household waste at the
end of its life, but hand it in at an
ocial collection point for recycling.
By doing this, you help to preserve the
environment.
Guarantee and support
If you need information or support,
please visit www.philips.com/support
or read the separate worldwide
guarantee leaet.
Guarantee restrictions
The shaving heads (cutters and guards)
are not covered by the terms of the
international guarantee because they
are subject to wear.
The battery pack will be guaranteed for
6 months from the date of purchase.
Troubleshooting
This chapter summarizes the most
common problems you could
encounter with the appliance. If you
are unable to solve the problem with
the information below, visit
www.philips.com/support for a list of
frequently asked questions or contact
the Consumer Care Center in your
country.
繁體中文
一般描述
1 電鬍刀刀頭
2 除毛刀頭組
3 支架
4 鬍渣室
5 開關按鈕
6 旅行鎖環與旅行鎖圖示
7 刀網
8 刀具
9 固定架
10固定架的中央彈簧
11清潔刷
12非水洗式標誌
13飛利浦噴霧清潔劑(HQ110)(選購)
14旅行袋
簡介
感謝您購買本產品。歡迎來到飛利浦的世
界!為充分享受飛利浦為您提供的好處,
請至下列位址註冊產品:www.philips.com/
welcome。
請閱讀本使用手冊,其中內容不僅說明本
電鬍刀的功能,也提供一些秘訣,幫助您
享受更加輕鬆、愉快的刮鬍過程。
重要安全資訊
使用本產品前,請先仔細閱讀此重要資訊,
並保留說明以供日後參考。
危險
本產品請保持乾燥(圖 2)。
警示
- 產品為非充電式。請勿嘗試拆開、
改造或重新組裝本產品。請勿嘗試更
換電池。
- 本產品不適合供下列人士(包括小孩)
使用:身體官能或心智能力退化者,
或是經驗與使用知識缺乏者。他們需要
有負責其安全的人員在旁監督,或指示
產品的使用方法,方可使用。
- 孩童使用本產品須有人監督,以免孩童
將本產品當成玩具。
警告
- 本產品不可水洗。切勿將本產品浸入
水中或置於水龍頭(圖 2)下沖洗。
- 使用前請務必檢查本產品。如有損壞
情況,請勿繼續使用該產品或任何其他
零件,否則可能導致受傷。零件如有
受損,請務必以原型號更換之。
- 本產品儘限用於本使用手冊所述之相
關用途。

電鬍刀刀頭
我們建議您每兩年更換一次電鬍刀刀頭。
更換時請一律使用飛利浦電鬍刀刀頭。
(中國為HQ4+,其他國家/地區(圖 19)
為HQ56)。
清潔
使用飛利浦噴霧清潔劑(HQ110)徹底清潔
電鬍刀刀頭。
回收
本產品使用壽命結束時請勿與一般家庭廢
棄物一併丟棄。請將該產品放置於政府指
定的回收站,此舉能為環保盡一份心力。
保固與支援
如需資訊或支援,請造訪:www.philips.com/
support,或另行參閱全球保證書。
保固限制
電鬍刀刀頭(刀具和刀網)由於其耗損性,
因此不在全球保固範圍內。
電池組保固期為購買日期起內6個月。
疑難排解
本章概述了使用本產品最常遇到的問題。
如果無法利用以下資訊解決遇到的問題,
請造訪www.philips.com/support瀏覽常
見問題清單,或聯絡您所在國家/地區的飛
利浦客戶服務中心。
問題 可能原因 解決方法
電鬍刀不
像平常一
樣運作。
電鬍刀刀頭
髒污。
電鬍刀清潔
不夠徹底或
是太久沒有
清潔。
在您繼續刮鬍
之前,請徹底
清潔電鬍刀。
請參閱「清潔
與維護」
單元。
長鬍鬚卡住
電鬍刀刀
頭。
請使用隨附的
清潔刷清潔刀
具及刀網。請
參閱「清潔與
維護」單元之
「每月:
電鬍刀刀頭」
一節。
電鬍刀刀頭
毀壞或磨
損。
更換刀頭。
請參閱「更
換」單元。
電池已幾乎
沒電。
更換刮鬍刀。
我按下開
關按鈕
時,電鬍
刀沒有
反應
電池電量完
全耗盡。
更換刮鬍刀。
- 絕對不可使用壓縮空氣、鋼絲絨、
磨蝕性的清潔劑或侵蝕性的液體
(例如汽油或丙酮)清潔本產品。
- 請於5°C到35°C間使用並存放本
產品。
電磁波 (EMF)
本飛利浦裝置符合所有電磁波暴露的相關
適用標準和法規。
使用本產品
1 確定旅行鎖在「開」(unlock)位置
(圖 3)。(有關旅行鎖的使用方式,
請參閱「旅行鎖」單元。)
2 按下開/關(On/Off)按鈕,開啟電鬍刀
(圖 4)電源。
3 讓電鬍刀刀頭在皮膚上移動。請同時
用直線及畫圓的方式來移動(圖 5)。
注意:僅可乾刮。使用電鬍刀時,
請勿搭配刮鬍凝露、刮鬍泡或水。
注意:您的皮膚可能需要2到3週的
時間才能完全適應飛利浦電鬍刀系統。
4 按下開/關(On/Off)按鈕,關閉電鬍刀
電源。
請在每次刮鬍後啟動旅行鎖,以避免電
鬍刀意外開啟電源。
5 每次刮鬍後均需清潔電鬍刀。請參閱
「清潔與維護」單元。
旅行鎖
外出旅行時,可以設定鎖住本產品。
旅行鎖可防止本產品意外開啟電源。
啟動/解除旅行鎖
啟動:順時針轉動旅行鎖到「鎖定」位置,
直到聽到「喀噠(圖 3)」為止。
解除:逆時針轉動旅行鎖到「開」的位置。
電池
此刮鬍刀可使用430分鐘。電池使用時間
會依使用情況及其他因素而有所不同。
警告: 電池為非充電式,亦無法更換。
清潔與維護
隨附配件可能隨產品而異。包裝盒會顯示
您產品隨附的配件。
警告: 切勿使用鋼絲絨、磨蝕性的清潔
劑或侵蝕性的液體 (例如酒精、汽油或
丙酮) 清潔本產品。
每次刮鬍後清潔電鬍刀,以維持較佳的刮
鬍效能。為達到最理想的清潔效果,我們
建議您使用飛利浦噴霧清潔劑(HQ110)。
詳細資訊請洽詢飛利浦經銷商。
每次刮鬍後: 清理電鬍刀組及鬍
渣室
1 請關閉電鬍刀電源。
2 使 用 隨附(圖 6)的清潔刷清潔產品上方。
問題 可能原因 解決方法
旅行鎖在鎖
定「鎖定」
(lock)位置
將旅行鎖推
回「開」
(unlock)位
置。請參閱
「旅行鎖」單
元。
刮鬍之
後,皮膚
感到刺
痛。
您的皮膚需
要一些時間
才能適應飛
利浦電鬍刀
系統。
開始使用的第
2到3週,皮
膚可能會有過
敏現象。過了
這段時間,皮
膚過敏的症狀
通常會消失。
刀頭的旋
轉速度比
平常緩
慢。
過多污垢累
積在電鬍刀
刀頭中。
清潔刀頭。請
參閱「清潔與
維護」單元。
電池電量完
全耗盡。
更換刮鬍刀。
產品發出
奇怪的噪
音。
過多污垢累
積在電鬍刀
刀頭中。
清潔刀頭。
清潔後,
請使用飛利浦
噴霧清潔劑
(HQ110)潤滑
刀網內側的中
心點。請參
閱「清潔與維
護」單元。
電鬍刀刀頭
毀壞或磨
損。
更換刀頭。
請參閱「更
換」單元。
可提供的
刮鬍時間
少於430
分鐘。
若您的鬢鬚
濃密,電鬍
刀的刮鬍時
間可能少於
430分鐘。
此外,由於
刮鬍方式、
清潔習慣和
鬍鬚類型不
同,可使用
時間也可能
會隨著時日
改變。
3 從電鬍刀(圖 7)中垂直抽出電鬍刀組。
4 使用隨附的清潔刷(圖 8)清潔刮鬍刀頭
組內部。
5 使用清潔刷(圖 9)清潔鬍渣室。
6 將電鬍刀組裝回電鬍刀(圖 18)上。
每兩個月: 電鬍刀刀頭
注意:請勿使用清潔劑或酒精清潔電鬍
刀刀頭,務必使用飛利浦噴霧清潔劑
(HQ110)。
1 請關閉電鬍刀電源。
2 從電鬍刀(圖 7)中垂直抽出電鬍刀組。
3 將中央彈簧的兩側朝中間推壓,然後提
起固定架將電鬍刀組(圖 10)取出。
4 將電鬍刀刀頭推出固定架外。一次取
下並清洗一個刀頭。每個電鬍刀刀頭
都是由刀具和刀網(圖 11)組成。
注意:刀具及電鬍刀刀網是成對組
合,請勿一次清潔超過一組。如果您
不小心將刀片放進錯誤的電鬍刀刀網
中,可能要花幾週的時間才能恢復最理
想的刮鬍效果。
5 取下刀具(圖 12)的刀網。
6 使用隨附的清潔刷清潔刀片。請朝箭
頭(圖 13)方向小心刷動。
7 用清潔刷(圖 14)清潔刀網。
8 將刀片放回刀網(圖 15)中。
9 將電鬍刀刀頭推回固定架(圖 16)中。
10將固定架裝回電鬍刀組(會聽見「喀噠
(圖 17)」一聲)。
11將電鬍刀組裝回電鬍刀(圖 18)上。
收納
將產品放置在安全、乾燥、溫度介於
5°C至35°C的地方。
1 請關閉電鬍刀電源。
2 啟動旅行鎖。
警告: 為避免電池效能在極高溫或極
低溫環境下衰退,不建議將產品存放
在車內。
更換
每隔兩年更換一次電鬍刀刀頭,以確保維
持最佳的刮鬍效果。
損壞或用舊的刀頭限以飛利浦電鬍刀刀
頭替換(中國為HQ4+,其他國家/地區為
HQ56)。
有關如何取下電鬍刀刀頭的說明,請參閱
「清潔與維護」單元之「每月:電鬍刀刀
頭」一節。
訂購配件
若要購買配件或備用零件,請造訪
www.shop.philips.com/service,或洽詢
您的飛利浦經銷商。您也可以聯絡您所在
國家/地區的飛利浦客戶服務中心。
-
 1
1
-
 2
2
-
 3
3


