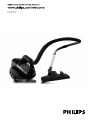
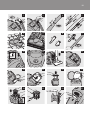
Philips FC8732/01は、サイクロン式のコード付き掃除機です。パワフルな吸引力で、フローリングやカーペットなどのあらゆる床をきれいにします。また、付属のノズルで、家具や車の掃除も可能です。
軽量で操作性がよく、狭い場所にも楽に掃除機をかけることができます。また、コードが長いため、コンセントを頻繁に抜き差しする必要がありません。
Philips FC8732/01は、お手入れも簡単です。ダストカップとフィルターは水洗いできるので、いつも清潔に保つことができます。
サイクロン式掃除機をお探しなら、Philips FC8732/01はおすすめです。強力な吸引力、操作性、お手入れのしやすさを兼ね備えた、頼れる掃除機です。


-
 1
1
-
 2
2
-
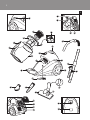 3
3
-
 4
4
-
 5
5
-
 6
6
-
 7
7
-
 8
8
-
 9
9
-
 10
10
-
 11
11
-
 12
12
-
 13
13
-
 14
14
-
 15
15
-
 16
16
-
 17
17
-
 18
18
-
 19
19
-
 20
20


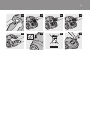
Philips FC8732/01は、サイクロン式のコード付き掃除機です。パワフルな吸引力で、フローリングやカーペットなどのあらゆる床をきれいにします。また、付属のノズルで、家具や車の掃除も可能です。
軽量で操作性がよく、狭い場所にも楽に掃除機をかけることができます。また、コードが長いため、コンセントを頻繁に抜き差しする必要がありません。
Philips FC8732/01は、お手入れも簡単です。ダストカップとフィルターは水洗いできるので、いつも清潔に保つことができます。
サイクロン式掃除機をお探しなら、Philips FC8732/01はおすすめです。強力な吸引力、操作性、お手入れのしやすさを兼ね備えた、頼れる掃除機です。
他の言語で
- English: Philips FC8732/01 User manual