
4-475-417-31(1)
© 2013 Sony Corporation Printed in China
PCM-D100
應用軟體
使用Sound Forge Audio Studio LE
Sound Forge Audio Studio LE 的用途
Sound Forge Audio Studio LE 可以播放並編輯以下條件的音訊檔案:以線性 PCM 錄音機錄製的音訊檔案、從
音訊 CD 匯入的音訊檔案、從網站下載的音訊檔案,或是複製自電腦的音訊檔案。
您也可以燒錄音訊 CD,並透過 Sound Forge Audio Studio LE 的各種功能欣賞。
註
Sound Forge Audio Studio LE 不支援或處理 DSD﹙.dsf/.dff/.wsd﹚檔案。
您可以使用線性 PCM 錄音機分割、合併及刪除檔案。詳細程序,請參閱操作說明。
在電腦上安裝 Sound Forge Audio Studio LE
Sound Forge Audio Studio LE 的系統需求
作業系統
Windows® XP 32 位元 Service Pack 3 或更新版本
Windows Vista® 32 位元或 64 位元 Service Pack 2 或更新版本
Windows® 7 32 位元或 64 位元
Windows® 8 32 位元或 64 位元
註
應依據上述作業系統之一預先預設安裝。不支援任何除上列所示以外的作業系統、升級過的作業系統或
多重開機環境。
硬體環境
CPU:1 GHz 或速度更快的處理器
釋放硬碟空間:至少 350 MB﹙軟體安裝﹚
記憶體:至少 1 GB
聲卡:與任何支援之作業系統相容的音效卡
連接埠:USB連接埠
磁碟機:DVD-ROM 磁碟機相容於任何受支援的作業系統
﹙如需建立音樂 CD,必須要有 CD-R/RW 磁碟機。﹚
Microsoft DirectX® 9.0c 或更高版本
Microsoft .NET Framework 2.0
網際網路連線
Sound Forge Audio Studio LE
音訊簡易編輯
音訊檔案
傳輸檔案
建立光碟
安裝 Sound Forge Audio Studio LE
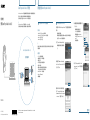
1 將隨附的 DVD-ROM﹙“Sound Forge Audio Studio LE”﹚安裝程式插入電腦DVD-ROM磁
碟機。
此時會自動出現安裝視窗。
如果未自動出現安裝視窗設定視窗,請開啟 Windows 檔案總管,在 DVD-ROM 磁碟機上按右
鍵,按兩下[setup.exe],然後依照畫面說明操作。
2
按一下[Install Sound Forge Audio Studio]。
如果想要變更選單和訊息語言,請選取所需語
言。
3 此時會出現 “Welcome to the Sound Forge
Audio Studio 10.0 Installation Wizard” 視
窗,按一下[Next]。
4 閱讀 END USER LICENSE AGREEMENT 的說明,
勾選 “I have read the End User License
Agreement and the Privacy Policy and agree
to their terms.”,然後按一下[Next]。
翻至背面
5 此時會出現安裝目的地資料夾的選取視窗時,按
一下[Install]。
如果想要變更目的地資料夾,請按一下
[Change],然後選取所需的資料夾。
如需從桌面快速啟動 Sound Forge Audio
Studio,請勾選 “Create a shortcut on the
desktop”。
此時安裝程式即開始。
6 出現 “Sound Forge Audio Studio 10.0 has
been successfully installed.” 的視窗時,請
按一下[Finish]。
1
步驟
Sound Forge is a trademark or registered trademark of Sony Creative Software, Inc. in the United
States and other countries.

啟動 Sound Forge Audio Studio LE 複製檔案並儲存到電腦
您可以在 線性 PCM 錄音機及電腦之間交換檔案,不需使用 Sound Forge Audio Studio LE。
建立音訊 CD
您可以從註冊到 Sound Forge Audio Studio LE 的曲目建立音訊 CD。
1 依序按一下[開始]、[所有程式]–[Sound
Forge Audio Studio]。
此時即啟動 Sound Forge Audio Studio LE。
第一次啟動軟體時,會出現產品註冊視窗。
2 按一下[Next]。
3 出現產品註冊視窗時,請勾選 “Register
online”,然後按一下[Next]。
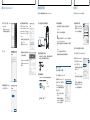
1 使用 USB纜線﹙隨附﹚將線性 PCM 錄音機連線到電腦。
電腦
USB纜線(隨附)
線性 PCM 錄音機
連接到電腦上的 USB 連接埠
2 確認電腦已正確識別您的線性 PCM 錄音機。
Windows 電腦:開啟[電腦]﹙或[我的電腦]﹚,查看是否已正確識別[PCMRECORDER]。
Mac 電腦:查看[PCMRECORDER]磁碟機是否已正確顯示在 Finder。
3 複製您要傳輸到電腦的檔案。
從 “PCMRECORDER” 或 “MEMORY CARD” 將您要複製的檔案拖放到電腦的本機磁碟機。
PCMRECORDER 或 MEMORY
CARD
您的電腦
按住,
拖曳,
然後放開。
從 CD 匯入音訊檔案
1 將音訊 CD 插入電腦的 CD-R/RW 磁碟機。
2 從[File]功能表選取[Extract Audio from CD]。
3 此時即會出現 “Extract Audio from CD”
視窗,再從 “Action” 下拉式清單中選
取[Read by track]。在 “Tracks to
extract” 清單方塊中選取您要匯入的曲目,
然後按一下[OK]。
如需匯入 CD 中的所有曲目,請選取[Read
entire disc]。
此時即會將選取的音訊曲目擷取到 Sound
Forge Audio Studio LE。如需使用擷取的曲
目,請從[File]功能表選取[Save]。
1 開啟您要燒錄成音訊 CD 的檔案。
選取工具列上的[Open]按鈕,或從[View]
功能表上選取[Explorer],在 Sound Forge
Audio Studio 的工作區中開啟所需的檔案。
2 將新的 CD-R/CD-RW 光碟插入電腦的 CD-R/RW 磁碟機。
3 在[Tool]功能表上,按一下[Burn Track-at-Once Audio CD]。
4 此時會出現 “Burn Track-at-Once Audio
CD” 視窗,請勾選 “Close disc when done
burning”,然後按一下[Start]。
此時即開始燒錄音訊 CD。燒錄完成後,會出現確
認訊息。按一下[OK]。
要點
關閉光碟片可讓您在音訊 CD 播放器上播放檔案。
註
若要在音訊 CD 上燒錄多個檔案,請在要燒錄
的最後一個檔案勾選 “Close disc when done
burning”。請勿勾選其他檔案的核取方塊。
4 出現線上註冊視窗時,請輸入您的註冊資訊,
並勾選 “By providing this registration
information, I acknowledge that I have read
and agree with terms of the Sony Creative
Software Inc. Privacy Policy.”,然後按一下
[Finish]。
此時即開始線上註冊。線上註冊完成後,會出現確
認訊息。按一下[OK]。
此時即啟動 Sound Forge Audio Studio LE。
教學課程視窗將開啟。您可以選取所需的操作,按
一下即開始該操作的教學課程。
有關 Sound Forge Audio Studio LE 操作的詳細
資訊,請參閱 Sound Forge Audio Studio LE 的
說明指南。
4 中斷 PCM 錄音機與電腦的連線。
確認線性 PCM 錄音機上的 ACCESS 指示燈未亮起,然後在電腦上執行以下操作。
Windows 電腦:
在桌面右下方的工作列上,用滑鼠左鍵點選下列圖示:
用滑鼠左鍵點選 “移除PCMRECORDER”﹙Windows 7、Windows 8﹚或 “安全地移除USB Mass
Storage Device”﹙Windows XP、Windows Vista﹚。
圖示及功能表可能會因作業系統而有所不同。圖示未必始終顯示在工作列上,視電腦設定而
定。
Mac 電腦:
按一下 Finder 側邊欄項目的 “PCMRECORDER” 移除圖示。
如需從電腦移除線性 PCM 錄音機的詳細程序,請參閱電腦的隨附手冊。
2
步驟
3
步驟
4
步驟
-
 1
1
-
 2
2

