
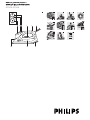
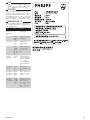
GC1409, GC1408
A
G H I
B C
D E F
1 2 3 4 5
6
7 8 9
10 11 12

简体中文
一般说明(图1)
A 注水口盖
B 蒸汽控制
;=蒸汽
t=无蒸汽
u=除水垢功能
C 喷雾按钮8
D 温度旋钮
E 温度指示灯
F 电源线
G 喷雾嘴
H 水箱
I 型号牌
注意事项
使用产品之前,请仔细阅读本用户
手册,并妥善保管以供日后参考。
危险
切勿将熨斗浸入水中。
警告
连接产品电源前,请检查型号铭
牌所标示的电压与当地电源电压
是否一致。
如果插头、电源线或产品本身已
经明显损坏,或产品曾坠落或出
现渗漏,请勿再使用。
如果电源软线损坏,为避免危
险,必须由制造厂或其维修部或
类似的专职人员来更换。
在产品接通电源期间,使用者不
得离开。
本产品不打算由肢体不健全、感
觉或精神上有障碍或缺乏相关
经验和知识的人(包括儿童)
使用,除非有负责他们安全的人
对他们使用本产品进行监督或
指导。
应照看好儿童,确保他们不会玩
耍这些产品。
切勿让电源线触及高温电熨斗
底板。
注意
如果产品带有接地插头,则必须
将其插至接地线的插座。
定期检查电源线是否损坏。
电熨斗的底板会变得非常烫,
如触摸底板,可能会导致烫伤。
当完成熨烫、清洁熨斗、注水或
将水倒出水箱以及即使短时间离
开熨斗时:将蒸汽控制旋钮调
至“无蒸汽”位置,熨斗竖放,
并且从电源插座中拔下插头。
一定要在稳固、平整且水平的表
面上放置和使用熨斗。
本产品仅限于家用。
电磁场(EMF)
这款飞利浦产品符合关于电磁场(EMF)的相
关标准。据目前的科学证明,如果正确使用并
按照本用户手册中的说明进行操作,本产品是
安全的。
-
-
-
-
-
-
-
-
-
-
-
-
-
-
-
-
-
初次使用之前
1 从熨斗底板上取下任何标签或保护膜。
2 让熨斗加热至最高温度。
3 在一块湿布上熨烫几分钟,以去除底板上
的任何残留物。
注:首次使用时,熨斗可能冒烟。过一会就
会停止。
使用准备
给水箱注水
切勿将熨斗浸入水中。
1 确保熨斗的插头已经拔掉。
2 将蒸汽控制旋钮设定到“无蒸汽”位
置。(图2)
3 将熨斗向后倾斜。
4 打开注水口的盖子。(图3)
5 将自来水加注到水箱的最高标志。(图4)
切勿让水位超过最高水位标志。
不要将香水、醋、淀粉、除垢剂、烫衣剂或其
它化学品放入水箱。
注:如果您所在地区的自来水硬度很高,我
们建议您将自来水与等量的蒸馏水混合后再使
用,或仅使用蒸馏水。
6 将注水口盖关闭。
设定温度
1 将熨斗竖立。
2 要设定所需熨烫温度,请将温度转盘转到
适当位置。(图5)
检查衣服标签以了解所需熨烫温度:
1 合成纤维(例如丙烯酸、粘胶、尼龙和
涤纶纤维)
1 丝绸
2 羊毛
3棉,亚麻
如果您不知衣物是由何种纤维组成,找一处穿
时看不见的地方熨,试试何种温度最合适。
丝绸,羊毛及合成纤维:应当熨其反面,以防
产生局部发亮。为避免产生水渍印,请勿使用
喷雾功能。
从需要最低熨烫温度的布料开始熨烫,如合成
纤维织物。
3 将插头插入有接地的电源插座。
温度指示灯亮起。(图6)
4 如果温度指示灯亮着,应等一会再开始熨
烫。
在熨烫期间,温度指示灯会时亮时灭。
使用本产品
蒸汽电熨斗
1 确保水箱中有足够的水。
2 选择推荐的熨烫温度(见“使用准备”一
章中的“设定温度”一节)。
3 温度指示灯熄灭之后,将蒸汽控制旋钮设
定到适当位置。确保您所选定的熨烫温度
适合所选温度:(图7)
温度从
2设定为3可获得从最小到适中
的蒸汽量。
温度从
3设定为MAX可获得从适中到最
大的蒸汽量。
熨斗将在达到设定温度时立即开始发出蒸汽。
无蒸汽熨烫
1 将蒸汽控制旋钮设定到“无蒸汽”位
置。(图2)
,
2 选择推荐的熨烫温度(见“使用准备”一
章中的“设定温度”一节)。
功能
喷雾装置
您可在任何温度下使用喷雾功能去除顽固褶
皱。
1 确保水箱中有足够的水。
2 按几次喷雾按钮(8),把要熨烫的布料弄
湿。(图8)
清洁和保养
熨烫后
1 从插座中拔下电源插头,让熨斗充分冷
却。
2 用湿布和非腐蚀性(液体)清洁剂抹去底
板上的水垢和其它沉积物。
为了保持底板光滑,应避免底板与金属物体碰
撞。切勿使用磨砂布、醋或其他化学品清洁
底板。
3 用湿布清洁熨斗的上部。
4 定期用水冲洗水箱。清洗之后将水箱中的
水全部倒出。
除水垢功能
建议两周使用一次自动除垢功能。如果您所在
地区的水质很硬(即在熨烫过程中底板出现
水垢薄片时),可增加使用自动除垢功能的
次数。
1 将蒸汽控制旋钮设定到“无蒸汽”位
置。(图2)
2 将温度转盘调至最大(MAX)。
3 将水箱注满至最高水位(MAX)。
请勿将醋或其它除垢剂注入水箱。
4 将电源插头插入插座。
5 当温度指示灯熄灭时,拔下熨斗的电源插
头。
6 在水池上方手持熨斗,并将蒸汽控制旋钮
设定到除水垢位置。
7 将蒸汽控制旋钮保持在除水垢位置并轻
轻摇晃熨斗,直到水箱中的水全部排
完。(图9)
蒸汽和沸水会从底板冲出。水垢(如果有
的话)也一并冲出。
8 使用了除水垢功能之后,请将蒸汽控制旋
钮设置到“无蒸汽”位置。
9 如果从熨斗中冲出的水仍有水垢颗粒,则
应再次使用除水垢功能。
完成除水垢过程后
1 插上熨斗的插头,让底板变干。
2 当温度指示灯熄灭时,拔下熨斗的电源插
头。
3 将熨斗放在一块用过的布上轻轻地前后移
动,以除去留在底板上的水渍。
4 让熨斗冷却,然后存放好。
存放
1 拔下产品的电源插头并将蒸汽控制旋钮设
置到“无蒸汽”位置。
2 倒空水箱。(图10)
3 将电源线绕在存线装置上。(图11)
4 请将熨斗竖放在安全干燥的地方。
,
4239.000.6746.1
2/7

环保
弃置产品时,请不要将其与一般生活垃圾
堆放在一起;应将其交给官方指定的回收
中心。这样做有利于环保。(图12)
保修与服务
如果您需要详细信息或有任何问题,请浏览飞
利浦网站,地址为www.philips.com。您也可
以与贵国的飞利浦顾客服务中心联系(您可以
从全球保修卡中找到电话号码)。如果贵国没
有飞利浦顾客服务中心,请与当地的飞利浦经
销商或与飞利浦家庭小电器的维修中心联系。
故障种类和处理方法
本章归纳了您的熨斗在使用时最常遇到的问
题。如果您还不能解决问题,请与贵国的飞利
浦客户服务中心联系。
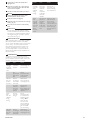
问题 原因 解决方法
熨斗已经插
好插头,但
底板仍是凉
的。
接触不
良。
检查电源线、插头
和电源插座。
温度转
盘设在
MIN。
将温度转盘设定到
所需温度。
熨斗没有蒸
汽。
水箱中
水不
足。
将水箱注满水(
见“使用准备”一
章)。
将蒸汽
控制旋
钮设定
到“无蒸
汽”位
置。
将蒸汽控制旋钮设
定为蒸汽设定(
见“使用产品”一
章)。
熨烫时水
从底板漏
出。
熨斗不
够热。
将温度转盘设定在
一个适合蒸汽熨烫
的温度(
2到最
大)。将熨斗竖
立,直到温度指示
灯熄灭后再开始熨
烫。
喷雾功能不
能工作。
水箱中
水不
足。
将水箱注满水(
见“使用准备”一
章)。
在熨烫过程
中底板内冒
出水垢和杂
质。
硬水在
底板内
形成水
垢。
使用一次或多次除
垢功能(见“清洁
和保养”一章)。
当熨斗冷却
或存放后,
水从底板漏
出。
熨斗水
平放置
时水箱
中还有
水。
存放熨斗之前,先
将水箱倒空,然后
将蒸汽控制设定
到“无蒸汽”位置
(见“存放”一
章)。将熨斗竖立
存放。
-
GC1409, GC 1408
2007/06/11
4239.000.6746.1
3/7

ENGLISH
General description (Fig. 1)
A Capofllingopening
B Steamcontrol
;=steam
t =nosteam
u=Calc-Cleanfunction
C Spraybutton8
D Temperaturedial
E Temperaturelight
F Mainscord
G Spraynozzle
H Watertank
I Typeplate
Important
Readthisusermanualcarefullybeforeyouusethe
applianceandsaveitforfuturereference.
Danger
Neverimmersetheironinwater.
Warning
Checkifthevoltageindicatedonthetypeplate
correspondstothelocalmainsvoltagebefore
youconnecttheappliance.
Donotusetheapplianceiftheplug,themains
cordortheapplianceitselfshowsvisible
damage,oriftheappliancehasbeendropped
orleaks.
Ifthemainscordisdamaged,youmusthaveit
replacedbyPhilips,aservicecentreauthorised
byPhilipsorsimilarlyqualiedpersonsinorder
toavoidahazard.
Neverleavetheapplianceunattendedwhenit
isconnectedtothemains.
Thisapplianceisnotintendedforuseby
persons(includingchildren)withreduced
physical,sensoryormentalcapabilities,orlack
ofexperienceandknowledge,unlessthey
havebeengivensupervisionorinstruction
concerninguseoftheappliancebyaperson
responsiblefortheirsafety.
Childrenshouldbesupervisedtoensurethat
theydonotplaywiththeappliance.
Donotletthemainscordcomeintocontact
withthehotsoleplateoftheiron.
Caution
Iftheappliancehasanearthedplug,itmustbe
pluggedintoanearthedwallsocket.
Checkthemainscordregularlyforpossible
damage.
Thesoleplateoftheironcanbecome
extremelyhotandmaycauseburnsiftouched.
Whenyouhavenishedironing,whenyou
cleantheappliance,whenyoulloremptythe
watertankandalsowhenyouleavetheiron
evenforashortwhile:setthesteamcontrol
tothe‘nosteam’position,puttheirononits
heelandremovethemainsplugfromthewall
socket.
Alwaysplaceandusetheirononastable,level
andhorizontalsurface.
Thisapplianceisintendedforhouseholduse
only.
Electromagnetic elds (EMF)
ThisPhilipsappliancecomplieswithallstandards
regardingelectromagneticelds(EMF).Ifhandled
properlyandaccordingtotheinstructionsinthis
usermanual,theapplianceissafetousebasedon
scienticevidenceavailabletoday.
Before first use
1 Remove any sticker or protective foil from
the soleplate.
2 Let the iron heat up to maximum
temperature.
-
-
-
-
-
-
-
-
-
-
-
-
-
-
-
-
-
3 Pass the iron over a piece of damp cloth for
several minutes to remove any residues from
the soleplate.
Note: The iron may give off some smoke when you
use it for the rst time. This ceases after a short while.
Preparing for use
Filling the water tank
Never immerse the iron in water.
1 Make sure the appliance is unplugged.
2 Set the steam control to the ‘no steam’
position (Fig. 2).
3 Tilt the iron backwards.
4 Openthecaptheofllingopening(Fig.3).
5 Fill the water tank with tap water up to the
maximum level. (Fig. 4)
DonotllthewatertankbeyondtheMAX
indication.
Do not put perfume, vinegar, starch, descaling
agents, ironing aids or other chemicals in the
water tank.
Note: If the tap water in your area is very hard, we
advise you to mix it with an equal amount of distilled
water or to use distilled water only.
6 Closethecapofthellingopening.
Setting the temperature
1 Put the iron on its heel.
2 To set the required ironing temperature, turn
the temperature dial to the appropriate
position (Fig. 5).
Checkthelaundrycarelabelfortherequired
ironingtemperature:
1 Syntheticfabrics(e.g.acrylic,viscose,
polyamide,polyester)
1 Silk
2 Wool
3Cotton,linen
Ifyoudonotknowwhatkindorkindsoffabric
anarticleismadeof,determinetherightironing
temperaturebyironingapartthatisnotvisible
whenyouwearorusethearticle.
Silk,woollenandsyntheticmaterials:ironthe
reversesideofthefabrictopreventshinypatches.
Topreventstains,donotusethesprayfunction.
Startironingthearticlesthatrequirethelowest
ironingtemperature,suchasthosemadeof
syntheticbres.
3 Put the mains plug in an earthed wall socket.
The temperature light goes on (Fig. 6).
4 When the temperature light has gone out,
wait a while before you start ironing.
Thetemperaturelightgoesonfromtimetotime
duringironing.
Using the appliance
Steam ironing
1 Make sure that there is enough water in the
water tank.
2 Select the recommended ironing temperature
(see chapter ‘Preparing for use’, section
‘Setting the temperature’).
3 Afterthetemperaturelighthasgoneout,set
the steam control to the appropriate steam
position. Make sure that the steam setting you
select is suitable for the ironing temperature
selected: (Fig. 7)
Temperaturesettings
2 to 3forminimumto
moderatesteam.
,
Temperaturesettings3toMAXformoderate
tomaximumsteam.
Theironstartstoproducesteamassoonas
itreachesthesettemperature.
Ironing without steam
1 Set the steam control to the ‘no steam’
position (Fig. 2).
2 Select the recommended ironing temperature
(see chapter ‘Preparing for use’, section
‘Setting the temperature’).
Features
Spray function
Youcanusethesprayfunctiontoremovestubborn
creasesatanytemperature.
1 Make sure that there is enough water in the
water tank.
2 Press the spray button ( 8)several times to
moisten the article to be ironed. (Fig. 8)
Cleaning and maintenance
After ironing
1 Remove the mains plug from the wall socket
and let the iron cool down.
2 Wipe scale and any other deposits off the
soleplate with a damp cloth and a non-
abrasive (liquid) cleaner.
To keep the soleplate smooth, avoid hard contact
with metal objects. Never use a scouring pad,
vinegar or other chemicals to clean the soleplate.
3 Clean the upper part of the appliance with a
damp cloth.
4 Regularly rinse the water tank with water.
Empty the water tank after cleaning.
Calc-Clean function
UsetheCalc-Cleanfunctiononceeverytwo
weeks.Ifthewaterinyourareaisveryhard(i.e.
whenakescomeoutofthesoleplateduring
ironing),usetheCalc-Cleanfunctionmore
frequently.
1 Set the steam control to the ‘no steam’
position (Fig. 2).
2 SetthetemperaturedialtoMAX.
3 Fill the water tank to the maximum level.
Do not pour vinegar or other descaling agents
into the water tank.
4 Put the mains plug in the wall socket.
5 Unplug the iron when the temperature light
goes out.
6 Hold the iron over the sink and set the steam
control to the Calc-Clean position .
7 Hold the steam control at the Calc-Clean
position and gently shake the iron until all the
water in the tank has been used up (Fig. 9).
Steam and boiling water come out of the
soleplate.Scale(ifany)isushedout.
8 AfteryouhaveusedtheCalc-Cleanfunction,
set the steam control to the ‘no steam’
position.
9 Repeat the Calc-Clean process if the water
that comes out of the iron still contains scale
particles.
After the Calc-Clean process
1 Connect the iron to the mains to let the
soleplate dry.
,
4239.000.6746.1
4/7

2 Unplug the iron when the temperature
light goes out.
3 Move the iron gently over a piece of used
cloth to remove any water stains that have
formed on the soleplate.
4 Let the iron cool down before you store it.
Storage
1 Unplug the appliance and set the steam
control to the ‘no steam’ position.
2 Empty the water tank (Fig. 10).
3 Wind the mains cord round the cord storage
facility. (Fig. 11)
4 Store the iron on its heel in a safe and dry
place.
Environment
Donotthrowawaytheappliancewiththe
normalhouseholdwasteattheendofitslife,
buthanditinatanofcialcollectionpointfor
recycling.Bydoingthis,youhelptopreserve
theenvironment(Fig.12).
Guarantee & service
Ifyouneedinformationorifyouhaveaproblem,
pleasevisitthePhilipswebsiteatwww.philips.
comorcontactthePhilipsCustomerCareCentre
inyourcountry(younditsphonenumberin
theworldwideguaranteeleaet).Ifthereisno
CustomerCareCentreinyourcountry,goto
yourlocalPhilipsdealerorcontacttheService
DepartmentofPhilipsDomesticAppliancesand
PersonalCareBV.
Troubleshooting
Thischaptersummarisesthemostcommon
problemsyoucouldencounterwithyouriron.If
youareunabletosolvetheproblem,contactthe
CustomerCareCentreinyourcountry.
Problem Cause Solution
Theiron
isplugged
inbutthe
soleplateis
cold.
Thereisa
connection
problem.
Checkthemains
cord,theplugand
thewallsocket.
The
temperature
dialissetto
MIN.
Setthe
temperaturedial
totherequired
temperature.
Theiron
doesnot
produce
anysteam.
Thereis
notenough
waterinthe
watertank.
Fillthewater
tank(seechapter
‘Preparingforuse’).
Thesteam
controlis
settothe
‘nosteam’
position.
Setthesteam
controltoa
steamsetting(see
chapter‘Usingthe
appliance’).
Water
leaks
fromthe
soleplate
during
ironing.
Theiron
isnothot
enough.
Setthe
temperaturedial
toatemperature
suitableforsteam
ironing(
2 to
MAX).Putthe
irononitsheel
andwaituntilthe
temperaturelight
goesoutbefore
youstartironing.
Thespray
function
doesnot
work.
Thereis
notenough
waterinthe
watertank.
Fillthewater
tank(seechapter
‘Preparingforuse’).
-
Problem Cause Solution
Flakesand
impurities
comeout
ofthe
soleplate
during
ironing.
You
haveused
hardwater,
whichhas
caused
scaleakes
todevelop
insidethe
soleplate.
UsetheCalc-Clean
functiononeor
moretimes(see
chapter‘Cleaning
andmaintenance’).
Water
leaks
fromthe
soleplate
whilethe
ironcools
downor
afterit
hasbeen
stored.
Youhaveput
theironin
horizontal
position
whilethere
isstillwater
inthewater
tank.
Emptythewater
tankandsetthe
steamcontrol
tothe‘nosteam’
positionbeforeyou
storetheiron(see
chapter‘Storage’).
Storetheironon
itsheel.
4239.000.6746.1
5/7

繁體中文
一般說明(圖1)
A 注水口蓋子
B 蒸汽控制鈕
;=蒸汽
t=無蒸汽
u=除鈣清洗功能
C 噴水按鈕8
D 溫度控制設定
E 溫度指示燈
F 電線
G 噴水噴嘴
H 水箱
I 機型標籤
重要事項
在使用本產品前,請先仔細閱讀本使用手冊,
並保留說明以供日後參考。
危險
請勿將熨斗浸泡在水中。
警示
在使用前,請先檢查標籤上所標示的電壓
是否與當地的電源系統電壓一致。
插頭、電線或產品本身受損時,或是產品
曾摔落或漏電時,請勿使用。
如果電線損壞,必須交由飛利浦、飛利浦
授權之服務中心,或是具備相同資格的技
師更換,以免發生危險。
當本產品連接到電源時,必須有人看顧。
本產品不適合供下列人士(包括小孩)使
用:身體官能或心智能力退化者,或是經
驗與使用知識缺乏者。他們需要有負責其
安全的人員在旁監督,或指示產品的使用
方法,方可使用。
請勿讓孩童將本產品當成玩具。
請勿讓電源線靠近接觸熨斗的熱底盤。
警告
如果產品有接地插頭,則必須插入吻合的
接地插座上。
定期檢查電線看看是否受損。
熨斗的底盤可能會變得很燙,如果碰到可
能會燙傷。
當您熨燙完畢、清理熨斗、倒乾水箱的水
或加水,或即使短暫離開熨斗時:請將蒸
汽控制鈕設定到「無蒸汽」的位置,將熨
斗直立在其跟部上,並且將電源插頭從插
座拔出。
請將熨斗放置在平穩的水平面上使用。
本電器用品僅供家用。
電磁場(EMF)
本飛利浦產品符合電磁場(electromagnetic
fields,EMF)所有相關標準。若正確處理及依
照本使用手冊之說明進行操作,根據現有之科
學文獻來看,使用本產品並無安全顧慮。
第一次使用前
1 請拔除在熨斗底盤的任何貼紙或保護膜。
2 讓熨斗加熱達到最高溫度。
3 用熨斗熨燙濕布達數分鐘,以便去除底盤
的殘留物。
注意:第一次使用時,熨斗可能會產生一些
煙霧,煙霧會在不久後消失。
使用前準備
加水至水箱內
請勿將熨斗浸泡在水中。
1 確定產品的插頭已經拔離電源插座。
2 將蒸汽控制鈕設定到「無蒸汽」的位
置。(圖2)
3 將熨斗向後傾斜。
4 將注水口的蓋子打開。(圖3)
-
-
-
-
-
-
-
-
-
-
-
-
-
-
-
-
-
5 將自來水注滿到水箱最高刻度。(圖4)
切勿注入超過「MAX」的水位指示。
請勿將香水、醋、澱粉、除水垢劑、熨燙添加
劑或其他化學物質加入水箱中。
注意:如果在您居住地區的自來水質硬度很
高,我們建議您用等量的蒸餾水調合,或是僅
使用蒸餾水。
6 蓋上加水蓋。
設定溫度
1 將熨斗直立。
2 將溫度控制設定轉到適當的位置來設定所
需的熨燙溫度。(圖5)
關於適當的熨燙溫度,請檢查洗濯指示標籤:
1 合成纖維(例如,壓克力纖維、人造絲、
聚醯胺、聚酯纖維)
1 絲
2 毛料
3棉、亞麻布
如果您不知道衣料是由哪一種纖維製成,請先
在該衣料不起眼的部份試燙,以判斷適當的熨
燙溫度。
絲質、毛料和合成纖維:熨燙布料的背面以防
止衣料發亮。請勿使用噴水功能,以防止產生
印漬。
請從需要最低溫的衣物開始熨燙,例如合成纖
維製的衣料。
3 將電源線插頭插入接地插座中。
加熱指示燈會亮起。(圖6)
4 當溫度指示燈熄滅時,請先稍待一會兒再
開始熨燙。
熨燙期間,指示燈會間歇性地亮起。
使用此電器
蒸汽熨燙
1 確認在水箱中有足夠的水。
2 選取有建議的熨燙溫度(請參閱「準備使
用」的「設定溫度」之說明)。
3 溫度指示燈熄滅後,將蒸汽控制設定到適
當的蒸汽位置。選擇適當的蒸汽設定,
並確定您選擇的蒸汽設定適合熨燙的溫
度:(圖7)
溫度設定
2到3從最小蒸汽到一般蒸
汽。
溫度設定
3到MAX,從一般蒸汽到最大
蒸汽。
到達設定溫度時,熨斗便會立即開始產生蒸
汽。
無蒸汽熨燙
1 將蒸汽控制鈕設定到「無蒸汽」的位
置。(圖2)
2 選取有建議的熨燙溫度(請參閱「準備使
用」的「設定溫度」之說明)。
功能
噴水功能
您可以在任何溫度下使用噴水功能,以燙平頑
固的縐褶。
1 確認在水箱中有足夠的水。
2 按噴水按鈕(8)數下,以潤溼衣
服。(圖8)
清潔與維護
熨燙後
1 將電源插頭從插座上拔除並讓熨斗冷卻。
2 用濕布和非磨蝕性的(液體)清潔劑擦掉底
盤上的水垢和其他任何沈積物。
,
為保持底盤滑順,請避免底盤與金屬物品直接
碰觸。禁止使用鋼絲絨、醋或其他的化學物質
清潔底盤。
3 請用溼布清潔熨斗上面的部份。
4 定期使用清水沖洗熨斗水箱。在清潔水箱
後,請將水倒乾。
除鈣清洗功能
每兩週使用一次除鈣功能。如果居住地的水質
非常硬(亦即在熨燙過程中有小薄片從底盤產
生),則必須更頻繁地使用除鈣功能。
1 將蒸汽控制鈕設定到「無蒸汽」的位
置。(圖2)
2 將溫度控制設定到「MAX」。
3 將水倒入水箱到最高的刻度。
切勿在水箱中倒入醋或其他除垢劑。
4 將電源插頭插入牆上插座。
5 溫度指示燈熄滅時,請拔除熨斗的插頭。
6 在洗手槽上握住熨斗,並將蒸汽控制設定
到除鈣清洗的位置。
7 按住蒸汽控制鈕至除鈣清洗位置,並輕
輕搖動熨斗,直到水箱中所有的水都流
盡。(圖9)
蒸汽和滾水會從底盤流出,水垢(如果有的
話)會被沖出來。
8 使用完除鈣清洗功能後,請將蒸汽控制鈕
設為「無蒸汽」的位置。
9 假如從熨斗內流出的水仍含有水垢,請重
複此除鈣清洗程序。
除鈣清洗之後
1 將熨斗連接到電源使底盤變乾。
2 溫度指示燈熄滅時,請拔除熨斗的插頭。
3 將熨斗輕輕地在用過的布料上摩擦,以將
底盤上已形成的水漬擦拭乾淨。
4 在您將熨斗收藏前,請先讓其冷卻。
收藏
1 拔下產品插頭,並將蒸汽控制鈕設為「無
蒸汽」的位置。
2 將水箱內的水倒光。(圖10)
3 將電源線捲繞在熨斗捲線裝置上。(圖11)
4 將直立在其跟部上的熨斗存放在一個安全
且乾燥的地方。
環境保護
電器壽命結束時請勿與一般家庭廢棄物一
併丟棄。請將該產品放置於政府指定的回
收站,此舉能為環保盡一份心力。(圖12)
保固與服務
若您需要相關資訊或有任何問題,請瀏覽飛
利浦網站www.philips.com,或連絡您當地的
飛利浦客戶服務中心(您可以在全球保證書上
找到連絡電話)。如果您當地沒有客戶服務中
心,請洽詢當地飛利浦經銷商,或與飛利浦小
家電服務部門聯繫。
,
-

故障排除
本章概述使用本熨斗最常會遇到的問題。詳情
請參閱相關章節之說明。如果問題無法解決,
請與您所在國家的飛利浦客戶服務中心聯繫。
問題 原因 解決方法
熨斗已經
插電,但
是底盤仍
是冷的。
電源連
接有問
題。
檢查電源線,插頭和
插座。
溫度控
制設定
設為
MIN。
將溫度控制設定轉到
所需的溫度。
熨斗不會
產生蒸
汽。
水箱中
的水量
不足。
加水至水箱(請參閱
「準備使用」單元)。
蒸汽控
制鈕設
為「無
蒸汽」
的位
置。
蒸汽控制鈕設為蒸汽
設定(請參閱「使用
此電器」單元)。
熨燙過程
中有水從
底盤漏
出。
熨斗不
夠燙。
將溫度控制設定到
適合蒸汽熨燙的溫
度(從
2到MAX)。
將熨斗直立在其跟部
上,並靜待溫度指示
燈熄滅後再開始熨
燙。
噴水功能
無法運
作。
水箱中
的水量
不足。
加水至水箱(請參閱
「準備使用」單元)。
在熨燙過
程中會有
小薄片和
雜質從底
盤產生。
您使用
的是硬
水,所
以會在
底盤上
形成水
垢。
請使用除鈣清洗功能
一次或數次(請參閱
「清潔與維護」)。
當熨斗冷
卻時,或
在收藏
後,底盤
會漏水。
當熨斗
置於水
平位置
時,水
箱仍然
有水。
在收藏熨斗前(請參
閱「收藏」單元),請
將水箱清空,並設定
蒸汽控制鈕到「無蒸
汽」的位置。將熨斗
直立收藏。
-
 1
1
-
 2
2
-
 3
3
-
 4
4
-
 5
5
-
 6
6
-
 7
7


他の言語で
- English: Philips GC1408/02 User manual