A
16
E-mount
1.42
2.8
4
5.6
8
11
16
6
7 8
F
E
1
.
4
/
35
G
GM
FE
1.4
/35
G
M
a
(1)
(2)
F
E
1
.
FE
1.4
/35
G
M
–1
(1) (2)
–2
–3
Cette notice explique comment se servir des
objectifs. Les précautions communes à tous
les objectifs, par exemple les remarques sur
l’emploi, se trouvent sur la feuille « Précautions
avant toute utilisation ». Veuillez lire les deux
documents avant d’utiliser votre objectif.
Votre objectif est conçu pour les appareils photo à
monture E de type Sony α. Il ne peut pas être utilisé
pour les appareils photo à monture A.
Le FE 35mm F1.4 GM est compatible avec la plage
d’un capteur d’image de format 35 mm.
Un appareil photo équipé d’un capteur d’image de
format 35 mm peut être réglé pour la prise de vue
en APS-C.
Pour les détails sur la manière de régler l’appareil
photo, reportez-vous à son mode d’emploi.
Pour plus d’informations sur la compatibilité,
consultez le site de Sony de votre pays, ou
adressez-vous à un revendeur Sony ou à un service
après-vente agréé Sony.
Remarques sur l’emploi
• Ne laissez pas la lentille orientée vers le soleil ou une
source de lumière intense. Cela risque de provoquer
un problème de fonctionnement interne du boîtier
de l’appareil photo et de l’objectif, de dégager de la
fumée, voire de provoquer un incendie. Si toutefois
vous ne pouvez pas faire autrement, veillez à fixer les
capuchons sur l’objectif.
• Lors d’une prise de vue en direction du soleil, veillez
à ce que le soleil ne soit pas dans l’angle de vue.
Dans le cas contraire, les rayons solaires peuvent être
concentrés vers le point focal dans l’appareil photo,
et provoquer un incendie ou dégager de la fumée.
Vous pouvez provoquer un incendie ou dégager de la
fumée même si le soleil est légèrement en dehors de
l’angle de vue.
• Lorsque vous portez un appareil photo avec l’objectif
dessus, tenez toujours fermement l’appareil photo et
l’objectif.
• Cet objectif n’est pas étanche à l’eau bien qu’il
soit conçu pour résister à la poussière et aux
éclaboussures. Si vous l’utilisez sous la pluie, etc.
veillez à ce que de l’eau ne tombe pas dessus.
• Lorsque l'objectif seul est secoué ou lorsqu'un
appareil photo hors tension sur lequel est fixé
l'objectif est secoué, un composant interne de
l'objectif peut faire du bruit. Toufefois, ce phénomène
n’indique en aucune manière un dysfonctionnement.
En outre, lors du transport de l'objectif, votre
mouvement peut provoquer la vibration des groupes
de lentilles internes. Ceci n'influe toutefois pas sur les
performances des groupes de lentilles.
Précautions concernant l’emploi d’un flash
• Lorsque vous utilisez un flash, retirez toujours le pare-
soleil et prenez vos photos à au moins 1 m (3,3 pieds)
du sujet.
• Associé à certains types de flashs, l’objectif peut
bloquer partiellement la lumière du flash et produire
un ombre au bas de l’image. Dans ce cas, corrigez la
distance de prise de vue avant la prise de vue.
Vignetage
• Lorsque l’objectif est utilisé, les coins de l’écran
deviennent plus sombres que le centre. Pour réduire
ce phénomène (appelé vignetage), fermez l’ouverture
de 1 ou 2 crans.
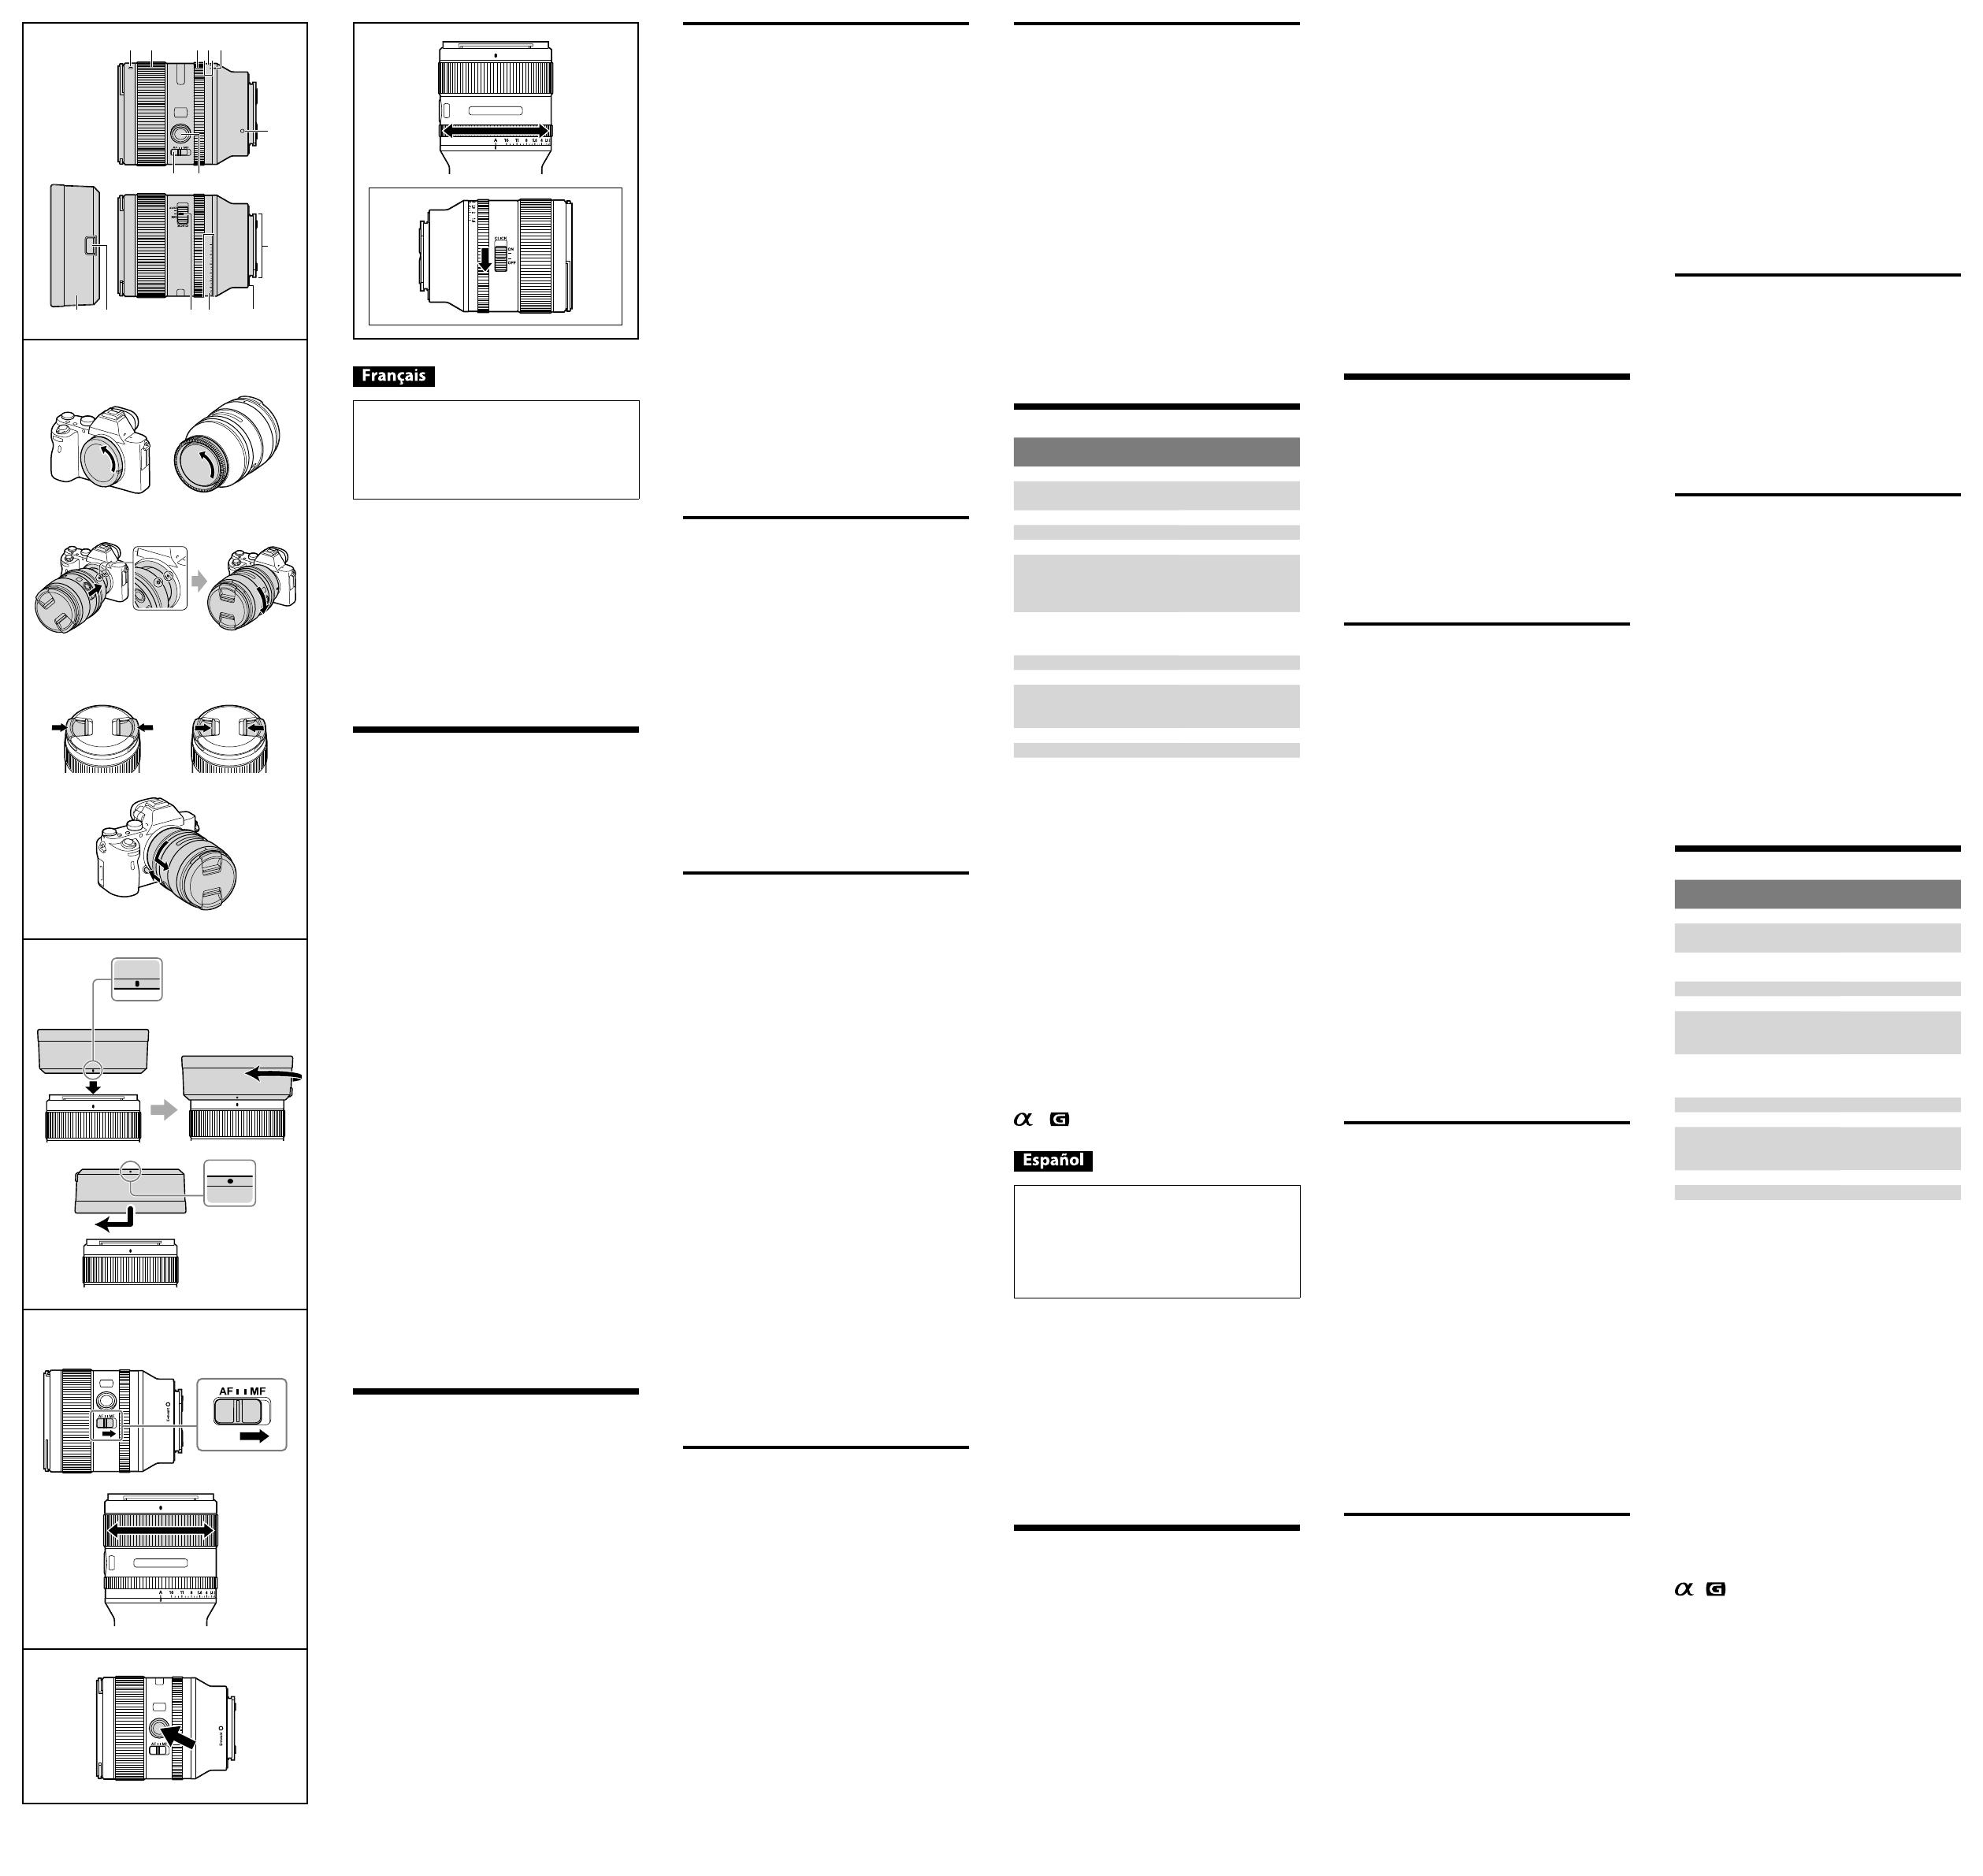
Identification des éléments
1 Repère de pare-soleil
2 Bague de mise au point
3 Bague d’ouverture
4 Échelle d’ouverture
5 Repère d’ouverture
6 Repère de montage
7 Commutateur de mode de mise au point
8 Bouton de maintien de la mise au point
9 Pare-soleil
10 Bouton de libération du pare-soleil
11 Commutateur d’encliquetage de l’ouverture
12 Contacts d’objectif *
13 Bague en caoutchouc de montage de l’objectif
* Ne touchez pas les contacts d’objectif.
Pose et dépose de l’objectif
Pour poser l’objectif
(Voir l’illustration
–
.)
1
Déposez le capuchon d'objectif arrière et
le capuchon de l'appareil photo.
2
Alignez le repère blanc du barillet
d’objectif sur le repère blanc de l’appareil
photo (repère de montage), puis posez
l’objectif sur la monture de l’appareil
photo et tournez-le dans le sens horaire
de sorte qu’il s’encliquette.
• N’appuyez pas sur le bouton de libération de
l’objectif sur l’appareil photo lorsque vous posez
l’objectif.
• Ne posez pas l’objectif de biais.
3
Retirez le capuchon d'objectif avant.
• Vous pouvez poser et déposer les capuchons
d’objectif avant de deux façons, (1) et (2). Si vous
posez/déposez le capuchon d’objectif avec le
pare-soleil, utilisez la méthode (2).
Pour déposer l'objectif
1
Installez le capuchon d'objectif avant.
2
Tout en appuyant sur le bouton de
libération de l’objectif sur l’appareil
photo, tournez l’objectif dans le sens
antihoraire jusqu’à l’arrêt, puis déposez
l’objectif. (Voir l’illustration
–
.)
Fixation du pare-soleil
Il est conseillé d’utiliser un pare-soleil pour réduire
la lumière parasite et obtenir la meilleure image
possible.
Alignez la ligne rouge du pare-soleil sur
la ligne rouge de l'objectif (repère de
paresoleil), puis insérez le pare-soleil sur la
monture d'objectif et tournez-le dans le sens
des aiguilles d'une montre jusqu'à ce qu'il
s'encliquette et le point rouge du pare-soleil
s'aligne sur la ligne rouge de l'objectif.
• Veillez à tourner le pare-soleil jusqu'à ce qu'il
s'enclenche à fond afin d'éviter qu'il ne se détache de
l'objectif.
• Pour ranger le pare-soleil, insérez-le à l’arrière de
l’objectif.
Pour déposer le pare-soleil
Tout en appuyant sur le bouton de libération
du pare-soleil, tournez le pare-soleil dans le
sens contraire des aiguilles d’une montre.
Mise au point
• Le mode de mise au point de cet objectif ne
fonctionne pas sur certains modèles d’appareils
photo.
Pour plus d’informations sur la compatibilité,
consultez le site de Sony de votre pays, ou adressez-
vous à un revendeur Sony ou à un service après-vente
agréé Sony.
Pour commuter entre AF (mise au
point automatique) et MF (mise au
point manuelle)
Il est possible de régler le mode de mise au point
sur AF ou MF sur l’objectif.
Pour la photographie en mode AF, l’appareil photo
et l’objectif doivent être tous les deux réglés sur AF.
Pour la photographie en mode MF, l’appareil photo
ou l’objectif, ou bien les deux, doivent être réglés
sur MF.
Pour régler le mode de mise au point sur
l’objectif
Réglez le commutateur de mode de mise au
point sur le mode adapté, AF ou MF (1).
• Reportez-vous aux manuels de l’appareil photo pour
régler le mode de mise au point sur l’appareil photo.
• En mode MF, tournez la bague de mise au point pour
faire la mise au point (2) tout en regardant dans le
viseur, etc.
Pour utiliser un appareil photo pourvu
d’une touche de commande AF/MF
• En appuyant sur la touche de commande AF/MF en
mode AF, vous pouvez provisoirement passer en
mode MF.
• En appuyant sur la touche de commande AF/MF
en mode MF, vous pouvez provisoirement passer
en mode AF si l’appareil photo est réglé sur MF et
l’objectif sur AF.
Utilisation des boutons de
maintien de la mise au point
• Le bouton de maintien de la mise au point de cet
objectif ne fonctionne pas sur certains modèles
d’appareils photo.
Pour plus d’informations sur la compatibilité,
consultez le site de Sony de votre pays, ou adressez-
vous à un revendeur Sony ou à un service après-vente
agréé Sony.
Appuyez sur le bouton de maintien de la mise au
point en mode AF pour annuler AF. La mise au point
est fixée et vous pouvez déclencher avec cette mise
au point. Appuyez sur le bouton de maintien de la
mise au point tout en appuyant sur le déclencheur
à mi-course pour recommencer la mise au point
automatique.
Réglage de l’exposition
Si vous alignez le « A » de l’échelle d’ouverture sur
le repère d’ouverture, l’exposition est réglée par
l’appareil photo. Vous pouvez régler la quantité
de lumière entre f/1,4 et f/16 en tournant la bague
d’ouverture.
Réglage manuel de la quantité de
lumière
Faites pivoter la bague d’ouverture sur
l’exposition voulue (f-stop) lorsque l’appareil
photo est en mode M ou A.
Remarques
Réglez le commutateur d’encliquetage de
l’ouverture sur OFF lors de l’enregistrement de
vidéos. (Voir l’illustration
-a.)
Lorsque le commutateur d’encliquetage de
l’ouverture est réglé sur OFF, le bruit émis par la
bague d’ouverture est réduit. (Pour l’enregistrement
de vidéos)
Si vous changez la valeur d’ouverture pendant
l’enregistrement d’une vidéo avec le commutateur
d’encliquetage de l’ouverture réglé sur ON, le bruit
émis par la bague d’ouverture sera enregistré.
Spécifications
Nom de produit
(Nom de modèle)
FE 35mm F1.4 GM
(SEL35F14GM)
Longueur focale (mm) 35
Longueur focale équivalente
à 35 mm*¹ (mm)
52,5
Éléments-groupes de lentilles 10-14
Angle de champ 1*² 63°
Angle de champ 2*² 44°
Mise au point minimale*³
(m (pieds))
Mise au point automatique
Mise au point manuelle
0,27 (0,89)
0,25 (0,82)
Grossissement maximal (X)
Mise au point automatique
Mise au point manuelle
0,23
0,26
Ouverture minimale f/16
Diamètre d’objectif (mm) 67
Dimensions (diamètre
maximal × hauteur)
(environ, mm (po.))
76 × 96
(3 × 3 7/8)
Poids (environ, g (oz)) 524 (18,5)
SteadyShot Non
*¹ Longueur focale équivalente en format 35 mm
lorsque installé sur un appareil photo à objectif
interchangeable avec capteur d’image de taille
APS-C.
*² L’angle de vue 1 est la valeur correspondant aux
appareils photo 35 mm et l’angle de vue 2 est la
valeur corrspondant aux appareils photo à objectif
interchangeable équipés d’un capteur d’image
APS-C.
*³ La mise au point minimale est la distance du capteur
d’image au sujet.
• Selon le mécanisme de l’objectif, la focale peut
changer lorsque la distance de prise de vue change.
Les focales indiquées ci-dessus présupposent que
l’objectif est réglé sur l’infini.
Articles inclus
(Le chiffre entre parenthèses indique le nombre
d’unités.)
Objectif (1), Capuchon d’objectif avant (1),
Capuchon d’objectif arrière (1), Pare-soleil (1),
Étui pour objectif (1), Jeu de documents imprimés
La conception et les spécifications peuvent être
modifiées sans préavis.
et sont des marques commerciales de Sony
Corporation.
En este manual se explica cómo utilizar
objetivos. Las precauciones comunes a todos
los objetivos, como notas sobre la utilización,
se encuentran en las “Precauciones previas a
la utilización del producto” suministradas por
separado. Cerciórese de leer ambos documentos
antes de utilizar su objetivo.
Este objetivo está diseñado para cámaras con
montura E del sistema de cámaras α de Sony. No
podrá utilizarse con cámaras con montura A.
El FE 35mm F1.4 GM es compatible con la gama de
un sensor de imágenes de formato de 35 mm.
Una cámara equipada con un sensor de imágenes
de formato de 35 mm puede establecerse para
fotografiar con tamaño APS-C.
Con respecto a los detalles sobre cómo configurar
su cámara, consulte su manual de instrucciones.
Para más información sobre compatibilidad, visite
el sitio Web de Sony de su área, o consulte a su
proveedor Sony o a un centro de servicio local
autorizado por Sony.
Notas sobre la utilización
• No deje el objetivo expuesto al sol o a fuentes de
luz intensas. Es posible que se produzcan fallos de
funcionamiento interno del cuerpo de la cámara y del
objetivo, humo, o un incendio como efecto de la luz
directa. Si las circunstancias exigen dejar el objetivo
expuesto a la luz solar, asegúrese de colocar las tapas
del objetivo.
• Cuando fotografíe contra el sol, mantenga el sol
completamente fuera del ángulo de visión. De lo
contrario, los rayos solares podrían concentrarse en
un punto en el interior de la cámara, causando humo
o un incendio. Mantener el sol ligeramente fuera del
ángulo de visión también puede causar humo o un
incendio.
• Cuando transporte una cámara con el objetivo fijado,
sujete siempre firmemente tanto la cámara como el
objetivo.
• Este objetivo no es impermeable, aunque se ha
diseñado teniendo en cuenta la resistencia al polvo
y a las salpicaduras. Si se utiliza bajo la lluvia, etc.,
mantenga las gotas de agua alejadas del objetivo.
• Si se agita el objetivo solo o si se agita una cámara
con el objetivo instalado mientras la cámara esté
apagada, un componente interno del objetivo puede
traquetear. Esto, sin embargo, no indica un mal
funcionamiento.
Además, mientras transporte el objetivo, su
movimiento puede hacer que los grupos del objetivo
internos se muevan. Esto, sin embargo, no afectará el
rendimiento de los grupos del objetivo.
Precauciones sobre la utilización de un
flash
• Cuando utilice un flash quítele siempre el parasol de
objetivo y fotografíe alejado a 1 m por lo menos de su
motivo.
• Con ciertas combinaciones de objetivo y flash, el
objetivo puede bloquear parcialmente la luz del flash,
lo que resultará en una sombra en la parte inferior de
la fotografía. En tal caso, ajuste la distancia de toma
de imagen antes de fotografiar.
Viñeteado
• Si utiliza el objetivo, las esquinas de la pantalla se
vuelven más oscuras que el centro. Para reducir este
fenómeno (llamado viñeteado), cierre la apertura de
1a 2 puntos.
Identificación de las partes
1 Índice del parasol de objetivo
2 Anillo de enfoque
3 Anillo de apertura
4 Escala de apertura
5 Índice de apertura
6 Índice de montaje
7 Interruptor del modo de enfoque
8 Botón mantener-enfoque
9 Parasol de objetivo
10 Botón de liberación del parasol de objetivo
11 Interruptor de chasqueo de apertura
12 Contactos del objetivo*
13 Anillo de caucho de montaje del objetivo
* No toque los contactos del objetivo.
Colocación y extracción del
objetivo
Para colocar el objetivo
(Consulte la ilustración
–
.)
1
Extraiga la tapa trasera del objetivo y la
tapa de caja de la cámara.
2
Alinee el índice blanco del barril del
objetivo con el índice blanco de la
cámara (índice de montaje), y después
inserte el objetivo en la montura de la
cámara y gírelo hacia la derecha hasta
que se bloquee.
• No presione el botón de liberación del objetivo de
la cámara cuando monte el objetivo.
• No monte el objetivo de forma inclinada.
3
Extraiga la tapa delantera de objetivo.
• Usted podrá colocar/extraer la tapa delantera de
objetivo de dos formas, (1) y (2). Cuando coloque/
extraiga la tapa del objetivo con el parasol fijado,
utilice el método (2).
Para extraer el objetivo
1
Coloque la tapa delantera de objetivo.
2
Manteniendo presionado el botón de
liberación del objetivo de la cámara, gire
el objetivo hacia la izquierda hasta que
se pare, y después extraiga el objetivo.
(Consulte la ilustración
–
.)
Colocación del parasol de
objetivo
Es recomendable utilizar un parasol de objetivo para
reducir los reflejos y garantizar la máxima calidad
de la imagen.
Alinee la línea roja del parasol de objetivo
con la línea roja del objetivo (índice del
parasol de objetivo), después inserte el
parasol de objetivo en la montura del
objetivo, y gírelo hacia la derecha hasta que
chasquee en su lugar y el punto rojo del
parasol de objetivo quede alineado con la
línea roja del objetivo.
• Asegúrese de girar el parasol de objetivo hasta que
chasquee en su lugar para evitar que se desenganche
del objetivo.
• Cuando guarde la cámara, fije el parasol de objetivo
hacia atrás.
Para extraer el parasol de objetivo
Manteniendo pulsado el botón de liberación
del parasol de objetivo, gire el parasol de
objetivo hacia la izquierda.
Enfoque
• El interruptor de modo de enfoque de este objetivo
no funcionará con ciertos modelos de cámaras.
Para más información sobre compatibilidad, visite
el sitio Web de Sony de su área, o consulte a su
proveedor Sony o a un centro de servicio local
autorizado por Sony.
Para cambiar AF (enfoque
automático)/MF (enfoque manual)
El enfoque puede cambiarse entre AF y MF en el
objetivo.
Para fotografiar con AF, tanto la cámara como el
objetivo deberán ajustarse a AF. Para fotografiar
con MF, tanto la cámara como el objetivo deberán
ajustarse a MF.
Para ajustar el modo de enfoque en el
objetivo
Deslice el interruptor del modo de enfoque
hasta el modo apropiado, AF o MF (1).
• Para ajustar el modo de enfoque de la cámara,
consulte los manuales de la cámara.
• En MF, gire el anillo de enfoque mientras observe a
través del visor, etc., para ajustar el enfoque (2).
Para utilizar una cámara equipada con
botón de control AF/MF
• Pulsando el botón de control AF/MF durante la
operación con AF, podrá cambiar temporalmente a
MF.
• Pulsando el botón de control AF/MF durante la
operación con MF, podrá cambiar temporalmente a
AF si el objetivo está ajustado a AF y la cámara a MF.
Utilización de los botones
mantener-enfoque
• El botón mantener-enfoque de este objetivo no
funcionará con ciertos modelos de cámaras.
Para más información sobre compatibilidad, visite
el sitio Web de Sony de su área, o consulte a su
proveedor Sony o a un centro de servicio local
autorizado por Sony.
Pulse el botón mantener-enfoque en AF para
cancelar AF. El enfoque se fijará y podrá accionar
el obturador en el enfoque fijo. Suelte el botón
mantener-enfoque mientras pulse hasta la mitad el
botón del obturador para iniciar de nuevo AF.
Ajuste de la exposición
Cuando alinee “A” de la escala de apertura con el
índice de apertura, la exposición se establecerá
mediante la cámara. Y puede ajustar la cantidad
de luz que entra en el objetivo entre f/1,4 y f/16
girando el anillo de apertura.
Ajuste manualmente la cantidad de
luz
Gire el anillo de apertura a la exposición
deseada (f-stop) cuando la cámara esté
ajustada al modo M o al modo A.
Notas
Cuando filme películas, ajuste el interruptor de
chasqueo de apertura a OFF. (Consulte la ilustración
-a.)
Cuando el interruptor de chasqueo de apertura está
ajustado a OFF, el sonido del anillo de apertura se
reduce. (Para grabación de películas)
Si cambia el valor de apertura mientras filme una
película con el interruptor de chasqueo de apertura
en ON, se grabará el sonido del anillo de apertura.
Especificaciones
Nombre del producto
(Nombre del modelo)
FE 35mm F1.4 GM
(SEL35F14GM)
Distancia focal (mm) 35
Distancia focal equivalente a
35 mm*¹ (mm)
52,5
Grupos y elementos del
objetivo
10-14
Ángulo de visión 1*² 63°
Ángulo de visión 2*² 44°
Enfoque mínimo*³ (m)
Enfoque automático
Enfoque manual
0,27
0,25
Ampliación máxima (X)
Enfoque automático
Enfoque manual
0,23
0,26
Apertura mínima f/16
Diámetro del filtro (mm) 67
Dimensiones (diámetro
máximo × altura)
(Aprox., mm)
76 × 96
Peso (Aprox., g) 524
SteadyShot No
*¹ Esta es la distancia focal equivalente al formato de
35mm cuando se monta en una cámara digital de
lentes intercambiables equipada con un sensor de
imágenes de tamaño APS-C.
*² El ángulo de visión 1 es el valor para cámaras de
formato de 35 mm y el ángulo de visión 2 es el valor
para cámaras digitales de lentes intercambiables
equipadas con un sensor de imágenes de tamaño
APS-C.
*³ El enfoque mínimo es la distancia desde el sensor de
imágenes al motivo.
• En función del mecanismo del objetivo, es posible
que la distancia focal varíe si la distancia de toma
de imagen también lo hace. Las distancias focales
indicadas arriba asumen que el objetivo está
enfocado al infinito.
Elementos incluidos
(El número entre paréntesis indica el número de
piezas.)
Objetivo (1), Tapa delantera de objetivo (1),
Tapa trasera de objetivo (1), Parasol de objetivo (1),
Estuche para objetivo (1), Juego de documentación
impresa
El diseño y las especificaciones están sujetos a
cambios sin previo aviso.
y son marcas comerciales de Sony
Corporation.

