Hanpusen
Remote Controller
User Manual
Thank you for purchasing an AODELAN product.
Installing batteries to the Remote Controller
Please read this user manual as well as the user
manual provided with your camcorder which
works with ZC-3 before use.
FCC Statement
Caution: Any changes or modifications to this
device not explicitly approved by manufacturer
could void your authority to operate this equipment.
RF Exposure Information
Declaration of Conformity USA and Canada Connecting to a camcorder (Supports both wired and
wireless connections)
Wired connection – by connecting the Remote
Controller to the camcorder with the supplied remote cable.
1.
Loosen the clamp knob on the Remote controller as
far
as required to insert the pan handle on the tripod.
2.
Align the center of the pan handle with the V groove
on
the
clamp, and rotate the clamp knob in the opposite
direction
to lock it firmly.
3. Be sure the camcorder is turned off; insert one end of
the remote cable into the Remote Controller’s REMOTE
jack
and the other end into the camcorder’s REMOTE
or LANC
terminal.
4. Turn on the camcorder and slide the switch on the
side of the Remote Controller to “ON” position.
ZC-3
AODELAN ZC-3
contains a Remote Controller and a Receiver.
It was especially
developed to wirelessly operate compatible
Sony and Canon camcorders from a distance. By simply
connecting the Receiver to the REMOTE or LANC terminal
(2.5mm) on the camcorder and turning on the Remote
Controller, you can easily operate many of the camcorder’s
functions wirelessly, such as controlling recording functions,
adjusting the zoom, focus and iris. Wired control of these
functions can also be achieved by connecting the Remote
Controller directly to the camcorder with the supplied
remote cable. Wired control and wireless remote control
can be performed simultaneously to enable
simultaneous operation of two camcorders.
1.
Loosen the clamp knob and turn the clamp so that it does
not block the battery compartment cover.
2. Open the cover and install two AAA 1.5V batteries
(available separately) as shown.
3. Close the cover.
Press the cover until it snaps shut.
Before using your product, please read the following
safety
precaution carefully to ensure correct and safe
use.
This equipment has been tested and found to comply with
the limits for a Class B digital device, pursuant to part 15 of
the FCC Rules. These limits are designed to provide
reasonable protection against harmful interference in a
residential installation. This equipment generates, uses and
can radiate radio frequency energy and, if not installed and
used in accordance with the instructions, may cause harmful
interference to radio communications. However, there is no
guarantee that interference will not occur in a particular
installation. If this equipment does cause harmful interference
to radio or television reception, which can be determined by
turning the equipment off and on, the user is encouraged to
try to correct the interference by one or more of the following
measures:
This device complies with part 15 of the FCC Rules.
Operation is subject to the following two conditions: (1) This
device may not cause harmful interference, and (2) this
device must accept any interference received, including
interference that may cause undesired operation.
The device has been evaluated to meet general RF exposure
requirement. The device can be used in portable exposure
condition without restriction.
CAUTION
RISK OF EXPLOSION IF BATTERY IS REPLACED BY AN
INCORRECT TYPE. DISPOSE OF USED BATTERIES
ACCORDING TO THE INSTRUCTIONS.
IC Warning
Avertissement IC
This device complies with RSS Gen of the Canada Rules.
Operation is subject to the following two conditions:
1) this device may not cause interference and
1) cet appareil ne doit pas causer d'interférences et
2) cet appareil doit accepter toutes les interférences, y
compris celles pouvant causer des effets indésirables
fonctionnement de l'appareil.
Exposition aux radiations: Cet équipement est conforme
à la
réglementation canadienne sur les radiations. limites
d'exposition établies pour un environnement non contrôlé.
2) this device must accept any interference, including
interference that may cause undesired operation of the
device.
Radiation Exposure: This equipment complies with Canada
radiation exposure limits set forth for an
uncontrolled
environment.
Cet appareil est conforme aux règles RSS Gén du Canada.
Le fonctionnement est soumis aux deux suivants conditions:
Setting the shooting state of the camcorder
Wireless connection - by connecting the Receiver
to the camcorder.
SLEEP – OFF, 10M, 1H, 4H
KEY B.L. – AUTO, ON, OFF
PAIR MODE – Y
RESET ALL – Y
VERSION VX.X
Specifications and design are subject to change without
notice.
“Sony” and “Canon” mentioned in the manual are
protected trademarks which do not belong to Shenzhen
Aodelan Technology Co., Ltd.
Restore factory settings.
The current firmware version of the Remote Controller.
To control the key backlight of the Remote Controller.
To set the auto-sleep of the Remote Controller.
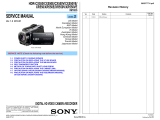
Remote Controller
01. Screen
For details, refer to the camcorder’s user manual.
Depending on the camcorder used, you may need to active
the remote controller using the camcorder’s menu.
Canceling automatic adjustment of the camcorder’s
shooting
state.
1.Be sure the camcorder is turned off; insert the plug of
Receiver into the camcorder’s REMOTE or LANC terminal.
If using an interchangeable lens type camcorder with
t
he supplied lens, set the focus ring to electronic control.
If using a lens other than the supplied lens, focusing may
not be supported from this unit.
If the camcorder is an interchangeable lens type, set the
IRIS switch on the lens to auto adjustment (AUTO).
Displays the current status of the Remote Controller.
02. A/M(IRIS) key
Press to toggle auto iris adjustment on/off.
When the Remote Control enters the setup menu, press
the key to exit the menu.
03. Adjustment keys (left) “+”, “-”
When the iris mode is set to manual, press the two keys
to adjust the iris.
Press “+” to open the iris (decrease the iris value).
Press “-” to close the iris (increase the iris value).
When the Remote Control enters the setup menu, press
the two keys to switch the selected item.
04. Menu key
Press to enter/exit the Remote Controller’s setup menu.
05. Record review key
While in standby mode, press the key to review the last
recorded clip* on the camcorder’s screen, and then the
camcorder will return to standby mode.
08. Record key
Press to start recording.
To stop recording, press the record key again.
06. A/M (FOCUS) key
Press to toggle auto focus adjustment on/off.
When the Remote Controller enters the setup menu, press
the key to confirm the selected item.
07. Adjustment keys (right) “+”, “-”
When the focus mode is set to manual focus, press the
two keys to adjust the focus.
Press “+” to focus on distant subjects.
Press “-” to focus on near subjects.
When the Remote Control enters the setup menu, press
the two keys to switch the selected item.
Receiver
Blinking red indicates that no wireless connection is
established with a Remote Controller. (Now, you need to
operate the Remote Controller to pair with the Receiver.
Refer to the section [Menu setting functions] – [PAIR
MODE].)
When the Receiver is not connected to a camcorder or
the connected camcorder is powered off, the lamp goes off.
1. Recording indicator
The timer starts when the camcorder starts recording.
When recording stops, the timer displays 00 : 00 : 00.
"00 : 00 : 00" indicates "hours : minutes : seconds"
from left to right respectively.
1. Press Menu key to enter the Remote Controller’s setup
menu.
2. Setup menu operations.
2. Connection indicator
3. Battery level indicator
4. Timer
Enter the setup menu
1(Slow): In slow mode, one pressing on the adjustment
key (left) “+” or “-” will adjust the camcorder’s
iris by 1 stop.
2(Fast): In fast mode, one pressing on the adjustment
key (left) “+” or “-” will adjust the camcorder’s
iris by 4 stops.
OFF: Turn off the auto-sleep of the Remote Controller.
If the ON/OFF switch is not slid to the OFF position,
the
Remote Controller will remain on until the
battery runs out.
10M: The Remote Controller will go into sleep mode
after 10 minutes of inactivity.
1H: The Remote Controller will go into sleep mode after
1 hour of inactivity.
4H: The Remote Controller will go into sleep mode after
4 hours of inactivity.
AUTO: The key backlight will light up for about 10
seconds if there is an operation on any key or
on the zoom lever.
ON: The key backlight is always on.
OFF: The key backlight is always off.
To set the Remote Controller to pair with the Receiver.
Y: Press the A/M (FOCUS) key (functions as “SET” at
this point) to confirm the setting; then the Remote
Controller will enter pairing mode and automatically
search for the Receiver and pair with it.
Y: Press the A/M (FOCUS) key (functions as “SET” at this
point) to confirm the setting; then all settings on the
Remote Controller will be restored to the factory
settings.
Remote Controller
Connector:
REMOTE jack
(Ø2.5mm stereo mini jack) x1
USB Type-C connector x1
Screen:
OLED screen, 0.96”
Zoom lever:
Support pressure-sensitive
Power source:
Two AAA 1.5V batteries
Remote Cable
(Ø2.5 - Ø2.5mm plug) x1,
stretchable length up to
1m (3.3 ft.)
Wireless frequency
Remote control
range (Approx.)
Weight
(Approx.)
Other
Usage environment
Dimensions
(Approx.)
Receiver
2.4GHz
50 m (164 ft.)
(Open space without interference)
Temperature: 0℃ to 40℃ (32°F to 104°F)
Humidity: 80% or lower
104x58x81mm
(4.1x2.3x3.2 in.)
143 g (5.0 oz) (excluding
battery and remote cable) 3g (0.1 oz)
Plug:
Ø2.5mm stereo mini
plug
Lamp:
Green and red bi-color
LED
22x12.5x29mm
(0.9x0.5x1.1 in.)
For your safety
Names of Parts and Their Functions
Remote Controller’s Menu Display and Settings
Menu setting functions
Specifications
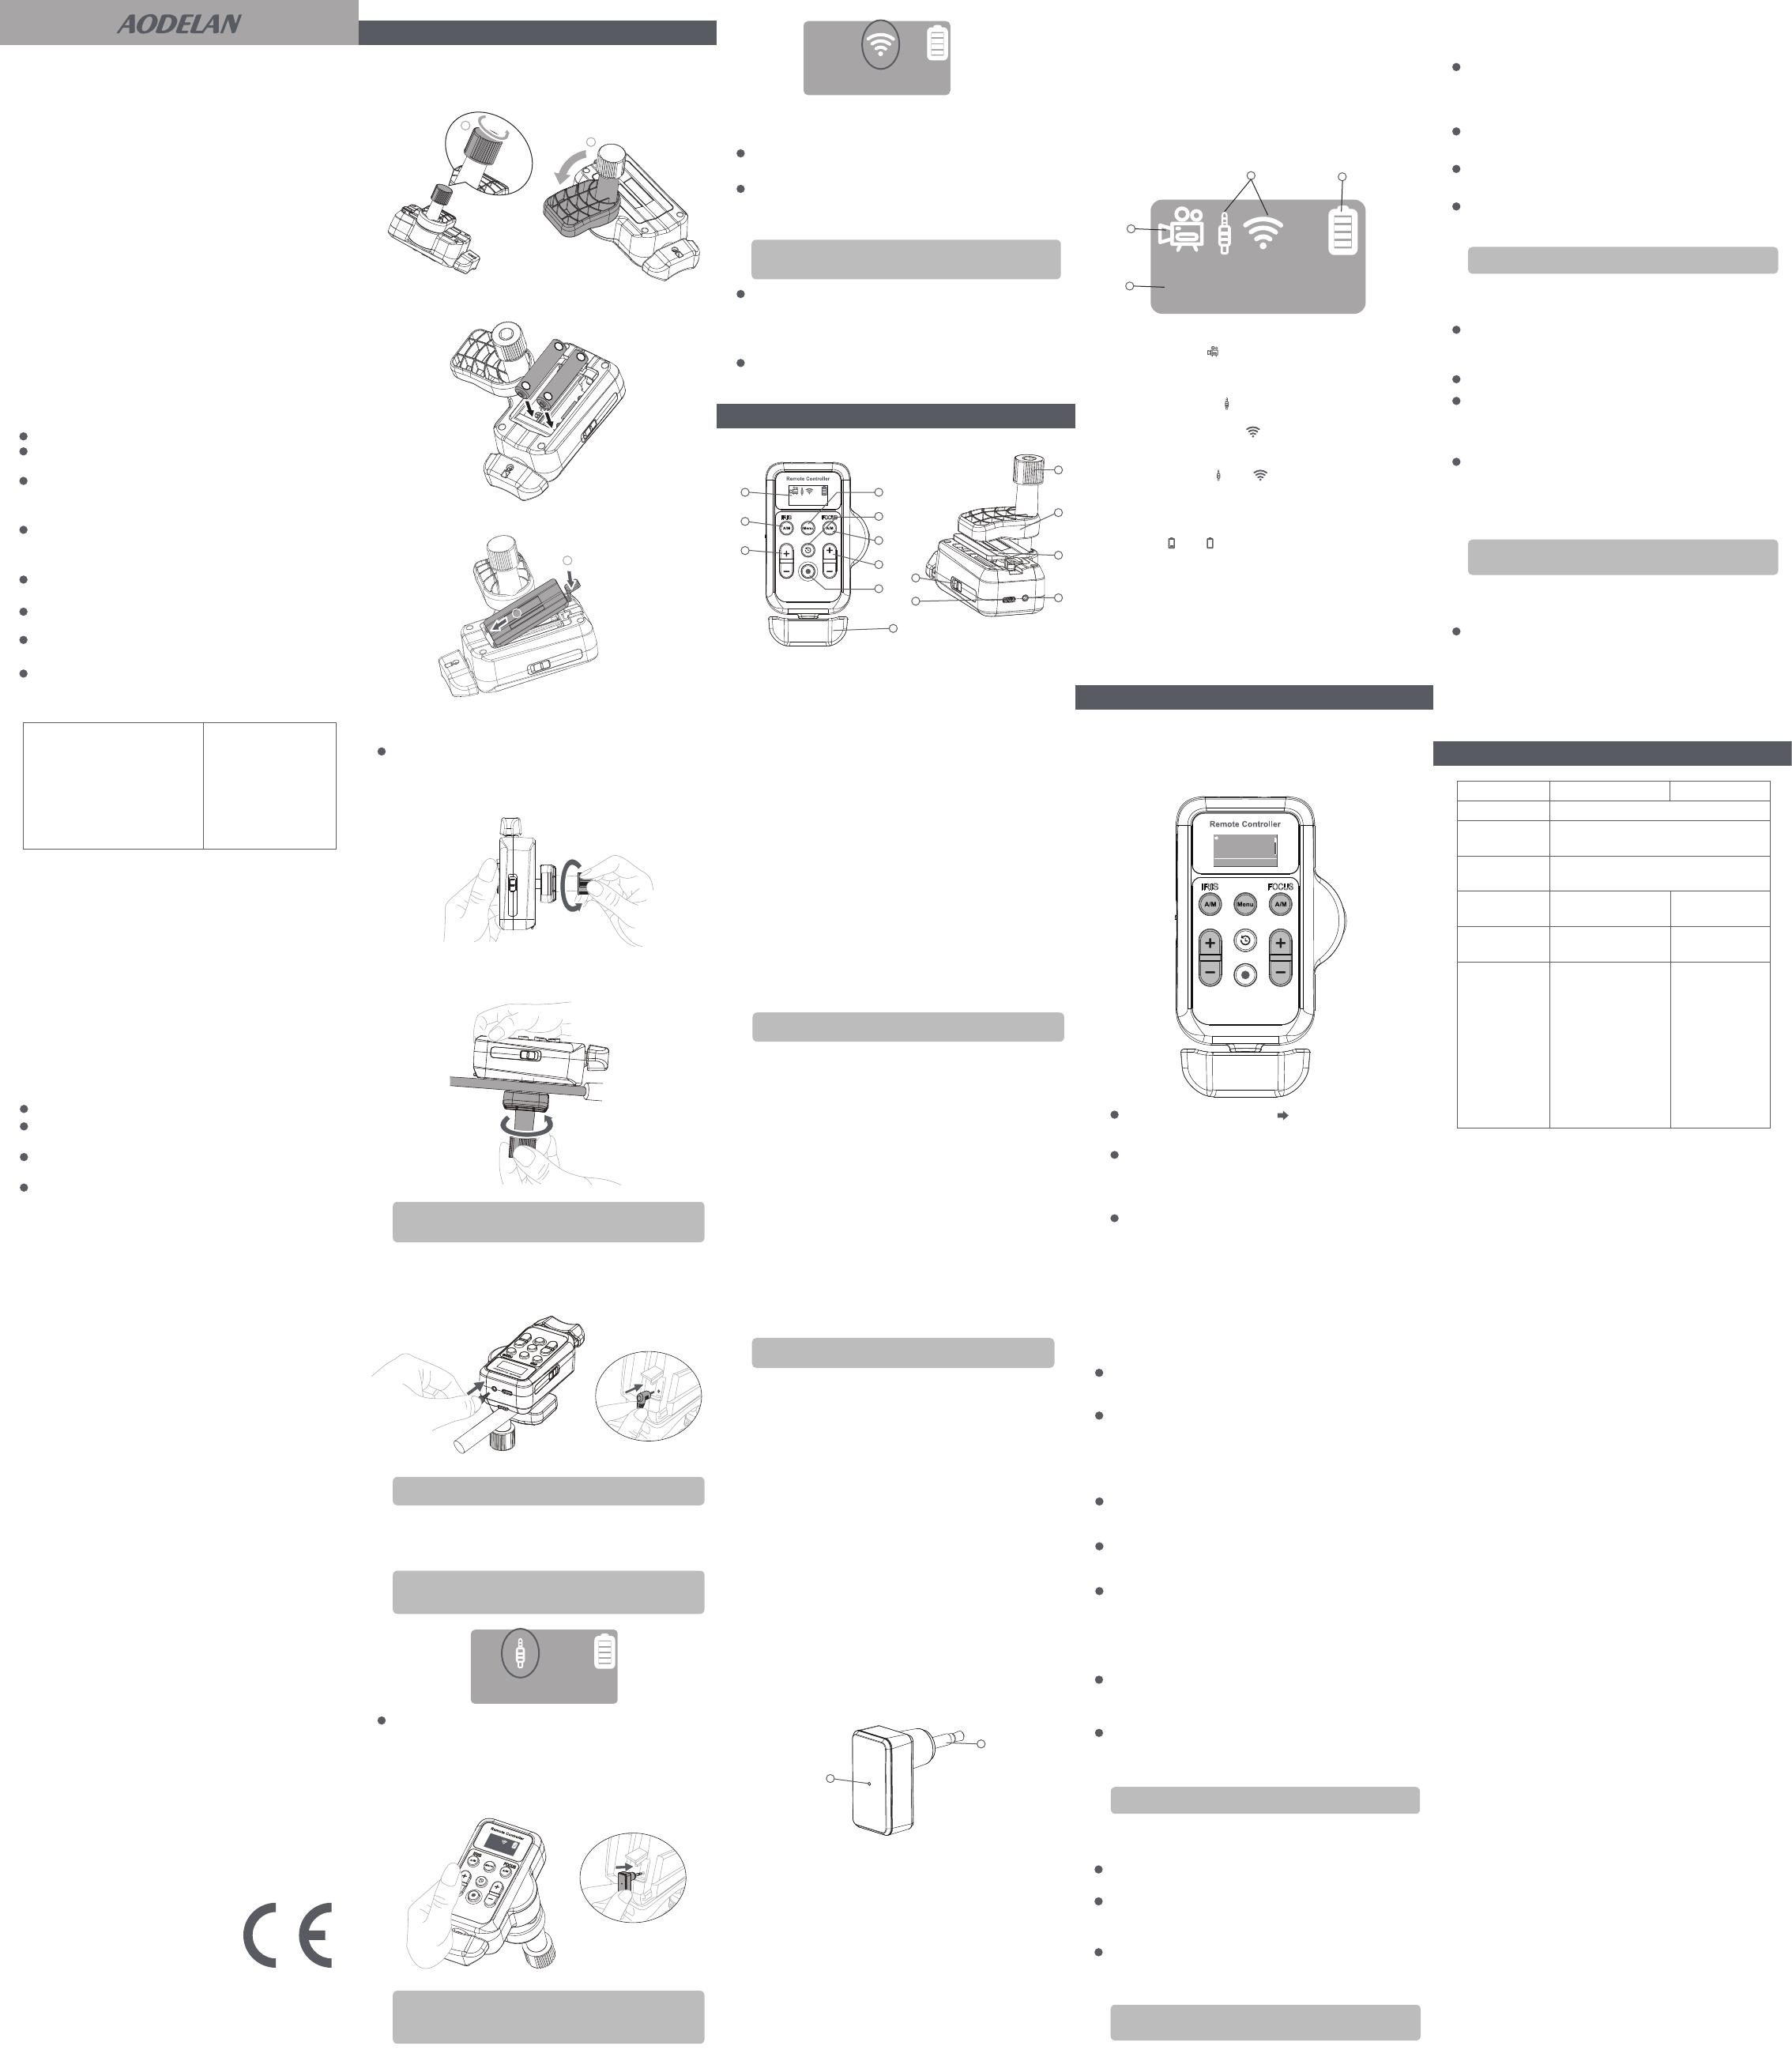
Screen of the Remote Controller
Getting Started
Declaration of Conformity EC
RED 2014/53/EU
Hereby, Shenzhen Aodelan Technology
Co., Ltd. declares that this product is in
compliance with essential requirements and other relevant
provisions of Directive 2014/53/EU. This product can be
used across EU member
states. A copy of the Declaration
of conformity can be found
at www.aodelan.net.
2.
Turn on the camcorder and slide the switch on the side
of the
Remote Controller to “ON” position.
09. Zoom lever
Turn left/right to adjust the zoom.
11. Clamp
Used to attach the Remote Controller to the pan handle
of tripod.
10. Clamp knob
Rotate to lock/unlock the clamp.
12. Battery compartment cover
Two AAA 1.5V batteries can be installed in the battery
compartment.
13. REMOTE jack (Ø2.5mm stereo mini jack)
Connect to the camcorder with the supplied remote cable.
14. USB Type-C connector
Used for firmware update (when necessary).
Go to www.aodelan.net to download the latest firmware
update package for ZC-3, update your ZC-3 to the latest
firmware according to the provided update files.
15. ON/OFF switch
ON: To turn on the Remote Controller.
OFF: To turn off the Remote Controller.
Press the A/M (FOCUS) key (functions as “SET” at
this point) to confirm the sub-item setting and return
to the menu item for other settings.
Press the A/M (FOCUS) key (functions as “SET” at
this point) to enter the setting of this menu item, and
then press the "+" / "-" keys to select the desired
sub-item.
ZOOM DIRECT – N, R
ZOOM SPEED – 1, 2, 3
3.
To exit the menu, press the A/M (IRIS) key (functions as
“EXIT”at this point) or press the Menu key.
To change the rotation direction of the ZOOM lever.
N (Normal): Turn the ZOOM lever to the right to zoom
in (telephoto), and to the left to zoom out
(wide angle).
R (Reverse): Turn the ZOOM lever to the right to zoom
out (wide angle), and to the left to zoom
in (telephoto).
To change the zoom speed.
1(Slow): In slow mode, the camcorder zooms at the
slowest speed, regardless of how much the
zoom lever is rotated.
2(Mid): In mid mode, the camcorder zooms quickly,
depending on how much the zoom lever is
rotated. (4 stages)
3(Fast): In fast mode, the camcorder zooms ever faster,
depending on how much the zoom lever is
rotated. (8 stages)
To change the iris manual adjustment speed.
IRIS SPEED – 1, 2
00 : 00 : 00
00 : 00 : 00
D
epending on the pan handle attached, the Remote Controller
may make contact with the grip of the pan handle when it is in
use. Set the Remote Controller a little apart from the grip.
[Note]
Depending on the camcorder’s recording review settings, it is also
possible that the last several seconds of the clip* will be reviewed.
[Note]
Refer to the user manual of the camcorder for the location of the
REMOTE or LANC terminal on the camcorder.
[Note]
If the camcorder has a ZOOM switch, set it to SERVO or
REMOTE mode.
[Note]
The iris adjustment level obtained by pressing the adjustment
key (left)“+” or “-”
will vary depending on the camcorder being used.
[Note]
When a plug icon is displayed on the Remote Controller’s screen,
it indicates that a wired connection has been established and
you can operate the camcorder through the remote control.
[Note]
When a wireless icon is displayed on the Remote Controller’s
screen,it indicates that a wireless connection has been
established and you can wirelessly control the camcorder
through the Remote Controller.
[Note]
00 : 00 : 00
Displays the icon
when the camcorder is recording.
Displays nothing in this area when recording stops.
Displays a plug icon when a wired connection
is established.
Displays a wireless icon
when a wireless connection
is established.
If both wired and wireless connections are established,
then displays both and icons.
Displays nothing in this area if no connection is established.
Indicates the battery level of the Remote Controller.
If the icon or
is displayed, it indicates the battery
level is low (or extremely low), replace the batteries
with
new ones for the Remote Controller.
1,ZOOM DIRECT R
2,ZOOM SPEED 3
3,IRIS SPEED 2
EXIT 1/9 SET
1
2
Product name: Remote Controller
Trade name: AODELAN Trade nameAODELAN
Model number: ZC-3 TX Model numberZC-3 RX
FCC ID: 2AEJW-ZC3
IC: 25192-ZC3
Manufacturer: Shenzhen Aodelan
Technology Co., Ltd.
Manufacturer: Shenzhen
Aodelan Technology Co.,
Ltd.
Product name: Receiver
1. Plug (Ø 2.5mm)
Connect to the camcorder’s REMOTE or LANC terminal.
After the camcorder is turned on, the Receiver connected
to the camcorder will automatically establish a wireless
connection with the paired Remote Controller.
2. Status lamp
When the Receiver is connected to a camcorder that is
powered on, the lamp indicates the wireless connection
status of the Receiver and Remote Controller.
Blinking green indicates that a wireless connection has
been established with the Remote Controller.
The switches used to turn on/off automatic adjustment of the
shooting
state on the camcorder varies depending on the
camcorder
(for example,FULL AUTO switch, AUTO/MANUAL switch).
[Note]
Press any key to wake up the Remote Controller in sleep mode.
[Note]
After successful pairing, the status lamp on the Receiver blinks
green.
[Note]
FOCUS SPEED – 1, 2, 3
To change the focus manual adjustment speed.
1(Slow): In slow mode, press the adjustment key (right)
“+” or “-”, the camcorder adjusts the focus slowly.
2(Mid): In mid mode, press the adjustment key (right) “+”
or “-”, the camcorder adjusts the focus at a faster
speed.
3(Fast): In fast mode, press the adjustment key (right) “+”
or “-”,
the camcorder adjusts the focus at the
fastest speed.
Move the selection arrow to the desired menu
item by pressing the "+"/"-" adjustment keys.
00 : 00 : 00
1
4
23
Do not disassemble or attempt to repair it.
Do not use the product in the presence of flammable or
explosive gas.
The product is not dustproof, splashproof, nor
waterproof. Make sure that no water, liquid, or dust can
enter the product.
Do not expose the product to hasty temperature
changes in humid conditions as this could lead to
condensation water in the unit.
Do not expose the product to high temperature over
45 (e.g. left in a car trunk).
Do not use organic solvents such as alcohol, benzine
or paint thinner to clean the product.
Do not connect the product to camcorders or other
devices that are not compatible.
Do not overly tighten the clamp. Doing so may cause
damage.
Reorient or relocate the receiving antenna.
Increase the separation between the equipment and
receiver.
Connect the equipment into an outlet on a circuit
different from that to which the receiver is connected.
Consult the dealer or an experienced radio/TV
technician for help.
1
2
00 : 00 : 00
1
2
3
4
5
8
6
7
9
11
10
12
13
15
14
The focus adjustment level obtained by pressing the adjustment
key(right) “+” or “-” will vary depending on the camcorder being used.
[Note]
1
2
+ -
+ -