PETKIT PURA X ユーザーマニュアル

タイプ
ユーザーマニュアル
4
1. xSecure – 6 Levels of Safety
3. Anti-bacterial Odor Removal (Using the Odor
-Removal Device and Concentrated Purifying Liquid)
Through experimental verification, this product has proven
to be effective at removing unpleasant odors and
formaldehyde, while also killing common forms of harmful
bacteria. (colon bacillus, staphylococcus aureus,
pseudomonas aeruginosa, candida albicans, salmonella
typhimurium, klebsiella pneumoniae, etc.)
2. Use multiple types of cat litter.
The cat litter filter net is effective at filtering both plant
litters and bentonite litters, and mixture litters as well.
FUNCTIONS
Thermal sensor : The product will be suspended if the cat enters.
Infrared Sensor: The entrance is equipped with an infrared sensor that will halt product operation if it detects a cat nearby.
Weight sensor: the interior of the litter box is equipped with 4 weight sensors. If a cat enters the litter box, these sensors
will detect the cat and cease the operation.
Anti-Pinch Infrared Sensors: There are two pairs of infrared sensors installed on the bottom Inside the litter box.
While the product is operating, if a cat approaches, the device will immediately cease the operation.
Smart Detection, Remote Alerts: Use the APP to get smart updates and early alerts of abnormal activity.
Accident Protection System: Sensors system will be activated before operating. The product will shutdownand send an alert
if any of the sensors malfunction.
Weight sensor
Odor-removal device
Anti-Pinch Safety Sensor
Entrance Safety Sensors
Infrared Sensor
TABLE OF CONTENTS
A Message to Our Valued Customers
User Safety Guide
Functions
Packing list
Product description
Scan the QR code and watch the set up video
Take out cylinder
Add the purifying liquid
Install the cylinder and pour in the litter
Install the trash bag
Insert the litter pad
Plug in the power cord, start using
Use the App
Menu
Display Guide
Scan the QR code and watch the clean up video
Product Cleaning
FAQ
Specifications
3
3
4
5
6,7
8
9
10
11,12
14
Replace the litter box cover 13
15
16
17
18
19
20
21
22
23
A MESSAGE TO OUR VALUED CUSTOMERS
USER SAFETY GUIDE
· Thank you for choosing PETKIT PURA X Self-cleaning cat litter box. We at PETKIT have
done our best to make life easier for you and your pet through the miracle of technology.
· Before using this product, please carefully read the user’s manual. By setting up and using this product,
you acknowledge that you have already read and accepted the safety measures listed below.
· We are not liable and will not accept responsibility for any accidents or injuries that result from improper
use of this product.
· Concerning this notice, we reserve the rights of interpretation and revision.
* Failure to follow the safety measures outlined below can result in product malfunction or other unforeseen
mishaps.
· Please install and use product exactly as instructed in the User’s Manual.
· Pets under the age of 6 months should not use this product.
· For indoor use only. Do not expose product directly to sunlight for extended periods of time. Do not place
near an open flame.
· Even though this product uses low current, pets can still damage the power cord if they chew on it,
preventing the product from getting power. Please ensure pets use product as intended.
· Only use the provided power adapter. Using a different power adaptor may result in damage to the product
or potential safety hazards.
· Make sure the product remains parallel to the ground, otherwise the concentrated purifying liquid may pour
out and cause product malfunction.
· Do not allow the bottom half of the product to be dipped or submerged in water.
· Repairs should be done under the guidance of a professional to avoid safety hazards.
· When leaving for a long period of time, make sure there is enough space in the waste collection bin.
· If you encounter any problems while using this product, please contact us immediately.
3
PACKING LIST
Litter Box *1
Litter Pad *1 Power Adapter *1
(in the accessories box)
Concentrated
Purifying Liquid *4
(in the accessories box)
Trash Bag *1
(in the accessories box)
Litter Box Cover *1
5
PRODUCT DESCRIPTION
6
*Note: In order to improve the quality of
our products, we will be implementing
periodic product enhancements. Product
images shown are for illustration purposes
only. Actual product may vary from the
image shown on the box. For any
discrepancies, refer to the actual product
as standard.
Short Press: Choose menu item
Short Press: navigate menu
Long Press: Turn on or Turn off.
Cylinder release button
Waste collection bin
Entrance
OK Button
OLED Display Scree
Litter Box Cover
Litter Box
Handhold
Power input
Menu Button
Front of the
Litter Box
Back of
Litter Box
Please read the User Manual carefully before using the product and keep it properly.
PURA X
INSTRUCTION MANUAL
1 - 24
English
Deutsch
En français
Português
Español
日本語
繁体
한국어
Italiano
25 - 48
49 - 72
73 - 96
97 - 120
121 - 144
145 - 168
169 - 192
193 - 216
Русский 217 - 240
The “PETKIT” logo should
always face forward
LOCKED
REPLACE THE LITTER BOX COVER
1. Rotate the locker counterclockwise which is located on the back of cat litter box.
2. Place the cover back on the litter box. (*The PETKIT logo should face the front opening of the litter
box once the cover is placed properly.)
13
MENU
18
Short Press: Choose menu item.
OK Button
How to use the menu: Short press the menu button to navigate the menu. The screen will display
different functions to choose from. Short press OK to choose a function.
Short Press: Navigate menu
Long Press: Turn on, turn off.
Menu Button
OLED Screen
Begin cleaning litter box Spray odor-removing solution Dump all kitty litter into
waste collection bin
Evenly distribute cat litter Cylinder will rotate back
to original position
Litter box is connected to Wi-Fi,
can be used to update network
Clean now
Deodorize now
Empty cat litte
Level cat litter
Reset figure the netw
Take the cord adapter and attach is to the lower slot on the back of the litter box, which is near the
bottom. Then plug into a power socket.
PLUG IN THE POWER CORD, START USING
16
INSERT THE LITTER PAD
Spread out the litter pad and place the two front legs of the litter box in the left and right leg holes of the
litter pad. If this step is not done as instructed, it may render the liquid detection function of the
odor-removal device ineffective and influence the overall lifespan of the odor-removal device.
* The orange area on the litter pad is the effective range of the thermal sensor. Once the cat enters this
area, it will be recognized by the sensor, and the device will automatically cease operation.
When the litter pad is installed correctly,
the orange area indicates the effective
range of the thermal sensor.
15
Waste
collection bin
Trash bag
ring
Trash bag
hooks
INSTAL LTHE TRASH BAG
14
* Make sure you install the trash bag correctly and flatten out the edges of the bag. Otherwise, it may
influence the ability of the device to sense the amount of urine in the litter box.
1. Take out the entire waste collection bin.
3. Open trash bag all the way up, and hang it
from the four trash bag hooks located on the
waste collection bin.
4. Place on the trash bag ring to secure the
trash bag in place and put the waste collection
bin back into the bottom of the litter box.
*When placing the trash bag ring, make sure
the front of the trash bag ring is facing forward.
2. Detach the ring used to secure the trash
bag onto the waste collection bin.
Scan to download
the “PETKIT” APP
USE THE APP
17
1. Scan to download the PETKIT APP. After
registering in the APP, follow the prompts to
your account to your PETKIT Smart
Automatic cat Litter Box.
2. Use the App to get real-time information and
notifications about cat’s weight, as well as time
and frequency of using the litter box.
*Automatic cleaning and periodic cleaning can
only be accessed through the APP.
Smart settings
The device will pause when pets approach while it is cleaning,
and resume automatically when pet departs
The device will clean automatically after a
pet has used it
Clean automatically
3 Actions total
Clean periodically
2 Actions total
Periodic odor removal
Time to wait to begin cleaning after pet has
departed
Wait time 3min
Interval between automatic
cleanings, the device will not clean
if less than this time
Interval time Do not limit
Not enabled
Enabled
A
silicone lid
ADD THE PURIFYING LIQUID
* To ensure the effectiveness of odor removal, please only use the “PETKIT Concentrated Purifying Liquid
for the PETKIT Smart Automatic cat Litter Box”.
1. Remove the orange silicone lid of the
odor-removal device and pour the entire
bottle of concentrated Purifying Liquid into
the odor-removal device.
2. Reattach the silicone lid to the odor-removal
device, make sure it is securely fastened.
10
PRODUCT DESCRIPTION
Top View of
Litter Box
Top View of
Litter Box
(After removing
the cylinder)
Cylinder release button
Entrance
Cylinder
Litter removal opening
Weight sensors.
Weight sensors.
Odor-removal device
Waste collection bin
7
TAKE OUT CYLINDER
1. To unlock the cylinder that holds the
concentrated solution, twist the release button for
the cylinder in a clockwise direction. The release
button is located on the end of the cylinder on the
back of the litter box. *If the covering has not
already been removed from the litter box, make
sure to remove it by sliding it off before taking
out the cylinder.
2. Use both hands to lift upward as picture
instructed.
Cylinder Locker
9
UNLOCK
SCAN THE QR CODE AND WATCH THE SET UP VIDEO
Scan QR Code to Watch a Video on How
to Set Up and Use Your Litter Box
8
INSTALL THE CYLINDER AND POUR IN THE LITTER
1. Use both hands to lift upward, reinstall the cylinder into the back of the litter box.
11
INSTALL THE CYLINDER AND POUR IN THE LITTER
2. Pour the cat litter into the opening in the cylinder. The amount of cat litter should not exceed the MAX
Line indicated inside the cylinder.)
MAX Line
The amount of cat litter
should not exceed the
MAX line.
The “Empty Litter Line”
* The “Empty Litter Line” is determined by the capacity of the waste collection bin.
When the amount of kitty litter remaining falls below the “Empty Litter Line”, the litter box will
allow you to empty the litter with the press of a single button. Once you press the button, the
cylinder will rotate over, dumping out the remaining litter.
1. Please do not allow cats to enter the kitty litter box during the litter emptying process or interrupt the process in any way.
2. Before emptying the litter using the “Empty Litter Button”, please make sure the waste collection bin has enough available space.
3. Please do not turn off the device or remove the power cord during the litter emptying process.
12
DISPLAY GUIDE
19
Percentage of
remained cat
litter
Network status Times of use in each day The weight of the cat
*Please choose the
right type of the cat
litter via the App.
The different type of
cat litter will vary
the accuracy.
Please check if the
cover is properly
placed.
Please place the
cylinder properly
and rotate the
locker into the
‘LOCKED’ position.
If the cat approaches or
enters the litter box while
it is operation, the litter
box will automatically
cease operating and send a
notification
Please check the App
for more malfunction
information.
id is not closed
r barrel not loc is in the litter
re, check the d
Cat weight
kg%
emaining cat litt
SCAN THE QR CODE AND WATCH THE CLEAN UP VIDEO
Scan QR Code to Watch a Video on How
to Clean Your Litter Box.
20 24
Remove cylinder periodically for cleaning.
21
PRODUCT CLEANING
2. Steps to remove cylinder:
1. The "Empty Litter Button":
3. To remove sifting net
*It is recommended to wait until the level of kitty litter has gone below the “Empty Litter Line” before
removing the cylinder for cleaning.
Take off the upper cover.
Rotate the ‘locker’ into UNLOCKED position
Lift the cylinder upwards and take out.
Grasp the filter net (as shown in picture 1), and use
your fingers to press inward on the curve of the filter
net (as shown in picture 2)
After bending the filter net, lift the hooks to remove.
4. Installing the filter net
Make sure Point A of the sifting net is securely in place, then
use your fingers to press inward on the curve of the sifting net
Once the filter net is sufficiently bent, secure Point B in
place.
Picture 1
Picture 2
Point B
Point A
In order to empty out the litter as quick as possible, do not allow the cat to enter the litter box while the emptying process is
underway. (*Note: The cylinder can tip easily when full of litter. Please wait until the litter level has gone down before
removing. Take careful note of the litter level shown on the “Empty Litter Line” located by the trash symbol on the inside of
cylinder. Also check the space remaining in the waste collection bin.)
SPECIFICATIONS
Product name PETKIT PURA X Self-cleaning cat litter box
P9901
504mm X 523mm X 642mm
Product code
Product dimensions
Total weight
Voltage
Power
≈ 15kg (including power adapter)
12V
Recommended for use with Cats
24W
23
Disposal
The European directive 2012 / 19 / CE on Waste Electrical and Electronic Equipment(WEEE), requires that old
household electrical appliances must not be disposed in the normal unsorted municipal waste stream. Old
appliances must be collected separately in order to optimize the recovery and recycling of the materials they
contain and reduce the impact on human health and the environment. The crossed out "wheeled bin" symbol
on the product reminds you of your obligation,that when you dispose of the appliance it must be separately
collected. Consumers should contact their local authority or retailer for information concerning the correct
disposal of their old appliance.
22
Q: Why do rollers rotate when I didn’t perform any operation?
A: The machine automatically detects the position between the rollers and returns them to the original
positions.
Q: Why does it show prompt that the lid is not placed when I put the lid on the main unit?
A: Check whether the upper lid for the main unit is correctly placed. (PETKIT logo should be on the
display side)
Q: Why do the rollers stop when working?
A: When sensors system detects nearby moving subjects, it will shut down the operation for safety.
Q: Will the waste collecting bin full even if the screen doesn’t display so?
A: The sensors on the top of the bin will detect whether it is full. To prevent blocking the sensors, squeeze
the garbage bag down to the ring.
Q: Why is the display screen off?
A: The display screen will enter the screen protection mode with a dynamic PETKIT logo when the product
is not operating for a period of time. The screen will also be turned off when the App shuts it down. You
can also modify the brightness level.
Q: How to use App’s smart setting?
A: That smart settings for cat toilets include automatic cleaning, set cleaning, and regular deodorization;
when there are few cats in the family (within 3), we recommend using the automatic cleaning function.
We recommend using the set cleaning function to avoid cleaning too frequently; the device will
automatically deodorize during the cleaning process, and regular deodorization can be applied
according to the circumstances.
FAQ This device complies with part 15 of the FCC Rules. Operation is subject to the following two conditions:
(1) This device may not cause harmful interference, and (2) this device must accept any interference
received, including interference that may cause undesired operation.
FCC warning:
Any Changes or modifications not expressly approved by the party responsible for compliance could void
the user's authority to operate the equipment.
Note: This equipment has been tested and found to comply with the limits for a Class B digital device,
pursuant to part 15 of the FCC Rules. These limits are designed to provide reasonable protection against
harmful interference in a residential installation. This equipment generates uses and can radiate radio
frequency energy and, if not installed and used in accordance with the instructions, may cause harmful
interference to radio communications. However, there is no guarantee that interference will not occur in a
particular installation. If this equipment does cause harmful interference to radio or television reception,
which can be determined by turning the equipment off and on, the user is encouraged to try to correct the
interference by one or more of the following measures: -Reorient or relocate the receiving antenna.
-Increase the separation between the equipment and receiver.
-Connect the equipment into an outlet on a circuit different from that to which the receiver is connected.
-Consult the dealer or an experienced radio/TV technician for help.
ThedevicehasbeenevaluatedtomeetgeneralRFexposurerequirement.
This equipment complies with FCC radiation exposure limits set forth for an uncontrolled environment. This
equipment should be installed and operated with minimum distance 20cm between the radiator & your body.
IC warning
- English:
This device complies with Industry Canada licence-exempt RSS standard(s). Operation is subject to the
following two conditions: (1) This device may not cause interference, and (2) This device must accept any
interference, including interference that may cause undesired operation of the device.
- French:
Le présentappareilestconforme aux CNR d'Industrie Canada applicables aux appareils radio exempts de
licence. L'exploitationestautorisée aux deux conditions suivantes:
(1) l'appareil ne doit pas produire de brouillage, et
(2) l'utilisateur de l'appareildoit accepter tout brouillageradioélectriquesubi, mêmesi le brouillageest
susceptible d'encompromettre le fonctionnement.
English
28
1. xSecure - 6 Sicherheitsebenen
3. Antibakterielle Geruchsentfernung (mit dem
Geruchsentfernungsgerät und konzentrierter Lösung)
Experimente haben bewiesen, dass dieses Produkt sehr
wirksam bei der Beseitigung von unangenehmen Gerüchen
und Formaldehyd ist, während es gleichzeitig gängige Formen
schädlicher Bakterien (Kolonbazillus, Staphylococcus aureus,
Pseudomonas aeruginosa, Candida albicans, Salmonella
typhimurium, Klebsiella
pneumoniae usw.) abtötet.
2. Verwendung mehrerer Arten von Katzenstreu.
Das Katzenstreufilternetz filtert sowohl Pflanzenstreu als
auch Bentonitstreu und Mischungsstreu.
FUNKTIONEN
Wärmesensor: Das Produkt wird aufgehängt, wenn die Katze hereinkommt.
Infrarotsensor: Der Eingang ist mit einem Infrarotsensor ausgestattet, der den Produktbetrieb stoppt, wenn eine Katze in
der Nähe erkannt wird.
Gewichtssensor: Das Innere der Katzentoilette ist mit 4 Gewichtssensoren ausgestattet. Wenn eine Katze die Katzentoilette
betritt, erkennen diese Sensoren die Katze und stellen den Betrieb ein.
Anti-Pinch-Infrarotsensoren: Auf der Unterseite der Katzentoilette sind zwei Paar Infrarotsensoren installiert. Während sich
das Produkt in Betrieb befindet, wenn sich eine Katze nähert, stellt das Gerät den Betrieb sofort ein.
Unfallschutzsystem: Das Sensorsystem wird vor dem Betrieb aktiviert. Das Produkt wird heruntergefahren und eine
Warnung gesendet, wenn einer der Sensoren fehlerhaft funktioniert.
Unfallschutz-System: Jedes Mal, bevor das Produkt eingeschaltet und in Betrieb genommen wird, aktiviert es jedes seiner
Sensorsysteme. Sollte aus irgendeinem Grund eines dieser Sensorsysteme eine Fehlfunktion aufweisen, stellt das Produkt
seine Arbeit ein und sendet eine sofortige Warnung.
Gewichtssensor
Geruchsentfernungsgerät
Anti-Klemm-Sensoren
Eingangssicherheits-Sensor
Infrarot-Sensor
INHALT
Eine Nachricht an unsere geschätzten Kunden
Leitfaden zur Benutzersicherheit
Funktionen
Packliste
Produktbeschreibung
Scannen Sie den QR-Code und sehen Sie sich das Einrichtungsvideo an
Zylinder herausnehmen
Fügen Sie die Reinigungsflüssigkeit hinzu
Den Zylinder einbauen und die Einstreu einfüllen
Installieren Sie den Müllsack
Einlegen der Einstreu
Stecken Sie das Netzkabel ein, und beginnen Sie
Verwendung der App
Menüpunkte
Erklärung der Statusanzeige
Scannen Sie den QR-Code und sehen Sie sich das Bereinigungsvideo an
Produktreinigung
FAQ
Spezifikationen
27
27
28
29
30,31
32
33
34
35,36
38
Bringen Sie die Katzentoilettenabdeckung wieder an 37
39
40
41
42
43
44
45
46,47
47
EINE NACHRICHT AN UNSERE GESCHÄTZTEN KUNDEN
LEITFADEN ZUR BENUTZERSICHERHEIT
· Vielen Dank, dass Sie sich für den Kauf des selbstreinigenden Katzenklos PETKIT PURA X entschieden
haben. Wir von PETKIT haben unser Bestes getan, um Ihnen und Ihrem Haustier das Leben durch das
Wunder der Technik zu erleichtern.
· Bevor Sie dieses Produkt verwenden, lesen Sie bitte sorgfältig die Gebrauchsanweisung. Indem Sie
dieses Produkt einrichten und verwenden, bestätigen Sie, dass Sie die unten aufgeführten
Sicherheitsmaßnahmen bereits gelesen haben und akzeptieren.
· Wir sind nicht haftbar und übernehmen keine Verantwortung für Unfälle oder Verletzungen, die durch
unsachgemäßen Gebrauch dieses Produkts entstehen.
· Bezüglich dieses Hinweises behalten wir uns das Recht auf Auslegung und Überarbeitung vor.
* Die Nichtbeachtung der unten aufgeführten Sicherheitsmaßnahmen kann zu einer Fehlfunktion des
Produkts oder anderen unvorhergesehenen Pannen führen.
· Bitte installieren und verwenden Sie das Produkt genauso, wie es im Benutzerhandbuch beschrieben ist.
· Haustiere unter 6 Monaten sollten dieses Produkt nicht benutzen.
· Nur für den Gebrauch in Innenräumen. Setzen Sie das Produkt nicht über einen längeren Zeitraum
direktem Sonnenlicht aus. Nicht in die Nähe einer offenen Flamme stellen.
· Dieses Produkt wird mit Schwachstrom betrieben. Aber Haustiere können das Netzkabel beschädigen,
wenn sie darauf herumkauen, so dass das Produkt nicht mit Strom versorgt wird. Bitte stellen Sie sicher,
dass Haustiere das Produkt wie vorgesehen verwenden.
· Verwenden Sie nur das mitgelieferte Netzteil. Die Verwendung eines anderen Netzteils kann zu Schäden
am Produkt oder potenziellen Sicherheitsrisiken führen.
· Stellen Sie sicher, dass das Produkt waagerecht stehen bleibt. Produkt nicht beschädigen. Andernfalls
könnte die konzentrierte Lösung auslaufen oder anderweitig Fehlfunktionen des Produkts verursachen.
· Lassen Sie die untere Hälfte des Produkts nicht in Wasser eingetaucht oder untergetaucht werden.
· Reparaturen sollten unter der Anleitung eines Fachmanns durchgeführt werden, um Sicherheitsrisiken
zu vermeiden.
· Stellen Sie bei längerem Verlassen sicher, dass genügend Platz im Abfallsammelbehälter vorhanden ist.
· Sollten bei der Verwendung dieses Produkts Probleme auftreten, wenden Sie sich bitte umgehend an
uns
27
PACKLISTE
Katzenklo X 1
Streueinlage X 1 Netzkabel X 1
(in der Zubehörschachtel)
Konzentratlösung x 4
(in der Zubehörschachtel)
Müllbeutel X 1
(in der Zubehörschachtel)
Katzenklodeckel X 1
29
PRODUKTBESCHREIBUNG
30
*Note: In order to improve the quality of
our products, we will be implementing
periodic product enhancements.
Product images shown are for illustration
purposes only. Actual product may vary
from the image shown on the box. For
any discrepancies, refer to the actual
product as standard.
Kurz drücken: Menüpunkt
auswählen
Kurz drücken: Durchs
Menü navigieren.
Zylinderentriegelunsgstaste
Eingang
OK-Taste
OLED-Bildschirm
Katzenklodeckel
Katzenklo
Handgriff
Netzeingang
Menü-Taste
Vorderseite
des Katzenklos
Rückseite
des Katzenklos
Bitte lesen Sie die Bedienungsanleitung vor der ersten Verwendung des Produktes sorgfältig durch und
bewahren Sie sie sorgfältig auf.
PURA X
BEDIENUNGSANLEITUNG
Das “Petkit”–Logo sollte
immer nach vorne weisen
LOCKED
KATZENKLODECKEL WIEDER AUFSETZEN
1. Drehen Sie das Schließfach gegen den Uhrzeigersinn, das sich auf der Rückseite der Katzentoilette befindet.
2. Setzen Sie den Deckel dann wieder auf das Katzenklo. (*Das PETKIT-Logo sollte nach dem Aufsetzen des
Deckels zur vorderen Öffnung des Katzenklos zeigen).
37
MENÜPUNKTE
42
Kurz drücken: Menüpunkt auswählen
OK-Taste
Verwendung des Menüs: Drücken Sie kurz auf die Menütaste, um im Menü zu navigieren. Auf dem
Bildschirm werden verschiedene Funktionen angezeigt, aus denen Sie wählen können. Drücken Sie kurz
auf OK, um eine Funktion auszuwählen.
Kurz drücken: Durchs Menü navigieren
Lange drücken: Ein- oder Ausschalten.
Menü-Taste
OLED-Display
Katzenklo reinigen Geruchsbeseitigende Lösung
sprühen
Den gesamten Katzenstreu
in den Abfallsammelbehälter
werfen
Katzenstreu gleichmäßig
verteilen
Zylinder dreht sich zurück in
die Ausgangsposition
Das Katzenklo ist an WLAN
angeschlossen, kann zur
Aktualisierung des Netzwerks
verwendet werden
Clean now
Deodorize now
Empty cat litte
Level cat litter
Reset figure the netw
Nehmen Sie den Kabeladapter und befestigen Sie ihn am unteren Schlitz auf der Rückseite der
Katzentoilette, die sich in der Nähe des Hinterns befindet. Dann in eine Steckdose stecken.
STECKEN SIE DAS NETZKABEL EIN, UND BEGINNEN SIE
40
ABFALLAUFNAHME EINFÜLLEN
39
Breiten Sie die Katzenstreumatte aus und stellen Sie die beiden vorderen Beine der Katzentoilette auf die
orangefarbene Fläche der Katzenstreumatte, wobei der Abstand zwischen der linken und der rechten
Seite gleich bleiben muss. Wenn dieser Schritt nicht wie vorgeschrieben durchgeführt wird, kann dies die
Flüssigkeitserkennungsfunktion des Geruchsbeseitigungsgeräts unwirksam machen und die
Gesamtlebensdauer des Geruchsbeseitigungsgeräts beeinflussen.
* Der orangefarbene Bereich auf der Abfallaufnahme ist der effektive Bereich des Wärmesensors. Sobald
die Katze diesen Bereich betritt, wird sie vom Sensor erkannt, und die Vorrichtung stellt automatisch ihre
Funktion ein.
Wenn die Abfallaufnahme korrekt installiert
ist, zeigt der orangefarbene Bereich den
effektiven Bereich des Wärmesensors an.
Abfallsammelbehälter
Müllbeutelring
Haken für
Müllbeutel
MÜLLBEUTEL EINSETZEN
38
* Stellen Sie sicher, dass Sie den Müllbeutel korrekt einsetzen und die Ränder des Beutels abflachen.
Andernfalls könnte die Fähigkeit des Geräts, die Urinmenge im Katzenklo zu erfassen, beeinträchtigt werden.
1. Nehmen Sie den gesamten
Abfallsammelbehälter heraus.
3. Öffnen Sie den Müllbeutel ganz und hängen
Sie ihn an die vier Müllbeutelhaken,
4. Setzen Sie den Müllbeutelring auf den
Müllbeutel, um diesen zu befestigen. Stellen Sie
dann den Abfallsammelbehälter wieder auf den
Boden des Abfallbehälters.
*Achten Sie darauf, dass die Vorderseite des
Müllbeutelrings nach vorne zeigt.
2. Entfernen Sie den Ring, mit dem der
Müllbeutel auf dem Abfallsammelbehälter
befestigt ist.
Zum Herunterladen
der PETKIT APP
scannen
VERWENDUNG DER APP
41
1. Zum Herunterladen der PETKIT APP scannen.
Nachdem Sie sich in der APP registriert haben,
folgen Sie den Anweisungen zu Ihrem Konto zu
Ihrem PETKIT Smart automatischen Katzenklo.
2. Verwenden Sie die App, um Echtzeitinformationen
und Benachrichtigungen über das Gewicht der
Katze sowie Zeit und Häufigkeit der Verwendung
der Katzentoilette zu erhalten.
*Automatische Reinigung und periodische
Reinigung sind nur über das APP zugänglich.
Smart settings
The device will pause when pets approach while it is cleaning,
and resume automatically when pet departs
The device will clean automatically after a
pet has used it
Clean automatically
3 Actions total
Clean periodically
2 Actions total
Periodic odor removal
Time to wait to begin cleaning after pet has
departed
Wait time 3min
Interval between automatic
cleanings, the device will not clean
if less than this time
Interval time Do not limit
Not enabled
Enabled
A
Weichplastikdeckel
FÜGEN SIE DIE REINIGUNGSFLÜSSIGKEIT HINZU
* Um die Wirksamkeit der Geruchsbeseitigung zu gewährleisten, verwenden Sie bitte ausschließlich die
PETKIT-Konzentratlösung für das Intelligente Automatische Katzenklo von PETKIT”.
1. Entfernen Sie den orangefarbenen
Weichplastikdeckel der
Geruchsentfernungsvorrichtung und gießen Sie
die gesamte Flasche der konzentrierten
Lösung in die
Geruchsentfernungsvorrichtung.
2. Bringen Sie den Weichplastikdeckel wieder an
der Geruchsentfernungsvorrichtung an und
stellen Sie sicher, dass er sicher befestigt ist.
34
PRODUKTBESCHREIBUNG
Draufsicht
des Katzenklos
Draufsicht des
Katzenklos (nach
Entfernung des
Zylinders)
Zylinderentriegelunsgstaste
Eingang
Zylinder
Öffnung zur Entfernung
des Streus
Gewichtssensoren
Gewichtssensoren
Geruchsentfernungsgerät
Abfallsammelbehälter
31
ZYLINDER HERAUSNEHMEN
1. Um den Zylinder, der die konzentrierte Lösung
enthält, zu entriegeln, drehen Sie den
Entriegelungsknopf für den Zylinder im
Uhrzeigersinn. Der Entriegelungsknopf befindet sich
am Ende des Zylinders auf der Rückseite des
Katzenklo. *Wenn die Abdeckung nicht bereits aus
dem Katzenklo entfernt wurde, stellen Sie sicher,
dass sie vor der Entnahme des Zylinders durch
Abschieben entfernt wird.
2. Heben Sie mit beiden Händen nach oben,
wie auf dem Bild angegeben.
Zylinderschließfach
33
SCANNEN SIE DEN QR-CODE UND SEHEN SIE SICH
DAS EINRICHTUNGSVIDEO AN
SCANNEN SIE DEN QR-CODE, UM EIN
VIDEO ÜBER DIE EINRICHTUNG UND
NUTZUNG IHRES KATZENKLOS ZU
SEHEN
32
DEN ZYLINDER EINBAUEN UND DIE EINSTREU
EINFÜLLEN
1. Heben Sie den Zylinder mit beiden Händen nach oben und setzen Sie den Zylinder wieder in die
Rückseite der Katzentoilette ein
35
DEN ZYLINDER EINBAUEN UND DIE EINSTREU
EINFÜLLEN
2. Gießen Sie die Katzenstreu in die Öffnung des rotierenden Zylinders, der zur Abgabe der Streu dient.
(Achten Sie darauf, dass Sie nicht zu viel Katzenstreu einfüllen. Die Menge an Katzenstreu sollte die im
Inneren des rotierenden Zylinders angegebene MAX-Linie nicht überschreiten).
MAX-Linie
Die Katzstreu sollte nicht
die MAX-Linie überschreiten.
Die “Streu entfernen”-Linie
*
36
Die "Abfall-entsorgen-Markierungslinie" wird durch das Fassungsvermögen des Sammelbehälters bestimmt.
Wenn die Restmenge an Katzenstreu unter die "Abfall-entsorgen-Markierungslinie" sinkt, können Sie die Katzentoilette mit einem
einzigen Knopfdruck leeren. Sobald Sie den Knopf drücken, dreht sich der Zylinder um und entleert den verbleibenden Abfall.
1. Bitte erlauben Sie den Katzen nicht, die Katzentoilette während des Entleerungsvorgangs zu betreten oder den Vorgang in
irgendeiner Weise zu unterbrechen.
2. Bevor Sie das Katzenstreu mit Hilfe der "Abfall-entsorgen-Markierungslinien"-Taste entleeren, vergewissern Sie sich bitte,
dass im Abfallsammelbehälter genügend Platz zur Verfügung steht.
3. Bitte schalten Sie das Gerät während des Entleerungsvorgangs nicht aus und entfernen Sie das Netzkabel nicht.
UNLOCK
id is not closed
r barrel not loc is in the litter
re, check the d
Cat weight
kg%
emaining cat litt
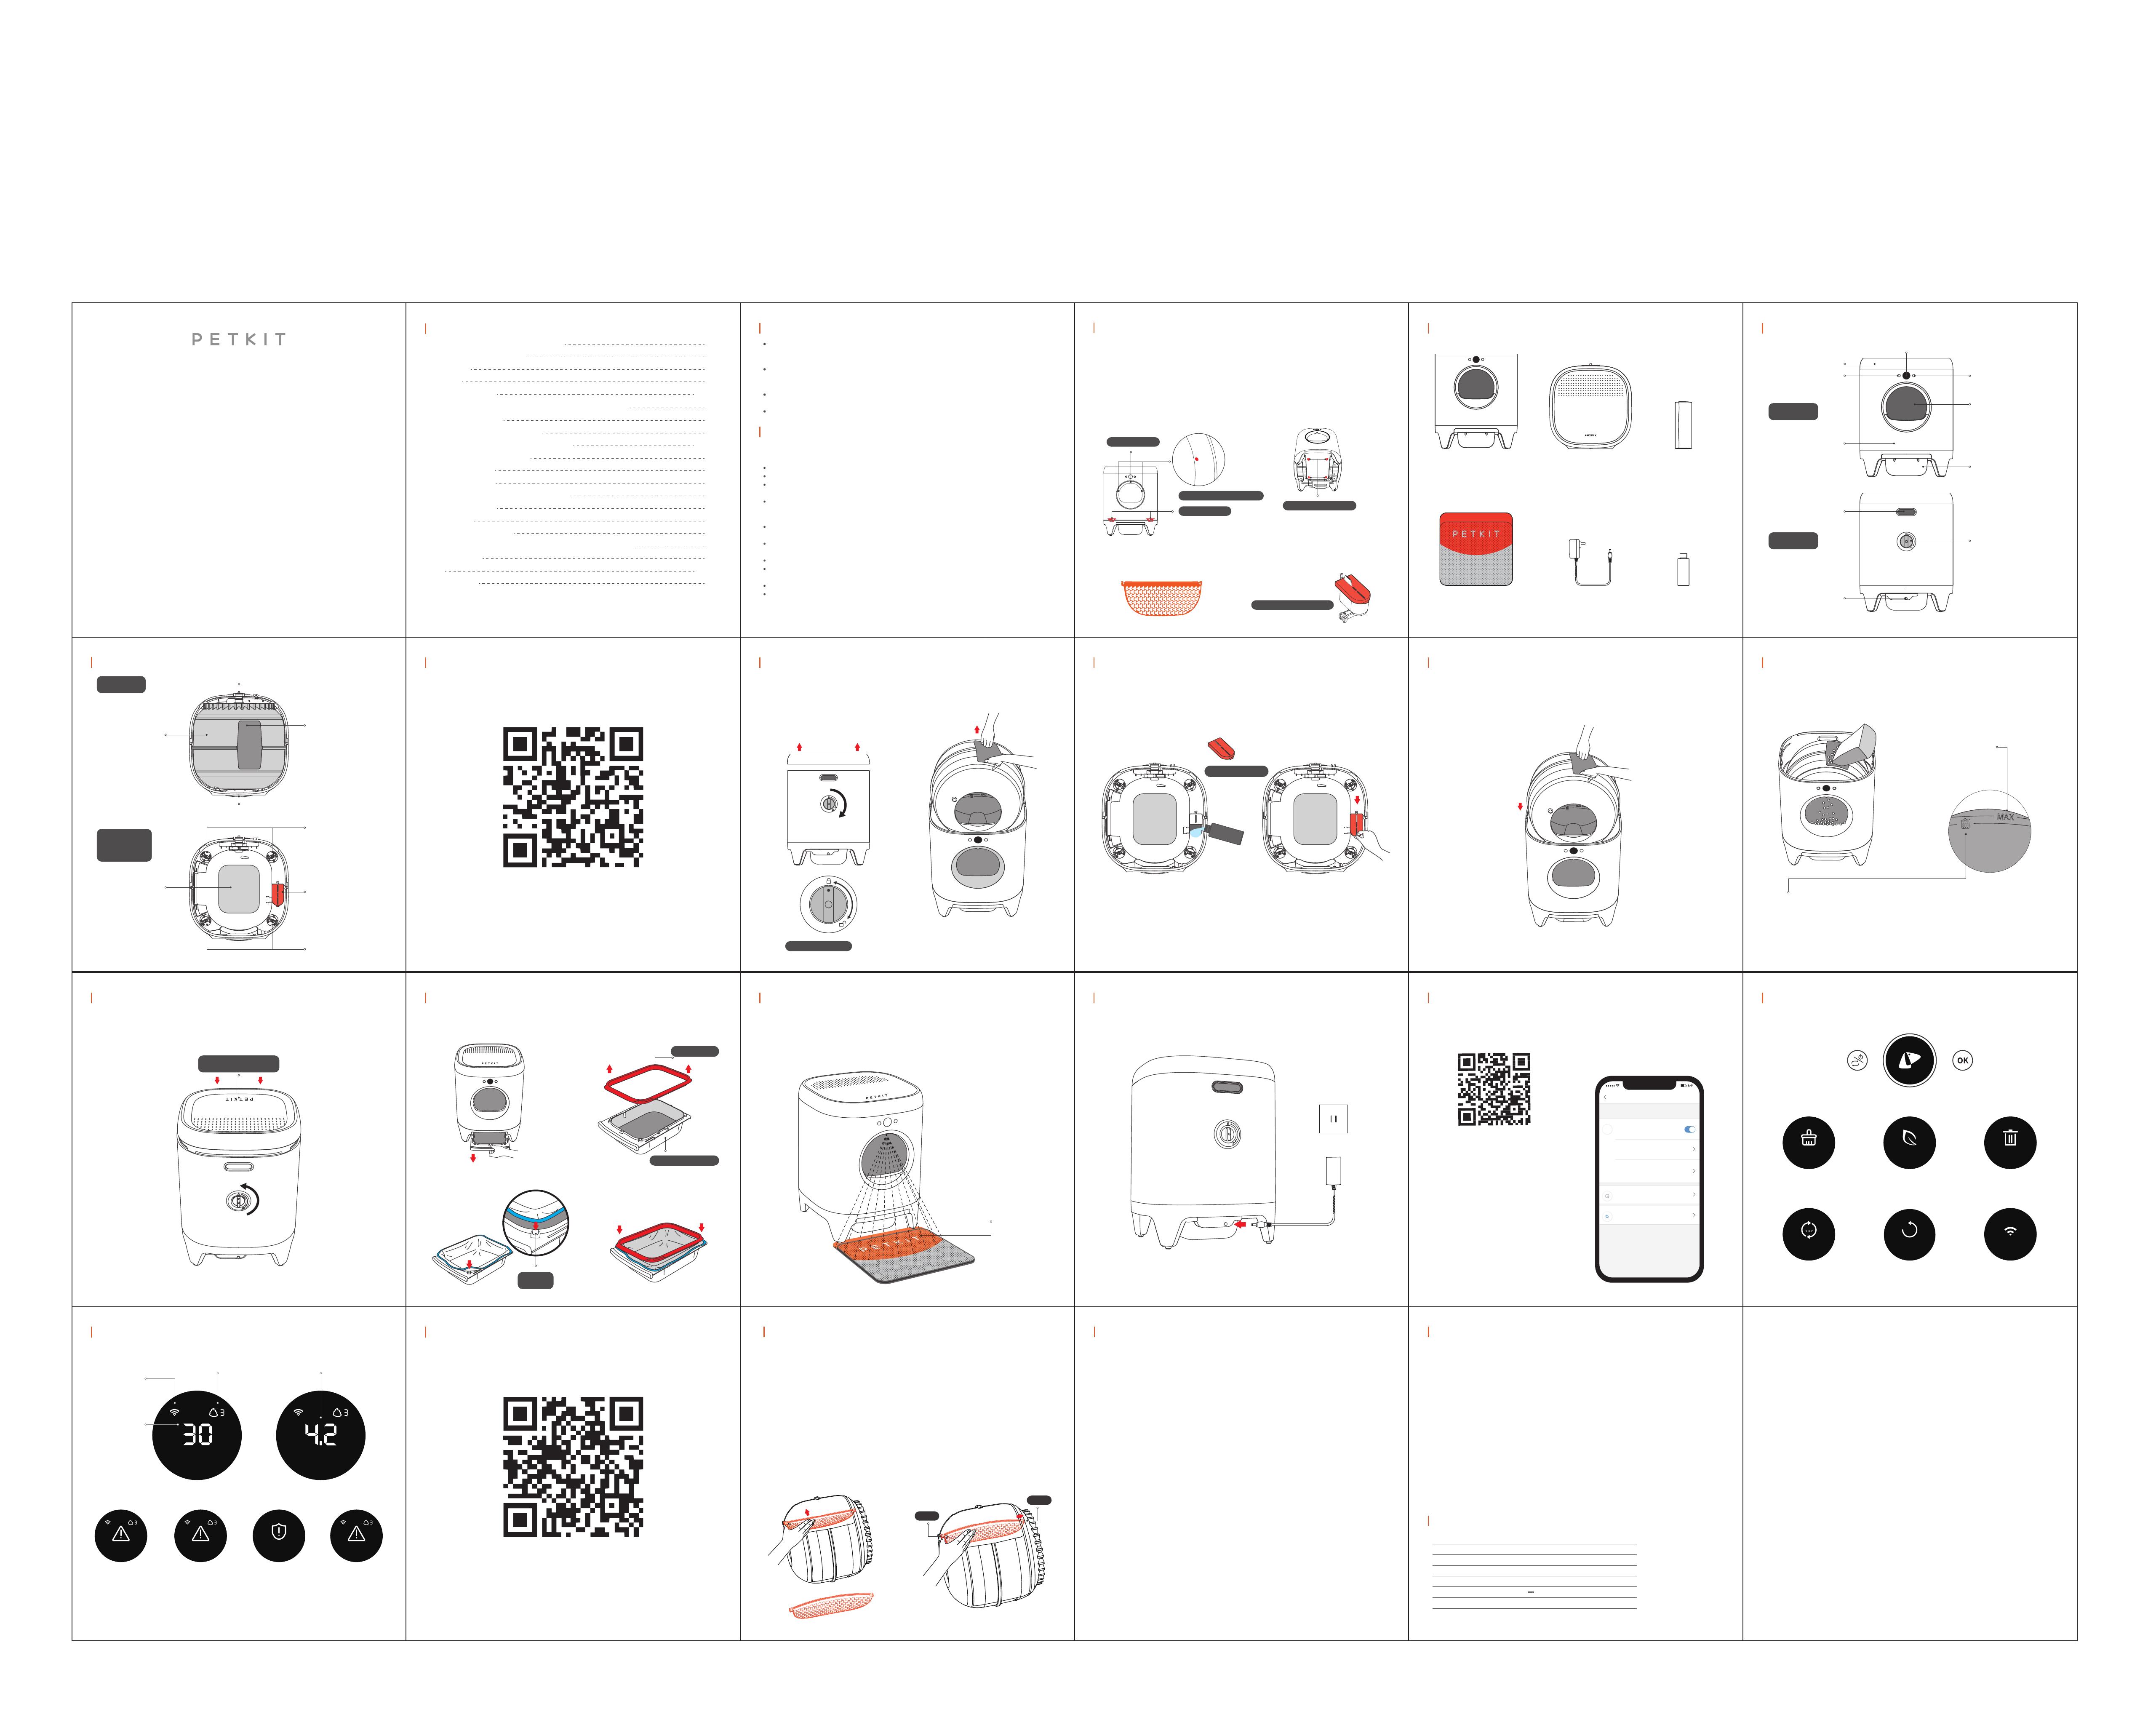
ERKLÄRUNG DER STATUSANZEIGE
43
Prozentsatz des
verbleibenden
Katzenstreus
Netzwerkstatus
Nutzungsdauer an jedem Tag Das Gewicht der Katze
Bitte wählen Sie die
richtige Art von
Katzenstreu über die
App. Die
unterschiedliche Art
des Katzenstreus
variiert die
Genauigkeit
Bitte überprüfen Sie,
ob die Abdeckung
richtig platziert ist
Bitte platzieren Sie den
Zylinder richtig und
drehen Sie das Schließfach
in die Position `‘LOCKED '
Wenn sich die Katze dem
Katzenklo nähert oder es
betritt, während es in
Betrieb ist, stelltdas
Katzenklo automatisch
seinen Betrieb ein
und sendet eine
Benachrichtigung
Bitte überprüfen Sie
die App für weitere
Informationen
zu Fehlfunktionen
SCANNEN SIE DEN QR-CODE UND SEHEN SIE SICH
DAS BEREINIGUNGSVIDEO AN
Scannen Sie den QR-Code, um ein Video
über die Reinigung Ihres Katzenklos
anzusehen.
44
Entnehmen Sie den Zylinder regelmäßig zur Reinigung.
45
PRODUKTREINIGUNG
2. Schritte zum Entfernen des Zylinders:
1. Die Taste "Streu entfernen"
3. Das Siebnetz entfernen:
* Es wird empfohlen, mit dem Entfernen des Zylinders zur Reinigung zu warten, bis das Niveau der
Katzenstreu unter die "Streu entfernen"-Linie gefallen ist.
Nehmen Sie die obere Abdeckung ab.
Drehen Sie das Schließfach in die Position UNLOCKED.
Heben Sie den Zylinder nach oben und nehmen Sie ihn heraus.
Greifen Sie das Siebnetz (wie in Abbildung 1 dargestellt)
und drücken Sie mit den Fingern auf der Kurve des
Siebnetzes nach innen (wie in Abbildung 2 dargestellt);
Nachdem Sie das Siebnetz gebogen haben, heben Sie
die Haken zum Entfernen an.
4. Das Siebnetz anbringen
① Vergewissern Sie sich, dass Punkt A des Siebnetzes sicher an
seinem Platz ist, und drücken Sie dann mit den Fingern auf der
Krümmung des Siebnetzes nach innen;
② Sobald das Siebnetz ausreichend gebogen ist, befestigen Sie
Punkt B an seinem Platz.
Abb. 1
Abb. 2
Punkt B
Punkt A
Um das Katzenstreu so schnell wie möglich zu entleeren, erlauben Sie der Katze nicht, während des Entleerungsvorgangs in das
Katzenklo zu gehen. (*Bemerkung: Der Zylinder kann leicht umkippen, wenn er voll mit Streu ist. Bitte warten Sie, bis das
Streu-Niveau gesunken ist, bevor Sie den Zylinder entfernen. Achten Sie sorgfältig auf das Streu-Niveau, das auf der "Streu
entfernen"-Linie durch das Müll-Symbol auf der Innenseite des Zylinders angezeigt wird. Überprüfen Sie auch den
verbleibenden Platz im Abfallsammelbehälter).
SPEZIFIKATIONEN
Produktname PETKIT PURA X Selbstreinigendes Katzenklo
P9901
504mm X 523mm X 642mm
Produkt-Code
Produktabmessungen
Gesamtgewicht
Spannung
Strom
15 kg (inkl. Netzkabel)
12V
Empfohlen für Katzen
24W
47
F: Warum ist der Bildschirm ausgeschaltet?
A: Der Bildschirm wechselt mit einem dynamischen PETKIT-Protokoll in den Bildschirmschutzmodus, wenn
das Produkt längere Zeit nicht in Betrieb ist. Der Bildschirm wird auch ausgeschaltet, wenn die App ihn
herunterfährt. Sie können auch die Helligkeitsstufe ändern.
F: Wie verwende ich die intelligente Einstellung der App?
A: Zu den intelligenten Einstellungen für Katzentoiletten gehören automatische Reinigung, Set-Reinigung
und regelmäßige Desodorierung; wenn es nur wenige Katzen in der Familie gibt (höchstens 3), empfehlen wir,
die automatische Reinigungsfunktion zu verwenden. Wir empfehlen, die eingestellte Reinigungsfunktion zu
verwenden, um eine zu häufige Reinigung zu vermeiden; das Gerät desodoriert automatisch während des
Reinigungsprozesses, und je nach den Umständen kann eine regelmäßige Desodorierung vorgenommen
werden.
FAQ
46
F: Warum rollen Walzen, wenn ich keine Operation durchgeführt habe?
A: Die Maschine erkennt automatisch die Position zwischen den Rollen und bringt sie in die
Ausgangspositionen zurück.
F: Warum wird angezeigt, dass der Deckel nicht aufgesetzt ist, wenn ich den Deckel auf das Hauptgerät setze?
A: Stellen Sie sicher, dass der obere Deckel richtig auf der Haupteinheit aufgesetzt ist. (Das PETKIT-Logo sollte
sich auf der Bildschirmseite befinden)
F: Warum stoppen die Rollen während des Betriebs?
A: Wenn das Sensorsystem in der Nähe sich bewegende Objekte erkennt, wird der Betrieb aus
Sicherheitsgründen abgeschaltet.
F: Ist der Abfallsammelbehälter voll, auch wenn der Bildschirm dies nicht anzeigt?
A: Der Sensor oben im Behälter erkennt, ob er voll ist. Drücken Sie den Müllsack bis zum Ring zusammen, um
ein Blockieren der Sensoren zu vermeiden.
FAQ
48
Entsorgung
Die europäische Richtlinie 2012 / 19 / CE über Elektro- und Elektronik-Altgeräte (WEEE) schreibt vor, dass
Elektroaltgeräte nicht über den normalen, unsortierten Gemeindeabfall entsorgt werden dürfen. Altgeräte
müssen getrennt gesammelt werden, um die Rückgewinnung und das Recycling der in ihnen enthaltenen
Materialien zu optimieren und die Auswirkungen auf die menschliche Gesundheit und die Umwelt zu verringern.
Das Symbol der "durchgestrichenen Mülltonne" auf dem Produkt erinnert Sie an Ihre Verpflichtung, das Gerät
getrennt zu entsorgen. Verbraucher sollten sich bei ihrer örtlichen Behörde oder ihrem Händler über die
korrekte Entsorgungart ihres Altgeräts informieren.
Deutsch
Le logo «PETKIT» doit toujours
se trouver sur l’avant
REMETTRE LE COUVERCLE DU BAC DE LITIÈRE
1. 1.Faites tourner le casier dans le sens inverse des aiguilles d'une montre, qui se trouve à l'arrière du bac
à litière pour chat.
2. Remettez le couvercle sur le bac à litière. (*Une fois le couvercle remis en place, le logo PETKIT doit se
trouver du côté de l’ouverture, à l’avant du bac à litière.)
61
ÉLÉMENTS DU MENU
66
Appui court: Sélectionner un élément
du menu
Bouton OK
Comment utiliser le menu: Appui court sur la touche Menu pour naviguer dans le menu. L’écran
affichera les différentes fonctions à sélectionner. Appui court sur OK pour sélectionner une fonction.
Appui court: Navigation dans le menu
Appui long: Allumer, éteindre.
Touche Menu
Affichage OLED
Commencer le nettoyage
du bac à litière
Vaporiser la solution pour
l’élimination des odeurs
Vider toute la litière pour
chat dans le bac de
récupération des déchets
Répartir uniformément
la litière pour chat
Le cylindre va tourner pour
revenir en position de départ
Le bac à litière est connecté
au Wifi, le système peut être
actualisé
Clean now
Deodorize now
Empty cat litte
Level cat litter
Reset figure the netw
Prenez l'adaptateur de cordon et fixez-le à la fente inférieure à l'arrière du bac à litière, qui se trouve près
du fond. Branchez-le ensuite sur une prise de courant.
BRANCHEZ LE CÂBLE D’ALIMENTATION ET
COMMENCEZ L’UTILISATION
64
INSÉREZ LE TAPIS DE LITIÈRE
63
Étalez le coussin de litière et placez les deux pattes avant du bac à litière sur la zone orange du coussin de
litière, en maintenant la même distance entre la gauche et la droite. Si cette étape n'est pas réalisée
conformément aux instructions, la fonction de détection des liquides du dispositif d'élimination des
odeurs risque ne pas être efficace et la durée de vie globale du dispositif d'élimination des odeurs peut ê
tre compromise.
* La zone orange du tapis de litière représente la portée effective du capteur thermique. Une fois que le chat
pénètre dans cette zone, il est détecté par le capteur et l’appareil arrête automatiquement de fonctionner.
Quand le tapis de litière est placé correctement,
la zone orange représente la portée effective
du capteur thermique.
Bac de
récupération
des déchets
Élément de maintien
du sac à litière
Crochets pour
sac à litière
INSTALLER LE SAC POUBELLE
62
* Assurez-vous d’installer le sac à litière correctement et d’aplatir les côtés du sac. Dans le cas contraire, la
capacité de l’appareil à détecter la quantité d’urine dans le bac à litière pourrait être altérée.
1. Retirez le bac de récupération des déchets.
3. Ouvrez le sac à litière jusqu’en haut puis
suspendez-le aux quatre crochets placés sur le bac
de récupération des déchets.
4. Placez l’élément de maintien du sac à litière
pour maintenir le sac en place et replacez le bac
de récupération des déchets au fond du bac à
litière. *Quand vous positionnez l’élément de
maintien du sac à litière, assurez-vous que
l’avant de l’élément soit placé vers l’avant.
2. Détachez l’élément servant à maintenir le sac
à litière sur le bac de récupération des déchets.
Scannez pour
télécharger
l’application
“PETKIT”
UTILISATION DE L’APPLICATION
65
1. Scannez pour télécharger l’application PETKIT.
Après vous être inscrit dans l’application, suivez les
instructions sur votre compte pour trouver votre
Bac à litière intelligent automatique PETKIT.
2. Utilisez l'application pour obtenir des informations
et des notifications en temps réel sur le poids du
chat, ainsi que l'heure et la fréquence d'utilisation
du bac à litière.
Smart settings
The device will pause when pets approach while it is cleaning,
and resume automatically when pet departs
The device will clean automatically after a
pet has used it
Clean automatically
3 Actions total
Clean periodically
2 Actions total
Periodic odor removal
Time to wait to begin cleaning after pet has
departed
Wait time 3min
Interval between automatic
cleanings, the device will not clean
if less than this time
Interval time Do not limit
Not enabled
Enabled
A
LOCKED
52
1. xSécurité – 6 niveaux de sécurité
3. Élimination des odeurs et lutte contre les bactéries
(à l’aide d’un dispositif d’élimination des odeurs et
une solution concentrée)
Après avoir fait l’objet de tests expérimentaux, ce produit a
démontré son efficacité dans l’élimination des odeurs
déplaisantes et du formaldéhyde ainsi que dans l’élimination
des formes communes de bactéries nocives (bacille du côlon,
staphylocoque doré, pseudomonas aeruginosa, candida
albicans, salmonella typhimurium,
klebsiella pneumoniae, etc.).
2. Utilisation de divers types de litières pour chat.
Le filet filtrant pour litière de chat est efficace pour filtrer
à la fois les litières végétales et les litières de bentonite,
ainsi que les litières de mélange.
FONCTIONS
Capteur thermique : Le produit sera suspendu si le chat entre.
Capteur infrarouge : L'entrée est équipée d'un capteur infrarouge qui arrêtera le fonctionnement du produit s'il détecte un
chat à proximité.
Capteur de poids : l'intérieur du bac de litière est équipé de 4 capteurs de poids. Si un chat entre dans le bac de litière, ces
capteurs détectent le chat et arrêtent le fonctionnement.
Capteurs infrarouges anti-pincement : Il y a deux paires de capteurs infrarouges installés au fond du bac de litière. Pendant
que le produit fonctionne, si un chat s'approche, l’appareil cessera immédiatement de fonctionner.
Détection intelligente, alertes à distance: Utilisez l’application pour obtenir des mises à jour intelligentes et des alertes
immédiates en cas d’activité anormale.
Système de protection contre les accidents : Le système de capteurs sera activé avant de fonctionner. Le produit s'arrêtera
et enverra une alerte si l'un des capteurs ne fonctionne pas correctement.
Capteurs de poids
Dispositif d’élimination
des odeurs
Capteurs de sécurité anti-enfermement
Capteurs de sécurité à l’entrée
Capteur infrarouge
SOMMAIRE
MESSAGE A L’ATTENTION DE NOS CHERS CLIENTS
LISTE D’EMBALLAGE
GUIDE RELATIF À LA SÉCURITÉ
FONCTIONS
DESCRIPTION DU PRODUIT
SCANNER LE CODE QR ET REGARDER LA VIDÉO DE RÉGLAGE
RETIREZ LE CYLINDRE
AJOUTER LE LIQUIDE DE PURIFICATION
INSTALLER LE CYLINDRE ET VERSEZ LA LITIÈRE
INSTALLER LE SAC POUBELLE
INSÉREZ LE TAPIS DE LITIÈRE
BRANCHEZ LE CÂBLE D’ALIMENTATION ET COMMENCEZ L’UTILISATION
UTILISATION DE L’APPLICATION
ÉLÉMENTS DU MENU
GUIDE DE L’AFFICHAGE DU STATUT
SCANNER LE CODE QR ET REGARDER LA VIDÉO DE NETTOYAGE
NETTOYAGE DU PRODUIT
FAQ
CARACTÉRISTIQUES TECHNIQUES
51
51
52
54,55
56
53
57
5859
60
62
REMETTRE LE COUVERCLE DU BAC DE LITIÈRE
61
63
64
65
66
67
68
69
70,71
71
MESSAGE A L’ATTENTION DE NOS CHERS CLIENTS
GUIDE RELATIF À LA SÉCURITÉ
· Merci d’avoir choisi le bac à litière autonettoyant pour chat PETKIT PURA X. Nous faisons de notre mieux,
chez PETKIT, pour vous rendre la vie plus facile, à vous et à votre chat, grâce au miracle de la technologie.
· Avant d’utiliser ce produit, veuillez lire attentivement ce guide de l’utilisateur. En installant et en utilisant
ce produit, vous indiquez que vous avez lu et accepté les mesures de sécurité mentionnées ci-dessous.
· Nous déclinons toute responsabilité pour tout accident ou blessure pouvant résulter d’une mauvaise
utilisation de ce produit.
· Nous nous réservons le droit d’interprétation et de révision en rapport avec cette notice.
* Le non-respect des mesures de sécurité indiquées ci-dessous peut conduire à un mauvais fonctionnement
du produit ou à d’autres incidents imprévisibles.
· Veuillez installer et utiliser le produit exactement comme indiqué dans le mode demploi.
· Les animaux de moins de 6 mois ne doivent pas utiliser ce produit.
· Pour utilisation en intérieur uniquement. Ne pas exposer le produit à la lumière directe du soleil pendant
de longues périodes. Ne pas placer à proximité d’une flamme nue.
· Même si ce produit utilise un courant faible, les animaux peuvent endommager le câble d’alimentation en
le mordillant et empêcher l’alimentation du produit. Assurez-vous que les animaux utilisent le produit
comme prévu.
· Utilisez uniquement l’adaptateur secteur fourni. L’utilisation d’un adaptateur différent peut endommager
le produit ou créer des dangers éventuels.
· Assurez-vous que le produit reste à l’horizontale. Ne l’inclinez pas. Dans le cas contraire, la solution
concentrée pourrait se déverser ou causer un dysfonctionnement du produit.
· Les réparations doivent être effectuées sous la direction dun professionnel pour éviter les risques liés à la
sécurité.
· En cas dabsence prolongée, s’assurer qu'il y a suffisamment de place dans la poubelle de collecte des déchets.
· Si vous rencontrez un problème quelconque pendant l’utilisation de ce produit, contactez-nous
immédiatement.
51
LISTE D’EMBALLAGE
Maison de toilette X 1
Tapis de litière X 1 Adaptateur secteur x1
(dans la boîte d’accessoires)
Solution concentrée x 4
(dans la boîte d’accessoires)
Sac à litière x1
(dans la boîte d’accessoires)
Couvercle du bac à litière X 1
53
DESCRIPTION DU PRODUIT
54
*Note: Dans le but d’améliorer la qualité
de nos produits, nous réalisons
régulièrement des améliorations du
produit. Les images du produit présentées
ici le sont à des fins d’illustration
uniquement. Le produit reçu peut être
différent de l’image placée sur le bac. Pour
toute différence éventuelle, se référer au
produit lui-même.
Appui court: sélectionner un
élément du menu
Appui court: faire défiler le
menu Appui long: mettre en
marche ou arrêter.
Bouton de déverrouillage
du cylindre
Bac de récupération des
déchets
Entrée
Bouton OK
Écran à affichage OLED
Couvercle du bac à litière
Bac à litière
Poignée
Entrée de courant
Touche Menu
Côté avant
du bac à litière
Côté arrière
du bac à litière
Veuillez lire attentivement ce mode d’emploi avant d’utiliser le produit puis conservez-le soigneusement.
PURA X
MODE D’EMPLOI
GUIDE DE L’AFFICHAGE DU STATUT
67
Statut du
réseau
Temps d’utilisation chaque jour Poids du chat
Pourcentage
restant de
litière pour chat
Veuillez choisir le
type correct de
litière pour chat
via l’App. Le type
différent de litière
pour chat varie en
fonction
de la précision.
Veuillez vérifier si le
couvercle est
correctement placé.
Veuillez placer le cylindre
correctement et tourner le
casier dans la position
“VERROUILLÉ”
Si le chat s’approche du
bac à litière ou entre dans
le bac pendant l’opération,
le bac à litière s’arrête
automatiquement et
envoie une notification
Veuillez verifier l’App
pour des informations
supplémentaires
concernant la
défaillance
id is not closed
r barrel not loc is in the litter
re, check the d
Cat weight
kg%
emaining cat litt
SCANNER LE CODE QR ET REGARDER LA VIDÉO DE
NETTOYAGE
Scannez le code QR pour voir une vidéo
sur la façon de nettoyer votre bac à
litière.
68 72
Mise au rebut
La directive européenne 2012 / 19 / CE relative aux déchets d'équipements électriques et électroniques (DEEE),
exige que les déchets d'appareils électroménagers ne soient pas éliminés avec les déchets municipaux normaux
non triés. Les vieux appareils doivent être collectés séparément afin d'optimiser la récupération et le recyclage
des matériaux qu'ils contiennent et de réduire leur impact sur la santé humaine et l'environnement. Le symbole
de la "poubelle sur roues" barré sur le produit vous rappelle cette obligation, à savoir que lorsque vous vous
débarrassez de l'appareil, il doit être collecté séparément. Les consommateurs doivent contacter leur autorité
locale ou leur détaillant pour obtenir des informations sur l'élimination correcte de leur appareil usagé.
Retirez le cylindre régulièrement pour le nettoyer.
69
NETTOYAGE DU PRODUIT
2. Étapes du démontage du cylindre:
1. Le bouton de “vidange de la litière”:
3. Pour retirer le tamis:
* Il est conseillé d’attendre que le niveau de litière pour chat soit descendu sous le trait de «vidange de la
litière» avant de retirer le cylindre pour le nettoyer.
Enlevez le couvercle supérieur.
Faites pivoter le «casier» en position DÉVERROUILLÉE.
Soulever le cylindre vers le haut et le retirer.
Attrapez le tamis (comme sur l’image 1) et appuyez vers
l’intérieur avec les doigts sur la courbe du tamis (comme
sur l’image 2);
Après avoir incurvé le tamis, soulevez les crochets pour
le libérer.
4. Installer le tamis
① Assurez-vous que le point A du tamis est bien en position,
puis appuyez vers l’intérieur avec les doigts sur la courbe du
tamis ;
② Quand le tamis est suffisamment incurvé, mettez-le en
place sur le point B.
Image 1
Image 2
Point B
Point A
Pour vider la litière le plus vite possible, ne laissez pas le chat entrer dans le bac à litière pendant que le processus de vidange
est en cours. (*Note: Le cylindre peut facilement basculer quand il est plein de litière. Attendez que le niveau de litière ait
baissé avant de le retirer. Vérifiez bien le niveau de litière indiqué par le trait de «vidange de la litière» identifiable par le
symbole d’une poubelle à l’intérieur du cylindre. Vérifiez également l’espace restant dans le bas de récupération des déchets.)
CARACTÉRISTIQUES TECHNIQUES
Nom du produit Bac à litière autonettoyant PETKIT PURA X
P9901
504mm X 523mm X 642mm
Code produit
Dimensions du produit
Poids total
Tension
Puissance
Environ 15 kg (adaptateur secteur inclus)
12V
Utilisation recommandé pour Chats
24W
71
Q : Pourquoi l'écran d'affichage est-il éteint ?
R : L'écran d'affichage entre en mode de protection de l'écran avec un logo PETKIT dynamique lorsque le
produit ne fonctionne pas pendant un certain temps. L'écran sera également éteint lorsque l'application
l'arrêtera. Vous pouvez également modifier le niveau de luminosité.
Q : Comment utiliser le réglage intelligent de l'application ?
R : Ces réglages intelligents pout toilettes pour chats incluent le nettoyage automatique, le nettoyage
programmable et la désodorisation programmable ; quand il y a plusieurs chats dans la famille (3 au maximum),
nous conseillons d’utiliser la fonction de nettoyage automatique. Nous conseillons dutiliser la fonction de
nettoyage programmable pour éviter de nettoyer trop fréquemment ; le dispositif désodorisera
automatiquement pendant le processus de nettoyage, et une désodorisation programmée peut être mise en
place en fonction de la situation.
FAQ
70
Q: Pourquoi les rouleaux tournent-ils alors que je n'ai effectué aucune opération ?
R: La machine détecte automatiquement la position du cylindre et le ramène en position de départ.
Q: Pourquoi l'écran affiche-t-il une invite indiquant que le couvercle n'est pas placé lorsque j’ai mis le
couvercle sur l'unité principale ?
R: Vérifiez que le couvercle supérieur de l’unité principale soit bien en place (le logo PETKIT doit se trouver
côté affichage).
Q: Pourquoi le cylindre s’arrête-t-il en cours de fonctionnement?
R: Lorsque le système de capteurs détecte des sujets mobiles à proximité, il arrête l'opération pour des
raisons de sécurité.
Q: La poubelle sera-t-elle pleine même si l'écran ne l'affiche pas ?
R: Les capteurs situés sur le dessus de la poubelle détectent si elle est pleine. Pour éviter de bloquer les
capteurs, pressez le sac poubelle jusqu'à l'anneau.
FAQ
Couvercle en
plastique souple
AJOUTER LE LIQUIDE DE PURIFICATION
* Pour garantir une élimination des odeurs efficace, utilisez uniquement la Solution concentrée PETKIT
pour le Bac à litière PETKIT intelligent automatique pour chat (en anglais «PETKIT Concentrated Solution
for the PETKIT Smart Automatic Kitty Litter Box»).
1. Retirez le couvercle orange en plastique souple
du dispositif d’élimination des odeurs et versez
tout le contenu de la bouteille de solution
concentrée dans le dispositif.
2. Replacez le couvercle en plastique souple sur
le dispositif en vous assurant qu’il est bien fixé.
58
DESCRIPTION DU PRODUIT
Vue de dessus
du bac à litière
Vue de dessous
du bac à litière
(une fois le
cylindre retiré)
Bouton de déverrouillage du cylindre
Entrée
Cylindre
Ouverture pour le
retrait de la litière
Capteurs de poids
Capteurs de poids
Dispositif d’élimination
des odeurs
Bac de récupération
des déchets
55
RETIREZ LE CYLINDRE
1. Pour déverrouiller le cylindre qui contient la solution
concentrée, tournez le bouton de déverrouillage du
cylindre dans le sens des aiguilles d’une montre. Le
bouton de déverrouillage se trouve à l’extrémité du
cylindre, à l’arrière du bac à litière. *Si le couvercle n’a
pas encore été enlevé du bac à litière, assurez-vous de
l’enlever en le faisant glisser avant de retirer le cylindre.
2. Utilisez les deux mains pour soulever vers le
haut selon les instructions de l'image.
Casier de cylindre
57
SCANNER LE CODE QR ET REGARDER LA VIDÉO DE
RÉGLAGE
Scannez le code QR pour voir une vidéo
sur la façon d’installer et d’utiliser votre
bac à litière
56
AJOUTER LE LIQUIDE DE PURIFICATION
1. 1.Utiliser les deux mains pour soulever le cylindre, le réinstaller à l'arrière du bac à litière.
59
INSTALLER LE CYLINDRE ET VERSEZ LA LITIÈRE
2. Versez la litière pour chat par l’ouverture du cylindre rotatif utilisé pour distribuer la litière.
(Assurez-vous de ne pas verser trop de litière pour chat. La quantité de litière ne doit pas dépasser le
trait MAX présent à l’intérieur du cylindre).
Trait MAX
La quantité de litière ne
doit pas dépasser le trait
avec la mention MAX.
Le trait de “vidange de la litière”
* Le trait de «vidange de la litière» dépend de la capacité du bac de récupération des déchets.Quand la quantité de litière
restante descend sous le trait de «vidange de la litière», le bac à litière vous permet de vider la litière en appuyant sur un
simple bouton. Quand vous appuyez sur ce bouton, le cylindre se met à tourner et vide la litière restante.
1) Ne laissez pas les chats entrer dans le bac à litière pour chat pendant le processus de vidange de la litière et n’interrompez
pas le processus de quelque manière que ce soit.
2) Avant de vider la litière à l’aide du bouton de «vidange de la litière», assurez-vous qu’il y ait assez de place dans le bac de
récupération des déchets.
3) N’éteignez pas l’appareil et ne débranchez pas le câble d’alimentation pendant le processus de vidange de la litière.
60
UNLOCK
Enfrançais
76
1. Segurança x – 6 Níveis de Segurança
3. Remoção antibacteriana de odores (Utilizando o
Dispositivo de Eliminação de Odores e a Solução
Concentrada)
Através da análise experimental, este produto é reconhecido
por ser eficaz na eliminação de odores desagradáveis e de
formol, além de matar formas comuns de bactérias nocivas,
como bacilo do cólon, staphylococcus aureus, pseudomonas
aeruginosa, candida albicans, salmonela typhimurium,
klebsiella, pneumonia, entre outros.
2. Utilize múltiplos tipos de sanitário para gatos.
A rede do filtro da liteira é eficaz na filtração da areia
sanitária vegetal, areia de bentonite bem como areia
mista.
FUNÇÕES
Sensor térmico: O produto será suspenso quando o gato entrar.
Sensor infravermelho: A entrada está equipada com um sensor infravermelho que interromperá a operação do produto
se detetar a presença de algum gato.
Sensor de peso: O interior da liteira está equipado com 4 sensores de peso. Se algum gato entrar na liteira, estes sensores
irão detetá-lo e interromper a operação.
Sensores Infravermelhos de Proteção: Trata-se de dois pares de sensores infravermelhos instalados no fundo interno da
liteira. Enquanto o produto estiver em operação, se um gato se aproximar, o dispositivo irá parar de operar imediatamente.
Detecção Smart e Alertas remotos: utilize o APP para obter as atualizações inteligentes e saber com antecedência sobre
as atividades anormais.
6.Sistema de Proteção contra Acidentes: O sistema de sensores será ativado antes da operação. O produto irá desligar-se
e enviar um alerta se algum sensor avariar.
Sensor de peso
Dispositivo de
eliminação de odor
Sensor de segurança de antipegadas
Sensores de segurança do acesso
Sensor Infravermelho
SUMÁRIO
MENSAGEM AOS NOSSOS CLIENTES FIDELIDADE
INSTRUÇÕES DE SEGURANÇA
FUNÇÕES
LISTA DO PACOTE
DESCRIÇÃO DO PRODUTO
FAZER O SCAN DO CÓDIGO QR E ASSISTIR AO
VÍDEO DE CONFIGURAÇÕES
REMOÇÃO DO CILINDRO
ADICIONAR O LÍQUIDO PURIFICADOR
INSTALAR O CILINDRO E COLOCAR A AREIA SANITÁRIA
INSTALAR O SACO DE LIXO
COLOCAÇÃO DA ALMOFADA SANITÁRIA
LIGUE O CABO DE ENERGIA E COMECE A USAR
USO DO APP
ITENS DO MENU
INSTRUÇÕES DO STATUS NO ECRÃ
FAZER O SCAN DO CÓDIGO QR E ASSISTIR AO VÍDEO DE LIMPEZA
LIMPEZA DO PRODUTO
FAQ(Perguntas Frequentes)
ESPECIFICAÇÕES
75
75
76
77
78,79
80
81
82
83,84
86
SUBSTITUIR A TAMPA DA LITEIRA 85
87
88
89
90
91
92
93
94,95
95
MENSAGEM AOS NOSSOS CLIENTES FIDELIDADE
INSTRUÇÕES DE SEGURANÇA
· Agradecemos por adquirir a Caixa Sanitária Autolimpante para Gatos PURA X da PETKIT. Através dos
benefícios tecnológicos, empenhamo-nos em favorecer a sua vida e a do seu animal de estimação.
· Leia atentamente ao Manual de Instruções antes da utilização. Ao instalar ou utilizar este produto, o usuário
concorda que leu atentamente todas as instruções de segurança descritas abaixo e está de acordo.
· Nossa empresa não assumirá nenhum tipo de responsabilidade, a incluir quaisquer responsabilidades
legais provenientes de acidentes e danos causados por uso incorreto deste produto.
· Em relação a estas informações, a empresa reserva-se o direito de explicação e revisão dos termos.
* O descumprimento das cláusulas a seguir poderá ocasionar em anormalidades do produto e outras
perdas acidentais.
· Instale e utilize o produto seguindo rigorosamente o Manual do Usuário.
· Não utilize este produto em animais de estimação inferiores a 6 meses.
· Utilize este produto somente em ambientes internos. Não exponha o produto à luz direta do sol por
longos períodos. Mantenha este produto longe de chamas.
· Mesmo que este produto use baixa corrente, os animais de estimação podem mastigar o cabo de
alimentação e danificá-lo e impedir o funcionamento do produto. Assegure aos animais de estimação
usar o produto de forma adequada.
· Use apenas o adaptador de energia fornecido. Usar um adaptador de energia diferente pode danificar o
produto ou estar sujeitos a riscos de segurança.
· Verifique se o produto está ao seu nível. Não incline-o, caso contrário, a solução concentrada pode vazar
ou interferir no funcionamento do produto.
· Evite que a parte inferior do produto seja imersa ou submersa em água.
· Os reparos devem ser feitos sob a orientação de um profissional para evitar riscos à segurança.
· Ao sair por um longo período de tempo, certifique-se de deixar um espaço suficiente no caixote de resíduos.
· Se está a enfrentar problemas para usar este produto, contacte o serviço de atendimento ao cliente o
mais rápido possível.
75
LISTA DO PACOTE
1 Caixa Sanitária
1 Almofada Sanitária 1 Adaptador de energia
(na caixa de acessórios)
4 Solução concentrada
(na caixa de acessórios)
1 Saco de resíduos
(na caixa de acessórios)
1 Tampa da Caixa Sanitária
77
DESCRIÇÃO DO PRODUTO
78
*Nota: Para melhorar a qualidade de
nossos produtos, vamos incluir
aprimoramentos de forma periódica. As
imagens dos produtos ilustrados são para
fins ilustrativos. O produto real pode ser
diferente daquele ilustrado na caixa. Se há
diferença entre eles, consulte o produto
real como padrão.
Premir uma vez: selecionar o
item do menu.
Premir uma vez: acesso ao menu
Premir longo: Ligar ou Desligar.
Botão de abertura do cilindro
Caixa coletora de resíduos
Porta de entrada
Botão OK
Ecrã de exibição OLED
Tampa da Caixa Sanitária
Caixa Sanitária
Apoio
Entrada de energia
Botão do Menu
Lado Frontal da
Caixa Sanitária
Lado Traseiro da
Caixa Sanitária
Leia atentamente todo o Manual de Instruções antes de utilizar e manter o produto.
PURA X
MANUAL DE INSTRUÇÕES
O logo da PETKIT sempre
deve estar na parte frontal.
LOCKED
SUBSTITUIR A TAMPA DA LITEIRA
1. Localize o fecho atrás da liteira e gire-o no sentido anti-horário.
2. Devolva a tampa à caixa sanitária. (* Ao recolocar a tampa, o logotipo da PETKIT deve aparecer na
abertura frontal da caixa sanitária.)
85
ITENS DO MENU
90
Premir uma vez: Selecionar item do menu
Botão OK
Como usar o menu: premir uma vez vai acessar o menu. O ecrã vai exibir diferentes funções para seleção.
Prima uma vez OK para selecionar a função.
Premir uma vez: Acesso ao menu
Manter premido: Ligar, desligar.
Botão MENU
Ecrã OLED
Iniciar a limpeza da
caixa sanitária
Solução aerosol para
eliminação de odor
Esvaziar por completo o resíduo
da caixa coletora de resíduos
Distribuir uniformemente
o sanitário para gatos
O cilindro vai retornar
à posição original
A caixa sanitária está conectada
ao Wi-Fi, pode ser usado
para atualizar a rede
Clean now
Deodorize now
Empty cat litte
Level cat litter
Reset figure the netw
Pegue no cabo adaptador e conecte-o na entrada inferior atrás da liteira, mesmo quase no fundo do
dispositivo. Depois ligue o cabo à tomada elétrica.
LIGUE O CABO DE ENERGIA E COMECE A USAR
88
COLOCAÇÃO DA ALMOFADA SANITÁRIA
87
Estique o tapete de areia para gato e coloque os dois pés frontais da liteira na zona alaranjada do tapete
e na mesma distância entre o lado esquerdo e o direito. Caso este passo não seja executado de acordo
com as instruções, pode levar à ineficácia da função de deteção de líquido no dispositivo de remoção de
odores e afetar negativamente a vida útil do dispositivo de remoção de odores.
* A área laranja na almofada sanitária é a faixa indicadora do sensor térmico. Se o gato entrar nesta área,
o sensor vai detectá-lo e o dispositivo vai parar automaticamente.
Se a almofada sanitária está fixada
corretamente, a área laranja destaca
a faixa indicadora do sensor térmico.
Caixa coletora
de resíduos
Aro do saco
de resíduos
Hastes do saco
de resíduos
INSTALAR O SACO DE LIXO
86
* Assegure de fixar o saco de resíduos corretamente e achatar suas bordas, caso contrário, o dispositivo
não vai detectar a quantidade de urina na caixa sanitária.
1. Remova por completo a caixa coletora de resíduos.
3. Abra o saco de resíduos com a abertura
totalmente voltada para cima e use as quatro
hastes para fixá-lo à caixa
coletora de resíduos.
4. Coloque a aro do saco de resíduos para
prendê-lo na posição e coloque a caixa
coletora de resíduos de volta ao fundo da
caixa. * Ao colocar o aro do saco de resíduos,
assegure que o lado frontal da aro do saco
está voltada para frente.
2. Destaque a aro usado para prender o saco
de resíduos à caixa coletora.
Digitalize para fazer
o Download do
APP “PETKIT”.
USO DO APP
89
1. Digitalize o código QR para fazer o download
do APP da PETKIT. Após o registo no APP, siga
as instruções fornecidas em sua Conta para
usar a Caixa Sanitária Automática Smart para
Gatos da PETKIT.
2. 2.Use a App para obter informações em tempo
real e notificações sobre o peso do gato, bem
como o tempo e a frequência de utilização da
liteira.
*A limpeza automática e periódica pode ser a
cessada somente através do APP.
Smart settings
The device will pause when pets approach while it is cleaning,
and resume automatically when pet departs
The device will clean automatically after a
pet has used it
Clean automatically
3 Actions total
Clean periodically
2 Actions total
Periodic odor removal
Time to wait to begin cleaning after pet has
departed
Wait time 3min
Interval between automatic
cleanings, the device will not clean
if less than this time
Interval time Do not limit
Not enabled
Enabled
A
Tampa flexível
de plástico
ADICIONAR O LÍQUIDO PURIFICADOR
* Para assegurar a eliminação do odor, use somente a “Solução Concentrada PETKIT na Caixa Sanitária
Automática Smart para Gatos da PETKIT”.
1. Retire a tampa flexível plástica laranja
do dispositivo de eliminação de odor
toda a solução concentrada do
frasco no dispositivo.
2. RColoque novamente a tampa flexível de
plástico e no dispositivo de remoção,
assegurando estar bem despeje presa.
82
DESCRIÇÃO DO PRODUTO
Vista de cima
da Caixa
Sanitária
Vista de cima da
Caixa Sanitária
(após a remoção
do cilindro)
Botão de abertura do cilindro
Entrada
Cilindro
Abertura da peça de
remoção do santário
Sensores de peso ntrada
Dispositivo de eliminação
de odor rada
Caixa coletora
de resíduos
79
REMOÇÃO DO CILINDRO
1. Para destravar o cilindro que contém a solução
concentrada, gire o botão de abertura do cilindro
no sentido horário. O botão de abertura está
localizado na ponta do cilindro, na parte traseira
da caixa sanitária.
* Se a tampa ainda estiver na caixa sanitária,
retire-a deslizando antes de remover o cilindro.
2. Levante o produto com as duas mãos, como
se indica na figura.
TravadoCilindro
81
UNLOCK
FAZER O SCAN DO CÓDIGO QR E ASSISTIR AO
VÍDEO DE CONFIGURAÇÕES
Digitalize o código QR para assistir ao
vídeo de instalação e utilização da caixa
sanitária.
80
INSTALAR O CILINDRO E COLOCAR A AREIA
SANITÁRIA
1. Levante o produto com as duas mãos, reinstale o cilindro na parte de trás da liteira.
83
INSTALAR O CILINDRO E COLOCAR A AREIA
SANITÁRIA
2. Despeje a quantidade do sanitário para gatos na porta de abertura do cilindro rotatório, que é
utilizado para remover os resíduos. (Assegure de despejar a quantidade necessária. Esta quantidade de
sanitário para gatos não deve exceder o Nível MÁX indicado na parte interna do cilindro rotatório.)
Nível MÁX
A quantidade do sanitário
para gatos não deve exceder
o nível indicador MÁX.
“Nível Vazio do Sanitário”
* O “Nível Vazio do Sanitário” corresponde à capacidade da caixa coletora de resíduos.
Se a quantidade do sanitário para gatos for inferior ao “Nível Vazio do Sanitário”, esvazie a caixa sanitária premindo o botão
uma vez apenas. Após premir o botão, o cilindro vai girar e despejar o resíduo restante.
1. Não permita que os gatos entrem na caixa sanitária durante o processo de esvaziamento do sanitário ou interrompa o
processo de uma forma adequada.
2. Antes de esvaziar o sanitário usando o Botão "Esvaziar Sanitário", verifique se a caixa coletora de resíduos tem espaço
disponível.
3. Não desligue o dispositivo nem remova o cabo de energia durante o processo de esvaziamento do sanitário.
84
id is not closed
r barrel not loc is in the litter
re, check the d
Cat weight
kg%
emaining cat litt
INSTRUÇÕES DO STATUS NO ECRÃ
91
Percentagem de
areia sanitária
remanescente
Estado da
rede
Tempo de
utilização diária O peso do gato
*Por favor, selecione o
tipo certo de areia
através da App. Um
tipo diferente de areia
irá afetar a precisão.
Por favor, verifique se a
tampa está corretamente
fechada.
Por favor, coloque o cilindro
de forma correta e gire o
fecho para a posição
de BLOQUEIO.
Se o gato se apoximar ou
entrar na caixa sanitaria
durante a operação,
esta vai parar
imediatamente e
enviar uma notificação.
Para mais informações
sobre avarias, por favor,
verifique a App.
FAZER O SCAN DO CÓDIGO QR E ASSISTIR AO
VÍDEO DE LIMPEZA
Digitalize o CÓDIGO QR para assistir ao
vídeo de limpeza da Caixa Sanitária.
92 96
Eliminação
A Diretiva da União Europeia 2002/96/CE, sobre os resíduos de equipamentos elétricos e eletrónicos (WEEE),
exige que os eletrodomésticos não devem ser descartados em lixos urbanos não separados. Aparelhos antigos
devem ser recolhidos separadamente de modo a otimizar a recuperação e reciclagem dos materiais e reduzir o
impacto sobre a saúde humana e o ambiente. O símbolo riscado de "contentor com rodas" no produto lembra a
sua obrigação de, ao eliminar o aparelho, este deve ser recolhido seletivamente. Os consumidores devem entrar
em contacto com as autoridades locais ou revendedores para obter informações sobre o descarte correto dos
seus aparelhos antigos.
Retire o cilindro periodicamente para executar a limpeza.
93
LIMPEZA DO PRODUTO
2. Etapas para executar a remoção do cilindro:
1. “Botão de Esvaziamento do Sanitário":
3. Remoção do filtro de rede:
* Antes de remover o cilindro para limpá-lo, recomenda-se aguardar até o nível do sanitário para gatos
decair abaixo do “Nível Vazio do Sanitário”.
Retire a tampa superior.
Gire o fecho para a posição de DESBLOQUEIO.
Levante o cilindro e retire-o.
Segure o filtro de rede (conforme a ilustração 1) e com
os dedos prima adentro da curva do filtro (conforme a
ilustração 2);
Após dobrar o filtro de rede, levante as hastes para
remoção.
4. Instalando o filtro de rede:
① Assegure que o ponto A do filtro de rede está preso no local
e com os dedos prima adentro da curva do filtro de rede;
② Quando o filtro de rede estiver bem dobrado, prenda o
Ponto B ao local.
Figura 1
Figura 2
Ponto b
Ponto a
Para esvaziar o sanitário imediatamente, evite a entrada do gato na durante o processo de esvaziamento. (* Nota: o cilindro
pode inclinar facilmente se estiver cheio de resíduos. Aguarde o nível residual baixar para removê-lo. Preste atenção ao nível
residual, que não aparece no “Nível de Sanitário Vazio”, identificado pelo símbolo de lixo dentro do cilindro. Verifique também
o espaço restante na caixa coletora de resíduos.
ESPECIFICAÇÕES
Nome do Produto Caixa sanitária autolimpante para gatos PURA X PETKIT
P9901
504mm X 523mm X 642mm
Código do Produto
Dimensões do Produto
Peso Total
Tensão
Potência
15kg (adaptador de energia incluso)
12V
Uso recomendado para Gatos
24W
95
Q: Por que é que o ecrã está desligado?
R: O ecrã entra no modo de protecao do ecrã e exibe um logotipo dinâmico da PETKIT quando o produto não
está em operação durante algum tempo. O ecrã também irá se desligar quando a App o desligar. Você também
pode modigficar o nível do brilho.
Q: Como utilizar as definições inteligentes da App?
R: Estas configurações inteligentes para sanitários felinos possuem limpeza automática, conjunto de limpeza
e desodorização regular; se há poucos gatos na família (até 3), recomenda-se usar a função de limpeza
automática. Recomenda-se usar a função de limpeza definida para evitar a execução muito frequente da
limpeza; o dispositivo desodoriza automaticamente durante o processo de limpeza, e a desodorização
regular pode ser aplicada de acordo com as circunstâncias.
FAQ (PERGUNTAS FREQUENTES)
94
P: Por que é que as roldanas giram mesmo sem eu ter feito nada?
executar nenhuma operação?
R: Porque o dispositivo detecta automaticamente a posição entre os rolos e os retorna às suas posições originais.
P: Por que é que aparece uma notificação de que a tampa não está no seu lugar quando coloco a tampa na
unidade principal?
R: Verifique se a tampa superior da unidade principal está fixada corretamente. (O logotipo da PETKIT deve
aparecer no lado do ecrã)
P: Quando o sistema de sensores deteta algum movimento de objetos próximos, ele desliga a operação por
questões de segurança.
R: Enquanto os roletes estão a operar, o dispositivo vai iniciar o monitoramento de segurança durante todo
o processo. Se o animal está nas prroximidades ou entrar no local, o dispositivo vai interromper
imediatamente a operação e vai continuar automaticamente após a liberação da segurança. O ecrã de
exibição também vai mostrar um aviso correspondente. Há uma cerca de segurança invisível na entrada da
caixa coletora de resíduos. Quando alguém se aproxima, a operação é interrompida.
P: Será que pode acontecer que o caixote esteja cheio mas nada seja exibido no ecrã?
R: Os sensores no topo do caixote detetarão se o caixote está cheio ou não. Para não bloquear os sensores,
aperte o saco de lixo para baixo até ao anel.
FAQ (PERGUNTAS FREQUENTES)
Português
100
1. xSecure - 6 Niveles de Seguridad
3. Eliminación de Olores Antibacterianos
(uso del Dispositivo de Eliminación de Olores
y Solución Concentrada)
Mediante la verificación experimental, este producto ha
demostrado ser efectivo para eliminar los olores
desagradables y Formaldehído, al tiempo que mata las
formas comunes de bacterias dañinas (Bacilo del Colon,
Estafilococo áureo, Pseudomonas Aeruginosa, Candida
Albicans, Salmonela tifimuria,
klebsiella Pneumoniae, etc.).
2. Uso Múltiples tipos de Arena para Gatos
La Red de Filtro de Arena para Gatos es eficaz para
filtrar tanto la arena de las plantas como la arena de
bentonita, así como las mezclas de las arenas.
FUNCIONES
Sensor Térmico: El producto estará suspendido cuando el Gato entra.
Sensor Infrarrojo:La entrada está equipada con un Sensor Infrarrojo que detendrá el funcionamiento del producto al
detectar un Gato cerca.
Sensor de Peso: El interior de la litera está equipado con 4 Sensores de Peso. Si un Gato entra en la litera, estos sensores
detectarán al Gato y cesarán el funcionamiento.
Sensores Infrarrojo Antiatrapamiento:Hay dos pares de Sensores Infrarrojos instalados en la parte inferior dentro de la litera.
Detección Inteligente,Alertas Remotas:Se usa la APP para obtener actualizaciones inteligentes y alertas tempranas de
actividad anormal.
Sistema de Protección contra Accidentes: El Sistema de Sensores se activará antes de operar. El producto se apagará y
enviará una alerta si alguno de los sensores no funciona correctamente.
Sensor de Peso
Odor-removal device
Sensor de Seguridad Anti-Pinch
Sensores de
Seguridad de Entrada
Sensor infrarojo
TABLA DE CONTENIDOS
Un mensaje para nuestros Apreciados Clientes
Guía de Seguridad del Usuario
Funciones
Lista de Empaque
Descripción del Producto
Escaneo del Código QR para ver el Video de Configuración
Sacar el Cilindro
Agregar el líquido purificante
Instalar el Cilindro y vierta la Arena
Instalar la bolsa de residues
Insertar la Alfombrilla de Arena
Conectar el Cable Eléctrico para comenzar a utilizar
Uso de la APP
Opciones de Menú
Guía de Estado de Pantalla
Escaneo del Código QR para ver el Video de Limpieza
Limpieza del Producto
Preguntas más Frecuentes
Especificaciones
99
99
100
101
102,103
104
105
106
107,108
110
Reemplazar la tapa de la litera 109
111
112
113
114
115
116
117
118,119
119
UN MENSAJE PARA NUESTROS APRECIADOS
CLIENTES
GUÍA DE SEGURIDAD DEL USUARIO
· Gracias por elegir comprar la Litera de Autolimpieza para Gatos PETKIT PURA X. Nosotros PETKIT hemos
hecho todo lo posible para facilitarle la vida a usted y de su mascota mediante el milagro de la Tecnología.
· Antes de usar este producto, por favor debe leer detenidamente el Manual de Usuario. Al configurar y
usar este producto, reconoce que ya ha leído y acepta las medidas de seguridad que mencionadas
a continuación.
· No somos responsables ni aceptaremos responsabilidades por accidentes o lesiones que resulte del uso
incorrecto de este producto.
· Con referente a este aviso, nos reservamos el derecho de interpretación y revisión.
* El incumplimiento de las Medidas de Seguridad descritas a continuación puede ocasionar un mal
funcionamiento del Producto u otros contratiempos sin Tensión.
· Por favor , debe instalar y usar el producto exactamente como se indica en el Manual de Uso.
· Las mascotas menores de 6 meses no deben usar este producto.
· Para uso en el interior exclusivamente. No exponer el producto a la luz solar directa durante largos
períodos de tiempo. No colocar cerca de fuego expuesto.
· Aunque este producto consume poca Energía, las mascotas pueden dañar el Cable de Alimentación si lo
mastican, evitando que el producto reciba Energía. Verificar de que las mascotas usen el producto
según lo previsto.
· Debe utilizar únicamente el Adaptador de Corriente suministrado. El uso de un Adaptador de corriente
diferente puede causar daños al producto o posibles riesgos de Seguridad.
· Verificar de que el producto pueda mantenerse nivelado. No incline el producto. De otra manera,la
solución concentrada puede derramarse o causar un mal funcionamiento del producto.
· No permita que la mitad inferior del producto se sumerja o sumerja en agua.
· Se deben realizar las reparaciones bajo la orientación de un Profesional para evitar riesgos de seguridad.
· Cuando necesite irse por un largo período de tiempo, asegúrese de que haya suficiente espacio en el
recipiente de recolección de residuos.
· Si enfrenta algún problema mientras usa este producto, por favor debe contactarse con nosotros de
inmediato.
99
LISTA DE EMPAQUE
Caja de Arena X 1
Alfombrilla X 1 Adaptador de Corriente X 1
(en la Caja de Accesorios)
Solución Concentrada X 4
(en la Caja de Accesorios)
Bolsa de Residuos X 1
(en la Caja de Accesorios)
Tapa de la Caja de Arena X 1
101
DESCRIPCIÓN DEL PRODUCTO
102
* Nota: A fin de mejorar la Calidad de
nuestros productos, implementaremos
mejoras periódicas del producto. Las
imágenes del Producto que se muestran
son solo para Fines ilustrativos. El
Producto Real puede variar de la imagen
que se muestra en la Caja. Para
cualquier discrepancia, consulte el
Producto de Serie.
Pulsación Corta: Elegir
opción de Menú
Pulsación Corta: Menú Negativo
Pulsación Larga: Encender o Apagar
Botón de Desbloqueo
del Cilindro
Contenedor de recolección
de residuos
Entrada
Botón OK
Pantalla OLED
Tapa de la Caja de Aren
Caja de Arena
Mango
Entrada de Energía
Botón de Menú
Frente de la
Caja de Arena
Parte Trasera de
la Caja de Arena
Por favor, leer el Manual con mucho cuidado antes de usar el producto y guárdelo adecuadamente.
PURA X
MANUAL DE INSTRUCCIONES
El logo de "PETKIT" siempre
debe mirar hacia adelante.
LOCKED
REEMPLAZAR LA TAPA DE LA LITERA
1. Girar el Bloqueador hacia la izquierda que se encuentra en la parte posterior de la litera para Gatos.
2.Colocar la tapa de nuevo en la Caja de Arena. (* El logo de PETKIT debe mirar hacia la abertura frontal
de la Caja de Arena una vez que se vuelva a colocar la tapa).
109
OPCIONES DE MENÚ
114
Pulsación Corta: Elegir opción de Menú
Botón OK
Cómo usar el Menú. Presionar brevemente el Botón de Menú para Navegar por el Menú. La pantalla
mostrará diferentes funciones para elegir. Presione OK brevemente para elegir una función.
Pulsación Corta: Navegar por el Menú
Pulsación Larga: Encender,Apagar
Botón de Menú
Pantalla OLED
Comenzar a limpiar
la Caja de Arena
Solución en Spray
para eliminar olores
Volcar toda la arena para gatos
en el contenedo de residuos
Distribuir uniformemente
la arena para gatos
El Cilindro volverá a girar
a su posición original
La Caja de Arena está conectada
a Wi-Fi ,puede usarse
para Actualizar la Red
Clean now
Deodorize now
Empty cat litte
Level cat litter
Reset
figure the netw
Tome el Adaptador de Cable y colóquelo en la ranura inferior en la parte posterior de litera, que está
cerca de la parte inferior. Luego, conéctelo a una Toma de Corriente.
CONECTAR EL CABLE ELÉCTRICO PARA
COMENZAR A UTILIZAR
112
INSERTAR LA ALFOMBRILLA DE ARENA
111
Extienda la alfombrilla de arena y coloque las dos bases delanteras de la caja de arena en la zona naranja
de la alfombrilla, y mantenga la misma distancia entre la izquierda y la derecha. Si este paso no se realiza
según las instrucciones, puede provocar que la función de detección de líquidos del dispositivo de
eliminación de olores sea ineficaz e influir en la duración general del dispositivo.
* El área naranja en la alfombrilla es el rango efectivo del sensor térmico. Una vez que el gato ingrese a
esta área, el sensor lo reconocerá y el dispositivo dejará de funcionar de forma automática.
Cuando la alfombrilla de arena
está instalada de forma correcta,
el área naranja indica el Rango
efectivo del Sensor Térmico.
Contenedor de
recolección
de residuos.
Anillo de la bolsa
de residuos
Ganchos para
bolsas de residuos
INSTALAR LA BOLSA DE RESIDUES
110
* Debe verificar de haber instalado la bolsa de residuos correctamente y aplanar los bordes de la
bolsa. De otra manera, puede influir en la capacidad del dispositivo para detectar la cantidad de
orina en la Caja de Arena.
1. Sacar todo el contenedor de residuos.
3. Abrir la bolsa de basura por completo hacia
arriba y cuélguela de los cuatro ganchos de
la bolsa de basura ubicados en el contenedor
de recolección de residuos.
4. Colocar en el anillo de la bolsa de residuos
para asegurar la bolsa de residuos en su lugar
y recolocar el contenedor de recolección de
residuos en el fondo de la caja de arena.*
Cuando coloca el anillo de la bolsa de residuos,
debe estar seguro de que el frente del anillo de
la bolsa de residuos esté orientado hacia
adelante.
2. Separar el anillo utilizado para asegurar la
bolsa de basura en el contenedor de
recolección de residuos.
Escanee para poder
Descargar la APP
"PETKIT"
USO DE LA APP
113
1. Escanee para poder Descargar la APP
PETKIT. Después de registrarse en la APP,
luego debe seguir las indicaciones de su
cuenta a su Caja de Arena Automática
Inteligente PETKIT para Gatos
2. Utilizar la App para obtener Información y
Notificaciones en tiempo real acerca del peso del
Gato, así como el tiempo y la frecuencia de uso
de la litera.
* La limpieza automática y la limpieza periódica
solo se puede acceder a través de la APP.
Smart settings
The device will pause when pets approach while it is cleaning,
and resume automatically when pet departs
The device will clean automatically after a
pet has used it
Clean automatically
3 Actions total
Clean periodically
2 Actions total
Periodic odor removal
Time to wait to begin cleaning after pet has
departed
Wait time 3min
Interval between automatic
cleanings, the device will not clean
if less than this time
Interval time Do not limit
Not enabled
Enabled
A
Tapa de
Plástico Blando
AGREGAR EL LÍQUIDO PURIFICANTE
* Para garantizar la Efectividad de la Extracción de la puerta,por favor debe utilizar únicamente la
"Solución Concentrada PETKIT para la Caja de Arena Automática Inteligente PETKIT para Gatos".
1. Retirar la tapa naranja de plástico blando del
dispositivo de Eliminación de Olores y vierta
toda la botella de Solución Concentrada en el
dispositivo de Eliminación de Olores.
2. Vuelva a colocar la tapa de plástico blando
en el dispositivo de eliminación de olores,
asegurándose de que esté bien sujeto.
106
DESCRIPCIÓN DEL PRODUCTO
Vista Superior de
la Caja de Arena
Vista Superior de
la Caja de Arena
(después de
quitar el Cilindro)
Botón de Desbloqueo del Cilindro
Entrada
Cilindro
Apertura de Eliminación
de residuos
Sensores de Peso
Sensores de Peso
Dispositivo de Eliminación
de Olores
Contenedor de
recolección
de residuos
103
SACAR EL CILINDRO
1. Para desbloquear el cilindro que contiene
la solución concentrada, gire el Botón de
Desbloqueo del Cilindro hacia la derecha. El
Botón de Desbloqueo se encuentra en el
extremo del Cilindro en la parte posterior de
la Caja de Arena.*Si la tapa aún no se ha
retirado de la Caja de Arena, asegúrese de
retirarla deslizándola antes de sacar el Cilindro.
2. Debe usar ambas manos para levantar hacia
arriba como se indica en la imagen.
Bloqueador del Cilindro
105
UNLOCK
ESCANEO DEL CÓDIGO QR PARA VER EL VIDEO
DE CONFIGURACIÓN
Escanee el código QR para ver un video
sobre cómo configurar y usar su caja
de arena.
104
INSTALAR EL CILINDRO Y VIERTA LA ARENA
1. Debe usar ambas manos para levantar hacia arriba, reinstale el Cilindro en la parte posterior de la
litera para Gatos.
107
INSTALAR EL CILINDRO Y VIERTA LA ARENA
2. Vierta la Arena para gatos en la abertura del Cilindro Giratorio que se utiliza para dispensar la arena
(verificar de no colocar demasiada arena para gatos. La cantidad de arena para gatos no debe exceder
la línea MAX indicada dentro del Cilindro Giratorio).
Línea MAX
La cantidad de Arena para
gatos no debe exceder
la línea que dice MAX
La "Línea de Literia Vacía"
* La "Línea de Literia Vacía" está determinada por la capacidad del Contenedor de Recolección de Residuos.
Cuando la cantidad de arena para gatos restante caiga por debajo de la "Línea de Literia Vacía", la Caja de Arena le permitirá
vaciar la arena con solo presionar un Botón. Una vez que presione el botón, el Cilindro girará, vertiendo los residuos restantes.
1.Por favor ,no debe permitir de que los gatos ingresen a la caja de arena durante el proceso de vaciado de arena ni tampoco
debe interrumpir el proceso de ninguna forma.
2. Antes de vaciar el residuo con el "Botón para vacíar Literia ", asegúrese de que el contenedor de recolección de residuos
tenga suficiente espacio disponible.
3. Por favor ,no debe apagar el dispositivo ni retirar el cable de alimentación durante el proceso de vaciado de la basura.
108
猫在厕所内
GUÍA DE ESTADO DE PANTALLA
115
Porcentaje de
Arena restante
para Gatos
Estado de la Red
Tiempos de
uso diariamente El peso del Gato
*Por favor ,debe elegir
el tipo adecuado de
Arena para Gatos
mediante la App. Los
diferentes tipos de
Arena para Gatos
variarán la precisión.
Por favor, debe
comprobar
si la cubierta es
colocada de forma
correcta.
Por favor,debe colocar el
Cilindro correctamente y
girar el Bloqueador en
la posición "LOCKED".
Si el Gato se acerca
o ingresa a la caja
de arena mientras
está en funcionamiento,
la caja de arena dejará
de funcionar de forma
automática y enviará
una Notificación.
Por favor, debe consultar
la App para obtener
más información sobre
el mal funcionamiento.
%
emaining cat litt
Cat weight
kg
id is not closed
r barrel not loc is in the litter
re, check the d
ESCANEO DEL CÓDIGO QR PARA VER EL VIDEO DE
LIMPIEZA
Escanee el código QR para ver un video
sobre cómo configurar y usar su caja
de arena.
116 120
Eliminación
La directiva europea 2012/19/CE sobre Residuos de Aparatos Eléctricos y Electrónicos (RAEE), exige que los
aparatos eléctricos domésticos viejos no se eliminen en el flujo normal de residuos municipales sin clasificar.
Los aparatos viejos deben recogerse por separado para optimizar la recuperación y el reciclaje de los materiales
que contienen y reducir el impacto sobre la salud humana y el medio ambiente. El símbolo del "contenedor con
ruedas" tachado en el producto le recuerda su obligación, que cuando se deshaga del aparato debe ser recogido
por separado. Los consumidores deben ponerse en contacto con las autoridades locales o con su distribuidor
para obtener información sobre la correcta eliminación de su aparato viejo.
Quitar el Cilindro periódicamente para realizar la Limpieza.
117
LIMPIEZA DEL PRODUCTO
2. Pasos para quitar el Cilindro:
1. El "Botón para vacíar los Residuos":
3. Para eliminar la Red tamizada:
*Se recomienda esperar hasta que el nivel de Arena para Gatos haya descendido por debajo de la "Línea
de Literia Vacía" antes de retirar el cilindro para limpiarlo.
Quitar la Cubierta Superior.
Girar el "Bloqueador" a la posición UNLOCKED
Levantar el Cilindro hacia arriba y sáquelo.
Agarrar la Red tamizada (mostrada en la Imagen 1),
y use sus dedos para presionar hacia adentro en la
Curva de la Red de tamizado (mostrada en la Imagen 2);
Después de doblar la Red de tamizado, levantar
los ganchos para retirarlos.
4. Instalación de la Red de Tamizado:
Verificar de que el Punto A de la Red de tamizado esté
firmemente en su lugar, luego use sus dedos para presionar
hacia adentro en la curva de la Red de tamizado;
Una vez que la Red de tamizado esté suficientemente
doblada, asegure el Punto B en su lugar.
Imagen 1
Imagen 2
Punto B
Punto A
Para vaciar los residuos lo más rápido posible, no permita que el Gato ingrese a la Caja de Arena mientras el proceso de
vaciado está en marcha. (* Nota: el Cilindro puede inclinarse fácilmente cuando está lleno de residuos. Espere hasta que el
nivel de residuo haya bajado antes de retirarlo. Cuidadosa tome nota del nivel de residuos que se muestra en la "Línea de
Literia Vacía" ubicada junto al símbolo de residuo o en el interior de Cilindro. También debe verificar el espacio restante en el
Contenedor de recolección de residuos.)
ESPECIFICACIONES:
Nombre del Producto Litera de Autolimpieza para Gatos PETKIT PURA X
P9901
504mm X 523mm X 642mm
Código de Producto
Dimensiones del Producto
Peso Total
Voltaje
Potencia
15 kg. (incluyendo el Adaptador de Corriente)
12V
Se recomienda su uso para Gatos
24W
119
P: ¿Por qué está apagada la Pantalla de Visualización?
R: La pantalla de visualización entrará en el Modo de Protección de Pantalla con un logo de PETKIT dinámico
cuando el producto no esté funcionando durante un largo período de tiempo. La pantalla también se
apagará cuando la App lo apague. Usted también puede modificar el nivel de Brillo.
P: ¿Cómo utilizar la Configuración Inteligente de la App?
R: Que los Ajustes Inteligentes para los inodoros para gatos incluyen limpieza automática, limpieza establecida
y desodorización regular; cuando hay pocos gatos en la familia (dentro de 3), recomendamos usar la función de
limpieza automática. Recomendamos usar la función de limpieza establecida para evitar la limpieza también
con frecuencia, el dispositivo se desodorizará de forma automática durante el proceso de limpieza, y se puede
aplicar una desodorización regular según las circunstancias.
PREGUNTAS MÁS FRECUENTES
118
P: ¿Por qué giran los rodillos cuando no he realizado ninguna operación?
R: La máquina detecta de manera automática la posición entre los rodillos y los devuelve a las posiciones
originales.
P: ¿Por qué se muestra un mensaje de que la tapa no está colocada cuando coloco la tapa en la unidad
principal?
R: Debe comprobar si la tapa superior de la unidad principal está colocada de forma correcta. (El logo de
PETKIT debe estar en el lado de la Pantalla)
P: ¿Por qué los rodillos se detienen cuando están funcionando?
R: Cuando el Sistema de Sensores detecta sujetos en movimiento cercanos, este apagará el funcionamiento
por seguridad.
P: El recipiente de recolección de residuos se llenará incluso si no se muestra la Pantalla?
R: Los Sensores en la parte superior del recipiente detectarán si está lleno. Para evitar bloquear los
sensores, apriete la bolsa de residuos hasta el anillo.
PREGUNTAS MÁS FRECUENTES
Español
124
1. xSecure - 6の安全
3. 細菌防止の除Junichi(除臭装置と濃縮液使用)
の製品は、実験検証を不快な臭いルムルデ
除去のに有効であが証明一方一般的な
形態の有害な細菌(大腸菌、黄色球菌、緑膿菌カ
ン ス 、ネ ズ ミ チ フ ス 、肺
2. 複数の種類の猫砂使用
砂 フル タ ー ネ ット 豆 腐 ペ レットと ベ ント ナ イト
の両方の猫砂との混合物を使用た猫砂の
ずれろ過するのにあります
機能性
① 熱セサー安全筐体: 透明な安全筐体が入口を保護製品が動作る間に猫がの筐体に入た場合、製品は動作
停止
入口を守る赤外線セサー: 入口には赤外線セーを搭載に猫が感知す製品の動作を停止さ
③ 重量セサー:猫砂ボの内部には、4つの重量セーを搭載いま猫が猫砂ボに入た場合、これのセサー
が猫を感知本製品の動作を停止
挟ま防止赤外線セー: 猫砂ボの内側の底面には、2組の赤外線セサーが設置れて本製品が動作てい間、
猫が近づに停止
マー検出、モー: ア使プデや異常活動の早期ラー取得
⑥ 事故保護シ: 電源を入れ動作前に毎回、製品はセサームのそれぞれを起動さの理由
のセーシムのずれかが故障た場合製品は動作を停止直ちを送信
センサ
除臭装置
挟ま防止安全セ
入口安全セ
赤外線セ
目次
大切なお客様へのージ
利用者安全ガ
機能性
梱包内容
製品の説明
QRコー猫砂ボの設定と使用方法のビデオ見る
シリン ダー の 取 り
濃縮液の追加
回転ーを挿入猫砂を投入す
ゴミ袋り付
猫砂パ挿入
電源コー込み、使用を開始す
アプリの使
メニュ
テ ー タス 表 イド
QRを猫砂ボスの清掃方法のビデオ見る
製品の清掃
よくあ る ご 質
仕様:
123
123
124
125
126,127
128
129
130
131,132
134
猫砂ボバー交換133
135
136
137
138
139
140
141
142,143
144
大切なお客様へ
利用者安全
· の度は「PETKIT PURAX セーニ猫砂ボ購入いただた。
当社PETKITでは、奇跡の技術皆様と生活を快適にために最善をた。
· 本製品を使用に前に取扱説明書をお読みださ本製品を設定て使用お客様は、
以下の安全対策を既にお読みにな同意されたみなれま
· 本製品を使用事故や怪我に当社は一切の責任を負い責任を受け入れまん。
· の通知に関当社は解釈おび修正の権利を留保
* 以下の安全対策をらな製品の故障不測の事故つなが可能性があ
· 製品は取扱説明書に記載さる通に設置使用ださ
· 6か月未満の年齢のペの製品を使用ないださい。
· 屋内での使用に製品を直射日光に長時間ないださ直火のに置かださ
· 本製品は低電流を使用ていが、噛む電源コー傷つまい電源が入
が製品の目的通製品を使用確認ださ
· 付属の電源アーの使用ださ別の電源ーを使用製品の破損や安全上の問題
が発生可能性が
· 製品が水平を確認ださ製品を傾けなださい。濃縮液が流出
製品の故障の原因があ
· 製品の下半分を水に浸けないださ
· 修理は、安全上の危険回避すため専門家の指導に必要が
· 休みの日長時間の外出時には、ク猫砂ボに十分な量の猫砂が入てい
収集容器に十分なペーがあかを必ず確認ださい。
· ご使用中に不具合が発生場合は、連絡ださい。
123
梱包内容
X 1
X 1 X 1
()
X 4
()
X 1
()
X 1
125
製品の説明
126
*注記:製品の品質向上ため定期的な製
品改良を実施てい掲載さてい
商品画像はイージ実際の商品はボ
に記載れてる画像異なる場合が
差異があ場合は、実際の製品を
準 として参 照してくだ さい 。
:
:
: /
シリン ダー 解 除 ボ
収集容器
入口
OKタン
LED デ画面
猫 砂 ボックバ ー
猫 砂 ボック
握り
電源入力
メニューボタ
猫 砂 ボック
の前面図
猫 砂 ボック
の背面図
本製品の使用前に取扱説明書をお読みにな保管ださ
PURA X
取扱説明書
PETKITのゴは常に前方
いてるこ
LOCKED
のカバ換する
1. 猫砂ボックスの背面にある解除ボタンを反時計回りに回転させ、シリンダーを所定の位置にロックする
必要があります。
2. 猫砂ボックス上にカバーを戻してください。(*PETKITのロゴは、カバーを交換した後、猫砂ボックスの
前面開口部の方を向いているようにしてください。)
133
ニュー
138
短押: ー項目を選択
OKタン
ーの使方: ーボ押すーが表示れま画面には様々な機能が表示され選択
OKを短押て機能を選択
短押: ーの案内
長押: 電源オン/オ
メニューボタ
有機ELデ
猫 砂 ボック
の清掃を開始
除臭液をーす収 集 ボック
べててる
猫砂を均等に分配る シーは回転
りま
猫砂ボスは Wi-Fiに
、ネ ッ ト
を更する使できます
Clean now
Deodorize now
Empty cat litte
Level cat litter
Reset
figure the netw
コードアダプターを取り、底部付近にある猫砂ボックスの背面の電源スロットに取り付けます。
コードのプラグの端を取って、電源コンセントに差し込みます。
電源コー込み、使用を開始
136
ドを入す
135
リターパッドを広げ、リターパッドのオレンジ色の部分にリターボックスの2本の前脚を置き、左右の間隔を
同じ幅に保ちます。この手順が指示通りに行われないと、脱臭装置の液体検知機能の効果がなくなり、 脱臭
装置の寿命に影響を与える場合があります。
* 猫砂パンジ色の領域が温度セサーの効果的な範囲をの領域に猫が入るサー
認識れ、装置が自動的に動作を停止
砂 パッド が 正 しく取 り 付 ら れ る と 、
オレン
の有効範囲を表示
収集容器
ゴミ袋
ング
フッ
取り付
134
* 袋を正取り付け袋の端らにださい。でない場合、砂ボの中の尿の量を感知
装置の能力が低下可能性が
1. ゴミ収集ボックス全体を取り出します。
3. ゴミ袋を全開にして、ゴミ収集容器上にあ
る4つのゴミ袋フックに掛けます。
4. ゴミ袋のリングの上に乗せてゴミ袋を固定し、
ゴミ収集容器を猫砂ボックスの底に戻します。
*ゴミ袋リングを付ける際は、ゴミ袋リングの前
面が前方を向いていることを確認してください。
2. ゴミ袋をゴミ収集ボックスに固定するため使
われるリングを取り外します。
Qrコードをスキャ
ンして「PETKIT」
のアプリをダウン
ロードしてください
プリ使
137
1. QRコードをスキャンしてPETKIT アプリ
をダウンロードしてください。アプリで
登録した後、画面のプロンプトに従って
PETKITスマート自動猫砂ボックスへのア
カウントへ進んでください。
2. アプリを使って、猫砂のレベル、猫の体重、猫が
毎回どのくらいの時間猫砂ボックスを使うか、猫が
どのくらいの頻度で猫砂ボックスを使うかについて、
リアルタイムの情報と通知を取得することができます。
*自動クリーニングと定期的なクリーニングは、アプ
リからのみアクセスできます。
Smart settings
The device will pause when pets approach while it is cleaning,
and resume automatically when pet departs
The device will clean automatically after a
pet has used it
Clean automatically
3 Actions total
Clean periodically
2 Actions total
Periodic odor removal
Time to wait to begin cleaning after pet has
departed
Wait time 3min
Interval between automatic
cleanings, the device will not clean
if less than this time
Interval time Do not limit
Not enabled
Enabled
A
濃縮液の追加
* PETKIT PETKIT
1. 除臭装置のジ色の柔かい
製蓋を濃縮液ボル全部を注ぎ
2. 柔かいク製蓋を除臭装置に再度装着
し、っかりと固されていることを確認してさい
130
製品の説明
猫 砂 ボック
の上面図
猫 砂 ボック
上面図
ダーした)
シリン ダー 解 除 ボ
入口
シリン
猫砂除去用開口部
センサ
センサ
除臭装置
収 集 ボック
127
シリンり出
1. 濃縮液を保持ているシーのロを解除
には、ーの解除ボ時計回にね
ださい。解除ボンは、猫砂ボの背面
シリンります。*して
いないず覆いをさせ外してか
ー を 取くだ さい 。
2. シーを解除た後、両手で猫砂除去に使用
される開を閉じたままにンダーを上
す。
シリン ダー 解 錠 ボ
129
UNLOCK
QRコー猫砂ボの設定
使用方法の見る
QR
128
回転ンダーを挿入猫砂を投入
1. 両手で猫砂除去に使用される開口部を閉じたままにして、シリンダーを猫砂ボックスの背面に再
取り付けします。
131
回転ンダーを挿入猫砂を投入
2. 猫砂を子ディスペンスするのに使用される回転シリンダーの開口部に猫砂を投入します。(猫砂を入れす
ぎないように注意してください。猫砂の量は、回転シリンダー内に表示されているMAXラインを超えない
ようにしてください)。
MAXライン
猫砂の量はMAXと
イン
てはいけません
「猫砂を空にする目安ライン」
* 「猫砂を空に目安ラ収集ボの容量にて決ま
猫砂の残量が「猫砂を空に目安」下回一つを押すだけで猫砂を空にを押
が 回 転 して残 った ゴ ミを 捨 て てくれ ま
1. 猫砂を空に作業中に猫を猫砂ボに入れかので作業中断ないにお願い
2. 「猫砂を空に使用て猫砂を空に前に、収集ボに十分な空ペーがあ確認ださ
3. 猫砂を空にてい間は、装置の電源を電源コー抜いないださい。
132
ー タス 表 示 ガイド
139
猫砂の残量パ
センテ
ステタス
カバーがきちんと
れているか
確 認 してくだ さ
シリン ダー の 背
タン
ッ ク 」の
し て 、シ リ ン
所定の位置に
してくだ さ
動作中に猫が猫砂
ボックス に近 づ い
たり入ったりする
と 、猫 ボ ッ ク
自動的に動作を停止
通知を送信
故障の詳細につい
、ア リ を チ ェ
ックてくだ い 。
id is not closed
r barrel not loc is in the litter
re, check the d
Cat weight
kg%
emaining cat litt
猫が今日、何回、猫砂
ボックを 使 用 猫砂使用中の
の現在の体
QRを猫砂スの清掃方法の
ことす。
QRコー猫砂ボの清
ビデオをることができます
140 144
定期的にーをて清掃ださい。
141
製品の清掃
2.ーを取りプ:
1. 「猫砂を空にるボ:
3. 取りは:
*清掃のためにンダ前に猫砂ボスのレベルが「猫砂を空にる目安下回
します。
① 猫砂ボスの覆い
② シーの背面の解除ボ回転「解除」の位置にな
シリンダーを持ち上げて取り外しま
(絵1に表示つかみ指でいネ
(絵2に表示)内側に押込みま
ふるいネトを曲クを持ち上げて
します。
4. ふるいネトを取り付ける:
のA点が固定してい確認
からでふるいネッーブを押しむようにします。
が十分に曲がB点を所定の位置に固定
ます。
絵1
絵2
A点
B点
だけ早猫砂を空にには空にる作業中は猫を猫砂ボスに入れなださい。(※注記: 猫砂が満杯にな
ればシーは簡単に傾除去す前に猫砂レベルがンを下回で待ださい。ー内側のマー
にあ「猫砂を空に目安ラに表示さてい猫砂のレベルに注意ださい。た、収集ボに残てい
て く だ 。)
仕様:
製品名 PETKIT PURA X セーニ猫砂ボ
P9901
504mm X 523mm X 642mm
ード
製品寸法
総重量
電圧
電力
15kg(電源アダー含む)
12V
推奨れる利用対象 猫
24W
143
問い: デ画面が黒表示れるはなぜですか
答え: 通常、一定時間操作ない画面は画面保護状態に入クなPETKITゴが表示
されますアプリがデプレイ画を閉じるとされて黒くえますボタンを押すと
点灯夜間の光が睡眠に影響場合は、画面の明る変更
問い: アマー設定の使方は?
答え: の猫用マー設定には、自動清掃、清掃、定期的な脱臭が猫が少な家庭(3匹以内
は、自動清掃機能の利用すめ頻繁に掃除をすぎない清掃機能の利用すめ
清掃中は自動で脱臭状況に応定期的に脱臭がで
よくあ る 仕様:
製品名 PETKIT PURA X セーニ猫砂ボ
P9901
504mm X 523mm X 642mm
ード
製品寸法
総重量
電圧
電力
15kg(電源アダー含む)
12V
推奨れる利用対象 猫
24W
142
問い: 機械にローを置い何も操作ないローーが自動的に回転のはなぜすか
答え: 機械は、ローー間の位置を自動的に検出それ元の位置に戻
問い: 本体に蓋をだ本体の蓋が外れプロが出のはなぜか?
答え: 上蓋が本体に配置さか確認ださい。(PETKITの側に)
問い: 作業中にローが止のはなぜか?
答え: ローが作動てい間、装置がプロセス全体で安全監視プロムを開始が近
に作業を停止安全を解除後は自動的に継続画面には、対応
プロも表示収集ボの入口には、目に見え安全柵が誰かが近
操作は一時停止
問い: そ表示れないは、収集ボスが満杯にていか?
答え: 収集ボの上部には、満杯でかどかを検出ための一連のーが袋を
たらゴミ袋圧リングを絞っゴミ袋を押げ、ゴミ袋いてセンいようにして、
いようにします
よくあ る
日本語
148
1. xSecure六級防護安全可靠
3. 除菌除臭(除臭模組配合淨化液使用
經實驗證明本品可有效祛除異味和甲醛;消滅常見病菌
(大腸桿菌金黃色葡萄球菌、綠膿桿菌、白色念珠菌、秕糠
馬拉癬菌、鼠傷寒沙門氏菌、肺炎克雷伯氏菌等
2. 兼容多種貓砂
濾砂網可以過濾澎潤土、豆腐砂和混合砂(適合由澎潤土
及豆腐砂組成的混合砂)滿足不同的選擇。
產品特色
① 安全圍欄溫度感測器:入口沒有隱形安全圍欄機器運轉時若有貓咪進入此區域機器立即停止工作。
② 守門紅外線感測器模組:進門處沒有1對紅外線感測器機器運轉時若有貓咪靠近機器立即停止工作。
③ 秤重感測器模組:內桶沒有4個秤重感測器機器運轉時若有貓咪進入機器立即停止工作。
④ 防夾紅外線感測器模組:內桶底部沒有2對紅外線感測器機器運轉時若有貓咪靠近機器立即停止運作。
⑤ 智慧型偵測遠端告警:App訊息智慧提醒異常情況提早知道。
⑥ 意外防護機制:每次機器運轉前所有感測器自行檢查萬一恰巧有重要感測器意外失靈機器自動停止工作並及時提醒。
秤重感測器
除臭零件
防夾安全感測器
入口安全感測器
紅外線溫度感測器
目錄
敬告使用者
使用安全指導
產品特色
包裝清單
產品簡介
掃描觀看安裝使用教學影片
取出滾筒
新增淨化液
裝入滾筒然後倒入貓砂
套垃圾袋
安裝控砂墊
接通電源開始使用
App的使用
選單選項
指示狀態說明
掃描觀看清洗教學影片
產品清洗
FAQ
基本資訊
147
147
148
149
150,151
152
153
154
155,156
158
蓋上主機上蓋 157
159
160
161
162
163
164
165
166,167
168
敬告使用者
使用安全指導
· 感謝您選購小佩智慧型全自動貓廁所小佩致力於用科技為您和您的毛小孩創造更好的生活。
· 使用前請仔細閱讀本產品說明書。一經安裝或使用即表示您已仔細閱讀並接受下列安全指導。
· 由於違規操作而導致的任何意外及損失本公司概不負責亦不承擔任何法律責任。
· 本聲明的解釋權和修改權歸本公司所有。
* 不遵守下列條款可能導致產品無法正常使用或其他意外損失。
· 請嚴格按說明書安裝和使用裝置。
· 六個月內的幼寵禁止使用此裝置。
· 請在室內環境使用請勿放置在陽光直射的地方使用請遠離火源。
· 本裝置處於低電壓模式但寵物撕咬電線仍會引發漏電請正確引導使用。
· 請使用原廠變壓器否則會損壞裝置或者造成安全隱患。
· 保持水平放置請勿傾倒以免淨化液漏出或導致裝置異常
· 本產品主機底部禁止進水或泡水。
· 如長時間不使用或移動本產品請拔掉電源線。
· 如有兒童使用此裝置請確保在成人引導下使用。
· 請在專業人員的指導下進行維修以免造成各種傷害。
· 在小長假前請務必檢查智慧型貓廁所內貓砂是否充足以及集便盒內空間是否足夠。
· 如欲產品使用問題請及時聯繫客服。
147
包裝清單
主機 X 1
控砂墊 X 1 變壓器 X 1
(在配件盒內)
濃縮淨化液 X 4
(在配件盒內)
垃圾袋 X 1
(在配件盒內)
主機上蓋 X 1
149
產品簡介
150
*註:為了提供更好的產品我們會定期
進行產品改良。產品圖片與實物略有不
同時請以實物為準。
短按:進入選單功能。
短按:選擇感應器
長按:開機或關機。
滾筒鎖定旋鈕
集便盒
入口
OK鍵
OLED顯示器
主機上蓋
主機
把手位置
電源插口
選單鍵
主機正面
主機背面
使用產品前請仔細閱讀使用說明書並妥善保管.
小佩智慧型全自動貓廁所
使用說明書
「PETKIT」的標誌保持在前方
LOCKED
蓋上主機上蓋
1. 在主機背面逆時針旋轉滾筒鎖定旋鈕,確認滾筒固定好。
2. 蓋上主機上蓋(*注意上蓋安放的方向,「PETKIT」的標誌在主機入口上方位置)。
157
選單選項
162
S短按:進入選單功能
OK鍵
選單主要功能使用方式:短按選單鍵選擇感應器,螢幕顯示出要選擇的功能,短按OK鍵執行或進入該功能。
短按:選擇感應器;
長按:開機、關機。
選單鍵
OLED顯示器
貓廁所開始清理 貓廁所進行噴霧除臭 貓廁所會將滾筒內全部
貓砂傾倒至集便盒中
貓廁所開始撫平貓砂 貓廁所將滾筒
恢復至初始位置
貓廁所處於連線狀態
可用於更換網路
Clean now
Deodorize now
Empty cat litte
Level cat litter
Reset figure the netw
取出變壓器,把變壓器的接口插入主機背面底部的電源插口,然後將變壓器的插頭插入電源插座,接通電源。
接通電源開始使用
160
安裝控砂墊
159
鋪好控砂墊,請務必將貓廁所兩只前腳置於控砂墊橙色延長區域,並保持左右預留相同的距離。若未按要求安裝,
可能會導致除臭模組的液位檢測失效,並且影響除臭模組的使用壽命。
* 控砂墊的橙色區域為溫度感應器有效偵測範圍貓咪進入此範圍可被感應識別機器會自動停止工作。
在正確安放控砂墊的情況下橙色
區域為溫度感應器有效偵測範圍。
集便盒
垃圾袋壓圈
卡榫
套垃圾袋
158
* 請正確裝套垃圾袋並撫平垃圾袋邊緣否則會影響對集便盒內貓屎量的感應。
1. 抽出整個集便盒組。
3. 將垃圾袋均勻鋪開,並套在集便盒上的四個卡榫上。 4. 壓緊垃圾袋壓圈後,將集便盒組裝入主機底部
*安裝壓圈時請注意壓圈前後方向正確。
2. 取下集便盒上垃圾袋壓圈。
Scan to download
the “PETKIT” APP
App的使用
161
1. 掃描下載小佩寵物APP,完成APP的註冊,根據
提示內容完成綁定,新增小佩智能全自動貓廁所。
2. APP可實時記錄貓砂剩餘量、以及貓咪每次使用
後的體重、如廁時長和次數。
*自動清理、定時清理僅在綁定APP後才可使用。
Smart settings
The device will pause when pets approach while it is cleaning,
and resume automatically when pet departs
The device will clean automatically after a
pet has used it
Clean automatically
3 Actions total
Clean periodically
2 Actions total
Periodic odor removal
Time to wait to begin cleaning after pet has
departed
Wait time 3min
Interval between automatic
cleanings, the device will not clean
if less than this time
Interval time Do not limit
Not enabled
Enabled
A
軟膠上蓋
新增淨化液
* 請務必配合「小佩寵物濃縮淨化液----小佩智能全自動貓廁所專用」淨化液使用否則可能會導致除臭模組失效
1. 取下除臭模組橙色的軟膠上蓋然後將整瓶淨化液
倒入除臭模組容器盒內。
2.蓋好軟膠上蓋(請務必將軟膠上蓋壓緊以保證
除臭模組密封
154
產品簡介
主機內部俯視圖
主機內部俯視圖
移除滾筒後
滾筒鎖定旋鈕
入口
滾筒
排砂口
稱重感應器
稱重感應器
除臭便組
集便盒
151
取出滾筒
1. 順時針旋轉主機背部的滾筒鎖定旋鈕進行解鎖。
*若主機上方有主機上蓋請先移除主機上蓋。
2. 解鎖後用雙手扣握排砂口向上提出滾筒。
滾筒鎖定旋鈕
153
UNLOCK
掃描觀看安裝使用教學影片
掃描觀看安裝使用教學影片
152
裝入滾筒然後倒入貓砂
1. 雙手扣握住排砂口把滾筒放入主機內
155
裝入滾筒倒入貓砂
2..把打開的貓砂從滾筒的排砂口倒入。注意貓砂用量不要超過滾筒內部的MAX線)
MAX線
貓砂用量不可超過MAX線
一鍵清空貓砂線
* 一鍵清空貓砂線是根據集便盒
內的空間容量來確定的。當貓砂剩
餘量低於一鍵清空貓砂線可使用一
鍵清空貓砂功能一次性傾倒滾筒內剩餘貓砂。
1. 一鍵清空貓砂過程中請勿讓貓咪進入中斷操作;
2. 一鍵清空貓砂前請確認下集便盒有足夠的空間;
3. 一鍵清空貓砂過程中請勿拔掉插頭。
156
指示狀態說明
163
剩餘百分比
網路狀態 當日貓咪如廁總次數 貓在廁所的實時重量
請在APP內準確
記錄貓砂種類
不同貓砂密度略有
差異實時貓砂剩
餘量數值可能略有
偏差。
請檢察上蓋的
方向並確認蓋好
請將主機背面的滾筒
鎖定旋鈕旋轉至鎖定
位置
運行過程中寵物靠近
或進入廁所設備自動
暫停並提示
在APP內查看
故障詳情
id is not closed
r barrel not loc is in the litter
re, check the d
Cat weight
kg%
emaining cat litt
掃描觀看清洗教學影片
掃描觀看清洗教學影片
164 168
定期拆除滾筒進行清洗。
165
產品清洗
2. 拆除滾筒步驟如下:
1. 一鍵清空貓砂。
3. 拆除濾砂網:
*建議在貓砂剩餘量低於一鍵清空貓砂線的情況下進行清理操作。
① 移除主機上蓋;
② 解鎖主機背面滾筒鎖定旋鈕;
③ 提出滾筒。
① 手掌扣住濾砂網(如圖1所示)並用手指往裡壓彎濾砂網
(如圖2所示
② 彎曲後的濾砂網脫離卡榫便可取下。
4. 安裝濾砂網:
① 把濾砂網a點先確認卡住然後用手指往裡壓彎濾砂網;
② 彎曲後的濾砂網卡住b點。
圖 1
圖 2
b
a
為盡快把貓砂傾倒完請勿讓貓咪進入干擾中斷傾砂過程。(*請注意在滿砂狀態下容易傾灑,請在貓砂較少的情況下移除,高度請
參考滾筒內部垃圾桶圖示處的一鍵傾倒貓砂線並檢查集便盒內空間。
167
Q:為何顯示器螢幕變黑?
A:正常情況下一段時間沒操作時顯示器會進入螢幕保護模式動態顯示小佩的logo當APP內關閉顯示器時
示器就會熄滅看起來是螢幕變黑的樣子此時任意按鍵可使螢幕亮起。如果夜間螢幕變亮影響休息,可修改螢幕
變亮時間。
Q:APP智慧設定怎麼使用?
A:貓廁所的智慧設定包括自動清理、定時清理和定時除臭;家庭中貓較少3隻以內建議使用自動清理功能
每次如廁都能及時清理當貓數量較多(大於3隻或者貓經常進入廁所內玩耍時建議使用定時清理功能避免
清理運行太過頻繁;設備清理過程中會自動除臭定時除臭可根據實際情況來使用。
FAQ 基本資訊
產品名稱 小佩智能全自動貓廁所
P9901
504mm X 523mm X 642mm
產品型號
機體尺寸
機體重量
額定電壓
額定功率
約15kg(含變壓器
12V
建議寵物類型 貓
24W
166
Q:為什麼我把滾筒放到機器上沒有任何操作滾筒自動旋轉?
A:機器會自動檢測滾筒的位置恢復到初始位置。
Q:為什麼我主機上蓋已經放好還是提示主機上蓋未放置到位?
A:查看主機上太是否正確放置「PETKIT」標誌應在顯示器那一側)
Q:在工作過程中滾筒停止滾動?
A:滾筒運行過程中設備會全程啟動安全監控程序當寵物靠近或進入時會立刻停止運轉,等待安全解除後自動
繼續顯示器也會有相應的提示。貓廁所入口處設有隱形安全圍欄當人靠近時,貓廁所都會暫停運轉。
Q:集便盒沒滿卻顯示已滿?
A:集便盒上方有一組感應器用來檢測集便盒是否已滿垃圾袋套好以後要壓緊垃圾袋壓圈,並撫平垃圾袋防止
垃圾袋翹起來遮住了感應器影響檢測結果。
FAQ
繁體
172
1. X안전보안 ‒ 6가지�안전�레벨
3. 항균�악취제거 (냄새�제거기�및�농축�공기정화액�사용)
이�기기는�실험�검증을�통해�불쾌한�냄새와�포름알데히드를
제거하는�동시에�일반적인�형태의�유해세균을�죽이는�효과가
있는�것으로�입증되었습니다.
(산소균, 포도상구균, 가성모나스�에어루진사, 칸디다알비칸,
살모넬라�티티푸륨, 클렙시엘라�폐렴�등)
2. 여러�종류의�고양이�모래를�사용할�수�있습니다.
고양이�모래�여과망은�흡수형�모래, 벤토나이트�모래,
두부�모래와�같은�혼합�모래�등등�모든�고양이�모래를
여과하는데�효과적입니다.
기능
① 열�센서 : 고양이가�들어오면�제품이�정지됩니다.
② 적외선�센서: 입구에는�근처에�고양이를�발견하면�제품�작동이�중단되는�적외선�센서가�설치되어�있습니다.
③ 중량�센서: 자동화장실�내부에는 4개의�중량�센서가�장착되어�있습니다. 만약�고양이가�화장실에�들어간다면, 이�센서들은�고양이를
감지하고�작동을�멈출�것이다.
④ 끼임�방지�적외선�센서: 자동화장실�안쪽�바닥에는�적외선�센서�두�개가�설치되어�있습니다. 제품이�작동하는�동안�고양이가�접근하면
기기는�즉시�작동을�중지합니다.
⑤ 스마트�감지�원격�알림: 앱을�사용하여�스마트�업데이트�및�비정상적인�활동에�대한�조기�알림을�받을�수�있습니다.
사고방지�시스템: 기기가�작동하기�전에�센서�시스템이�활성화됩니다. 센서가�하나라도�오작동하면�기기가�멈추고�경보�알람을�보냅니다.
무게 센서
악취 제거 장치
끼임 방지 안전 센서
입구 안전 감지기
적외선 감지기
목차
소중한�고객에게�보내는�메시지
사용자�안전�가이드
기능
부품�목록
제품�설명
QR코드�스캔�및�설정�비디오�시청
실린더�꺼내기
농축�공기정화액�넣기
실린더�설치�및�고양이�모래�붓기
고양이화장실�봉투�장착
고양이�모래�패드�장착
전원�코드�연결�후�사용�시작
어플리케이션�사용
메뉴
디스플레이�가이드
QR코드�스캔�및�세척�비디오�시청
제품�세척
FAQ
사양
171
171
172
173
174,175
176
177
178
179,180
182
고양이화장실�덮개�교체 181
183
184
185
186
187
188
189
190,191
192
소중한�고객에게�보내는�메시지
사용자�안전�가이드
· PETKIT 퓨라 X 고양이�자동�화장실을�구매해주셔서�감사합니다. 펫킷만의�놀라운�기술력으로�반려주와�반려동물
모두의�삶은�더�편안하게�만들기�위해서�항상�최선을�다하고�있습니다.
· 본�제품을�사용하기�전에�사용�설명서를�주의�깊게�읽어�주십시오. 이�제품을�설정하고�사용하면�아래에�나열된
주의사항을�읽고�수락했음을�인정합니다.
· 본�제품의�부적절한�사용으로�인한�사고나�손실에�대해 PETKIT은�어떠한�책임이나�법적�책임을�지지�않습니다.
· 본�고시에�대한�해석�및�개정권을�보유합니다.
* 아래�설명된�안전지침에�따르지�않을�경우�제품이�정상적으로�작동하지�않거나�예기치�않은�사고가�발생할�수�있습니다.
· 사용 설명서에 지침에 따라 제품을 설정한 사용하십시오.
· 제품은 6개월 미만의 반려동물이 사용하는 것을 권장하지 않습니다.
· 실내용 제품입니다. 제품을 장시간 햇빛에 직접 노출하지 마십시오. 화기 주변에 두지 마십시오.
· 제품은 전압 모드의 제품이지만, 반려동물이 전선을 물어 뜯는 경우 전원 공급이 차단됩니다. 반려동물이
안전전하게 사용할 있도록 하십시오.
· 제품에 들어있는 어댑터를 사용해주십시오. 다른 어댑터를 사용시 제품에 잠재적으로 손상이 발생하거나 잠재적인
위험이 발생할 있습니다.
· 제품이 지면과 평행하게 유지되도록 하십시오. 그렇지 않으면 농축된 정화액이 쏟아져 제품 오작동을 일으킬 있습니다.
· 제품의 하단을 물에 담그거나 적시지 마십시오.
· 위험을 안전하게 방지하기 위해서 전문가의 안내에 따라 수리를 진행해야 합니다.
· 장기간 방치 시에는 화장실 수거함에 공간이 충분한지 확인합니다.
· 제품 사용 문제가 발생하면 고객센터로 즉시 연락을 부탁드립니다.
171
부품�목록
고양이화장실 *1
고양이�모래�패드 *1 전원�어댑터 *1
(부품�상자�안)
농축�공기정화액 *4
(부품�상자�안)
휴지통 *1
(부품�상자�안)
고양이화장실�덮개 *1
173
제품�설명
174
*참고: 당사는�제품의�품질을�개선하기�위해
정기적인�제품�업그레이드를합니다. 표시된
제품�이미지는�예시입니다. 실제�제품은
패키지상자에�표시된�이미지와�다를�수
있습니다. 불일치�할�경우�실제�제품을
표준으로�참고하십시오.
짧게�누르기: 메뉴�항목�선택
짧게�누르기: 탐색�메뉴
길게�누르기: 켜기�또는�끄기
실린더�해제�버튼
폐기물�수거함
입구
OK 버튼
OLED 디스플레이화면
고양이화장실�덮개
고양이화장실
손잡이
전원 INPUT
메뉴�버튼
화장실 전면
화장실 후면
사용자 매뉴얼을 주의 깊게 읽어 보신 후 제품을 사용하시고 적절하게 보관하세요..
PURA X
안내�매뉴얼
펫킷 로고는 화장실의 전면 입구를 향하도록 합니다
LOCKED
고양이화장실�덮개를�원위치�시킵니다.
1. 고양이화장실 뒷면에 있는 잠금 장치를 시계 반대 방향으로 돌립니다.
2. 덮개를 다시 고양이 화장실에 놓습니다. (*화장실 덮개를 올바르게 장착한 후 PETKIT의 로고가 그림과 같이
고양이화장실의 정면으로 향하도록 해야 합니다.)
181
倾空猫砂
메뉴
186
짧게�누르기: 메뉴�항목�선택
확인�버튼
메뉴 사용 방법: 메뉴 버튼을 짧게 눌러 메뉴를 탐색합니다. 화면에는 선택할 수 있는 다양한 기능이 표시됩니다. 확인을
짧게 눌러 기능을 선택합니다.
짧게�누르기: 탐색�메뉴
길게�누르기: 켜기, 끄기
메뉴�버튼
OLED 디스플레이
고양이화장실�세척�시작 냄새를�제거하는�용액�분사 모든�고양이�모래를
폐기물�수거함에�버림
고양이�모래를�고르게�분배 실린더가�원래�위치로
다시�돌아옵니다.
고양이화장실이 Wi-Fi에
연결되어�있으며, 네트워크를
업데이트가�가능합니다.
Clean now
Deodorize now
Empty cat litte
Level cat litter
Reset figure the netw
어댑터 코드를 꺼내어 아래쪽에 있는 고양이화장실 뒷면의 하단 전원 소켓에 연결합니다.
전원�코드를�연결하고�사용을�시작합니다.
184
고양이�모래�매트�설치
183
고양이 모래 패드를 넓게 펼친 다음 고양이 모래 패드의 오렌지 색 영역에 모래 박스의 앞발 두 개를 놓고, 왼쪽과 오른쪽
사이에 같은 거리를 유지하십시오. 이 단계가 지침대로 이루어지지 않는 경우, 탈취 장치의 액체 감지 기능이 비효과적이
될 수 있으며, 탈취 장치의 전반적인 수명에 영향을 미칠 수 있습니다.
* 고양이�모래�매트의�주황색�영역은�열�센서의�유효�범위입니다. 고양이가�이�영역에�들어오면�센서가�이를�인식하고
기기가�자동으로�작동을�중지합니다.
화장실�패드가�올바르게�장착되면
오렌지색�부분은�열센서의
효율적인�범주를�가리킵니다.
변기통
쓰레기백 링
쓰레기백 고리
폐기물�봉투�설치
182
* 폐기물�봉투를�올바르게�설치하고�봉지의�가장자리를�평평하게�펴야�합니다. 그렇지�않으면, 고양이화장실에서�소변의
양을�감지하는�센서의�작동에�영향을�미칠�수�있습니다.
1. 화장실 수거함을 통째로 꺼냅니다.
3. 폐기물 봉투를 열어 화장실 수거함에 있는 4개의 폐기물
봉투 고리에 걸어줍니다.
4. 폐기물 봉투 고리를 제자리에 고정시키고 화장실
수거함을 고양이 화장실 바닥에 다시 넣습니다.
*폐기물 봉투 고리를 놓을 때는 폐기물 봉투 고리의
앞쪽이 앞쪽을 향하도록 하십시오.
2. 폐기물 봉지를 수거함에 고정하는 데 사용되는
링을 분리합니다.
(QR 코드를) 스캔하여 “펫킷”
앱을 다운로드하세요.
APP 사용
185
1. 스캔하여 PETKIT 앱을 다운로드합니다. 앱에 등록한
후 PETKIT Smart Automatic Cat Litter Box로
안내 메시지를 따라 이동합니다.
2. 앱을 통하여 고양이 몸무게에 대한 실시간 정보 및 알림,
고양이화장실 사용 시간 및 빈도 등을 확인할 수 있습니다.
*자동세척 및 주기 세척은 앱을 통해서만 접속할 수
있습니다.
Smart settings
The device will pause when pets approach while it is cleaning,
and resume automatically when pet departs
The device will clean automatically after a
pet has used it
Clean automatically
3 Actions total
Clean periodically
2 Actions total
Periodic odor removal
Time to wait to begin cleaning after pet has
departed
Wait time 3min
Interval between automatic
cleanings, the device will not clean
if less than this time
Interval time Do not limit
Not enabled
Enabled
A
연성 플라스틱
뚜껑
농축�공기정화액�넣기
* 악취�제거를�효과적으로�하기�위해 “펫킷�스마트�고양이�자동화장실�전용�제품인�펫킷�농축�공기정화액”만�사용하시기
바랍니다.
1. 냄새�제거�기기의�주황색�실리콘�뚜껑을�제거하고
농축�공기�정화액을�냄새�제거�기기에�부으십시오.
2. 실리콘�뚜껑을�냄새�제거�기기에�다시�부착하고�단단히
고정되었는지�확인하십시오.
178
제품�설명
위에서 바라본 고양이화장실
위에서 바라본 고양이화장실
(실린더 제거 후)
실린더�해제�버튼
입구
실린더
고양이�모래�제거�구멍
중량�센서
중량�센서
악취제거장치
폐기물�수거함
175
실린더�꺼내기
1. 농축액을�고정하는�실린더의�잠금을�해제하려면�실린더의
해제�버튼을�시계�방향으로�돌립니다. 해제�버튼은
고양이화장실�뒷면에�있는�실린더의�끝�부분에�있습니다.
*아직�고양이화장실�덮개가�제거하지�않은�경우, 실린더를
꺼내기�전에�반드시�밀어내어�제거하십시오.
2. 그림과�같이�양손으로�위로�들어�올립니다.
원통형 용기 해제 버튼
177
UNLOCK
화장실�설치와�사용�방법에�관한�비디오를�보기�위해서 QR
코드를�스캔하세요.
화장실 설치와 사용 방법에 관한 비디오를
보기 위해서 QR 코드를 스캔하세요
176
실린더�설치�및�고양이�모래�붓기
1. 양�손으로�위로�들어�올린�후�실리더를�고양이화장실�뒷면에�다시�설치합니다.
179
실린더�설치�및�고양이�모래�붓기
2. 고양이 모래를 실린더의 구멍에 부으십시오. 고양이 모래의 양은 실린더 내부에 표시된 MAX 라인을 초과하면 안 됩니다.
MAX 라인
고양이�모래의�양은 MAX선을
초과해서는�안�됩니다.
“모래 부족선”
* "모래�부족선"은�화장실�수거함의�용량에�따라�결정됩니다.
남은�고양이�모래의�양이 “모래�부족선” 아래로�떨어지면, 고양이�화장실은�버튼�한번의�클릭으로�남은�고양이�모래를�비울�수�있게
해줍니다. 버튼을�누르면�실리더가�회전하여�남은�고양이�모래를�한번에�버립니다.
1. 고양이�모래를�비우는�동안�고양이가�고양이화장실에�들어가지�못하게�하거나�어떤�이유에서건�모래를�비우는�작업을�방해하지�않게
하십시오.
2. “모래�비우기�버튼”을�사용하여�고양이�모래를�비우기�전에, 화장실�수거함에�사용�가능한�공간이�충분한지�확인하십시오.
3. 고양이�모래를�비우는�동안�기기를�끄거나�전원�코드를�제거하지�마십시오.
180
id is not closed
r barrel not loc is in the litter
re, check the d
Cat weight
kg%
emaining cat litt
디스플레이�가이드
187
남아�있는
카트리지의 %
연결�상태
당신의�고양이가�오늘
화장실을�사용한�횟수
화장실을�사용하는�동안의
고양이의�현재�몸무게
앱을�통해�올바른
타입의�고양이�모래를
선택하십시오. 다른
유형의�고양이�모래를
선택하면�정확도가
떨어질�수�있습니다.
덮개가�제대로
설치되었는지
확인해�주십시오.
실린더를�올바르게
배치하고�잠금�장치를
'LOCKED' 위치로
돌리십시오.
고양이가�작동�중에
고양이화장실로�접근하거나
들어올�경우, 고양이화장실은
자동으로�작동을�중지하고
알림을�보냅니다.
자세한�오작동�정보는
앱에서�확인하십시오.
QR 코드를�스캔하고�정리�비디오를�봅니다.
QR 코드를 스캔하고 비디오를 통해
고양이화장실을 세척하는 방법에 봅니다.
188 192
주기적으로�실린더를�제거하여�세척하십시오.
189
제품�세척
2. 실린더를�제거하는�단계:
1. “모래�비움�버튼”:
3. 거름망�제거�방법:
*세척을�위해�실린더를�분리할�때에는�고양이�모래의�수위가 "모래�부족선" 아래로�내려갈�때까지�기다리는�것이�좋습니다.
① 상부 커버를 벗깁니다.
② 잠금 장치를 잠금 해제 위치로 돌립니다.
③ 실린더를 위로 들어 올리고 꺼내십시오.
① 필터망(그림1)을 잡고 손가락으로 필터망(그림2)을 곡선을
주어 안쪽으로 누릅니다.
② 필터망을 구부린 후 후크를 들어올려 제거합니다.
4. 필터망�설치:
① 필터망의 A지점 확실히 제자리에 있는지 확인한 후 손가락으로
필터망의 곡선을 안쪽으로 누른다.
② 필터망이 충분히 휘어지면 B지점에 고정한다.
(실제 제품이 없어 정확하지 않아 수정이 필요할 수 있습니다.)
그림1
그림2
포인트B
포인트A
신속하게 고양이 모래를 비우기 위해서 고양이가 모래를 비우는 동안 고양이화장실에 접근하지 못하게 하십시오.
가능한 한 빨리 쓰레기를 비우기 위해, 고양이가 비우는 과정이 진행되는 동안 쓰레기통에 들어가지 못하게 하세요. (*참고: 실린더는 고양이
모래가 많으면 쉽게 기울어질 수 있습니다. 제거하기 전에 고양이 모래가 줄어들 때까지 기다리십시오.실린더 내부에 있는 폐기물 심볼에
따라 "모래 부족선"에 표시된 고양이 모래 레벨을 주의 깊게 살펴보십시오. (폐기물 수거함에 남아 있는 공간도 확인해야 합니다.)
191
Q: 디스플레이�화면이�꺼진�이유는�무엇입니까?
A: 제품이�일정�시간�동안�작동하지�않을�경우�디스플레이�화면이 PETKIT 로고의�보호�모드로�전환됩니다. 앱이
종료되면�스크린도�꺼집니다. 또한�스크린의�밝기�수준을�변경할�수도�있습니다.
Q: 앱의�스마트�설정을�사용하는�방법은?
A: 고양이�화장실의�스마트�설정으로는�자동청소, 세트청소, 정기적인�탈취�등이�있습니다. 다묘�가정의�경우 (3마리)
때는�자동청소�기능을�사용하는�것이�좋습니다. 청소가�너무�잦은�것을�원하지�않으시면�세트청소�기능을�사용하는
것이�좋습니다. 청소�과정에서�기기가�자동으로�탈취기능이�작동하며, 상황에�따라�정기적인�탈취도�가능합니다.
FAQ 사양
제품명 펫킷�퓨라�엑스�자가�청소�고양이�화장실
P9901
504mm X 523mm X 642mm
제품�코드
제품�크기
총�무게
전압
전력
약 15kg(전원�어댑터�포함)
12V
추천�사용�대상 고양이
24W
190
Q: 아무런�작업을�하지�않았는데�롤러가�회전하는�이유는�무엇입니까?
A: 자동으로�롤러�사이의�위치를�감지하여�원래�위치로�되돌립니다.
Q: 본체�뚜껑을�덮었을�때�뚜껑이�안�놓여�있다는�메시지가�나타나는�이유는�무엇입니까?
A: 메인�상부�뚜껑이�올바르게�배치되었는지�확인합니다. (PETKIT 로고는�디스플레이�측면에�위치해야�합니다.)
Q: 롤러가�작동�중에�멈추는�이유는�무엇입니까?
A: 센서�시스템�주변의�움직이는�물체를�감지하면�안전을�위해�작동을�중지합니다.
Q: 스크린에�표시되지�않은�상태에서도�폐기물�수거함이�가득�차나요?
A: 빈�상단의�센서가�가득�찼는지�여부를�감지합니다. 센서를�차단하지�않으려면�폐기물�봉지를�고리까지�꼭�쥐어짜야
합니다.
(실제�제품이�없어�정확하지�않아�수정이�필요할�수�있습니다.)
FAQ
한국어
196
1. xSicuro - 6 livelli di sicurezza
3. Anti odori anti batterico (utilizzando un dispositivo
anti odori e soluzione concentrata)
Attraverso la verifica sperimentale, questo prodotto è stato
provato efficace nel rimuovere spiacevoli odori e la
formaldeide, la quale uccide i batteri più comuni (bacillo del
colon, stafilococco aureo, pseudomonas aeruoginosa, candida
albicans, salmonella typhimurium, klebisella pneumoniae, ecc.)
2. Uso di più tipi di lettiera per gattini.
La rete filtro della lettiera per gatti è effettiva sia per
filtrare le lettiere naturali sia le lettiere di bentonite e
anche le lettiere miste.
FUNZIONI
Sensore termico: il prodotto si fermerà se il gatto entra.
Sensore Infrarosso: l'entrata è fornita con un sensore ad infrarosso che fermerà l'operazione se viene rilevato un gatto
nelle vicinanze.
Sensore di peso: l'interno della lettiera chiusa è fornito con 4 sensori di peso. Se un gatto entra nella lettiera chiusa,
questi sensore rileveranno il gatto e cessa l'operazione.
Sensori Infrarosso Anti Schiacciamento: vi sono due paia di sensori ad infrarosso installati sul fondo interno la lettiera
chiusa. Mentre il prodotto sta operando, se il gatto si avvicina, il dispositivo blocca immediatamente l'operazione.
Rilevamento intelligente. Allarmi remoti: usa la app per avere aggiornamenti intelligenti e allarmi in anticipo su attività anormali.
Sistema di Protezione Incidente: il sistema di sensori si attiverà prima dell'operazione. Il prodotto si spegnerà e invia
un'allerta se vi è un malfunzionamento ad uno dei sensori.
Cella di carico
Dispositivo anti odori
Sensori di sicurezza
anti schiacciamento
Sensori di sicurezza ingresso
Sensore infrarosso
SOMMARIO
Un messaggio per i nostri stimati clienti
Guida per la sicurezza dell'utente
Funzioni
Lista Confezione
Descrizione Prodotto
Scansiona il codice QR e guarda il video delle impostazioni
Togliere il cilindro
Aggiungi il liquido purificante
Installa il cilindro e versa nella lettiera
Installa il sacchetto dei rifiuti
Inserire il tappettino della lettiera
Inserire il cavo di alimentazione, iniziare l'utilizzo
Utilizzare la app
Elementi del menu
Guida sullo stato del display
Scansiona il codice QR e guarda il video per pulire
Pulizia del prodotto
Domande frequenti
Specifiche
In merito a petkit ricarica concentrato per la purificazione dell'aria
195
195
196
197
198,199
200
201
202
203,204
206
Sostituisci il coperchio della lettiera chiusa 205
207
208
209
210
211
212
213
214,215
215
216
UN MESSAGGIO PER I NOSTRI STIMATI CLIENTI
GUIDA PER LA SICUREZZA DELL'UTENTE
· Grazie per aver scelto PETKIT PURA X Lettiera per gatti auto pulente. Noi della PETKIT abbiamo fatto del
nostro meglio per rendere la vita più semplice a te e al tuo animale domestico attraverso i miracoli
della tecnologia.
· Prima di utilizzare questo prodotto, si prega di leggere con attenzione questo manuale utente.
Impostando ed utilizzando questo prodotto sei consapevole di aver già letto ed accettato le misure di
sicurezza elencate qui sotto.
· Non siamo responsabili e non accettiamo responsabilità per qualsiasi tipo di incidente o danno
risultante da un uso improprio di questo prodotto.
· In merito a questo avviso, ci riserviamo ogni diritto di revisione ed interpretazione.
* Non seguire le seguenti delineate misure di sicurezza può portare a malfunzionamenti o altri
improvvisi incidenti.
· Per favore installa ed utilizza il prodotto esattamente come descritto nel Manuale Utente.
· Gli animali domestici al di sotto dei 6 mesi di età non dovrebbero usare questo prodotto.
· Solo per uso al chiuso. Non esporre il prodotto alla luce diretta del sole per lunghi periodi di tempo. Non
posizionare vicino a fiamme vive.
· Anche se questo prodotto utilizza corrente a basso voltaggio, gli animali domestici possono danneggiare
il cavo di alimentazione se lo masticano, impedendo al prodotto di alimentarsi. Per favore assicurati che
gli animali domestici utilizzino il prodotto come inteso.
· Utilizzare solo l'adattatore di alimentazione provvisto. Utilizzare un adattatore di alimentazione differente
potrebbe danneggiare il prodotto o creare potenziali pericoli alla sicurezza.
· Assicurarsi che il prodotto rimanga a livello. Non inclinare il prodotto. Altrimenti la soluzione concentrata
potrebbe fuoriuscire oppure provocare malfunzionamenti al prodotto.
· Non permettere che la metà inferiore del prodotto venga immersa o sommersa in acqua.
· Le riparazioni dovrebbero essere fatto sotto la supervisione di un professionista per evitare pericoli
alla sicurezza.
· Quando viene lasciato per un lungo periodo di tempo, assicurati che vi sia abbastanza spazio nel cestino
dei rifiuti
· Se si riscontrano problemi nell'uso di questo prodotto, per favore, contattateci immediatamente.
195
LISTA CONFEZIONE
Lettiera chiusa X 1
Tappetino della lettiera X 1 Adattatore di alimentazione X 1
(nella scatola degli accessori)
Soluzione
concentrata X 4
(nella scatola degli
accessori)
Sacchetto dei rifiuti X 1
(nella scatola degli accessori)
Coperchio della
lettiera chiusa X 1
197
DESCRIZIONE DEL PRODOTTO
198
*Nota: in modo da per migliorare la
qualità dei nostri prodotti, apporteremo
periodici miglioramenti del prodotto. Le
immagini del prodotto mostrate sono
solo per scopi illustrativi. Il prodotto
reale potrebbe variare rispetto a quello
mostrato sulla scatola. Per qualsiasi
discrepanza, fare riferimento al
prodotto reale come standard.
Pressione breve: selezione
elementi del menu
Pressione breve:
navigazione menu
Pressione lunga:
acceso spento
Tasto di rilascio
del cilindro
Contenitore di
raccolta rifiuti
Ingresso
Tasto OK
Schermo display OLED
Coperchio della
lettiera chiusa
Lettiera chiusa
Maniglia
Ingresso alimentazione
Tasto del menu
Fronte della
lettiera chiusa
Retro della
lettiera chiusa
Si prega di leggere il manuale utente con attenzione prima di utilizzare il prodotto e conservarlo in modo appropriato.
PURA X
MANUALE DI ISTRUZIONI
Il logo "PETKIT" dovrebbe sempre
essere rivolto in posizione frontale.
LOCKED
SOSTITUISCI IL COPERCHIO DELLA LETTIERA CHIUSA
1. Ruota il bloccaggio in senso antiorario che è localizzato sul retro della lettiera chiusa.
2. Posizionare il coperchio sul retro della lettiera chiusa. (*Il logo PETKIT dovrebbe essere rivolto verso
l'apertura frontale della lettiera chiusa quando il coperchio è stato sostituito).
205
Clean now
Reset
ELEMENTI DEL MENU
210
Pressione breve: scegliere un
elemento del menu
Tasto OK
Come usare il menu: pressione breve sul tasto menu per navigare nel menu. Lo schermo mostrerà
differenti funzioni tra cui scegliere. Pressione breve di OK per scegliere una funzione.
Pressione breve: navigare nel menu
Pressione lunga: accendere, spegnere
Tasto Menu
Display OLED
Inizia pulizia della
lettiera chiusa
Spruzzare la soluzione anti odore Scaricare tutta la lettiera
per gattini nel contenitore
dei rifiuti
Distribuire uniformemente
la lettiera per gattini
Il cilindro ruoterà nella
posizione originale
La lettiera chiusa è connessa
al Wi-Fi, può essere usata
per aggiornamenti.
Deodorize now
figure the netw
Level cat litter
Empty cat litte
Prendi il cavo adattatore e attaccalo nello slot in basso sul retro della lettiera chiusa, che è vicino al fondo.
Quindi collega alla presa di corrente.
INSERIRE IL CAVO DI ALIMENTAZIONE, INIZIARE
L'UTILIZZO
208
INSERIRE IL TAPPETTINO DELLA LETTIERA
207
Stendere il materassino della lettiera e posizionare le due gambe anteriori della lettiera chiusa sull'area
arancione del materassino della lettiera e mantenere la stessa distanza tra sinistra e destra. Se questo
passaggio non viene eseguito come indicato, può rendere inefficace la funzione di rilevamento dei liquidi
del dispositivo di rimozione degli odori e influenzare la durata complessiva del dispositivo di rimozione
degli odori.
* L'area arancione sul tappetino della lettiera è nell'effettivo raggio del sensore termico. Una volta che il
gatto è entrato in questa aerea, sarà riconosciuto dal sensore ed il dispositivo cesserà automaticamente
l'operazione.
Quando il tappetino della
lettiera è istallato correttamente,
l'area arancione indica l'effettivo
raggio del sensore termico.
Contenitore
dei rifiuti
Anello per il
sacchetto dei rifiuti
Ganci per il
sacchetto dei rifiuti
INSTALLA IL SACCHETTO DEI RIFIUTI
206
* Assicurarsi di installare il sacchetto dei rifiuti correttamente e aderente sui lati del contenitore. Altrimenti
potrebbe influenzare la capacità del dispositivo di percepire la quantità di urina nella lettiera chiusa.
1. Estrarre l'intero contenitore dei rifiuti.
3. Aprire completamente il sacchetto dei
rifiuti ed agganciarlo ai quattro ganci per
il sacchetto dei rifiuti localizzati
sul contenitore dei rifiuti.
4. Posizionare l'anello per il sacchetto dei rifiuti
per assicurare il sacchetto dei rifiuti e riporre il
contenitore dei rifiuti sul fondo della lettiera
chiusa.
* Quando si posiziona l'anello per il sacchetto
dei rifiuti, assicurarsi che il fronte dell' l'anello
per il sacchetto dei rifiuti sia rivolto in avanti.
2. Staccare l'anello utilizzato per assicurare il
sacchetto dei rifiuti sul contenitore dei rifiuti.
Scansiona per
scaricare la APP
"PETKIT"
UTILIZZARE LA APP
209
1. Scannerizzare per scaricare la APP PETKIT.
Dopo la registrazione nella APP, seguire le
richieste del tuo account della tua Lettiera
Chiusa Automatica Intelligente per Gattini
PETKIT.
2. Usa la app per avere informazioni in tempo
reale e notifiche in merito al peso del gatto, così
come al tempo e alla frequenza di utilizzo della
lettiera chiusa.
*La pulizia automatica e la pulizia periodica sono
accessibili solo tramite APP.
Smart settings
The device will pause when pets approach while it is cleaning,
and resume automatically when pet departs
The device will clean automatically after a
pet has used it
Clean automatically
3 Actions total
Clean periodically
2 Actions total
Periodic odor removal
Time to wait to begin cleaning after pet has
departed
Wait time 3min
Interval between automatic
cleanings, the device will not clean
if less than this time
Interval time Do not limit
Not enabled
Enabled
A
Coperchio di
plastica morbida
TOGLIERE IL CILINDRO
* Per assicurare un effettiva azione anti odore, per favore usa solo "PETKIT Soluzione Concentrata per
Lettiera Chiusa Automatica Intelligenti per Gattini PETKIT".
1. Rimuovere il coperchio di plastica arancione
morbida del dispositivo anti odori e versare
l'intera bottiglia di soluzione concentrata
dentro il dispositivo anti odori.
2. Riattaccare il coperchio di plastica morbida
sul dispositivo anti odori, assicurarsi che sia
saldamente agganciato.
202
DESCRIZIONE PRODOTTO
Vista dall'alto della
lettiera chiusa
Vista dall'alto della
lettiera chiusa(dopo
aver rimosso il
cilindro)
Tasto di rilascio del cilindro
Ingresso
Cilindro
Apertura di rimozione
della lettiera
Contenitore di
raccolta rifiuti
Dispositivo anti odori
Sensori del peso
Sensori del peso
199
TOGLIERE IL CILINDRO
1. Per sbloccare il cilindro che trattiene la
soluzione concentrata, girare il tasto di rilascio
del cilindro in senso orario. Il tasto di rilascio è
localizzato alla fine del cilindro sul retro delle
lettiera chiusa. *Se il coperchio non è già stato
rimosso dalla lettiera chiusa, assicurarsi di
rimuoverlo facendolo scivolare prima di
rimuovere completamente il cilindro.
2. Usa entrambe le mani per sollevare verso
l'alto come mostrato in figura.
Bloccaggio cilindro
201
UNLOCK
SCANSIONA IL CODICE QR E GUARDA IL VIDEO
DELLE IMPOSTAZIONI
Scansionare il codice QR per guardare
il video su come impostare e utilizzare
la tua lettiera chiusa
200
AGGIUNGI IL LIQUIDO PURIFICANTE
1. Usa entrambe le mani per sollevare verso l'alto, reinstalla il cilindro nel retro della lettiera chiusa.
203
AGGIUNGI IL LIQUIDO PURIFICANTE
2. Versare la lettiera per gattini dentro l'apertura del cilindro rotante usato per dispensare la lettiera.
(Assicurarsi di non versare troppa lettiera per gattini. L'ammontare di lettiera per gattini non deve
eccedere la Linea MAX indicata dentro il cilindro rotante).
Linea MAX
L'ammontare di lettiera
per gattini non dovrebbe
eccedere la linea
che dice MAX
La "Linea della Lettiera Vuota"
* La "Linea della Lettiera Vuota" è determinata dalla capacità del contenitore di raccolta dei rifiuti. Quando l'ammontare
rimanente della lettiera per gattini scende al di sotto della "Linea della Lettiera Vuota", la lettiera chiusa ti permetterà di
svuotare la lettiera premendo un singolo tasto. Una volta premuto il tasto, il cilindro ruoterà scaricando la lettiera rimanente.
1. Per favore non permettere ai gatti di entrare dentro la lettiera chiusa per gattini durante il processo di svuotamento della
lettiera o interrompere il processo in qualsiasi modo.
2. Prima di svuotare la lettiera usando il " Tasto Svuota Lettiera", per favore assicurati che il contenitore dei rifiuti abbia
abbastanza spazio.
3. Per favore non spegnere il dispositivo o rimuovere il cavo di alimentazione durante il processo di svuotamento della lettiera.
204
is in the litterr barrel not loc
re, check the d
GUIDA SULLO STATO DEL DISPLAY
211
Percentuale di
lettiera per
gatto rimanente
Stato della Rete
Quante volte viene
usata ogni giorno Il peso del gatto
Per favore inserisci
il tipo di lettiera
utilizzata tramite la
APP. Perché
differenti tipi di
lettiera hanno
diverse densità
e caratteristiche,
la metrica in tempo
reale della lettiera
potrebbe variare.
Per favore controlla
se il coperchio è
posizionato
correttamente.
Per favore posiziona il
cilindro in modo corretto
e ruota il bloccaggio nella
posizione di " BLOCCATO".
Se il gatto si avvicina o
entra nella lettiera
chiusa mentre sta
operando, la lettiera
chiusa
ferma automaticamente
le operazioni e invia
una notifica
Per favore controlla
la App per maggiori
informazioni sul
malfunzionamento
id is not closed
Cat weight
kg%
emaining cat litt
SCANSIONA IL CODICE QR E GUARDA IL VIDEO
PER PULIRE
Scansionare il codice QR per guardare
il video su come pulire la tua lettiera
chiusa
212 216
Smaltimento
La Direttiva Europea 2012/19/CE sui Rifiuti di Apparecchiature Elettriche ed Elettroniche (RAEE), prevede che i
vecchi elettrodomestici non debbano essere smaltiti nel normale flusso di rifiuti urbani indifferenziati. I vecchi
apparecchi devono essere raccolti separatamente al fine di ottimizzare il recupero e il riciclaggio dei materiali
in essi contenuti e ridurre l'impatto sulla salute umana e sull'ambiente. Il simbolo del "bidone su ruote" barrato
sul prodotto ricorda l’obbligo, cioè nel caso di smaltimento dell'apparecchio questo deve essere raccolto
separatamente. I consumatori devono contattare l'autorità locale o il rivenditore per informazioni sul corretto
smaltimento del loro vecchio apparecchio.
Rimuovere il cilindro periodicamente per la pulizia.
213
PULIZIA DEL PRODOTTO
2. Passi per rimuovere il cilindro:
1. "Il Tasto della Lettiera Vuota":
3. Rimuovere la retina di vagliatura:
* È raccomandato di attendere fino a quando il livello della lettiera per gattini è andato sotto "La Linea
della Lettiera Vuota" prima di rimuovere il cilindro per la pulizia.
Togli il coperchio superiore.
Ruota il bloccaggio nella posizione di SBLOCCATO..
Solleva il cilindro verso l'alto e toglilo.
Impugnare la retina di vagliatura (come mostrato in
figura 1) e usare le proprie dita per premere verso
l'interno sulla curva della retina di vagliatura (come
mostrato in figura 2);
Dopo aver curvato la retina di vagliatura, sollevare
i ganci per rimuovere.
4. Installare la retina di vagliatura:
Assicurarsi che il Punto A della retina di vagliatura sia
posto in sicurezza, quindi usare le vostre dita per premere
verso l'interno sulla curva della retina di vagliatura;
Quando la retina di vagliatura è sufficientemente piegata,
assicurare il Punto B in loco.
Figura 1
Figura 2
Punto b
Punto a
In modo da svuotare la lettiera il più rapidamente possibile, non permettere al gatto di entrare nella lettiera chiusa mentre il
processo di svuotamento è in corso. (*Nota: il cilindro può rovesciarsi facilmente quando pieno della lettiera. Per favore
attendere fino a quando il livello della lettiera è sceso prima di rimuovere. Prendere nota con cura del livello mostrato nella
"Linea della Lettiera Vuota" localizzata dal simbolo della spazzatura dentro il cilindro. È possibile anche controllare lo spazio
rimanente nel contenitore dei rifiuti).
SPECIFICHE
Nome prodotto PETKIT PURA X Lettiera chiusa per gatti autopulente
P9901
504mm X 523mm X 642mm
Codice prodotto
Dimensioni prodotto
Peso totale
Voltaggio
Alimentazione
≈ 15 kg (incluso adattatore di alimentazione)
12V
Raccomando per l'uso con Gatti
24W
215
D: Perché lo schermo del display è spento?
R: Lo schermo del display entrerà in modalità protezione schermo con logo dinamico PETKIT quando il prodotto
non sta operando per un certo periodo di tempo. Lo schermo si spegnerà anche quando la App viene spenta.
Puoi anche modificare la luminosità dello schermo.
D:Come utilizzare l'impostazione intelligente della App?
R: Le impostazioni intelligenti per la toilet del gatto includono pulizia automatica, set di pulizia e
deodorizzazione regolare; quando ci sono alcuni gatti in famiglia (fino a 3), raccomandiamo di usare le
funzioni di pulizia automatica. Raccomandiamo di utilizzare il set di funzioni di pulizia per evitare pulizie
troppo frequenti; il dispositivo deodorizzerà automaticamente durante il processo di pulizia e la
deodorizzazione regolare può essere applicata a seconda delle circostanze.
DOMANDE FREQUENTI
214
D: Perché i rulli ruotano quando non ho avviato nessuna operazione?
R: La macchina individua automaticamente la posizione tra i rulli e li posiziona nella posizione originale.
D: Perché mostra la richiesta che il coperchio non è posizionato quando metto il coperchio nell'unità principale?
onato correttamente. (il logo PETKIT
dovrebbe essere visibile sul lato).
D: Perché i rulli si fermano mentre sta lavorando?
R: Quando il sistema dei sensori rileva soggetti che si muovono nelle vicinanze, spegnerà l'operazione per
sicurezza.
D: Il cestino dei rifiuti è pieno anche quando non viene mostrato nello schermo?
R: I sensori sulla parte superiore del cestino rileveranno se è pieno. Per prevenire il blocco dei sensori,
comprimi il sacchetto dei rifiuti in basso verso l'anello.
DOMANDE FREQUENTI
Italiano
220
219 221 222
229 234
232
231
230 233
Расстелите коврик и поместите передние ножки лотка на оранжевую зону коврика. Сохраняйте
одинаковое расстояние между левой и правой ножкой. Если коврик будет размещен неверно, это
может повлиять на работу функции определения жидкости в устройстве по устранению запахов,
и также на общий срок службы устройства устранения запахов.
226
223 225
224 227 228
219
219
220
221
222,223
224
225
226
227,28
229
230
231
232
233
234
235
236
237
238,239
239
4
235 236 99V1.5
237 239238
Pусский
  • Page 1 1
  • Page 2 2
  • Page 3 3
  • Page 4 4
  • Page 5 5
  • Page 6 6
  • Page 7 7
  • Page 8 8
  • Page 9 9
  • Page 10 10

PETKIT PURA X ユーザーマニュアル

タイプ
ユーザーマニュアル