
Meet Philips at the Internet
http://www.philips.com
CLASS 1
LASER PRODUCT
AZ102S
AZ102C
AZ102N
AZ102G
AZ102V
AZ102R
AZ102B
English
简体中文
Printed in China AZ102_93_UM_V1.0
AZ1022CD Soundmachine
User Manual
Register your product and get support at
www.philips.com/welcome
AZ102S
AZ102C
AZ102N
AZ102G
AZ102V
AZ102R
AZ102B
DYNAMIC BASS BOOST
CD SOUNDMACHINE AZ102
VOLUME
S
H
UF
F
L
E
R
E
P
E
A
T
P
R
O
G
L
I
F
T
T
O
O
P
E
N
TUNING
1
@
2
3
5
4
6
7
8
0
1
Congratulations on your purchase and
welcome to Philips!
To fully benefit from the support that
Philips offers, register your product at
www.philips.com/welcome.
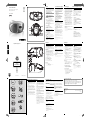
Supplied Accessories
– AC power cord
Top/front panels (See 1)
1
VOLUME
–
adjusts volume level.
2
SHUFFLE –
plays all tracks in random order
.
3
REPEAT
–
repeats a track/
CD program/entire CD.
4
2 ;
–
starts or pause CD playback.
§ ∞
–
selects the next/previous track
– searches forwards/backwards (press and
hold the button) within the current track
.
9
–
stops CD playback;
–
erases a CD program.
5 PROG – programs tracks and reviews the
program
.
6 LIFT TO OPEN
– opens/closes the CD door.
7
TUNING
– tunes to radio stations
.
8
Display
–
shows the CD functions.
Back panel (See 1
and
2)
9
Source selector: CD, FM, MW, OFF
–
selects CD or radio source of sound.
–
power off switch.
0 Telescopic antenna
–
improves FM reception.
!
AC MAINS~
–
inlet for power cord.
@
DBB
–
turns the bass enhancement on/off.
#
LINE-IN
– inlet for external audio source.
Bottom panel
$
Battery door –
Press on the arrow and
push to
insert 6 x 1.5V R-14/ UM-2/
C-cells.
CAUTION
– Visible and invisible laser radiation. If the
cover is open, do not look at the beam.
– High voltage! Do not open.You run the
risk of getting an electric shock. The
machine does not contain any user-
serviceable parts.
– Modification of the product could result
in hazardous radiation of EMC or other
unsafe operation.
– Use of controls or adjustments or
performance of procedures other than
herein may result in unsafe operation.
This set complies with the radio
interference requirements of the
European Union.
Power Supply
Whenever convenient, use the power supply
cord if you want to conserve battery life.
Make sure you remove the plug from the
set and wall outlet before inserting batteries.
Batteries (not included)
1 Open the battery door and insert 6 batteries,
type R-14, UM-2 or C-cells, (preferably
alkaline) with the correct polarity as indicated
by the "+" and "–" symbols inside the
compartment.
2 Replace the battery door, making sure the
batteries are firmly and correctly in place. The
set is now ready to operate.
Batteries contain chemical substances, so
they should be disposed of properly.
• Incorrect use of batteries can cause electrolyte
leakage and will corrode the compartment or
cause the batteries to burst:
• Do not mix battery types: e.g. alkaline with
carbon zinc. Only use batteries of the same type
for the set.
• When inserting new batteries, do not try to mix
old batteries with the new ones.
• Remove the batteries if the set is not to be used
for a long time.
English Controls/Power Supply Power Supply General Operation / Tuner
Using AC power
WARNING: Always check you have
completely switched off the set, before
you change or disconnect power supply.
1 Check if the power voltage, as shown on
the type plate located on the bottom
of the set, corresponds to your local
power supply. If it does not, consult your
dealer or service center.
2 Connect the power cord to the AC
MAINS~ inlet and the wall socket. The set
is now connected and ready for use.
3 To switch the set off completely, withdraw
the power cord from the wall socket.
4 Install the unit near the AC outlet and
where the AC power plug can be easily
reached.
• Disconnect the power cord from the wall
socket to protect your set during heavy
thunderstorms. Children could seriously
injure themselves as the free end of the
cable may still be live if only the connector
is removed from the MAINS socket at the
back of the unit.
The type plate is located on the bottom
of the set.
Helpful hints:
–
To avoid unnecessary energy consumption,
always adjust the
Source selector
to
OFF
after using the set.
General operation
Switching on and off and selecting the
function
1 To select your sound source, adjust the
Source selector to: CD, FM or
MW.
2 To switch off the set, adjust the Source
selector to
OFF
position.
3 To switch to LINE IN mode, connect
an external audio source to the LINE-
IN inlet.
Helpful hints:
• The set switches to LINE IN mode
automatically when an external audio source
is connected, no matter the set is in CD,
FM or
MW
mode.
• The LINE-IN inlet is not for earphones.
Adjusting volume and sound
Adjust the sound with the VOLUME and
DBB controls.
Radio reception
1 Adjust the Source selector to FM or
MW.
2 Turn TUNING to tune to a station.
Helpful hints:
To improve radio reception
• For FM, extend, incline and turn the
telescopic antenna for best reception.
Reduce its length if the signal is too strong.
• For
MW, the set uses a built-in antenna.
Direct this antenna for best reception by
turning the whole set.
Playing a CD
• This CD player plays Audio Discs
including CD-Recordables (CD-R) and
CD-Rewritables (CD-RW).
• MP3, CD-ROM, CD-I, CDV, VCD, DVD or
computer CDs are not possible for playback.
IMPORTANT!
CDs encoded with copyright protection
technologies by some record companies
may be unplayable by this product.
1 Adjust the Source selector to CD.
2 Open the CD door, and insert a CD with
the printed side facing up, then press the
CD door gently to close.
Display shows
--
, and later the total number
of tracks. (See
3
)
3 Press
2;
to start playback.
4 To pause playback, press
2;
.
Display:
2
fl ashes.
(See
4
)
5 To resume, press
2;
again.
6 To stop CD playback, press
9
.
Helpful hints:
CD play will also stop when:
–
you open the CD door;
– you select
FM
,
MW
or
OFF
sound source;
– the CD has reached the end.
Selecting a different track
• Press
∞ / §
once or repeatedly until the
desired track number appears in the display.
• In the pause/stop position, press 2; to start
playback.
Finding a passage within a
track
1 During playback, press and hold ∞ or § .
The CD is played at high speed and with
reduced volume.
2 When you recognize the passage you want,
release ∞ or § to resume normal playback.
Helpful hints:
– When your searching reaches the end of the
last track, the CD goes to stop mode.
CD Player
Programming track
numbers
You may store up to 20 tracks in the
desired sequence. If you like, store any track
more than once.
1 In the stop position, press PROG to
activate programming.
Display: PROG and
00
fl ash. (See
5
)
2 Press
∞
or
§
to select your desired track
number.
3 Press PROG to store the desired track
number.
Display: PROG and
00
fl ash for you to
program the next track..
4 Repeat steps 2 to 3 to select and store all
desired tracks in this way.
If you attempt to store more than 20 tracks,
no track can be selected and the display
shows
--.
5 To play your program, press
2
/
;
.
Helpful hints :
– When playback of your program comes to the
stop position, your set will return to normal
playback. To re-enter program mode, press
PROG in the stop position.
Reviewing the program
In the stop position, press PROG
repeatedly to see your stored tracks.
Erasing a program
You can erase the contents of the memory
by:
– in the stop position, press PROG to
enter program mode, and then press
9.
– selecting
FM
,
MW
or
OFF
;
– opening the CD door;
Different play modes:
REPEAT. and SHUFFLE
(See 6
, 7)
REPEAT
You can play the current track or the whole
disc repeatedly, and combine REPEAT
modes with PROG (PROGRAM).
REP – plays the current track continuously.
REP ALL – repeats the entire CD/program
1 To select play mode, press REPEAT once
or more.
The display shows REP icon or REP ALL icon.
2 Press 2; to start playback if in the stop/
pause position.
3 To return to normal playback, press
REPEAT repeatedly until the modes are no
longer displayed.
– You can also press 9 to cancel your play
mode.
SHUFFLE
You can play all the tracks in random order.
1 In the stop position, press SHUFFLE to
switch on shuffle play.
Display shows
SHUFFLE
icon.
2 To switch off shuffle play, press 9.
Helpful hints:
– During the shuffle play, when REP function is
selected, it will play the current shuffled track
repeatedly, or when the REP ALL function is
selected, it will repeat the shuffle play of the
entire CD.
CD Player
CD player and CD handling
• If the CD player cannot read CDs correctly,
use a cleaning CD to clean the lens before
taking the set to repair.
• The lens of the CD player should never be
touched!
• Sudden changes in the surrounding
temperature can cause condensation on
the lens of your CD player. Playing a CD
is then not possible. Do not attempt to
clean the lens but leave the set in a warm
environment until the moisture evaporates.
• Always close the CD door to avoid dust on
the lens.
• To clean the CD, wipe in a straight line
from the center towards the edge using
a soft, lint-free cloth. Do not use cleaning
agents as they may damage the disc.
• Never write on a CD or attach any stickers
to it.
Safety information
• Place the set on a flat, hard and stable
surface so that the system does not tilt.
• Where the MAINS plug or an appliance
coupler is used as the disconnect device,
the disconnect device shall remain readily
operable.
• Do not expose the set, batteries, CDs to
humidity, rain, sand or excessive heat caused
by heating equipment or direct sunlight.
• The apparatus shall not be exposed to
dripping or splashing.
• Adequate ventilation with a minimum gap
of 15cm (6 inches) between the ventilation
holes and surrounding surfaces is necessary
to prevent heat build-up.
• Do not cover the ventilation openings with
items such as newspapers, table-cloths,
curtains, etc.
• No objects filled with liquids, such as vases,
shall be placed on the apparatus.
• No naked flame sources, such as lighted
candles, should be placed on the apparatus.
• The mechanical parts of the set contain self-
lubricating bearings and must not be oiled
or lubricated.
• To clean the set, use a dry cloth. Do not
use any cleaning agents containing alcohol,
ammonia, benzene or abrasives as these may
harm the housing.
Maintenance & Safety (
See
8
)
Problem
– Possible cause
• Remedy
No sound /power
– Volume not adjusted
• Adjust the VOLUME
– Power cord not securely connected
• Connect the AC power cord properly
– Batteries dead/ incorrectly inserted
• Insert (fresh) batteries correctly
– CD contains non-audio files
• Press
∞
,
§
once or more to skip to a CD
audio track, instead of the data file.
Display does not function properly /
No reaction to operation of any of the
controls
– Electrostatic discharge
• Switch off and unplug the set. Reconnect after a
few seconds
--, Er
or
01 indication
– No CD inserted
• Insert a CD
– CD badly scratched or dirty
• Replace/ clean CD, see Maintenance
– Laser lens steamed up
• Wait until lens has cleared
– CD-R/CD-RW is blank or not finalized
• Use a finalized CD-R/CD-RW or suitable CD
Audio disc only
Note:
Make sure the CD is not encoded with
copyright protection technologies, as some
do not conform to the Compact Disc
standard.
The CD skips tracks
– CD damaged or dirty
• Replace or clean CD
– Program/shuffle is active
• Quit program/shuffle mode
Note: A CD badly scratch or dirty may result in
improper operation.
Troubleshooting
If a fault occurs, first check the points listed below before taking the set for repair.
If you are unable to remedy a problem by following these hints, consult your dealer or service
centre.
WARNING: Do not open the set as there is a risk of electric shock. Under no
circumstances should you try to repair the set yourself, as this will
invalidate the guarantee.
Environmental information
All unnecessary packaging material has been omitted. The packaging can be easily
separated into three materials: cardboard, polystyrene and plastic.
Your set consists of materials which can be recycled if disassembled by a
specialized company. Please observe the local regulations regarding the
disposal of packaging, dead batteries and old equipment.
2
ALL
PROG
X
3
4
5
6
7
8
Specifications
Power consumption ............................................................................................................ ≤ 15 W
Dimensions ...................................................................................290 mm x 143 mm x 240 mm
Weight ......................................................................................................................................1.62 kg

DYNAMIC BASS BOOST
CD SOUNDMACHINE AZ102
VOLUME
S
H
UF
F
L
E
R
E
P
E
A
T
P
R
O
G
L
I
F
T
T
O
O
P
E
N
TUNING
1
@
2
3
5
4
6
7
8
0
1
恭喜您购买了您的产品,欢迎您来到
Philips
大家庭!为了您能充分享受
Philips
提供的支持,请在
www.philips.com/
welcome
上注册您的产品。
提供的配件
– 交流电源线
顶部面板
/
前面板(请参阅 1)
1
VOLUME
–
调节音量水平。
2
SHUFFLE –
按随机顺序播放所有曲目。
3
REPEAT
–
重复播放曲目
/CD
曲目设定
/
整张
CD
。
4
2 ;
–
开始或暂停
CD
播放。
§ ∞
–
选择下一
/
上一曲目。
–
在当前曲目内向前
/
向后搜索
(按住该按钮)
9
–
停止
CD
播放。
–
擦除一个
CD
曲目设定。
5
PROG –
对曲目进行设定并查看该设定。
6
LIFT TO OPEN
–
打开
/
关闭
CD
舱门。
7
TUNING
–
调谐电台。
8
显示屏
–
显示
CD
功能。
后面板(请参阅 1
和
2)
9
来源选择器:
CD, FM, MW, OFF
–
选择
CD
或收音机音源。
–
关机开关。
0
伸缩天线
–
改善
FM
信号接收效果。
!
AC MAINS~
–
电源线插孔。
@
DBB
–
打开
/
关闭低音增强。
#
LINE-IN
–
外部音源插孔。
底部面板
$
电池盖
–
按下并推动箭头打开电池盖,插
入
6
节
1.5
伏
R-14/ UM-2/ C
型电池。
注意
–
存在可见及不可见的激光辐射。如果盖
子为打开状态,请勿直视激光束。
–
高电压!请勿打开。有触电危险。本设
备不包含任何用户
可更换部件。
–
修改本产品可导致
EMC
有害辐射情形或
其它不安全的操作。
–
不按此处说明的操作流程使用控件或进
行调整可能导致不安全的操作。
本设备符合欧盟的无线电干扰要求。
电源
如果方便,请尽可能地使用电源线供电,
以便节约电池电量。
在装入电池之前,请确保从设备和电源插
座上拔出了插头。
电池(未提供)
1 打开电池盖并插入
6
节电池
R-14
、
UM-2
或
C
型电池(最好为碱性电池),按照电
池仓内标示的“
+
”和“
–
”符号,以正确
的极性插入电池。
2 盖回电池盖,确保正确装入电池并且牢
固、到位。设备现在可以操作了。
电池含有化学物质,因此应正确处理。
•
电池使用不当可导致漏液,从而腐蚀电池
仓或导致电池爆裂。
•
不要混用电池:例如碱性电池与锌碳电池一
起使用。该设备只能使用同一类型的电池。
•
插入新电池时,不要将新旧电池混合使用。
•
如果长时间不使用本设备,请将电池取出。
电源 常规操作
/
调谐器
使用交流电源
警告:更改或断开电源之前,务必确保已
完全关闭本设备。
1 检查本设备底部型号铭牌上所标示的电源
电压
是否与当地电源电压一致。如果不一
致,请咨询经销商或服务中心。
2 将电源线连接到
AC MAINS~
插孔和电源插
座。设备即已连接,可以使用。
3 要完全关闭本设备,请从电源插座中拔出
电源插头。
4 将本设备安装在交流电插座附近,使交流
电源插头可轻易插接。
• 遇到雷暴天气时,请从电源插座中拔出电
源线以保护您的设备。如果仅从该设备背
面的
MAINS
插孔中拔出接头,由于线缆
的未使用端仍然带电,它可能导致儿童受
到严重的人身伤害。
型号铭牌位于本设备底部。
帮助提示:
–
为避免不必要的电能消耗,在使用完本
设备后,请始终将来源选择器调至
OFF
(关)位置。
常规操作
打开
/
关闭及选择功能
1 要选择音源,请将来源选择器调至
CD、
FM
或
MW
位置。
2 要关闭本设备,请将来源选择器调至
OFF
(关)位置。
3 要切换至
LINE IN(线路输入)模式,请
将外部音源连接至
LINE IN
插孔。
帮助提示:
• 当连接了外部音源时,本设备将自动切换
至
LINE IN(线路输入)模式,无论设备
处于
CD、FM
还是
MW
模式。
• 注意,LINE-IN
插孔并非用于插接耳机。
调节音量和声音
通过
VOLUME
和
DBB
控件调节音量。
电台接收
1 将来源选择器调到
FM
或
MW。
2 旋转
TUNING
调至所需电台。
帮助提示:
改善电台接收效果
• 对于
FM
,延长、倾斜和转动伸缩天线,
以获得最佳接收效果。
如果信号太强,请缩短天线长度。
• 对于
MW
,本设备使用内置天线。
转动整台设备以调整天线的方向,从而获
得最佳接收效果。
播放
CD
• 本
CD
播放机可播放音频光盘,包括可
刻录
CD (CD-R)
和可重写
CD (CD-
RW)
。This CD player plays Audio Discs
including CD-Recordables (CD-R) and
CD-Rewritables (CD-RW).
• 不能播放
MP3
、
CD-ROM
、
CD-I
、
CDV
、
VCD
、
DVD
或电脑
CD
。MP3,
CD-ROM, CD-I, CDV, VCD, DVD or
computer CDs are not possible for playback.
注意事项!
本产品可能无法播放某些唱片公司发行的
采用版权保护技术编码的
CD
。
1 将来源选择器调至
CD。
2 打开
CD
舱门,令印刷面朝上放入
CD
,
然后轻按
CD
舱门将其关闭。
显示屏将显示
--
,然后显示总曲目数。
(请参阅
3
)
3 按
2;
开始播放。
4 要暂停播放,请按
2;
。
要显示屏:闪烁
2
次。(请参阅
4
)
5 要继续,请再次按
2;
。
6 要停止
CD
播放,请按
9
。
帮助提示:
如出现以下情况,
CD
播放也会停止:
–
打开
CD
舱门;
–
选择
FM
、
MW
或
OFF
音源;
–
CD
播放到了末尾。
选择不同的曲目
• 按一次或反复按
∞ / §
,直至显示屏中出
现所需曲目号。
• 处于暂停
/
停止位置时,按
2;
可开始播放。
在曲目内查找一个片段
1 在播放期间,按住
∞
或
§ 。
CD
将以较低的音量高速播放。
2 找到所需片段时,放开
∞
或
§
可恢复正
常播放。
帮助提示:
– 当搜索过程到达最后一个曲目的末尾时,
CD
将进入停止模式。
CD
播放机
设定曲目号
您可以按所需的顺序存储最多
20
首曲
目。根据需要,可多次存储任何曲目。
1 在停止状态下,按
PROG
可开始设定。
显示屏:
PROG
和
00
将闪烁。(请参阅
5
)
2 按
∞
或
§
选择所需的曲目编号。
3 按
PROG
存储所需的曲目编号。
显示屏:
PROG
和
00
将闪烁,提示您可以
设定下一曲目。
4 重复步骤
2
至
3
,按此方法选择并存储所
有想要的曲目。
如果您尝试存储超过
20
首曲目,则将无
法选择曲目,且显示屏将显示
--
。
5 要播放设定曲目,请按
2
/
;
。
帮助提示:
–
当设定曲目播放到停止位置时,本设备将
回到正常播放状态。要重新进入曲目设定
模式,请在停止位置按
PROG
。
查看曲目设定
在停止位置,反复按
PROG
可查看存储的
曲目。
擦除曲目设定
您可通过以下方式擦除存储的内容:
– 在停止位置,按
PROG
进入设定模式,
然后按
9
。
– 选择
FM
、
MW
或
OFF
;
– 打开
CD
舱门;
不同的播放模式:
REPEAT
(重复)和
SHUFFLE
(随机)(请参阅
6, 7)
重复
您可反复播放当前曲目或整张光盘,并可
将
REPEAT(重复)模式与
PROG(设
定)模式结合使用。
REP – 持续播放当前曲目。
REP ALL – 重复播放整张
CD/
整个曲目
设定
1 要选择播放模式,请按一次或多次
REPEAT。
显示屏将显示
REP
图标或
REP AL
图标。
2 如果处于停止
/
暂停位置,请按
2;
开始播放。
3 要返回正常播放状态,请反复按
REPEAT,直到不再显示模式为止。
– 您还可以按
9
取消播放模式。
随机
您可按随机顺序播放所有曲目。
1 在停止位置,按
SHUFFLE
可打开随机播
放功能。
显示屏将显示
SHUFFLE
图标。
2 要关闭随机播放,请按
9 。
帮助提示:
–
在随机播放期间,如果选择了
REP
(重复
播放)功能,则会反复播放当前处于随机
播放状态的曲目;如果选择了
REP ALL
(全部重复)功能,则会反复随机播放整
张
CD
。
CD
播放机
CD
播放机和
CD
处理
• 如果
CD
播放机无法正确读取
CD
,可在
维修之前使用清洁
CD
来清洁镜头。
• 绝对不要触摸
CD
播放机的镜头!
• 环境温度的突然变化会导致
CD
播放机
镜头上凝结水汽。这种情况下,便不能播
放
CD
。切勿尝试清洁镜头,而应该将该
设备置于温暖的环境中,直到湿气蒸发。
• 请始终关闭
CD
舱门,避免灰尘落在镜
头上。
• 要清洁
CD
,请使用柔软的无绒布从中心
朝边缘的方向呈直线擦拭。切勿使用清洁
剂,否则可能会损坏光盘。
• 切勿在
CD
上写字或粘贴任何标签。
安全信息
• 如请将本设备放在坚固、平坦且稳定的表
面,确保设备不会倾斜。
• 将电源插头或产品耦合器用作断开设备
时,该断开设备应可以随时使用。
• 切勿将该设备、电池、
CD
暴露于潮湿、
阴雨、风沙环境,或者由于加热设备或阳
光直射造成的高温环境中。
• 切勿将本装置暴露在滴漏或溅漏环境下。
• 通风孔和周围表面间具有最小
15
厘米
(
6
英寸)的间隙,可适当通风,以防止
热量聚集。
• 切勿用报纸、桌布、窗帘等物体遮盖住通
风口。
• 不要将装有液体的物品(例如花瓶)放在
本设备上。
• 不要将无遮盖的火源(例如点燃的蜡烛)
放在本设备上。
• 本设备的机械部件包含自润滑轴承,无需
上油或润滑。
• 如果要清洁本设备,请使用干布。切勿使
用含有酒精、氨、苯或磨蚀性原料的清洁
剂,否则可能损坏外壳。
维护与安全(请参阅
8
)
问题
–
可能的原因
•
纠正措施
没有声音
/
电源
–
未调节音量
•
调节
VOLUME
(音量)
–
可
Power cord not securely connected
•
电源线没有连接稳固
–
正确连接交流电源线
•
电池已失效
/
没有正确插入
–
CD
包含非音频文件
•
按一次或多次
∞
,
§
跳过数据文件,跳至
CD
音频曲目。
显示屏不能正常工作
/
所有控件的操作都没有响应
–
放电
•
关闭设备电源并拔出电源插头。几秒钟后重
新连接
--, Er 或
01
指示
–
未插入
CD
•
插入
CD
–
CD
严重刮花或弄脏
•
更换
/
清洁
CD
,请参阅“维护”
–
激光镜头有水汽
p
•
等待镜头干燥。
–
CD-R/CD-RW
是空白光盘或已结定
•
使用结定的
CD-R/CD-RW
或合适的
CD
仅限使用音频光盘
注意:
请确保没有用版权保护技术对
CD
进行编码,
因为有一些
CD
不符合压缩光盘标准。
CD
跳过曲目
–
CD
已损坏或弄脏
•
更换或清洁
CD
–
编序播放
/
随机播放已启用
•
退出编序播放
/
随机播放模式
注意:
严重刮花或很脏的
CD
可能引起不当操作。
故障种类和处理方法
如果出现故障,请在将设备送予维修之前先检查以下列出的几点。
如果无法按照以下说明解决问题,请咨询经销商或服务中心。
警告:
请勿打开本设备,以免触电。任何情况下,您都不应该自行尝试维修此设备,这
样做将使保修失效。
环境信息
为使包装尽量简化,已省去所有不必要的包装材料。包材可轻易地分为
三类:纸板、聚苯乙烯和塑料。
本设备的所有材料均可回收和再利用(如果由专业公司拆卸)。请遵守
当地有关包装材料、废电池和旧设备的处理规定。
2
ALL
PROG
X
3
4
5
6
7
8
规格
能耗
............................................................................................................................................. ≤ 15
瓦
尺寸
....................................................................................... 290
毫米
x 143
毫米
x 240
毫米
重量
............................................................................................................................................1.62
千克
控制/电源
简体中文
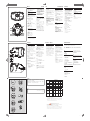
¾ńњ൙ۂႹႹݡ༂ᇍᄡۂҊࡵෲႹबᇍҏਜᇓ֩ݧबᄡ6-7їም݃֩ཏဵၟ༳
2,QGLFDWHVWKDWWKLVWR[LFRUKD]DUGRXVVXEVWDQFHFRQWDLQHGLQDOORIWKHKRPRJHQHRXVPDWHULDOVIRUWKLVSDUW
LVEHORZWKHOLPLWUHTXLUHPHQWLQ6-7ķ
ńњ൙ۂႹႹݡ༂ᇍᇄഖᄡۂҊࡵ֩ଚ၆बᇍҏਜᇓ֩ݧӕԟ6-7 ķ їም݃֩ཏဵ
;,QGLFDWHVWKDWWKLVWR[LFRUKD]DUGRXVVXEVWDQFHFRQWDLQHGLQDWOHDVWRQHRIWKHKRPRJHQHRXVPDWHULDOV
XVHGIRUWKLVSDUWLVDERYHWKHOLPLWUHTXLUHPHQWLQ6-7
ညΧၬణᬀ(QYLURQPHQWDO3URWHFWLRQ8VH3HULRG
7KLVORJRUHIHUVWRWKHSHULRG\HDUV
ሴྔ༓ӅᇓݧႹ֩ႹႹݡ༂ᇍࠋჱෑᄡᆢӌൔႬ֩์ࡵ༳҆ߺكഷທྈࠋёĶሴྔ༓ӅႬ߀ൔ
Ⴌۂሴྔ༓Ӆ҆ߺؗߐࣦᄳӲᇛಝࠋؗఇಪപґӅᄳӲᇛ෩ݡ֩ཏ
7KLV ORJR UHIHUV WR WKH SHULRG \HDUV GXULQJ ZKLFK WKH WR[LF RU KD]DUGRXV VXEVWDQFHV RU HOHPHQWV
FRQWDLQHGLQHOHFWURQLFLQIRUPDWLRQSURGXFWVZLOOQRWOHDNRUPXWDWHVRWKDWWKHXVHRIWKHVH>VXEVWDQFHVRU
HOHPHQWV@ZLOOQRWUHVXOWLQDQ\VHYHUHHQYLURQPHQWDOSROOXWLRQDQ\ERGLO\LQMXU\RUGDPDJHWRDQ\DVVHWV
̻Ճሙ
1DPHRIWKH
3DUWV
ఙർఙࠂྠ᠂ਾϾዼ
+D]DUGRXVWR[LF6XEVWDQFH
ధ
3E/HDG
܌+J
0HUFXU\
ᬄ&G
FDGPLXP
ࡒ۴&KURPLXP
أᜌ৷Ъ
3%%
أᜌفЪ
3%'(
+RXVLQJ
ທक़
2
22 2 22
'9'&'ORDGHU
'9'&'ܿދ
;
22 2 22
/&'3DQHO
၅ࣚ૯ϴ
;;
2222
/RXGVSHDNHUV
ঝϗ֊ჱ
222 2 22
3:%V
ϴቊࡵ
;
22 2 22
$FFHVVRULHV
5HPRWHFRQWURO
FDEOHV
ڼࡵIJီ३చĶ
჻ཐĶ৹ࢨཐij
;
22 2 22
%DWWHULHVLQ
5HPRWH&RQWURO
=Q&
ီ३చԁ
;
22 2 22
$GGHQGXPQHZLQGG
-
 1
1
-
 2
2


他の言語で
- English: Philips AZ102S/93 Owner's manual
関連論文
-
Philips AZ420/93 取扱説明書
-
-
-
-
-
-
-
-
-