Logitech Zone 900 Receiver インストールガイド

タイプ
インストールガイド

Logitech Zone 900 Receiver は、Zone 900 ヘッドセットを最大 6 台までワイヤレスで接続できるワイヤレス レシーバーです。複数のデバイスを 1 台のレシーバーに接続できるため、デスクをすっきりと保ち、生産性を向上させることができます。レシーバーは小型で持ち運びが容易なので、自宅やオフィスなど、どこでも使用できます。また、レシーバーはプラグ アンド プレイ対応なので、ドライバーをインストールする必要はありません。

レシーバーは、USB-A または USB-C コネクタを介してコンピューターに接続できます。レシーバーをコンピューターに接続したら、Logi Tune ソフトウェアをダウンロードしてインストールする必要があります。Logi Tune ソフトウェアは、レシーバーとヘッドセットをペアリングするために使用されます。

Logi Tune ソフトウェアをインストールしたら、レシーバーとヘッドセットをペアリングする必要があります。ヘッドセットの電源ボタン

LOGITECH ZONE 900 RECEIVER
Complete Setup Guide | 设置指南 |
完整設定指南 | 설치 가이드 |
Panduan Pemasangan Lengkap
罗技 ZONE 900 接收器
CONTENTS
English . . . . . . . . . . . . . . . . .3
简体中文 . . . . . . . . . . . . . . . . 7
繁體中文 . . . . . . . . . . . . . . . 11
한국어 . . . . . . . . . . . . . . . . 15
Indonesia . . . . . . . . . . . . . . . 19
WHAT’S IN THE BOX
USB-A Unifying + Audio receiver
USB-A Unifying
+Audio receiver
Light indicator
KNOW YOUR PRODUCT
3 English
USB-C
USB-A
Zone 900 connected
With Zone 900 you can connect up to 6
mice and keyboards.
Add mouse or keyboard
Done
CONNECTING THE RECEIVER TO THE HEADSET
1. Insert your Zone 900 receiver into thecomputer
USB-A port. Or to connect it via USB-C,
insertthereceiver into USB-C adapterrst.
Thenplug in the USB-C adapter into
thecomputer USB-C port.
2. Install and open Logi Tune desktop. Download it from
www.logitech.com/tune
3. Logi Tune desktop will conrm that a new receiver
isfound. Click Done to start connecting to
theheadset.
4 English
Connecting to your headset
Keep your receiver plugged in during the
connection process and make sure your
headset for is in pairing mode.
Cancel pairing
Connection successful
Device is ready to use.
Done
New receiver found
Press and hold the paring button on your
headset for 3 sec to enter pairing mode.
Show me how
Continue
Power
4. Enter pairing mode on headset by pressing
thepower button for 3 seconds. Click Continue.
5. If pairing mode is successful, light indicators
on the receiver and headset will ash white.
6. Once you see this screen, the receiver is now
paired with the headset. Light indicators on
the receiver and headset will turn solid white.
5 English
60%
Logi Zone 900
SOUND SETTINGS
About the headset
Add mouse or keyboard
Voice prompts
Rotate to mute
Button functions
Sleep settings
Logi Zone 900Device name
1 hour
Receiver support multiple devices
Logitech® Unifying Software
Welcome
Plug it. Forget it. Add to it.
Learn more...
You are now ready to use your Logitech® Unifying receiver.
And you can pair up to six compatible wireless mice, keyboards, and number pads with
one single Logitech Unifying receiver.
Advanced...
Copyright © 2018 Logitech
Next
RECEIVER:
Height x Width x Depth: 35.5 mm x 16.2 mm x 5.3 mm
DIMENSIONS
www.logitech.com/support/zone900
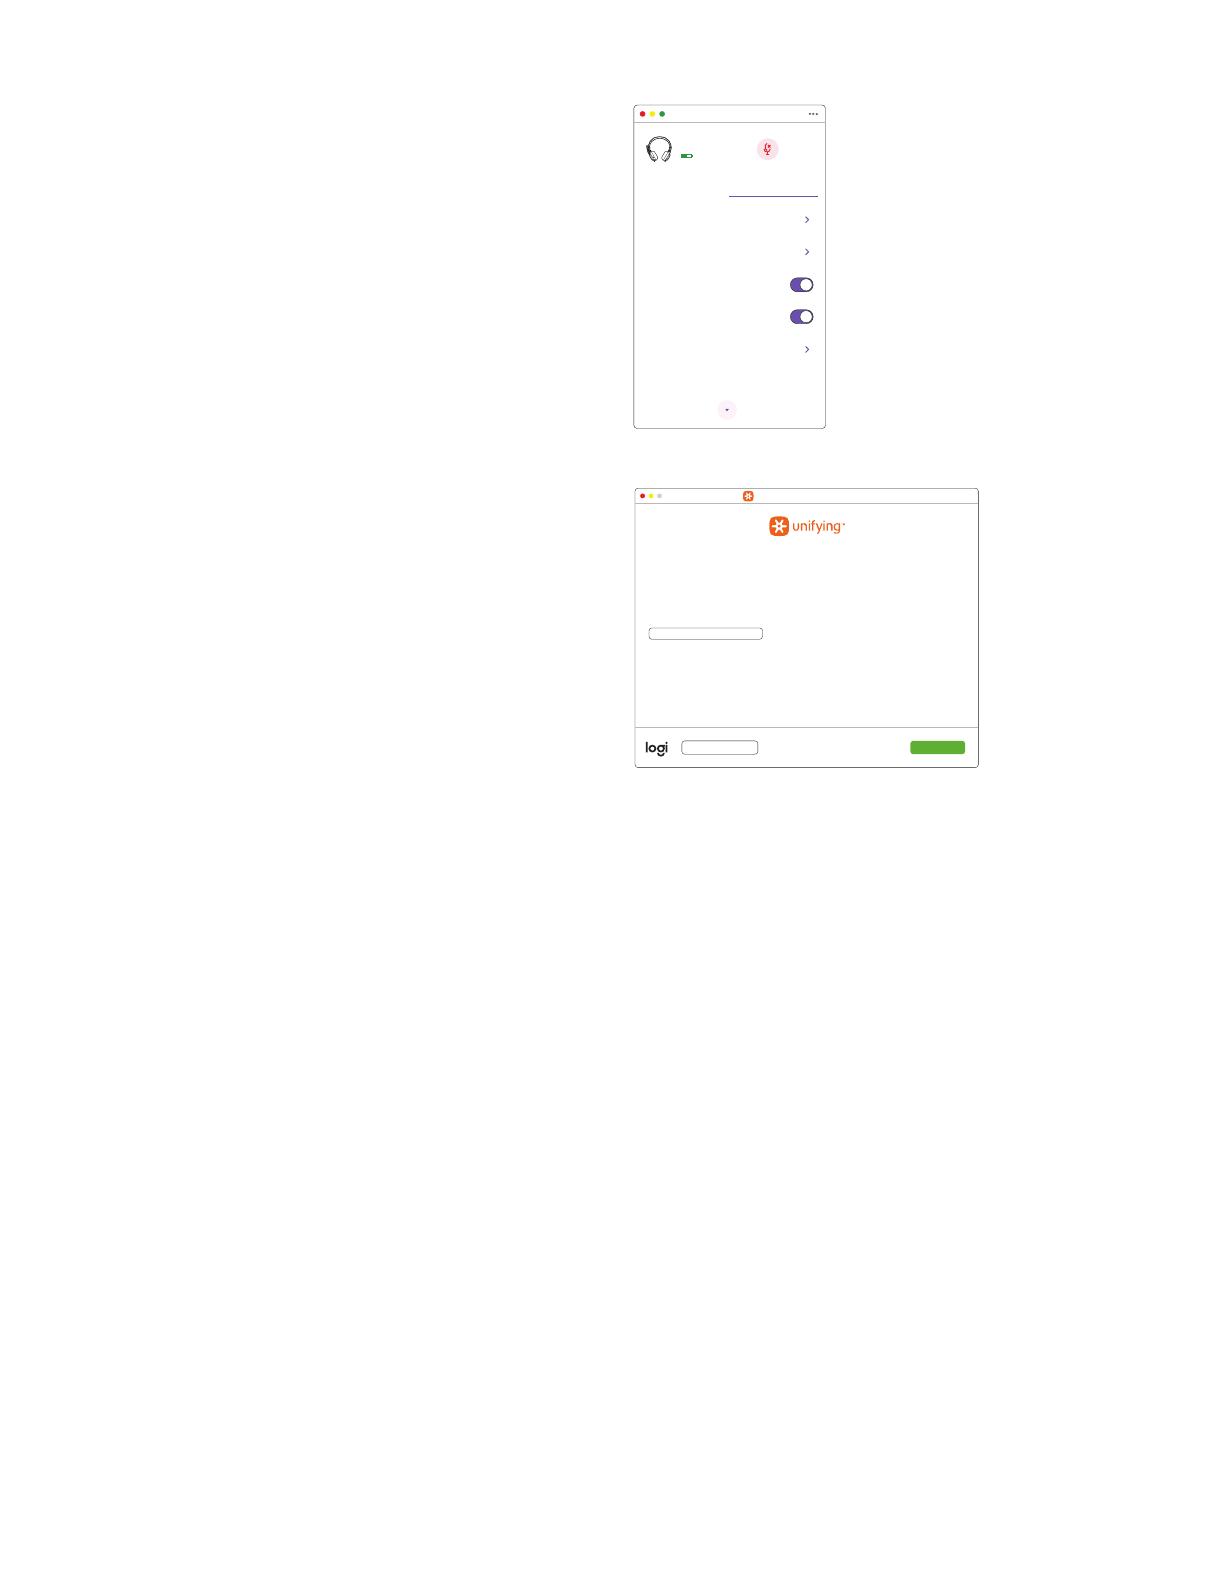
7. With Zone 900 receiver, you can pair up to 6 Logitech
Unifying peripherals.
a. On Logi Tune desktop, go to Settings and click
Addmouse or keyboard.
b. If you already have the Unifying Software installed
on your computer, it should open. If not, it will be
downloaded and installed automatically.
c. Follow the Unifying Software prompts to
complete adding your mouse and keyboard.
d. To add more devices, follow steps 2 and 3 and
follow the steps in the Unifying Software.
© 2021 Logitech, Logi and the Logitech Logo are trademarks or registered trademarks of
Logitech Europe S.A. and/or its aliates in the U.S. and other countries. Logitech assumes
noresponsibility for any errors that may appear in thismanual. Information contained herein
issubject to change without notice.
包装内容
USB-A Unifying 优联 + 音频接收器
USB-A Unifying 优联
+音频接收器
指示灯
了解您的产品
简体中文 7
USB-C
USB-A
Zone 900 connected
With Zone 900 you can connect up to 6
mice and keyboards.
Add mouse or keyboard
Done
将接收器连接到耳机麦克风
1. Zone 900 接收器插入电脑的 USB-A 端口。或通
USB-C 连接,先将接收器插入 USB-C 适配器。
USB-C 适配器插入电脑的 USB-C 端口。
2. 安装并启动 Logi Tune 桌面版。下载请访问 www.
logitech.com/tune
3. Logi Tune 桌面版将确认找到新的接收器。点击完成开始
连接耳机麦克风。
简体中文 8
Connecting to your headset
Keep your receiver plugged in during the
connection process and make sure your
headset for is in pairing mode.
Cancel pairing
Connection successful
Device is ready to use.
Done
New receiver found
Press and hold the paring button on your
headset for 3 sec to enter pairing mode.
Show me how
Continue
电源
4. 按住电源按钮 3 秒,进入耳机麦克风的配对模
式。点击继续
5. 如果配对模式成功,接收器和耳机麦克风的指
示灯将闪烁白色。
6. 看到此屏幕后,接收器即已与耳机麦克风配
对。接收器和耳机麦克风指示灯将常亮白色。
简体中文 9
60%
Logi Zone 900
SOUND SETTINGS
About the headset
Add mouse or keyboard
Voice prompts
Rotate to mute
Button functions
Sleep settings
Logi Zone 900Device name
1 hour
Receiver support multiple devices
Logitech® Unifying Software
Welcome
Plug it. Forget it. Add to it.
Learn more...
You are now ready to use your Logitech® Unifying receiver.
And you can pair up to six compatible wireless mice, keyboards, and number pads with
one single Logitech Unifying receiver.
Advanced...
Copyright © 2018 Logitech
Next
接收器:
x x 深:约 35.5 毫米 x 16.2 毫米 x 5.3 毫米
规格
www.logitech.com/support/zone900
7. 使用 Zone 900 接收器,您最多可以配对 6 个罗技
Unifying 优联外设。
a. Logi Tune 桌面版上,前往设置,点击添加鼠标
或键盘。
b. 如果您的电脑已安装Unifying 优联软件,将自动启
动软件。若未启动,将自动下载并安装软件。
c. 按照 Unifying 优联软件的提示操作,
完成鼠标和键盘的添加。
d. 要添加更多设备,请执行步骤 2 3,按照 Unifying
优联软件的步骤进行操作。
版权所有 ©2021 年罗技。罗技、LogiLogitech 和罗技标志为 罗技欧洲公司 /或其美国及
其他国家/地区附属公司的商标,并或已注册。罗技对于本手册中可能出现的任何错误不承担任
何责任。本手册中包含的信息如有更改,恕不事先通知。
包裝內容
USB-A Unifying + 音訊接收器
USB-A Unifying
+ 音訊接收器
指示燈
瞭解您的產品
繁體中文 11
USB-C
USB-A
Zone 900 connected
With Zone 900 you can connect up to 6
mice and keyboards.
Add mouse or keyboard
Done
將接收器連線到耳機麥克風
1. Zone 900 接收器插入到電腦的 USB-A 連接埠。
或是透過 USB-C 連接,要如此做,請先將接收
器插入 USB-C 轉接器。然後將 USB-C 轉接器插入
到電腦的 USB-C 連接埠。
2. 安裝並開啟 Logi Tune 電腦版。此軟體可從
www.logitech.com/tune 下載
3. Logi Tune 電腦版 會確認找到新接收器。按一下完成
始連線到耳機麥克風。
繁體中文 12
Connecting to your headset
Keep your receiver plugged in during the
connection process and make sure your
headset for is in pairing mode.
Cancel pairing
Connection successful
Device is ready to use.
Done
New receiver found
Press and hold the paring button on your
headset for 3 sec to enter pairing mode.
Show me how
Continue
電源
4. 按住電源按鈕 3 秒以在耳機麥克風上進入配對模式。
按一下繼續
5. 如果成功進入配對模式,接收器和耳機麥克風
上的指示燈會閃爍白燈。
6. 當看到此畫面時,接收器即已和耳機麥克風配對。
接收器和耳機麥克風上的指示燈會轉為亮起穩定白燈。
繁體中文 13
60%
Logi Zone 900
SOUND SETTINGS
About the headset
Add mouse or keyboard
Voice prompts
Rotate to mute
Button functions
Sleep settings
Logi Zone 900Device name
1 hour
Receiver support multiple devices
Logitech® Unifying Software
Welcome
Plug it. Forget it. Add to it.
Learn more...
You are now ready to use your Logitech® Unifying receiver.
And you can pair up to six compatible wireless mice, keyboards, and number pads with
one single Logitech Unifying receiver.
Advanced...
Copyright © 2018 Logitech
Next
接收器:
x x 深:35.5 公釐 x 16.2 公釐 x 5.3 公釐
尺寸
www.logitech.com/support/zone900
7. 使用 Zone 900 接收器,您最多可以配對 6 個羅技
Unifying 週邊設備。
a. Logi Tune 電腦版 中,前往「設定」然後按一下
「新增滑鼠或鍵盤」。
b. 如果您電腦上已經有安裝有 Unifying 軟體,其應會
開啟。如果沒有,則會自動下載並安裝。
c. 遵循 Unifying 軟體的指示
完成新增滑鼠與鍵盤的程序。
d. 若要新增更多裝置,請完成步驟 2 3,然後在
Unifying 軟體中遵循步驟進行。
版權所有 © 2021 Logitech、羅技、Logi 和羅技標誌為 Logitech Europe S.A. /或其附屬公司在
美國和其他國家的商標或註冊商標。羅技對於本手冊中可能出現的任何錯誤不承擔任何責任。
本手冊中包含的資訊如有更改,恕不事前通知。
박스 내용물
USB-A Unifying + 오디오 수신기
USB-A Unifying +
오디오 수신기
표시등
제품 설명
한국어 15
USB-C
USB-A
Zone 900 connected
With Zone 900 you can connect up to 6
mice and keyboards.
Add mouse or keyboard
Done
수신기와 헤드셋 연결
1. Zone 900 수신기를 컴퓨터 USB-A 포트에
연결합니다. 또는 USB-C 연결하려면, USB-C
어댑터에 먼저 수신기를 연결합니다. 그런 다음
컴퓨터 USB-C 포트에 USB-C 어댑터를 연결합니다.
2. Logi Tune 데스크탑을 설치하고 엽니다.
www.logitech.com/tune에서 다운로드
3. Logi Tune 데스크탑에서 수신기를 감지하였음을
확인합니다. 헤드셋 연결을 시작하려면 완료
클릭합니다.
한국어 16
Connecting to your headset
Keep your receiver plugged in during the
connection process and make sure your
headset for is in pairing mode.
Cancel pairing
Connection successful
Device is ready to use.
Done
New receiver found
Press and hold the paring button on your
headset for 3 sec to enter pairing mode.
Show me how
Continue
전원
4. 전원 버튼을 3 동안 눌러 헤드셋 페어링 모드로
들어갑니다. 계속 클릭합니다.
5. 페어링 모드가 성공하면 수신기와 헤드셋의
표시등이 흰색으로 깜박입니다.
6. 화면이 표시되면 수신기가 헤드셋과
페어링된 것입니다. 수신기와 헤드셋의
표시등은 흰색으로 유지됩니다.
한국어 17
60%
Logi Zone 900
SOUND SETTINGS
About the headset
Add mouse or keyboard
Voice prompts
Rotate to mute
Button functions
Sleep settings
Logi Zone 900Device name
1 hour
Receiver support multiple devices
Logitech® Unifying Software
Welcome
Plug it. Forget it. Add to it.
Learn more...
You are now ready to use your Logitech® Unifying receiver.
And you can pair up to six compatible wireless mice, keyboards, and number pads with
one single Logitech Unifying receiver.
Advanced...
Copyright © 2018 Logitech
Next
수신기:
높이 x 너비 x 깊이: 35.5mm x 16.2mm x 5.3mm
규격
www.logitech.com/support/zone900
7. Zone 900 수신기에 최대 6개의 로지텍 Unifying
주변기기를 페어링할 있습니다.
a. Logi Tune 데스크탑에서 설정으로 이동하여 마우스
또는 키보드 추가 클릭합니다.
b. 컴퓨터에 이미 Unifying 소프트웨어가 설치되어
있는 경우, 소프트웨어가 열립니다. 열리지 않는
경우, 자동으로 다운로드 설치됩니다.
c. Unifying 소프트웨어 알림을 따라
마우스 키보드 추가를 완료합니다.
d. 장치를 추가하려면, 2, 3단계와 Unifying
소프트웨어 단계를 따릅니다.
© 2021 Logitech, Logi Logitech 로고는 미국과 기타 국가에서 Logitech Europe S.A. /또는
계열사의 상표 또는 등록 상표입니다. Logitech 설명서에 명시된 어떤 오류에 대해서도
책임지지 않습니다. 설명서에 있는 정보는 예고 없이 변경될 있습니다.
ISI KEMASAN
Receiver Audio + Unifying USB-A
Receiver Audio +
Unifying USB-A
Indikasi lampu
MENGENAL PRODUK
Indonesia 19
USB-C
USB-A
Zone 900 connected
With Zone 900 you can connect up to 6
mice and keyboards.
Add mouse or keyboard
Done
MENGHUBUNGKAN RECEIVER KE HEADSET
1. Masukkan receiver Zone 900 ke port USB-A
dikomputer. Atau untuk menghubungkannya
via USB-C, masukkan receiver ke adaptor USB-C
terlebih dahulu. Kemudian masukkan adaptor
USB-C ke port USB-C di komputer.
2. Instal dan buka Logi Tune Desktop. Download dari
www.logitech.com/tune
3. Logi Tune Desktop akan mengonrmasikan telah
ditemukannya sebuah receiver baru. Klik Done
(Selesai) untuk mulai menghubungkan ke headset.
Indonesia 20
  • Page 1 1
  • Page 2 2
  • Page 3 3
  • Page 4 4
  • Page 5 5
  • Page 6 6
  • Page 7 7
  • Page 8 8
  • Page 9 9
  • Page 10 10
  • Page 11 11
  • Page 12 12
  • Page 13 13
  • Page 14 14
  • Page 15 15
  • Page 16 16
  • Page 17 17
  • Page 18 18
  • Page 19 19
  • Page 20 20
  • Page 21 21
  • Page 22 22

Logitech Zone 900 Receiver インストールガイド

タイプ
インストールガイド

Logitech Zone 900 Receiver は、Zone 900 ヘッドセットを最大 6 台までワイヤレスで接続できるワイヤレス レシーバーです。複数のデバイスを 1 台のレシーバーに接続できるため、デスクをすっきりと保ち、生産性を向上させることができます。レシーバーは小型で持ち運びが容易なので、自宅やオフィスなど、どこでも使用できます。また、レシーバーはプラグ アンド プレイ対応なので、ドライバーをインストールする必要はありません。

レシーバーは、USB-A または USB-C コネクタを介してコンピューターに接続できます。レシーバーをコンピューターに接続したら、Logi Tune ソフトウェアをダウンロードしてインストールする必要があります。Logi Tune ソフトウェアは、レシーバーとヘッドセットをペアリングするために使用されます。

Logi Tune ソフトウェアをインストールしたら、レシーバーとヘッドセットをペアリングする必要があります。ヘッドセットの電源ボタン