
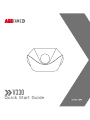
Quick Start Guide
V330

5
Opening Package
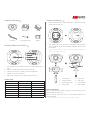
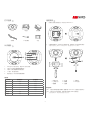
Knowing about the Camera
1. WiFi indicator: After the camera is turned on, the WiFi indicator lights up
later.
2. Card slot 1: For camera storage of video and image les.
3. Card slot 2: Used only for upgrades of the Photo Collage Max.
4. Interface 1/4: For xing the camera.
5. Aviation plug socket: For power supply and data transmission.
Indicator lights
Operating state Power indicator Operating indicator
Power on Flashing Flashing
Charging Flashing Solid
Video recording / Flashing
Photographing / Flashing
Live streaming / Flashing
Battery full Solid /
Low battery warning Flashing /
AdapterBattery caseV330A
1/4 Lengthened screw Power cord Battery
Camera Installation
1. Remove the camera bottom cover in the direction of the arrow, and insert
MicroSD card into Card slot 1.
2. Align with the interface at the bottom of the camera, install the battery
case in the direction of the arrow, and tighten the battery case screw with
a screw driver.
* Whenthecamera is mountedon atripod, 1/4lengthened screwmay beadded atthe
bottomifthescrewlengthisnotenough.
Power Supply Modes:
Mode 1: Power the camera directly by powering on (100~240V) through the
standard adapter and power cord.
Mode 2: Power the camera by putting two standard 18650 batteries in the
battery compartment.
* Whenthebatteryislow,connectthepoweradaptertochargethebattery.
1. Power indicator
2. Operating indicator
3. Live streaming button
4. Display screen
5. Power button
6. Cover button
7. Power interface
8. RJ45 interface

6
Operation and Use
ON/OFF
ON: press the “Power Button” for 3 seconds. After the camera is turned on,
the power indicator will light up and the Wi-Fi indicator will light up later.
OFF: press the “Power Button” for 3 seconds. After the camera is turned o,
the indicator will go out.
APP Installation and Connection
1. Download and install “AEE_VR_Cam” from Google play or Apple Store;
2. Turn on the camera by pressing the “Power Button” for 3 seconds, and
wait for the Wi-Fi light to illuminate;
3. Connect the wireless signal source of “AEE_VR_Cam” in the mobile device
WLAN;
* Defaultpassword:AEE12345
Video Recording/Photographing
1. Make sure your mobile phone is connected to your camera Wi-Fi;
2. Start “AEE_VR_Cam” and click the corresponding button for video
recording/ photographing/settings, etc.
* Afterthevideorecordingorlivestreamingstarts,thedisplayscreenstartstiming.
Pushing video stream
1. Install the VLC player on your computer;
2. Connect the wireless signal source of “AEE_VR_Cam” in the computer
WLAN;
3. Open the VLC player, click on “Media” > “Open Network Streaming” > “Network”
in the menu bar, select the type you want to play in “Please enter the
network URL”, and click on “Play”.
- Rtsp://192.168.42.1/live (2K video/auxiliary code stream, smoother)
- Rtsp://192.168.42.1/liveMain (4K video/main code stream, clearer)
* Inorderto make thevideo streamsmootherwhenpushing video stream,it is
recommendedtoexittheWi-Ficonnectiononthemobileterminal.
4. You can push the video stream directly by connecting the network cable:
turn o Wi-Fi, connect RJ45 interface of battery case and PC using the
standard network cable, and enter the corresponding IP address at the
network URL.
- Rtsp://192.168.0.226/live (auxiliary code stream)
- Rtsp://192.168.0.226/liveMain (main code stream)
Live streaming
Live streaming by mobile phone
1. Make sure your mobile phone has a normal Internet connection and 4G
network or above;
2. Turn on the camera and connect the mobile phone to camera Wi-Fi;
3. Open up the APP and click the live streaming button on the home page for
live streaming;
* Pleasecheckthedetailedoperationinstructionsforlivestreamingafterenteringthelive
streamingsettingspage.
Live streaming by computer
1. Make sure your mobile phone has a normal Internet connection and 4G
network or above;
2. Turn on the camera and make sure the camera and the external network
are connected normally through the network cable;
3. Open up the APP and set the upload server address;
4. Click the live streaming button on the home page for live streaming;
5. The terminal customer can watch the live streaming on the PC through the
corresponding server address.
Specications
Angle 360° x 360° Aperture 2.4f
Photo
resolution
5MP Video
resolution
3840x1920/30fps,
1920x960/30fps
Power input 5.5V/6A Battery
capacity
6000mAh
Video
duration
1 hour Charging
duration
3 hours
Memory
card
Leading Brand Micro
SD card, maximum
support for 128GB
External
interface
RJ45 interface, DC
charging interface,
interface 1/4
Operating
temperature
0° C -50° C Storage
temperature
-20° C - 60° C
Weight 650g Dimension 110x110x60(mm)

7
Notes
1. Don’t expose the camera to high temperatures or direct sunlight.
2. Don’t place the camera near objects with strong magnetic elds, such as
magnets or motors. Also avoid placing the product close to objects that
emit strong radio waves, such as antennas. Strong magnetic elds may
cause product failure or damage to image and audio data.
3. In case of overheating, smoke or unpleasant smell during the charging
process, immediately unplug the power cord to stop charging and avoid a
re hazard.
4. While it is charging, keep the product out of children’s reach. The power
cord may cause children accidental suocation or electric shock.
5. Keep the camera in cool, dry and dust-free places.
6. Don’t place Micro SD card near strong magnetic objects, such as
televisions, speakers, magnets, etc. Also, avoid places where static
electricity is easily generated; otherwise, the data stored in the Micro SD
card may be lost.
FCC Announcements
1. The manufacturer shall not be responsible for any interference with
the device from radio or television signals caused by unauthorized
modications. This modication could void the user’s authority to operate
the device.
2. This device complies with Part 15 of the FCC Rules. (1) This device will not
cause harmful interference. (2) This device can receive any interference
signals, including some interference that may cause undesired eects.
Attention:
This equipment has been tested and found to comply with the limits for a Class
B digital device, pursuant to Part 15 of the FCC Rules. These limits are designed
to provide reasonable protection against harmful interference in a residential
installation. This equipment generates, uses and can radiate radio frequency
energy, if not installed and used in accordance with the instructions, may cause
harmful interference to radio communications. However, there is no guarantee
that interference will not occur in a particular installation. If this equipment
does cause harmful interference to radio or television reception, which can be
determined by turning the equipment o and on, the user is encouraged to try
to correct the interference by one or more of the following measures:
- Reorient or relocate the receiving antenna.
- Keep a certain distance between the device and the receiver.
- Connect the equipment into an outlet on a circuit dierent from that to
which the receiver is connected.
- Consult the dealer or an experienced radio/TV technician for help.

3
打开包装
认识相机
1. WiFi 指示灯 : 相机启动后,稍后 WiFi 指示灯亮起。
2. 卡槽 1: 用于相机存储视频和图像文件。
3. 卡槽 2: 仅用于拼接软件的升级使用。
4. 1/4 接口 : 用于固定相机。
5. 航空头插座 : 用于供电以及数据传输。
指示灯
工作状态 电源指示灯 工作指示灯
开机 闪烁 闪烁
充电 闪烁 长亮
录影 / 闪烁
拍照 / 闪烁
直播 / 闪烁
电池充满 长亮 /
低电警告 闪烁 /
适配器电池盒V330A
1/4 加长螺钉电源线 电池
相机安装
1. 按箭头方向取出相机底盖,卡槽 1 插入 MicroSD 卡。
2. 对准相机底部接口,按箭头方向安装电池盒,并用镙丝刀将电池盒镙钉紧固。
* 将相机安装固定在三脚架时,如镙钉长度不够,请在底部加装 1/4 加长镙钉。
1. 电源指示灯 4. 显示屏 7. 电源接口
2. 工作指示灯 5. 电源键 8. RJ45 接口
3. 直播键 6. 仓盖键
供电方式:
方式一:通过标配的适配器与电源线 , 接通电源(100~240V)后直接为相机供电。
方式二:通过电池仓为相机供电,需装入两节标配的 18650 标准电池。
* 当电池电量不足时,请连接电源适配器为电池充电。

4
操作使用
开机 / 关机
开机:长按“电源键”3 秒,相机启动后,电源指示灯亮起,稍后 Wi-Fi 指示灯亮起。
关机:长按“电源键”3 秒,相机启动关闭后,指示灯熄灭。
APP 安装与连接
1. 在 Google play 或 Apple Store 中下载安装“AEE_VR_Cam”;
2. 长按相机“电源键”3 秒启动相机 , 等待 Wi-Fi 灯点亮;
3. 在移动设备 WLAN 中连接“AEE_VR_Cam”的无线信号源;
* 默认密码 :AEE12345
录影 / 拍照
1. 确保手机已连接相机 Wi-Fi;
2. 启动“AEE_VR_Cam”,点击相应的按钮可进行录影 / 拍照 / 设置等;
* 录影 / 直播开始后,显示屏开始计时。
视频推流
1. 在电脑上装 VLC 播放器;
2. 在电脑 WLAN 中连接“AEE_VR_Cam”的无线信号源;
3. 打开 VLC 播放器,依次点击菜单栏中的“媒体”>“打开网络串流”>“网络”> 在“请
输入网络 URL”中选择需要播放的类型 > 点击“播放”。
- rtsp://192.168.42.1/live(2K 视频 / 辅码流,更流畅)
- rtsp://192.168.42.1/liveMain(4K 视频 / 主码流,更清晰)
* 推流时,为了使推流更加流畅,建议退出手机端的 Wi-Fi 连接。
4. 可以通过连接网线直接推流:关闭 Wi-Fi,用标准网线连接电池盒和 PC 的
RJ45 接口 , 在网络 URL 处输入对应的 IP。
- rtsp://192.168.0.226/live(辅码流)
- rtsp://192.168.0.226/liveMain(主码流)
直播
手机直播
1. 确保手机上网功能正常,并具有 4G 以上网络;
2. 启动相机,使用手机连接相机 Wi-Fi;
3. 打开 APP,点击首页直播按钮进行直播;
* 请在进入直播设置页面之后查看详细的直播操作说明;
电脑直播
1. 确保手机上网功能正常,并具有 4G 以上网络;
2. 启动相机,确保相机与外网通过网线正常连接;
3. 打开 APP,设置上传服务器地址;
4. 点击首页直播按钮进行直播;
5. 终端客户在 PC 端通过相应的服务器地址即可观看直播;
规格参数
视角 360° x 360° 光圈 2.4f
照片分辨率 5MP 视频分辨率 3840x1920/30fps,
1920x960/30fps
电源输入 5.5V/6A 电池容量 6000mAh
录像时长 1 小时 充电时长 3 小时
存储卡 主流品牌 Micro SD 卡,
最高支持 128GB
外置接口 RJ45 接口,DC 充电接口,
1/4 接口
工作温度 0° C 至 50° C 储存温度 -20° C 至 60° C
重量 650g 尺寸 110x110x60(mm)
注意事项
1. 请勿将相机放置在温度较高或阳光直射的地方。
2. 请勿将相机靠近具有强磁场的物体,如磁铁或电动机。另外避免将产品靠近发
出较强无线电波的物体,如天线。强磁场可能会引起产品故障或破坏图像、声
音数据。
3. 充电过程中,如果出现过热、冒烟或发出异味,请立即拔下电源停止充电,避
免发生火灾。
4. 充电时,请将产品置于儿童无法触及之处。电源线可能导致儿童意外窒息或使
其受到电击。
5. 请将相机存放在阴凉、干燥、无灰尘的位置。
6. 请勿将内存卡存放或靠近 任何强磁场区域,如电视机、扬声器、磁铁等。另外
避免易于产生静电的场所,否则可能会丢失内存卡中存储的数据。
FCC 通告
1. 因未被授权的修改而使本设备受到无线电广播或电视信号的干扰,制造商不对
此负责。这种修改使用户无权操作本设备。
2. 本设备适用 FCC 规则 Part 15.(1) 本设备不会造成伤害性干扰 (2) 本设备会接
收到任何干扰信号,包括一些可能会造成不期望影响的干扰。
注意:
依据 FCC part 15, 本设备经测试适用 B 等级数字产品限制。这些限制要求在住宅区
安装要提供合理的保护,避免受到伤害性干扰。本设备会产生辐射频率,如果没有
按照指示安装可能会对无线电通讯造成伤害性干扰。然而,不能确保在特别的安装
下不会造成干扰。通过打开或关闭本设备判断对无线电广播或电视信号接收的确造
成了伤害性干扰,请用户通过以下方式进行纠正:
- 调整或移动接收天线
- 使本设备和接收器之间的保持一定距离
- 使用与连接接收器不同线路的电源插座来连接本设备
- 咨询经销商或有经验的无线电广播或电视信号的技术员

-
 1
1
-
 2
2
-
 3
3
-
 4
4
-
 5
5
-
 6
6
-
 7
7


