
立即注册您的新博世产品:
www.bosch-home.cn
使用产品前请仔细阅读本使用说明书,并请妥善保管
zh 使用说明书
en Instruction manual
多功能料理碗
MUZ9VLP1

zh 简体中文 3
en English 8

3
zh 按照规程的使用
按照规程的使用
本附件为 MUM9 厨师机(“OptiMUM”系列)专用。请注意该厨师
机的使用说明书。
切勿将附件用于其他电器。只能与配套零部件一起使用。
根据不同组装方式,该附件适用于下列目的:
通用刀片:用于切碎、加工糊状食品、混合、揉合、切开和制作酱汁
及混合饮料。
切割刀盘:用于切丝、研磨和切碎食物。
榨汁器:用于榨柑橘汁。
待加工的食物不得包含任何硬物(如骨头)。本附件不得用于加工其他
物品或物质。
安全须知
W 受伤危险!
■ 请勿将手伸入进料槽内。只能使用随产品提供的推杆!
■ 请勿赤手触碰通用刀片!插入、拆下通用刀片时,只能抓住通用刀
片的塑料把手。通用刀片不使用时,务必存放到刀片保护套中。请
用刷子清洁刀片。
■ 请勿抓握切割刀盘的利刃或边缘。仅可抓握刀盘中心的塑料件!
■ 附件必须完全组装好才能使用。切勿将附件组装到底座装置上。
附件应仅用于目标操作位置。仅在标记为黄色的前驱动装置上使用
附件。在安装或拆下本附件之前,请等待驱动装置完全停止并拔下
电源插头。
W 注意!
■ 遵循最大加注液位。
■ 检查进料槽或容器中是否有异物。切勿向进料槽或容器中插入任何
物体(如刀具、汤匙)。
W 重要!
本附件每次使用后或者长时间不使用时要清洁电器,这一点很重要。
X“清洁和维护”参见第6页

4
zh 概述
原产地:
斯洛文尼亚
总经销商:
博西家用电器(中国)有限公司
南京市中山路129号中南国际大厦20、21楼
全国统一客户服务热线:
4008855888
客户服务电子邮箱:
公司网站:
www.bosch-home.cn
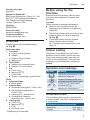
概述
请翻开图示页。
X 图 A
多功能料理碗
1 容器
a 颜色代码(黄色)
b 手柄
c 刀具架支架
d 标记G
2 刀具架
a 通用刀片支架
b 切割刀盘支架
3 防溅盖
a 锁扣
b 标记K
c 进料槽
d 推杆/带刻度的量杯
刀具
4 通用刀片
a 刀片护罩
5 切割刀盘
a 双面切片刀盘–厚/薄
b 双面切丝刀盘–
粗/细
c 磨碎刀盘–中细
d 专业Supercut双面刀盘–厚/薄*
6 榨汁器
a 锁扣
b 标记K
c 过滤器
d 压锥
*具体取决于机型
首次使用前
使用新附件之前,必须完全拆除包装并进行
清洁、检查。
警告!
切勿使用已损坏的附件!
■ 从包装中取出所有附件,处理掉所有包
装材料。
■ 检查部件是否齐全,以及是否有明显
损坏。X图 A
■ 在首次使用前要彻底清洁并擦干所
有部件。X“清洁和维护”参见
第6页
颜色代码
每种底座装置驱动器颜色各不相同(黑色、
黄色、红色)。也可在附件上查看该颜色代码
系统。仅在标记为黄色的前驱动装置上使用
本附件。
符号和标记
符号 含义
j
请遵守说明手册中的说明。
W
警告!旋转工具。请勿将手伸
入进料槽内。
K
安装防溅盖(,)并用螺钉拧
紧(;)。
G
用于安装防溅盖的标记。
多功能料理碗
多功能料理碗可与通用刀片、切割刀盘配合
使用,或作为榨汁器使用。
最大加工量
固态食物 最大500g
液体 最大250g
警告!
切勿将通用刀片、切割刀盘之一或榨汁器同
时放在刀具架上。
说明:
– 组装完毕后,多功能料理碗只能放在底
座装置上,且要盖上防溅盖。
– 不得超过最大加注液位。使用过程中不
断检查!

5
zh 通用刀片
推荐速度
1 榨汁器(仅在设置1 下使用!)
5 双面切片刀盘-专业Supercut双
面刀盘/
7 通用刀盘、双面切丝刀盘、磨碎刀
盘–
中等粗细
r
通用刀片
z
不适用于本附件!
通用刀片
用于切碎、加工糊状食品、混合、切开和制
作酱汁及混合饮料。
W 有受伤危险!
请勿赤手触碰通用刀片!只能抓住通用刀片
的塑料把手。通用刀片不使用时,务必存放
到刀片保护套中。
用途
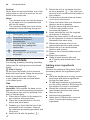
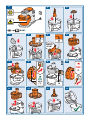
X 图像顺序 B
重要说明:必须按照主操作手册的说明准备
底座装置。只能在正确安装碗具后使用附
件。
1. 将刀具架放在容器内的支架上,向下按。
2. 将通用刀片放在刀具架上,向下按。
3. 准备食物。将要加工的食物放进容器。
遵循最大加工量和加注液位。
4. 装上带推杆(,)的防溅盖。
5. 沿顺时针方向(;)尽可能转动防溅盖。
锁扣必须与容器手柄完全接触。
6. 如图所示,将多功能料理碗放在前面的
黄色驱动装置上。
7. 按下,沿顺时针方向尽可能转动。
8. 将电源插头插入电源插座。将旋转开关
旋至建议的速度。
9. 保持接通状态,直至达到所需要的均
匀度。
10. 将旋转开关转动至y,等待电器停止。
拔下电源插头。
11. 沿逆时针方向旋转多功能料理碗,将其
拆下。
12. 沿逆时针方向旋转防溅盖,将其拆下。
13. 拆下通用刀片和刀具架上。
14. 清空容器。
■ 在使用后立即清洁所有部件。
X“清洁和维护”参见第6页
加入更多食材
警告!
遵循最大加注液位。在食材触及防溅盖之前
结束加工。
■ 在电器运转时,取出推杆,通过进料槽
添加食材。
■ 如要添加大量食材,将旋转开关转动
至y,等待电器停止。
■ 沿逆时针方向旋转多功能料理碗,将其
拆下。
■ 取下防溅盖。
■ 加入更多食材。
■ 装上防溅盖。装回多功能料理碗。继续
处理食材。
切割刀盘
请注意:
– 双面刀盘:插入时必须将要用的一面
朝上。
– 单面刀盘:插入时必须将刀片/锯片一
侧朝上。
双面切片刀盘 – 粗/细
用于将水果和蔬菜切成厚片(如制作
焗烤西红柿或炸土豆)或薄片(如制
作黄瓜沙拉或蔬菜脆片)。
刀盘上的标记:
1=厚片端
3=薄片端
注意:双面切片刀盘不适用于硬质奶酪、面
包、圆面包或巧克力切片。煮过的软马铃薯
只能在冷却后切片。
双面切丝刀盘 – 粗/细
用于切碎蔬菜、水果和奶酪(例如:
用粗切端切碎Gouda或Edamer奶
酪作为比萨配料,或者用细切端切碎辣根作
为装饰或酱料底料)。
刀盘上的标记:
2=粗切端
4=细切端
注意:双面切丝刀盘不适用于硬质奶酪、果
核切丝。软质奶酪只能用粗切端切丝。
磨碎刀盘 – 中细
用于磨碎生土豆、硬质奶酪(如帕马
森干酪)、冷巧克力和坚果。
注意:磨碎刀盘不适用于磨碎软质奶酪和奶
酪片。

6
zh 榨汁器
专业 Supercut
双面刀盘– 厚/薄
用于将水果和蔬菜切成厚片、薄片。
尤其适用于非常软的食物(如过熟的西红柿)
和多纤维食物(如韭菜或芹菜)。
刀盘上的标记:
1=厚片端
3=薄片端
注意:双面切片刀盘不适用于硬质奶酪、面
包、圆面包或巧克力切片。煮过的马铃薯只
能在冷却后切片。
用途
W 受有伤危险!
请勿抓握切割刀盘的利刃或边缘。仅可抓握
刀盘中心的塑料件!
警告!
在被加工的食材到达最大加注液位前结束
加工,清空容器。
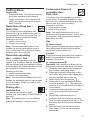
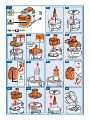
X 图像顺序 C
重要说明:必须按照主操作手册的说明准备
底座装置。
1. 将刀具架放在容器内的支架上,向下按。
2. 将所需要的切割刀盘放在刀具架上,
向下按。确保所需要的刀片侧朝上。
3. 装上带推杆(,)的防溅盖。
4. 沿顺时针方向(;)尽可能转动防溅盖。
锁扣必须与容器手柄完全接触。
5. 如图所示,将多功能料理碗放在前面的
黄色驱动装置上,向下按。
6. 沿顺时针方向尽可能转动多功能料理碗。
7. 将电源插头插入电源插座。将旋转开关
旋至建议的速度。
8. 将要加工的食物放进进料槽。事先切开
大块食材。
9. 只能使用随产品提供的推杆添加食材!
10. 结束加工后,或当被加工食材接近切割
盘的底部时,转动旋转开关到y,等待
驱动装置停止。拔下电源插头。
11. 沿逆时针方向旋转多功能料理碗,将其
拆下。
12. 沿逆时针方向旋转防溅盖,将其拆下。
13. 拆下切割刀盘和刀具架。
14. 清空容器。
■ 在使用后立即清洁所有部件。X“清洁
和维护”参见第6页
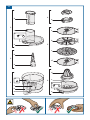
榨汁器
用于柑橘类榨汁,如柠檬、橙子、葡萄柚。
警告!
在榨出的汁液到达过滤器底部前结束加工,
清空容器。
用途
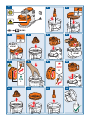
X 图像顺序 D
重要说明:必须按照主操作手册的说明准备
底座装置。
1. 将刀具架放在容器内的支架上,向下按。
2. 安装过滤器(,)。
3. 沿顺时针方向尽可能转动过滤器(;)。
锁扣必须与容器手柄完全接触。
4. 将压椎放在刀具架上,向下按。
5. 如图所示,将多功能料理碗放在前面的
黄色驱动装置上,向下按。
6. 沿顺时针方向尽可能转动多功能料理碗。
7. 将电源插头插入电源插座。将旋转开关
旋至建议的速度。
8. 将半个柑橘类水果按压到压椎上。果汁
将流入容器。
9. 结束加工后,或当被榨汁食材接近过滤
器的底部时,将旋转开关转到y,等待
电器停止。拔下电源插头。
10. 沿逆时针方向旋转多功能料理碗,将其
拆下。
11. 取下压锥。
12. 沿逆时针方向旋转过滤器,将其拆下。
13. 拆下刀具架。
14. 清空容器。
■ 在使用后立即清洁所有部件。X“清洁
和维护”参见第6页
清洁和维护
每次使用后都必须彻底清洁附件和配件。
W 有受伤危险
– 请勿赤手触碰通用刀片!清洁时,只能
抓住通用刀片的塑料把手。通用刀片不
使用时,务必存放到刀片保护套中。请
用刷子清洁刀片。
– 请勿抓握切割刀盘的利刃或边缘。仅可
抓握刀盘中心的塑料件!
警告!
– 请勿使用任何含酒精或溶剂的清洁剂。
– 请勿使用任何锋利、尖锐或金属的物体。
– 请勿使用砂布或清洁剂。
– 请勿将塑料部件塞入洗碗机内,否则可
能永久变形。

7
zh 应用实例(通用刀片)
图 E中总结了各个部件的清洁方法。
注意:加工某些食材时可能会使塑料部件
变色,如胡萝卜,但只要滴入几滴食用油就
可以消除。
应用实例 (通用刀片)
洋葱、大蒜
– 1个-300g洋葱
– 1瓣-300g大蒜
■ 加工至所需大小。
硬奶酪 (如帕马森干酪)
– 10-200g
■ 将奶酪切成块。
■ 加工至所需大小。
巧克力
– 50-200g
■ 将巧克力切碎或掰碎。
■ 加工至所需大小。
欧芹
– 10-50g
■ 加工至所需大小。
肉、肝脏 (用于肉馅、鞑靼牛排等)
– 50-500g
制作香肠肉、馅料和肉酱:
■ 去除骨头、软骨、皮和肌腱。把肉切
成丁。
■ 将肉(牛肉、猪肉、小牛肉、禽肉,甚至
是鱼肉等)连同其他食材和调味料一起放
入碗中,然后搅拌进生面团。
草莓汁冰球
– 250g冷冻草莓
– 100g糖粉
– 180ml奶油(比一锅小一点儿)
■ 将所有食材放入搅拌碗中。立即开启,
否则混合物将粘结成块。
■ 一直搅拌至果汁形成奶油状。
蜂蜜面包酱
(CNUM60B, CNUM61B)
– 50g榛子粉
– 1小撮肉桂粉
– 300g蜂蜜(冷藏)
■ 先将蜂蜜加入碗中,随后加入肉桂和榛
子粉。
■ 设置为M,加工食材20秒。
蜂蜜面包酱
(CNUM60A, CNUM61A)
– 50g榛子粉
– 1小撮肉桂粉
– 250g蜂蜜(冷藏)
■ 先将蜂蜜加入碗中,随后加入肉桂和榛
子粉。
■ 设置为M,加工食材15秒。
如有更改,恕不另行通知。

8
en Intended use
Intended use
This accessory is designed for the MUM9 kitchen machine
(“OptiMUM” series). Follow the operating instructions for
the kitchen machine.
Never use the accessory for other appliances. Only use matching
parts together.
Depending on assembly, this accessory is suitable for the following
purposes:
Universal blade: For mincing, puréeing, blending, kneading, cutting
and for making sauces and mixed drinks.
Cutting discs: For shredding, grating and cutting up food.
Citrus press: for squeezing juice out of citrus fruits.
Food which is to be processed must not contain any hard
components (e.g. bones). The accessory must not be used for
processing other objects or substances.
Safety instructions
W Risk of injury
■ Never reach into the feed chute. Only use the pusher provided!
■ Do not touch the blades of the universal blade with bare
hands. To insert and remove the universal blade, grasp by the
plastic only. When not in use, always store the universal blade
in the blade guard. Clean with a brush.
■ Never grasp the sharp blades or edges of the cutting discs.
Grasp the discs by the plastic part in the centre only.
■ The accessory must be completely assembled before use. Never
assemble the accessory on the base unit. The accessory should
only be used in the intended operating position. Only use the
accessory on the front drive marked in yellow. Before attaching
or removing the accessory, wait until the drive has come to a
standstill and pull out the mains plug.
W Caution!
■ Always observe the maximum filling level.
■ Check that there are no foreign objects in the feed chute or
container. Do not insert objects (e.g. knives, spoons) into the feed
chute or container.
W Important!
It is essential to clean the accessory thoroughly after each use or
after it has not been used for an extended period. X “Cleaning and
maintenance” see page 12

9
en
Overview
Country of origin:
Slovenia
Exclusive distributor:
BSH Home Appliances (China) Co., Ltd.
20/F,21/F, CN International Mansion,
129 Zhongshan Road, Nanjing,
Jiangsu Province, PRC.
Careline:
4008855888
Service E-mail:
Company website:
www.bosch-home.com
Overview
Please fold out the illustrated pages.
X Fig. A:
Universal mixer
1 Container
a Colour coding (yellow)
b Handle
c Support for tool holder
d Marking G
2 Tool holder
a Support for universal blade
b Support for cutting discs
3 Lid
a Catch lock
b Marking K
c Feed chute
d Pusher / measuring jug with scale
Tools
4 Universal blade
a Blade guard
5 Cutting discs
a Reversible slicing disc – thick / thin
b Reversible shredding disc –
coarse / fine
c Grating disc – medium-fine
d Professional Supercut
reversible disc – thick / thin *
6 Citrus press
a Catch lock
b Marking K
c Filter
d Pressing cone
* Depending on the model
Before using for the
first time
Before the new accessory can be used,
it must be fully unpacked, cleaned and
checked.
Caution!
Never operate a damaged accessory!
■ Remove all accessories from the
packaging and dispose of all packing
materials.
■ Check that all the parts are present and
examine them for obvious damage.
X Fig. A
■ Thoroughly clean and dry all parts
before using for the first time.
X “Cleaning and maintenance” see
page 12
Colour coding
The drives of the base unit each have
different colours (black, yellow and red).
This colour coding system can also be
found on the accessories. Only use this
accessory on the front drive marked in
yellow.
Symbols and markings
Symbol Meaning
j
Follow the instructions in the
instruction manual.
W
Caution! Rotating tools. Do
not reach into the feed chute.
K
Fit the lid (,) and screw
on securely (;).
G
Marking for fitting the lid.
Universal mixer
The universal mixer can be used with the
universal blade, with the cutting discs or as
a citrus press.
Maximum processing quantities
Solid food max. 500 g
Liquids max. 250 g

10
en Universal blade
Caution!
Never place the universal blade, one of the
cutting discs or the citrus press on the tool
holder at the same time.
Notes:
– The universal mixer can only be placed
on the base unit once assembled and
with the lid closed.
– The maximum filling level must not be
exceeded. Keep checking during use!
Recommended speeds
1 Citrus press (only use on setting 1!)
5 Reversible slicing disc,
Professional Supercut
reversible disc
7 Universal blade, reversible
shredding disc, grating disc –
medium-fine
r
Universal blade
z
Not suitable for use with this
accessory!
Universal blade
For mincing, puréeing, blending, kneading,
cutting and for making sauces and mixed
drinks.
W Risk of injury!
Do not touch the blades of the universal
blade with bare hands. Grasp the universal
blade by the plastic only. When not
in use, always store the universal blade
in the blade guard.
Use
X Image sequence B
Important: Only prepare the base unit as
described in the main operating instructions.
The accessory can only be operated if the
bowl is fitted properly.
1. Place the tool holder on the support in
the container and press down.
2. Place the universal blade on the tool
holder and press down.
3. Prepare your food. Add the food to be
processed to the container. Observe
the maximum processing quantities and
filling level.
4. Attach the lid with the pusher (,).
5. Rotate the lid in a clockwise direction
as far as possible (;). The catch lock
must be in full contact with the handle of
the container.
6. Position the universal mixer as shown
on the front yellow drive.
7. Press down and rotate in a clockwise
direction as far as possible.
8. Plug the mains plug into the mains.
Turn the rotary switch to the
recommended speed.
9. Leave switched on until the required
consistency is achieved.
10. Move the rotary switch to y and wait
for the appliance to come to a standstill.
Disconnect the mains plug.
11. Rotate the universal mixer in an
anticlockwise direction and remove.
12. Rotate the lid in an anticlockwise
direction and remove.
13. Remove the universal blade and tool
holder.
14. Empty the container.
■ Clean all parts directly after use.
X “Cleaning and maintenance” see
page 12
Adding more ingredients
Caution!
Observe the maximum filling level. Finish
processing before the ingredients touch
the lid.
■ While the appliance is running, remove
the pusher and add the ingredients
through the feed chute.
■ To add large quantities or ingredients,
turn the rotary switch to y and wait for
the machine to come to a standstill.
■ Rotate the universal mixer in an
anticlockwise direction and remove.
■ Remove the lid.
■ Add the extra ingredients.
■ Attach the lid. Replace the universal
mixer. Continue processing your
ingredients.

11
en
Cutting discs
Cutting discs
Please note:
– Reversible discs: The side you require
must face upwards when inserted.
– Single-sided discs: The side with the
blade / serrations must face upwards
when inserted.
Reversible slicing disc –
thick / thin
For cutting fruit and vegetables into
thick slices (e.g. for potatoes au gratin or
fried potatoes) or into thin slices (e.g. for
cucumber salad or vegetable crisps).
Marking on the disc:
1 = side for thick slicing
3 = side for thin slicing
Note: The reversible slicing disc is not
suitable for slicing hard cheese, bread,
rolls or chocolate. Only slice boiled waxy
potatoes when they are cold.
Reversible shredding
disc – coarse / fine
For shredding vegetables, fruit and
cheese (e.g. Gouda or Edamer shredded
with the coarse side as a topping for pizza,
or horseradish shredded with the fine side
as a garnish or a base for sauces).
Marking on the disc:
2 = side for coarse shredding
4 = side for fine shredding
Note: The reversible shredding disc is not
suitable for shredding nuts or hard cheese
(e.g. Parmesan). Shred soft cheese with
the coarse side.
Grating disc –
medium-fine
For grating raw potatoes, hard
cheese (e.g. Parmesan), chilled chocolate
and nuts.
Note: The grating disc is not suitable for
grating soft cheese or cheese slices.
Professional Supercut
reversible disc –
thick / thin
For cutting fruit and vegetables into thick
or thin slices. Particularly suitable for very
soft food (e.g. overripe tomatoes) and very
fibrous food (e.g. leeks or celery).
Marking on the disc:
1 = side for thick slicing
3 = side for thin slicing
Note: The reversible slicing disc is not
suitable for slicing hard cheese, bread, rolls
or chocolate. Only slice boiled potatoes
when they are cold.
Use
W Risk of injury!
Never grasp the sharp blades or edges of
the cutting discs! Grasp the discs by the
plastic part in the centre only.
Caution!
Finish processing and empty the container
before the processed food reaches the
maximum filling level.
X Image sequence C
Important: Only prepare the base unit as
described in the main operating instructions.
1. Place the tool holder on the support in
the container and press down.
2. Place the required cutting disc on the
tool holder and press down. Make sure
that the required side is face up.
3. Attach the lid with the pusher (,).
4. Rotate the lid in a clockwise direction
as far as possible (;). The catch lock
must be in full contact with the handle of
the container.
5. Position the universal mixer as shown
on the front yellow drive and press
down.
6. Rotate the universal mixer in a
clockwise direction as far as possible.
7. Plug the mains plug into the mains. Turn
the rotary switch to the recommended
speed.
8. Add the food to be processed to the
feed chute. Cut up very large pieces
beforehand.

12
en Citrus press
9. Only use the pusher provided to add
food.
10. When you have finished processing,
or when the processed food almost
reaches the underside of the cutting
disc, turn the rotary switch to y and
wait for the drive to come to a standstill.
Disconnect the mains plug.
11. Rotate the universal mixer in an
anticlockwise direction and remove.
12. Rotate the lid in an anticlockwise
direction and remove.
13. Remove the cutting disc and tool holder.
14. Empty the container.
■ Clean all parts directly after use.
X “Cleaning and maintenance” see
page 12
Citrus press
For squeezing juice out of citrus fruits, such
as lemons, oranges and grapefruits.
Caution!
Finish processing and empty the container
before the squeezed juice reaches the
underside of the filter.
Use
X Image sequence D
Important: Only prepare the base unit as
described in the main operating instructions.
1. Place the tool holder on the support in
the container and press down.
2. Fit the filter (,).
3. Rotate the filter in a clockwise direction
as far as possible (;). The catch lock
must be in full contact with the handle of
the container.
4. Place the pressing cone on the tool
holder and press down.
5. Position the universal mixer as shown
on the front yellow drive and press
down.
6. Rotate the universal mixer in a
clockwise direction as far as possible.
7. Plug the mains plug into the mains.
Turn the rotary switch to the
recommended speed.
8. Press one half of the citrus fruit down on
the pressing cone. The juice will run into
the container.
9. When you have finished processing, or
when the squeezed juice food almost
reaches the underside of the filter, turn
the rotary switch to y and wait for
the appliance to come to a standstill.
Disconnect the mains plug.
10. Rotate the universal mixer in an
anticlockwise direction and remove.
11. Remove the pressing cone.
12. Rotate the filter in an anticlockwise
direction and remove.
13. Remove the tool holder.
14. Empty the container.
■ Clean all parts directly after use.
X “Cleaning and maintenance” see
page 12
Cleaning and maintenance
The attachments and accessories used
must be thoroughly cleaned after each use.
W Risk of injury
– Do not touch the blades of the universal
blade with bare hands. To clean the
universal blade, grasp by the plastic
only. When not in use, always store
the universal blade in the blade guard.
Clean with a brush.
– Do not grasp the sharp blades or edges
of the cutting discs. Grasp the discs by
the plastic part in the centre only.
Caution!
– Do not use any cleaning agents
containing alcohol or spirits.
– Do not use any sharp, pointed or metal
objects.
– Do not use abrasive cloths or cleaning
agents.
– Do not wedge plastic parts in the
dishwasher as they could become
permanently deformed.
In Fig. E you will find a summary of how to
clean the individual parts.
Note: when processing food such as
carrots, the plastic parts may become
discoloured, but this can be removed with a
few drops of cooking oil.

13
en
Application examples (universal blade)
Application examples
(universal blade)
Onions, garlic
– from 1 onion (quartered) up to 300 g
– from 1 clove of garlic up to 300 g
■ Process until it has been chopped to the
required size.
Hard cheese (e.g. Parmesan)
– 10 g to 200 g
■ Cut the cheese into cubes.
■ Process until it has been chopped to the
required size.
Chocolate
– 50 g to 200 g
■ Cut or break the chocolate into pieces.
■ Process until it has been chopped to the
required size.
Parsley
– from 10 g to 50 g
■ Process until it has been chopped to the
required size.
Meat, liver (for mince, steak
tartare, etc.)
– 50 g to 500 g
Making sausage meat, stuffing and pâté:
■ Remove bones, gristle, skin and sinews.
Dice the meat.
■ Put the meat (beef, pork, veal, poultry,
or even fish, etc.) together with the other
ingredients and spices into the bowl and
mix into a dough.
Strawberry sorbet
– 250 g frozen strawberries
– 100 g icing sugar
– 180 ml cream (a bit less than one pot)
■ Put all ingredients in the bowl. Switch
on immediately or the mixture will go
lumpy.
■ Mix until a creamy sorbet forms.
Honey spread
(CNUM60B, CNUM61B)
– 50 g ground hazelnuts
– 1 pinch cinnamon
– 300 g honey (from the refrigerator)
■ First add the honey to the bowl, followed
by the cinnamon and hazelnuts.
■ Process the ingredients for 20 seconds
on setting M.
Honey spread
(CNUM60A, CNUM61A)
– 50 g ground hazelnuts
– 1 pinch cinnamon
– 250 g honey (from the refrigerator)
■ First add the honey to the bowl, followed
by the cinnamon and hazelnuts.
■ Process the ingredients for 15 seconds
on setting M.
Subject to change without notice.


Robert Bosch Hausgeräte GmbH
Carl-Wery-Straße 34
81739 München, GERMANY
www.bosch-home.com
8001074295
*8001074295*
970622

b
5
6
1
b
a
c
2
a
b
3
4
a
a
a
b
a
c
d*
d
c
d
c
b
d
A

咔嚓声!
click!
MUM9
M
咔嚓声!
click!
ON
M/A
(7)
OFF
y
B
3 4 5 6
7 9
11 12 13 14
1 2
8 10

咔嚓声!
click!
MUM9
ON
5...7
咔嚓声!
click!
OFF
y
C
3 4 5 6
8 9
11 12 13 14
1 2
7
10

MUM9
ON
1
咔嚓声!
click!
咔嚓声!
click!
OFF
y
D
3 4 5 6
8 10
11 12 13 14
1 2
7 9
ページが読み込まれています...
-
 1
1
-
 2
2
-
 3
3
-
 4
4
-
 5
5
-
 6
6
-
 7
7
-
 8
8
-
 9
9
-
 10
10
-
 11
11
-
 12
12
-
 13
13
-
 14
14
-
 15
15
-
 16
16
-
 17
17
-
 18
18
-
 19
19
-
 20
20
-
 21
21


他の言語で
- English: Bosch MUMPCX5S32 User manual