Whirlpool WFCR86430 Use and care guide
- カテゴリー
- 洗濯機
- タイプ
- Use and care guide

Model : WFCR 86430
產品型號
:
WFCR 86430
產品安全指引、使用說明及安裝指南

2
繁體中文
3
26

3
3
EN
THANK YOU FOR BUYING AN WHIRLPOOL PRODUCT.
For even more complete user support, register your
appliance at www.whirlpool.com.hk
User manual
Index
Health and Safety guide
SAFETY INSTRUCTIONS . . .... ....... ... .............................. . ................. ...... 5
IMPORTANT TO BE READ AND OBSERVE ................................................................ 5
PRODUCT DESCRIPTION . . ... ... ... ... ................ .................. .... .... .... .... .... . 7
APPLIANCE ........................................................................................... 7
CONTROL PANEL ...................................................................................... 7
DETERGENT DISPENSER ............................................................................... 8
TECHNICAL SPECIFICATIONS FOR THE WATER CONNECTION ............................................ 9
DOOR ................................................................................................ 9
HOW TO USE THE APPLIANCE . . .... ......... . . ........................................... .... 10
FIRST TIME USE ..................................................................................... .10
DAILY USE .......................................................................................... . 10
HINTS AND TIPS ..................................................................................... .12
PROGRAMME CHART ................................................................................ .13
PROGRAMMES ...................................................................................... .14
OPTIONS AND FUNCTIONS .......................................................................... . 15
CLEANING AND MAINTENANCE . . ... ... ... . ....
. . ............................... .... .... .... . 16
CLEANING THE WASHER DRYER EXTERNALLY ......................................................... . 16
CHECKING THE WATER INTAKE HOSE ................................................................. .17
CLEANING THE FILTERS IN THE WATER INTAKE HOSE .................................................. . 18
CLEANING THE DETERGENT DISPENSER .............................................................. . 19
ENGLISH
USER MANUAL

4
49

5
5
EN
Health & Safety guide
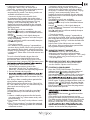
SAFETY INSTRUCTIONS
IMPORTANT TO BE READ AND OBSERVE
Before using the appliance, read these safety
instructions. Keep them nearby for future reference.
These instructions and the appliance itself provide
important safety warnings, to be observed at all
times. The manufacturer declines any liability for
failure to observe these safety instructions, for
inappropriate use of the appliance or incorrect
setting of controls.
kept away from the appliance. Young children
appliance unless continuously supervised.
persons with reduced physical, sensory or
mental capabilities or lack of experience and
knowledge can use this appliance only if they
are supervised or have been given instructions
on safe use and understand the hazards
involved. Children must not play with the
appliance. Cleaning and user maintenance must
not be carried out by children without
supervision. Never open the door forcibly or use
it as a step.
PERMITTED USE
CAUTION: The appliance is not intended to
be operated by means of an external switching
device, such as a timer, or separate remote
controlled system.
This appliance is intended to be used in
working environments; farm houses; by clients
in hotels, motels, bed & breakfast and other
residential environments.
Do not load the machine above the
maximum capacity (kg of dry cloth) indicated in
the programme table.
This appliance is not for professional use. Do
not use the appliance outdoors.
Do not use any solvents (e.g. turpentine,
benzene), detergents containing solvents,
scouring powder, glass or general purpose
wash fabrics that have been treated with
.
Do not dry unwashed items in the tumble
dryer.
Items that have been soiled with substances
such as cooking oil, acetone, alcohol, petrol,
kerosene, spot removers, turpentine, waxes and
wax removers should be washed in hot water
with an extra amount of detergent before being
dried in the tumble dryer.
Items such as foam rubber (latex foam),
shower caps, waterproof textiles, rubber backed
rubber pads should not be dried in the tumble
dryer.
Fabric softeners, or similar products, should
instructions.
without heat (cool down cycle) to ensure that
the items are left at a temperature that ensures
that the items will not be damaged.
Never stop a tumble dryer before the end of
the drying cycle unless all items are quickly
removed and spread out so that the heat is
dissipated.
During the drying phase, the door tends to
get quite hot.
Do not use the appliance to dry clothes that
(e.g. trichlorethylene).
Do not use the appliance to dry foam rubber
or similar elastomers.
Make sure that the water tap is turned on
during the drying cycles.
Remove all objects from pockets such as
lighters and matches.
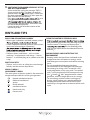
INSTALLATION
The appliance must be handled and installed
. Use
cuts.
If you want to stack a dryer on top of your
Service or your specialist dealer to verify
whether this is possible. This is only possible if
the dryer is attached to the washing machine by
means of appropriate stacking kit available
through our After- Sales Service or your
specialist dealer.
Move the appliance without lifting it by the
worktop or top lid.
Installation, including water supply (if any)
and electrical connections and repairs must be
. Do not
repair or replace any part of the appliance
.
Keep children away from the installation site.
After unpacking the appliance, make sure that it
has not been damaged during transport. In the
event of problems, contact the dealer or your
nearest After-sales Service. Once installed,
packaging waste (plastic, styrofoam parts etc.)

6
6
Health & Safety guide
. The appliance must be disconnected
from the power supply before any installation
. During installation,
make sure the appliance does not damage the
. Only
activate the appliance when the installation has
been completed.
Do not install your appliance where it may be
exposed to extreme conditions, such as: poor
ventilation, temperatures below 5 °C or above 35 °C.
When installing the appliance make sure that
adjusting them as required, and check that the
appliance is perfectly to level using a spirit level.
If the appliance is being installed on wood or
appliance on top of this.
Connect the water inlet hose(s) to the water
supply in accordance with the regulations of
your local water company.
the hot water supply.
.
bolts to prevent any possible damage to the
interior during transport. Before using the
machine, it is imperative that the transport bolts
are removed. After their removal, cover the
openings with the 4 enclosed plastic caps.
After installation of the device, wait a few
hours before starting it so that it acclimates to
the environmental conditions of the room.
Make sure that the ventilation openings in
the base of your washing machine (if available
on your model) are not obstructed by a carpet
or other material.
Use only new hoses to connect the appliance
to the water supply. The old hose-sets should
not be reused.
The supply water pressure must be in the
0.1-1 Mpa range.
ELECTRICAL WARNINGS
It must be possible to disconnect the
appliance from the power supply by
unplugging it if plug is accessible, or by a multi-
pole switch installed upstream of the socket in
accordance with the wiring rules and the
appliance must be earthed in conformity with
national electrical safety standards.
Do not use extension leads, multiple sockets
or adapters. The electrical components must
not be accessible to the user after installation.
Do not use the appliance when you are wet or
barefoot. Do not operate this appliance if it has
a damaged power cable or plug, if it is not
working properly, or if it has been damaged or
dropped.
If the supply cord is damaged, it must be
replaced with an identical one by the
manufacturer, its service agent or similarly
risk of electric shock.
CLEANING AND MAINTENANCE
WARNING: Ensure that the appliance is
supply before performing any maintenance
operation; never use steam cleaning
.
DISPOSAL OF PACKAGING MATERIALS
The packaging material is 100% recyclable and is marked with the
recycle symbol
.
The various parts of the packaging must therefore be disposed of
responsibly and in full compliance with local authority regulations
governing waste disposal.
DISPOSAL OF HOUSEHOLD APPLIANCES
This appliance is manufactured with recyclable or reusable
materials. Dispose of it in accordance with local waste disposal
regulations. For further information on the treatment, recovery
and recycling of household electrical appliances, contact your local
authority, the collection servi
ce for household waste or the store
where you purchased the appliance. This appliance is marked in
compliance with European Directive 2012/19/EU, Waste Electrical
and Electronic Equipment (WEEE). By ensuring this product is
disposed of correctly, you will help prevent negative consequences
for the environment and human health.
The symbol
on the product or on the accompanying
documentation indicates that it should not be treated as domestic
waste but must be taken to an appropriate collection center for the
recycling of electrical and electronic equipment.

7
7
EN
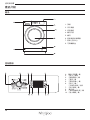
CONTROL PANEL
User manual
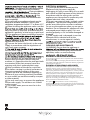
1.
2. Programme selector
3. Start/Pause button
4. Temperature button
5. FreshCare+ button
6. Dry Only button / Lock
button
7. Drying settings button
8. Display
9. Start delay button
10. Spin speed button
1. Top
2. Detergent dispenser
3. Control Panel
4. Lid handle
5. Door
6.
kick panel
7. Removable kick panel
8. Adjustable feet (2)
1.
2.
3. 4.
5.
7.
8.
9.
10. 6.
1.
3.
2.
5.
4.
7.
6.
8.
APPLIANCE
PRODUCT DESCRIPTION
User manual

8
8
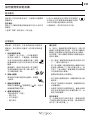
Prewash Compartment
• Detergent for prewash
Main Wash Compartment
• Detergent for the main wash
• Stain remover
• Water softener
Softener compartment
• Softener
• Liquid starch
Pour softener or starch solution into
the compartment without exceeding
the “max” level.
Release button
(press to remove tray for cleaning).
Preferably use the partition A when
washing with a liquid detergent for
washing, to ensure that the correct
quantity of detergent is used (the
partition is included in the bag containing
the instructions).
Move the partition into slot B when using
detergent powder.
DETERGENT DISPENSER
B
A

9

10
10
DAILY USE
1. LOADING LAUNDRY.
• Prepare the laundry, following the
recommendations given in the section
“HINTS AND TIPS”. - Open the door and
load the laundry into the drum, without
exceeding the maximum load capacities
indicated in the Programme Chart.
• Close the door, pressing until the
latch audibly locks, and check
that there is no laundry trapped
between the door glass and the rubber seal.
2. OPEN THE WATER TAP
Check that the washer dryer is
connected correctly to the water mains.
Open the water tap.
3. SWITCHING ON THE WASHER DRYER
MACHINE.
Press button
; the lamp .
4. SELECTING A PROGRAMME AND
CUSTOMISING A CYCLE. The following
functions are possible with this appliance:
• Wash only
• Wash and dry
• Dry only
Wash only
Select the required programme with the
PROGRAMME selector dial. The duration of the
wash cycle is shown on the display. The washer
dryer machine automatically displays the
maximum temperature and spin speed settings
possible for the selected programme. Adjust
the temperature and/or spin speed settings if
needed with the relative buttons.
• Press button “Temp°” to cycle through progressively
lower temperature settings until cold wash is set (“-
-“) shown on display.
• Press button “Spin speed” to cycle through
progressively lower spin speed settings until the
.
Pressing the button again sets the highest
possible setting.
Select the required options (if necessary).
• Press the button to select the option; the
respective button lamp illuminates.
• Press the button again to cancel the option; the
lamp extinguishes.
! If the selected option is not compatible with the
programme set, an error warning tone sounds
. The
option is not selected.
Wash and dry
To wash and dry a load with no interruption
between the wash and dry cycles, make sure
that the load does not exceed the maximum
permissible drying load for the selected
programme (see the column “Max. load for drying
cycle” in the Programme chart).
For more information on functions, a more detailed
guide may be requested or downloaded from the website
following the instructions given on the last page.
See the section DAILY USE for instructions on selecting and starting
a programme.
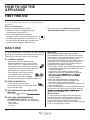
FIRST CYCLE OPERATION
Remove any manufacturing debris:
1. Select the “Cotton” programme with a
temperature setting of 60 °C.
2. Pour a small quantity of detergent
powder into the main wash compartment
of the detergent dispenser (maximum 1/3
of the quantity the detergent manufacturer
recommends for lightly soiled laundry).
3. Start the programme without loading the
washer dryer machine (with empty drum).
HOW TO USE THE
APPLIANCE
FIRST TIME USE

11
11
EN
1. Follow the instructions given in the
paragraph “Wash Only” to select and, if
necessary, customise the required programme.
2. Press “Drying settings” to select the
required drying mode. Two drying modes are
available: automatic or timer.
- Automatic drying with selectable levels:
In automatic drying mode, the washer dryer
machine dries the laundry until the set level of
dryness is reached. Pressing button “Drying
settings” once automatically selects the
highest drying level available for the selected
programme. Press the button again to reduce
the drying level.
The following levels are available:
Wardrobe
: laundry is completely dry and
ready to be put away in the wardrobe without
ironing.
Hanger
: laundry is left slightly damp to
minimise creasing. Garments must be hung to
air dry completely.
Iron
: garments are left reasonably damp to
make ironing easier.
- Timer drying mode:
Press button “Drying settings” repeatedly to
set timer drying mode. After cycling through all
the automatic drying levels, continue pressing
button “Drying settings” until the desired time
is displayed. Values from 210 to 30 minutes are
settable.
To wash a load of laundry larger than the
maximum permissible load for drying (see
the column “Max. load for drying cycle” in the
Programme chart), remove a few garments once
the drying cycle. Proceed as follows:
1. Follow the instructions given in the
paragraph “Wash Only” to select and, if
necessary, customise the required programme.
2. Do not include a drying cycle .
3.
door and remove a few garments to reduce
the load. Now follow the instructions for “Dry
only”.
N.B.: always allow a cooling down period after
drying before opening the door.
When using the two preset cycles “Wash & Dry
45’” and “Wash & Dry 90’”, it is not necessary to
select and start a drying cycle.
Dry only
This function is used to simply dry a wet load
washed previously in the washer dryer or by
hand.
1. Select a suitable programme for the laundry
you want to dry (e.g. select cotton to dry wet
cotton laundry).
2. Press button “Dry only” to dry without a wash
cycle.
3. Press “Drying settings” to select the required
drying mode. Two drying modes are available:
automatic or timer.
- Automatic drying with selectable levels:
In automatic drying mode, the washer dryer
machine dries the laundry until the set level
of dryness is reached. Pressing button “Drying
settings” once automatically selects the
highest drying level available for the selected
programme. Press the button again to reduce
the drying level.
The following levels are available:
Wardrobe
: laundry is completely dry and
ready to be put away in the wardrobe without
ironing.
Hanger
: laundry is left slightly damp to
minimise creasing. Garments must be hung to
air dry completely.
Iron
: garments are left reasonably damp to
make ironing easier.
- Timer drying mode:
Press button “Drying settings” repeatedly to
set timer drying mode. After cycling through all
the automatic drying levels, continue pressing
button “Drying settings” until the desired time
is displayed.
Values from 210 to 30 minutes are settable.
N.B.: always allow a cooling down period after
drying before opening the door.
5. USING THE CORRECT AMOUNT OF
DETERGENT. Pull out the tray and pour
detergent into the relative compartments
as described in “Detergent dispenser”. This is only
necessary when using a wash only or a wash
+ dry programme.
6. DELAYING THE START OF A PROGRAMME.
To
set a programme to start at a later time,
see the section “Options and Functions”.
7. STARTING A PROGRAMME.
Press the START/PAUSE button. The relative
indicator lamp illuminates, the door locks and
the door open
symbol extinguishes. To
change a programme while a cycle is in progress,
press START/PAUSE to pause the washer dryer
then select the required cycle and press START/
PAUSE again. To open the door while a cycle is in
progress, press START/PAUSE; the door may be
opened if the
symbol lights. Press the START/
PAUSE button again to resume the programme
from where it was paused.
8.
Press and hold the button until the washer
dryer stops.
If the water level and temperature are low
enough, the door unlocks and may be opened.
The door remains locked if there is water in the
drum. To unlock the door, switch the washer
dryer on, select the
SPIN & DRAIN programme and
speed to 0. The water is emptied and the door
unlocks at the end of the programme.

12
12
RULES FOR SEPARATING LAUNDRY
• Fabric type / indications on label (cotton, mixed
• Colour (separate coloured garments from whites,
wash new coloured items separately)
•
distribution in the drum)
• Delicates (place small items – such as nylon
stockings – and garments with clasps – such as
braziers – in a laundry bag or in a pillow case with
a zip).
EMPTY POCKETS
• Objects such as coins or safety pins can damage
laundry and the washer dryer drum.
WASH SYMBOLS
ON GARMENT LABELS
The value given in the tub symbol is the maximum
temperature possible for washing the garment.
Normal mechanical action
Reduced mechanical
action
Much reduced
mechanical action
Hand wash only
Do not wash
HINTS AND TIPS
CLEAN THE WATER FILTER REGULARLY
•
and preventing the water from draining correctly.
See the section “Cleaning and Maintenance” /
in the detailed guide
that may be requested or downloaded from the
website.
WWW
SAVING ENERGY AND PROTECTING THE
ENVIRONMENT
• Keeping within the load limits indicated in the
programme chart will optimise energy, water
and detergent consumption and reduce washing
times.
• Do not exceed the detergent quantities
recommended by the detergent manufacturer.
• Save energy by using a 60°C instead of a 90°C
wash programme, or by using a 40°C instead of
a 60°C wash programme. We recommend using
the “
Cotton ” 60°C programme for cotton
garments, which is longer but uses less energy.
• To save energy and time when washing and
drying, select highest spin speed available for
the programme to reduce the residual water
remaining in the garments at the end of the wash
cycle.
9. SWITCHING THE WASHER DRYER OFF AT THE
END OF A PROGRAMME.
At the end of the cycle, the message “END” is
shown on the display. The door can only be
opened when the
symbol lights. Check that
the door unlocked symbol is lit, then open the
door and take out the laundry.
Press
. To save
energy, if the washer dryer is not switched
automatically approximately 30 minutes after
the end of the programme.
Leave the door ajar to let the interior of the
washer dryer dry.

13
13
EN
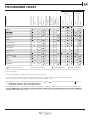
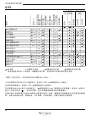
PROGRAMME CHART
The cycle duration indicated on the display or in the manual is an estimated time calculated for standard conditions. The actual cycle time may vary in relation
and any additional optional functions selected.
* Select the SPIN & DRAIN programme and set the spin speed to 0 to empty only.
1) Test programme in compliance with standard EN 50229 (Wash): select the “
Cotton ” programme with a temperature of 60°C.
2) Long cotton programme: set the “Cotton“ programme with a temperature of 40°C.
Test programme in compliance with standard EN 50229 (Drying): select the “ Cotton “ wash programme and set the drying level to “ ”, for both
loads. .
For wash programmes with temperatures above 50°C, we recommend using powder detergent rather than liquid, and following the directions given on
the detergent package.
Detergents and
additives
Recommended
detergent
Programme
Available tempera-
tures
Max. spin speed
(rpm)
Dry Only
Max. load for wash
cycle (kg)
Max. load for dry-
ing cycle (kg)
Duration
(H: Minutes)
Fresh Care +
Prewash
Main
Softener
Powder
Liquid
MIXED
- 40°C
1000
4.5 4.5 - -
- 60°C
1400
8 6 -
SYNTHETICS
- 60°C
1200
4.5 4 -
RAPID 30’
- 30°C
800 - 3.5 - -
-
SPORT
- 40°C
600
4 4 - -
WASH & DRY 45’ 30°C 1400 1 1 - -
WASH & DRY 90’ 30°C 1200 2 2 - -
SPIN & DRAIN *
- 1400 8 6 - - - - -
RINSE & SPIN - 1400
8 6 - - - -
WHITE
- 90°C
1400
8 6
(90°)
COTTON
- 60°C
1400
8 6 -
WOOL
- 40°C
800
2 2 - -
DELICATES
- 30°C
0
1 1 -
-
-
-
-
-
-
-
-
-
COLOURS 15° 15°C 1000 4.5 4.5 - -
Selectable/optional
-
Not selectable/applicable Required quantity Optional quantity
0:59
3:55
3:25
0:30
1:45
0:45
1:30
1:10
0:50
2:40
3:45
1:35
1:10
1:30

14
14
PROGRAMMES
WHITE
For washing normally to heavily soiled towels,
underwear, table and bed linen, etc in resilient cotton
and linen. Only when the temperature is selected at
90°C the cycle is provided with a prewash phase before
main washing phase. In this case it is recommended
to add detergent both, in the prewash and main wash
section.
COTTON
for washing normally soiled cotton garments.
At 40°C and 60°C, this is the standard cotton
water and energy consumption.
WOOL
All wool garments can be washed using programme
‚“Wool“ even those carryng the “hand-wash only “
label. For best results, use special detergents and do
not exceed max kg declaration of laundry.
DELICATES
for washing particularly delicate garments.
Preferably turn garments inside out before washing.
COLOURS 15°
This cycle helps protect colours by washing in cold
water (15°C) and uses less energy to heat the water
. Suitable
for lightly soiled, ustained garments.
wash results comparable to 40°c mixed at just 15°C
MIXED
For washing lightly to normally soiled resilient
.
COTTON
for washing normally to heavily soiled towels,
underwear, table and bed linen etc. in resilient
cotton and linen.
SYNTHETICS
for washing normally soiled garments made from
viscose etc.) or cotton/synthetic blends.
RAPID 30’
for washing lightly soiled garments quickly: this
cycle lasts only 30 minutes, saving time and
energy. Maximum load 3.5 Kg.
SPORT
For washing lightly soiled sports clothing
(tracksuits, shorts, etc.). For best results, we
recommend not exceeding the maximum load
indicated in the ‚‘‘PROGRAMME CHART‘‘. We
recommend using liquid detergent , and adding
the amount suitable for half-load.
WASH & DRY 45’
for washing and drying lightly soiled cotton
. This cycle
washes and dries a laundry load of up to 1 Kg in
just 45 minutes.
WASH & DRY 90’
garments quickly. This cycle washes and dries a
laundry load of up to 2 Kg in just 90 minutes.
SPIN & DRAIN
spins the load then empties the water. For
resilient garments.
RINSE & SPIN
rinses and then spins. For resilient garments.
Follow the directions indicated in the garment
wash symbols.

15
15
EN
START DELAY
To set the selected programme to start
at a later time, press the button to set the
desired delay time. The
h.
symbol lights on
the display when this function is enabled.
To cancel the delayed start, press the button
again until the value “0” is shown on the
display.
LOCK BUTTON
to lock the control panel, press and hold the
button “Dry only” for approximately 3 seconds.
the symbol
lights on the display to indicate
that the control panel is locked (with the
exception of the button). This prevents
unintentional changes to programmes,
especially with children near the machine.
If any attempt is made to use the control
panel, the symbol
.
To unlock the control panel, press and hold
the button “Dry only” for approximately 3
seconds.
OPTIONS AND FUNCTIONS
FRESHCARE+
If associated with wash cycles, this option
increases their performances by generating
steam to block proliferation of the main
sources of unpleasant odours inside the
appliance (exclusively for the wash). After
the steam phase, the machine runs a
delicate cycle with slow drum rotations.
When the FRESHCARE+ option is associated
with drying cycles, it prevents stubborn
creases from stabilising on garments,
thanks to slow drum rotations.
The FRESHCARE+ cycle starts at the end of
the wash or drying cycle and continues for
maximum 6 hours; it can be interrupted at
any time by pressing any button on the
control panel, or by turning the knob. Wait
roughly 5 minutes before opening the door.
OPTIONS selectable directly by pressing the
relative button
! If the selected option is not compatible with
the programme set, an error warning tone
times. The option is not selected.
h.

16
16
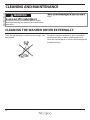
CLEANING THE WASHER DRYER EXTERNALLY
Clean the washer dryer's external parts using a soft
damp cloth.
Do not use generic detergents, glass detergents,
abrasive powders, or other similar products to
clean the control panel, as these could damage the
printed elements.
WARNING
disconnect it from its electrical power supply
before performing any cleaning or maintenance
operations.
dryer.
CLEANING AND MAINTENANCE

17
17
EN
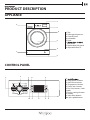
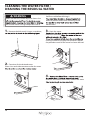
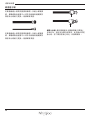
Periodically check the integrity of the water
intake hose. If it is found to be damaged, contact
Customer Support or an authorised dealer in order
to obtain a replacement hose.
Based on the type of hose:
If the water intake hose has a transparent cover,
periodically check to make sure that there are no
areas where the colour is more pronounced.In such
cases, the hose may have a leak and may need to
be replaced.
inspection window (see the arrow). If it's red, this
been engaged; in this case, the hose will have to
be replaced with a new one. In order to detach
the hose, press the release button (if present) and
unscrew the hose.
CHECKING THE WATER INTAKE HOSE

18
18
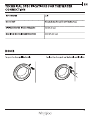
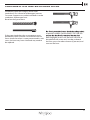
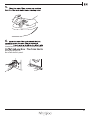
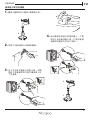
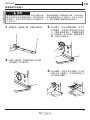
CLEANING THE FILTERS IN THE WATER INTAKE HOSE
1. Close the water tap and unscrew the intake
hose.
1
2
2.
the hose using a brush.
3. At this point, manually unscrew the intake hose
from the back of the washer dryer. Using pliers,
of the washer dryer and clean it.
4. . Reconnect the intake
hose to the water tap and the washer dryer. Do
not use tools to connect the intake hose. Open
the water tap and check to make sure that all the
connections have been tightened properly.
2
1

19
19
EN
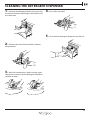
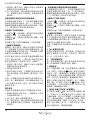
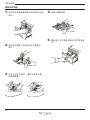
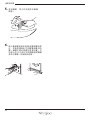
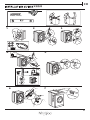
CLEANING THE DETERGENT DISPENSER
1. Remove the detergent dispenser by pressing
the release button and pulling on the dispenser at
the same time.
1
2
2. Remove the insert from the fabric softener
compartment.
3. Wash the components under running water,
taking care to remove all the detergent and fabric
softener residues.
4. Dry with a soft cloth.
5. Re-install the detergent dispenser and close it.

20
20
WARNING
Make sure that the washer dryer has been shut
the residual water.If a high temperature wash
programme has recently been used, wait for the
water to cool before draining it.
order to prevent water from remaining inside
obstructions.
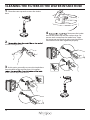
CLEANING THE WATER FILTER /
DRAINING THE RESIDUAL WATER
1. Remove the kick panel: Using a screwdriver,
.
2. Container for the drained water:
Place a low and wide container under the water
.
3. Drain the water:
water has come out.
.
turning it clockwise. Empty the container. Repeat
the procedure until all the water has been drained.
4.
amounts of residual water. Next, remove the water
.
ページが読み込まれています...
ページが読み込まれています...
ページが読み込まれています...
ページが読み込まれています...
ページが読み込まれています...
ページが読み込まれています...
ページが読み込まれています...
ページが読み込まれています...
ページが読み込まれています...
ページが読み込まれています...
ページが読み込まれています...
ページが読み込まれています...
ページが読み込まれています...
ページが読み込まれています...
ページが読み込まれています...
ページが読み込まれています...
ページが読み込まれています...
ページが読み込まれています...
ページが読み込まれています...
ページが読み込まれています...
ページが読み込まれています...
ページが読み込まれています...
ページが読み込まれています...
ページが読み込まれています...
ページが読み込まれています...
ページが読み込まれています...
ページが読み込まれています...
ページが読み込まれています...
ページが読み込まれています...
ページが読み込まれています...
ページが読み込まれています...
ページが読み込まれています...
-
 1
1
-
 2
2
-
 3
3
-
 4
4
-
 5
5
-
 6
6
-
 7
7
-
 8
8
-
 9
9
-
 10
10
-
 11
11
-
 12
12
-
 13
13
-
 14
14
-
 15
15
-
 16
16
-
 17
17
-
 18
18
-
 19
19
-
 20
20
-
 21
21
-
 22
22
-
 23
23
-
 24
24
-
 25
25
-
 26
26
-
 27
27
-
 28
28
-
 29
29
-
 30
30
-
 31
31
-
 32
32
-
 33
33
-
 34
34
-
 35
35
-
 36
36
-
 37
37
-
 38
38
-
 39
39
-
 40
40
-
 41
41
-
 42
42
-
 43
43
-
 44
44
-
 45
45
-
 46
46
-
 47
47
-
 48
48
-
 49
49
-
 50
50
-
 51
51
-
 52
52


Whirlpool WFCR86430 Use and care guide
- カテゴリー
- 洗濯機
- タイプ
- Use and care guide
他の言語で
- English: Whirlpool WFCR86430