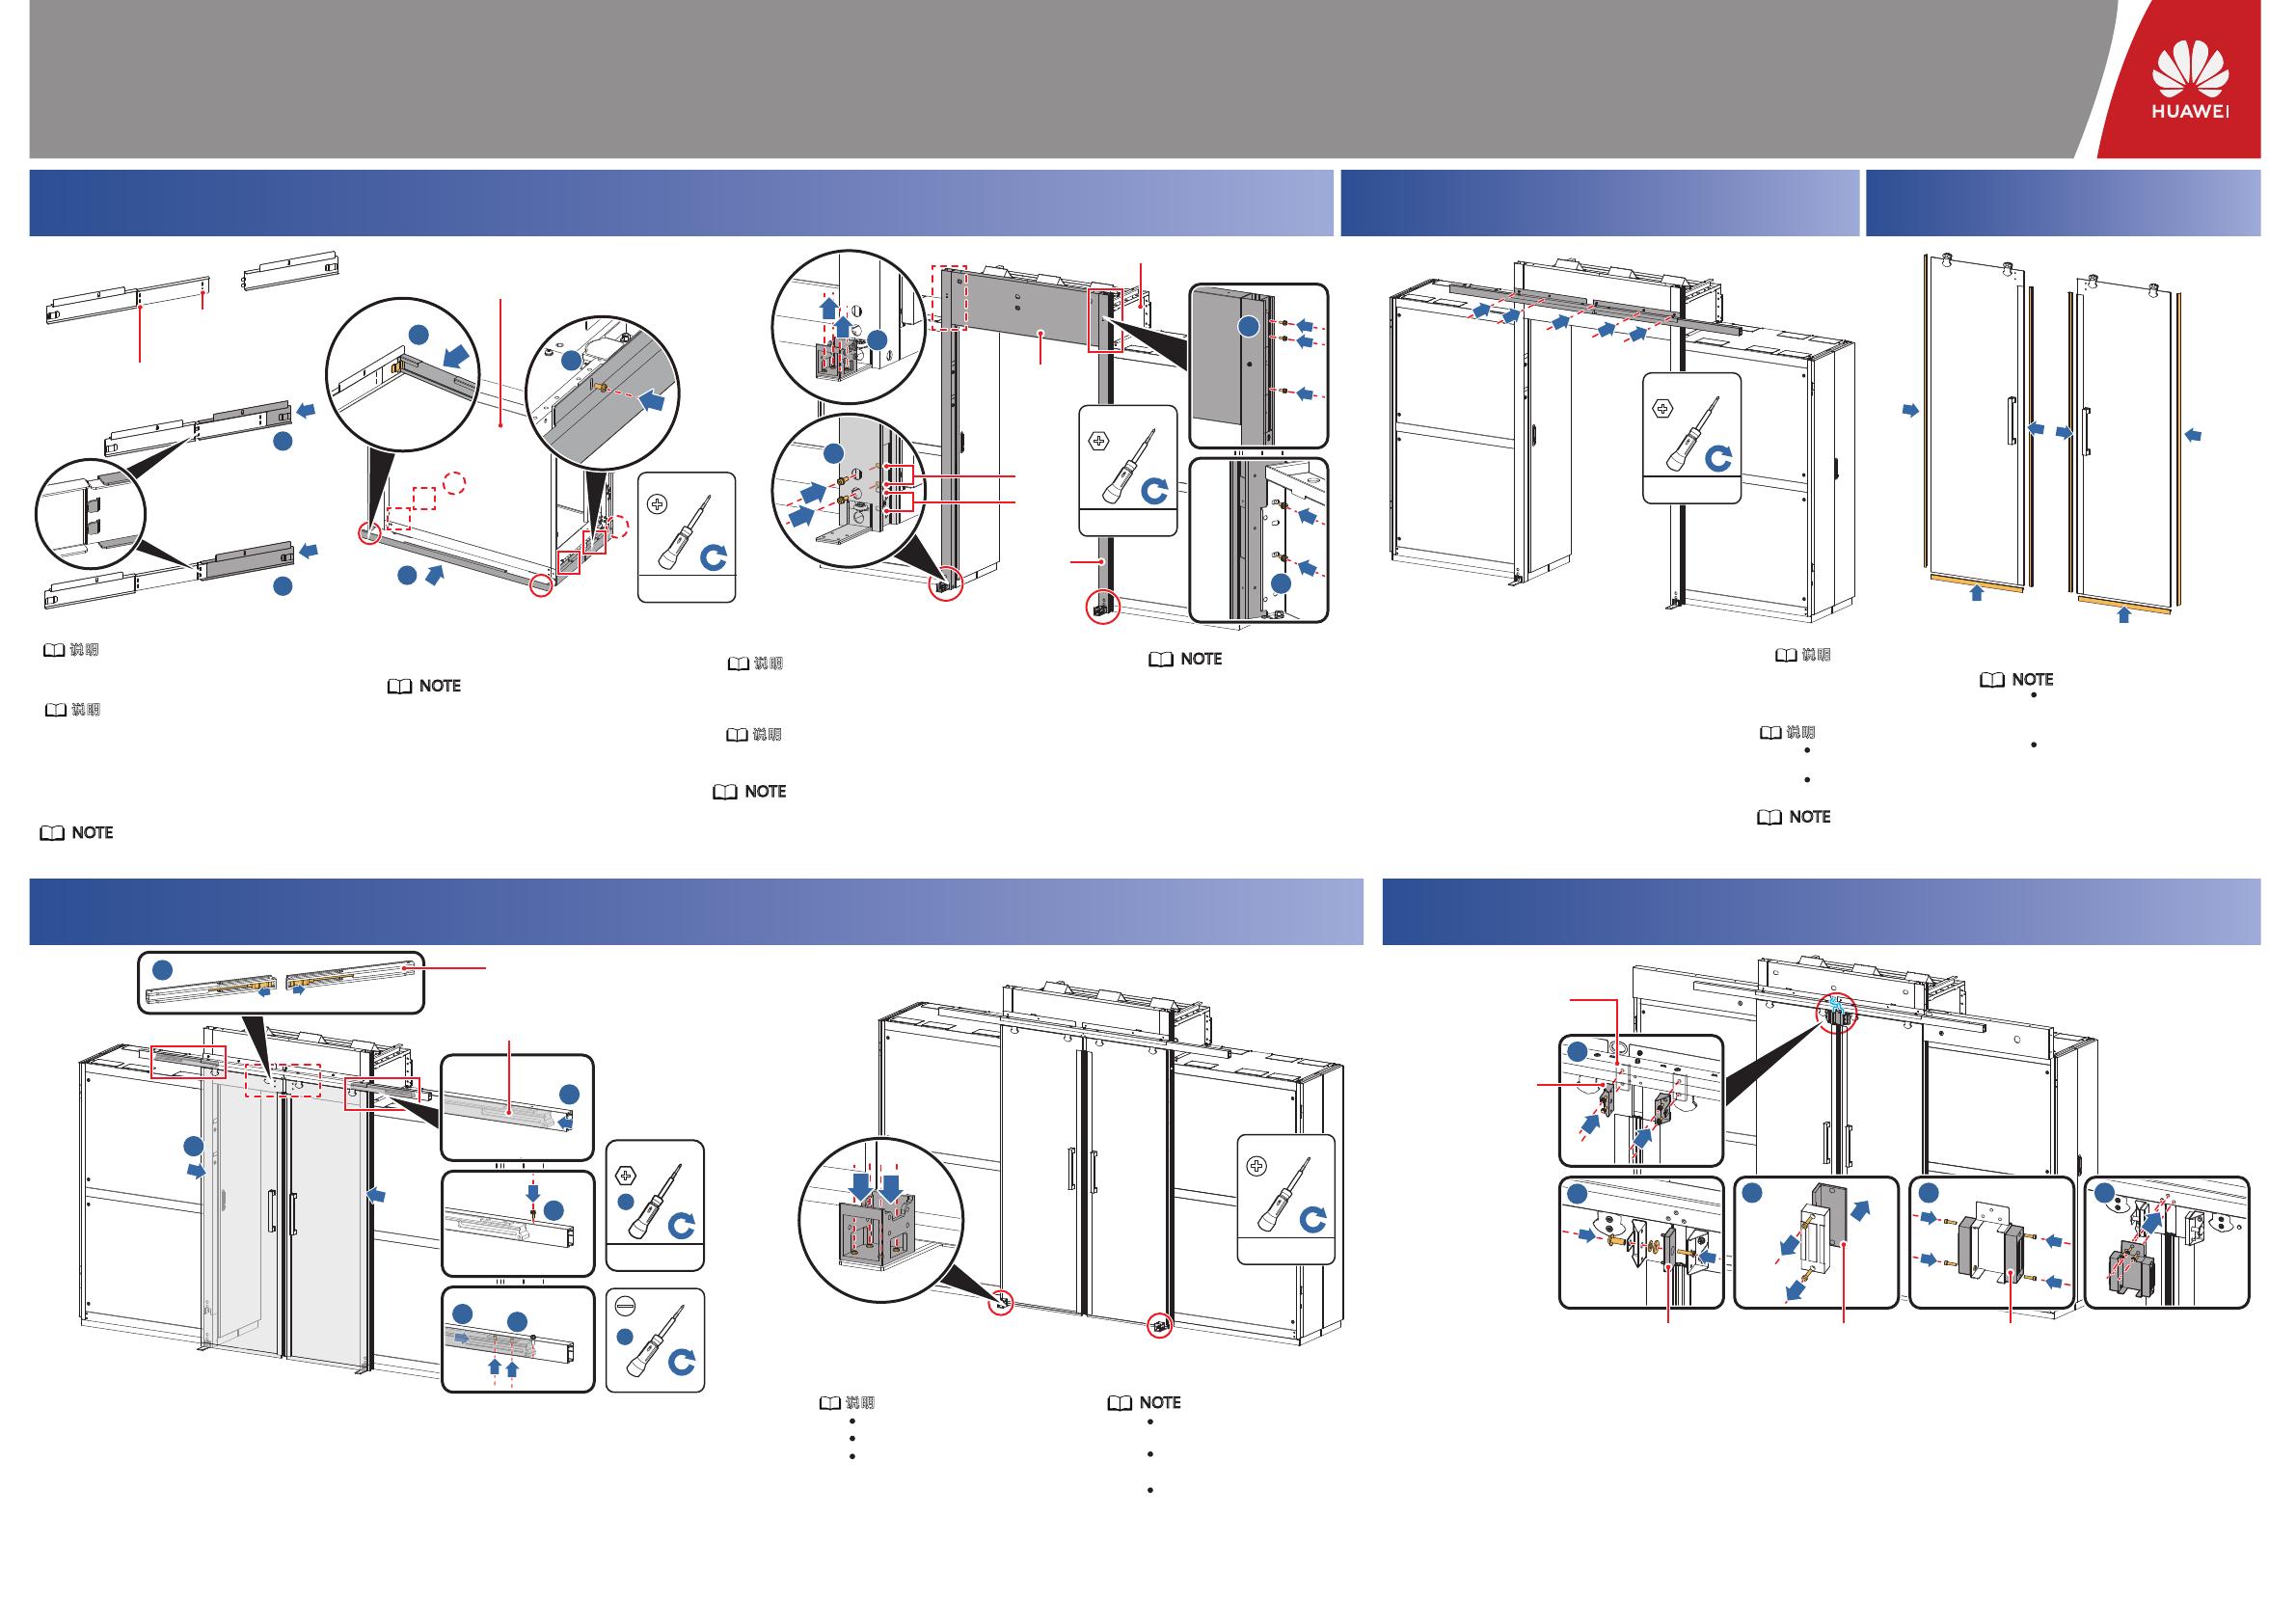
Huawei 21501718 ユーザーガイド

タイプ
ユーザーガイド

Huawei 21501718 は、さまざまな業界で利用できるインテリジェントなモジュール式のスライド ドアです。このドアは、高品質の素材で作られており、長寿命で耐久性に優れています。また、スマート機能により、リモートでドアを開閉したり、アクセスを制御したりすることができます。

Huawei 21501718 は、データセンター、通信室、医療施設、製造工場など、さまざまな業界で使用されています。このドアは、セキュリティを強化し、エネルギー効率を向上させ、スペースを節約するのに役立ちます。

Huawei 21501718 の主な機能は以下の通りです。

  • リモートでドアを開閉できるスマート機能
  • ドアの開閉履歴を記録する機能
  • アクセスを制御する機能
  • セキュリティを強化する機能
  • エネルギー効率を向上させる機能
  • スペースを節約する機能
安装下封板与内门框
Installing Bottom Sealing Plates and the Inner Door Frame
01 02 安装导轨
Installing a Guide Rail 03 安装胶条
Installing Rubber Strips
安装玻璃门和止摆器
Installing a Glass Door and Damper
04 (可选)安装电磁锁
(Optional) Installing a Magnetic Lock
05
步骤1:将内立柱与内门楣固定。 步骤1:安装门胶条。
步骤1:将门推入导轨。
步骤2:将中间缓冲器弹簧拨到压缩状态。
步骤3:根据标签箭头方向,将端部缓冲器分别
推入导轨两端。
步骤4:固定导轨两端螺丝。
步骤5:将缓冲器往导轨末端推,直到紧贴导轨螺丝。
步骤6:在缓冲器弹簧压缩状态下,紧固缓冲器。
Step 4: Secure the screws at both ends of the guide rail.
Step 5: Push the buers to the ends of the guide rail until
they are in close contact with the guide rail screws.
Step 6: Secure the buers when the springs of the
buers are in the compressed state.
步骤1:将电磁吸铁固定角件与垫片固定在门板上。
步骤2:左右两侧的电磁吸铁分别紧固在固定角件上。
步骤3:拆除电磁锁附件,保留拆下的两颗螺钉。
步骤4:用螺钉将2个电磁锁分别固定在电磁锁固定件上。
步骤5:将组装完成的电磁锁固定在导轨上。
Step 1: Secure the magnet fastener and washer to
the door panel.
Step 2: Secure the magnets on the left and right
sides to the fasteners respectively.
Step 3: Remove the magnetic lock accessory and
save the two removed screws for later use.
Step 4: Secure the two magnetic locks to the
magnetic lock fasteners using screws.
Step 5: Secure the assembled magnetic locks to the
guide rail.
步骤1:将导轨紧固在门框。
步骤2:将立柱与天窗连接板固定。
步骤3:拆除止摆器前滚轮。
步骤4:将立柱底部与机柜紧固。
拆除立柱侧面维护板后,将立柱和门楣平放在地面组装。
组装完成后,确保立柱与门楣各面对齐。
安装前,先拆除门楣后盖板,待所有器件安装完成后
再装回。
安装前,请拆除玻璃门
运输保护胶条。
确保玻璃门之间无缝隙,且平整。
确保玻璃门与立柱之间没有摩擦。
确保缓冲器完成到位。
步骤1:组装机柜等宽的前后封板。
Step 1: Assemble front and rear sealing plates
that are as wide as the cabinet. Step 1: Secure the guide rail
to the door frame.
步骤2:将前后封板固定在机柜上。
步骤3:使侧封板带凹口侧朝上,将侧封板卡入前
后封板。
从门盒物料中取出1100mm或者1200mm
机柜侧封板,根据实际情况拼接600mm
或者800mm宽机柜下封板。
Step 2:
Secure the front and rear sealing
plates to the cabinet.
Step 3:
Place the side with dents upwards,
and snap the side sealing plate into
the front and rear sealing plates.
Take the side sealing plate for the
1100 mm or 1200 mm deep cabinet
out of the door box materials, and
splice the bottom sealing plate for the
600 mm or 800 mm wide cabinet
based on the site requirements.
Before installation, ensure that the left and right
end cabinets are on the same horizontal line.
Ensure that there is no gap between the
glass doors and they are flush.
Ensure that there is no friction between
the glass doors and posts.
Ensure that the buers are installed
properly.
Before installation, remove the rear cover of the door
head and reinstall it after all components are installed.
600mm宽机柜拼接孔位
Splicing holes for a 600 mm
wide cabinet
Splicing holes for a
800 mm wide cabinet
800mm宽机柜拼接孔位
列头柜
End cabinet
Step 1: Push the door onto the guide rail.
Step 2: Set the spring of the middle buer to the
compressed state.
Step 3: Push an end buer into each end of the
guide rail according to the direction of the
arrow on the label.
Step 1: Secure the internal posts to the internal door head. Step 2: Secure the posts to the skylight connective plate.
Step 3: Remove the front wheel of the damper.
Step 4: Secure the bottom of the posts to the cabinets.
After removing the maintenance panels
from both sides of the posts, put the posts
and door head horizontally on the floor
and assemble them. After the assembly is
complete, verify that the posts are flush with
the door head.
04
智能微模块 推拉门 快速指南 (高配,21501718,21501712)
Smart Module Sliding Door Quick Guide (Advanced Configuration, 21501718, 21501712)
Step 1: Install the door rubber strips.
Before installation, remove
the protective rubber strips
from the glass door.
确保门与胶条紧密贴合、
无缝隙。
确保内外侧胶条与门上方
平齐,底部胶条与门同宽。
Ensure that the door is in
close contact with the rubber
strips without gaps.
Ensure that the inner and
outer rubber strips are flush
with the door and the rubber
strip at the bottom is as wide
as the door.
版权所有 © 华为数字能源技术有限公司2022。保留一切权利。
Copyright © Huawei Digital Power Technologies Co., Ltd. 2022. All rights reserved.
3 N·m
M5x10
3 N·m
M6x16
3 N·m
M6x16
2
1
1:有滚轮机柜固定孔位
2:无滚轮机柜固定孔位
1: Securing holes for cabinets with castors
2: Securing holes for cabinets without castors
立柱
Post
门楣
Door head
天窗连接板 Skylight connective plate
1
3
端部缓冲器
End buer
45
3
1
电磁吸铁
固定角件
Magnet
fastener
电磁锁附件
Magnetic lock
accessory
电磁锁固定件
Magnetic lock
fastener
电磁吸铁
Magnet
垫片
Washer
2
1
13
2
3
4
3 N·m
M6x16
4
6
安装前确保左右列头柜在同一个水平线上。
3 N·m
M5x10
6
5
中间缓冲器
Middle buer
2
3
4
1
2
步骤1:装回止摆器前滚轮。
Step 1: Reinstall the front wheel of the damper.
说明
说明 说明
说明
说明
说明
说明
NOTE
NOTE
NOTE
NOTE
NOTE
NOTE
NOTE
(可选)调节电磁锁间隙
(Optional) Adjusting the Magnetic Lock Gap
05 07 安装外门框
Installing an External Door Frame
06 安装外门框和门盒
Installing an External Door Frame and Door Boxes
08
08 (可选)安装PAD安装件和门禁机
(Optional) Installing a PAD Mounting Kit and Access Control Device
09
安装立柱侧盖板
Installing Side Covers for the Posts
安装门盒挂装件
Installing Door Box Hanging Kits
Step 1: Install the bottom plate of the PAD mounting kit.
Step 2: Pre-route the cables for the PAD and access control device.
Step 3: Remove the bae plate from the installation position and
secure the bae plate with the cable hole in the lower part. Step 8: Install the access control device.
a: Remove the screws (set aside) from the access control device and take o the baseplate.
b: Secure the baseplate to the bae plate.
c: Route the cable of the access control device through the cable hole in the bae plate.
d: Secure the access control device to the baseplate.
Step 6: Install the PAD cover and pull the pre-routed cables out of the
cable hole.
Step 7: Adjust the feet on the PAD
mounting support and clamp the
PAD into the PAD mounting support.
步骤1:将门框扶起,并与机柜内门框顶部固定。
步骤2:紧固立柱底部螺丝。
步骤3:安装门盒。
Step 1: Stand up the door frame, and secure it to the top of
the internal door frame of the cabinet.
Step 2: Tighten the screws at the bottom of the posts.
Step 3: Install door boxes.
步骤1:安装立柱侧板盖板。
Step 1: Install side covers for the posts.
步骤1:面向通道,将标识“L”“R”的门盒挂装件
分别紧固在机柜顶部。
步骤2:将预装在立柱的线缆拉出。
步骤3:将门盒挂装件紧固在立柱上。
1100mm机柜场景时,门盒使用单独发货的
1100mm门盒,门物料中打包的1200mm
盒舍弃。
步骤1:将外立柱与外门楣固定。
Step 1: Secure the external posts to the external
door head.
将立柱和门楣平放在地面组装。
组装完成后,确保立柱与门楣各面对齐。
安装门盒前,请确认是否需要安装eLight。如果安装eLight,建议先安
eLight后再执行此步骤。
In case of 1100 mm cabinet scenario, the
1100 mm door box separately delivered is used,
the 1200 mm door box packaged in the door
materials is abandoned.
Step 1: Facing the aisle, secure the door box hanging
kits labeled L and R to the top of the cabinet.
Step 2: Pull out the cables that are preinstalled in
the post.
Step 3: Secure the door box hanging kits to the post.
Put the posts and door head horizontally on
the floor and assemble them.
After the assembly is complete, verify that
the posts are flush with the door head.
Before installing the door boxes, check whether the eLight needs
to be installed. If the eLight needs to be installed, you are advised
to install the eLight first and then perform this step.
04
智能微模块 推拉门 快速指南 (高配,21501718,21501712)
Smart Module Sliding Door Quick Guide (Advanced Configuration, 21501718, 21501712)
版权所有 © 华为数字能源技术有限公司2022。保留一切权利。
Copyright © Huawei Digital Power Technologies Co., Ltd. 2022. All rights reserved.
步骤1:安装PAD安装件底板。
步骤2:预布PAD和门禁机线缆。
步骤3:拆除安装位挡片,并固定过线孔下端的挡片。
外门楣(背面)
External door
head (rear)
外立柱
External door frame
3 N·m
M5x10
调节电磁锁间隙
Adjusting the Magnetic Lock Gap
If the magnetic lock fails to attract the magnet after being installed on a sliding door,
you can adjust the magnetic lock by either of the following methods:
Loosen the two M6 screws on the fixing
corner pieces of the magnet. Then move the
fixing corner piece assembly horizontally until
the magnet closely attaches to the magnetic
lock.
推拉门电磁锁安装完毕后如若出现电磁锁吸合不上的情况时,可采取如下两种方案
对电磁锁进行调节:
拧松用于电磁吸铁固定角件的两颗M6的螺钉,
横向移动电磁吸铁固定角件组合体,至电磁
吸铁与电磁锁紧密贴合为止。
方案一: 方案二:
Method 1: Method 2:
Loosen the two screws that secure the
magnetic lock. Then insert a washer between
the magnetic lock and the sheet metal
fastener until the magnet closely attaches to
the magnetic lock.
拧松固定电磁锁的两颗螺钉,在电磁锁与电磁
锁固定钣金件之间插入垫片,至电磁吸铁与电
磁锁紧密贴合为止。
2
1
3
3
3 N·m
M5x10
3 N·m
M5x10
Skylight
connective
plate
1
3
2
天窗连接板
机柜顶部
Top of the
cabinet
预装线缆
Preinstalled cables
3 N·m
M5x10
1
1
2
1
1 N·m
M4
2
3 N·m
M5x10
1
2
3
4
步骤5:拆除安装位挡片,并固定PAD支架。
Step5: Remove the bae plate from the installation position and
secure the PAD mounting bracket.
步骤4:(可选)如果PAD安装支架下方支脚与PAD不等宽,调节支脚。
Step 4: (Optional) If the feet in the lower part of the PAD mounting
bracket are not as wide as the PAD, adjust the feet.
2
1
3
3 N·m
M5x10
步骤6:安装PAD盖板,并从过线孔拉出预布的线缆。
步骤7:调整PAD安装支架上方支脚,
将PAD卡入PAD安装支架。
12
1
23
4
步骤8:安装门禁机。
a:拆下门禁机固定螺钉(请妥善保存),取下底板。
b:将底板固定在挡片上。
c:将门禁机线缆穿过挡片过线孔。
d:将门禁机固定在底板上。
说明 说明
说明
NOTE
NOTE
  • Page 1 1
  • Page 2 2

Huawei 21501718 ユーザーガイド

タイプ
ユーザーガイド

Huawei 21501718 は、さまざまな業界で利用できるインテリジェントなモジュール式のスライド ドアです。このドアは、高品質の素材で作られており、長寿命で耐久性に優れています。また、スマート機能により、リモートでドアを開閉したり、アクセスを制御したりすることができます。

Huawei 21501718 は、データセンター、通信室、医療施設、製造工場など、さまざまな業界で使用されています。このドアは、セキュリティを強化し、エネルギー効率を向上させ、スペースを節約するのに役立ちます。

Huawei 21501718 の主な機能は以下の通りです。

  • リモートでドアを開閉できるスマート機能
  • ドアの開閉履歴を記録する機能
  • アクセスを制御する機能
  • セキュリティを強化する機能
  • エネルギー効率を向上させる機能
  • スペースを節約する機能

他の言語で