
HealthyWhite
700 series


1
3
2
8
8.1
8.2
6
4
5
7
9
9.3
9.2
9.1
1


6
Introduction
Congratulations on your purchase and welcome to Philips! To fully benet from the support that Philips
offers, register your product at www.philips.com/welcome.
Important
Read this user manual carefully before you use the appliance and save it for future reference.
Danger
- Keep the charger away from water. Do not place or store it over or near water contained in a bathtub,
washbasin, sink etc. Do not immerse the charger in water or any other liquid. After cleaning, make
sure the charger is completely dry before you connect it to the mains.
Warning
- Check if the voltage indicated on the appliance corresponds to the local mains voltage before you
connect the appliance.
- The mains cord cannot be replaced. If the mains cord is damaged, discard the charger. Always have the
charger replaced with one of the original type in order to avoid a hazard.
- If the appliance is damaged in any way (brush head, toothbrush handle and/or charger), stop using it.
- This appliance contains no serviceable parts. If the appliance is damaged, contact the Consumer Care
Centre in your country (see chapter ‘Guarantee and support’).
- Do not use the charger outdoors or near heated surfaces.
- This appliance is not intended for use by persons (including children) with reduced physical, sensory or
mental capabilities, or lack of experience and knowledge, unless they have been given supervision or
instruction concerning use of the appliance by a person responsible for their safety.
- Children should be supervised to ensure that they do not play with the appliance.
Caution
- If you have had oral or gum surgery in the previous 2 months, consult your dentist before you use the
toothbrush.
- Consult your dentist if excessive bleeding occurs after using this toothbrush or if bleeding continues to
occur after 1 week of use.
- If you have medical concerns, consult your doctor before you use the Sonicare.
- The Sonicare toothbrush complies with the safety standards for electromagnetic devices. If you have
a pacemaker or other implanted device, contact your physician or the device manufacturer of the
implanted device prior to use.
- This appliance has only been designed for cleaning teeth, gums and tongue. Do not use it for any other
purpose. Stop using the appliance and contact your doctor if you experience any discomfort or pain.
- The Sonicare toothbrush is a personal care device and is not intended for use on multiple patients in a
dental practice or institution.
- Stop using a brush head with crushed or bent bristles. Replace the brush head every 3 months or
sooner if signs of wear appear.
- Do not use other brush heads than the ones recommended by the manufacturer.
- If your toothpaste contains peroxide, baking soda or other bicarbonate (common in whitening
toothpastes), thoroughly clean the brush head and the handle with soap and water after each use.
Otherwise the plastic may crack.
- Do not clean brush heads, the handle, the charger and the charger cover in the dishwasher.
ENGLISH

Electromagnetic elds (EMF)
This Philips appliance complies with all applicable standards and regulations regarding exposure to
electromagnetic elds.
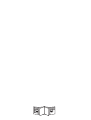
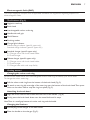
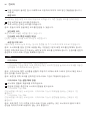
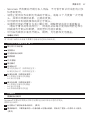
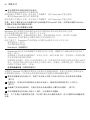
The Sonicare (Fig. 1)
1 Hygienic travel cap
2 Brush head
3 Interchangeable colour code ring
4 Handle with soft grip
5 On/off button
6 Brushing modes
7 Charge light indicator
- Deluxe charge indicator (specic types only)
- Standard charge indicator (specic types only)
8 Standardcharger(specictypesonly)
- 8.1 Charger cover with brush head holder
- 8.2 Travel charger
9 Deluxecharger(specictypesonly)
- 9.1 Charger cover with brush head holder
- 9.2 Travel charger
- 9.3 Charger base with cord wrap facility
Getting started
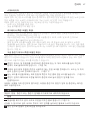
Changing the colour code ring
Sonicare brush heads come with interchangeable colour code rings to identify your brush head.
To change the colour code ring:
1 Pullthecolourcoderingfromthebottomofthebrushhead(Fig.2).
2 To attach a new ring, slip one edge of the new ring over the bottom of the brush head. Then press
downontheothersidetosnaptheringintoplace(Fig.3).
Attaching the brush head
1 Alignthebrushheadsothebristlesfacethefrontofthehandle.(Fig.4)
2 Firmly press the brush head down onto the metal shaft until it stops.
Note: There is a small gap between the colour code ring and the handle.
Charging the Sonicare
1 Put the plug of the charger in the wall socket.
2 Placethehandleonthecharger(Fig.5).
ENGLISH 7

, Thebatterychargeindicatornexttothebatterysymbolashestoindicatethatthetoothbrushis
charging.
Battery charge indicator
The battery charge indicator shows the approximate remaining battery charge.
Deluxe charge indicator (specic types only):
- Solid green: 50-100%
- Flashing green: 10-49%
- Flashing yellow: less than 10%
Standard charge indicator (specic types only):
- Solid green: 50-100%
- Flashing green: less than 50%
Note: When the battery is low, you hear 3 beeps after the completion of the brushing cycle and the battery
charge indicator ashes for 30 seconds.
Note: To keep the battery fully charged, you may keep your Sonicare on the charger when not in use. It takes 24
hours to charge the battery fully.
Using the Sonicare
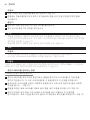
Brushing instructions
1 Wet the bristles and apply a small amount of toothpaste.
2 Placethetoothbrushbristlesagainsttheteethataslightangletowardsthegumline(Fig.6).
3 Press the on/off button to switch on the Sonicare.
4 Apply light pressure to maximise Sonicare’s effectiveness and let the Sonicare toothbrush do the
brushing for you.
5 Gently move the brush head slowly across the teeth in a small back and forth motion so the longer
bristles reach between your teeth. Continue this motion throughout the brushing cycle.
Note: To make sure you brush evenly throughout the mouth, divide your mouth into 4 sections using the
Quadpacer feature (see chapter ‘Features’).
6 Beginbrushinginsection1(outsideupperteeth)andbrushfor30secondsbeforeyoumoveto
section2(insideupperteeth).Continuebrushinginsection3(outsidelowerteeth)andbrushfor
30secondsbeforeyoumovetosection4(insidelowerteeth)(Fig.7).
7 After you have completed the brushing cycle, you can spend additional time brushing the chewing
surfaces of your teeth and areas where staining occurs. You can also brush your tongue, with the
toothbrushswitchedonoroff,asyouprefer(Fig.8).
The Sonicare is safe to use on:
- Braces (brush heads wear out sooner when used on braces)
- Dental restorations (llings, crowns, veneers)
Note: You can switch off the toothbrush at any time by pressing and holding the on/off button for 2 seconds.
ENGLISH8

Clean and White mode brushing instructions
The Clean and White mode consists of 2 minutes of Clean mode to clean the whole mouth and an
additional 30 seconds of White mode to focus on the visible front teeth.
1 Brushtherst2minutesasinstructedinsteps1-6above.
2 After the 2 minutes of Clean mode, the White mode begins with a change in brushing sound and
motion. That is your signal to start brushing the visible upper front teeth for 15 seconds
3 Atthenextbeepandpause,movetothevisiblelowerfrontteethforthenal15secondsof
brushing(Fig.9).
Brushing modes
The Sonicare automatically starts in the default Clean mode. To select a different brushing mode:
1 Press the on/off button to toggle between modes.
, The green LED indicates the selected mode.
Note: You can only switch between modes when the toothbrush is switched on.
Clean mode
Standard mode for superior teeth cleaning.
Sensitive mode (specic types only)
Gentle yet thorough cleaning for sensitive gums and teeth.
Clean and White mode
2 minutes of Clean mode with an additional 30 seconds of White mode to focus on the visible front teeth.
Note: When the Sonicare is used in clinical studies, the default 2-minute Clean mode must be selected. However,
in whitening/stain reduction studies, the Clean and White mode must be selected. The handle should be fully
charged and the Easy-start feature deactivated.
Features
Easy-start
- This Sonicare comes with the Easy-start feature activated.
- The Easy-start feature gently increases power over the rst 14 brushings to help you get used to
brushing with the Sonicare.
Note: Each of the rst 14 brushings must last at least 1 minute to move through the Easy-start ramp-up cycle
properly.
Note: When the Clean and White mode is selected, the Easy-start feature is inactive.
Deactivating or activating the Easy-start feature
1 Attach the brush head to the handle.
2 Placethehandleintheplugged-incharger.
- To deactivate Easy-start:
Press and hold the on/off button for 2 seconds. You hear 1 beep to indicate that the Easy-start feature has
been deactivated.
ENGLISH 9

- To activate Easy-start:
Press and hold the on/off button for 2 seconds. You hear 2 beeps to indicate that the Easy-start feature
has been activated.
Note: Use of the Easy-start feature beyond the initial ramp-up period is not recommended and reduces the
effectiveness of the Sonicare toothbrush in removing plaque.
Smartimer
The Smartimer indicates that your brushing cycle is complete by automatically switching off the
toothbrush at the end of the brushing cycle.
Dental professionals recommend brushing no less than 2 minutes twice a day.
If you want to pause or stop brushing during the 2-minute brushing cycle, press and hold the on/off
button for 2 seconds. Press the on/off button again and the Smartimer picks up where you left off.
The Smartimer automatically resets to the beginning of a 2-minute cycle if:
- you stop brushing for 30 seconds or longer.
- you put the handle in the charger.
Quadpacer (select models)
- The Quadpacer is an interval timer that has a short beep and pause to remind you to brush the 4
sections of your mouth evenly and thoroughly (Fig. 7).
- When you use the two-minute Clean or Sensitive mode, you hear a short beep and a pause in
brushing action at 30, 60 and 90 seconds.
- When you use the Clean and White mode, you hear and feel a change in the brush head sound and
motion after 2 minutes of Clean mode. Then move the brush head to the visible upper front teeth
and brush them for 15 seconds. At the nal beep and pause, move to the visible lower front teeth and
brush them for 15 seconds (Fig. 9).
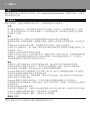
Cord wrap facility (specic types only)
If your Sonicare type includes the deluxe charger cover and base, the travel charger is pre-installed inside
the cover. If you want to shorten the mains cord, you can store excess cord in the cord wrap facility in the
charger base.
1 To separate the charger cover from the charger base, press the two grey snap bars on the charger
baseandpullthewhitechargercoverupwards.(Fig.10)
2 Wrap excess mains cord around the grey charger base as shown in the picture. Make sure
youwrapthecordontheinsideofthetwosnaplevers.(Fig.11)
3 When you have stored the excess cord, guide the mains cord through the small groove in the rear
ofthegreychargerbase.(Fig.12)
4 To reattach the charger cover, press it down over the charger base until it snaps into place.
Tip: For extra convenience during travel, you can remove the travel charger and use it without the charger cover
and charger base.
ENGLISH10

Cleaning
Do not clean brush heads, the handle, the charger or the charger cover in the dishwasher.
Toothbrush handle
1 Removethebrushheadandrinsethemetalshaftareawithwarmwater(Fig.13).
Do not push on the rubber seal on the metal shaft with sharp objects, as this may cause damage.
2 Wipe the entire surface of the handle with a damp cloth.
Brush head
1 Rinsethebrushheadandbristlesaftereachuse(Fig.14).
2 Remove the brush head from the handle and rinse the brush head connection at least once a
week with warm water.
Charger
1 Unplug the charger before you clean it.
2 Wipe the surface of the charger with a damp cloth.
Storage
- If you are not going to use the appliance for a long time, unplug it, clean it and store it in a cool and
dry place away from direct sunlight. You can use the cord wrap facility (specic types only) to store
the mains cord in an organised way.
- You can store brush heads on the pegs at the back of the charger.
Replacement
Brush head
- Replace Sonicare brush heads every 3 months to achieve optimal results.
- Use only Sonicare ProResults replacement brush heads.
Recycling
Do not throw away the appliance with the normal household waste at the end of its life, but hand it in at
an ofcial collection point for recycling. By doing this, you help to preserve the environment.
Removing the rechargeable battery
Please note that this process is not reversible.
1 To deplete the rechargeable battery of any charge, remove the handle from the charger, switch on
the Sonicare and let it run until it stops. Repeat this step until you can no longer switch on the
Sonicare.
2 Insertaathead(standard)screwdriverintotheslotlocatedatthebottomofthehandleand
turnitanticlockwisetoreleasethebottomcap.(Fig.15)
ENGLISH 11

3 Hold the handle upside down and push down on the shaft to release the internal components of
thehandle(Fig.16).
4 Insert the screwdriver under the circuit board, next to the battery connections, and twist to break
theconnections.Removethecircuitboardandprythebatteryfromtheplasticcarrier(Fig.17).
Guarantee and support
If you need information or support, please visit www.philips.com/support or read the separate
worldwide guarantee leaet.
Guarantee restrictions
The terms of the international guarantee do not cover the following:
- Brush heads.
- Damage caused by misuse, abuse, neglect, alterations or unauthorised repair.
- Normal wear and tear, including chips, scratches, abrasions, discolouration or fading.
ENGLISH12

소개
필립스 제품을 구입해 주셔서 감사합니다! 필립스가 드리는 지원 혜택을 받으실 수 있도록
www.philips.co.kr에서 제품을 등록하십시오.
중요 사항
본 제품을 사용하기 전에 이 사용 설명서를 주의 깊게 읽고 나중에 참조할 수 있도록 잘
보관하십시오.
주의
- 충전기는 물이 없는 곳에서 사용하십시오. 욕조, 세면대, 싱크대 등 물이 가까이 있는
곳에서 사용하거나 두지 마십시오. 그리고 충전기를 물이나 기타 액체에 담그지 마십시오.
청소한 후에는 충전기가 완전히 건조된 다음 제품을 본체에 연결하십시오.
경고
- 제품에 전원을 연결하기 전에, 제품에 표시된 전압과 사용 지역의 전압이 일치하는지
확인하십시오.
- 전원 코드는 교체할 수 없습니다. 전원 코드가 손상된 경우 충전기를 폐기하십시오.
손상된 충전기는 위험한 상황을 방지하기 위해 정품으로 교체하여 사용하십시오.
- 제품에 손상된 부분(칫솔모, 칫솔 손잡이, 충전기)이 나타나면 사용을 중단하십시오.
- 본 제품은 서비스되는 부품이 없습니다. 제품이 손상되면 필립스 고객 상담실로
문의하십시오(‘보증 및 지원’란 참조).
- 충전기를 실외 또는 발열되는 표면 근처에서 사용하지 마십시오.
- 신체적인 감각 및 인지능력이 떨어지거나 경험과 지식이 풍부하지 않은 성인 및 어린이는
혼자 제품을 사용하지 말고 제품 사용과 관련하여 안전에 책임질 수 있도록 지시사항을
충분히 숙지한 사람의 도움을 받으십시오.
- 어린이가 제품을 가지고 놀지 못하도록 지도해 주십시오.
주의
- 최근 2개월 이내에 구강 또는 잇몸 수술을 받은 경우에는 칫솔을 사용하기 전에 치과
전문의와 상의하십시오.
- 본 제품을 사용한 후 출혈이 심하거나 1주일이 지나도 증상이 호전되지 않는다면 치과
전문의와 상의하십시오.
- 의료적 문제는 소닉케어를 사용하기 전에 치과 전문의와 상의하십시오.
- 소닉케어 칫솔은 국내 안전 기준에 따라 전자파 장해 검정을 받은 제품입니다. 심장 박동
보조기 등, 보조 기구를 이식 받은 경우에는 주치의나 보조 기구 제조업체에 문의하여
충분히 이해한 후 이용하십시오.
- 본 제품은 치아와 잇몸, 그리고 혀만 세정할 수 있도록 만들어졌으므로 다른 용도에는
사용하지 마십시오. 사용 중 불편함이나 통증이 느껴지면 제품 사용을 중단하고 의사와
상의하십시오.
- 소닉케어 칫솔은 개인 용품이므로 치과나 기타 의료 시설에서 공용으로 이용하지
마십시오.
- 눕거나 휘어진 칫솔모는 사용을 중단하십시오. 마모 증상이 나타나면 칫솔모를
교체하거나 3개월마다 정기적으로 교체하십시오.
- 제조업체에서 권장한 제품 이외의 칫솔모를 사용하지 마십시오.
- 사용하는 치약 성분에 과산화수소, 탄산수소나트륨, 기타 중탄산염(미백 치약 주성분)이
포함된 경우 이용 후에 칫솔모 및 핸들을 비누로 닦고 물로 깨끗이 씻어내십시오. 그렇지
않으면 플라스틱에 금이 갈 수도 있습니다.
- 칫솔모, 손잡이, 충전기 및 충전기 덮개를 식기세척기로 세척하지 마십시오.
한국어 13

14
EMF(전자기장)
이 제품은 EMF(전자기장)와 관련된 모든 기준 및 규정을 준수합니다.
소닉케어 (그림 1)
1 위생칫솔모캡
2 칫솔모
3 개인식별색상코드링
4 부드러운핸들그립
5 전원버튼
6 세정모드
7 충전표시등
- 고급 충전 표시등(특정 모델만 해당)
- 일반 충전 표시등(특정 모델만 해당)
8 여행용세트충전기(특정모델만해당)
- 8.1 칫솔모 꽂이가 있는 충전기 덮개
- 8.2 여행용 충전기
9 고급충전기(특정모델만해당)
- 9.1 칫솔모 꽂이가 있는 충전기 덮개
- 9.2 여행용 충전기
- 9.3 코드 정리 기능이 있는 충전대
시작하기
색상 코드링 변경
소닉케어 칫솔모는 교체 가능한 색상 코드링으로 사용자 구별이 가능합니다.
색상 코드링 변경하기:
1 칫솔모의아래쪽에서색상코드링을빼내십시오(그림2).
2 새링을연결하려면칫솔모의아래쪽에새로운링의가장자리한부분을올려놓고링의
다른쪽부분을눌러제대로끼우십시오(그림3).
칫솔모 부착 방법
1 칫솔모가손잡이앞면을향하도록칫솔모를조정합니다.(그림4)
2 칫솔모를금속샤프트에꼭눌러고정시킵니다.
참고:색상코드링과손잡이사이가약간벌어집니다.
소닉케어 충전
1 충전기플러그를벽면콘센트에꽂으십시오.
2 충전기에핸들을꽂으십시오(그림5).
, 배터리기호옆의배터리충전표시등이깜박이면칫솔이충전되고있는것입니다.
한국어

배터리 충전 표시등
배터리 충전 표시등은 대략적인 배터리 잔량을 보여줍니다.
고급 충전 표시등(특정 모델만 해당):
- 녹색: 50-100%
- 녹색 깜박임: 10-49%
- 노란색 깜박임: 10% 미만
표준 충전 표시등(특정 모델만 해당):
- 녹색: 50-100%
- 녹색 깜박임: 50% 미만
참고:배터리잔량이적으면칫솔질완료후신호음이세번울리고배터리충전표시등이30
초간깜박입니다.
참고:배터리를완전충전상태로유지하려면소닉케어를사용하지않을때충전기에꽂아
두어야합니다.배터리를완전히충전하려면24시간이걸립니다.
소닉케어 사용 방법
칫솔질 방법
1 칫솔모에소량의치약을바르십시오.
2 칫솔모가잇몸과살짝각을이루도록치아에올려놓으십시오(그림6).
3 전원버튼을눌러소닉케어를켜십시오.
4 소닉케어를더욱효과적으로사용하려면칫솔모를치아에세게문지르지마시고,가볍게
미끄러지듯사용하십시오.
5 치아를향해칫솔모를앞뒤로약간씩움직여서칫솔모의끝부분이치아사이사이에
위치하도록합니다.이동작을양치질해야하는동안에계속유지하십시오.
참고:Quadpacer(쿼드페이서)기능을사용하여입안을4개의구간으로나누고알림음에
따라입안치아를골고루양치할수있습니다.(‘기능’란참조).
6 1구간(윗니바깥쪽)부터30초동안양치한후2구간(윗니안쪽)으로칫솔모를
옮기십시오.계속해서3구간(아랫니바깥쪽)을30초간닦은다음4구간(아랫니안쪽)으로
옮기십시오(그림7).
7 소닉케어를이용하여어금니끝쪽씹는면을닦을수있습니다.또한칫솔의전원을켜거나
끈상태에서혀를닦을수도있습니다(그림8).
소닉케어는 다음과 같은 경우에 사용해도 안전합니다.
- 치아 교정기(교정기에 사용하는 경우 칫솔모가 보다 빨리 마모될 수 있습니다.)
- 치아 보철물(신경치료, 크라운, 라미네이트)
참고:전원버튼을2초간눌러언제라도칫솔을끌수있습니다.
세정 및 미백 모드 칫솔질 지침
세정 및 미백 모드는 전체 구강을 세정하는 2분의 세정 모드와 눈에 보이는 앞니에 중점을 둔
추가 30초의 미백 모드로 구성됩니다.
1 위의1-6단계에나온대로처음2분동안칫솔질을합니다.
2 2분의세정모드가지나면칫솔질소리및동작이바뀌면서미백모드가시작됩니다.
이것은15초동안앞니위쪽의칫솔질을시작하라는신호입니다.
한국어 15

3 다음신호음이울리면앞니아래쪽으로이동하여마지막15초동안칫솔질을합니다(
그림9).
세정 모드
소닉케어는 일반 세정 모드에서 자동으로 시작됩니다. 다른 칫솔질 모드를 선택하려면
1 전원버튼을눌러모드를전환합니다.
, 녹색LED는선택한모드를나타냅니다.
참고:칫솔이켜져있을때만모드를전환할수있습니다.
일반세정 모드
표준 모드로 탁월한 세정을 할 수 있습니다.
민감세정 모드(특정 모델만 해당)
민감한 잇몸과 치아를 위해 부드럽게 세정합니다.
세정 및 미백 모드
2분의 세정 모드와 눈에 보이는 앞니에 중점을 둔 추가 30초의 미백 모드로 구성됩니다.
참고:소닉케어를임상연구에사용할때는기본값인2분의세정모드를선택해야합니다.
하지만미백/착색감소연구에서는세정및미백모드를선택해야합니다.손잡이를완전히
충전하고이지스타트기능을해제해야합니다.
기능
이지스타트
- 이 소닉케어에는 이지스타트 기능이 있습니다.
- 이지스타트 기능은 최초 14회 양치하는 동안 서서히 전원을 높여서 소닉케어를 이용한
양치질에 익숙해지도록 도와 줍니다.
참고:이지스타트점증사이클을원활히작동하기위해서최초14회의양치시매번최소1
분의양치를하셔야합니다.
참고:세정및미백모드를선택하면이지스타트기능이적용되지않습니다.
이지스타트 기능 설정/해제 방법
1 소닉케어핸들에칫솔모를부착하십시오.
2 전원에연결된충전기에소닉케어핸들을꽂으십시오.
- 이지스타트 기능 해제:
전원 버튼을 2초 동안 누르십시오. 이지스타트 기능이 해제됨을 알리는 신호음이 1번
울립니다.
- 이지스타트 기능 작동:
전원 버튼을 2초 동안 누르십시오. 이지스타트 기능이 설정됨을 알리는 신호음이 2번
울립니다.
참고:최초점증기간이후에이지스타트기능을사용하는것은소닉케어의플라그제거
성능을저하시키므로사용하지않는것이좋습니다.
16 한국어

스마트타이머
스마트타이머는 양치질이 끝난 후 자동으로 전원을 차단해 양치질이 끝났음을 알려줍니다.
치과 전문의는 하루에 두 번씩 2분 이상 칫솔질 하는 것을 권장합니다.
2분의 양치 시간 중 소닉케어를 일시 중지하거나 멈추려면 전원 버튼을 2초 동안 누르십시오.
전원 버튼을 다시 누르면 스마트타이머 기능이 남은 시간만큼 다시 작동됩니다.
2분의 양치 시간이 처음부터 다시 계산되는 경우는 다음과 같습니다.
- 30초 이상 양치질을 멈춘 경우
- 칫솔 몸체를 충전기에 꽂은 경우
쿼드페이서(특정 모델만 해당)
- 쿼드페이서는 입 안을 골고루 깔끔하게 양치할 수 있도록 짧은 신호음과 함께 일시
중지하는 간격 타이머입니다 (그림 7).
- 2분의 일반세정 또는 민감세정 모드를 사용할 경우 30초, 60초 및 90초 간격으로
신호음이 짧게 울리면서 일시 중지합니다.
- 세정 및 미백 모드를 사용할 경우 2분의 세정 모드 후 칫솔모 소리 와 동작이 바뀌면
칫솔모를 눈에 보이는 위쪽 앞니로 이동하여 15초 동안 칫솔질을 합니다. 그런 다음 최종
신호음이 들리면 일시 정지하여 눈에 보이는 아래쪽 앞니로 이동하여 15초 동안 칫솔질을
합니다 (그림 9).
고급 충전기 케이스(특정 모델만 해당)
고급 충전기케이스가 구매하신 소닉케어 모델에 포함되어 있다면 케이스 내부에 이미 여행용
충전기가 내장되어 있습니다. 전원 코드를 짧게 하려면 충전대에 내장되어 있는 코드 정리
공간으로 사용하지 않는 코드를 보관할 수 있습니다.
1 충전기케이스및받침대를분리하려면충전대에있는두개의회색바를눌러하얀색
덮개가위로올라오도록당깁니다.(그림10)
2 그림과같이회색받침대주변의사용하지않는전원코드를정리합니다.코드는두개의
걸쇠손잡이안으로정리해야합니다.(그림11)
3
남는코드를보관할때에는회색받침대후면의작은홈에전원코드를놓습니다.(그림12)
4 충전기덮개가제자리에고정될때까지충전대위로눌러충전기덮개를다시
연결하십시오.
도움말:여행을더욱편안하게즐기려면,여행용충전기의충전기덮개및충전대는제거한
채로사용하십시오.
세척
칫솔모,핸들,충전기또는충전기덮개를식기세척기로세척하지마십시오.
핸들
1 칫솔모를제거하고금속샤프트부분을따뜻한물로헹굽니다(그림13).
손상될수있으므로금속샤프트주위의고무덮개를날카로운물체로누르지마십시오.
2 젖은천으로핸들의전체표면을닦으십시오.
한국어 17

칫솔모
1 사용후에는항상칫솔모를물로헹구십시오(그림14).
2 핸들에서칫솔모를제거하고매주1회칫솔모와핸들사이연결부분을따뜻한물로
닦아줍니다.
충전기
1 청소하기전에항상충전기의전원코드를뽑으십시오.
2 젖은천으로충전기의표면을닦으십시오.
보관
- 제품을 오랫동안 이용하지 않으려면 전원 코드를 뽑고 세척한 다음 직사광선이 없는
건냉한 장소에 보관하십시오. 코드 정리 기능(특정 모델만 해당)을 사용하여 전원 코드를
정리해서 보관할 수 있습니다.
- 칫솔모를 충전기 뒤쪽에 있는 걸이에 걸어 보관할 수도 있습니다.
교체
칫솔모
- 최적의 결과를 얻으려면 3개월에 한 번씩 소닉케어 칫솔모로 교체하십시오.
- 소닉케어 ProResults(프로리졀트) 교체용 칫솔모만 이용하십시오.
재활용
수명이 다 된 제품은 일반 가정용 쓰레기와 함께 버리지 마시고 지정된 재활용 수거 장소에
버리십시오. 이런 방법으로 환경 보호에 동참하실 수 있습니다.
충전식 배터리를 분리하는 방법
이과정은번복이불가능합니다.
1 충전식배터리를제거하려면충전기에서핸들을제거하고소닉케어를켠다음멈출
때까지작동합니다.더이상소닉케어를켤수없을때까지이단계를반복합니다.
2 일자(표준)드라이버를손잡이아래쪽의슬롯에넣고시계반대방향으로돌려아래쪽
뚜껑을풉니다.(그림15)
3 핸들을뒤집은채로샤프트를아래로눌러핸들내부부품을분리합니다(그림16).
4 배터리연결부옆의회로기판아래로드라이버를넣고비틀어서두연결부를
분리하십시오.회로기판을제거하고플라스틱부분에서배터리를꺼내십시오(그림17).
한국어18

보증 및 지원
보다 자세한 정보나 지원이 필요한 경우에는 필립스 웹사이트(www.philips.com/support)를
방문하시거나 제품 보증서를 참조하십시오.
보증 제한
국제 보증 약관에서 제외되는 항목은 다음과 같습니다.
- 칫솔모
- 오용, 남용, 부주의, 개조 또는 무단 수리로 인한 손상
- 쪼개짐, 긁힘, 마멸, 변색, 탈색 등, 일반적인 마모 또는 손상
한국어 19

20
簡介
恭喜您購買本產品並歡迎加入飛利浦!請於 www.philips.com/welcome 註冊您的產品,以善用
飛利浦提供的支援。
重要事項
使用本產品前,請先仔細閱讀本使用手冊,並保留說明以供日後參考。
危險
- 請勿讓充電器沾到水。請勿放置或存放於盛水的澡盆、洗臉盆、洗手槽等區域的上方或附
近。請勿將充電器浸入水中或其他液體中。完成清潔程序後,請先確定充電器已完全乾燥,
再連接到主電源。
警示
- 在您連接電源之前,請檢查本地的電源電壓是否與產品所標示的電壓相符。
- 電線無法更換。如果電線損壞,請棄置充電器。請務必以原型號的充電器更換,以免發生危
險。
- 如果產品有任何機件受損 (刷頭、牙刷握柄和/或充電器),請停止使用產品。
- 本產品不含可維修部分;萬一損壞,請與您所在國家/地區的客戶服務中心聯繫 (請參閱「保
固與支援」單元)。
- 充電器不可在室外或高熱表面附近使用。
- 本產品不適合供下列人士 (包括兒童) 使用:身體官能或心智能力退化者,或是經驗與使用知
識缺乏者。他們需要有負責其安全的人員在旁監督,或指示產品的使用方法,方可使用。
- 請勿讓孩童使用本產品或將本產品當成玩具。
警告
- 如果您的口腔或牙齦在過去 2 個月內曾動過手術,請在使用本牙刷前諮詢您的牙醫。
- 如果您在使用本牙刷後有出血狀況,或出血狀況延續超過 1 星期,請向您的牙醫諮詢。
- 若您有醫療方面的顧慮,使用 Sonicare 之前請先諮詢您的醫師。
- Sonicare 電動牙刷符合電磁裝置之安全標準。若您身上裝有心律調整器或曾植入其他裝置,
請於使用前詢問您的醫師或植入裝置的製造商。
- 本產品只適用於清潔牙齒、牙齦與舌頭,請勿用作其他用途。用後若感到任何不適或疼痛,
請停止使用並尋求醫生協助。
- Sonicare 電動牙刷為個人保健用品,不宜在牙醫診所或醫療機構供多名病患使用。
- 牙刷刷頭的刷毛若傾倒彎曲,請停止使用。請每 3 個月更換一次刷頭,其間出現老化現象時
則提早更換。
- 請勿使用非製造商推薦的刷頭。
- 如果牙膏內含過氧化氫、小蘇打或其他重碳酸鹽 (常見於美白用牙膏),請在每次刷牙完畢後
以肥皂及水徹底清洗刷頭及握柄。否則塑膠部分可能會裂開。
- 請勿在洗碗機中清潔刷頭、握柄、充電器以及充電器蓋。
電磁波 (EMF)
本飛利浦產品符合所有電磁波暴露的相關適用標準和法規。
繁體中文
ページが読み込まれています...
ページが読み込まれています...
ページが読み込まれています...
ページが読み込まれています...
ページが読み込まれています...
ページが読み込まれています...
ページが読み込まれています...
ページが読み込まれています...
ページが読み込まれています...
ページが読み込まれています...
ページが読み込まれています...
ページが読み込まれています...
ページが読み込まれています...
ページが読み込まれています...
ページが読み込まれています...
ページが読み込まれています...
-
 1
1
-
 2
2
-
 3
3
-
 4
4
-
 5
5
-
 6
6
-
 7
7
-
 8
8
-
 9
9
-
 10
10
-
 11
11
-
 12
12
-
 13
13
-
 14
14
-
 15
15
-
 16
16
-
 17
17
-
 18
18
-
 19
19
-
 20
20
-
 21
21
-
 22
22
-
 23
23
-
 24
24
-
 25
25
-
 26
26
-
 27
27
-
 28
28
-
 29
29
-
 30
30
-
 31
31
-
 32
32
-
 33
33
-
 34
34
-
 35
35
-
 36
36


Sonicare HX6711/02 ユーザーマニュアル
- カテゴリー
- 電動歯ブラシ
- タイプ
- ユーザーマニュアル
他の言語で
- English: Sonicare HX6711/02 User manual
関連論文
-
Philips HX6731/02 ユーザーマニュアル
-
Sonicare HX6512/35 ユーザーマニュアル
-
-
-
-
-
-
-
Saeco HX6511/50 取扱説明書
-
Saeco HX6616/51 ユーザーマニュアル
