
EWFC 无线快速部署方案
用户快速操作指南
无线快速部署方案-EWFC(ESCENE WIFI FAST CONNECTION)是为了帮
助用户能够简单快速地实施 wifi 系列话机的部署,实现 5.8G 无线话机与无
线接入点 EWA AP-3 之间的自动连接,并隔离其他无线设备的接入,提高办
公区域话机所接入的 wifi 网络的可靠性,稳定性及安全性。5.8Gwifi 话机与
EWA AP-3 如果不启用 EWFC 快速部署,则可以按照普通的方法进行手动连
接和设置。
方案所需设备
名称
描述
ESCENE
系列话机
WS620-PEGV4,WS330-PEGV4,WS282-P,WS118-P
Univois
系列话机
U8S,U7KS,U7S,U6S,U3S,U3+UniWiFi USB
适配器
话机软件版本要求
0.1.7.0811_Alpha(886)
及以上
无线 AP
EWA AP-3
快速部署必须具备的条件:
a. 5.8G wifi 话机和 EWA AP-3 为出厂默认状态。
b. 局域网具备 DHCP 功能,能够为 EWA AP-3 和 IP 话机提供 IP 地址。
c. EWA AP-3 连接的网线最好支持 POE 供电,这样可以免除布电源线的麻
烦。
快速部署安装:
将 EWA AP-3 固定在天花板上或者墙体的上端, 通过网线(带 POE 供
电)连接到局域网交换机。EWA AP-3 将自动获取 IP 地址。5.8Gwifi 话机上
电后将立即自动连接 EWA AP-3. 如果有多个 EWA AP-3 则按照 15 米 x15
米位置进行平均分布安装,具体要根据场地的实际情况进行调整。如果话机
能正确地连上无线网络,且型号强度大于 2 格,则表明网络已经正常。后续
的相关话机设置就和普通有线 IP 话机一样进行。
注意:管理员想重设无线参数则要按照下一步进行设置。
重新设置无线连接参数使之与出厂参数不一致(可选)
话机安装好后,就可以正常使用。出厂均为保密的参数,通常不需要进
行更换;但如果管理员想重设无线参数,则修改 EWA AP-3 的出厂参数。操
作步骤如下:
1-1
1. 首先将需要重设参数的 EWA AP-3 设备恢复出厂值,EWA AP-3 设备上
长按 reset 键还原,再将 EWA AP-3 网线直连 PC 口并上电
2. 用任意一台话机的 PC 口与 EWA AP-3 设备的网口通过网线直连;
3. 直接长按 OK 键,弹框后输入连接密码(范围为 4-8 位字符,可为数字,
字母,符号),确认提交后,将话机设置一个静态 IP 地址:192.168.0.X,
提示重启,话机起来继续第 4 步操作;
4. 话机待机界面长按 OK 键 3 秒,设置成功将会提示“EWA AP-3 Initial
successful! Do not power off!”,此时话机将自动连接,如修改失
败将会提示“EWA AP-3 Initial Fail! Do not power off!”,则需检
查网线是否完好及插好,主控话机静态 IP 地址是否设置正确,EWA AP-3
是否为默认出厂值设置;需安装多台 EWA AP-3 时,重复以上操作,如
用同一台话机设置可省略第 3 步,否则,第 3 步不可省略,所有都设置
完毕的 EWA AP-3 可以安装到天花上并连接网线。
5. 无线话机安装:所有话机拆开包装安装好电源适配器和手柄等,上电后,
通过话机长按 OK 键,弹框后输入第三步所设置的连接密码,确认提交
即可自动连接;
6. 如 wifi 话机被恢复出厂设置,则重复上一步操作即可再次连接,如 EWA
AP-3 设备被恢复出厂,则需重新设置。
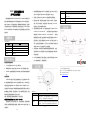
EWA AP-3
LED 指示灯
描述
SYS
绿色常亮表示
AP
上电;绿色闪烁表示
AP
正常工作;不亮表
示
AP
未上电、出现故障或已关闭
LED
指示灯;
5.8GHz
无线信号指示灯,常亮表示开启无线功能;闪烁表示有无线
数据传输;不亮表示已关闭无线功能或已关闭
LED
指示灯;
1-2
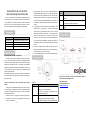
接口、按钮
描述
RESET
复位按钮。通电状态下持续按住 7 秒后松开,可将设备恢复
到出厂状态。
PoE
PoE 电源输入、数据传输复用口。
PWR
电源接口,可连接电源适配器给 AP 供电。
---------------------------------------------------------------------------------------------------
广州市亿景通信技术有限公司
地址:广州市天河区东圃镇黄村路 51 号粤安工业园 C 栋 4 楼
网址:http://www.escene.cn
邮箱:suppo[email protected]
1-3

ESCENE WIFI FAST CONNECTION
SOLUTION FOR QUICK USER GUIDE
Interface
& Button
Description
RESET
Pressing it for over 7 seconds restores the device to its factory
defaults.
PoE
LAN/PoE (802.3at) port. You can connect it to a computer, or
an IEEE 802.3at-compliant PoE switch, etc.
PWR
Used for connecting to the included power adapter for power
supply.
----------------------------------------------------------------------------------------------------------
Address: Floor 4 Building C YueAn Industrial Park No.54 Huangcun
Road Tianhe District Guangzhou China
Postal Code: 510665
E-mail: support@escene.cn
http://www.escene.cn/en
2-3
This is a Wi-Fi solution for Escene Wireless Accesspoint(EWA AP-3)
and Wi-Fi IP Phones. It’s very secure and convenience. In this solution, the
AP-3 only provide for our IP Phones, you could not connect any other Wi-Fi
devices to the AP-3, and the SSID and password is hidden, no one can
crack the AP-3 because we use private password generate method.
Item
Description
ESCENE Series Phone
WS620-PEGV4,WS330-PEGV4,WS282-P,WS118-P
Univois Series Phone
U8S,U7KS,U7S,U6S,U3S,U3+UniWiFi USB Dongle
Firmware Version
Up to 0.1.7.0811_Alpha(886)
AP
EWA AP-3
Rapid Deployment installation---recommended
Mount the AP-3 in the ceiling or the upper wall. Power the AP-3 by the
PoE, The Wi-Fi phone will connect with the AP-3 automatically and obtain
IP address from your local DHCP server. If there’re several AP-3s, suggest
installing them accordance with 15m * 15m position evenly distributed
(Specifically to be adjusted according to the actual situation of the site). The
IP Phone working well if it auto connect the Wi-Fi network and signal
strength is greater than level 2.
PS: If your local network has no DHCP, the AP-3 will use 192.168.0.254/24
as his local IP address, please pay attention, maybe it’ll IP conflict with your
other local machine.
Change the default setting so that it will different with our factory
settings.
Usually, there’s a default password setting in the AP, the user no need
to change anything, just installing the IP Phone, It’ll auto obtain password
from the AP, for detail please see the Step3.1. If you want to change the
default, follow the below step:
1. Reset the AP-3 device----Long press the “reset” button, it’ll auto reboot.
2. Powering the Wi-Fi IP Phone, connect the LAN port to the PC port of
the AP-3 by network cable.
2-1
3. Long pressing “OK” key in the IP Phone, it’ll ask password input, do
that(the password length should be 4-8, including digits, letters and
symbols---this is not the real password for the AP-3, just a PIN code),
submit the setting, set a static IP for the phone, the network segment
must be 192.168.0.x, Net Mask 255.255.255.0(such as 192.168.0.100,
255.255.255.0), it will ask reboot, press ok button, and then execute the
4th step.
4. Long pressing the “OK” button 3 seconds, the LCD will display “EWA
Initial successful! Do not power off!”, It means the AP-3 configure
succeed, the Wi-Fi phone will auto connect to the AP-3. If the LCD
display “EWA Initial Fail!Do not power off!”, It means configure error,
please check the network cable, the static IP in the IP Phone is
correct or not, and if the AP-3 reset or not. When install multi AP-3s,
you may use the same IP Phone(which configured in the step 3rd ) to
reset password for them. PS: This step just resetting the password for
the AP-3.
5. Wi-Fi Phone installation: When installing other Wi-Fi phones, just
pressing the OK button, and then input the correct PIN code which you
set in the step 3th. It’ll auto connect to the AP-3.
6. You need to repeat Step 5th if the IP Phone be reset to default settings.
EWA AP-3
LEDs
Description
SYS
Solid green: The AP is powered on.
Blinking green: The AP works properly.
Off: The AP is not powered on, malfunctions occur or
LEDs are disabled manually.
5.8GHz
Solid: 5.8G Wi-Fi is enabled.
Blinking: 5.8G wireless data is being transmitted.
Off: 5.8G Wi-Fi is disabled or LEDs are disabled manually.
2-2
-
 1
1
-
 2
2


