
user manual
使用者手冊
Dishwasher
洗碗機
ESI63010

Electrolux. Thinking of you.
Share more of our thinking at www.electrolux.com
Contents
Safety information 2
Product description 4
Control panel 5
Use of the appliance 6
Setting the water softener 6
Use of dishwasher salt 7
Use of detergent and rinse aid 7
Loading cutlery and dishes 8
Select and start a washing programme
10
Washing programmes 11
Care and cleaning 11
What to do if… 12
Technical data 14
Environment concerns 14
Subject to change without notice
Safety information
Before the installation and use, read this
manual carefully:
• For your personal safety and the safety of
your property.
• For the respect of the environment,
• For the correct operation of the appliance.
Always keep these instructions with the ap-
pliance also if you move or sell it.
The manufacturer is not responsible if an in-
correct installation and use causes damage.
Children and vulnerable persons safety
• Do not let persons, children included, with
reduced physical sensory, reduced mental
functions or lack of experience and knowl-
edge use the appliance. They must have
supervision or instruction for the operation
of the appliance by a person who is re-
sponsible for their safety.
• Keep all packaging away from children.
There is the risk of suffocation or physical
injury.
• Keep all detergents in a safe area. Do not
let the children touch the detergents.
• Keep children and small animals away
from the appliance when the door is open.
General safety
• Do not change the specifications of this
appliance. There is the risk of injury and
damage to the appliance.
• Obey the safety instructions from the man-
ufacturer of the dishwasher detergent to
prevent burns to eyes, mouth and throat.
• Do not drink the water from the appliance.
Detergent residue can stay in your appli-
ance.
• Always close the door after you load or
unload the appliance to prevent injury and
to prevent someone falling on an open
door.
• Do not sit or stand on the open door.
Use
• The appliance is only for domestic use. Do
not use the appliance for commercial and
industrial use or for other uses.
• Do not use the appliance for uses other
than that for which it made. You will pre-
vent physical injury to persons or prevent
damage to property.
• Only use the appliance to clean household
utensils that are applicable for dishwash-
ers.
• Do not put flammable products or items
that are wet with flammable products in,
near or on the appliance. Risk of explosion
or fire.
• Put the knives and all items with sharp
points in the cutlery basket with their
points down. If not, put in a horizontal po-
sition in the upper basket or in the knife
basket. (Not all models have the knife bas-
ket).
• Use only specified products for dishwash-
ers (detergent, salt, rinse aid).
• Types of salt that are not specified for dish-
washers can cause damage to the water
softener.
• Fill the appliance with salt before you start
a washing programme. The grains of salt
and salty water can cause corrosion or
make a hole in the bottom of the appliance.
2 electrolux

• Do not fill the rinse aid dispenser with prod-
ucts other than rinse aid, (e.g. dishwasher
cleaning agent, liquid detergent). This can
cause damage to the appliance.
• Make sure that the spray arms can move
freely before you start a washing pro-
gramme.
• If you open the door while the appliance is
in operation, hot steam can escape. There
is a risk of skin burns.
• Do not remove the dishes from the appli-
ance before the end of the washing pro-
gramme.
Care and cleaning
• Before maintenance, switch off the appli-
ance and disconnect the mains plug from
the mains socket.
• Do not use flammable products or prod-
ucts that can cause corrosion.
• Do not use the appliance without the fil-
ters. Make sure that the installation of the
filters is correct. An incorrect installation
causes unsatisfactory washing results and
damage to the appliance.
• Do not use spray water or steam to clean
the appliance. Risk of electrocution and
damage to the appliance.
Installation
• Make sure that the appliance has not suf-
fered any damage while in transport. Do
not connect a damaged appliance. If nec-
essary, contact the supplier.
• Remove all packaging before first use.
• Only a qualified person must do the elec-
trical and the plumbing installation, the set
up and the maintenance of the appliance.
This to prevent the risks of structural dam-
age or physical injury.
• Make sure that the mains plug is discon-
nected from the mains socket during in-
stallation.
• Do not drill into the sides of the appliance
to prevent damage to hydraulic compo-
nents and electrical components.
• Important! Obey the instructions in the
enclosed template:
– To install the appliance.
– To assemble the furniture door.
– To connect to the water supply and
drain.
• Make sure that the appliance is installed
under and adjacent safe structures.
Frost precautions
• Do not install the appliance where the tem-
perature is below 0°C.
• The manufacturer is not responsible for
frost damage.
Water connection
• Use new hoses to connect the appliance
to the water supply. Do not use used ho-
ses.
• Do not connect the appliance to new pipes
or pipes not used for a long time. Let the
water flow for some minutes, then connect
the inlet hose.
• Make sure not to squash or cause damage
to the water hoses when you install the
appliance.
• Make sure that the water couplings are
tight to prevent a water leakage.
• The first time you use the appliance, make
sure that the hoses do not have water
leaks.
Electrical connection
• The appliance must be earthed.
• Make sure that the electrical data on the
rating plate agree with your domestic pow-
er supply.
• Always use a correctly installed shock-
proof socket.
• Do not use multi-way plugs, connectors
and extension cables. There is a risk of fire.
• Do not replace or change the mains cable.
Contact the service centre.
• Make sure not to squash or cause damage
to the mains plug and cable behind the
appliance.
• Make sure that the mains plug is accessi-
ble after the installation.
• Do not pull the mains cable to disconnect
the appliance. Always pull the mains plug.
Service centre
• Only an approved engineer can repair or
work on the appliance. Contact the service
centre.
• Use only original spare parts.
Disposal of the appliance
• To prevent the risk of physical injury or
damage:
electrolux 3

– Disconnect the mains plug from the
mains socket.
– Cut off the mains cable and discard it.
– Discard the door catch. This prevents
children or small animals from being
closed inside of the appliance. There is
a risk of suffocation.
Warning! The dishwasher
detergents are dangerous and can
cause corrosion !
• If an accident occurs with these de-
tergents, contact immediately your re-
gional poisons centre and a doctor.
• If the detergent gets into the mouth,
contact immediately your regional poi-
sons centre and a doctor.
• If the detergent gets into the eyes,
contact immediately a doctor and wet
the eyes with water.
• Keep dishwasher detergents in a safe
area and out of children touch.
• Do not keep the appliance door open
when there is detergent in the deter-
gent dispenser.
• Fill the detergent dispenser only be-
fore you start a washing programme.
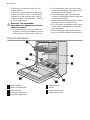
Product description
1 Upper basket
2 Water hardness dial
3 Salt container
4 Detergent dispenser
5 Rinse aid dispenser
6 Rating plate
7 Filters
8 Lower spray arm
9 Upper spray arm
4 electrolux

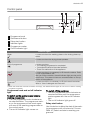
Control panel
123
4
6 5
1 Programme knob
2 Start/cancel button
3 Delay start button
4 Indicator lights
5 Programme marker
6 On/off indicator light
Indicator lights
Wash It comes on when the washing phase or the rinsing phase op-
erates.
Dry It comes on when the drying phase operates.
End-of-programme It comes on when:
• The washing programme is completed.
• You adjust the level of the water softener.
• There is a malfunction of the appliance.
Salt
1)
It comes on when it is necessary to fill the salt container. Refer
to 'Use of dishwasher salt'.
After you fill the container, the salt indicator light can stay on for
some hours. This does not have an unwanted effect on the op-
eration of the appliance.
Rinse aid
1)
It comes on when it is necessary to fill the rinse aid container.
Refer to 'Use of detergent and rinse aid'.
1) When the salt and/or rinse aid containers are empty, the related indicator lights do not come on while a washing
programme operates.
Programme knob and on/off indicator
light
To switch on the appliance and select a
washing programme:
• Turn the programme knob clockwise or
counterclockwise. The programme mark-
er on the programme knob must agree
with one of the washing programmes on
the control panel.
• The on/off indicator light comes on.
To switch off the appliance:
– Turn the programme knob clockwise or
counterclockwise until the programme
marker agrees with the on/off indicator
light.
– The on/off indicator light goes off.
Delay start button
Use this button to delay the start of the wash-
ing programme with an interval of 3 hours.
Refer to 'Select and start a washing pro-
gramme'.
electrolux 5

Use of the appliance
Refer to the instructions for each step of pro-
cedure:
1. Make a check if the adjustment of the
water softener agrees with the water
hardness in your area. If necessary, ad-
just the water softener.
2. Fill the salt container with dishwasher salt.
3. Fill the rinse aid dispenser with rinse aid.
4. Load cutlery and dishes into the appli-
ance.
5. Set the correct washing programme for
the type of load and soil.
6. Fill the detergent dispenser with the cor-
rect quantity of detergent.
7. Start the washing programme.
If you use detergent tablets, refer to 'Use
of detergent and rinse aid'.
Setting the water softener
The water softener removes minerals and
salts from the water supply. Minerals and
salts can have a bad effect on the operation
of the appliance.
Equivalent scales measure the water hard-
ness:
• German degrees (dH°).
• French degrees (°TH).
• mmol/l (millimol for each litre - international
unit for the hardness of water).
• Clarke degrees.
Adjust the water softener to the water hard-
ness in your area. If necessary, contact your
local water authority.
Water hardness Water hardness adjustment
°dH °TH mmol/l Clarke manually electronically
51 - 70 91 - 125 9,1 - 12,5 64 - 88
2
1)
10
43 - 50 76 - 90 7,6 - 9,0 53 - 63
2
1)
9
37 - 42 65 - 75 6,5 - 7,5 46 - 52
2
1)
8
29 - 36 51 - 64 5,1 - 6,4 36 - 45
2
1)
7
23 - 28 40 - 50 4,0 - 5,0 28 - 35
2
1)
6
19 - 22 33 - 39 3,3 - 3,9 23 - 27
2
1)
5
1)
15 - 18 26 - 32 2,6 - 3,2 18 - 22 1 4
11 - 14 19 - 25 1,9 - 2,5 13 - 17 1 3
4 - 10 7 - 18 0,7 - 1,8 5 - 12 1 2
< 4 < 7 < 0,7 < 5
1
2)
1
2)
1) Factory position.
2) No use of salt is necessary.
You must adjust the water softener man-
ually and electronically.
Manual adjustment
Turn the water hardness dial to the position
1 or 2 (refer to the chart).
Electronic adjustment
1. Press and hold the start/cancel button.
6 electrolux

2. Turn the programme knob clockwise until
the programme marker agrees with the
first available washing programme on the
control panel.
3. Release the start/cancel button when the
on/off and the start/cancel indicator lights
start to flash.
4. At the same time, the end-of-programme
indicator light starts to flash. The number
of flashes shows the current adjustment.
Example: 5 flashes / pause / 5 flashes =
level 5.
5. Press the start/cancel button to change
the adjustment. Each time you press the
start/cancel button, the adjustment goes
to the subsequent level.
6. Switch off the appliance to keep the op-
eration.
If the water softener is set electronically
to the level 1, the salt indicator light stays
off.
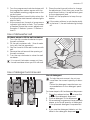
Use of dishwasher salt
Do these steps to fill the salt container:
1. Turn the cap counterclockwise to open
the salt container.
2. Fill the salt container with 1 litre of water
(only with the first operation).
3. Use the funnel to fill the salt container with
salt.
4. Remove the salt around the opening of
the salt container.
5. Turn the cap clockwise to close the salt
container.
It is correct that water comes out from
the salt container when you fill it with salt.
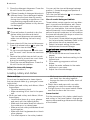
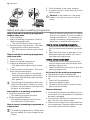
Use of detergent and rinse aid
8
2
4
5
6
1
7
3
Use of detergent
To help the environment, do not use
more than the correct quantity of deter-
gent.
Follow the detergent manufacturer rec-
ommendations on the detergent pack-
aging.
Do these steps to fill the detergent dispenser:
1.
Press the release button
2
to open the
lid
8
of the detergent dispenser.
2.
Put the detergent in the dispenser
3
.
3. If the washing programme has a prewash
phase, put a small quantity of detergent
in the prewash detergent compartment
1
.
4. If you use the detergent tablets, put the
tablet in the detergent dispenser
3
.
electrolux 7

5. Close the detergent dispenser. Press the
lid until it locks into position.
Different brands of detergent dissolve in
different times. Some detergent tablets
do not have the best cleaning results
during short washing programmes. Use
long washing programmes when you
use the detergent tablets to fully remove
the detergent.
Use of rinse aid
Rinse aid makes it possible to dry the
dishes without streaks and stains.
The rinse aid dispenser automatically
adds rinse aid during the last rinsing
phase.
Do these steps to fill the rinse aid dispenser:
1.
Press the release button
5
to open the
lid
7
of the rinse aid dispenser.
2.
Fill the rinse aid dispenser
4
with rinse
aid. The mark 'max' shows the maximum
level.
3. Remove the spilled rinse aid with an ab-
sorbent cloth to prevent too much foam
during the washing programme.
4. Close the rinse aid dispenser. Press the
lid until it locks into position.
Adjust the rinse aid dosage
Factory set: position 4.
You can set the rinse aid dosage between
position 1 (lowest dosage) and position 6
(highest dosage).
Turn the rinse aid selector
6
to increase or
decrease the dosage.
Use of combi detergent tablets
These tablets contain agents such as deter-
gent, rinse aid and dishwasher salt. Some
types of tablets can contain other agents.
When you use tablets, that contain special
salt and rinse aid, it is not necessary to fill the
salt and rinse aid containers. In this condition
the rinse aid indicator light stays on when the
appliance is switched on.
1. Do a check if these tablets are applicable
for the local water hardness. Refer to the
instructions from the manufacturer.
2. Select the lowest setting for the water
hardness and rinse aid dosage.
To go back and use separately detergent,
salt and rinse aid
1. Fill the salt container and rinse aid dis-
penser.
2. Adjust the water hardness setting to the
highest level.
3. Do a washing programme without
dishes.
4. Adjust the water softener to the water
hardness in your area.
5. Adjust the rinse aid dosage.
Loading cutlery and dishes
Hints and tips
Do not use the appliance to clean objects
that can absorb water (e.g. sponges, house-
hold cloths).
• Before you load cutlery and dishes, follow
these steps:
– Remove remaining food.
– Make remaining burnt food in the pans
soft.
• While you load cutlery and dishes, follow
these steps:
– Load hollow items (e.g. cups, glasses
and pans) with the opening down.
– Make sure that water does not collect in
the container or in a deep base.
– Make sure that cutlery and dishes do not
bond together.
– Make sure that the glasses do not touch
other glasses.
– Put small objects in the cutlery basket.
– Mix the spoons with other cutlery to pre-
vent them from bonding together.
– Arrange the items to let water touch all
surfaces.
• Plastic items and pans with non-stick
coatings can retain the water droplets.
• Put light items in the upper basket. Make
sure that the items do not move.
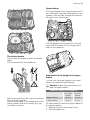
Lower basket
Put the saucepans, lids, plates, salad bowls
and cutlery in the lower basket. Arrange the
service dishes and large lids around the edge
of the basket.
8 electrolux

The cutlery basket
Put the forks and spoons with the handles
down.
Put the knives with the handles up.
Mix the spoons with other cutlery to prevent
them to bond together.
Use the cutlery grid. If the dimensions of the
cutlery prevent use of the cutlery grid, you
can easily remove it.
Upper basket
The upper basket is for plates (maximum 24
cm in diameter), saucers, salad bowls, cups,
glasses, pots and lids. Arrange the items to
let water touch all surfaces.
Put the glasses with long stems in the cup
racks with the stems up. For longer items,
fold the cup racks up.
Adjustment of the height of the upper
basket
You can put the upper basket in two posi-
tions to increase the load flexibility.
Caution! Adjust the height before you
load the upper basket.
Maximum height of the dishes in:
the upper
basket
the lower
basket
Higher position 20 cm 31 cm
Lower position 24 cm 27 cm
Do these steps to move the upper basket to
the higher position:
1. Move the front runner stops (A) out.
2. Pull the basket out.
electrolux 9

3. Put the basket in the upper position.
4. Put back the front runner stops (A) in their
initial position.
Caution! If the basket is in the upper
position, do not put cups on the cup
racks.
Select and start a washing programme
Select and start a washing programme
without delay start
1. Close the door.
2. Select a washing programme. Refer to
'Washing programmes'.
– The on/off indicator light comes on.
3. Press the start/cancel button. The wash-
ing programme starts automatically.
– The start/cancel indicator light comes
on.
Select and start a washing programme
with delay start
1. Close the door.
2. Select a washing programme.
3. Press the delay start button.
– The delay start indicator light comes
on.
4. Press the start/cancel button. The count-
down starts automatically.
– When the countdown is completed,
the washing programme starts auto-
matically and the delay start indicator
light goes off.
The opening of the appliance door inter-
rupts the countdown. When you close
the door, the countdown continues from
the point of interruption.
Interruption of a washing programme
• Open the appliance door.
– The washing programme stops.
• Close the appliance door.
– The washing programme continues
from the point of interruption.
How to cancel a washing programme or
a delay start
If a washing programme or a delay start
has not started, you can change the se-
lection.
When a washing programme or a delay
start are in progress, it is not possible to
change the selection. It is necessary to
cancel the washing programme or the
delay start to make a new selection.
How to cancel a washing programme
1. Press and hold the start/cancel button
until the start/cancel indicator light goes
off.
2. Make sure that there is detergent in the
detergent dispenser before you start a
new washing programme.
How to cancel a delay start
1. Press and hold the start/cancel button
until the start/cancel and the delay start
indicator lights go off.
2. Press the start/cancel button to start the
washing programme.
At the end of the washing programme
• The appliance stops automatically.
• The end-of-programme indicator light is
on.
1. Switch off the appliance.
2. Open the appliance door.
3. For better drying results, keep the door
ajar for some minutes.
Remove the load
• Let the dishes become cold before you re-
move them from the appliance. Hot dishes
are easily damaged.
• First remove the items from the lower bas-
ket, then from the upper basket.
• There can be water on the sides and door
of the appliance. Stainless steel becomes
cool more quickly than the dishes.
10 electrolux

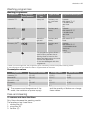
Washing programmes
Washing programmes
Programme Programme
knob position
Degree of
soil
Type of load Programme description
Intensive 70° Heavy soil Crockery, cut-
lery, pots and
pans
Prewash
Main wash 70 °C
2 middle rinses
Last rinse
Dry
Normal 65° Normal soil Crockery and
cutlery
Prewash
Main wash 65 °C
2 middle rinses
Last rinse
Dry
Quick 60° A 30'
1)
Normal or
light soil
Crockery and
cutlery
Main wash 60 °C
Rinse
Economy 50°
2)
Normal soil Crockery and
cutlery
Prewash
Main wash 50 °C
1 intermediate rinse
Final rinse
Drying
Rinse This programme gives dishes a
quick rinse to prevent the re-
maining food to bond on the
dishes and bad odours to come
out from the appliance.
Do not use detergent with this
programme.
1 cold rinse
1) When you have a light load, this programme gives a timesaving solution with perfect washing results.
2) Test programme for test institutes. Refer to supplied leaflet for test data.
Consumption values
Programme Duration (minutes) Energy (kWh) Water (litres)
Intensive 70° 120-130 1,8-2,0 22-24
Normal 65° 105-115 1,5-1,7 23-25
Quick 60° A 30' 30 0,9 9
Economy 130-140 1,0-1,2 14-16
Rinse 12 0,1 5
The pressure and temperature of the
water, the variations of power supply
and the quantity of dishes can change
these values.
Care and cleaning
To remove and clean the filters
Dirty filters decrease the washing results.
The appliance has three filters:
1. coarse filter (A)
2. microfilter (B)
3. flat filter (C)
electrolux 11

A
B
C
A
B
C
1. To unlock the filter system, turn the han-
dle on the microfilter (B) approximately
1/4 counterclockwise.
2. Remove the filter system.
3. Hold the coarse filter (A) by the handle
with the hole.
4. Remove the coarse filter (A) from the mi-
crofilter (B).
5. Remove the flat filter (C) from the bottom
of the appliance.
D
6. Clean the filters below running water.
7. Put the flat filter (C) to its initial position.
Make sure that it assembles correctly
under the two guides (D).
8. Put the coarse filter (A) in the microfilter
(B) and push the filters together.
9. Put the filter system in position.
10. To lock the filter system, turn the handle
on the microfilter (B) clockwise until it
locks in position.
To clean the spray arms
Do not remove the spray arms.
If the holes in the spray arms become clog-
ged, remove remaining parts of soil with a
cocktail stick.
To clean the external surfaces
Clean the external surfaces of the appliance
and control panel with a damp soft cloth.
Only use neutral detergents. Do not use
abrasive products, scouring pads or solvents
(e.g. acetone).
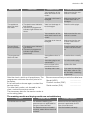
What to do if…
The appliance does not start or stops during
operation.
First try to find a solution to the problem (refer
to the chart). If not, contact the service cen-
tre.
Malfunction Fault code Possible cause Possible solution
The appliance
does not fill with
water.
• The start/cancel indicator
light flashes.
• The end-of-programme
indicator light flashes one
time.
The water tap is blocked
or is furred with lime-
scale.
Clean the water tap.
The water pressure is
too low.
Contact your local water
authority.
The water tap is closed. Open the water tap.
The filter in the water in-
let hose is blocked.
Clean the filter.
12 electrolux

Malfunction Fault code Possible cause Possible solution
The connection of the
water inlet hose is not
correct.
Make sure that the con-
nection is correct.
The water inlet hose is
damaged.
Make sure that the wa-
ter inlet hose has no
damages.
The appliance
does not drain
the water.
• The start/cancel indicator
light flashes. .
• The end-of-programme
indicator light flashes two
times.
There is a blockage in
the sink spigot.
Clean the sink spigot.
The connection of the
water drain hose is not
correct.
Make sure that the con-
nection is correct.
The water drain hose is
damaged.
Make sure that the wa-
ter drain hose has no
damages.
The anti-flood
device operates.
• The start/cancel indicator
light flashes.
• The end-of-programme
indicator light flashes
three times.
Close the water tap and
contact the service cen-
tre.
The programme
does not start.
The appliance door is
open.
Close the door correctly.
The mains plug is not
connected in.
Put in the mains plug.
Blow out fuse in the
household fuse box.
Replace the fuse.
The delay start is set. If you want to cancel the
delay start, refer to 'Se-
lect and start a washing
programme'.
After the check, switch on the appliance. The
programme continues from the point of in-
terruption.
If the malfunction shows again, contact the
service centre.
For other fault codes, not showed in the
chart, contact the service centre.
The necessary data for the service centre is
on the rating plate.
We recommend that you write the data here:
Model (MOD.) ....................
Product number (PNC) ....................
Serial number (S.N.) ....................
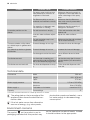
The washing results and drying results are not satisfactory
Problem Possible cause Possible solution
The dishes are not clean. The selected washing pro-
gramme was not applicable for
the type of load and soil.
Make sure that the washing pro-
gramme is applicable for the
type of load and soil.
The baskets were not loaded
correctly, water did not touch all
surfaces.
Load the baskets correctly.
electrolux 13

Problem Possible cause Possible solution
The spray arms could not turn
freely because of incorrect ar-
rangement of the load.
Make sure that an incorrect ar-
rangement of the load does not
cause a blockage of the spray
arms.
The filters are dirty or not as-
sembled and installed correctly.
Make sure that the filters are
clean and correctly assembled
and installed.
The quantity of detergent was
not sufficient or missing.
Make sure that the quantity of
detergent is sufficient.
Limescale particles on the
dishes.
The salt container is empty. Fill the salt container with dish-
washer salt.
Incorrect water softener adjust-
ment
Adjust the water softener.
The salt container cap is not
closed correctly.
Make sure that the salt container
cap is closed correctly.
There are streaks, milky stains,
or a bluish layer on glasses and
dishes.
Rinse aid dosage is too high. Decrease the rinse aid dosage.
Dry water drop stains on glasses
and dishes.
Rinse aid dosage is too low. Increase the rinse aid dosage.
The detergent can be the cause. Use a different brand of deter-
gent.
The dishes are wet. You have set a washing pro-
gramme without drying phase or
with a decreased drying phase.
Let the door stay ajar for some
minutes before you remove the
dishes.
The dishes are wet and dull. The rinse aid dispenser is emp-
ty.
Fill the rinse aid dispenser with
rinse aid.
Technical data
Dimensions Width 596 mm
Height 818 - 878 mm
Depth 575 mm
Water supply pressure Minimum 0,5 bar (0,05 MPa)
Maximum 8 bar (0,8 MPa)
Water supply
1)
Cold water or hot water maximum 60°C
Capacity Place settings 12
1) Connect the water inlet hose to a water tap with a 3/4'' thread.
The rating plate on the inner edge of the
appliance door shows the electrical con-
nection data.
If the hot water comes from alternative
sources of energy, (e.g. solar panels,
photovoltaic panels and aeolian), use a
hot water supply to decrease energy
consumption.
Environment concerns
The symbol on the product or on its
packaging indicates that this product may
not be treated as household waste. Instead
it should be taken to the appropriate
14 electrolux

collection point for the recycling of electrical
and electronic equipment. By ensuring this
product is disposed of correctly, you will help
prevent potential negative consequences for
the environment and human health, which
could otherwise be caused by inappropriate
waste handling of this product. For more
detailed information about recycling of this
product, please contact your local council,
your household waste disposal service or the
shop where you purchased the product.
Recycle the materials with the symbol
.
Put the packaging in applicable containers to
recycle it.
electrolux 15

Electrolux. Thinking of you.
詳情請訪問www.electrolux.com。
前言
安全資訊 16
產品說明 18
控制面板 18
首次使用前 19
設定軟水劑 19
使用洗碗機鹽 20
使用洗滌劑和過水增亮劑 21
裝入餐具和碗碟 21
選擇和開始洗碗程序 23
洗碗程序 24
護理與清潔 24
出現問題時… 25
技術數據 27
環保資訊 27
如有更改恕不另行通知
安全資訊
基於下列原因,請在安裝和使用之前仔細閱
讀本手冊:
• 基於個人安全和所屬財產的安全。
• 基於對環境的尊重。
• 基於正確運作洗碗機設備。
搬移或出售這部洗碗機時,請一律附帶這些
說明文件。
對於不正確的安裝和使用所造成的損害,製
造商概不負責。
兒童和易受傷者的安全
• 請勿讓感官不全、心智機能不足或經驗和
知識不足者 (含兒童在內) 使用這部洗碗
機。上述人員運作這部洗碗機時,務必伴
隨負責其安全者的監督和指示。
• 將所有包裝放在兒童不易觸及之處。包裝
有使人窒息或人身傷害的風險。
• 請將所有清潔劑放置於安全區域中。請勿
讓兒童觸碰到清潔劑。
• 打開機門時,請讓兒童和小動物遠離這部
洗碗機。
安全須知
• 請勿變更這部洗碗機的規格。這麼做會有
破壞和損害洗碗機的風險。
• 請遵守洗碗機清潔劑製造商的安全說明,
以防灼傷眼、口及喉嚨。
• 請勿飲用這部洗碗機所流出的水。清潔劑
殘留物可能會留存在洗碗機中。
• 將碗盤放入或拿出洗碗機時,務必關緊機
門,以防止受傷及防止某人跌入開啟的機
門。
• 請勿蹲坐或站立於開啟的機門上。
使用
• 本洗碗機僅適合居家使用。請勿將這部洗
碗機用於工商場所或其他用途。
• 請勿將這部洗碗機應用於原先用途以外的
事項。您應該防止人身傷害或防止財產損
害。
• 只能將這部洗碗機用於清洗適合洗碗機的
家用器皿。
• 請勿將可燃產品或沾染可燃產品的物品放
置在這部洗碗機內部、附近或上頭。這麼
做會有爆炸或起火的風險。
• 請將刀具和所有尖銳物品放在餐具籃中,
並將尖銳處朝下。如果不這麼做,請水平
放置在上層籃子中,或放在刀具籃中。(僅
部分機型提供刀具籃)。
• 僅使用洗碗機所指定的產品 (清潔劑、鹽、
過水增亮劑)。
• 洗碗機指定類型之外的鹽巴可能會破壞軟
水劑。
• 啟動洗碗程序前,請先將鹽巴填入洗碗機
中。鹽粒和鹽水可能會使洗碗機底部受到
腐蝕或穿孔。
• 請勿將過水增亮劑以外的產品 (例如洗碗
粉、清潔劑) 填入過水增亮劑分配器中。
這麼做可能會對洗碗機造成損害。
• 啟動洗碗程序前,請先確認噴灑臂可以活
動自如。
• 如果在洗碗機運作時開啟機門,可能會冒
出熱蒸氣。這樣會有灼傷皮膚的風險。
• 結束洗碗程序之前,請勿從洗碗機中取出
碗盤。
護理與清潔
• 維護前,請先關閉洗碗機電源,並從電源
插座將電源插頭拔下。
• 請勿使用可燃產品或可能造成腐蝕現象的
產品。
• 沒有過濾器時切勿使用本洗碗機。請確認
已正確安裝過濾器。安裝不正確會使得清
洗結果不佳,以及對洗碗機造成損害。
16 electrolux

• 請勿使用噴霧或蒸汽來清潔洗碗機。這麼
做會有觸電或對洗碗機造成損害的風險。
安裝
• 確認洗碗機在運送過程中未遭受損害。請
勿連上受損的洗碗機。必要時,請聯絡供
應商。
• 首次使用前,請先卸除所有包裝。
• 務必只讓合格人員處理電路和水管安裝,
以及洗碗機的裝設和維護。這樣可以避免
結構損害或人身傷害的風險。
• 確認安裝時電源插頭已從主插座拔離。
• 請勿在洗碗機的側板鑽孔,以免對液壓元
件和電子元件造成損害。
• 重要事項! 請遵守隨附範本的說明,進行
下列步驟:
– 安裝洗碗機。
– 組裝家具機門。
– 連接供水和排水管路。
• 確認洗碗機已安裝在安全的結構之下或鄰
近處。
預防霜凍
• 請勿將洗碗機安裝在溫度低於 0°C 的位置
上。
• 對於霜凍損害,製造商概不負責。
連接水源
• 請使用新的水管來連接洗碗機和供水管
路。請勿使用用過的水管。
• 請勿將洗碗機連上全新管路或久未使用的
管路。請讓水流過數分鐘,再連接進水水
管。
• 確認安裝洗碗機時,不會擠壓到水管或損
壞水管。
• 確認水管接頭密合,防止漏水。
• 首次使用洗碗機時,請確認水管沒有漏水
問題。
電氣連接
• 本洗碗機必須連接地線。
• 確認定額牌上的電氣資料符合您所在國家
的供電數據。
• 一律使用已正確安裝的防震插座。
• 請勿使用多線路的插頭、連接器及延長
線。這些器具有引發火災的風險。
• 請勿替換或變更電源線。請聯絡服務中
心。
• 確認洗碗機後的電源插頭和纜線,不會受
到擠壓或遭到損壞。
• 確認安裝之後,電源插頭位於伸手可及之
處。
• 請勿以拉扯的方式將洗碗機的電源線拔
除。請一律從電源插頭處拔下。
服務中心
• 只有核准的工程師才可以維修或修理洗碗
機。請聯絡服務中心。
• 請只使用原廠備用零件。
洗碗機廢棄處理方式
• 為避免人身傷害或損害風險,請執行下列
動作:
– 將電源插頭從電源插座拔除。
– 剪下電源線並加以丟棄。
– 丟棄機門門閂,藉此防止兒童或小動物
被關在洗碗機中,因為這樣會有窒息風
險。
警告 洗碗機清潔劑屬危險物品,可能會
造成腐蝕!
• 如果發生這些清潔劑造成的意外,請
立即聯絡區域毒物中心和醫生。
• 如果清潔劑進入口中,請立即聯絡區
域毒物中心和醫生。
• 如果清潔劑進入眼中,請立即聯絡醫
生,並用清水沖洗眼睛。
• 請將洗碗機清潔劑放在安全區域,以
及兒童無法觸及之處。
• 當清潔劑分配器中有清潔劑時,請隨
時緊閉洗碗機機門。
• 請只在啟動洗碗程序前再填充清潔劑
分配器。
electrolux 17

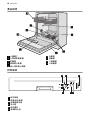
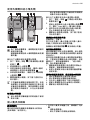
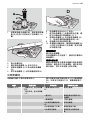
產品說明
1 上層籃子
2 水質硬度調節盤
3 貯鹽器
4 清潔劑分配器
5 過水增亮劑分配器
6 定額牌
7 過濾器
8 下噴灑臂
9 上噴灑臂
控制面板
123
4
6 5
1 程序旋鈕
2 啟動/取消按鈕
3 延遲啟動按鈕
4 指示燈
5 程序標記
6 開/關指示燈
18 electrolux

指示燈
主洗 當運作進入洗潔階段或洗清階段時亮起。
烘乾 當運作進入烘乾階段時亮起。
程序結束 下列狀況時亮起:
• 洗碗程序已完成。
• 您調節軟水劑等級時。
• 洗碗機故障時。
鹽巴
1)
需要填入貯鹽器時才會亮起。請參閱「使用洗碗機鹽」。
填充貯鹽器之後,「鹽巴」指示燈會持續亮燈數小時。這對洗
碗機的運作不會有不良影響。
過水增亮劑
1)
需要填充過水增亮劑盒時才會亮起。請參閱「使用洗滌劑和過
水增亮劑」。
1) 當鹽巴和/或過水增亮劑盒是空的時,相關的指示燈在洗碗程序運作時不會亮起。
程序旋鈕和開/關指示燈
啟動洗碗機並選擇洗碗程序:
• 以順時針方向或逆時針方向旋轉程序旋
鈕。程序旋鈕上的程序標記,必須符合控
制面板上顯示的洗碗程序。
• 「開/關」指示燈亮起。
關閉洗碗機:
– 以順時針方向或逆時針方向旋轉程序旋
鈕,直到程序標記符合「開/關」指示燈。
– 「開/關」指示燈熄滅。
延遲啟動按鈕
使用這個按鈕可以延遲洗碗程序的啟動時
間,以每 3 小時為延後的時間間隔。請參閱
「選擇和開始洗碗程序」。
首次使用前
請參閱各程序步驟的說明:
1. 檢查軟水劑的調節是否符合所在地區的
水質硬度。必要時,調節軟水劑。
2. 請將洗碗機鹽填入貯鹽器中。
3. 請將過水增亮劑填入過水增亮劑分配器
中。
4. 將餐具和碗盤放入洗碗機。
5. 依放入餐具的類型和髒污類型設定正確
的洗碗程序。
6. 使用正確的清潔劑數量來填充清潔劑分
配器。
7. 啟動洗碗程序。
如果您使用清潔劑片,請參閱「使用洗
滌劑和過水增亮劑」。
設定軟水劑
軟水劑會從供水中去除礦物質和鹽分。礦物
質和鹽分對洗碗機的運作會有不良影響。
等值比例尺測量水質硬度:
• 德國度數 (dH°)。
• 法國度數 (°TH)。
• mmol/l (毫摩爾/公升 - 國際水質硬度單
位)。
• 克拉克度數。
將軟水劑調節為所在地區的水質硬度。必要
時,聯絡當地負責自來水的機關。
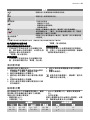
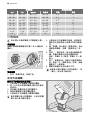
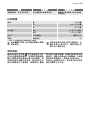
水質硬度 水質硬度調節
°dH °TH mmol/l 克拉克 手動 電動
51 - 70 91 - 125 9,1 - 12,5 64 - 88
2
1)
10
43 - 50 76 - 90 7,6 - 9,0 53 - 63
2
1)
9
electrolux 19

水質硬度 水質硬度調節
°dH °TH mmol/l 克拉克 手動 電動
37 - 42 65 - 75 6,5 - 7,5 46 - 52
2
1)
8
29 - 36 51 - 64 5,1 - 6,4 36 - 45
2
1)
7
23 - 28 40 - 50 4,0 - 5,0 28 - 35
2
1)
6
19 - 22 33 - 39 3,3 - 3,9 23 - 27
2
1)
5
1)
15 - 18 26 - 32 2,6 - 3,2 18 - 22 1 4
11 - 14 19 - 25 1,9 - 2,5 13 - 17 1 3
4 - 10 7 - 18 0,7 - 1,8 5 - 12 1 2
< 4 < 7 < 0,7 < 5
1
2)
1
2)
1) 出廠預設位置。
2) 不可使用鹽巴。
您必須以手動或電動方式調節軟水劑。
手動調節
旋轉水質硬度調節盤到位置 1 或 2 (請參考
圖表)。
電動調節
1. 按住「啟動/取消」按鈕不放。
2. 以順時針方向旋轉程序旋鈕,直到程序
標記符合控制面板上首個可用的洗碗程
序。
3. 當「開/關」指示燈和「啟動/取消」指示
燈開始閃爍時,放開「啟動/取消」按
鈕。
4. 同時,「程序結束」指示燈也會開始閃
爍。閃爍次數顯示目前的調節結果。
例如:閃爍 5 次 / 暫停 / 閃爍 5 次 = 等
級 5。
5. 按下「啟動/取消」按鈕可以變更調節內
容。每按一次「啟動/取消」按鈕,就會
調節成下一個等級。
6. 關閉洗碗機可保存此操作方式。
如果軟水劑以電動方式設為等級 1,則
「鹽巴」指示燈不會亮起。
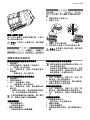
使用洗碗機鹽
執行以下步驟來填充貯鹽器:
1. 以逆時針方向旋轉蓋子開啟貯鹽器。
2. 將 1 公升的水倒進貯鹽器 (僅在首次運作
時使用)。
3. 使用漏斗將鹽巴填充到貯鹽器中。
4. 清除貯鹽器開口處周圍的鹽巴。
5. 以順時針方向旋轉蓋子關閉貯鹽器。
當您將鹽巴填入貯鹽器時,水份從貯鹽
器中流出是正確的情形。
20 electrolux
ページが読み込まれています...
ページが読み込まれています...
ページが読み込まれています...
ページが読み込まれています...
ページが読み込まれています...
ページが読み込まれています...
ページが読み込まれています...
ページが読み込まれています...
-
 1
1
-
 2
2
-
 3
3
-
 4
4
-
 5
5
-
 6
6
-
 7
7
-
 8
8
-
 9
9
-
 10
10
-
 11
11
-
 12
12
-
 13
13
-
 14
14
-
 15
15
-
 16
16
-
 17
17
-
 18
18
-
 19
19
-
 20
20
-
 21
21
-
 22
22
-
 23
23
-
 24
24
-
 25
25
-
 26
26
-
 27
27
-
 28
28


