電気製品は、安全のための注意事項を守らな
いと、人身への危害や火災などの財産への損
害を与えることがあります。
使用上のご注意
•
•
•
•
•
•
•
•
フラッシュ使用時のご注意
•
•
周辺光量について
•
各部のなまえ
レンズの取り付けかた/取りはず
しかた
取り付けかた(イラスト–参照)
1
レンズのレンズリヤキャップとカメラのボ
ディキャップをはずす。
2
レンズとカメラの白の点(マウント標点)を合
わせてはめ込み、レンズを軽くカメラに押し
当てながら、時計方向に「カチッ」とロックが
かかるまでゆっくり回す。
•
•
取りはずしかた(イラスト–参照)
カメラのレンズ取りはずしボタンを押したま
ま、レンズを反時計方向に回してはずす。
三脚を使う
三脚台座の取りはずしかた/取り付けかた
取りはずしかた(イラスト参照)
1
レンズをカメラから取りはずす。
2
台座固定ノブを反時計方向に回してゆるめる
。
3
台座取りはずしレバーを押しながら、三 脚
台座を矢印の方向に取りはずす。
取り付けかた
1
三脚台座をレンズ本体の取り付け部に「カ
チッ」というまで差し込む。
2
台座固定ノブを時計方向に止まるまで回して
三脚台座を固定する。
レンズフードを取り付ける
フードの印をレンズのレンズフード指標に合わ
せてはめ込み、「カチッ」というまで時計方向に
回す。(イラスト-参照)
レンズカバーを開閉する
レンズフードを取りはずす
ズームする
POWER ZOOMレバーを使う
1
ZOOMスイッチを「SERVO」にする。
2
POWERZOOMレバーを動かして、希望の焦
点距離(ズームの位置)に合わせる。
ズームリングを使う
1
ZOOMスイッチを「MANUAL」にする。
2
ズームリングを回して、希望の焦点距離(ズー
ムの位置)に合わせる。
ズームリングの操作方向を変更する
(イラスト-a参照)
1
ズームリングをW側に回して、ズーム回転方
向切り替え指標()( )とズーム回転方向
切り替えロックスイッチの印を合わせる。
2
ズーム回転方向切り替えロックスイッチを矢
印の方向にスライドさせる。
3
ズームリングをT側に回す。
Notes on Use
Do not leave the lens exposed to the sun or a bright
light source. Internal malfunction of the camera body
and lens, smoke, or a fire may result due to the effect of
light focusing. If circumstances necessitate leaving the
lens in sunlight, be sure to attach the lens caps. If a lens
hood is attached, be sure to close the lens cover.
When shooting against the sun, keep the sun
completely out of the angle of view. Otherwise, solar
rays may be concentrated at a focal point inside the
camera, causing smoke or a fire. Keeping the sun
slightly out of the angle of view may also cause smoke
or a fire.
When carrying a camera with the lens attached, always
firmly hold both the camera and the lens.
This lens is not water-proof, although designed with
dust-proofness and splash-proofness in mind. If using
in the rain etc., keep water drops away from the lens.
The zoom pin can be attached to and detached from
the zoom ring.
Be careful not to drop the lens when storing and
carrying it. Use a sturdy tripod for shooting.
AF illuminator of the camera may be blocked by the
lens. We recommend that you set the AF illuminator
to OFF.
When recording movies, zoom operation sound may
be recorded depending on the camera or shooting
conditions. Use of an external microphone can help
reducing the zoom operation sound being recorded.
Precautions on using a flash
You cannot use a built-in camera flash with this lens.
Use an external flash (sold separately).
When using a flash, the lens may partially block the
light of the flash, resulting in a shadow at the bottom
of the picture.
Vignetting
When using the lens, the corners of the screen become
darker than the center. To reduce these phenomena
(called vignetting), close the aperture by 1 to 2 stops.
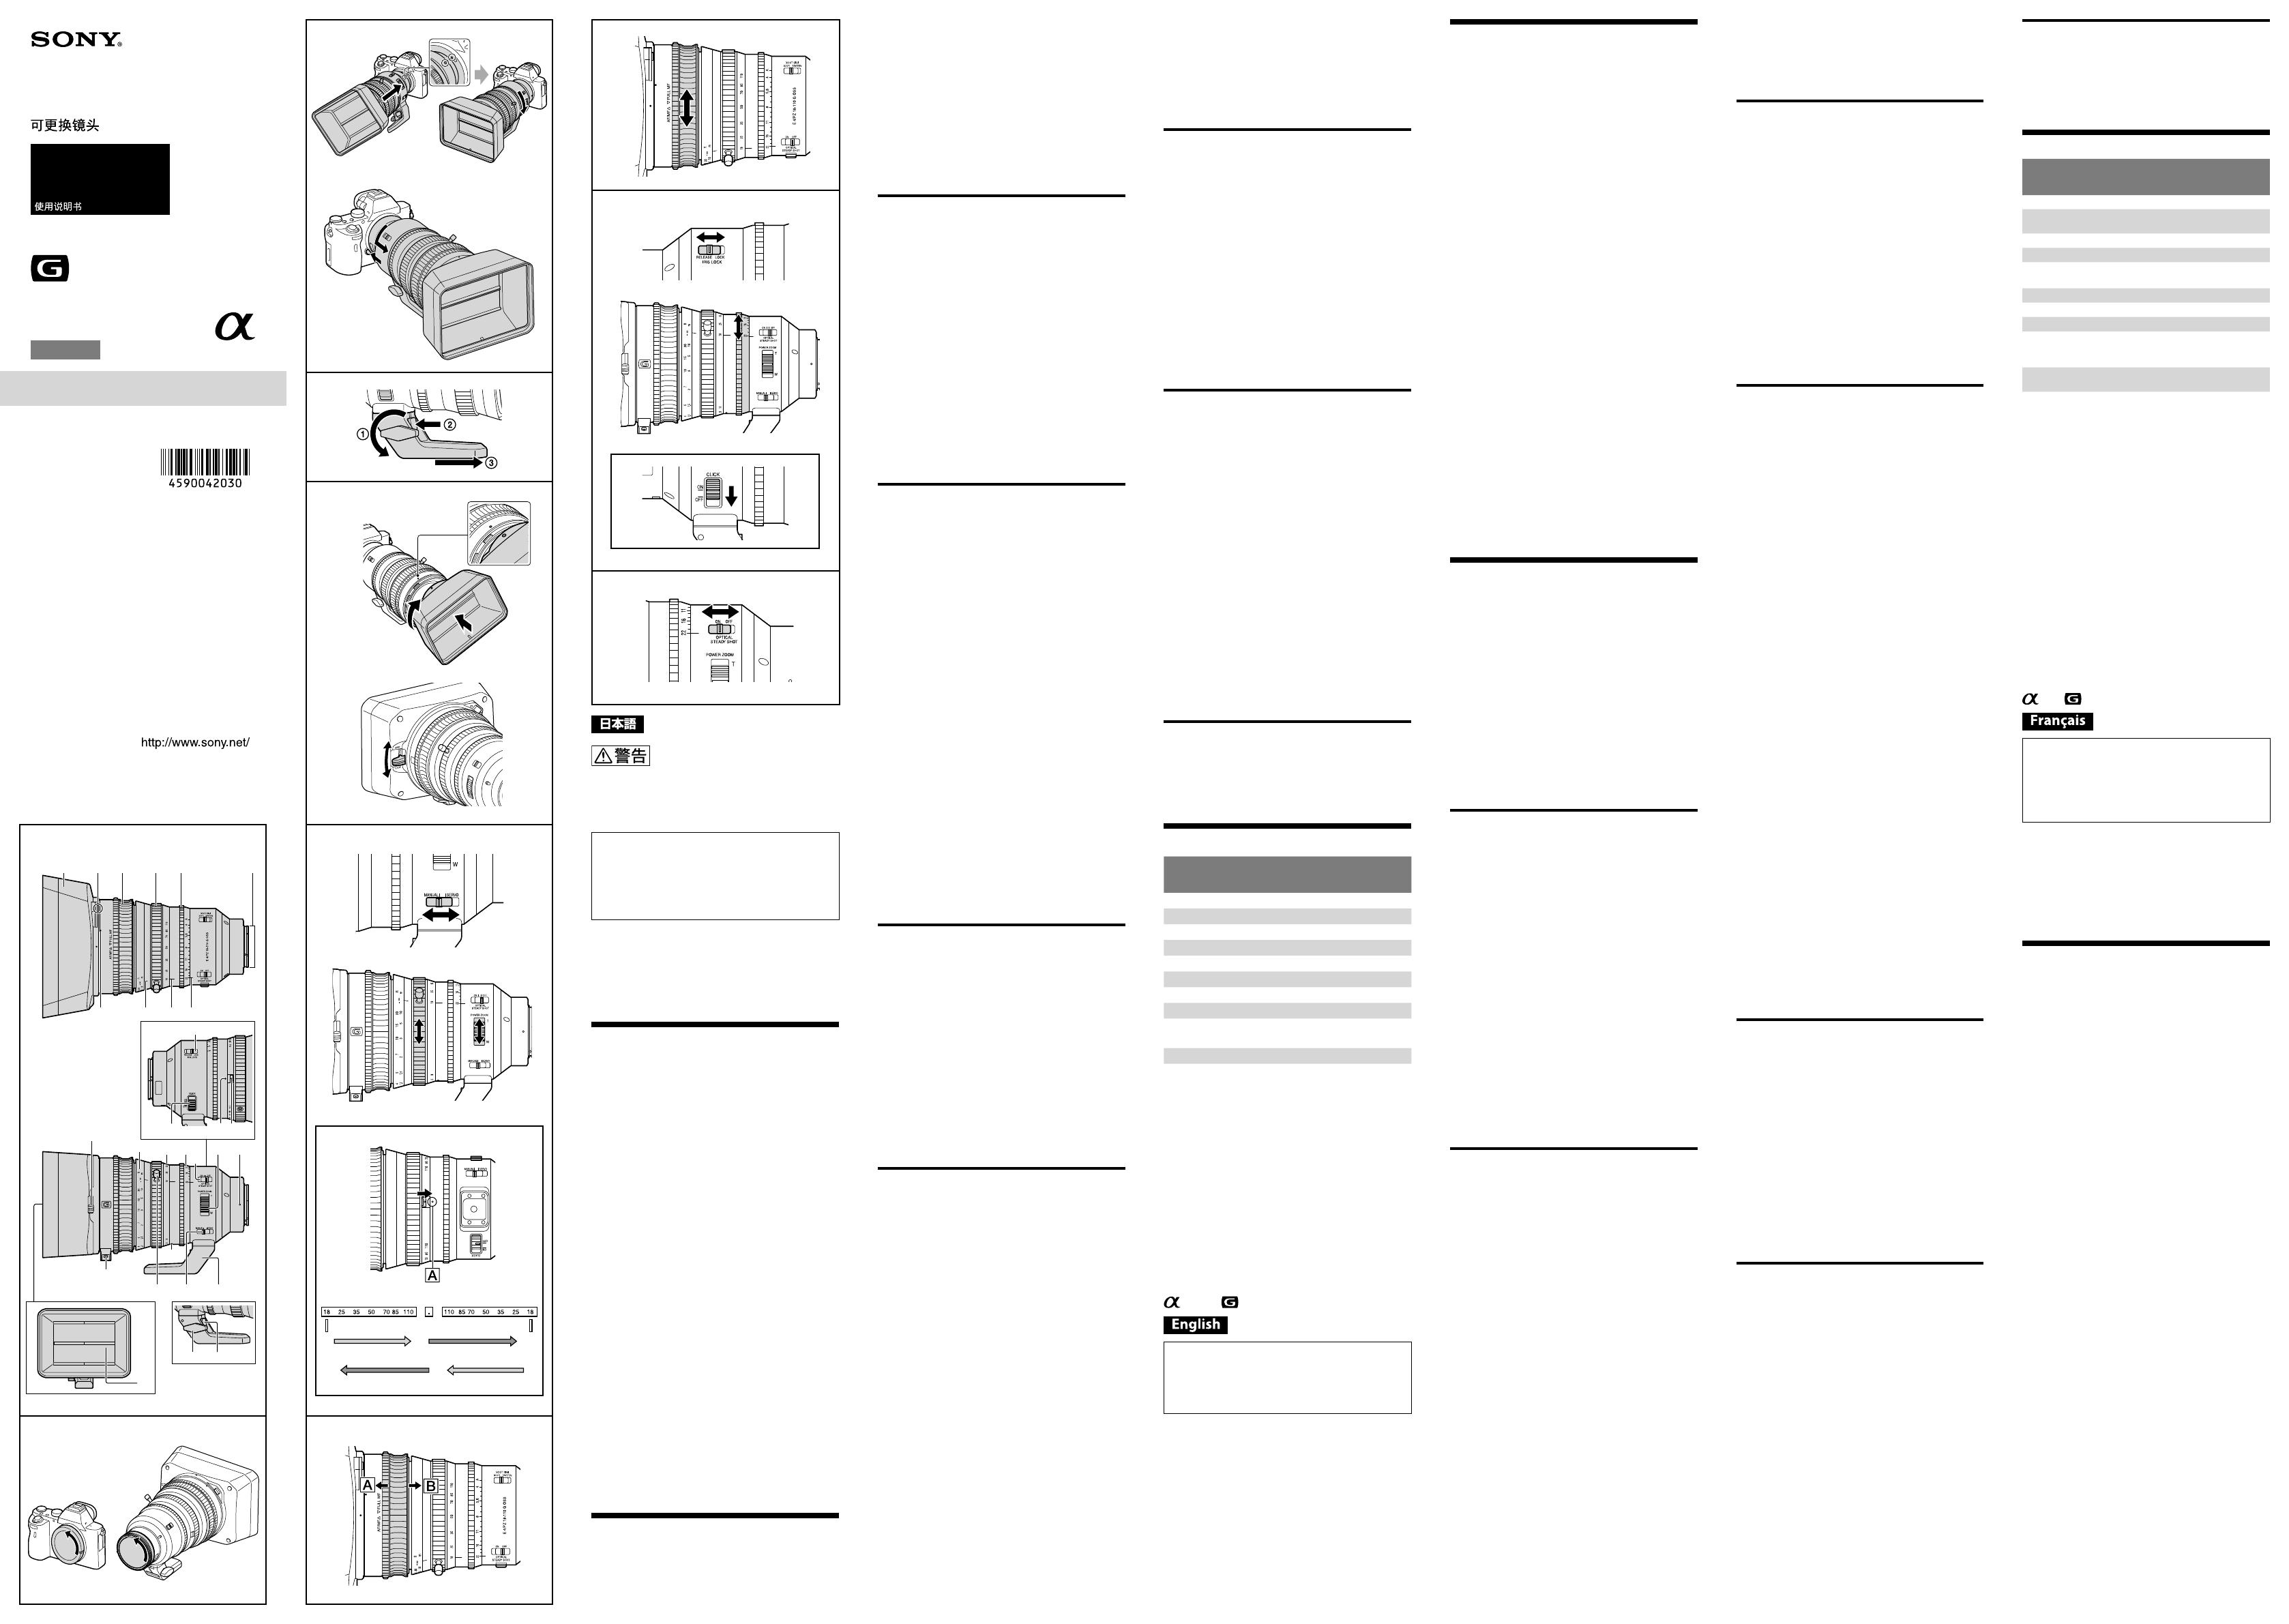
Identifying the Parts
1 Lens hood 2 PUSH (lens hood release) button
3 Focusing ring 4 Zoom ring 5 Iris ring
6 Lens contacts* 7 Aperture index
8 Focal-length index 9 Distance index
10 Lens hood index 11 IRIS LOCK switch
12 Iris click switch
13 Zoom rotation direction select indices
14 Zoom rotation direction select locking switch
15 Lens cover 16 Lens cover lever 17 Distance scale
18 Focal-length scale 19 Aperture scale
20 Shake compensation switch
21 POWER ZOOM lever 22 Lens mounting index
23 Tripod collar (detachable) 24 ZOOM switch
25 Zoom pin 26 Lens support bracket
27 Tripod collar release lever
28 Tripod collar-locking knob
* Do not touch the lens contacts.
Attaching/Detaching the Lens
To attach the lens
(See illustration –.)
1 Remove the rear lens cap and the
camera body cap.
2 Align the white dot on the lens barrel
with the white dot on the camera
(mounting index), then insert the lens
into the camera mount and rotate it
clockwise until it locks.
Do not press the lens release button on the camera
when mounting the lens.
Do not mount the lens at an angle.
To remove the lens
(See illustration –.)
While holding down the lens release
button on the camera, rotate the lens
counterclockwise until it stops, then detach
the lens.
Using the Tripod
When using a tripod, attach it to the tripod collar of
the lens, not to the tripod receptacle of the camera.
Detaching and attaching the tripod
collar
Detaching the tripod collar
(See illustration .)
The tripod collar can be detached from the lens when
not using a tripod.
1 Remove the lens from the camera.
See “
Attaching/Detaching the Lens” for details.
2 Rotate the tripod collar-locking knob
counterclockwise to loosen it .
3 While pressing the tripod collar release
lever , detach the tripod collar in the
direction of the arrow .
If you detach the tripod collar without removing the
lens from the camera, the tripod collar may hit the
camera body or accessory. We recommend you remove
the lens from the camera before detaching the tripod
collar.
Attaching the tripod collar
1 Slide the tripod collar to the mount of
the lens until it clicks.
4
もう一つの焦点距離目盛の「18」と焦点距離
指標を合わせる。()
5
ズーム回転切り替えスイッチをスライドして
元の位置に戻し、ロックする。
ピントを合わせる
AF/MFモードで調節する
FULL MFモードで調節する
•
•
•
明るさを調節する
IRIS LOCKスイッチ
マニュアルで光量調節する
カメラがMモードまたはAモードの状態で、アイ
リスリングを回して、希望の絞り値(F値)に合わ
せる。
ご注意
a
手ブレ補正を使用する
手ブレ補正スイッチ
•
•
主な仕様
商品名(型名)
E PZ 18-110mm
F4 G OSS
SELP18110G
焦点距離(mm)
18-110
焦点距離イメージ*
¹
(mm)
27-165
レンズ群一枚
15-18
画角*
76°-14° 30'
最短撮影距離*
³
(m)
0.4-0.95
最大撮影倍率(倍)
0.122
最小絞り
F22
フィルター径(mm)
95
外形寸法(最大径×長さ)
(約:mm)
110 × 167.5
質量(約:g)(三脚台座別)
1,105
手ブレ補正機能
*
*
*
•
This instruction manual explains how to use
lenses. Precautions common to all lenses such
as notes on use are found in the separate
“Precautions before using”. Be sure to read both
documents before using your lens.
This lens is designed for Sony α camera system
E-mount cameras. You cannot use it on A-mount
cameras.
For further information on compatibility, visit the web
site of Sony in your area, or consult the dealer of Sony
or local authorized service facility of Sony.
(Suite à la page arrière)
a
Using the Shake Compensation
Function
Shake compensation switch
ON: Compensate for camera shake.
OFF: Does not compensate for camera shake. We
recommend using a tripod during shooting.
Specifications
Name (Model name)
E PZ 18-110mm
F4 G OSS
SELP18110G
Focal length (mm)
18-110
35mm equivalent
focal length*¹ (mm)
27-165
Lens groups-elements
15-18
Angle of view*²
76°-14° 30'
Minimum focus*³ (m (feet))
0.4-0.95
(1.31- 3.12)
Maximum magnification (×)
0.122
Minimum aperture
f/22
Filter diameter (mm)
95
Dimensions
(maximum diameter × height)
(approx., mm (in.))
110 × 167.5
(4 3/8 × 6 5/8)
Mass (approx., g (oz))
(excluding tripod collar)
1,105 (39)
Shake compensation function Yes
*¹ This is the equivalent focal length in 35mm format
when mounted on an Interchangeable Lens Digital
Camera equipped with an APS-C sized image sensor.
*² Angle of view is the value for Interchangeable Lens
Digital Cameras equipped with an APS-C sized image
sensor.
*³ Minimum focus is the distance from the image sensor
to the subject.
Depending on the lens mechanism, the focal length
may change with any change in shooting distance. The
focal lengths given above assume the lens is focused
at infinity.
Included items
(The number in parentheses indicates the number of
pieces.)
Lens (1), Rear lens cap (1), Lens hood (1),
Lens case (1), Zoom pin (1), Lens cap (1),
Set of printed documentation
Design and specifications are subject to change
without notice.
and are trademarks of Sony Corporation.
Cette notice explique comment se servir des
objectifs. Les précautions communes à tous les
objectifs, par exemple les remarques sur l’emploi,
se trouvent sur la feuille « Précautions avant toute
utilisation ». Veuillez lire les deux documents avant
d’utiliser votre objectif.
Votre objectif est conçu pour les appareils photo
pourvus d’une monture E de type Sony α. Il ne peut
pas être utilisé pour les appareils photo pourvus
d’une monture A.
Pour plus d’informations sur la compatibilité,
consultez le site de Sony de votre pays, ou
adressezvous à un revendeur Sony ou à un service
aprèsvente agréé Sony.
Remarques sur l’emploi
Ne laissez pas la lentille orientée vers le soleil ou une
source de lumière intense. Cela risque de provoquer
un problème de fonctionnement interne du boîtier
de l’appareil photo et de l’objectif, de dégager de la
fumée, voire de provoquer un incendie. Si toutefois
vous ne pouvez pas faire autrement, veillez à fixer les
capuchons sur l’objectif. Si un paresoleil de l’objectif est
installé, assurez-vous de fermer le capuchon d'objectif.
Lors d'une prise de vue en direction du soleil, veillez
à ce que le soleil ne soit pas dans l'angle de vue.
Dans le cas contraire, les rayons solaires peuvent être
concentrés vers le point focal dans l'appareil photo, et
provoquer un incendie ou dégager de la fumée. Vous
pouvez provoquer un incendie ou dégager de la fumée
même si le soleil est légèrement en dehors de l'angle
de vue.
Lorsque vous portez un appareil photo sur lequel est
installé l’objectif, tenez toujours fermement l’appareil
photo et l’objectif.
Cet objectif n’est pas étanche bien qu’il soit conçu pour
résister à la poussière et aux éclaboussures. Si vous
l’utilisez sous la pluie, etc., veillez à ce que de l’eau ne
tombe pas dessus.
La goupille de zoom peut être posée ou déposée de la
bague de zoom.
Faites attention de ne pas faire tomber l’objectif lors de
son rangement ou transport. Utilisez un trépied robuste
lors de la prise de photos.
L’illuminateur AF de l’appareil photo peut être bloqué
par l’objectif. Nous conseillons de régler la position de
l’illuminateur AF sur OFF.
Lors de l'enregistrement de films, le son du mouvement
du zoom risque d'être enregistré selon l'appareil photo
ou les conditions de prise de vue. L'utilisation d'un
microphone externe peut aider à éviter d'enregistrer le
son du mouvement du zoom.
Précautions concernant l’emploi d’un flash
Vous ne pouvez pas utiliser le flash de votre appareil
photo avec cet objectif. Utilisez un flash externe (vendu
séparément).
Lors de l’utilisation d’un flash, l’objectif peut bloquer
partiellement la lumière du flash et produire une ombre
au bas de l’image.
Vignetage
Lorsque l’objectif est utilisé, les coins de l’écran
deviennent plus sombres que le centre. Pour réduire
ce phénomène (appelé vignetage), fermez l’ouverture
d’un ou de deux crans.
4-590-042-03(1)
SELP18110G
E-mount
©2016 Sony Corporation
Printed in China
E PZ 18-110mm
F4 G OSS
–1
–2
(1)
1 3 4 5 62
22
10 9 8 7
20
18 19
17
16
21
12
23
27
24
28
25
1413
11
13
26
15
a
(2)
2 Rotate the tripod collar-locking knob
clockwise firmly to set it.
Be sure that the tripod collar-locking knob is set
firmly. If the tripod collar-locking knob is not set
firmly, the lens may fall off the tripod collar.
Attaching the Lens Hood
It is recommended that you use a lens hood to
reduce flare and ensure maximum image quality.
To attach a lens hood, be sure to remove the lens cap
beforehand.
Align the mark on the lens hood with the
lens hood index on the lens, then insert the
lens hood into the lens mount and rotate
it clockwise until it clicks into place. (See
illustration
-
.)
To open or close the shutter of the lens
cover
Move the lens cover lever to OPEN to open the lens
cover, and move the lever to CLOSE to close the lens
cover. (See illustration
-
.)
To remove the lens hood
Hold the PUSH (lens hood release) button down and
turn the lens hood in the opposite direction of when
attaching.
Zooming
Using the POWER ZOOM lever
1 Set the ZOOM switch to SERVO.
2 Move the POWER ZOOM lever to adjust
the focal distance (zoom position).
Move the POWER ZOOM lever toward T
(Telephoto) to zoom in.
Move the POWER ZOOM lever toward W (Wide) to
zoom out.
Using the zoom ring
1 Set the ZOOM switch to MANUAL.
2 Rotate the zoom ring to adjust the focal
distance (zoom position).
To change the rotation direction of the
zoom ring operation
(See illustration
-a.)
You can change the rotation direction of the zoom
ring to zoom in or zoom out.
1 Align the mark of the zoom rotation
direction select locking switch with the
zoom rotation direction select index ()
() by rotating the zoom ring to the W
side.
2 Slide the zoom rotation direction select
locking switch in the direction of the
arrow.
3 Rotate the zoom ring to the T side.
Once the value “110” on the focal-length scale has
reached the focal-length index (), an attempt to
further rotate the zoom ring makes a click sound.
Make sure that you hear the click sound before you
rotate it further on.
4 Align the value “18” on the other focal-
length scale with the focal-length index.
()
Be sure to rotate the zoom ring until it clicks.
5 Slide the zoom rotation selecting switch
back to its original position to lock it.
Focusing
To adjust the focus in AF/MF mode
When using the autofocus function together with
manual focus or when recording movies, set the
focusing ring to position .
To adjust the focus in FULL MF mode
If you do not want to use autofocus, set the focusing
ring to position and adjust the focus manually.
The distance scale is only a rough guide.
The minimum focuses are different in AF/MF mode and
in FULL MF mode.
In AF/MF mode: 0.4 m (W) – 0.95 m (T)
In FULL MF mode: 0.95 m in all area
When you move the focus ring from AF/MF mode
to FULL MF mode
, focus is adjusted to the distance
indicated on the distance scale.
Adjusting the Exposure
IRIS LOCK switch
LOCK: You can lock the iris ring at “A” on the
aperture scale, or rotate it between f/4 and
f/22.
RELEASE: You can rotate the iris ring between “A” and
f/22 on the aperture scale.
When you align “A” on the aperture scale to the
aperture index, the camera is set to auto iris mode
and the exposure is set by the camera. And you can
adjust the amount of light manually between f/4 and
f/22 by rotating the iris ring.
Adjust the amount of light manually
Rotate the iris ring to the desired exposure
(f-stop) when the camera is set to the M mode
or A mode.
Notes
Set the iris click switch to OFF when shooting movies.
(See illustration -a.)
If you change the aperture value while shooting a
movie with the iris click switch set to ON, the sound of
the iris ring will be recorded.
交換レンズ
Interchangeable Lens
Objectif interchangeable
取扱説明書
Operating Instructions
Mode d’emploi
Manual de instrucciones
