
S1560


1
8
2
3
4
5
9
7
6

empty page before TOC


English
Introduction
Congratulations on your purchase and welcome to
Philips! To fully benefit from the support that
Philips offers, register your product at
www.philips.com/welcome.
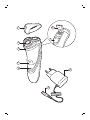
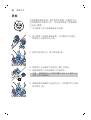
General description (Fig. 1)
1 Protection cap
2 Shaving unit
3 Shaving unit release button
4 On/off button
5 Charging light
6 Trimmer
7 Trimmer release slide
8 Supply unit
9 Small plugs
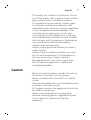
Important safety information
Read this important information carefully before
you use the appliance and its accessories and
save it for future reference. The accessories
supplied may vary for different products.
Danger
- Keep the supply unit dry.
- This symbol means: Forbidden to clean under a
running tap.
Warning
- To charge the battery, only use the detachable
supply unit (HQ850) provided with the
appliance.
6
English

- The supply unit contains a transformer. Do not
cut off the supply unit to replace it with another
plug, as this causes a hazardous situation.
- This appliance can be used by children aged
from 8 years and above and persons with
reduced physical, sensory or mental capabilities
or lack of experience and knowledge if they
have been given supervision or instruction
concerning use of the appliance in a safe way
and understand the hazards involved. Children
shall not play with the appliance. Cleaning and
user maintenance shall not be made by
children without supervision.
- Always unplug the shaver before you clean it
under the tap.
- Always check the appliance before you use it.
Do not use the appliance if it is damaged, as
this may cause injury. Always replace a
damaged part with one of the original type.
- Do not open the appliance to replace the
rechargeable battery.
Caution
- Never immerse the shaver in water. Do not use
the shaver in the bath or in the shower.
- Never use water hotter than 60°C to rinse the
shaver.
- Only use this appliance for its intended purpose
as shown in the user manual.
- For hygienic reasons, the appliance should only
be used by one person.
- Never use compressed air, scouring pads,
abrasive cleaning agents or aggressive liquids
such as petrol or acetone to clean the
appliance.
7
English

- Water may drip from the socket at the bottom
of the shaver when you rinse it. This is normal
and not dangerous because all electronics are
enclosed in a sealed power unit inside the
shaver.
- Do not use the supply unit in or near wall
sockets that contain an electric air freshener to
prevent irreparable damage to the supply unit.
Electromagnetic fields (EMF)
- This Philips appliance complies with all
applicable standards and regulations regarding
exposure to electromagnetic fields.
General
- This shaver can be safely cleaned under the
tap.
- This symbol means: Suitable to be cleaned
under a running tap.
- The appliance is suitable for mains voltages
ranging from 100 to 240 volts.
- The supply unit transforms 100-240 volts to a
safe low voltage of less than 24 volts.
Charging
It takes approx. 8 hours to fully charge the
appliance. When you charge the appliance for the
first time or after a long period of non-use, let it
charge until the charging light lights up
continuously. A fully charged appliance provides
up to 40 minutes of shaving time. The shaving time
may be less than 40 minutes as a result of your
shaving behavior, your cleaning habits or your
beard type.
8
English

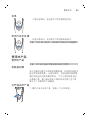
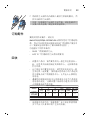
Charging with the supply unit S1560
2
1
1 Put the small plug in the appliance.
2 Put the supply unit in the wall socket.
- The charging light shows the charging status of
the appliance (see 'Charge indications').
3 After charging, remove the supply unit from the
wall socket and pull the small plug out of the
appliance.
Charge indications
Battery low
- When the battery is almost empty (when there
are only 5 or fewer shaving minutes left), the
charging light starts to flash orange.
- When the battery is completely empty, the
charging light starts to flash orange quickly.
- When you switch off the appliance, the
charging light continues to flash orange for a
few seconds.
Charging
- When the appliance is charging, the charging
light flashes green.
Battery fully charged
- When the battery is fully charged, the charging
light lights up green continuously.
Note: After approx. 30 minutes, the charging light
goes out to save energy.
9
English

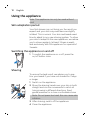
Using the appliance
Note: This appliance can only be used without
cord.
Skin adaptation period
Your first shaves may not bring you the result you
expect and your skin may even become slightly
irritated. This is normal. Your skin and beard need
time to adapt to any new shaving system. To allow
your skin to adapt to this new appliance, we advise
you to shave regularly (at least 3 times a week)
and exclusively with this appliance for a period of
3 weeks.
Switching the appliance on and off
1 To switch the appliance on or off, press the
on/off button once.
Shaving
To ensure the best result, we advise you to pre-
trim your beard if you have not shaved for 3 days
or longer.
1 Switch on the appliance.
2 Move the shaving heads over your skin in both
straight and circular movements to catch all
hairs growing in different directions. Exert
gentle pressure for a close comfortable shave.
Note: Do not press too hard, this can cause skin
irritation.
3 After shaving, switch off the appliance.
4 Clean the appliance.
10
English

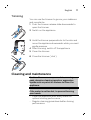
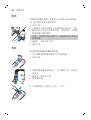
Trimming
You can use the trimmer to groom your sideburns
and moustache.
1 Push the trimmer release slide downwards to
open the trimmer.
2 Switch on the appliance.
3 Hold the trimmer perpendicular to the skin and
move the appliance downwards while you exert
gentle pressure.
4 After trimming, switch off the appliance.
5 Clean the trimmer.
6 Close the trimmer (‘click’).
Cleaning and maintenance
Caution: Never use compressed air, scouring
pads, abrasive cleaning agents or aggressive
liquids such as petrol or acetone to clean the
appliance.
Caution: Be careful with hot water. Always check
if the water is not too hot, to prevent burning
your hands.
- Clean the appliance after every shave for
optimal shaving performance.
- Regular cleaning guarantees better shaving
performance.
11
English

- For the best cleaning results, we advise you to
use Philips Cleaning spray (HQ110).
- Never dry the shaving unit with a towel or
tissue, as this may damage the shaving heads.
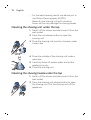
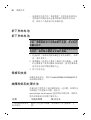
Cleaning the shaving unit under the tap
1 Switch off the shaver and disconnect it from the
wall socket.
2 Press the unit release button to open the
shaving unit.
3 Rinse the shaving unit and hair chamber under
a warm tap.
4 Rinse the outside of the shaving unit under a
warm tap.
5 Carefully shake off excess water and let the
appliance air dry.
6 Close the shaving unit.
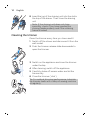
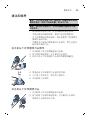
Cleaning the shaving heads under the tap
1 Switch off the shaver and disconnect it from the
wall socket.
2 Press the shaving unit release button to open
the shaving unit. Pull the shaving unit off the
appliance.
12
English

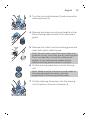
2
1
3 Turn the lock anticlockwise (1) and remove the
retaining frame (2).
4 Remove and clean one shaving head at a time.
Each shaving head consists of a cutter and a
guard.
5 Remove the cutter from the shaving guard and
clean both parts under the tap.
Note: Do not clean more than one cutter and
guard at a time, since they are all matching sets.
If you accidentally mix up the cutters and
guards, it may take several weeks before
optimal shaving performance is restored.
6 Put the shaving heads back into the shaving
unit.
Note: Make sure the notches on both sides of
the shaving heads fit exactly onto the
projections in the shaving head holder.
1
2
7 Put the retaining frame back into the shaving
unit (1) and turn the lock clockwise (2).
13
English

8 Insert the lug of the shaving unit into the slot in
the top of the shaver. Then close the shaving
unit.
Note: If the shaving unit does not close
smoothly, check if you have inserted the
shaving heads properly and if the retaining
frame is locked.
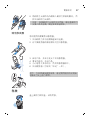
Cleaning the trimmer
Clean the trimmer every time you have used it.
1 Switch off the shaver and disconnect it from the
wall socket.
2 Push the trimmer release slide downwards to
open the trimmer.
3 Switch on the appliance and rinse the trimmer
under the tap.
4 After cleaning, switch off the appliance.
5 Carefully shake off excess water and let the
trimmer dry.
6 Close the trimmer (‘click’).
Tip: For optimal trimming performance, lubricate
the trimmer teeth with a drop of sewing machine
oil regularly.
14
English

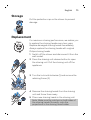
Storage
Put the protection cap on the shaver to prevent
damage.
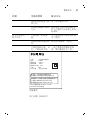
Replacement
2yrs
For maximum shaving performance, we advise you
to replace the shaving heads every two years.
Replace damaged shaving heads immediately.
Always replace the shaving heads with original
Philips shaving heads.
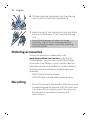
1 Switch off the shaver and disconnect it from the
wall socket.
2 Press the shaving unit release button to open
the shaving unit. Pull the shaving unit off the
appliance.
2
1
3 Turn the lock anticlockwise (1) and remove the
retaining frame (2).
4 Remove the shaving heads from the shaving
unit and throw them away.
5 Place new shaving heads in the shaving unit.
Note: Make sure the notches on both sides of
the shaving heads fit exactly onto the
projections in the shaving head holder.
15
English

1
2
6 Put the retaining frame back into the shaving
unit (1) and turn the lock clockwise (2).
7 Insert the lug of the shaving unit into the slot in
the top of the shaver. Then close the shaving
unit.
Note:If the shaving unit does not close
smoothly, check if you have inserted the
shaving heads properly and if the retaining
frame is locked.
Ordering accessories
To buy accessories or spare parts, visit
www.shop.philips.com/service or go to your
Philips dealer. You can also contact the Philips
Consumer Care Center in your country (see the
international warranty leaflet for contact details).
The following accessories and spare parts are
available:
- SH30 Philips Shaving Heads.
- HQ110 Philips shaving head cleaning spray
Recycling
- Do not throw away the product with the normal
household waste at the end of its life, but hand
it in at an official collection point for recycling.
By doing this, you help to preserve the
environment.
16
English

- This product contains a built-in rechargeable
battery which shall not be disposed of with
normal household waste. We strongly advise
you to take your product to an official collection
point or a Philips service centre to have a
professional remove the rechargeable battery.
- Follow your country’s rules for the separate
collection of electrical and electronic products
and rechargeable batteries. Correct disposal
helps prevent negative consequences for the
environment and human health.
- 该表格中所显示的“有害物质”在产品正常使用情况
下不会对人身和环境产生任何伤害。
- 该表格中所显示的“有害物质”及其存在的部件向消
费者和回收处理从业者提供相关物质的存在信息,
有助于产品废弃时的妥善处理。
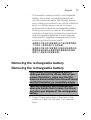
Removing the rechargeable battery
Removing the rechargeable battery
Only remove the rechargeable battery
when you discard the shaver. Before you
remove the battery, make sure that the
shaver is disconnected from the wall socket
and that the battery is completely empty
Take any necessary safety precautions
when you handle tools to open the shaver
and when you dispose of the rechargeable
battery.
1 Check if there are screws in the back of the
shaver or in the hair chamber. If so, remove
them.
17
English

2 Remove the outer panels of the shaver with a
screwdriver or other tool. If necessary, also
remove additional screws and/or parts until you
see the printed circuit board with the
rechargeable battery.
3 Remove the rechargeable battery.
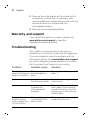
Warranty and support
If you need information or support, please visit
www.philips.com/support or read the
international warranty leaflet.
Troubleshooting
This chapter summarizes the most common
problems you could encounter with the appliance.
If you are unable to solve the problem with the
information below, visit www.philips.com/support
for a list of frequently asked questions or contact
the Consumer Care Center in your country.
Problem Possible cause Solution
The appliance
does not shave as
well as it used to.
The shaving heads
are damaged or
worn.
Replace the shaving heads
(see ' ').
Long hairs obstruct
the shaving heads.
Clean the shaving heads
one by one.
You have not
inserted the
shaving heads
properly.
Make sure the notches on
both sides of the shaving
heads fit exactly onto the
projections in the shaving-
head holder.
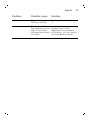
The appliance
does not work
when I press the
on/off button.
The appliance is
connected to the
wall socket.
This appliance can only be
used without cord.
18
English

Problem Possible cause Solution
The rechargeable
battery is empty.
Recharge the battery (see '
').
The temperature of
the appliance is too
high. In this case,
the appliance does
not work.
As soon as the
temperature of the
appliance has dropped
sufficiently, you can switch
on the appliance again.
19
English

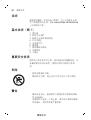
简体中文
说明
感谢您的惠顾,欢迎光临飞利浦! 为了让您能充分享
受飞利浦提供的支持,请在 www.philips.com/welcome
上注册您的产品。
基本说明(图 1)
1 保护盖
2 剃毛刀头部件
3 剃须刀头部件释放按钮
4 开/关按钮
5 充电指示灯
6 修剪器
7 修发器释放滑块
8 电源部件
9 小插头
重要安全信息
使用本产品及其附件之前,请仔细阅读本重要信息,并
妥善保管以供日后参考。 随附的附件可能因产品而
异。
危险
- 保持电源部件干燥。
- 警告符号注释: 禁止在打开的水龙头下进行清洗。
警告
- 要给电池充电,请仅使用产品随附的可拆卸电源部
件 (HQ850)。
- 电源部件中包含一个变压器。 请勿自行更换电源部
件的插头,否则将导致严重后果。
20
简体中文
ページが読み込まれています...
ページが読み込まれています...
ページが読み込まれています...
ページが読み込まれています...
ページが読み込まれています...
ページが読み込まれています...
ページが読み込まれています...
ページが読み込まれています...
ページが読み込まれています...
ページが読み込まれています...
ページが読み込まれています...
ページが読み込まれています...
ページが読み込まれています...
ページが読み込まれています...
ページが読み込まれています...
ページが読み込まれています...
-
 1
1
-
 2
2
-
 3
3
-
 4
4
-
 5
5
-
 6
6
-
 7
7
-
 8
8
-
 9
9
-
 10
10
-
 11
11
-
 12
12
-
 13
13
-
 14
14
-
 15
15
-
 16
16
-
 17
17
-
 18
18
-
 19
19
-
 20
20
-
 21
21
-
 22
22
-
 23
23
-
 24
24
-
 25
25
-
 26
26
-
 27
27
-
 28
28
-
 29
29
-
 30
30
-
 31
31
-
 32
32
-
 33
33
-
 34
34
-
 35
35
-
 36
36


