Ariston RNF8021HK Daily Reference Guide
- カテゴリー
- 洗濯機
- タイプ
- Daily Reference Guide

使用說明書
Model /
產品型號
:
RNF8021HK
User Manual
https://www.aristonchannel.hk/

2
繁體中文
3
12

3
Index
USER MANUAL 3
CONTROL PANEL 4
WASH CYCLE TABLE 4
PRODUCT DESCRIPTION 4
DETERGENT DISPENSER DRAWER 4
WASH CYCLES 5
DISPLAY 5
FIRST-TIME USE 5
DAILY USE 5
PAUSING A CYCLE 5
OPENING THE DOOR, IF NECESSARY 6
ADDING GARMENTS 6
CHANGING A RUNNING WASH CYCLE 6
AT THE END OF THE WASH CYCLE 6
OPTIONS 6
DESCALE AND CLEAN PROCEDURE 6
TIPS AND SUGGESTIONS 6
CARE AND MAINTENANCE 6
ANTIMICROBIAL SEAL 6
ACCESSORIES 6
TRANSPORT AND HANDLING 6
TROUBLESHOOTING 7
INSTALLATION GUIDE
8
SAFETY INSTRUCTIONS
10
REPAIR INFORMATION
11

4
EN
Quick Guide
THANK YOU FOR PURCHASING AN ARISTON PRODUCT.
To receive more comprehensive assistance, register the
appliance on
www.aristonchannel.hk/registration
Before using the appliance carefully read the Health and Safety guide.
Before using the machine, it is imperative that the transport bolts are removed. For more
detailed instructions on how to remove them, see the Installation Guide.
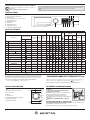
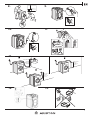
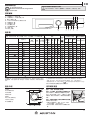
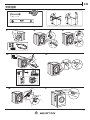
CONTROL PANEL
WASH CYCLE TABLE
The programme used for the evaluation of (RNF8021HK) under the mandatory Water
clothes is as follows : Eco Cotton 60°C.
* By selecting the 14 cycle and excluding the spin cycle, the washing machine will drain only.
**For Prewash press the “Temp.” button until the symbol lights up (only 90°).
The cycle duration indicated on the display or instruction manual is an estimate based on
standard conditions. The actual duration may vary in relation to several factors, such as
the temperature and pressure of the incoming water, ambient temperature, amount of
detergent, load quantity and type, load balancing and any additional options selected.
(1) Eco Cotton - Test wash cycle in compliance with regulation EN 60456:
set wash cycle Eco Cotton with a temperature of 60°C.
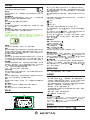
PRODUCT DESCRIPTION
1.
3.
2.
5.
4.
7.
6.
8.
1. Top
2. Detergent dispenser drawer
3. Control panel
4. Handle
5. Porthole door
6. Drain pump (behind the plinth)
7. Plinth (removable)
8. Adjustable feet (2)
1. STEAM HYGIENE / MUTE button
2. FINAL CARE / KEY LOCK button
3. ON/OFF button
4. ACTIVE CARE button and indicator light
5. START/PAUSE button
6. RAPID / ECO button
7. SPIN button
8. START DELAY button
9. TEMPERATURE button
10. WASH CYCLE SELECTOR KNOB
DETERGENT DISPENSER DRAWER
compartment 1: Pre-wash detergent
(powder)
compartment 2: Detergent for the wash
cycle (powder or liquid)
If liquid detergent is used, it is recommended
that the removable plastic partition A
(if supplied) be used for proper dosage.
If powder detergent is used, place the partition
into slot B.
compartment 3: Additives (fabric softeners,
etc.)
! Use powder detergent for white cotton garments, for pre-washing, and
for washing at temperatures over 60°C.
! Follow the instructions given on the detergent packaging.
1
2
3
A
B
1 2
4
5
67
8
9
3
10
DISPLAY
Model: RNF8021HK Washing Capacity: 8kg Spin Speed: 0-1200rpm
Add
Gar-
ments
Detergents and
Additives
Recommended
detergent
Wash cycle
Temperature (°C)
Max.
spin speed
(rpm)
Max.
load
(kg)
Default
Cycle
Duration
(hh:mm)
Pre-
wash
Wash
Fabric
softener
Powder Liquid
Default Range 1 2 3
1 Mixed
40°C - 40°C
1200 8
– –
2 Eco Cotton (1) 60°C 40°C - 60°C 1200 8
–
3 Cotton
40°C - 60°C
1200 8
–
4 Synthetics
40°C - 60°C
1200 4.5
–
5 Delicates
40°C - 40°C
1000 4.5
– –
6
Wool
40°C - 40°C
800 2
– –
7 Anti Allergy
60°C
40°C - 60°C
1200 5
–
8 Anti Stain
40°C - 40°C
1000 4.5
–
9 White
40°C - 90°C
1200 8
**
10 Steam Refresh
– – –
2
– – – – – –
11 Rapid 30 min
30°C - 30°C
1200 (2)
4.5
– –
12 Bed & Bath
60°C - 60°C
1200 8
–
13 Shirts
40°C - 40°C
1200 (2)
2
– –
14 Spin & Drain *
– –
1200 8
– – – – – –
15 Rinse & Spin
– –
1200 8
– – – – –
Option available / Required dosage Option unavailable / Optional dosage
Options
Active
Care
Steam
Hygiene
Final
Care
Rapid
Eco
–
–
–
–
–
–
–
–
–
–
–
–
–
–
–
–
–
–
–
–
–
–
–
–
–
–
–
–
–
–
–
–
–
–
–
–
–
4:00
3:55
2:55
1:35
1:25
3:10
1:00
2:00
0:20
0:30
2:20
1:20
0:10
0:55
1:55
2) The display will show the suggested spin speed as default value.

5
WASH CYCLES
Follow the instructions on the symbols of the garment’s wash
care label. The value indicated in the symbol is the maximum
recommended temperature for washing the garment.
Mixed
For washing lightly to normally soiled resilient garments in cotton, linen,
Eco Cotton
Suitable for washing moderately soiled cotton garments. At 60°C it is the
terms of combined water and electricity consumption.
Cotton
Normally to heavily soiled and robust cottons .
Synthetics
Delicates
For washing very delicate garments. It is advisable to turn the garments
inside out before washing them. For best results, use liquid detergent on
delicate garments.
Wool - Woolmark Apparel Care - Green:
The “Wool” wash cycle is approved by the Woolmark Company for
wash complies with the instructions appearing on the garment’s label
and with those provided by the manufacturer of this washing machine.
(M1127)
Anti Allergy
Suitable for removing major allergens such as pollen, mites and cat or dog hair.
Anti Stain
The programme is suitable to heavily-soiled garments with resistant
colours. It ensures a washing class that is higher than the standard class (A
colours. We recommend the use of powder detergent. Pre-treatment with
special additives is recommended if there are obstinate stains.
White
For washing normally to heavily soiled towels, underwear, table and bed
linen, etc in resilient cotton and linen. Only when the temperature is
selected at 90°C the cycle is provided with a prewash phase before main
washing phase. In this case it is recommended to add detergent both, in
the prewash and main wash sections.
Steam Refresh
The garments will be damp once the cycle is completed, so we recommend
hanging them to dry (2 kg, roughly 3 items). This programme refreshes
only (that are not dirty) and select programme “Steam Refresh”. Garments
will be a little damp at the end of the cycle and can be worn after a few
minutes. The “Steam Refresh” programme makes ironing easier.
! Do not add softeners or detergents.
! Not recommended for wool or silk garments.
Rapid 30 min
For washing lightly soiled garments quickly. This cycle lasts only 30
minutes, saving time and energy.
Bed & Bath
For washing home linen in a single cycle. It optimises the use of fabric
softener and allows for saving time and electricity. We recommend the
use of powder detergent.
Shirts
to guarantee they receive the best possible care.
Spin & Drain
Spins the load then empties the water. For resilient garments. If you
exclude the spin cycle, the machine will drain only.
Rinse & Spin
Rinses and then spins. For resilient garments.
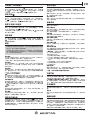
DISPLAY
The display is useful when programming the washing machine and
provides plenty of information.
The duration of the available wash cycles and the remaining time of a
running cycle appear in section A (the display will show the maximum
duration of the cycle chosen, which may decrease after several minutes,
si
wash load and the sett
ings chosen); if the DELAYED START option has been
set, the countdown to the start of the selected wash cycle will appear.
Pressing the corresponding button allows you to view the maximum spin
speed and temperature values attained by the machine during the set
wash cycle, or the values selected most recently, if these are compatible
with the set wash cycle.
The “wash cycle phases” corresponding to the selected wash cycle and the
“wash cycle phase” of the running wash cycle appear in section B:
Main wash
Rinse
Spin + Pump out
References C indicate the wash options available (See “Options” section).
The “Start Delay” symbol
, when lit, indicates that the set “Delayed start”
value has appeared on the display.
The symbol indicates the possibility of inserting an additional garments
load with the washing program started (See “Adding Garments” section).
The
symbol indicates the possibility to silence the key tones.
signals and the alarms remain active, as well as the sound of the end of cycle.
For activate/deactivate the mute press and hold
button.
DISPLAY INDICATORS
Failure: Call Service
Refer to “Troubleshooting” section
Failure: No water
In the event of any failure, refer to the “Troubleshooting” section.
Key Lock
To lock the control panel, press and hold the “Key lock”
button for
approximately 3 seconds. The symbol
will light up on the display to
indicate that the control panel has been locked (with the exception of the
“ON/OFF“
button). This prevents unintentional changes to
programmes, especially with children near the machine. To unlock the
control panel, press and hold the “Key lock”
button for approximately
3 seconds .
Locked door indicator
When lit, the symbol indicates that the door is locked. To prevent any
To open the door while a cycle is in progress, press the START/PAUSE
button
; if the
FIRST-TIME USE
Once the appliance has been installed, and before you use it for the rst time,
run a wash cycle with detergent and no laundry, using the wash cycle 9 (60°).
DAILY USE
Prepare the laundry by following the suggestions appearing under the
“Tips And Suggestions” Section.
- Press the ON/OFF button
.
- Open the door. Load the laundry while making sure not to exceed the
maximum load quantity indicated in the “Wash Cycle Table”.
- Pull out the detergent dispenser drawer and pour the detergent into the
relevant compartments, as described in the “Detergent Dispe
nser
Drawer ” section.
- Close the door.
- The machine automatically displays the default temperature and spin
speed values for the selected cycle, or the most recently used settings if
they are compatible with the selected cycle.
- Select the desired wash cycle.
- Select the desired options.
STARTING CYCLE
- Press the start/pause button.
The machine will lock the door ( symbol on) and the drum will start to
rotate; the door will be unlocked ( symbol OFF) and then locked again
( symbol on) as preparation phase of each washing cycle. The
“Clicking” noise is part of the door locking mechanism. Water will enter
the drum and start the washing phase once the door is locked.
PAUSING A CYCLE
To pause the wash cycle, press the START/PAUSE button again. To start
the wash cycle from the point at which it was interrupted, press the
START/PAUSE
button again.
B
A
END
DEMO
h
C
C
C
C
C

6
OPENING THE DOOR, IF NECESSARY
Once a cycle starts, the symbol turns on to signal that the door cannot
be opened. While a wash cycle is running, the door remains locked. To
open the door while a cycle is under way, for example, to add or remove
garments, press the START/PAUSE
button to pause the cycle. If the
symbol is not lit, the door may be opened. Press the START/PAUSE
button again to continue the cycle.
ADDING GARMENTS
An icon on the display will signal when additional garments can be
introduced into the washing machine, without decreasing the washing
pressing the START/PAUSE
button then open the door and insert
them.
Press the START/PAUSE
button again to restart the wash cycle from
the point at which it was interrupted.
CHANGING A RUNNING WASH CYCLE
To change a wash cycle while it is in progress, pause the washing machine
using the START/PAUSE
button, then select the desired cycle and press
the START/PAUSE
button again.
! To cancel a cycle that has already begun, press and hold the ON/OFF
AT THE END OF THE WASH CYCLE
This will be indicated by the word “ ” on the display; when the
button,
OPTIONS
- If the selected option is not compatible with the set wash cycle, the
not be activated.
- If the selected option is not compatible with another previously
and the option will not be activated.
Steam Hygiene
This option enhances washing performance by generating steam during
at the same time. Place the laundry in the drum, choose a compatible
programme and select option Steam Hygiene.
! The steam generated during the operation of the washing machine may
cause the porthole door to become hazy.
Rapid / Eco
After pushing the button for the 1st time, option Rapid is selected and the
cycle duration will be reduced.
Otherwise after pushing for the 2nd time, option Eco is selected allowing
more energy saving.
Final Care
The washing machine will perform gentle tumbling through slow
rotations of the drum. Final Care option starts after the cycle ends for a
maximum duration of 6h and you can interrupt at any time by pressing
any button on control panel or turning the knob.
Active Care
The detergent, premixed with water, creates an unique emulsion able
low temperatures, preserving both colors and fabrics. These results are
drum which best take care of the garments.
Start Delay
To set a delayed start (10mins - 24 hours) for the selected cycle, press the
corresponding button repeatedly until the desired delay period is reached.
When this option has been activated, the
symbol lights up on the display.
To remove the delayed start setting, press the button until “OFF” appears
on the display.
Temperature
press the “Temp.” button. The value will appear on the display.
Spin
press the “Spin Speed” button. The value will appear on the display.
DESCALE AND CLEAN PROCEDURE
An icon on the display will regularly (roughly every 50 cycles) remind users
that is time to run a maintenance cycle to clean the washing machine and
combat limescale build-up and bad odours.
To delete the descale alert turn the knob or push any button (including
ON/OFF button).
For optimal result we suggest using special additives to clean the washer.
TIPS AND SUGGESTIONS
Divide the laundry according to:
hand-washed). Colour (separate coloured garments from whites, wash
new coloured garments separately). Delicates (small garments – such as
nylon stockings – and items with hooks – such as bras: insert them in a
fabric bag).
Empty the pockets:
Objects such as coins or lighters can damage the washing machine and
the drum. Check all buttons.
CARE AND MAINTENANCE
Before performing cleaning and maintenance, switch the washing machine
clean the washing machine.
Cutting o the water and electricity supplies
Close the water tap after every wash. This will limit wear on the hydraulic
system inside the washing machine and help to prevent leaks.
Unplug the washing machine when cleaning it and during all
maintenance work.
Cleaning the washing machine
The outer parts and rubber components of the appliance can be cleaned using
a soft cloth soaked in lukewarm soapy water. Do not use solvents or abrasives.
Cleaning the detergent dispenser drawer
Remove the dispenser drawer by lifting and pulling it outwards. Wash it
Caring for the door and drum
Always leave the porthole door ajar in order to prevent unpleasant odours
from forming.
Cleaning the pump
require any maintenance. Small items (such as coins or buttons) may
sometimes fall into the protective pre-chamber situated at the base of the
pump.
! Make sure that the wash cycle has ended and unplug the appliance.
To access the pre-chamber:
1. remove the covering panel on the front side of the machine by inserting
a screwdriver in the centre and sides of the panel and using it as a lever;
the residual water.
3. loosen the drainage pump cover by turning it anti-clockwise: it is
normal for some water to leak out;
4. clean the inside thoroughly;
5. screw the cover back on;
6. put the panel back in place, making sure the hooks slot in place before
pushing the panel onto the appliance.
Checking the water inlet hose
Check the water inlet hose at least once a year. If it is cracked or broken, it
must be replaced: during wash cycles, the high pressure of the water
could suddenly split the hose open.
! Never use hoses that have already been used.
ANTIMICROBIAL SEAL
The seal around the porthole door is made from a special mixture
ensuring antimicrobial protection, thus reducing bacterial proliferation
up to 99.99%.
The seal contains zinc pyrithione, a biocidal substance which reduces the
proliferation of harmful microbes (*) such as bacteria and mould prone
to causing stains, unpleasant odours and product deterioration.
(*) According to tests performed by the University of Perugia, Italy
on: Staphylococcus aureus, Escherichia coll, Pseudomonas aeruginosa,
Candida albicans, Aspergillus niger, Penicillium digitatum
In rare cases an allergic reaction may be caused by prolonged contact between
seal and skin.
ACCESSORIES
Contact our Customer Support Centre to check whether the following
accessories are available for this washing machine model.
Stacking kit
With this accessory you can secure the tumble dryer to the upper part of
your washing machine to save space and facilitate loading and unloading
of the tumble dryer.
TRANSPORT AND HANDLING
Do not lift the washing machine by gripping it from the upper section.
Unplug the appliance and c
lose the water tap. Check that the door and
the water tap then detach the drain hose. Empty all the water remaining in
detergent dispenser drawer are tightly closed. Detach the lling hose from
the hoses and secure the latter so that they do not get damaged during
transport. Apply the transport bolts back on. Repeat, in reverse order, the
transport bolt removal procedure described in the “Installation Guide”.

7
TROUBLESHOOTING
Your washing machine could occasionally fail to work. Before contacting the Customer Support Centre, make sure that the problem cannot be easily
solved using the following list.
Anomalies Possible causes / Solution
The washing machine does
not start.
The appliance is not plugged into the socket fully, or not enough to make contact.
There is no power in the house.
The wash cycle does not start.
The washing machine door is not closed properly.
The ON/OFF
button has not been pressed.
The START/PAUSE
button has not been pressed.
The water tap has not been opened.
A delay has been set for the start time.
The Demo Mode is active (see below how to deactivate).
The washing machine does
not ll with water (“
”
appears on the display).
The water inlet hose is not connected to the tap.
The hose is bent.
The water tap has not been opened.
There is no water supply in the house.
The pressure is too low.
The START/PAUSE
button has not been pressed.
The washing machine
continuously loads and
unloads water.
The free end of the hose is immersed in water.
If the problem persists even after these checks, turn o the water tap, switch the appliance o and contact the
Customer Support Centre. If the home is on one of the upper oors of a building, there may be problems relating
to back-siphonage, causing the washing machine to ll with water and drain continuously. Special anti-siphon
valves are available in shops and help to prevent this inconvenience.
Clean the pump lter (see “Care and Maintenance” chapter)
The washing machines does
not drain and the symbol
(F9E1) on the display.
The drain hose is bent.
The drainage duct is clogged.
The washing machine
vibrates a lot during the spin
cycle.
Transport bolts have not been removed correctly during installation.
The washing machine is not leveled.
The washing machine is tucked between furniture cabinets and the wall.
The washing machine leaks.
The water inlet hose is not screwed on properly.
The detergent dispenser drawer is obstructed.
The drain hose is not properly attached.
The
symbol blinks and the
display visualises an error
code (e.g.: F1E1, F4...).
Switch o the machine and unplug it, wait for approximately 1 minute and then switch it back on
again. If the problem persists, contact the Customer Support Centre.
There is too much foam.
The detergent is not suitable for machine washing (it should display the text “for washing machines” or “hand and
machine wash”, or the like).
Too much detergent was used.
“
” phase icon blinks, “0”
spin speed displayed .
Unbalance of laundry load prevented spin cycle, to protect the washing machine.
load.
You can download the Product Factsheet and User Manual by:
• Visiting the website https://www.aristonchannel.hk/
•
Alternatively, contact our Customer Support Centre (the telephone number is indicated in the warranty
card). When contacting the Customer Support Centre, provide the codes shown on the adhesive label applied to
the inside of the door.
xxxxxxxxxxxx
xxxx
Disable the DEMO MODE : The following actions must be carried out in sequence, without breaks. Switch the machine ON and then switch it OFF again. Press
the START/PAUSE
TROUBLESHOOTING

8
1.
2.
3.
4. 5.
150 ml
100 ml
50 ml
10 mm - 0.39 inch
2 cm - 0.7 inch
6.
7.
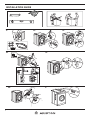
INSTALLATION GUIDE

9
10. 11.
12.
13.
14.
max 100 cm
39 inch
min 65 cm
25 inch
max 100 cm
39 inch
min 65 cm
25 inch
max 100 cm
39 inch
min 65 cm
25 inch
9.8.
max 0.5 cm
max 0.2 inch

10
Before using the appliance, read these safety instruc-
tions. Keep them nearby for future reference. These
instructions and the appliance itself provide impor-
tant safety warnings, to be observed at all times. The
manufacturer declines any liability for failure to ob-
serve these safety instructions, for inappropriate use
of the appliance or incorrect setting of controls.
should be kept away from the appliance unless
and above and persons with reduced physical,
sensory or mental capabilities or lack of experience
and knowledge can use this appliance only if they
are supervised or have been given instructions on
safe use and understand the hazards involved.
Children must not play with the appliance. Cleaning
and user maintenance must not be carried out by
children without supervision. Never open the door
forcibly or use it as a step.
PERMITTED USE
CAUTION: The appliance is not intended to be
operated by means of an external switching device,
such as a timer, or separate remote controlled
system.
This appliance is intended to be used in
environments; farm houses; by clients in hotels,
motels, bed & breakfast and other residential
environments.
Do not load the machine above the maximum
capacity (kg of dry cloth) indicated in the
programme table.
This appliance is not for professional use. Do not
use the appliance outdoors.
Do not use any solvents (e.g. turpentine,
benzene), detergents containing solvents, scouring
powder, glass or general purpose cleaners, or
liquids.
INSTALLATION
The appliance must be handled and installed by
If you want to stack a dryer on top of your washing
or your specialist dealer to verify whether this is
machine, rst contact our Customer Support Centre
possible. This is only possible if the dryer is attached
to the washing machine by means of appropriate
stacking kit available through our Customer Support
Centre or your specialist dealer.
Move the appliance without lifting it by the
worktop or top lid.
Installation, including water supply (if any) and
electrical connections and repairs must be carried
stated in the user manual. Keep children away from
the installation site. After unpacking the appliance,
make sure that it has not been damaged during
transport. In the event of problems, contact the
dealer or Customer Support Centre. Once installed,
packaging waste (plastic, styrofoam parts etc.)
must be stored out of reach of children-risk of
from the power supply before any installation
make sure the appliance does not damage the
activate the appliance when the installation has
been completed.
Do not install your appliance where it may be
exposed to extreme conditions, such as: poor
ventilation, temperatures below 5 °C or above 35 °C.
When installing the appliance make sure that
adjusting them as required, and check that the
appliance is perfectly to level using a spirit level.
If the appliance is being installed on wood or
top of this.
Connect the water inlet hose(s) to the water
supply in accordance with the regulations of your
local water company.
hot water supply.
bolts to prevent any possible damage to the interior
during transport. Before using the machine, it is
imperative that the transport bolts are removed.
After their removal, cover the openings with the 4
enclosed plastic caps.
After installation of the device, wait a few hours
before starting it so that it acclimates to the
environmental conditions of the room.
Make sure that the ventilation openings in the
base of your washing machine (if available on your
model) are not obstructed by a carpet or other
material.
Use only new hoses to connect the appliance to
the water supply. The old hose-sets should not be
reused.
The supply water pressure must be in the 0.1-1
Mpa range.
SAFETY INSTRUCTIONS
IMPORTANT TO BE READ AND OBSERVE

11
EN
Repair Information
RNF8021HK
BEFORE CONTACTING CUSTOMER SUPPORT
Call the customer support hotline shown on
warranty card, or follow the instructions
provided on:
https://www.aristonchannel.hk/
When contacting us, provide:
- A brief desciption of the problem
- The washer model number and serial number
(as on the data plate inside the door)
- Your address and contact number
IF THE PROBLEM PERSISTS,
CONTACT CUSTOMER SUPPORT
- Try to resolve problems you may encounter on
your own (see "Troubleshooting" part).
- Restart the washer to see if the problem persists.
For any repairs that may be required, please
contact an authorised Customer Support
Centre in order to ensure that the repaires are
performed correctly using original spare parts.
REPAIR INFORMATION
ELECTRICAL WARNINGS
It must be possible to disconnect the appliance
from the power supply by unplugging it if plug is
accessible, or by a multi-pole switch installed
upstream of the socket in accordance with the
wiring rules and the appliance must be earthed in
conformity with national electrical safety standards.
Do not use extension leads, multiple sockets or
adapters. The electrical components must not be
accessible to the user after installation. Do not use
the appliance when you are wet or barefoot. Do
not operate this appliance if it has a damaged
power cable or plug, if it is not working properly, or
if it has been damaged or dropped.
If the supply cord is damaged, it must be
replaced with an identical one by the manufacturer,
.
CLEANING AND MAINTENANCE
WARNING: Ensure that the appliance is switched
before performing any maintenance operation;
electric shock.
DISPOSAL OF PACKAGING MATERIALS
The packaging material is 100% recyclable and is marked with the
recycle symbol
.
The various parts of the packaging must therefore be disposed of
responsibly and in full compliance with local authority regulations
governing waste disposal.
DISPOSAL OF HOUSEHOLD APPLIANCES
This appliance is manufactured with recyclable or reusable materials.
Dispose of it in accordance with local waste disposal regulations.
For further information on the treatment, recovery and recycling of
household electrical appliances,
contact your local authority, the
collection service for household waste or the store where you purchased
the appliance. This appliance is marked in compliance with European
Directive 2012/19/EU, Waste Electrical and Electronic Equipment (WEEE).
By ensuring this product is disposed of correctly, you will help prevent
negative consequences for the environment and human health.
The symbol
on the product or on the accompanying documentation
indicates that it should not be treated as domestic waste but must be
taken to an appropriate collection center for the recycling of electrical
and electronic equipment.

12
索引
使用說明
12
控制面板 13
程序表 13
產品介紹 13
洗衣劑投放盒 13
洗衣程序 14
顯示屏 14
啟動洗衣程序 14
日常使用 14
暫停程序 14
打開機門 (如有需要) 15
添加衣物 15
變更正在運行的程序 15
程序結束 15
選項 15
清洗洗衣機內部 15
提示及應用 15
保養須知 15
抗菌門邊 15
洗衣機配件 15
搬運和處理 15
故障排除 16
安裝指南
17
安全說明
19
維修資訊
20
繁體中文
產品安全指引、使用說明及安裝指南

13
CH
為了獲得更完善的服務,
請於www.aristonchannel.hk/registration
註冊您的產品
在本機顯示屏上或此說明書中的程序時間是按標準情況計算,實際程序時間會因不同的因
素自動調整,如進水溫度和水壓,環境溫度,洗衣劑量,衣物的類型,負載平衡及附加選
項等。
型號:RNF8021HK 最大洗衣量:8公斤 脫水轉速:0-1200轉/分鐘 選項
預設 溫度範圍
最高脫水
轉速
(轉/分鐘)
可使用該選項/需要使用洗衣劑 不可使用該選項/選擇性使用洗衣劑
預設洗衣
程序時間
(小時/分鐘)
添加
衣物
預洗 主洗 柔順劑
1 2 3
洗衣粉 洗衣液
最大洗
衣量
(公斤)
Active Care
活泡潔淨
蒸氣潔淨
抗皺呵護
快速
節能
溫度(°C )
洗衣劑及添加劑 建議洗衣劑類別
(1) 符合標準EN60456 (洗衣)的測試程序:使用60°C的「棉質節能洗」程序 (程序2)。
* 選擇「脫水及排水」 程序 (程序14)並設定脫水轉速為“OFF”以進行免旋排水 。
** 要啟用預洗功能,按下「溫度」鍵直至 提示燈亮起 (預洗功能只適用於90°C水溫)。
1. 「蒸氣潔淨」/「靜音」鍵
2. 「抗皺呵護」/「兒童安全鎖」鍵
3. 電源「開/關」鍵
4. 「Active Care活泡潔淨」鍵及提示燈
5. 「啟動/暫停」鍵
6. 「快速/節能」鍵
7. 「脫水轉速」鍵
8. 「預校開機時間」鍵
9. 「溫度」鍵
10. 「程序」旋鈕
1. 頂板
2. 洗衣劑投放盒
3. 控制面板
4. 機門門把
5. 機門
6. 排水泵 (底座後方)
7. 底座 (可拆卸)
8. 可調機腳 (2)
盒子1:預洗,洗衣劑用(洗衣粉)
盒子2:主洗程序,洗衣劑用(洗衣粉或洗衣液)
使用洗衣液時,建議放置分隔器於A格(如有,
附於〈使用說明書〉袋內),以確保注入適當
的劑量。當使用洗衣粉時,請把分隔器放置於
B格。
盒子3:衣物柔順劑用(注意:先稀釋及不應過量)
柔順劑不能溢出盒子。
! 洗滌白色棉質衣物,預洗,及以60°C或以
上水溫洗滌時,可使用洗衣粉。
! 使用洗衣劑時,請遵守包裝上的建議使用份
量。
控制面板
程序表
產品介紹 洗衣劑投放盒
感謝您購買愛朗產品
使用洗衣機前請先細閱產品安全指引
在使用洗衣機前,必須卸下搬運螺栓。詳情參閱「安裝指南」頁面。
1
2
3
4
5
6
7
8
9
10
11
12
13
14
15
混合洗
節能棉質洗衣(1)
棉質
合成纖維
纖細衣物
羊毛
防敏感
除漬
白色衣物
蒸氣護理
快洗30分鐘
床單
襯衫
脫水及排水*
過水及脫水
40°C
60°C
40°C
40°C
40°C
40°C
60°C
40°C
40°C
-
30°C
60°C
40°C
-
-
1200
1200
1200
1200
1000
800
1200
1000
1200
-
1200 (2)
1200
1200 (2)
1200
1200
8
8
8
4.5
4.5
2
5
4.5
8
2
4.5
8
2
8
8
1:55
4:00
3:55
2:55
1:35
1:25
3:10
1:00
0:20
0:30
2:20
1:20
0:10
0:55
-
-
-
-
-
-
-
-
-
-
-
-
-
-
-
-
-
-
-
-
-
-
-
-
-
-
-
-
-
-
-
-
-
-
-
-
-
-
-
-
-
-
-
-
-
-
-
-
-
-
-
-
-
-
-
-
-
-
-
-
-
-
-
-
-
-
-
-
-
-
-
-
-
-
-
-
-
-
-
-
-
-
-
-
-
-
-
- 40°C
40°C - 60°C
- 60°C
- 60°C
- 40°C
- 40°C
40°C - 60°C
- 40°C
- 90°C
-
- 30°C
- 60°C
- 40°C
-
-
**
2:00
2) 顯示屏將建議的旋轉速度顯示為默認值。

14
請根據衣物上的護理標籤選擇合適的洗衣程序,
標籤上會顯示建議的最高洗滌溫度。
混合洗
適用於洗滌由棉、麻、人造纖維及其混合織物製成的少量或一般
骯髒衣物。
節能棉質洗衣
適用於洗滌一般骯髒的棉質衣物。在60°C水溫下,此程序能達致
最佳耗水和耗電量,屬能源標籤的參考程序。
棉質
適用於洗滌一般至深層污垢的棉質衣物。
合成纖維
適用於洗滌一般骯髒的人造衣物纖維衣物,如滌綸、綸、黏膠
纖,以及混棉織物。
纖細衣物
適用於洗滌質料纖細的衣物。建議洗衣前先把衣物內部反出來,
及使用洗衣液進行洗滌,以達致最佳洗滌效果。
羊毛衣物:
本機的羊毛衣物程序,已獲得The Woolmark Company認可,可
洗滌衣物標籤上附有手洗標誌的羊毛纖維衣物。洗衣時應按衣物
標籤,以及「程序表」上所列之指示進行洗滌 (M1127)。
防敏感
適用於去除主要過敏源,如花粉、蟎、貓狗毛髮等。
除漬
適用於洗滌深層污垢的不易褪色衣物,並達致高於標準(A級)的洗
滌效果。建議使用此程序時,應該洗滌相同色系的衣物,並使用
洗衣粉進行洗滌,以達致最佳洗滌效果。如衣物上有頑固污垢,
建議預先使用除漬劑進行處理。
白色衣物
適用於洗滌一般至深層污垢的彈性棉或麻質布料毛巾、內衣褲、桌
布及床單等。當洗衣溫度為90°C時,可於主洗程序進行前加入預
洗。如需使用預洗功能,建議於預洗及主洗格內均需加入洗滌劑。
蒸氣護理
此程序會使用蒸氣清新衣物,去除異味並放鬆衣物纖維,令衣物
柔軟潔淨,便於熨燙。放入之衣物應為乾身衣物。於完成程序
後,衣物會略為潮濕,建議掛起風乾數分鐘後,便可穿上。
! 注意:不要加入洗滌劑及衣物柔順劑。
! 注意:此程序不適用於羊毛及絲質衣物。
快洗30分鐘
適用於快速清洗有少量污漬的衣物。可於30分鐘內清洗最多4.5公
斤的衣物,節省時間和能源。
床單
專門用於洗滌麻質床單,節省時間和能源。建議使用洗衣粉進行
洗滌,並加入衣物柔順劑,以達致最佳效果。
襯衫
專門用於洗滌不同顏色,由棉質、麻、合成纖維及混合纖維製成
的襯衫。
脫水及排水
進行脫水及排水程序。可關閉脫水程序以進行免旋排水。
過水及脫水
進行過水及脫水程序。適用於有彈性的衣物。
顯示屏上A部分會顯示所選程序時間,及其剩餘時間(於運行時)。
顯示屏會先顯示最長的程序時間,並會自動因應洗衣量及所選
設定等因素調節縮短。如已設定預校開機時間,此部分亦會倒
數顯示開機之時間。
按下相關按鍵調校脫水轉速/溫度,其數值亦會顯示於此部分(如
適用)。
B部分會顯示當前所選洗衣程序的各個洗衣階段,以及於運行時
正在運行至以下哪個階段:
C部分會顯示所選程序相應的選項(見「選項」部分)。
當「預校開機時間」指示燈 亮起時,所設定之時間將會顯示
於顯示屏上。
當「添加衣物」指示燈 亮起時,代表可於程序運行期間,暫
停程序並添放衣物於滾筒內(見「添加衣物」部分)。
當「靜音」指示燈 亮起時,代表「靜音」功能已經啟用,所有按
鍵音將會關閉(鬧鈴、完成提示音除外)。要啟用/關閉「靜音」
功能,按住 鍵。
故障提示燈
故障:聯絡售後服務中心
- 請參閱「故障排除」部分
故障:排水或脫水故障
- 排水過濾器阻塞
故障:洗衣機無法進水
- 自來水未有供應或供水不足
如本機出現任何故障,請參閱「故障排除」部分。
兒童安全鎖
用於鎖定控制面板,避免不必要的操作。這特別是針對洗衣機
附近的兒童。按下 直到顯示屏上的 指示燈亮起,控
制面板上的旋鈕和按鍵即被鎖定,只有「開/關」鍵 可如常運
作。要解開安全鎖,再次按下 鍵約3秒即可。
門鎖提示燈
當提示燈亮起時,表示門鎖功能已啟動,機門處於鎖閉狀態,
於熄滅後,方可打開機門,以免對機門做成損壞。如需在洗衣
程序中開啟機門,按下「啟動/暫停」鍵 ;當門鎖提示燈 熄
滅時,便可打開機門。
啟動洗衣程序
於完成洗衣機安裝後,在首次洗滌衣物之前,請在沒有衣物的情
況下,以60°C啟動程序9,運行一次本機。
暫停程序
要暫停正在運行的程序,按下「啟動/暫停」鍵 ,要從暫停點
重新啟動洗衣程序,再次按下「啟動/暫停」鍵 。
日常使用
請按照「提示及應用」部分中的建議準備衣物。
- 按下電源「開/關」鍵 ,「啟動/暫停」提示燈會慢慢閃爍。
- 打開機門,鬆散開衣物並放入滾筒中。注意投入衣物量不要超
出程序表中所列的最大建議洗衣量 (見「程序表」部分)。
- 拉出洗滌劑投放盒並加入洗衣劑(及添加劑/柔順劑)在相應的容
器隔間內,詳情請參閱「洗衣劑投放盒」部分。
- 關閉機門,關上後,應聽到喀噠一聲。
- 本機會自動顯示所選程序可能的最高溫度和脫水轉速,或最近
使用之設定(如適用)。
- 轉動「程序」旋鈕,以選擇所需程序。
- 按下相關按鍵,設定程序選項。
洗衣
過水
脫水+排水
洗衣程序
顯示屏
於設定程序及操作洗衣機時,顯示屏會提供以下所需資訊:
啟動週期
-
按下開始/暫停按鈕 。
機器將鎖定門( 符號已打開),並且硒鼓將開始旋轉;否則,硒鼓將
開始旋轉。在每個洗滌週期的準備階段,門將被解鎖( 符號關閉),
然後再次鎖定( 符號打開)。 “咔嗒”聲是門鎖機構的一部分。一旦
門鎖上,水將進入滾筒並開始洗滌階段。

15
CH
添加衣物
當指示燈亮起時,代表可於程序運行期間,以不影響潔淨效果的
情況下,添放衣物於滾筒內。要添放衣物,按下「啟動/暫停」
鍵 並於門鎖提示燈熄滅後,打開機門並放入衣物。完成後再
次按下「啟動/暫停」鍵 重新啟動洗衣程序。
清洗洗衣機內部
於運行約50次洗衣程序後,顯示屏上或會出現 提示燈,此時您
或需要運行程序,以清洗洗衣機滾筒,清除滾筒污垢及異味。如
要移除此提示燈,只需按下任何鍵或轉動旋鈕即可。建議使用洗
衣機專用護理產品,以達致最佳潔淨效果。進行清洗時,必須將
滾筒內所有衣物移走。
程序結束
程序完成時,顯示器上會顯示 字樣。當門鎖提示燈 熄滅
時,便可打開機門,取出機內衣物。最後按下電源「開/關」鍵
,以關閉洗衣機。如沒有按下電源「開/關」鍵,本機會於約15
分鐘後自動關閉。
變更正在運行的程序
要變更正在運行的程序,按下「啟動/暫停」鍵 以暫停洗衣機
運行,指示燈會慢慢以橙色閃爍;此時可變更所需設定,然後再
次按「啟動/暫停」鍵 繼續運行程序。
! 如需取消正在運行的程序,按下電源「開/關」鍵 直至洗衣機
停止運行並關閉。
- 如該選項不適用於目前的程序,其提示燈將會閃爍並發出錯誤
提示音,表示此選項不能被選擇。
- 如所選功能不能與早前已選之另一功能相容,早前已選的功能
提示燈將會閃爍並發出錯誤提示音;只有最新所選功能會被啟
用,而其提示燈亦會亮起。
請根據以下建議分類衣物:
衣料類型/衣物護理標籤(棉質、混合纖維、合成纖維、羊毛、手
洗衣物)。請確保白色和顏色衣物分開洗滌,簇新的顏色衣物亦需
分開清洗。
纖細衣物(清洗小件衣物,如尼龍絲襪;或有鉤扣的衣物,如胸
罩;請放網袋內進行洗滌)。
清空衣物口袋:
錢幣,別針等小物件會損毀洗衣機及滾筒。放入洗滌前檢查所有
衣物口袋和鈕釦。
關閉水電供應
每次使用洗衣機後,最好關閉進水管水龍頭,以免使本機水管接
頭承受不必要的壓力。
進行清潔和維修前,必須將電源插頭拔下,以確保安全。
清潔機身
如要清潔外殼及橡膠部件,請使用棉布、溫水和肥皂,請勿使用
溶劑或剝蝕性物質擦拭機身。
清洗洗滌劑投放盒
拉開並向上推出整個投放盒,把整個容格直接用水沖洗。投放盒
應經常清洗。
滾筒及機門保養
洗衣後,將機門半開,使滾筒內的水分慢慢揮發,以免洗衣機內
部產生異味。
清理排水過濾器
排水過濾器用於收集線頭和疏忽遺留在衣物中的小物件,請定期
打開過濾器檢查並進行清潔。
!重要提示:清理排水過濾器前,必須確認本機已經完成洗衣程
序,並已拔掉電源插頭。
清理阻塞的排水泵:
1. 使用螺絲批移除機身下方擋板。
2. 先在排水過濾器前方放置毛巾或盒子作吸水用。
3. 以逆時針方向擰開並抽出過濾器。打開時通常會有少量餘水
溢出。
4. 清洗過濾器:用水沖洗並除去濾網殘渣。
5. 將過濾器重新裝上並將其完全擰緊。
6. 將擋板放回。
檢查進水喉
應每年檢查進水喉一次,如有變脆或爆裂,應立刻更換。洗衣機
於運行時的高水壓,容易令有裂痕的水管爆開。
!注意:切勿使用舊有或曾用過的喉管。
進行任何清潔和維修前,必須將電源插頭拔下,請勿使用易燃液
體進行洗衣機清潔。
打開機門(如有需要)
洗衣程序運行時,門鎖提示燈 會亮起,代表機門處於鎖閉狀
態並不能被開啟。要於運行程序期間打開機門,按下「啟動/暫
停」 鍵,當門鎖提示燈 熄滅時,便可打開機門。完成及關
上機門後,再次按「啟動/暫停」鍵 以繼續運行程序。
選項
提示及應用
保養須知
抗菌門邊
本機機門門邊由特製物料製成,包括
吡
硫
鎓锌
成分,能有效抑制
有害微生物如細菌及霉菌繁殖;抗菌效果達99.99%(*)。 微生物的
形成會令筒內產生異味及污漬,並積聚滾筒做成損壞。
(*)根據意大利佩魯賈大學進行的測試:金黃色葡萄球菌,埃希氏
菌,銅綠假單胞菌,白色念珠菌,黑曲霉,青黴菌。在極少數情
況下,橡膠密封圈和皮膚之間長時間接觸可能引起過敏反應。
洗衣機配件
聯絡我們的售後服務中心,以確定以下配件是否適用於此洗衣
機。
搬運和處理
搬運時,切勿提拉洗衣機的頂板。
拔除電源插頭及關閉水龍頭。檢查並確定機門和洗滌劑投放盒均
已關好。先從水龍頭拆除進水管,然後拆除排水管,排出喉管內
的所有積水。於運輸過程中,確保妥善包裝好水管,避免做成任
何破損。最後重新安裝搬運螺栓以搬運本機。到達搬運目的地
後,重新按以上步驟安裝本機。
有關安裝或拆卸搬運螺栓的詳情,請參閱「安裝指南」頁面。
固定架
固定架可用於配疊乾衣機,使乾衣機放置於本機上方,靈活善用
空間。
蒸氣潔淨
此功能可加強潔淨效能,於過程中產生並注入蒸氣,殺滅衣物上
的細菌。選擇適合的洗衣程序,並選擇此功能。
! 於運行期間,機內產生的蒸氣或會令機門上有霧氣。
快速/節能
按下此功能鍵第一次,即可啟動「快速」選項,程序時間將會被
縮短。再按一下此功能鍵,即可啟動「節能」選項,以達致節省
能源的效果。
抗皺呵護
啟動此功能後,洗衣機將在程序結束後開始輕柔地翻滾筒內衣
物,最長達約6小時。您可以在任何時候按下任何鍵或轉動旋鈕停
止操作,並取出機內衣物。
ActiveCare活泡潔淨
此功能透過將洗衣劑及水預先混合,令其滲透至衣物纖維中,即
使以低水溫,亦能達致強效去漬的效果;同時保護衣物顏色及纖
維。同時配合不同的滾筒搖擺模式,加強除漬效能。
預校開機時間
要預校程序開始時間,持續按下「預校開機時間」鍵直至出現所
需之開始時間(可設定10分鐘-24小時之開機時間)。設定後顯示屏
上 提示燈便會亮起。如要取消此功能,請再次按下此鍵直至顯
示屏顯示“OFF”。
溫度
每項洗衣程序均會有預設溫度,按下「溫度」鍵以調校溫度,所
選溫度會顯示在顯示屏上。
脫水轉速
每項洗衣程序均會有預設脫水轉速,按下「脫水轉速」鍵以調校
溫轉速,所選轉速會顯示在顯示屏上。

16
機門未正確關閉。
未按下電源「開/關」 鍵 。
未按下「啟動/暫停」 鍵。
水龍頭未打開。
已設定預校開機時間。
示範模式已被啟用 (見下方「示範模式」部分以關閉此功能)。
進水管未連接到水龍頭。
進水管被壓扁或扭結。
水龍頭未打開。
自來水未有供應。
水壓過低。
未按下「啟動/暫停」 鍵。
排水管未正確安裝於離地面65至100厘米的位置。
排水管末端位置低於水面。
牆壁上的排水管通氣孔不足。
進行以上檢查後,如故障仍然存在,請關閉水龍頭及電源;並聯絡售後服務中
心。如居住較高樓層,操作時洗衣機或會出現虹吸現象,並持續入水和排水。
建議加配防回流閥以解決回流問題。
清理排水過濾器(見「保養須知」部分)。
排水喉管被壓扁或扭結。
排水管阻塞。
安裝時搬運用螺栓和包裝材料未被正確除下。
洗衣機機腳不平。
機器被夾於家具和牆壁之間,令其無法平衡擺放。
進水管未正確擰緊。
洗滌劑投放盒阻塞,需要清洗。
排水管未正確擰緊。
關閉電源並拔下電源插頭,約一分鐘後重開洗衣機。如果故障仍然存在,請聯
絡售後服務中心。
負荷平衡控制系統感應到滾筒內衣物未能均勻分佈,因而暫停脫水程序以保
護機件因高速旋轉所產生的震動而損壞。
如要重新啟動脫水程序,注意不要放入單一或數件過重衣物(如羽絨、被子等);
應放置不同大小的衣物,然後啟動「脫水及排水」程序。
洗衣劑不適用於洗衣機(參考洗衣劑的註明,檢查洗衣劑上的標籤是「適合機
洗」或「適合手洗」,或其他相關註解)。
過量的洗衣劑會造成太多泡沬。
洗衣機可能因為不同原因無法正常運作。聯絡售後服務中心之前,建議先自行進行檢查,看問題是否可以下列的簡易方
法解決。
故障
洗衣機無法啟動
洗衣程序無法啟動
洗衣機不停入水和排水,或水積
聚滾筒無法排出
您可以透過以下途徑下載產品規格單張及使用說明書:
脫水時機身震動過大
洗衣機/洗滌劑投放盒漏水
泡沫過多
可能成因/解決方法
插頭沒有正確插在插座內。
插座供電異常,或電源保險絲熔斷。
• 瀏覽 https://www.aristonchannel.hk/
• 您亦可以聯絡售後服務中心 (如保用證上所示) ,以查詢產品資訊。當致電我們時,
請提供洗衣機型號及機身號碼 (參閱機門內的銘牌)。
要關閉「示範模式」,按以下步驟操作:按下電源「開/關」鍵開啟洗衣機,再次按下此鍵關閉洗衣機,然後長按「啟動/
暫停」鍵直至發出提示音。最後再次開啟洗衣機,顯示屏上「示範模式」提示燈會熄滅,代表功能已被關閉。
xxxxxxxxxxxx
xxxx
顯示屏上 提示燈不斷閃爍,脫水
轉速顯示為0
顯示屏上提示燈不斷閃爍,及出現
錯誤代碼(如F1E1,F4等)
排水或脫水故障(顯示屏上出
現錯誤代碼F9E1及提示燈)
洗衣機無法進水
(顯示屏上出現提示燈)
故障排除

17
CH
1.
2.
3.
4. 5.
150 ml
100 ml
50 ml
10 毫米 - 0.39 吋
2 厘米 - 0.7吋
6.
7.
CH
安裝指南

18
10. 11.
12.
13.
14.
最高100 厘米
/
39 吋
最低 65 厘米
/
25
吋
9.8.
最高 0.5 厘米/
0.2 吋
最高100 厘米/39 吋
最低 65 厘米/25 吋
最高100 厘米/39 吋
最低 65 厘米/25 吋

19
CH
若將本機安裝在木或「夾層」地板 (嵌木或層壓材質)
上,請先在地板上放上一塊最少60 x 60 x 3厘米的膠合板,
然後再放置本機。
請依照本地安全標準正確連接進水管線。
請勿將只有冷水管線的機種連接熱水源。
連接熱水進水管之水溫不可超過60°C。
本機裝有可避免在運送時造成內部損壞的搬運螺栓。在
安裝完成及使用本機前,請先將搬運螺栓拆除,然後使用
提供的塑膠蓋,以密封螺絲釘孔。
安裝好本機後,請等待一段時間後始啟動使用,以令本
機適應房間的環境條件。
請不要讓本機底部的通風口被地毯或其他東西堵住。如
要將本機放在地毯上,請調整機腳,以便在本機下方留出
足夠的通風空間。
請使用跟機配備的全新喉管連接水源,切勿使用舊有或
曾用過的喉管。
供水壓力為0.1-1 Mpa。
電氣警告
本機的電源插座位置,應置於容易接觸到的地方,令本
機可以透過拔出插頭或關閉電箱中斷電源。
本機必須接上地線,及符合本地的電器安全標準法。
切勿以拖板或萬能插頭連接本機。在安裝後,使用者不
得接觸電線及電器組件。赤腳或手腳未乾時,不可觸碰本
機。若電線或插頭已損壞、無法正常運作,或曾掉落過,
均請不要繼續使用本機。
若電線損壞,請聯絡合資格的電器維修人員進行更換。
清潔和保養
警告:在進行任何清潔和保養工作前,必須將電源插
頭拔下,以確保安全;請勿使用蒸氣清潔設備,避免觸電
風險。
廢棄包裝材料
包裝材料均為100%可回收並帶有回收標誌 。
請將可循環再用的物料,放置適當的回收中心,以便循環
再用。
廢棄家用電器
本機以可回收或再利用之材料製成。請依照當地廢棄物處
理規定處置。如需取得進一步有關處理及回收本機之資
訊,請與您的家用廢棄物回收商及零售商聯繫。本機依照
有關廢棄電器和電子設備(WEEE)的歐盟標準2012/19/EU
標示。請確保以正確的方式廢棄本產品,避免因不當的廢
棄處理方式而對環境和人體健康造成潛在的負面影響。
本機標有 符號,表示此機不能作為一般家庭廢品處理,
該產品必須遵照本地的廢物處置法規進行棄置或回收。您
應將它交給回收電器和電子設備的適用收集點。
使用本機前,請仔細閱讀安全指引,並妥善保管本使用說
明書以便日後參考。在使用本機時,請務必遵守這些安全
指引。如因不正確使用或非本公司授權技術人員安裝而導
致的故障,不論是否處於保養期,本公司概不負責。
請讓幼童(0-3歲)遠離本機。除非得到持續監視,否則應
讓兒童(3-8歲)遠離本機。8歲以上之兒童,患有身體、感官
或精神障礙的人士,以及經驗知識不足的人士,需接受相
關安全指導或監督,方可操作本機。兒童不可胡亂玩弄本
機。未經指導,兒童不可進行本機的清潔及保養工作。請
勿強行開啟或踩踏機門。
使用
注意:本機不可搭配外接開關裝置如計時器或獨
立遙控系統使用。
本機僅可用於一般住宅及以下地點:商店、辦公室的員
工廚房區、飯店、旅館、民宿及其他居住環境。
投入衣物量不應超出程序表中所列的最大建議洗衣量(見
「程序表」頁面,衣物重量為乾衣狀態下的重量)。
本機並非供專業用途使用。請勿在戶外使用本機。
請勿使用任何溶劑(如松節油、苯)、含有溶劑之洗滌劑、
去污粉、玻璃用、一般用清潔劑或易燃性液體進行洗滌;
請勿以本機洗滌用易燃溶劑(如三氯 乙烯)清洗過的衣物。
安裝
若要搬動本機,必須找兩至三人一同小心搬動,切勿單
獨搬動。在開箱與安裝時請穿戴保護手套,避免割傷。
若要於本機上疊放乾衣機,請先與我們的售後服務中心或
零售商聯絡,確認是否可行。您必須使用專用的固定架才
能疊放乾衣機至本機上。
移動本機時請不要以握住頂部或上蓋的方式將其抬起。
所有供水裝置(如有)及電源連接等安裝或維修工作,均
須由合資格的技術人員進行。切勿自行維修或更換本機零
件。請讓兒童遠離安裝地點。卸下包裝後,請確保本機在
運輸過程中沒有損壞。如果已損壞,請與零售商聯繫,不
要繼續進行安裝。請將包裝材料(塑料袋、聚酯泡沫、釘子
等)置於兒童不能接觸的地方,以免發生意外。進行安裝
前,請勿連接電源,以避免觸電風險。在安裝過程中,請
確保電線沒有損壞,以避免起火或觸電風險。請在完成安
裝後,方啟動及使用本機。
請勿將本機安裝在可能暴露於以下極端條件的位置,
如:通風不良的地方,溫度低於5°C或高於35°C的環境。
將本機安裝在平坦堅固的地板上,若地板並非處於水平
狀態,通過左右旋轉調節機腳,使本機水平放置。可使用
水平儀檢查本機是否水平放置。
!重要請仔細閱讀和遵守下列安全指引
安全說明

20
聯絡售後服務中心前:
- 請先參閱「故障排除」頁面以嘗試解決問題。
- 重新啟動洗衣機,檢查洗衣機是否仍舊無法正
常運作。
若洗衣機仍舊無法正常運作:
請致電保用證上顯示的號碼,或按照以下網址上
的指引:
https://www.aristonchannel.hk/
當致電我們時,請提供以下資訊:
- 簡單的故障說明
- 洗衣機型號及機身號碼 (參閱機門內的銘牌)
- 您的完整地址和電話號碼
對於任何維修,使用我們授權的售後服務中
心,以確保適當的維修和使用原廠零配件。
洗衣機型號及機身號碼位置:
機身號碼
型號
工廠代碼
RNF8021HK
維修資訊
Ariston® Registered trademark
All rights reserved - https://www.aristonchannel.hk/
愛朗
®
註冊商標
版權所有 翻印必究 - https://www.aristonchannel.hk/
400011526070
-
 1
1
-
 2
2
-
 3
3
-
 4
4
-
 5
5
-
 6
6
-
 7
7
-
 8
8
-
 9
9
-
 10
10
-
 11
11
-
 12
12
-
 13
13
-
 14
14
-
 15
15
-
 16
16
-
 17
17
-
 18
18
-
 19
19
-
 20
20


Ariston RNF8021HK Daily Reference Guide
- カテゴリー
- 洗濯機
- タイプ
- Daily Reference Guide
他の言語で
- English: Ariston RNF8021HK
