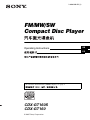
Sony CDX-GT160 は、車載用 CD プレーヤーです。CD、ラジオ、AUX 入力機器の音楽を再生することができます。ラジオは、FM/MW/SW の各バンドで、それぞれ最大 6 局までプリセットすることができます。また、音質を調整するためのイコライザー機能も搭載しています。さらに、時計機能や、一定時間操作を行わないと自動的に電源が切れるオートオフ機能も備えています。
この CD プレーヤーは、ドライブ中の音楽鑑賞に最適です。お気に入りの CD を再生したり、ラジオで好きな番組を聴いたり、AUX 入力機器に接続してスマートフォンや音楽プレーヤーの音楽を再生したりすることができます。また、イコライザー機能を使って音質を調整すれば、好みのサウンドで音楽を楽しむことができます。さらに、時計機能やオートオフ機能も搭載されているので、便利に使用することができます。


-
 1
1
-
 2
2
-
 3
3
-
 4
4
-
 5
5
-
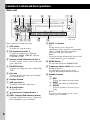 6
6
-
 7
7
-
 8
8
-
 9
9
-
 10
10
-
 11
11
-
 12
12
-
 13
13
-
 14
14
-
 15
15
-
 16
16
-
 17
17
-
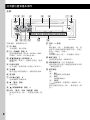 18
18
-
 19
19
-
 20
20
-
 21
21
-
 22
22
-
 23
23
-
 24
24
-
 25
25
-
 26
26
-
 27
27
-
 28
28


Sony CDX-GT160 は、車載用 CD プレーヤーです。CD、ラジオ、AUX 入力機器の音楽を再生することができます。ラジオは、FM/MW/SW の各バンドで、それぞれ最大 6 局までプリセットすることができます。また、音質を調整するためのイコライザー機能も搭載しています。さらに、時計機能や、一定時間操作を行わないと自動的に電源が切れるオートオフ機能も備えています。
この CD プレーヤーは、ドライブ中の音楽鑑賞に最適です。お気に入りの CD を再生したり、ラジオで好きな番組を聴いたり、AUX 入力機器に接続してスマートフォンや音楽プレーヤーの音楽を再生したりすることができます。また、イコライザー機能を使って音質を調整すれば、好みのサウンドで音楽を楽しむことができます。さらに、時計機能やオートオフ機能も搭載されているので、便利に使用することができます。
