
立即注册您的新博世产品:
www.bosch-home.cn
使用产品前请仔细阅读本使用说明书,并请妥善保管
zh 使用说明书
en Instruction manual
玻璃搅拌杯
MUZ9MX1

zh 简体中文 3
en English 8

3
zh 按照规程的使用
按照规程的使用
本附件为 MUM9 厨师机(“OptiMUM”系列)专用。请注意该厨师
机的使用说明书。
切勿将本附件用于其他机器。仅限使用相关零件。
本附件适于搅拌流体或半固体食品、切碎╱剁碎生水果和蔬菜、将食
材制成泥状及切碎冷冻食品(如水果)或冰块。
不得将本附件用于加工其他物体或物质。
安全须知
W 受伤危险!
■ 切勿将手伸到已安装好的搅拌杯中!切勿在未盖上盖子的情况下操
作搅拌杯。
■ 使用锋利的刀具、排空容器和清洁时请小心。
■ 只有在完全组装好的情况下才可使用附件!切勿在主机上组装附
件。只有在指定的工作位置上才可使用附件。只有安装在红色后驱
动器上才可使用附件。只有在驱动器完全停止运行,且已拔下电源
插头的情况下,才可安装或取下附件。
W 烫伤危险!
■ 加工高温配料时需格外小心。加工高温搅拌食物时,蒸汽会从盖子
上的进料口逸出。
■ 最多只能填充0.5升高温或起泡的液体。
■ 操作期间,请务必用手将盖子按住。请勿将手伸到进料口上方!
W 注意!
■ 切勿在无密封圈的情况下插入刀片组件。
■ 确保搅拌杯内没有任何异物。切勿在搅拌杯中使用物体(如刀具、
勺子)。
W 重要!
请于每次使用后或长时间未使用重新使用之前,务必彻底清洁本附件。
X“清洁和维护”参见第5页

4
zh
产品概览
原产地:
斯洛文尼亚
总经销商:
博西家用电器(中国)有限公司
南京市中山路129号中南国际大厦20、21楼
全国统一客户服务热线:
4008855888
客户服务电子邮箱:
公司网站:
www.bosch-home.cn
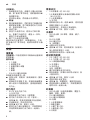
产品概览
请将图示页摊开。
搅拌杯附件
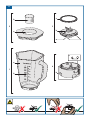
X 图 A
1 玻璃搅拌杯
a ThermoSafe耐温玻璃搅拌杯
b 刻度
2 盖子
a 进料口
b 帽塞╱量杯(含刻度)
3 刀片组件
a 刀片驱动器(红色)
b 搅拌刀
c 密封圈
d 扣位(4个)
4 刀架
a 标记L
b 刀架锁定装置(2个)
首次使用前
使用新附件之前,请先将包装完全拆开,清
洁并检查附件是否完好未损坏。
注意!
请勿运行损坏的附件!
■ 请从包装中取出所有附件零件,并除去
所有的包装材料。
■ 检查所有零件是否完整以及是否有明显
损坏现象。X图 A
■ 首次使用前,請先彻底清洁并晾干所有
零件。X“清洁和维护”参见第5页
色标
主机的驱动器上标有不同的颜色(黑
色、黄色及红色)。此色标同样也可
在附件零件上查看到。仅限将此附件用在红
色后驱动器上。
符号和标记
符号 含义
L
安装刀架:将符号G与搅拌
杯的把手对齐。
固定刀架:转动,直到符号0
与搅拌杯把手对齐为止。
玻璃搅拌杯
“ThermoSafe”耐温玻璃搅拌杯是由特殊的
硼硅酸盐玻璃制成,特别耐高温,因此,可
加工非常高温甚至煮沸的配料。
玻璃搅拌杯适用以下的加工量:
最大加工量
固体食物 最多100克
流体食物 最多1.5升
高温或起泡流体食物 最多0.5升

5
zh 准备工作
准备工作
W 受伤风险
– 切勿将手伸到搅拌刀片中。仅可握住刀
片组件的塑料部分。
– 只有在驱动器完全停止运行,且已拔下
电源插头的情况下,才可安装或取下附
件。
注意!
切勿在无密封圈的情况下插入刀片组件。
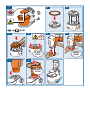
X 图 B
重要:请按照主要使用说明书所述准备主
机。本附件只能与正确插入的搅拌碗一同操
作。
1. 请将密封圈安装到刀片组件上。
2. 插入刀片组件时,请务必注意4个扣
位。扣位应两两相对,朝向标记0对
齐。
3. 斜握刀片组件将其放在刀架上。必要
时,以另一只手拖住底部。
4. 小心从上方按压刀架,直到听到卡入声
为止。
5. 将刀架安装到玻璃搅拌杯中。此时,标
记G应朝向把手对齐。
6. 转动刀架,直到标记0朝向把手对齐为
止。可听到刀架卡入固定的声音。
7. 将搅拌杯安装在红色后驱动器上,如图
所示。
8. 向下按压并按顺时针方向转到底。
使用
W 受伤风险
切勿将手伸到已安装好的搅拌杯中!切勿在
未盖上盖子的情况下操作搅拌杯。
W 烫伤危险
加工高温搅拌食物时,蒸汽会从盖子上的进
料口逸出。最多只能填充0.5升高温或起泡
的液体。
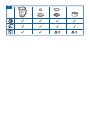
速度推荐
r
如需短时间搅拌应使用最高速。
1-3 用于混合无法切碎得很细的配料。
4-7 用于搅拌、打发及切碎。
z
不适合与本附件搭配使用!
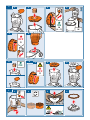
X 图 C
1. 请准备食材,并将其放入搅拌杯中。
2. 装上盖子和帽塞。
3. 将电源插头插上。将旋转开关调至推荐
的档位上。
4. 一旦搅拌达到所需的均匀度,即可关机。
5. 将旋转开关调至y。请等到驱动器完全
停止运行。拔出电源插头。
6. 将搅拌杯按逆时针方向旋转取出。
■ 所有零件在使用过后应立即清洁。
X“清洁和维护”参见第5页
续填配料
加工期间,还可续填其他配料。帽塞可当作
量杯(50毫升)使用。
X图 D
■ 机器运行时,可取下帽塞,并将其他配
料小心填充至盖子上的进料口中。
W 受伤危险!
不得将物体(如刀具、勺子)伸到盖子的进
料口中。切勿在机器运行时将盖子取下!
X 图 E
1. 如需添加大量食材或配料,请将旋转开
关调至y,并等到机器完全停止运行。
W 受伤危险!
请先检查驱动器是否完全停止运行,才可将
盖子取下。请勿在未盖上盖子的情况下开机!
2. 取下盖子。
3. 续填配料。
■ 装上盖子与帽塞。继续加工配料。
X“使用”参见第5页
清洁和维护
用过的附件零件在每次使用过后应彻底清
洁。
W 受伤风险
切勿将手伸到搅拌刀片中。仅可握住刀片组
件的塑料部分。
注意!
– 请勿使任何含酒精或苯的清洁剂。
– 不能使用尖锐、锋利或金属物体。
– 请勿使用摩擦型布或清洁剂。
– 请勿将刀架和刀片组件浸泡在水中。
– 请勿在洗碗机中将塑料零件夹住,因为
可能会变形!

6
zh
食谱
注意事项:
– 拆卸搅拌杯之前,请填充少量水和洗碗
精,按“使用”章节所述,将机器调至M
档短暂开机。
– 将洗涤水倒出,再用清水冲洗零件。
X 图 F
1. 握住玻璃搅拌杯。同时按压刀架槽边两
侧的锁定装置,将刀架按逆时针方向转
动,直到其松开为止。
2. 转动刀架。
3. 按压刀片组件中间,将其从刀架中取
出。放置刀片组件时,请垫上一块布,
避免刀片和台面受损。
4. 取下刀片组件的密封圈。
清洁并晾干所有零件,如图G所示。之后,
按“准备工作”章节所述,组装所有零件以备
存放。
食谱
蛋黄酱
注意事项:只能在搅拌杯中制备由全蛋製成
的蛋黄酱。
基本食谱
– 1个鸡蛋
– 1满茶匙芥末
– 1食匙柠檬汁或醋
– 1撮盐
– 1撮糖
– 200-250毫升食用油
所有配料的温度须一致。
■ 选择1档,将配料(食用油除外)搅拌
数秒钟。
■ 将旋转开关调至7档,将食用油缓慢地
倒入进料口内慢慢搅拌,直到蛋黄酱乳
化为止。
热巧克力
– 50-75克冰巧克力块
– ½升热牛奶
– 鲜奶油和巧克力碎片(视需要)
■ 将巧克力块切成小块(约1厘米),
选择r档,将其在搅拌器中完全搅碎。
■ 关闭搅拌杯,然后添加牛奶。
■ 选择r或7 档,搅拌1分钟。
■ 将热巧克力倒入玻璃杯中,并视需要将
其连同鲜奶油和巧克力碎片一起端上
桌。
香蕉冰沙
– 2-3根香蕉(约300克)
– 2-3满食匙香草冰淇淋或柠檬冰淇淋
(80-100克)
– 2小包香草糖末
– ½升牛奶
■ 将香蕉切成小块,选择r档,将其在搅
拌器中搅碎5-10秒钟。
■ 关闭搅拌杯,然后加入其余配料。
■ 选择r或7档,搅拌1分钟。
水果杯
– 250克水果(如草莓、香蕉、橘子、
苹果)
– 50-100克糖
– 500毫升冷水
– 冰(视需要)
■ 水果去皮并切成块。
■ 选择r或7档,将所有配料(冰除外)
加入搅拌杯搅拌1分钟。
■ 视需要将其连同冰一起端上桌。
运动员鸡尾酒
– 2-3个橘子(约600克)
– 1-2个柠檬(约150克)
– ½-1食匙糖或蜂蜜
– ¼升苹果汁
– ¼升矿泉水
– 冰块(视需要)
■ 橘子和柠檬去皮并切成块。
■ 将所有配料(苹果汁和矿泉水除外)加
入搅拌杯内。
■ 选择r或7档,搅拌1分钟
■ 添加苹果汁和矿泉水。
■ 选择r档,短暂搅拌,直到饮料起泡。
■ 将鸡尾酒放入玻璃杯中,并视需要将其
连同冰块一起端上桌。
红果羹
– 400克水果(去核的酸樱桃、覆盆子、
醋栗、草莓、黑莓)
– 100毫升酸樱桃汁
– 100毫升红葡萄酒
– 80克糖
– 1小包香草糖末
– 2食匙柠檬汁
– 1小撮丁香(粉)
– 1小撮肉桂(粉)
– 8片明胶

7
zh 故障排除
■ 将明胶放入冷水浸泡约10分钟。
■ 将所有配料(明胶除外)煮沸。
■ 挤压明胶,并放入微波炉微波融化,
不需烹煮。
■ 选择1档,将高温水果和明胶搅拌约1
分钟。
■ 将果羹倒入冷水冲洗过的小碗内并加以
冷藏。
提示:可搭配鲜奶油或香草酱品尝红果羹。
故障排除
故障:
附件无法放置并固定在红色驱动器上。
故障排除:
■ 将刀架置于搅拌杯内,并转到底固定。
把手必须朝向标记0精确地对齐。
故障:
倒出流体食材,将刀架从搅拌杯内取出。
故障排除:
■ 是否将密封圈安装在刀片组件上?
■ 请检查密封圈的安装位置是否正确
重要:若无法按上述步骤排除故障,请与客
户服务联系。
保留随时更改的权利。

8
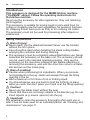
en Intended use
Intended use
This accessory is designed for the MUM9 kitchen machine
(“OptiMUM” series). Follow the operating instructions for
the kitchen machine.
Never use the accessory for other appliances. Only use matching
parts together.
This accessory is suitable for mixing liquid or semi-solid food, for
cutting or chopping raw fruit and vegetables, for puréeing food and
for chopping frozen food (such as fruit) or for crushing ice cubes.
The accessory must not be used for processing other objects or
substances.
Safety instructions
W Risk of injury!
■ Never reach into the attached blender! Never use the blender
without the lid in place.
■ Care should be taken when handling the sharp cutting blades,
emptying the container and during cleaning.
■ The accessory must be completely assembled before use. Never
assemble the accessory on the base unit. The accessory should
only be used in the intended operating position. Only use the
accessory on the rear drive marked in red. Before attaching or
removing the accessory, wait until the drive has come to a stand-
still and pull out the mains plug.
W Risk of scalding!
■ Caution when processing hot ingredients. When you process
hot ingredients in the jug, steam will escape through the filling
opening in the lid.
■ Add a maximum of 0.5 litres of hot or frothing liquid.
■ You should always use one hand to hold the lid firmly in place
while you work, but don’t place your hand over the filling opening!
W Caution!
■ Never use the blade insert without the seal.
■ Check that there are no foreign objects in the blender jug. Do not
insert objects (e.g. knives, spoons) into the jug.
W Important!
It is essential to clean the accessory thoroughly after each use or
after it has not been used for an extended period. X “Cleaning and
maintenance” see page 11

9
en
Overview
Country of origin:
Slovenia
Exclusive distributor:
BSH Home Appliances (China) Co., Ltd.
20/F,21/F, CN International Mansion,
129 Zhongshan Road, Nanjing,
Jiangsu Province, PRC.
Careline:
4008855888
Service E-mail:
Company website:
www.bosch-home.com
Overview
Please fold out the illustrated pages.
Blender attachment
X Fig. A
1 Glass blender jug
a Container made of ThermoSafe glass
b Scale
2 Lid
a Filling opening
b Locking cap / measuring jug
with scale
3 Blade insert
a Blade drive (red)
b Blender knife
c Seal
d Positioning lugs (4)
4 Blade holder
a Marking L
b Locking for blade holder (2)
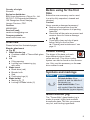
Before using for the first
time
Before the new accessory can be used,
it must be fully unpacked, cleaned and
checked.
Caution!
Never operate a damaged accessory!
■ Remove all accessories from the
packaging and dispose of all packing
materials.
■ Check that all the parts are present and
examine them for obvious damage.
X Fig. A
■ Thoroughly clean and dry all parts
before using for the first time.
X “Cleaning and maintenance” see
page 11
Colour coding
The drives of the base unit each
have different colours (black,
yellow and red). This colour coding
system can also be found on the accesso-
ries. Only use this accessory on the rear
drive marked in red.
Symbols and markings
Symbol Meaning
L
Fit blade holder: Align
symbol G and the handle of
the blender jug.
Lock blade holder: Turn
until symbol 0 and the handle
of the blender jug are aligned.
Glass blender jug
The “ThermoSafe” glass blender jug is
made of special, highly heat-resistant
borosilicate glass. This lets you process
very hot, even boiling ingredients.

10
en Preparation
The glass blender jug is suitable for
processing the following quantities:
Maximum processing quantities
Solid food max. 100 g
Liquids max. 1.5 l
Hot or frothing liquids max. 0.5 l
Preparation
W Risk of injury
– Do not reach into the knife. Grip the
blade insert by the plastic only.
– Before attaching or removing the
accessory, wait until the drive has come
to a standstill and pull out the mains
plug.
Caution!
Never use the blade insert without the seal.
X Image sequence B
Important: Only prepare the base unit as
described in the main operating instruc-
tions. The accessory can only be operated
if the bowl is fitted properly.
1. Fit the seal to the blade insert.
2. When fitting the blade insert, always
observe the position of the 4 lugs. Align
the 2 opposite lugs to the markings 0.
3. Hold the blade insert at an angle when
inserting in the blade holder. Possibly
support it underneath with the other
hand.
4. Press down carefully until you hear the
blade holder lock into place.
5. Position the blade holder on the glass
blender jug. When doing so, align the
marking G to the handle.
6. Turn the blade holder until the marking
0 on the handle is aligned. You will hear
the blade holder lock into place so it is
fixed in position.
7. Position the blender as shown on the
rear red drive.
8. Press down and rotate in a clockwise
direction as far as possible.
Use
W Risk of injury
Never reach into the attached blender!
Never use the blender without the lid in
place.
W Risk of scalding
When you process hot ingredients in the
jug, steam will escape through the filling
opening in the lid. Add a maximum of
0.5 litres of hot or frothing liquid.
Recommended speeds
r
For blending briefly at maximum
speed.
1-3
For blending ingredients that do
not need to be cut up too small.
4-7
For blending, frothing and chop-
ping up.
z
Not suitable for use with this
accessory.
X Image sequence C
1. Prepare your food and add to the
blender jug.
2. Put the lid and locking cap in place.
3. Plug the mains plug into the mains. Turn
the rotary switch to the recommended
setting.
4. Leave switched on until the required
consistency is achieved.
5. Turn the rotary switch to y. Wait
until the drive comes to a standstill.
Disconnect the mains plug.
6. Rotate the blender in an anticlockwise
direction and remove.
■ Clean all parts directly after use.
X “Cleaning and maintenance” see
page 11
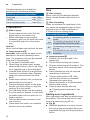
Adding more ingredients
More ingredients can also be added during
processing. The locking cap can be used
here as a measuring jug (50 ml).
X Fig. D
■ While the appliance is running, remove
the locking cap and carefully add more
ingredients through the filling opening in
the lid.

11
en
Cleaning and maintenance
W Risk of injury!
Do not insert any objects (e.g. knives,
spoons) in the filling opening in the lid.
Never remove the lid while the appliance is
running!
X Image sequence E
1. To add large quantities or ingredients,
turn the rotary switch to y and wait for
the machine to stop.
W Risk of injury!
Before removing the lid, check the drive
has come to a standstill. Never switch on
without the lid!
2. Remove the lid.
3. Add the extra ingredients.
■ Put the lid with the locking cap back
in place. Continue processing your
ingredients. X “Use” see page 10
Cleaning and maintenance
The attachments and accessories used
must be thoroughly cleaned after each use.
W Risk of injury
Do not reach into the knife. Grip the blade
insert by the plastic only.
Caution!
– Do not use any cleaning agents
containing alcohol or spirits.
– Do not use any sharp, pointed or metal
objects.
– Do not use abrasive cloths or cleaning
agents.
– Do not leave the blade holder or blade
insert in water.
– Do not wedge plastic parts in the
dishwasher as they could become
permanently deformed.
Notes:
– Before dismantling the blender jug,
fill with a little water and detergent,
proceed as described under Use and
switch on briefly at setting M.
– Pour out the water and rinse the parts
with clean water.
X Image sequence F
1. Hold the glass blender jug. On the blade
holder press together the two locks on
the ridged side and rotate the blade
holder anticlockwise until it releases.
2. Turn the blade holder over.
3. Force out the blade insert from the middle
of the holder. Place a cloth underneath to
avoid damaging the knife or worktop.
4. Remove the seal from the blade insert.
Clean all parts as shown in Fig. G and
allow to dry. Then re-assemble all parts as
described under Preparation before putting
away.
Recipes
Mayonnaise
Note: In the blender mayonnaise can only
be prepared with whole eggs.
Basic recipe
– 1 egg
– 1 heaped tsp mustard
– 1 tbsp vinegar or lemon juice
– 1 pinch salt
– 1 pinch sugar
– 200-250 ml oiI
Ingredients must be at the same
temperature.
■ Mix ingredients (except oil) for several
seconds at setting 1.
■ Turn the rotary selector to setting 7 and
slowly pour the oil through the filling
opening. Blend until the mayonnaise
emulsifies.
Hot chocolate
– 50-75 g frozen cooking chocolate
– ½ l hot milk
– Whipped cream and grated chocolate as
required
■ Cut the cooking chocolate into pieces
(approx. 1 cm) and chop up completely
in the blender at setting r.
■ Switch off the blender and add the milk.
■ Blend for 1 minute at setting r or 7.
■ Pour the hot chocolate into glasses and
serve with whipped cream and grated
chocolate as required.

12
en Troubleshooting
Banana ice shake
– 2-3 bananas (approx. 300 g)
– 2–3 heaped tbsp vanilla or lemon ice
cream (80-100 g)
– 2 sachets vanilla sugar
– ½ l milk
■ Cut the bananas into pieces and chop
up for 5–10 seconds at setting r.
■ Switch off the blender and add the rest
of the ingredients.
■ Blend for 1 minute at setting r or 7.
Fruit sundae
– 250 g fruit (e.g. strawberries, bananas,
oranges, apples)
– 50-100 g sugar
– 500 ml cold water
– Ice cream as required
■ Peel the fruit and cut into pieces.
■ Put all ingredients (except the ice) into
the blender and blend for 1 minute at
setting r or 7.
■ Serve with the ice cream if wished.
Sporty cocktail
– 2-3 oranges (approx. 600 g)
– 1-2 lemons (approx. 150 g)
– ½-1 tbsp sugar or honey
– ¼ l apple juice
– ¼ l mineral water
– Ice cubes as required
■ Peel the oranges and lemons and cut
into pieces.
■ Put all ingredients (except the apple
juice and mineral water) in the blender
jug.
■ Blend for 1 minute at setting r or 7.
■ Add the apple juice and mineral water
■ Blend briefly at setting r until the drink
is frothy.
■ Pour the cocktail into glasses and serve
as required with ice cubes.
Red fruit pudding
– 400 g fruit (pitted sour cherries, rasp-
berries, black/red currants, strawberries,
blackberries)
– 100 ml sour cherry juice
– 100 ml red wine
– 80 g sugar
– 1 sachet vanilla sugar
– 2 tbsp lemon juice
– 1 generous pinch cloves (ground)
– 1 pinch of cinnamon (ground)
– 8 sheets gelatine
■ Soak the gelatine in cold water for
approx. 10 minutes.
■ Bring all the ingredients (except the
gelatine) to the boil.
■ Squeeze out the gelatine and melt in
the microwave, but do not cook.
■ Blend the hot fruit and gelatine at setting
1 for approx. 1 minute.
■ Pour the red fruit pudding into small
bowls rinsed out with cold water and
chill.
Tip: Red fruit pudding tastes good with
whipped cream or vanilla sauce.
Troubleshooting
Fault:
It is not possible to fit and secure the
attachment to the red drive.
Remedy:
■ Place the blade holder on the container
and secure by rotating as far as
possible. The handle must be exactly
aligned with the marking 0.
Fault:
Liquid is leaking from the blender at the
blade holder.
Remedy:
■ Is the seal fitted to the blade insert?
■ Check the seal is fitted properly.
Important: If a fault cannot be eliminated,
please contact customer service.
Subject to change without notice.


Robert Bosch Hausgeräte GmbH
Carl-Wery-Straße 34
81739 München, GERMANY
www.bosch-home.com
8001074294
*8001074294*
970711

4
3
b
1
2
b
a d
a
a
b
b
c
a
A

MUM9
咔嚓声!
click!
咔嚓声!
click!
咔嚓声!
click!
B
1
3 4 5 6
7 8
2

M
ON
M
(1...7)
OFF
y
ON
OFF
y
F
D E
C
6
1 2
31 42
31 2
3
5
4

G
-
 1
1
-
 2
2
-
 3
3
-
 4
4
-
 5
5
-
 6
6
-
 7
7
-
 8
8
-
 9
9
-
 10
10
-
 11
11
-
 12
12
-
 13
13
-
 14
14
-
 15
15
-
 16
16
-
 17
17
-
 18
18


他の言語で
- English: Bosch MUMPC54S12/01 User manual