
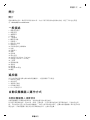
FC8796, FC8794,
FC8792


R
L
L
R
2
3
4
20
25
10
5
6
7 8
9
19
24
21
1
17
18
15
16
14
12 13
11
1


English
Introduction
Introduction
Congratulations on your purchase and welcome to Philips! To fully benefit from the support that
Philips offers, register your product at www.philips.com/welcome.
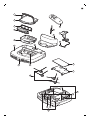
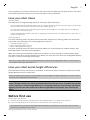
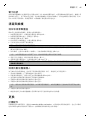
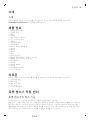
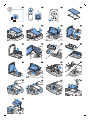
General description
1 Handle of dust container lid
2 Dust container lid
3 Filter unit
4 Dust container
5 Edge of top cover
6 Docking station sensor
7 Suction opening
8 Start/stop button
9 Side brushes
10 Shafts for mounting the side brushes
11 Front wheel
12 Suction opening
13 Side wheels
14 Sensors
15 Cover of the battery compartment
16 Mopping attachment (FC8796, FC8794)
17 Mopping pad (FC8796, FC8794)
18 Small plug
19 Adapter
20 Cleaning brush
21 Remote control
22 AA batteries for remote control
23 Docking station
Remote control
You can operate the robot with the remote control (Fig. 2). It has the following buttons:
1 Start/stop button
2 Navigation buttons
3 Cleaning mode buttons
4 Docking button
5 24-hour scheduler
How your robot works
What your robot cleans
This robot is equipped with features that make it a suitable cleaner to help you clean the floors in
your home.
The robot is especially suitable for cleaning hard floors, such as wooden, tiled or linoleum floors. It
may experience problems cleaning soft floors, such as carpet or rugs. If you use the robot on a carpet
6
English

or rug, please stay close by the first time to see if the robot can deal with this type of floor. The robot
also needs supervision when you use it on very dark or shiny hard floors.
How your robot cleans
Cleaning system
The robot has a 3-stage cleaning system to clean your floors efficiently.
-
The two side brushes help the robot clean in corners and along walls. They also help to remove dirt
from the floor and move it towards the suction opening (Fig. 3).
-
The suction power of the robot picks up loose dirt and transports it through the suction opening
into the dust container (Fig. 4).
-
Types FC8796 and FC8794 come with a mopping attachment that can be attached to the robot to
mop your hard floor.
Cleaning patterns
In its auto cleaning mode, the robot uses an automatic sequence of cleaning patterns to clean each
area of the room optimally. The cleaning patterns it uses are:
1 Random pattern (Fig. 5)
2 Wall-following pattern (Fig. 6)
3 Spot-cleaning pattern (Fig. 7)
In its auto cleaning mode, the robot uses these patterns in a fixed sequence: random pattern, wall-
following pattern, and spot-cleaning pattern.
When the robot has completed this sequence of patterns, it starts moving in random pattern again.
The robot continues to use this sequence of patterns to clean the room until the rechargeable battery
runs low, or until it is switched off manually.
Note: You can also select each mode individually by pressing the appropriate button on the remote
control (see 'Cleaning mode selection').
How your robot avoids height differences
The robot has five drop-off sensors in its bottom. It uses these drop-off sensors to detect and avoid
height differences such as staircases.
Note: It is normal for the robot to move slightly over the edge of a height difference, as its front drop-
off sensor is located behind the bumper.
Caution: In some cases, the drop-off sensors may not detect a staircase or other height difference
in time. Therefore monitor the robot carefully the first few times you use it, and when you operate
it near a staircase or another height difference. It is important that you clean the drop-off sensors
regularly to ensure the robot continues to detect height differences properly (see 'Cleaning the
robot').
Before first use
Mounting the side brushes
1 Unpack the side brushes and place the robot upside down on a table or on the floor.
2 Push the side brushes onto the shafts on the bottom of the robot (Fig. 8).
Note: Make sure you attach the side brushes properly. Press them onto the shaft until you hear
them lock into position with a click.
Placing the batteries in the remote control
7
English

The remote control works on two AA batteries.
1 Push the tab (1) to unlock the battery compartment lid (2) and remove the battery compartment lid
(Fig. 9).
2 Insert two AA batteries (Fig. 10).
Note: Make sure the + and - poles point in the right direction.
3 To reattach the battery compartment lid, first insert the lug into the opening in the rim of the
compartment (1) and then push down the lid (2) until it locks with a click (Fig. 11). Now the remote
control is ready for use.
Preparing for use
Installing the docking station
1 Insert the small plug of the adapter into the socket on the docking station (1) and insert the adapter
into the wall socket (2) (Fig. 12).
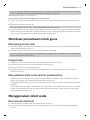
2 Place the docking station on a horizontal, level floor against a wall.
Note: Make sure that there are no obstacles or height differences 150 cm in front, 30 cm to the right
and 100 cm to the left of the docking station (Fig. 13).
Charging
1 Place the robot on the plugged-in docking station (Fig. 14).
2 Press the start/stop button to activate the robot (Fig. 15).
3 The start/stop button starts flashing (Fig. 16).
4 When the rechargeable battery is fully charged, the start/stop button lights up continuously (Fig.
17).
Preparing the room for a cleaning run
-
Before you start the robot on its cleaning run, make sure that you remove all loose and fragile
objects from the floor (Fig. 18).
-
Remove all cables, wires and cords from the floor to prevent the robot from getting entangled in
them.
-
If there is a rug with tassels in the room you want the robot to clean, fold the tassels under the rug
to prevent the robot from getting stuck on the tassels and to prevent the rug from getting damaged
(Fig. 19).
Using your robot
Starting and stopping
1 Press the start/stop button on the remote control (Fig. 20).
2 The start/stop button on the robot lights up continuously and the robot starts cleaning (Fig. 21).
3 The robot cleans in auto-cleaning mode until its battery runs low. In auto cleaning mode, it follows
repeated sequences of random, wall-following and spiral movements.
4 When the battery runs low, the start/stop button starts flashing quickly and the robot starts
searching for the docking station to charge (Fig. 22).
8
English

5 You can also press the start/stop button to interrupt or stop the cleaning run. If you press the
start/stop button again and there is still enough energy in the rechargeable battery, the robot
continues cleaning in the auto cleaning mode.
6 To make the robot return to the docking station before the rechargeable battery runs low, press the
docking button on the remote control (Fig. 23).
7 The start/stop button starts flashing and the robot returns to the docking station.
Note: If you did not start the robot from the docking station, it does not return to the docking
station automatically when the rechargeable battery runs low. If there is still enough energy in the
rechargeable battery, you can press the docking button on the remote control to make the robot
return to the docking station. If the rechargeable battery is completely empty, you have to place
the robot on the docking station manually.
Cleaning mode selection
This robot has three individual cleaning modes that can each be activated by pressing the
appropriate button on the remote control.
Random mode
In this mode, the robot cleans the room in a mixed pattern of straight and crisscross movements (Fig.
24).
Wall-following mode
In this mode, the robot follows the walls of the room to give the area alongside the walls an extra
clean (Fig. 25).
Spot-cleaning mode
In this mode, the robot moves randomly on a small area to clean this area thoroughly (Fig. 26).
Note: The manually selected modes are only active for a couple of minutes. After that, the robot
switches to auto-cleaning mode.
Manual driving
You can drive the robot manually with buttons on the remote control.
1 Use the arrow buttons above and below and to the left and right of the start/stop button on the
remote control to navigate the robot through the room. (Fig. 27)
Note: Be careful when you drive the robot manually close to height differences and staircases.
Note: The vacuuming function and the side brushes only work when the robot is driven forward.
The left, right or back buttons are only for maneuvering the robot.
Using the 24-hour scheduler
The 24-hour scheduler can be activated with the remote control. Make sure the robot is in standby
mode and is not positioned on the docking station.
1 Press the 24-hour scheduler button (Fig. 28) on the remote control to activate the 24-hour
scheduler.
-
When you activate the 24-hour scheduler, the display starts to flash briefly every few seconds.
-
The robot will start a cleaning run 24 hours after you activated the 24-hour scheduler. It will
continue to start a cleaning run at the same time every 24 hours until you deactivate the
24-hour scheduler.
2 To deactivate the 24-hour scheduler, press the 24-hour scheduler button. The display will light up
continuously to show the robot is in standby mode and the 24-hour scheduler is no longer active.
9
English

Mopping with the robot
Types FC8796 and FC8794 come with a mopping attachment and a mopping pad for wet cleaning of
hard floors.
Attaching the mopping pad
1 Soak the mopping pad in water or wet the mopping pad under the tap. You can add a few drops of
a readily available floor cleaner that is suitable for your floor.
2 Squeeze the mopping pad thoroughly to ensure it is only damp instead of wet.
3 Attach the damp mopping pad to the mopping attachment by pushing the Velcro fasteners of the
mopping pad onto Velcro fasteners of the mopping attachment (Fig. 29).
4 Insert the attachment lugs of the mopping attachment into the two attachment holes located just
behind the wheels. Then press down until you hear a click (Fig. 30).
Cleaning floors with the mopping attachment
Note: To clean hard floors with the mopping attachment, you have to start the robot from a point in
the room you wish to clean. You cannot start the robot from its docking station with the mopping pad
attached.
1 Just press the start/stop button on the remote control to start the robot.
-
The robot continues mopping until its battery runs low and the robot stops.
Note: Detach the mopping pad and the mopping attachment before you send the robot to the
docking station with the docking button on the remote control or before you place the robot on the
docking station manually.
Detaching the mopping attachment
1 To detach the mopping attachment, press the tab (1) and pull up the mopping attachment to
remove it (2) (Fig. 31).
2 Pull the mopping pad off the mopping attachment.
3 To clean the mopping pad, wash it in the washing machine on a gentle cycle at a temperature of
60°C max.
Alarm signal
If the robot gets into trouble while cleaning (e.g., because a wheel jams or is no longer in contact with
the floor, or because a sensor can no longer detect the floor), you will hear a sound and the robot
stops. Press the start/stop button to switch the robot to standby mode and solve the problem that
causes the alarm signal, for instance by removing the obstacle that blocks the wheel, cleaning the
sensors, or picking up the robot and putting it down in a different place.
Cleaning and maintenance
Emptying and cleaning the dust container
Empty and clean the dust container when the start/stop button starts flashing.
1 Pull up the handle of the dust container lid and lift the dust container out of the dust container
compartment (Fig. 32).
2 Pull the tab on the side of the dust container to open the lid (Fig. 33).
3 Remove the filter unit from the dust container (Fig. 34).
4 Shake the dust container over a dustbin to empty it (Fig. 35).
10
English

5 You can clean the dust container under a lukewarm tap.
Caution: Do not clean the dust container in the dishwasher.
6 To clean the filters thoroughly, take the filter unit apart by pressing the tabs located on both sides
of the filter unit and taking the dust filter off the EPA filter. Then clean the EPA filter with the
cleaning brush supplied (Fig. 36).
7 Reassemble the filter unit, snap the EPA filter into the dust filter. Then place the filter unit back into
the dust container (Fig. 37).
Note: If you cleaned the dust container under the tap, please make sure it is dry before you reinsert
the filter unit.
8 Put the lid on the dust container and make sure it locks into place with a click (Fig. 38).
9 Put the dust container back into the dust container compartment and fold down the dust container
handle (Fig. 39).
Caution: Always make sure the filter unit is present inside the dust container. If you use the
robot without the filter unit inside the dust container, the motor will be damaged.
Cleaning the robot
To maintain good cleaning performance, you have to clean the drop-off sensors, the wheels, the side
brushes and the suction opening from time to time.
1 Place the robot upside down on a flat surface.
2 To clean the side brushes, grab them by the bristles and pull them off their shafts (Fig. 40).
3 Clean the side brushes and the shafts of the side brushes with the cleaning brush supplied.
4 Remove dust or fluff from the front wheel and side wheels with the cleaning brush supplied.
5 Remove dust or fluff from the dust or fluff from the drop-off sensors with the cleaning brush
supplied.
Note: It is important that you clean the drop-off sensors regularly. If the drop-off sensors are dirty,
the robot may fail to detect height differences or staircases.
6 Use the cleaning brush supplied to clean the suction opening.
7 Check the side brushes and the bottom of the robot for any sharp objects that could damage your
floor.
Replacement
Ordering accessories
To buy accessories or spare parts, visit www.shop.philips.com/service or go to your Philips dealer.
You can also contact the Philips Consumer Care Center in your country (see the international
warranty leaflet for contact details).
Replacing the filter
Replace the EPA filter if it is very dirty or damaged (see 'Emptying and cleaning the dust container').
To obtain a new EPA filter, go to www.philips.com/support.
Replacing the side brushes
Replace the side brushes after some time to ensure proper cleaning results.
11
English

Note: Always replace the side brushes when you notice signs of wear or damage. We also recommend
that you replace both side brushes at the same time. To obtain new side brushes, go to
www.philips.com/support.
1 To replace the side brushes, grab the old side brushes by the bristles and pull them off their shafts.
2 Push the new side brushes onto the shafts.
Replacing the rechargeable battery
The rechargeable battery of the robot may only be replaced by qualified service engineers. Take the
robot to an authorized Philips service center to have the battery replaced when you can no longer
recharge it or when it runs out of power quickly. You can find the contact details of the Philips
Consumer Care Center in your country in the international warranty leaflet.
Replacing the batteries of the remote control
1 Push the tab (1) to unlock the battery compartment lid (2) and remove the battery compartment lid
(Fig. 9).
2 Remove the empty AA batteries from the battery compartment.
3 Insert two new AA batteries (Fig. 10).
Note: Make sure the + and - poles point in the right direction.
4 To reattach the battery compartment lid, first insert the lug into the opening in the rim of the
compartment (1) and then push down the lid (2) until it locks with a click (Fig. 11). Now the remote
control is ready for use.
Note: Dispose of empty disposable batteries according to the local rules in your country.
Removing the rechargeable battery
Warning: Only remove the rechargeable battery when you discard the appliance. Make
sure the battery is completely empty when you remove it.
To remove the rechargeable battery, follow the instructions below. You can also take the robot to a
Philips service center to have the rechargeable battery removed. Contact the Philips Consumer Care
Center in your country for the address of a service center near you.
1 Let the robot run until the rechargeable battery is empty to make sure that the rechargeable
battery is completely discharged before you remove it and dispose of it.
2 Undo the screws of the battery compartment lid and remove the lid (Fig. 45).
3 Lift out the rechargeable battery and disconnect it (Fig. 46).
4 Take the robot and the rechargeable battery to a collection point for electrical and electronic
waste.
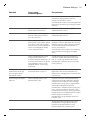
Troubleshooting
This chapter summarizes the most common problems you could encounter with the appliance. If you
are unable to solve the problem with the information below, visit www.philips.com/support for a list
of frequently asked questions or contact the Consumer Care Center in your country.
12
English

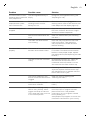
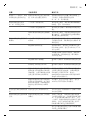
Problem Possible cause Solution
The robot does not start
cleaning when I press the
start/stop button.
The rechargeable battery is
empty.
Charge the rechargeable battery (see
'Preparing for use').
The robot does not
respond when I press
one of the buttons.
The robot could not find the
docking station and the
battery ran out.
Place the robot on the plugged-in
docking station. After a few seconds, the
robot beeps and the display lights up.
The robot beeped and
stopped.
One or both wheels are stuck. Press the start/stop button. Remove the
fluff, hair, thread or wire that is caught
around the wheel suspension.
One or both side brushes are
stuck.
Clean the side brushes (see 'Cleaning
the robot').
The robot was lifted while it
was cleaning.
Press the start/stop button. Place the
robot on the floor. Then press the
start/stop button to make the robot
resume cleaning.
The robot does not clean
properly.
The bristles of one or both side
brushes are crooked or bent.
Soak the brush or brushes in warm water
for a while. If this does not restore the
bristles to their proper shape, replace
the side brushes (see 'Replacing the side
brushes').
The filter in the dust container
is dirty.
Disassemble the filter unit. Clean the
dust filer and the EPA filter with a
toothbrush with soft bristles. You can
also rinse the dust filter under a tap.
If cleaning the EPA filter does not help
anymore, replace the filter with a new
one. We advise you to replace the EPA
filter at least once a year.
The suction opening in the
bottom of the dust container is
clogged.
Clean the suction opening (see
'Cleaning the robot').
The front wheel is jammed
with hair or other dirt.
Clean the front wheel (see 'Cleaning the
robot').
The robot is cleaning a very
dark or shiny surface, which
triggers the drop-off sensors.
This causes the robot to move
in an unusual pattern.
Press the start/stop button and then
move the robot to a lighter colored
piece of the floor. If the problem
continues to occur on lighter colored
floors, please go to
www.philips.com/support or contact the
Consumer Care Center in your country.
13
English

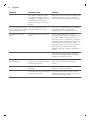
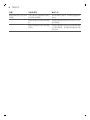
Problem Possible cause Solution
The robot is cleaning a floor
that reflects sunlight quite
strongly. This triggers the drop-
off sensors and causes the
robot to move in an unusual
pattern.
Close the curtains to block sunlight from
entering the room. You can also start
cleaning when the sunlight is less bright.
The rechargeable battery
can no longer be charged
or runs empty very fast.
The rechargeable battery has
reached the end of its life.
Have the rechargeable battery replaced
by a Philips service center (see
'Replacing the rechargeable battery').
The robot is moving in
circles.
The robot is in spot-cleaning
mode.
This is normal behavior. The spot-
cleaning mode can be activated when a
lot of dirt is detected on the floor for a
thorough clean. It is also part of the auto
cleaning mode. After approximately one
minute the robot resumes its normal
cleaning pattern. You can also stop the
spot-cleaning mode by selecting a
different cleaning mode on the remote
control.
You can also stop the spot-cleaning
mode by selecting a different cleaning
mode on the remote control.
The robot cannot find the
docking station.
There is not enough room for
the robot to navigate towards
the docking station.
Try to find another place for the docking
station (see 'Installing the docking
station').
The robot is still actively
searching.
Give the robot around 20 minutes to
return to the docking station.
The robot was not started from
the docking station.
If you want the robot to return to the
docking station after a cleaning run, start
it from the docking station.
14
English

Bahasa Melayu
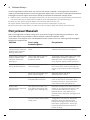
Pengenalan
Pengenalan
Tahniah atas pembelian anda dan selamat menggunakan Philips! Untuk memanfaatkan sepenuhnya
sokongan yang ditawarkan oleh Philips, daftar produk anda di www.philips.com/welcome.
Perihalan umum
1 Pemegang penutup bekas habuk
2 Tudung bekas habuk
3 Unit penuras
4 Bekas habuk
5 Hujung penutup atas
6 Sensor stesen dok
7 Bukaan sedutan
8 Butang mula/henti
9 Berus tepi
10 Batang untuk memasang berus tepi
11 Roda depan
12 Bukaan sedutan
13 Roda tepi
14 Sensor
15 Penutup petak bateri
16 Alat tambahan mengelap (FC8796, FC8794)
17 Pad mengelap (FC8796, FC8794)
18 Plag kecil
19 Penyesuai
20 Berus pembersih
21 Unit kawalan jauh
22 Bateri AA untuk unit kawalan jauh
23 Stesen dok
Unit kawalan jauh
Anda boleh mengendalikan robot dengan unit kawalan jauh (Raj. 2). Ia mempunyai butang yang
berikut:
1 Butang mula/henti
2 Butang navigasi
3 Butang mod pembersihan
4 Butang dok
5 Penjadual 24 jam
Bagaimana robot anda berfungsi
Apa yang dibersihkan oleh robot anda
Robot ini dilengkapi dengan ciri-ciri yang membuatnya pembersih yang sesuai untuk membantu
anda membersihkan lantai di rumah anda.
Robot ini paling sesuai untuk membersihkan lantai keras, seperti lantai kayu, berjubin atau linoleum.
Robot mungkin mengalami masalah membersihkan lantai lembut, seperti karpet atau ambal. Jika
15
Bahasa Melayu

anda menggunakan robot di atas karpet atau ambal, harap berada dekat dengannya pada kali
pertama untuk melihat sama ada robot itu boleh menangani lantai jenis ini. Robot juga memerlukan
penyeliaan apabila anda menggunakannya di atas lantai keras yang sangat gelap atau berkilat.
Bagaimana robot anda membersihkan kawasan
Sistem pembersihan
Robot mempunyai sistem pembersihan 3 tahap untuk membersihkan lantai anda dengan cekap.
-
Dua berus tepi membantu robot membersihkan sudut dan sepanjang dinding. Berus itu juga
membantu untuk mengeluarkan habuk daripada lantai dan menggerakkannya ke arah bukaan
sedutan (Raj. 3).
-
Kuasa sedutan robot mengutip habuk yang bertebaran dan mengangkutnya melalui bukaan
sedutan ke dalam bekas habuk (Raj. 4).
-
Jenis FC8796 dan FC8794 disediakan dengan alat tambahan mengelap yang boleh disambungkan
ke robot untuk mengelap lantai keras anda.
Corak pembersihan
Dalam mod auto-pembersihan, robot menggunakan urutan automatik corak pembersihan untuk
membersihkan setiap kawalan bilik secara optimum. Corak pembersihan yang digunakannya ialah:
1 Corak rambang (Raj. 5)
2 Corak mengikut dinding (Raj. 6)
3 Corak pembersihan rapi (Raj. 7)
Dalam mod auto pembersihan, robot menggunakan corak ini dalam urutan yang tetap: corak
rambang, corak mengikut dinding dan corak pembersihan rapi.
Apabila robot telah melengkapkan urutan corak ini, ia mula bergerak dalam corak rambang semula.
Robot terus menggunakan urutan corak ini untuk membersihkan bilik sehingga bateri boleh cas
semula kurang kuasa atau sehingga ia dimatikan secara manual.
Catatan: Anda juga boleh memilih setiap mod secara individu dengan menekan butang yang sesuai
pada unit kawalan jauh (lihat bahagian 'Pemilihan mod pembersihan' untuk butiran lanjut).
Bagaimana robot anda mengelak perbezaan ketinggian
Robot mempunyai lima sensor jatuh di bawahnya. Robot menggunakan sensor jatuh ini untuk
mengesan dan mengelakkan perbezaan ketinggian seperti anak tangga.
Catatan: Memang lumrah untuk robot bergerak lebih sedikit dari hujung perbezaan ketinggian kerana
sensor jatuh depannya terletak di belakang bampar.
Awas: Dalam sesetengah kes, sensor jatuh mungkin tidak dapat mengesan tangga atau perbezaan
ketinggian lain tepat pada masanya. Oleh itu awasi robot dengan teliti pada beberapa kali
pertama anda menggunakannya dan apabila anda menggunakannya berhampiran anak tangga
atau perbezaan ketinggian lain. Penting untuk anda membersihkan sensor jatuhnya secara tetap
bagi memastikan robot terus dapat mengesan perbezaan ketinggian dengan betul (lihat
'Membersihkan robot').
Sebelum penggunaan pertama
Memasang berus tepi
1 Buka berus tepi daripada bungkusannya dan terbalikkan robot di atas meja atau lantai.
2 Tolak berus tepi ke aci di bawah robot (Raj. 8).
16
Bahasa Melayu

Catatan: Pastikan anda menyambungkan berus tepi dengan sempurna. Tekannya ke aci sehingga
anda mendengarnya terkancing ke kedudukannya dengan bunyi klik.
Meletakkan bateri dalam unit kawalan jauh
Unit kawalan jauh berfungsi menggunakan dua bateri AA.
1 Tolak tab (1) untuk membuka penutup petak bateri (2) dan tanggalkan penutup petak bateri (Raj.
9).
2 Masukkan dua bateri AA (Raj. 10).
Catatan: Pastikan kutub + dan - bateri menghala ke arah yang betul.
3 Untuk memasang semula penutup petak bateri, masukkan dahulu cuping ke dalam bukaan dalam
bingkai petak (1) dan kemudian tolak ke bawah penutup (2) sehingga ia terkunci dengan bunyi klik
(Raj. 11). Kini unit kawalan jauh sudah bersedia untuk digunakan.
Membuat persediaan untuk guna
Memasang stesen dok
1 Masukkan palam kecil penyesuai ke dalam soket pada stesen dok (1) dan masukkan penyesuai ke
dalam soket dinding (2) (Raj. 12).
2 Letakkan stesen dok di atas lantai rata dan mendatar ke dinding.
Catatan: Pastikan tiada halangan atau perbezaan ketinggian 150 cm di depan, 30 cm ke kanan dan
100 cm ke kiri stesen dok (Raj. 13).
Pengecasan
1 Tempatkan robot pada stesen dok yang dipasangkan palamnya (Raj. 14).
2 Tekan butang mula/henti untuk mengaktifkan robot (Raj. 15).
3 Butang mula/henti mula berkelip (Raj. 16).
4 Apabila bateri boleh cas semula telah dicas sepenuhnya, butang mula/henti menyala secara
berterusan (Raj. 17).
Menyediakan bilik untuk aktiviti pembersihan
-
Sebelum anda memulakan robot bagi aktiviti pembersihan, pastikan anda mengetepikan semua
objek yang longgar dan mudah pecah daripada lantai (Raj. 18).
-
Tanggalkan semua kabel, wayar dan kord daripada lantai untuk mencegah robot daripada terbelit
padanya.
-
Jika terdapat ambal dengan rambu dalam bilik yang anda mahu dibersihkan oleh robot, masukkan
rambu ke bawah ambal untuk mencegah robot daripada tersangkut pada rambu dan mencegah
ambal daripada rosak (Raj. 19).
Menggunakan robot anda
Bermula dan berhenti
1 Tekan butang mula/henti pada unit kawalan jauh (Raj. 20).
2 Butang mula/henti pada robot menyala secara berterusan dan robot memulakan pembersihan
(Raj. 21).
17
Bahasa Melayu

3 Robot membersihkan kawasan dalam mod auto-pembersihan sehingga baterinya kurang kuasa.
Dalam mod auto-pembersihan, robot mengikuti urutan berulang secara rambang, mengikuti
dinding dan gerakan pilin.
4 Apabila kuasa bateri berkurangan, butang mula/henti mula berkelip dengan pantas dan robot mula
mencari stesen dok untuk mengecas (Raj. 22).
5 Anda juga boleh menekan butang mula/henti untuk mengganggu atau menghentikan aktiviti
pembersihan. Jika anda menekan butang mula/henti sekali lagi dan masih mempunyai tenaga
yang mencukupi dalam bateri boleh cas semula, robot akan terus membersihkan dalam mod auto-
pembersihan.
6 Untuk membuat robot kembali ke stesen dok sebelum bateri boleh cas semula kurang kuasa, tekan
butang dok pada unit kawalan jauh (Raj. 23).
7 Butang mula/henti mula berkelip dan robot kembali ke stesen dok.
Catatan: Jika anda tidak memulakan robot dari stesen dok, ia tidak akan kembali ke stesen dok
secara automatik apabila bateri boleh cas semula kurang kuasa. Jika tenaga masih mencukupi
dalam bateri boleh cas semula, anda boleh menekan butang dok pada unit kawalan jauh untuk
membuat robot kembali ke stesen dok. Jika bateri boleh cas semula sudah kosong sepenuhnya,
anda perlu meletakkan robot di stesen dok secara manual.
Pemilihan mod pembersihan
Robot ini mempunyai tiga mod pembersihan individu yang setiap daripadanya boleh diaktifkan
dengan menekan butang yang sesuai pada unit kawalan jauh.
Mod rambang
Dalam mod ini, robot membersihkan bilik dalam corak campuran pergerakan lurus dan silang-
menyilang (Raj. 24).
Mod mengikut dinding
Dalam mod ini, robot mengikuti dinding bilik untuk memberi kawasan sepanjang dinding
pembersihan tambahan (Raj. 25).
Mod pembersihan rapi
Dalam mod ini, robot bergerak secara rambang di kawasan yang kecil untuk membersihkan kawasan
ini dengan rapi (Raj. 26).
Catatan: Mod yang dipilih secara manual hanya aktif untuk beberapa minit. Selepas itu, robot bertukar
kepada mod auto-pembersihan.
Pemanduan manual
Anda boleh memandu robot secara manual dengan butang pada unit kawalan jauh.
1 Gunakan butang anak panah atas dan bawah serta kiri dan kanan butang mula/henti pada unit
kawalan jauh untuk mengemudi robot dalam bilik. (Raj. 27)
Catatan: Berhati-hati apabila anda memandu robot rapat dengan perbezaan ketinggian dan anak
tangga.
Catatan: Fungsi vakum dan berus tepi hanya berfungsi apabila robot dipandu ke hadapan. Butang
kiri, kanan atau belakang hanya untuk mengemudi robot tersebut.
Menggunakan penjadual 24 jam
Penjadual 24 jam boleh diaktifkan dengan unit kawalan jauh. Pastikan robot berada dalam mod
sedia dan tidak diletakkan pada stesen dok.
18
Bahasa Melayu

1 Tekan butang penjadual 24 jam pada unit (Raj. 28) kawalan jauh untuk mengaktifkan penjadual 24
jam.
-
Apabila anda mengaktifkan penjadual 24 jam, paparan mula berkelip sekejap setiap beberapa
saat.
-
Robot akan mula menjalankan pembersihan 24 jam selepas anda mengaktifkan penjadual 24
jam. Ia akan terus memulakan pembersihan pada masa yang sama setiap 24 jam sehingga anda
menyahaktifkan penjadual 24 jam.
2 Untuk menyahaktifkan penjadual 24 jam, tekan butang penjadual 24 jam. Paparan akan menyala
secara berterusan untuk menunjukkan robot berada dalam mod sedia dan penjadual 24 jam tidak
lagi aktif.
Mengelap dengan robot
Jenis FC8796 dan FC8794 disediakan dengan alat tambahan mengelap dan pad mengelap untuk
pembersihan basah lantai keras.
Menyambungkan pad mengelap
1 Rendamkan pad mengelap dalam air atau basahkan pad mengelap di bawah air paip. Anda boleh
menambah beberapa titisan pembersih lantai yang tersedia dan sesuai untuk lantai anda.
2 Perah pad mengelap dengan rapi untuk memastikan ia hanya lembap dan bukan basah.
3 Sambungkan pad mengelap yang lembap itu pada alat tambahan mengelap dengan menolak
kancing Velcro pad mengelap ke kancing Velcro alat tambahan mengelap (Raj. 29).
4 Masukkan cuping sambungan alat tambahan mengelap ke dalam dua lubang sambungan yang
terletak di belakang roda. Kemudian tekan ke bawah sehingga anda mendengar bunyi klik (Raj.
30).
Membersihkan lantai dengan alat tambahan mengelap.
Catatan: Untuk membersihkan lantai keras dengan alat tambahan mengelap, anda perlu memulakan
robot dari titik dalam bilik yang anda ingin bersihkan. Anda tidak boleh memulakan robot dari stesen
doknya dengan pad mengelap disambungkan.
1 Hanya tekan butang mula/henti pada unit kawalan jauh untuk memulakan robot.
-
Robot terus mengelap sehingga baterinya kurang kuasa dan robot berhenti.
Catatan: Tanggalkan pad mengelap dan alat tambahan mengelap sebelum anda menghantar robot
ke stesen dok dengan menggunakan butang dok pada unit kawalan jauh atau sebelum anda
meletakkan robot di stesen dok secara manual.
Menanggalkan alat tambahan mengelap.
1 Untuk menanggalkan alat sambungan mengelap, tekan tab (1) dan tarik alat sambungan mengelap
untuk menanggalkannya (2) (Raj. 31).
2 Tarik pad mengelap daripada alat sambungan mengelap.
3 Untuk membersihkan pad mengelap, cucinya dalam mesin basuh pada kitaran lembut pada suhu
60°C maksimum.
Bunyi amaran
Jika robot menghadapi masalah semasa membersihkan (contoh kerana roda tersangkut atau tidak
lagi mencecah lantai atau kerana sensor tidak boleh mengesan lagi lantai), anda akan mendengar
bunyi dan robot akan berhenti. Tekan butang mula/henti untuk menukar robot kepada mod sedia
dan selesaikan masalah yang menyebabkan bunyi amaran itu, sebagai contoh dengan
19
Bahasa Melayu

mengeluarkan halangan yang menghalang roda, membersihkan sensor atau mengangkat robot dan
meletakkannya di tempat lain.
Pembersihan dan penyelenggaraan
Mengosongkan dan membersihkan bekas habuk
Kosongkan dan bersihkan bekas habuk apabila butang mula/henti mula berkelip.
1 Tarik pemegang penutup bekas habuk dan angkat keluar bekas habuk itu daripada petak bekas
habuk (Raj. 32).
2 Tarik tab di tepi bekas habuk untuk membuka penutup (Raj. 33).
3 Keluarkan unit turas daripada bekas habuk (Raj. 34).
4 Goncang bekas habuk di atas tong sampah untuk mengosongkannya (Raj. 35).
5 Anda boleh membersihkan bekas habuk di bawah air paip suam.
Awas: Jangan bersihkan bekas habuk dalam mesin basuh pinggan.
6 Untuk membersihkan penuras dengan rapi, tanggalkan unit penuras dengan menekan tab yang
terletak di kedua-dua belah unit penuras dan mengeluarkan penuras habuk daripada penuras
EPA. Kemudian bersihkan penuras EPA dengan berus pembersih yang dibekalkan (Raj. 36).
7 Pasang semula unit penuras, masukkan penuras EPA ke dalam penuras habuk. Kemudian letakkan
semula unit turas ke dalam bekas habuk (Raj. 37).
Catatan: Jika anda membersihkan bekas habuk di bawah air paip, pastikan ia kering sebelum
dimasukkan semula ke dalam unit penuras.
8 Letakkan penutup pada bekas habuk itu dan pastikan ia terkunci di tempatnya dengan bunyi klik
(Raj. 38).
9 Letakkan bekas habuk semula ke dalam petak bekas habuk dan lipatkan pemegang bekas habuk
(Raj. 39).
Awas: Sentiasa pastikan ada unit penuras dalam bekas habuk. Jika anda menggunakan robot
tanpa unit penuras dalam bekas habuk, motor akan rosak.
Membersihkan robot
Untuk mengekalkan prestasi pembersihan yang baik, anda perlu membersihkan sensor jatuh, roda,
berus tepi dan bukaan sedutan dari semasa ke semasa.
1 Letakkan robot terbalik di atas permukaan yang rata.
2 Untuk membersihkan berus tepi, genggam bulu kejurnya dan keluarkannya daripada acinya (Raj.
40).
3 Bersihkan berus tepi dan batang berus tepi dengan berus pembersih yang dibekalkan.
4 Tanggalkan habuk atau bulu-bulu daripada roda hadapan dan roda tepi dengan berus pembersih
yang dibekalkan.
5 Tanggalkan habuk atau bulu-bulu daripada sensor jatuh dengan berus pembersih yang
dibekalkan.
Catatan: Penting untuk anda bersihkan sensor jatuh secara tetap. Jika sensor jatuh kotor, robot
mungkin tidak dapat mengesan perbezaan ketinggian atau anak tangga.
6 Gunakan berus pembersih yang dibekalkan untuk membersihkan bukaan sedutan.
7 Periksa berus tepi dan bawah robot untuk sebarang objek tajam yang boleh merosakkan lantai
anda.
20
Bahasa Melayu
ページが読み込まれています...
ページが読み込まれています...
ページが読み込まれています...
ページが読み込まれています...
ページが読み込まれています...
ページが読み込まれています...
ページが読み込まれています...
ページが読み込まれています...
ページが読み込まれています...
ページが読み込まれています...
ページが読み込まれています...
ページが読み込まれています...
ページが読み込まれています...
ページが読み込まれています...
ページが読み込まれています...
ページが読み込まれています...
ページが読み込まれています...
ページが読み込まれています...
ページが読み込まれています...
ページが読み込まれています...
ページが読み込まれています...
ページが読み込まれています...
ページが読み込まれています...
ページが読み込まれています...
ページが読み込まれています...
ページが読み込まれています...
ページが読み込まれています...
ページが読み込まれています...
ページが読み込まれています...
ページが読み込まれています...
ページが読み込まれています...
ページが読み込まれています...
ページが読み込まれています...
ページが読み込まれています...
ページが読み込まれています...
ページが読み込まれています...
ページが読み込まれています...
ページが読み込まれています...
ページが読み込まれています...
ページが読み込まれています...
ページが読み込まれています...
ページが読み込まれています...
-
 1
1
-
 2
2
-
 3
3
-
 4
4
-
 5
5
-
 6
6
-
 7
7
-
 8
8
-
 9
9
-
 10
10
-
 11
11
-
 12
12
-
 13
13
-
 14
14
-
 15
15
-
 16
16
-
 17
17
-
 18
18
-
 19
19
-
 20
20
-
 21
21
-
 22
22
-
 23
23
-
 24
24
-
 25
25
-
 26
26
-
 27
27
-
 28
28
-
 29
29
-
 30
30
-
 31
31
-
 32
32
-
 33
33
-
 34
34
-
 35
35
-
 36
36
-
 37
37
-
 38
38
-
 39
39
-
 40
40
-
 41
41
-
 42
42
-
 43
43
-
 44
44
-
 45
45
-
 46
46
-
 47
47
-
 48
48
-
 49
49
-
 50
50
-
 51
51
-
 52
52
-
 53
53
-
 54
54
-
 55
55
-
 56
56
-
 57
57
-
 58
58
-
 59
59
-
 60
60
-
 61
61
-
 62
62


