
FC6132
FC6130
Question?
有疑问?
Contact Philips
请联系飞利浦


1


6
Introduction
Congratulations on your purchase and welcome to Philips! To benet fully
from the support that Philips offers, register your product at
www.philips.com/welcome.
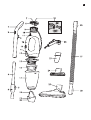
General description (Fig. 1)
1 Upper stick part with handle (FC6132)
2 On/off slide on stick (FC6132)
3 Cord winding hook (FC6132)
4 Lower stick part (FC6132)
5 Cord winding hook (FC6132)
6 Stick release button (FC6132)
7 Clean Air HEPA lter cover
8 Exhaust air openings
9 Clean Air HEPA lter
10 Mains cord
11 Shoulder strap attachment points
12 Handle
13 On/off slide on vacuum cleaner
14 Dust compartment release button
15 Inner lter
16 Outer lter
17 Dust compartment
18 Internal air inlet unit
19 Nosepiece release button
20 Detachable nosepiece
21 Attachment point for stick (FC6132)
22 Shoulder strap + clasps (FC6130)
23 Crevice tool
24 Brush tool
25 Floor nozzle (FC6132)
26 Appliance end of hose (FC6130)
27 Hose (FC6130)
28 Attachment end of hose (FC6130)
ENGLISH

Important
Read this user manual carefully before you use the appliance and save it
for future reference.
Danger
- Never immerse the appliance in water or any other liquid, nor rinse it
under the tap.
- Never vacuum up water or any other liquid, ammable substances or
hot ashes.
Warning
- Check if the voltage indicated on the appliance corresponds to the
local mains voltage before you connect the appliance.
- Do not use the appliance if the plug, the mains cord or other parts
are damaged.
- If the mains cord is damaged, you must have it replaced by Philips,
a service centre authorised by Philips or similarly qualied persons in
order to avoid a hazard.
- This appliance is not intended for use by persons (including children)
with reduced physical, sensory or mental capabilities, or lack of
experience and knowledge, unless they have been given supervision
or instruction concerning use of the appliance by a person
responsible for their safety.
- Care must be taken to ensure that children do not play with
the appliance.
- Keep the appliance and its cord out of the reach of children.
- The plug must be removed from the socket-outlet before you clean
or maintain the appliance.
Caution
- Always switch off the appliance after use.
- Never block the exhaust air openings during vacuuming.
- Always use the vacuum cleaner with the lter unit, the dust
compartment and the Clean Air HEPA lter assembled.
- Always switch off the appliance before you connect or disconnect
accessories.
ENGLISH 7

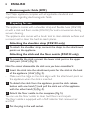
Electromagnetic elds (EMF)
This Philips appliance complies with all applicable standards and
regulations regarding electromagnetic elds.
Preparing for use
The appliance comes with a shoulder strap and exible hose (FC6130)
or with a stick and oor nozzle (FC6132) for extra convenience during
vacuum cleaning.
The appliance also comes with a brush tool to clean delicate surfaces and
a crevice tool to clean the hard-to-reach places.
Attaching the shoulder strap (FC6130 only)
1 To attach the shoulder strap, connect the clasps to the attachment
points on the appliance.
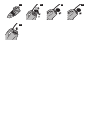
Attaching the stick and the oor nozzle (FC6132 only)
1 To assemble the stick, connect the lower stick part to the upper
stick part (‘click’) (Fig. 2).
Note: You cannot disassemble the stick once you have assembled it.
2 Insert the stick into the attachment point for the stick at the back
of the appliance (‘click’) (Fig. 3).
- Make sure the ridge on the stick aligns with the attachment point on
the appliance when the stick is inserted.
3 To detach the stick from the appliance, press the stick release
button with one hand (1) and pull the stick out of the appliance
with the other hand (2) (Fig. 4).
4 Attachtheoornozzletothenosepiece(Fig.5).
You can use the oor nozzle to clean hard oors and carpets.
The oor nozzle is equipped with a uff collector that removes hair
and uff.
5 Put the plug in the wall socket.
ENGLISH8

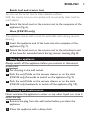
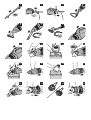
Brush tool and crevice tool
You can use the brush tool to clean delicate surfaces.
With the crevice tool, you can quickly and conveniently clean hard-to-
reach places.
1 Attach the brush tool or the crevice tool to the nosepiece of the
appliance (Fig. 6).
Hose (FC6130 only)
This appliance comes with a hose for extended reach during vacuum
cleaning.
1 Insert the appliance end of the hose into the nosepiece of the
appliance (Fig. 7).
2 Attach the brush tool or the crevice tool to the attachment end
of the hose for extended reach during vacuum cleaning (Fig. 8).
Using the appliance
Always switch off the appliance before you connect or disconnect
accessories.
1 Put the plug in the wall socket.
2 Push the on/off slide on the vacuum cleaner or on the stick
(FC6132 only) forwards to switch on the appliance (Fig. 9).
3 Push the on/off slide on the vacuum cleaner or on the stick
(FC6132 only) backwards to switch off the appliance (Fig. 10).
Cleaning and maintenance
Never immerse the appliance in water or any other liquid, nor rinse it
under the tap.
1 Remove the plug from the wall socket before you clean the
appliance.
2 Clean the appliance with a damp cloth.
ENGLISH 9

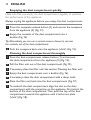
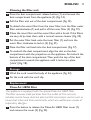
Emptying the dust compartment quickly
Make sure that you empty the dust compartment regularly to optimise
the performance of the appliance.
Always unplug the appliance before you empty the dust compartment.
1 Press the nosepiece release button (1) and remove the nosepiece
from the appliance (2) (Fig. 11).
2 Empty the contents of the dust compartment into a
dustbin (Fig. 12).
Tip: Alternatively, you can use a normal vacuum cleaner to vacuum
the contents out of the dust compartment.
3 Push the nosepiece back onto the appliance (‘click’) (Fig. 13).
Cleaning the dust compartment thoroughly
1 Press the dust compartment release button (1) and remove
the dust compartment from the appliance (2) (Fig. 14).
2 Pullthelterunitoutofthedustcompartment(Fig.15).
3 Ifnecessary,cleanthelterunit.Seesection‘Cleaningthelterunit’.
4 Empty the dust compartment over a dustbin (Fig. 16).
5 If necessary, clean the dust compartment with a damp cloth.
6 Placethelterunitbackintothedustcompartment(Fig.17).
7 To reattach the dust compartment, align the slot on the dust
compartment with the projection on the appliance. First attach the
bottom of the dust compartment. Then push the top of the dust
compartment towards the appliance until it locks into place
(‘click’) (Fig. 18).
ENGLISH10

Cleaning the lter unit
1 Press the dust compartment release button (1) and remove the
dust compartment from the appliance (2) (Fig. 14).
2 Pullthelterunitoutofthedustcompartment(Fig.15).
3 Todetachtheouterlterfromtheinnerlter,turnthelterouter
lteranticlockwise(1)andpullitofftheinnerlter(2)(Fig.19).
4 Cleantheinnerlterandtheouterlterwithabrush.Ifthelters
are very dirty, clean them with a normal vacuum cleaner (Fig. 20).
5 Puttheouterlterbackontotheinnerlter(1)andturnthe
outerlterclockwisetolockit(2)(Fig.21).
6 Placethelterunitbackintothedustcompartment(Fig.17).
7 To reattach the dust compartment, align the slot on the dust
compartment with the projection on the appliance. First attach the
bottom of the dust compartment. Then push the top of the dust
compartment towards the appliance until it locks into place
(‘click’) (Fig. 18).
Storage
1 Wind the cord round the body of the appliance (Fig. 22).
2 Fix the cord with the cord clip.
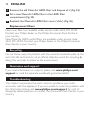
Replacement
Clean Air HEPA lter
The appliance is equipped with the special Clean Air HEPA lter.
This lter removes small particles from the outlet air. This not only
includes normal house dust, but also harmful microscopic vermin such as
house dust mites and their excrements, which are well-known causes of
respiratory allergies.
1 PressthebuttontoreleasetheCleanAirHEPAltercover(1)
and remove the cover (2) (Fig. 23).
ENGLISH 11

2 RemovetheoldCleanAirHEPAlteranddisposeofit(Fig.24).
3 PutanewCleanAirHEPAlterintheHEPAlter
compartment (Fig. 25).
4 ReattachtheCleanAirHEPAltercover(‘click’)(Fig.26).
Replacement lters
New inner lters are available under service code: 4222 459 45354.
Contact your Philips dealer or the Philips Consumer Care Centre in
your country.
New Clean Air HEPA outlet lters are available under service code:
4222 459 45355. Contact your Philips dealer or the Philips Consumer
Care Centre in your country.
Recycling
Do not throw away the product with the normal household waste at the
end of its life, but hand it in at an ofcial collection point for recycling. By
doing this, you help to preserve the environment.
Guarantee and support
If you need information or support, please visit www.philips.com/
support or read the separate worldwide guarantee leaet.
Troubleshooting
This chapter summarises the most common problems you could
encounter with the appliance. If you are unable to solve the problem with
the information below, visit www.philips.com/support for a list of
frequently asked questions or contact the Consumer Care Centre in your
country.
ENGLISH12

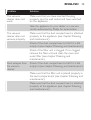
Problem Solution
The vacuum
cleaner does not
work.
Make sure that you have inserted the plug
properly into the wall socket and have switched
on the appliance.
Take the appliance to your dealer or a service
centre authorised by Philips for examination.
The vacuum
cleaner does not
vacuum properly.
Make sure that the dust compartment is attached
properly to the appliance (see chapter ‘Cleaning
and maintenance’).
Check if the dust compartment is full. If it is full,
empty it (see chapter ‘Cleaning and maintenance’).
Check if the lter unit is clogged. If it is clogged,
remove the lter unit and clean the inner and
outer lter (see chapter ‘Cleaning and
maintenance’).
Dust escapes from
the vacuum
cleaner.
Check if the dust compartment is full. If it is full,
empty it (see chapter ‘Cleaning and maintenance’).
Make sure that the lter unit is placed properly in
the dust compartment (see chapter ‘Cleaning and
maintenance’).
Make sure that the dust compartment is attached
properly to the appliance (see chapter ‘Cleaning
and maintenance’).
ENGLISH 13

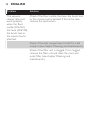
Problem Solution
The vacuum
cleaner does not
work properly
when the oor
nozzle (FC6132),
the hose (FC6130),
the brush tool or
the crevice tool is
attached.
Check if the oor nozzle, the hose, the brush tool
or the crevice tool is blocked. If this is the case,
remove the obstruction.
Check if the dust compartment is full. If it is full,
empty it (see chapter ‘Cleaning and maintenance’).
Check if the lter unit is clogged. If it is clogged,
remove the lter unit and clean the inner and
outer lter (see chapter ‘Cleaning and
maintenance’).
ENGLISH14

15
简介
感谢您的惠顾,欢迎光临飞利浦!为了您能充分享受飞利浦提供
的支持,请在 www.philips.com/welcome 上注册您的产品。
基本说明 (图 1)
1 带握把的把杆上半部分 (FC6132)
2 把杆上的开关滑钮 (FC6132)
3 绕线挂钩 (FC6132)
4 把杆下半部分 (FC6132)
5 绕线挂钩 (FC6132)
6 把杆拆卸按钮 (FC6132)
7 超洁空气 HEPA 滤网罩
8 排气口
9 超洁空气 HEPA 过滤网
10 电源线
11 肩带连接点
12 手柄
13 真空吸尘器上的开关滑钮
14 集尘桶拆卸按钮
15 内层过滤网
16 外层过滤网
17 集尘桶
18 内部进风组件
19 吸嘴拆卸按钮
20 可拆卸吸嘴口
21 把杆连接点 (FC6132)
22 肩带 + 搭扣 (FC6130)
23 缝隙吸嘴
24 毛刷
25 地板吸嘴 (FC6132)
26 软管连接吸尘器的一端 (FC6130)
27 软管 (FC6130)
28 软管连接附件的一端 (FC6130)
简体中文

注意事项
使用本产品之前,请仔细阅读本使用说明书,
并妥善保管以备日后参考。
危险
- 不要将本产品浸入水或其它液体中,
也不要在水龙头下冲洗。
- 切勿吸入水或其它液体、易燃物质或热灰。
警告
- 在将产品连接电源之前,请先检查产品所标电
压与当地的供电电压是否相符。
- 如果插头、电源线或其它部件受损,
则不要使用产品。
- 如果电源线损坏,为了避免危险,必须由飞利
浦、飞利浦特约维修中心或有同等维修资格的
专业人员来进行更换。
- 产品不建议由有肢体、感官或精神能力缺陷或
缺少使用经验和知识的人(包括儿童)使用,
除非有负责他们安全的人对他们进行与产品使
用有关的监督或指导。
- 请务必小心,确保儿童不玩耍本产品。
- 将产品及其线缆放在儿童接触不到的地方。
- 清洁或维护产品之前,必须先从插座拔掉插头。
警告
- 使用后,务必关闭产品电源。
- 吸尘时切勿阻塞排气口。
简体中文16

- 使用吸尘器时一定要安装滤网部件、集尘桶和
超洁空气 HEPA 过滤网。
- 在连接或拆开附件之前,请务必首先切断产品
电源。
电磁场 (EMF)
本飞利浦产品符合所有有关电磁场的适用标准和法规。
使用准备
产品随附有肩带和柔韧软管 (FC6130),或者随附把杆和地板吸嘴
(FC6132),吸尘更便捷。
产品还附带了用于清洁细致表面的毛刷,以及用于清洁难以触及
部位的缝隙吸嘴。
肩带安装(仅限于 FC6130)
1 要安装肩带,请将搭扣连接到产品上的连接点。
把杆和地板吸嘴安装(仅限于 FC6132)
1 要安装把杆,请将把杆下半部分与把杆上半部分相连
(可听到“咔哒”声)。(图2)
注意:把杆一旦组装,就不能拆卸。
2将把杆插入吸尘器背面的把杆连接点(可听到“咔哒”声)
。(图3)
- 插入把杆时,确保把杆上的突出段与吸尘器上的凹陷段吻合。
3要从吸尘器上拆下把杆,请用一只手按把杆拆卸按钮(1),
用另一只手将把杆从吸尘器中拉出(2)。(图4)
4将地板吸嘴安装到吸嘴上。(图5)
您可以使用地板吸嘴来清洁硬质地面和地毯。
地板吸嘴装有一个可清除毛发和绒毛的绒毛收集器。
5将电源插头接入插座。
简体中文 17

毛刷和缝隙工具
您可以使用毛刷清洁细致表面。
使用缝隙吸嘴,您可以迅速方便地清洁难以触及的地方。
1 将毛刷或缝隙吸嘴安装到吸尘器的吸嘴上。(图6)
软管(仅限于 FC6130)
本产品随附有软管,吸尘时可以利用它来加大接触范围。
1 将软管连接吸尘器的一端插入吸尘器的吸嘴。(图7)
2将毛刷或缝隙吸嘴连接到软管的连接端,以便在吸尘期间加大
接触范围。(图8)
使用本产品
在连接或拆开附件之前,请务必首先切断产品电源。
1 将电源插头接入插座。
2向前推吸尘器或把杆(仅限于FC6132)上的开关滑钮可打开
吸尘器。(图9)
3向后推吸尘器或把杆(仅限于FC6132)上的开关滑钮可关闭
吸尘器。(图10)
清洁和保养
不要将本产品浸入水或其它液体中,也不要在水龙头下冲洗。
1 清洁本产品之前,务必将插头从墙上的插座中拔出。
2用湿布擦拭本产品。
快速倒空集尘桶
请确保定期倒空集尘桶,以使产品达到最佳性能。
倒空集尘桶之前,切记拔下吸尘器的电源插头。
1 按吸嘴拆卸钮(1),将吸嘴从吸尘器上卸下(2)(图11).
简体中文18

2将集尘桶中的尘垢倒入垃圾桶。(图12)
提示:此外,您也可以使用普通的吸尘器将集尘桶中的尘垢吸出。
3将吸嘴推回到产品上(“咔哒”一声)。(图13)
彻底清洁集尘桶
1 按集尘桶拆卸按钮(1),将集尘桶从吸尘器上卸下(2)。(图14)
2从集尘桶中取出滤网部件。(图15)
3必要时,应清洁滤网部件。见“清洁滤网部件”部分。
4在垃圾桶上方倒空集尘桶。(图16)
5如果必要,可用湿布清洁集尘桶。
6将过滤网架重新装回集尘桶。(图17)
7要重新安装集尘桶,请将集尘桶的槽与吸尘器的突出部分对齐。
首先连接集尘桶的底部,然后将集尘桶的顶部推向吸尘器,
直到其锁定到位(“咔哒”一声)。(图18)
清洁过滤器
1 按集尘桶拆卸按钮(1),将集尘桶从吸尘器上卸下(2)。(图14)
2从集尘桶中取出滤网部件。(图15)
3要从内层过滤网上卸下外层过滤网,请逆时针旋转外层过滤网
(1),将其从内层过滤网上取下(2)。(图19)
4用刷子清洁内层过滤网和外层过滤网。如果滤网很脏,可用普
通的吸尘器进行清洁。(图20)
5将外层过滤网放回到内层过滤网上(1),然后顺时针旋转外层
过滤网将其锁定(2)。(图21)
6将过滤网架重新装回集尘桶。(图17)
7要重新安装集尘桶,请将集尘桶的槽与吸尘器的突出部分对齐。
首先连接集尘桶的底部,然后将集尘桶的顶部推向吸尘器,
直到其锁定到位(“咔哒”一声)。(图18)
简体中文 19

存储
1 将电线缠绕在产品的机身上。(图22)
2使用线夹固定电线。
更换
超洁空气 HEPA 过滤网
本产品配有特制的超洁空气 HEPA 过滤网。此过滤网可滤除排出
空气中的微小颗粒。这不仅可去除普通的居家灰尘,还能去除有
害的微小寄生虫,如尘螨及其排泄物,这是众所周知的呼吸道过
敏源。
1 按相应按钮释放超洁空气HEPA滤网罩(1),将滤网罩取下(2)
。(图23)
2卸下并弃置废旧的超洁空气HEPA过滤网。(图24)
3在滤网架上安装新的超洁空气HEPA过滤网。(图25)
4重新安装超洁空气HEPA滤网罩(“咔哒”一声)。(图26)
替换滤网
新内层过滤网的服务码为:4222 459 45354。请与您所在地的飞
利浦经销商或飞利浦顾客服务中心联系。
新超洁空气 HEPA 外层过滤网的服务码为:4222 459 45355。
请与您所在地的飞利浦经销商或飞利浦顾客服务中心联系。
回收
弃置产品时,请不要将其与一般生活垃圾堆放在一起;应将其交
给官方指定的回收点。这样做有利于环保。
保修和支持
如需信息或支持,请访问 www.philips.com/support 或阅读单独的
全球保修卡。
简体中文20
ページが読み込まれています...
ページが読み込まれています...
ページが読み込まれています...
ページが読み込まれています...
ページが読み込まれています...
ページが読み込まれています...
ページが読み込まれています...
ページが読み込まれています...
-
 1
1
-
 2
2
-
 3
3
-
 4
4
-
 5
5
-
 6
6
-
 7
7
-
 8
8
-
 9
9
-
 10
10
-
 11
11
-
 12
12
-
 13
13
-
 14
14
-
 15
15
-
 16
16
-
 17
17
-
 18
18
-
 19
19
-
 20
20
-
 21
21
-
 22
22
-
 23
23
-
 24
24
-
 25
25
-
 26
26
-
 27
27
-
 28
28


他の言語で
- English: Philips FC6130/01 User manual
関連論文
-
Philips 42PFL5300/T3 ユーザーマニュアル
-
-
-
-
-
-
-
-
-