
HQ8150, HQ8140
ENGLISH 4
INDONESIA
15
한국어 27
BAHASA MELAYU
39
ภาษาไทย 51
61
繁體中文 72
简体中文 82

4
Important
Read this user manual carefully before you use the
appliance and save it for future reference.
This appliance is not intended for use by persons
(including children) with reduced physical, sensory
or mental capabilities, or lack of experience
and knowledge, unless they have been given
supervision or instruction concerning use of the
appliance by a person responsible for their safety.
Children should be supervised to ensure that they
do not play with the appliance.
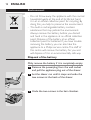
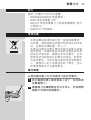
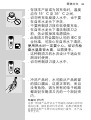
Only use the powerplug supplied.
The powerplug transforms 100-240 volts to a safe
low voltage of less than 24 volts.
The powerplug contains a transformer. Do not cut
off the powerplug to replace it with another plug,
as this causes a hazardous situation.
Do not use a damaged powerplug.
If the powerplug is damaged, always have it
replaced with one of the original type in order to
avoid a hazard.
Make sure the powerplug does not get wet.
Charge and store the appliance at a temperature
between 15°C and 35°C.
Never immerse the charging stand in water nor
rinse it under the tap.
Do not recharge the shaver in a closed pouch.
Always unplug the shaver before you clean it
under the tap.
The shaver complies with the internationally
approved IEC safety regulations and can be safely
cleaned under the tap.
Be careful with hot water. Always check if the water
is not too hot, to prevent your hands from getting
burnt.
-
-
-
-
-
-
-
-
-
-
-
-
-
ENGLISH

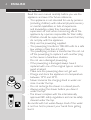
This washable shaver is not suitable for shaving in
the shower.
Do not immerse the shaver in water.
Water may leak from the socket at the bottom
of the appliance, when you rinse it. This is normal
and not dangerous because all electronics are
enclosed in a sealed shell inside the shaver.
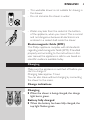
Electromagnetic elds (EMF)
This Philips appliance complies with all standards
regarding electromagnetic elds (EMF). If handled
properly and according to the instructions in this
user manual, the appliance is safe to use based on
scientic evidence available today.
Charging
Make sure the appliance is switched off before you
start to charge it.
Charging takes approx. 1 hour.
You can also shave without charging by connecting
the shaver to the mains.
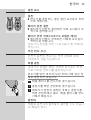
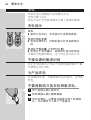
Charge indications
Charging
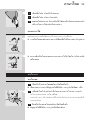
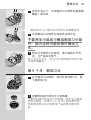
When the shaver is being charged, the charge
light burns green.
Battery fully charged
When the battery has been fully charged, the
top light ashes green.
-
-
-
,
,
ENGLISH 5

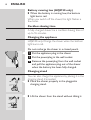
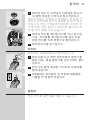
Battery running low (HQ8150 only)
When the battery is running low, the bottom
light burns red.
When you switch off the shaver, this light ashes a
few times.
Cordless shaving time
A fully charged shaver has a cordless shaving time of
up to 55 minutes.
Charging the appliance
HQ8150 only: Charge the shaver when the bottom
light burns red.
Do not recharge the shaver in a closed pouch.
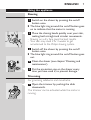
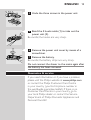
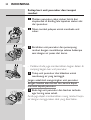
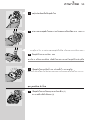
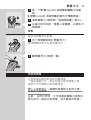
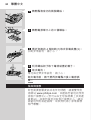
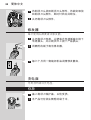
1 Put the appliance plug in the shaver.
2 Put the powerplug in the wall socket.
3 Remove the powerplug from the wall socket
and pull the appliance plug out of the shaver
when the battery has been fully charged.
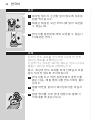
Charging stand
You can also charge the appliance by placing it in the
charging stand, if provided.
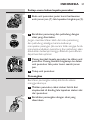
Place the shaver properly in the plugged-in
charging stand.
Lift the shaver from the stand without tilting it.
,
,
,
ENGLISH6

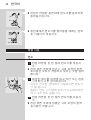
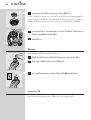
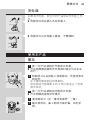
Using the appliance
Shaving
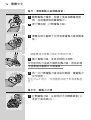
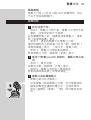
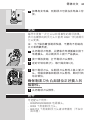
1 Switch on the shaver by pressing the on/off
button once.
The blue light ring around the on/off button goes
on to indicate that the motor is running.
2 Move the shaving heads quickly over your skin,
making both straight and circular movements.
Shaving on a dry face gives the best results.
Your skin may need 2 or 3 weeks to get
accustomed to the Philips shaving system.
3 Switch off the shaver by pressing the on/off
button once.
The blue light ring around the on/off button goes
out.
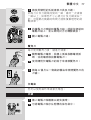
4 Clean the shaver (see chapter ‘Cleaning and
maintenance’).
5 Put the protection cap on the shaver every
time you have used it, to prevent damage.
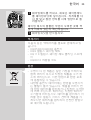
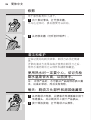
Trimming
For grooming sideburns and moustache.
1 Open the trimmer by pushing the slide
downwards.
The trimmer can be activated while the motor is
running.
,
-
-
,
ENGLISH 7

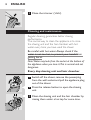
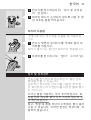
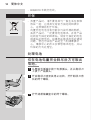
2 Close the trimmer (‘click’).
Cleaning and maintenance
Regular cleaning guarantees better shaving
performance.
The normal way to clean the appliance is to rinse
the shaving unit and the hair chamber with hot
water every time you have used the shaver.
Be careful with hot water. Always check if the
water is not too hot, to prevent your hands from
getting burnt.
Note: Water may leak from the socket at the bottom of
the appliance when you rinse it. This is normal and not
dangerous.
Every day: shaving unit and hair chamber
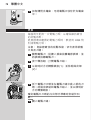
1 Switch off the shaver, remove the powerplug
from the wall socket and pull the appliance plug
out of the shaver.
2 Press the release button to open the shaving
unit.
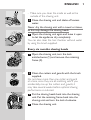
3 Clean the shaving unit and the hair chamber by
rinsing them under a hot tap for some time.
ENGLISH8

Make sure you clean the inside as well as the
outside of the shaving unit.
4 Close the shaving unit and shake off excess
water.
Never dry the shaving unit with a towel or tissue,
as this may damage the shaving heads.
5 Open the shaving unit again and leave it open
to let the appliance dry completely.
You can also clean the hair chamber without water
by using the brush supplied.
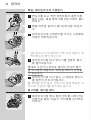
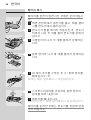
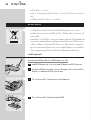
Every six months: shaving heads
1 Open the shaving unit, turn the lock
anticlockwise (1) and remove the retaining
frame (2).
2 Clean the cutters and guards with the brush
supplied.
Do not clean more than one cutter and guard
at a time, since they are all matching sets. If you
accidentally mix up the cutters and guards, it
may take several weeks before optimal shaving
performance is restored.
3 Put the shaving heads back into the shaving
unit. Put the retaining frame back into the
shaving unit and turn the lock clockwise.
4 Close the shaving unit.
-
ENGLISH 9

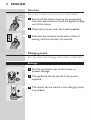
Trimmer
Clean the trimmer every time you have used it.
1 Switch off the shaver, remove the powerplug
from the wall socket and pull the appliance plug
out of the shaver.
2 Clean the trimmer with the brush supplied.
3 Lubricate the trimmer teeth with a drop of
sewing machine oil every six months.
Charging stand
You can clean the charging stand with a moist cloth.
Storage
1
Put the protection cap on the shaver to
prevent damage.
2 The appliance can be stored in the pouch
supplied.
3 The shaver can be stored in the charging stand,
if provided.
ENGLISH10

Replacement
Replace the shaving heads every two years for
optimal shaving results.
Replace damaged or worn shaving heads with HQ9
Philips shaving heads only.
Note: Do not mix up the cutters and the guards to
guarantee optimal shaving performance.
1 Switch the shaver off, remove the powerplug
from the wall socket and pull the appliance plug
out of the shaver.
2 Press the release button to open the shaving
unit.
3 Turn the lock anticlockwise (1) and remove the
retaining frame (2).
4 Remove the shaving heads and place new ones
in the shaving unit. Put the retaining frame
back into the shaving unit and turn the lock
clockwise.
Make sure that the projections of the shaving
heads t exactly into the recesses.
5 Close the shaving unit.
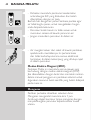
Accessories
The following accessories are available:
HQ8500/HQ8000 powerplug.
HQ9 Philips Shaving Heads.
HQ110 Philips Shaving Head Cleaning Spray
(not available in China).
HQ8010 car cord.
-
-
-
-
ENGLISH 11

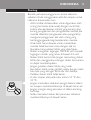
Environment
Do not throw away the appliance with the normal
household waste at the end of its life, but hand
it in at an ofcial collection point for recycling. By
doing this, you help to preserve the environment.
The built-in rechargeable battery contains
substances that may pollute the environment.
Always remove the battery before you discard
and hand in the appliance at an ofcial collection
point. Dispose of the battery at an ofcial
collection point for batteries. If you have trouble
removing the battery, you can also take the
appliance to a Philips service centre. The staff of
this centre will remove the battery for you and
will dispose of it in an environmentally safe way.
Disposal of the battery
Only remove the battery if it is completely empty.
1 Remove the powerplug from the wall socket
and pull the appliance plug out of the shaver.
2 Let the shaver run until it stops and undo the
two screws at the back of the shaver.
3 Undo the two screws in the hair chamber.
-
-
ENGLISH12

4 Undo the three screws in the power unit.
5 Bend the 4 hooks aside (1) to take out the
power unit (2).
Be careful, the hooks are very sharp.
6 Remove the power unit cover by means of a
screwdriver.
7 Remove the battery.
Be careful, the battery strips are very sharp.
Do not connect the shaver to the mains again after
the battery has been removed.
Guarantee & service
If you need information or if you have a problem,
please visit the Philips website at www.philips.com
or contact the Philips Customer Care Centre
in your country (you nd its phone number in
the worldwide guarantee leaet). If there is no
Customer Care Centre in your country, go to
your local Philips dealer or contact the Service
Department of Philips Domestic Appliances and
Personal Care BV.
ENGLISH 13

Guarantee restrictions
The shaving heads (cutters and guards) are not
covered by the terms of the international guarantee
because they are subject to wear.
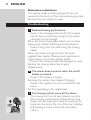
Troubleshooting
1
Reduced shaving performance.
Cause 1: the shaving heads are dirty.The shaver
has not been rinsed long enough or the water
used was not hot enough.
Clean the shaver thoroughly before you continue
shaving. See chapter ‘Cleaning and maintenance’.
Cause 2: long hairs are obstructing the shaving
heads.
Clean the cutters and guards with the brush
supplied. See chapter ‘Cleaning and maintenance’,
section ‘Every six months: shaving heads’.
Cause 3: the shaving heads are damaged or worn.
Replace the shaving heads. See chapter
‘Replacement’.
2 The shaver does not work when the on/off
button is pressed.
Cause 1: the battery is empty.
Recharge the battery. See chapter ‘Charging’.
Cause 2: the appliance is not connected to the
mains.
Put the powerplug in the wall socket.
3 The shaving unit has come off the shaver.
The shaving unit has not been placed correctly.
If the shaving unit becomes detached from the
shaver, you can easily put it back by inserting the
hinge into the slot in the rim of the hair chamber
and pushing it home until it locks into place
(‘click’).
-
-
-
-
-
-
-
ENGLISH14

15
Penting
Bacalah petunjuk pengguna ini secara seksama
sebelum Anda menggunakan alat dan simpan untuk
referensi di kemudian hari.
Alat ini tidak dimaksudkan untuk digunakan oleh
orang (termasuk anak-anak) dengan cacat sik,
indera atau kecakapan mental yang kurang, atau
kurang pengalaman dan pengetahuan, kecuali jika
mereka diberikan pengawasan atau pengarahan
mengenai penggunaan alat oleh orang yang
bertanggungjawab bagi keselamatan mereka.
Anak kecil harus diawasi untuk memastikan
mereka tidak bermain-main dengan alat ini.
Gunakan hanya steker listrik yang disertakan.
Steker mengubah tegangan 100-240 volt menjadi
tegangan rendah yang aman di bawah 24 volt.
Steker listrik berisi trafo. Jangan memotong steker
listrik dan menggantinya dengan steker lain, karena
ini dapat membahayakan.
Jangan gunakan steker listrik yang rusak.
Jika steker listrik rusak, gantilah selalu dengan salah
satu tipe yang asli agar terhindar dari bahaya.
Pastikan steker listrik tidak basah.
Isi dan simpan alat pada suhu antara 15 °C dan
35 °C.
Jangan merendam dudukan pengisi baterai dalam
air maupun membersihkannya di bawah keran air.
Jangan mengisi ulang pencukur di dalam kantong
tertutup.
Selalu mencabut steker dari pencukur sebelum
membersihkannya di bawah keran.
-
-
-
-
-
-
-
-
-
-
-
-
INDONESIA

16
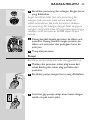
Alat cukur ini memenuhi peraturan keselamatan
IEC yang disepakati secara internasional dan dapat
dengan aman dibersihkan di bawah keran air.
Hati-hati dengan air panas. Selalu periksa apakah air
tidak terlalu panas untuk mencegah luka bakar pada
tangan Anda.
Pencukur yang dapat dicuci ini tidak sesuai untuk
mencukur di bawah pancuran.
Jangan mencelupkan pencukur ke dalam air.
Air mungkin keluar dari soket bawah alat saat
Anda membilasnya. Ini adalah normal dan tidak
berbahaya karena semua bagian elektronik
disimpan dalam wadah yang tertutup rapat di
dalam alat cukur.
Medan elektromagnet (EMF)
Alat Philips ini mematuhi semua standar yang
berkenaan dengan medan elektromagnet (EMF). Jika
ditangani sebagaimana layaknya dan sesuai dengan
petunjuk pengguna ini, alat tersebut aman digunakan
menurut bukti ilmiah yang kini tersedia.
Pengisian daya
Pastikan alat telah dimatikan sebelum mengisi
baterainya.
Waktu pengisian daya kurang lebih 1 jam.
Anda juga dapat mencukur tanpa mengisi daya
dengan menghubungkan pencukur ke listrik.
-
-
-
-
INDONESIA16

17INDONESIA 17
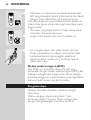
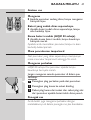
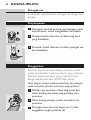
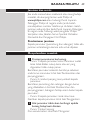
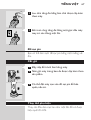
Indikator daya
Pengisian daya
Saat baterai pencukur diisi ulang, lampu pengisian
akan menyala hijau.
Baterai terisi penuh
Bila baterai sudah terisi penuh, lampu bagian atas
akan berkedip hijau.
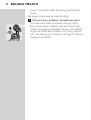
Baterai lemah (hanya HQ8150)
Saat baterai mulai melemah, lampu bagian bawah
menyala merah.
Apabila Anda mematikan pencukur, lampu ini
berkedip beberapa kali.
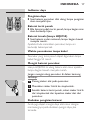
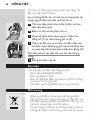
Waktu pencukuran tanpa kabel
Pencukur yang terisi penuh dapat digunakan tanpa
kabel hingga 55 menit.
Mengisi baterai pencukur
Hanya HQ8150: Isi ulang baterai alat cukur apabila
lampu bagian bawah menyala merah.
Jangan mengisi ulang pencukur di dalam kantong
tertutup.
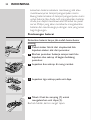
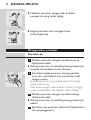
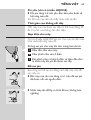
1 Pasang steker alat pada pencukur.
2 Masukkan steker listrik ke stopkontak.
3 Setelah baterai terisi penuh, cabut steker listrik
dari stopkontak dan lepaskan steker alat dari
pencukur.
Dudukan pengisian baterai
Anda juga dapat mengisi daya alat cukur dengan
memasangnya pada dudukan pengisi daya, jika
tersedia.
,
,
,

18
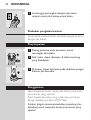
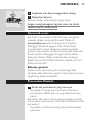
Letakkan alat cukur dalam dudukan pengisi
baterai plug-in.
Angkat pencukur dari dudukannya dengan arah
tegak lurus.
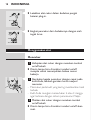
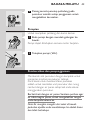
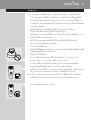
Menggunakan alat
Mencukur
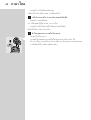
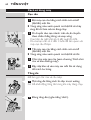
1 Hidupkan alat cukur dengan menekan tombol
on/off sekali.
Cincin lampu biru di sekitar tombol on/off
menyala untuk menunjukkan bahwa motor
bekerja.
2 Gerakkan kepala pencukur dengan cepat pada
kulit Anda, lakukan gerakan lurus maupun
memutar.
Mencukur pada kulit yang kering memberikan hasil
terbaik.
Kulit Anda mungkin memerlukan 2 atau 3 minggu
agar terbiasa dengan sistem pencukuran Philips.
3 Matikan alat cukur dengan menekan tombol
on/off sekali.
Cincin lampu biru di sekitar tombol on/off akan
mati.
,
,
,
-
-
,
INDONESIA18

19INDONESIA 19
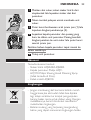
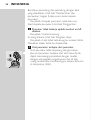
4 Bersihkan pencukur (lihat bab ‘Pembersihan
dan Perawatan’).
5 Pasang tutup pelindung pada pencukur setiap
kali Anda selesai menggunakannya, agar tidak
rusak.
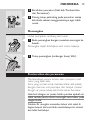
Memangkas
Untuk merapikan cambang dan kumis.
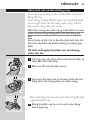
1 Buka pemangkas dengan menekan sorongan ke
bawah.
Pemangkas dapat dihidupkan saat motor bekerja.
2 Tutup pemangkas (terdengar bunyi ‘klik’).
Pembersihan dan perawatan
Membersihkan secara teratur akan menjamin hasil
cukur yang lebih baik.
Cara yang normal untuk membersihkan alat adalah
dengan mencuci unit pencukur dan tempat rambut
dengan air panas setiap kali Anda selesai bercukur.
Hati-hati dengan air panas. Selalu periksa apakah air
tidak terlalu panas untuk mencegah luka bakar pada
tangan Anda.
Catatan: Air mungkin merembes keluar dari soket di
bagian bawah alat saat Anda membilasnya. Ini normal
dan tidak berbahaya.

20
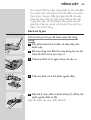
Setiap hari: unit pencukur dan tempat
rambut
1 Matikan pencukur, cabut steker listrik dari
stopkontak di dinding lalu lepaskan steker alat
dari pencukur.
2 Tekan tombol pelepas untuk membuka unit
cukur.
3 Bersihkan unit pencukur dan penampung
rambut dengan membilasnya selama beberapa
saat dengan air panas dari keran.
Pastikan Anda juga membersihkan bagian dalam di
samping bagian luar unit pencukur.
4 Tutup unit pencukur dan kibaskan untuk
membuang air yang tertinggal.
Jangan sekali-kali mengeringkan unit pencukur
dengan handuk atau kertas tisu, karena dapat
merusak kepala pencukur.
5 Buka lagi unit pencukur dan biarkan terbuka
agar kering sama sekali.
Anda juga dapat membersihkan ruang rambut tanpa
air dengan menggunakan sikat yang disertakan.
-
INDONESIA20

21INDONESIA 21
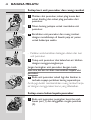
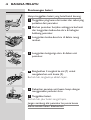
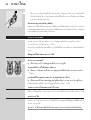
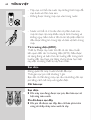
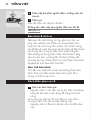
Setiap enam bulan: kepala pencukur
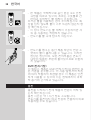
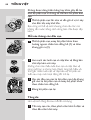
1 Buka unit pencukur, putar kunci berlawanan
arah jarum jam (1) lalu lepaskan bingkainya (2).
2 Bersihkan pemotong dan pelindung dengan
sikat yang disertakan.
Jangan membersihkan lebih dari satu pemotong
dan pelindung sekaligus, karena keduanya
merupakan pasangan. Jika secara tidak sengaja Anda
mencampuradukkan pemotong dan pelindung, akan
dibutuhkan beberapa minggu sebelum pencukuran
dapat kembali optimal.
3 Pasang kembali kepala pencukur ke dalam unit
pencukur. Pasang kembali bingkainya ke dalam
unit pencukur lalu putar kunci searah jarum
jam.
4 Tutup unit pencukur.
Pemangkas
Bersihkan pemangkas setiap kali Anda selesai
menggunakannya.
1 Matikan pencukur, cabut steker listrik dari
stopkontak di dinding lalu lepaskan steker alat
dari pencukur.
2 Bersihkan pemangkas dengan sikat yang
disertakan.

22
3 Lumasi gigi pemangkas dengan satu tetes
minyak mesin jahit setiap enam bulan.
Dudukan pengisian baterai
Anda dapat membersihkan dudukan pengisi baterai
dengan lap basah.
Penyimpanan
1
Pasang penutup pada pencukur untuk
mencegah kerusakan.
2 Alat cukur dapat disimpan di dalam kantung
yang disediakan.
3 Pencukur dapat disimpan pada dudukan pengisi
baterai, jika tersedia.
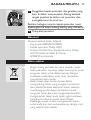
Penggantian
Ganti kepala pencukur setiap dua tahun untuk hasil
pencukuran yang optimal.
Ganti kepala pencukur yang rusak atau aus hanya
dengan kepala pencukur HQ9 Philips.
Catatan: Jangan mencampuradukkan pemotong dan
pelindung untuk menjamin kinerja pencukuran yang
optimal.
INDONESIA22
ページが読み込まれています...
ページが読み込まれています...
ページが読み込まれています...
ページが読み込まれています...
ページが読み込まれています...
ページが読み込まれています...
ページが読み込まれています...
ページが読み込まれています...
ページが読み込まれています...
ページが読み込まれています...
ページが読み込まれています...
ページが読み込まれています...
ページが読み込まれています...
ページが読み込まれています...
ページが読み込まれています...
ページが読み込まれています...
ページが読み込まれています...
ページが読み込まれています...
ページが読み込まれています...
ページが読み込まれています...
ページが読み込まれています...
ページが読み込まれています...
ページが読み込まれています...
ページが読み込まれています...
ページが読み込まれています...
ページが読み込まれています...
ページが読み込まれています...
ページが読み込まれています...
ページが読み込まれています...
ページが読み込まれています...
ページが読み込まれています...
ページが読み込まれています...
ページが読み込まれています...
ページが読み込まれています...
ページが読み込まれています...
ページが読み込まれています...
ページが読み込まれています...
ページが読み込まれています...
ページが読み込まれています...
ページが読み込まれています...
ページが読み込まれています...
ページが読み込まれています...
ページが読み込まれています...
ページが読み込まれています...
ページが読み込まれています...
ページが読み込まれています...
ページが読み込まれています...
ページが読み込まれています...
ページが読み込まれています...
ページが読み込まれています...
ページが読み込まれています...
ページが読み込まれています...
ページが読み込まれています...
ページが読み込まれています...
ページが読み込まれています...
ページが読み込まれています...
ページが読み込まれています...
ページが読み込まれています...
ページが読み込まれています...
ページが読み込まれています...
ページが読み込まれています...
ページが読み込まれています...
ページが読み込まれています...
ページが読み込まれています...
ページが読み込まれています...
ページが読み込まれています...
ページが読み込まれています...
ページが読み込まれています...
ページが読み込まれています...
ページが読み込まれています...
ページが読み込まれています...
ページが読み込まれています...
-
 1
1
-
 2
2
-
 3
3
-
 4
4
-
 5
5
-
 6
6
-
 7
7
-
 8
8
-
 9
9
-
 10
10
-
 11
11
-
 12
12
-
 13
13
-
 14
14
-
 15
15
-
 16
16
-
 17
17
-
 18
18
-
 19
19
-
 20
20
-
 21
21
-
 22
22
-
 23
23
-
 24
24
-
 25
25
-
 26
26
-
 27
27
-
 28
28
-
 29
29
-
 30
30
-
 31
31
-
 32
32
-
 33
33
-
 34
34
-
 35
35
-
 36
36
-
 37
37
-
 38
38
-
 39
39
-
 40
40
-
 41
41
-
 42
42
-
 43
43
-
 44
44
-
 45
45
-
 46
46
-
 47
47
-
 48
48
-
 49
49
-
 50
50
-
 51
51
-
 52
52
-
 53
53
-
 54
54
-
 55
55
-
 56
56
-
 57
57
-
 58
58
-
 59
59
-
 60
60
-
 61
61
-
 62
62
-
 63
63
-
 64
64
-
 65
65
-
 66
66
-
 67
67
-
 68
68
-
 69
69
-
 70
70
-
 71
71
-
 72
72
-
 73
73
-
 74
74
-
 75
75
-
 76
76
-
 77
77
-
 78
78
-
 79
79
-
 80
80
-
 81
81
-
 82
82
-
 83
83
-
 84
84
-
 85
85
-
 86
86
-
 87
87
-
 88
88
-
 89
89
-
 90
90
-
 91
91
-
 92
92


