
User Manual
BPx2
Advanced Blood Pressure Monitor
请 档
档
请

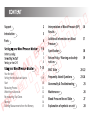
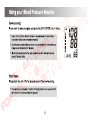
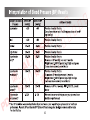
Interpretation of Blood Pressure (BP)
Results
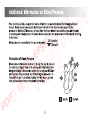
Additional Information on Blood
Pressure
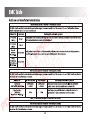
Specification
Return Policy / Warning and safety
notices
EMC Table
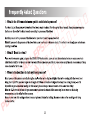
Frequently Asked Questions
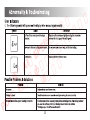
Abnormality & Troubleshooting
Maintenance
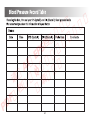
Blood Pressure Record Table
Explanation of symbols on unit
16
17
18
19
20-22
23-24
25
26
27
28
Your first test 7
Setting the time, date and alerts 8-9
Start 10
Measuring Process 11
What the results mean 12
Re-measuring, Shut Down 13
Memory 14
Deleting Measurements from the Memory 15
Support
Introduction
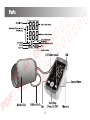
Parts
2
3
4
5-6
5
5
6
7-15
请 档
档
请

Support
Our manual should provide you with all the information you need to set up and use this product.
If you have a question, have a look at our Frequently asked questions or Abnormality & Troubleshooting page!
For further assistance, why not contact our Customer Care team directly? We’re here to help!
Our Customer Care team are available from 9am-5pm, Monday to Friday (excluding bank holidays).
We promise to respond to all queries and will ensure to resolve any issue you may be having.
You can reach us by…
Phone:
+44 1483 937969
Live Chat:
Simply visit www.kinetikwellbeing.com and send us a message.
Email:
Post:
Kinetik Medical Devices Limited
Unit 3, Perrywood Business Park, Honeycrock Lane,
Salfords, Redhill. RH1 5DZ
请 档
档
请

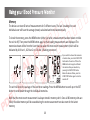
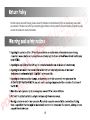
Thank you for buying your Kinetik Advanced Blood Pressure Monitor. Whether you have already
been diagnosed with high blood pressure or want to track any changes to your blood pressure, you
have taken the first step to quick, easy and accurate measurement that will keep you and, if
necessary, your doctor informed.
Easy to use – fully automatic, works at the push of a button.
Easy to read – LCD display and quick reference indicator.
Comfortable - Universal Easy Cuff (22-42cm), suitable for a wide range of arm sizes.
Memory – 3 users, with 60 memories each.
BP Alert – set reminders for your blood pressure readings.
Averages of last 3 readings.
Irregular Heartbeat and High BP.
Before you start, it is important that you read this manual carefully. Blood pressure testing is
easy but to make sure you have the most accurate readings, it is important to follow the instruc-
tions. Please keep them in a safe place in case you need to refer back to them at a later date.
3
请 档
档
请

4
请 档
档
请

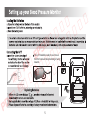
The cuff should be ready to use. Ensure
that the hook and loop fastening is facing
inwards.
5
请 档
档
请

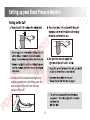
c. Turn the cuff end outwards and tighten by
wrapping around arm, then firmly press the
hook surface of the cuff onto the loop
surface of the cuff.
1~2c m
6
请 档
档
请

7
请 档
档
请

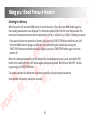
Setting the time, date and alerts
Time and Date
Once the batteries are inserted and the battery cover is back into place, the display will flash the Year 2017 in the bottom left
corner. Alternatively, press and hold the SET button to start the process.
To adjust the Year press the MEM button repeatedly until correct (pressing and holding the MEM button will advance the year
rapidly). When the correct Year is shown, press the SET button. The display will then show the Day/Month for you to adjust.
With the Day/Month displayed on screen, press the MEM button to adjust the Day and press the SET button to select the Month.
Again, adjust the Month using the MEM button. Once complete, press the SET button to adjust the hours and minutes. Adjust hours
and minutes by pressing the MEM button.
You can now set 3 Alerts to complete setup.
Setting Alerts
The BPX2 has 3 Blood Pressure measurement alerts. Users can have 1, 2 or 3 alerts that will repeat every 24 hours.
Setting Alert 1
After setting the time and date, AL 1 (Alert 1) will be displayed on screen. Press MEM to select if the alert should be ON or OFF.
Once you have made a selection, press the SET button to confirm.
8
请 档
档
请

If OFF is selected, you will move onto AL 2 (Alert 2).
If ON is selected, the time in the bottom left corner will flash. Press the MEM button to adjust the minutes/hours and press the SET
button to confirm and move onto AL 2 (Alert 2).
Setting Alert 2
After setting Alert 1, AL 2 (Alert 2) will be displayed on screen. Press MEM to select if the alert should be ON or OFF. Once you have
made a selection, press the SET button to confirm.
If OFF is selected, you will move onto AL 3 (Alert 3).
If ON is selected, the time in the bottom left corner will flash. Press the MEM button to adjust the minutes/hours and press the SET
button to confirm and move onto AL 3 (Alert 3).
Setting Alert 3
After setting Alert 2, AL 3 (Alert 3) will be displayed on screen. Press MEM to select if the alert should be ON or OFF. Once you have
made a selection, press the SET button to confirm.
If OFF is selected, the setup process will be complete.
If ON is selected, the time in the bottom left corner will flash. Press the MEM button to adjust the minutes/hours and press the SET
button to confirm. The setup process will then be complete.
Once setup is complete, press START/STOP to turn off the monitor.
9
请 档
档
请

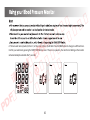
d. The last used memory bank (U1/User 1, U2/User 2 or U3/User 3) will blink. Press the MEM button to change to a different User.
Confirm your selection by pressing the START/STOP button once. If there is no operation, the User that is blinking on the monitor
will automatically be selected after 5 seconds.
10
请 档
档
请

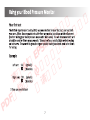
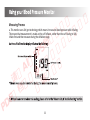
Measuring Process
a. This monitor uses 3rd gen technology which means it measures blood pressure while inflating.
This means that measurement is made as the cuff inflates, rather than the cuff having to fully
inflate first and then measure during the deflation stage.
11
请 档
档
请

12
请 档
档
请

13
请 档
档
请

Memory
The device can store 60 sets of measurements for 3 different users. The last 3 readings for each
individual user will have the average (mean) calculated and stored automatically.
To check the memory, press the MEM button (either just after a measurement has been taken or while
the unit is off). Then press the MEM button again so that reading measurements are displayed. The
memories shown will be from the User that has taken the most recent measurement (which will be
indicated by U1/User 1, U2/User 2 or U3/User 3 flashing on screen)
The unit will show the average of the last three readings. Press the MEM button to scroll up or the SET
button to scroll down through the individual memories.
Note that the most recent measurement is always stored in memory slot 1. Once all 60 memory slots are
filled, the oldest memory will be erased during the next measurement to make room for the latest
memory
•
If you want to be shown the memories
of another User, press the START/STOP
button while the unit is off. Press the
MEM button to change to a different
User and confirm your selection by
pressing the START/STOP button.
Before the device inflates, press the
START/STOP button again to turn the
monitor off.
14
请 档
档
请

Deleting the Memory
While the unit is off, press the MEM button to switch the unit on. Then press the MEM button again so
that reading measurements are displayed. The memories shown will be from the User that has taken the
most recent measurement (which will be indicated by U1/User 1, U2/User 2 or U3/User 3 flashing on screen).
• If you want to delete the memories of another User, press the START/STOP button while the unit is off.
Press the MEM button to change to a different User and confirm your selection by pressing the
START/STOP button once. Before the device inflates, press the START/STOP button again to turn the
monitor off.
When the reading measurements for the desired User are displayed on screen, press and hold the SET
button for 4 seconds. Press the SET button again to alternate between ‘DEL NO’ and ‘DEL YES’. Confirm
by pressing the START/STOP button.
The above procedure will delete the entire memory bank, not just a single measurement.
Once deleted, the memory cannot be recovered.
15
请 档
档
请

16
请 档
档
请

17
请 档
档
请

18
请 档
档
请

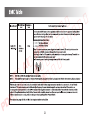
Product may be returned if faulty, please contact the Retailer or Kinetik directly if you’re experiencing issues with
your product. This does not affect your statutory rights. Please note the retailer’s own return policy may still be valid,
contact the retailer for more information.
19
请 档
档
请
ページが読み込まれています...
ページが読み込まれています...
ページが読み込まれています...
ページが読み込まれています...
ページが読み込まれています...
ページが読み込まれています...
ページが読み込まれています...
ページが読み込まれています...
ページが読み込まれています...
-
 1
1
-
 2
2
-
 3
3
-
 4
4
-
 5
5
-
 6
6
-
 7
7
-
 8
8
-
 9
9
-
 10
10
-
 11
11
-
 12
12
-
 13
13
-
 14
14
-
 15
15
-
 16
16
-
 17
17
-
 18
18
-
 19
19
-
 20
20
-
 21
21
-
 22
22
-
 23
23
-
 24
24
-
 25
25
-
 26
26
-
 27
27
-
 28
28
-
 29
29


