
ISD72
www.blackanddecker.com
4
English (original instructions)
9

2
3
1
2
5
6
4
7
A
5
7
6
B
C
1
2
D
E

3
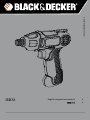
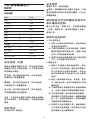
7.2V IMPACT SCREWDRIVER
ISD72
Technical Data
Specifications: ISD72
Voltage 7.2V
No load speed 2200
Chuck size 6.35
Weight 640g
Battery
Voltage V 7.2
Capacity Ah 1.3
Type Li-lon
Charger
Input Voltage V 110V
Output Voltage V 8V (Max)
Current 100ma
Approx. charge time 13 Hours
SAFETY GUIDELINES - DEFINITIONS
It is important for you to read and understand this
manual. The information it contains relates to protecting
YOUR SAFETY and PREVENTING PROBLEMS. The
symbols below are used to help you recognize this
information.
DANGER: Indicates an imminently hazardous
situation which, if not avoided, will result in death
or serious injury.
WARNING: Indicates a potentially hazardous
situation which, if not avoided, could result in
death or serious injury.
CAUTION: Indicates a potentially haz ard ous
situation which, if not avoided, may result in
minor or mod er ate injury.
NOTICE: Used without the safety alert symbol
indicates potentially hazardous situation which, if
not avoided, may result in property damage.
This tool is intended for consumer use only.
Safety instructions
GENERAL POWER TOOL SAFETY WARNINGS
WARNING: Read all safety warnings and all
instructions. Failure to follow the warnings and
instructions may result in electric shock, fire and/or
serious injury.
SAVE ALL WARNINGS AND
INSTRUCTIONS FOR FUTURE
REFERENCE
The term “power tool” in the warnings refers
to your mains-operated (corded) power tool or
battery-operated (cordless) power tool.
SAVE THESE INSTRUCTIONS
1) WORK AREA SAFETY
a) Keep work area clean and well lit. Cluttered or
dark areas invite accidents.
b) Do not operate power tools in explosive
atmospheres, such as in the presence of
flammable liquids, gases or dust. Power tools
create sparks which may ignite the dust or
fumes.
c) Keep children and bystanders away while
operating a power tool. Distractions can cause
you to lose control.
2) ELECTRICAL SAFETY
a) Power tool plugs must match the outlet. Never
modify the plug in any way. Do not use any
adapter plugs with earthed (grounded) power
tools. Unmodified plugs and matching outlets
will reduce risk of electric shock.
b) Avoid body contact with earthed or grounded
surfaces such as pipes, radiators, ranges
and refrigerators. There is an increased risk
of electric shock if your body is earthed or
grounded.
c) Do not expose power tools to rain or wet
conditions. Water entering a power tool will
increase the risk of electric shock.
d) Do not abuse the cord. Never use the cord
for carrying, pulling or unplugging the
power tool. Keep cord away from heat, oil,
sharp edges or
moving parts. Damaged or
entangled cords increase the risk of electric
shock.
e) When operating a power tool outdoors,
use an extension cord suitable for outdoor
use. Use of a cord suitable for outdoor use
reduces the risk of electric shock.
f) If operating a power tool in a damp location
is unavoidable, use a ground fault circuit
interrupter (GFCI) protected supply. Use of a
GFCI reduces the risk of electric shock.
3) PERSONAL SAFETY
a) Stay alert, watch what you are doing and
use common sense when operating a power
tool. Do not use a power tool while you are

4
tired or under the influence of drugs, alcohol
or medication. A moment of inattention
while operating power tools may result in
serious personal injury.
b) Use personal protective equipment. Always
wear eye protection. Protective equipment
such as dust mask, nonskid safety shoes,
hard hat, or hearing protection used for
appropriate conditions will reduce personal
injuries.
c) Prevent unintentional starting. Ensure
the switch is in the off position before
connecting to power source and/ or battery
pack, picking up or carrying the tool.
Carrying power tools with your finger on the
switch or energizing power tools that have
the switch on invites accidents.
d) Remove any adjusting key or wrench before
turning the power tool on. A wrench or a key
left attached to a rotating part of the power
tool may result in personal injury.
e) Do not overreach. Keep proper footing and
balance at all times. This enables better
control of the power tool in unexpected
situations.
f) Dress properly. Do not wear loose clothing or
jewelry. Keep your hair, clothing and gloves
away from moving parts. Loose clothes,
jewelry or long hair can be caught in moving
parts.
g) If devices are provided for the connection
of dust extraction and collection facilities,
ensure these are connected and properly
used. Use of dust collection can reduce
dust-related hazards.
4) POWER TOOL USE AND CARE
a) Do not force the power tool. Use the correct
power tool for your application. The correct
power tool will do the job better and safer at
the rate for which it was designed.
b) Do not use the power tool if the switch does
not turn it on and off. Any power tool that
cannot be controlled with the switch is
dangerous and must be repaired.
c) Disconnect the plug from the power source
and/or the battery pack from the power tool
before making any adjustments, changing
accessories, or storing power tools. Such
preventive safety measures reduce the risk
of starting the power tool accidentally.
d) Store idle power tools out of the reach of
children and do not allow persons unfamiliar
with the power tool or these instructions
to operate the power tool. Power tools are
dangerous in the hands of untrained users.
e) Maintain power tools. Check for
misalignment or binding of moving parts,
breakage of parts and any other condition
that may affect the power tool’s operation.
If damaged, have the power tool repaired
before use. Many accidents are caused by
poorly maintained power tools.
f) Keep cutting tools sharp and clean. Properly
maintained cutting tools with sharp cutting
edges are less likely to bind and are easier
to control.
g) Use the power tool, accessories and tool bits,
etc. in accordance with these instructions,
taking into account the working conditions
and the work to be performed. Use of the
power tool for operations different from
those intended could result in a hazardous
situation.
5) BATTERY TOOL USE AND CARE
a) Recharge only with the charger specified by
the manufacturer. A charger that is suitable
for one type of battery pack may create a
risk of fire when used with another battery
pack.
b) Use power tools only with specifically
designated battery packs. Use of any other
battery packs may create a risk of injury
and fire.
c) When battery pack is not in use, keep it
away from other metal objects like paper
clips, coins, keys, nails, screws, or other
small metal objects that can make a
connection from one terminal to another.
Shorting the battery terminals together may
cause burns or a fire.
d) Under abusive conditions, liquid may be
ejected from the battery, avoid contact.
If contact accidentally occurs, flush with
water. If liquid contacts eyes, additionally
seek medical help. Liquid ejected from the
battery may cause irritation or burns.
6) SERVICE
a) Have your power tool serviced by a
qualified repair person using only identical
replacement parts. This will ensure that the
safety of the power tool is maintained.

5
SPECIFIC SAFETY RULES
• Hold power tool by insulated gripping surfaces,
when performing an operation where the
fastener may contact hidden wiring. Fasteners
contacting a “live” wire may make exposed
metal parts of the power tool “live” and could
give the operator an electric shock.
• Use clamps or another practical way to secure
and support the workpiece to a stable platform.
Holding the work by hand or against your body
leaves it unstable and may lead to loss of
control.
• When not in use, place tool on its side on a
stable surface where it will not cause a tripping
or falling hazard.
Some tools with large battery
packs will stand upright but may be easily knocked
over.
SAVE THESE INSTRUCTIONS
SYMBOLS
The label on your tool may include the following
symbols. The symbols and their definitions are
as follows:
V .....................volts
A .....................amperes
Hz ...................hertz
W ....................watts
min .................minutes
or AC ......... alternating current
or DC ......direct current
n
o ...................no load speed
...................Class I Construction
(grounded)
...................earthing terminal
.................safety alert symbol
................... Class II Construction
(double insulated)
.../min or rpm...revolutions or
reciprocation per minute
SPM ................ Strokes per minute
..............
Read instruction manual before use
...................Use proper eye protection
...................Use proper hearing protection
...................
Use proper respiratory protection
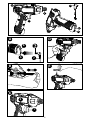
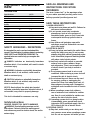
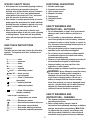
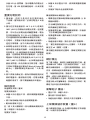
FUNCTIONAL DESCRIPTION
1. Variable speed trigger
2. Forward/reverse button
3. Quick-release chuck
4. Magnetic bit holder
5. Charging port
6. Charging indicator
7. Charger
SAFETY WARNINGS AND
INSTRUCTIONS - BATTERIES
• Do not disassemble or open, drop (mechanical
abuse), crush, bend or deform, puncture, or
shred.
• Do not modify or remanufacture, attempt to
insert foreign objects into the battery, immerse
or expose to water or other liquids, or expose to
fire, excessive heat including soldering irons, or
put in microwave oven.
• Only use the battery with a charging system
specified by the manufacturer/supplier.
• Do not short-circuit a battery or allow metallic
or conductive objects to contact both battery
terminals simultaneously.
• Dispose of used batteries promptly according to
the manufacturer/supplier’s instructions.
• Improper battery use may result in a fire,
explosion, or other hazard.
• Battery usage by children should be supervised.
WARNING: Never attempt to open the battery
for any reason. If battery case is cracked or
damaged, do not insert into charger. Do not
crush, drop or damage battery. Do not use a
battery or charger that has received a sharp
blow, been dropped, run over or damaged in any
way (i.e., pierced with a nail, hit with a hammer,
stepped on). Damaged batteries should be
returned to service center for recycling.
SAFETY WARNINGS AND
INSTRUCTIONS - CHARGING
1. This manual contains important safety and
operating instructions.
2. Before using battery charger, read all
instructions and cautionary warnings on battery
charger and product using battery.
CAUTION:
To reduce the risk of injury, use charger only
with this product. Batteries in other products
may burst causing personal injury or damage.

6
3. Do not expose charger to rain or snow.
4. Use of an attachment not recommended or sold
by Black & Decker may result in a risk of fire,
electric shock, or injury to persons.
5. To reduce risk of damage to electric plug
and cord, pull by plug rather than cord when
disconnecting charger.
6. Make sure cord is located so that it will not
be stepped on, tripped over, or otherwise
subjected to damage or stress.
7. An extension cord should not be used unless
absolutely necessary. Use of improper
extension cord could result in a risk of fire,
electric shock or electrocution.
a. Two-wire cords can be used with 2-wire or
3-wire extension cords. Only round
jacketed extension cords should be used,
and we recommend that they be listed
by Underwriters Laboratories (U.L.). If the
extension is to be used outside, the cord must
be suitable for outdoor use. Any cord marked
for outdoor use can also be used for indoor
work. The letters “W” or “WA” on the cord
jacket indicate that the cord is suitable for
outdoor use.
b. An extension cord must have adequate wire
size (AWG or American Wire Gauge) for safety,
and to prevent loss of power and overheating.
The smaller the gauge number of the wire, the
greater the capacity of the cable; that is, 16
gauge has more capacity than 18 gauge. When
using more than one extension to make up the
total length, be sure each extension contains at
least the minimum wire size.
Chart for minimum wire size (AWG) of Extension Cords
Nameplate rating AMPS – 0 – 10.0
Total Extension Cord Length (ft)
0-25 26-50 51-100 101-150
(0-7,6m) (7,6-15,2m) (15,2-30,4m) (30,4-45,7m)
Wire Gauge 18 16 16 14
8. Use only the supplied charger when charging
your tool. The use of any other charger
could damage the tool or create a hazardous
condition.
9. Use only one charger when charging.
10.Do not attempt to open the charger. There are
no customer serviceable parts inside. Return to
any authorized Black & Decker service center.
11.DO NOT incinerate the tool or batteries even if
they are severely damaged or completely worn
out. The batteries can explode in a fire.
12. Do not incinerate the battery even if it is
severely damaged or is completely worn out.
The batteries can explode in a fire. Toxic fumes
and materials are created when lithium ion
batteries are burned.
13. Do not charge or use battery in explosive
atmospheres, such as in the presence of
flammable liquids, gases or dust. Inserting or
removing the drill from the charger may ignite
the dust or fumes.
14. If battery contents come into contact with the
skin, immediately wash area with mild soap
and water. If battery liquid gets into the eye,
rinse water over the open eye for three minutes
or until irritation ceases. If medical attention is
needed, the battery electrolyte is composed of a
mixture of liquid organic carbonates and lithium
salts.
WARNING: Burn hazard. Battery liquid may be
flammable if exposed to spark or flame.
CHARGING PROCEDURE
THE BATTERIES IN YOUR TOOL ARE NOT FULLY
CHARGED AT THE FACTORY. BEFORE ATTEMPTING
TO CHARGE THEM, THOROUGHLY READ ALL OF
THE SAFETY INSTRUCTIONS.
To charge your tool, follow the steps below.
1. Plug the charger (7) into electrical outlet.
2. Insert the charger into the charging port (5),
making sure to line up the keyed plug with
the port as shown in figure A. The charging
indicator LED (6) will flash, indicating the
battery inside the drill is being charged. The
completion of charge is indicated by the LED
remaining on continuously.
IMPORTANT CHARGING NOTES
1. Your tool was sent from the factory in an
uncharged condition. Before attempting to use
it, it must be charged for at least 9 hours.
2. DO NOT charge the batteries in an air
temperature below 40°F (4,5° C) or above 105°F
(40,5 °C). This is important and will prevent
serious damage to the batteries. Longest
life and best performance can be obtained if
batteries are charged when air temperature is
about 75°F (23,8° C).
3. While charging, the charger may hum and
become warm to touch. This is a normal
condition and does not indicate a problem.

7
4. If the batteries do not charge properly—(1)
Check current at receptacle by plugging in a
lamp or other appliance. (2) Check to see if
receptacle is connected to a light switch which
turns power off when you turn out the lights.
(3) Move charger and tool to a surrounding air
temperature of 40°F (4,5° C) to 105°F (40,5°
C). (4) If the receptacle and temperature are
ok, and you do not get proper charging, take
or send the tool and charger to your local
Black & Decker service center. See Tools
Electric in yellow pages.
5. The tool should be recharged when it fails to
produce sufficient power on jobs which were
easily done previously. DO NOT CONTINUE
using product with its batteries in a depleted
condition.
OPERATING INSTRUCTIONS
Quick Release Chuck (figure B)
To install an accessory:
• Hold the tool as shown in figure B and push the
chuck collar away from the tool.
• Insert a hex shank accessory and release the
collar.
• The accessory is locked in place.
NOTE: Use 2” bits or 1” bits with a bit tip holder
(not provided).
To remove an accessory:
• Hold the tool as shown in figure B and push the
chuck collar away from the tool.
• Remove the accessory and release the collar.
Trigger Switch & Reversing Button (Figure C)
• The drill is turned ON and OFF by pulling and
releasing the trigger (1).
• A forward/reverse control button (2) determines
the direction of the tool and also serves as a
lock off button.
• To select forward rotation, release the trigger
switch and depress the forward/reverse control
button to the left.
• To select reverse, depress the forward/ reverse
control button the opposite direction.
• To avoid being turned on accidentally, do not
carry in your pocket.
NOTE: The center position of the control button
locks the tool in the off position.
When changing the position of the control button,
be sure the trigger is released.
SCREW DRIVING
For driving fasteners, the foward/reverse button
should be pushed to the left. Use reverse (button
pushed to the right) for removing fasteners. When
moving from forward to reverse, or vice versa,
always release the trigger switch first. Release
trigger when the fastener is at the desired depth.
NOTE: For best performance, use 2” fasteners or
smaller, or screw into pre-drilled holes.
NOTE: The impact mechanism of the screwdriver
creates a loud, impacting noise when extra force is
needed. This noise is normal; the screwdriver is not
malfunctioning or broken.
IMPACT DRIVER WARNINGS:
• Hold the tool as shown in figure D.
• Do not use tool as a pry bar.
• To avoid being turned on accidentally, do not carry
in your pocket.
ON BOARD BIT STORAGE (FIGURE E)
A magnetic bit holder(4) is built-in to the area
on top of the screwdriver for easy storage and
access.
DRILLING
• Use sharp drill bits only.
• Screwdriver is ideal for bits 1/4” or smaller.
• Support and secure work properly, as instructed
in the Safety Instructions.
• Use appropriate and required safety equipment,
as instructed in the Safety Instructions.
• Secure and maintain work area, as instructed in
the Safety Instructions.
• Apply pressure in a straight line with the bit. Use
enough pressure to keep the bit biting but not so
much as to stall the motor or deflect the bit.
• DO NOT CLICK THE TRIGGER OF A STALLED
SCREWDRIVER OFF AND ON IN AN ATTEMPT TO
START IT. DAMAGE TO THE SCREWDRIVER CAN
RESULT.
• Minimize stalling on breakthrough by reducing
pressure and slowly drilling through the last part
of the hole.
• Keep the motor running while pulling the bit out
of a drilled hole. This will help reduce jamming.
• Make sure switch turns screwdriver on and
off.

8
MAINTENANCE
Use only mild soap and damp cloth to clean the
tool. Never let any liquid get inside the tool; never
immerse any part of the tool into a liquid.
IMPORTANT: To assure product SAFETY and
RELIABILITY, repairs, maintenance and adjustment
(other than those listed in this manual) should be
performed by authorized service centers or other
qualified service personnel, always using identical
replacement parts.
LUBRICATION
Your tool was properly lubricated before leaving
the factory. Once every year take or send
your tool to a Black & Decker service center,
or authorized service station, for a complete
cleaning, inspection and lubrication. Tools “out of
service” for long periods should be relubricated
before being put back to work.
WARNING:
Since accessories, other than
those offered by Black & Decker, have not been
tested with this product, use of such accessories
with this tool could be hazardous. To reduce the risk
of injury, only Black & Decker recommended
accessories.
CLEANING
Use only mild soap and a slightly damp cloth to
clean your angle grinder. Many household clean-
ers contain chemicals which could seriously dam-
age the plastic. Also, do not use petrol, turpentine,
lacquer or paint thinners or similar products.
Never let any liquid get inside the tool and never
immerse any part of the tool into liquid.
Important! To assure product SAFETY and RE-
LIABILITY, repairs, maintenance and adjustment
(other than those listed in this manual) should be
performed by authorized
service centers or other qualified service person-
nel, always using identical replacement parts.
PROTECTING THE ENVIRONMENT
Separate collection. This product must not
be disposed of with normal household
waste.
Should you find one day that your Black &
Decker product needs replacement, or if it
is of no further use to you, do not dispose
of it with household waste. Make this
product available for separate collection.
Separate collection of used products and
packaging allows materials to be recycled
and used again. Re-use of recycled
materials helps prevent environmental
pollution and reduces the demand for raw
materials. Local regulations may provide for
separate collection of electrical products
from the household, at municipal waste
sites or by the retailer when you purchase a
new product.
SERVICE INFORMATION
Black & Decker offers a full network of company-
owned and authorized service locations. All Black
& Decker Service Centers are staffed with trained
personnel to provide customers with efficient and
reliable power tool service. For more information
about our authorized service centers and if you
need technical advice, repair, or genuine factory
replacement parts, contact the Black & Decker
location nearest you.
NOTES
• Black & Decker’s policy is one of continuous
improvement to our products and, as such,
we reserve the right to change product
specifications without prior notice.
• Standard equipment and accessories may vary
by country.
• Product specifications may differ by country.
• Complete product range may not be available in
all countries.

9
7.2V
ISD72
ISD72
7.2V
2200
6.35
640g
V 7.2
Ah 1.3
V 110V
V 8V
100ma
13
-
/
1)
a)
b)
c)
2)
a)
b)
c)
d)
e)

10
f)
(GFCI) GFCI
3)
a)
b)
c) /
d)
e)
f)
g)
4)
a)
b)
c)
/
d)
e)
f)
g)
5)
a)
b)
c)
d)

11
6)
a)
•
•
•
•
V .....................
A .....................
Hz ...................
W ....................
min .................
AC ........
DC ....
n
o ...................
...................I
...................
.................
................... II
...// ...
SPM ................
..............
...................
...................
.......................
1.
2. /
3.
4.
5.
6.
7.
-
•
•
• /
•
• /
•
•

12
-
1.
2.
3.
4. Black & Decker
5.
6.
7.
a.
Underwriters Laboratories
(U.L.)
W WA
b.
AWG
1618
(AWG)
AMPS – 0 – 10.0
0-25 26-50 51-100 101-150
(0-7.6m) (7.6-15.2m) (15.2-30.4m) (30.4-45.7m)
18 16 16 14
8.
9.
Black & Decker
10.
11.
12.
13.
1. (7)
2. (5)
A

13
LED (6)
LED
1.
9
2. 40° F (4.5°C)
105°F (40.5°C)
75° F (23.8°C)
3.
4. (1)
(2)
(3)
40° F (4.5°C)
105°F (40.5°C) (4)
Black & Decker
-
5.
B
• B
•
•
2 1
• B
•
C
• (1)
• / (2)
•
/
• /
•
off
/
2
• D
•
•
E
(4)

14
•
• 1/4
•
•
•
•
•
•
•
•
Black & Decker
Black & Decker
Black & Decker
Black & Decker
Black & Decker
Black & Decker
Black &
Decker

15
• Black & Decker
• /
•
• /

90603895 10/2013
-
 1
1
-
 2
2
-
 3
3
-
 4
4
-
 5
5
-
 6
6
-
 7
7
-
 8
8
-
 9
9
-
 10
10
-
 11
11
-
 12
12
-
 13
13
-
 14
14
-
 15
15
-
 16
16


他の言語で
- English: Black & Decker ISD72 User manual
関連論文
-
BLACK+DECKER BDCDD12 ユーザーマニュアル
-
BLACK+DECKER KTC12 ユーザーマニュアル
-
BLACK+DECKER BDCHD12S1 ユーザーマニュアル
-
BLACK+DECKER BDCDD12USB ユーザーマニュアル
-
-
-
-
-
-