
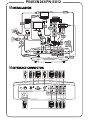
INSTALLATION
INTERFACE CONNECTOR
Note: Connector interface is subject to model's specifications
1
RS232
RBG
RBG
HDTV adapter
D-Sub
D-Sub
11
7
D-Sub
D-Sub
2
5
6
4
5
2
1
Y
R
W
R
W
98
3
Y
10
10
USB
USB
2
E62405SP
R
P5403/N243/PN-SX12

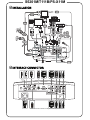
INSTALLATION
INTERFACE CONNECTOR
Note: Connector interface is subject to model's specifications
1
MIC.
RS232
RBG
RBG
HDTV adapter
D-Sub
D-Sub
12
7
D-Sub
D-Sub
2
6
4
5
2
1
Y
5
R
W
98
3
Y
10
10
11
USB
USB
DC OUT
2
MIC.
DC OUT
E62405SP
R
S5201M/T111B/PS-X11M

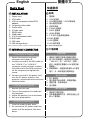
Quick Start
INSTALLATION
1. Power cord
2. VGA cable
3. VGA to component video/HDTV
adapter
4. Composite video cable
5. Audio cable
6. S-Video cable
7. RS232 cable
8. HDMI cable
9. 3 RCA component cable
10. RJ45 cable
11. USB cable
12. USB storage device
Note: Connector interface is subject to model's specifications
INTERFACE CONNECTOR
1. Ensure the projector and your
computer are turned off.
2. Connect one end of the VGA cable to
the "VGA IN 1" or "VGA IN 2"
connector on the projector; connect
the other end to the VGA connector
on the computer and tighten the
screws.
3. Connect one end of the power cord
into the AC power socket on the
projector; connect the other end to an
electrical outlet.
1. Remove the lens cap.
2. Turn on the projector first and then
the computer.
3. Adjust the position, focus and zoom.
4. Run your presentation.
1. Press the power button twice.
2. Do not remove AC power cord from
outlet until the projector fans shut
down.
1.
2. VGA
3. VGA HDTV
4.
5.
6. S-Video
7. RS232
8. HDMI
9. 3 RCA
10. RJ45
11. USB
12. USB
1.
2. VGA
VGA IN 1 VGA IN 2
VGA
3. AC
1.
2.
3.
4.
1.
2.
AC
1
2
Connecting to a Computer
Powering On the Projector
Powering Off the Projector
1
2
English
-
 1
1
-
 2
2
-
 3
3


他の言語で
- English: Acer N243 Quick start guide