


2

3

4

5

6
SA5213
ENGLISH
Foreword
Thank you for purchasing the Ibanez Sound Wave series bass amplifier. The
new SWX series amplifier was developed by Ibanez with great bass players to
achieve professional sound and portability. Read this manual thoroughly prior to
using your amplifier in order to get the most out of the functions available. Keep
this manual in a safe place. We wish you years of enjoyment playing bass guitar
through your new SWX
Important Safety Instructions
1) Read these instructions.
2) Keep these instructions.
3) Heed all warnings.
4) Follow all instructions.
5) Do not use this apparatus near water.
6) Clean only with a dry cloth.
7) Do not block any ventilation openings. Install in accordance with the manu
-
facturer’s instructions.
8) Do not install near any heat sources such as radiators, heat registers, stoves,
or other apparatus (including amplifiers) that produce heat.
9) Do not defeat the safety purpose of the polarized or grounding-type plug. A
polarized plug has two blades with one wider than the other. A grounding
type plug has two blades and a third grounding prong. The wide blade or the
third prong are provided for your safety. If the provided plug does not fit into
your outlet, consult an electrician for replacement of the obsolete outlet.
10) Protect the power cord from being walked on or pinched particularly at plugs,
convenience receptacles, and the point where they exit from the apparatus.
11) Only use attachments/accessories specified by the manufacturer.
12) Use only with the cart, stand, tripod, bracket, or table speci
-
fied by the manufacturer, or sold with the apparatus. When
a cart is used, use caution when moving the cart/apparatus
combination to avoid injury from tip-over.
13) Unplug this apparatus during lightning storms or when un
-
used for long periods of time.
14) Refer all servicing to qualified service personnel. Servicing is required when
the apparatus has been damaged in any way, such as power-supply cord or
plug is damaged, liquid has been spilled or objects have fallen into the ap
-
paratus, the apparatus has been exposed to rain or moisture, does not oper
-
ate normally, or has been dropped.
WARNING - To reduce the risk of fire or electric shock, do
not expose this apparatus to rain or moisture.
• “The Lightning Flash with arrowhead symbol within an equilateral triangle, is
intended to alert the user to the presence of uninsulated “dangerous voltage”
within the product enclosure that may be of sufficient magnitude to constitute
a risk of shock to persons”.
• “The exclamation point within an equilateral triangle is intended to alert the
user to the presence of important operating and maintenance (servicing) in
-
structions in the literature accompanying the product”.
Precautions during use
1) This product is capable of producing extremely high volumes. In some cases,
this could damage your hearing or cause other bodily impairment. You must
be careful of the volume when using this product.
2) Always make sure that a speaker system of the correct impedance is con
-
nected.
3) Use this product with a power supply of the voltage that is printed on the rear
panel.
4) Place this product near the main power outlet, and ensure that the main
power plug can be easily disconnected from the main power outlet if any
problem should occur.
5) This device contains a fuse for protection. The fuse may be broken due to
external physical shock or because it has reached the end of its lifetime, but
since a broken fuse may indicate that a serious internal malfunction has oc
-
curred, please contact your dealer before replacing the fuse.
6) When you are not using it, leave the power turned off. As long as the SWX is
connected to an electrical outlet, it is not completely insulated from the pow
-
er supply even if the power switch is turned off. If you will not be using the
SWX for an extended period, leave the power cable disconnected.
7) Do not turn off the power switch or disconnect the plug from the AC outlet
while the device is operating. Doing so may cause malfunctions.
8) Do not stand on this device or place heavy objects on it. Doing so may cause
breakage or malfunctions.

7
ENGLISH
Cautions regarding location
9) Secure the provided power plug to mains socket-outlets that has a protective
ground terminal.
10)
Do not place this device in locations where particularly low temperatures might
occur, such as walk-in coolers. The device may fail to operate correctly.
11) Do not place this device in locations subject to strong magnetic fields, such
as near a television or radio, or near any other device that emits electromag
-
netic radiation. This device may fail to operate correctly under such condi
-
tions.
12) Do not place the device in locations subject to sudden temperature changes
If this device is in a cold room whose temperature is suddenly raised, con
-
densation may form inside the device, causing it to fail to operate correctly.
13) Do not place the device in locations of excessive dust or vibration. Such
conditions may cause damage or malfunction.
14) Depending on the location in which this device is placed, noise may occur in
a radio located nearby, or flickering or distortion may be seen in the screen
of a nearby television. If you suspect that this device is responsible for these
conditions, turn off the power switch of this device. If this causes the radio or
television to return to normal operation, try moving this device away from the
radio or television, or change the orientation of the radio or television.

8
ENGLISH
Safety precautions
You must carefully read these precautions before you begin using this device,
and use the device only as directed.
After you’ve read these precautions, keep them with the “Owner’s manual” and
the “Warrantee.”
Prevention of fire, electrocution, or injury
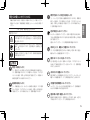
About the graphic symbols
indicates a caution (including a danger or warning). The spe-
cific content of the caution is indicated inside the triangle.
The graphic shown at left indicates a general caution, warning,
or danger.
indicates a prohibition (something you must not do). The spe-
cific content of the prohibition is depicted inside the symbol.
The graphic shown at left indicates that you must not disassem-
ble the unit.
indicates a compulsory action (something you are required to
do). The specific requirement is depicted inside the symbol.
If a foreign object enters this device
If a metallic or flammable foreign object should enter the interior of this
device through a jack or other opening, immediately turn off the power
switch, disconnect the plug from the AC outlet, and contact the dealer
from whom you purchased the device. Fire or electrocution may occur if
you continue using the device in this condition.
Do not disassemble or modify the device
Do not open the cabinet of this device. This device contains high-voltage
components, and touching them may produce electrical shock. Contact
your dealer if interior inspection or servicing is required.
Do not modify this device. Doing so may cause fire, electrical shock, or
malfunctions.
Do not place water or chemicals on the device
To avoid the risk of fire or electrical shock, do not place flower vases,
drinks, cosmetics, or containers of chemicals or water on top of this de
-
vice.
Unplug from the AC outlet if lightning occurs
If lightning occurs nearby, turn off the power switch, disconnect the plug
from the AC outlet, and stop using the device. Lightning can cause fire or
electrical shock.
Do not place the device near flame or heat
Do not allow this device or its power cable to be near heating equipment.
Such a situation poses a risk that the cabinet or the power cable sheath
-
ing may melt, causing fire or electrical shock.
Do not use the device at high volume levels for a
long time
Using the device at high volume levels through headphones or speakers
for a long time may cause permanent hearing loss depending on the out
-
put volume setting.
Do not place the device in locations of high humidity
Do not use this device in locations of high humidity such as near a bath or
humidifier, or in the rain, or near a body of water. Doing so may cause fire
or electrical shock.
Warnings
If the device emits smoke
Fire or electrocution may occur if you continue to use the device when it is
behaving abnormally, such as emitting smoke or an unusual odor. Imme
-
diately turn off the power switch, disconnect the plug from the AC outlet,
and contact the dealer from whom you purchased the device. Never at
-
tempt to repair the device yourself, since this can be hazardous.
If the device breaks
If you drop the device or if its cabinet is damaged, immediately turn off the
power switch, disconnect the plug from the AC outlet, and contact the
dealer from whom you purchased the device. Fire or electrocution may
occur if you continue using the device in this condition.

9
ENGLISH
Do not block the cooling vents
Since the rear of this device functions as a cooling vent, you must leave
sufficient space between it and the wall. Blocking the cooling vent will
cause heat to be trapped inside the device, possibly causing fire.
Do not place the device in locations of high
temperature
Do not place this device in locations of high temperature, such as in direct
sunlight or near equipment that produces heat, such as a stove or heater.
Doing so will cause the internal temperature to rise, possibly causing fire.
Do not subject the device to oil spatters or steam
Do not place this device where it might be subjected to oil spatters or
steam. This could cause fire or electrical shock.
Use this device only with an AC outlet of the correct
voltage
You must use this device only with an AC outlet of the correct voltage as
marked on the device itself. Fire or electrical shock may occur if you use
this device with an AC outlet of the wrong voltage.
Do not operate with wet hands
Do not connect or disconnect the power cable while your hands are wet.
You risk electrical shock if you do so.
Handle the plug with caution
When unplugging the cable, be sure to grasp the plug itself. If you unplug
the power cable by pulling the cable itself, you risk damaging the cable,
possibly causing fire or electrical shock.
Do not use “octopus-like” connections
Do not use branching extension cords, power strips, or branching sockets
to create “octopus-like” connections from an AC power outlet. Doing so
may cause fire or electrical shock.
Handle the power cable with caution
Do not allow the power cable to be scarred, damaged, modified, exces-
sively bent, pulled, twisted, or bundled. If heavy objects are placed on the
power cable or if it is subjected to heat, it may be damaged, possibly caus
-
ing fire or electrical shock. Please contact your dealer if the power cable
becomes damaged.
Use this device only in the country where you
purchased it
This device is designed for the AC power supply voltage of the country in
which you purchased it; you cannot use it outside the country.
Cautions
Disconnect the power cable if you will be away
If you won’t be using the device for an extended period of time, disconnect
the plug from the AC outlet for safety.
Do not drop the device or subject it to physical
impact
Do not drop this device or subject it to strong physical impact. Doing so
may cause breakage or malfunctions.
Do not place the device in an unstable location
Do not place this device in an unstable location, such as on an unsteady
stand or at an angle. It may become unbalanced and tip over or fall, caus
-
ing damage or injury.

10
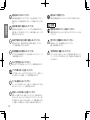
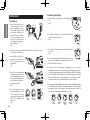
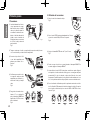
Fig. 1
Fig. 2
Fig. 3
Fig. 4
Fig. 5
Fig. 6
Fig. 7
Fig. 8
ENGLISH
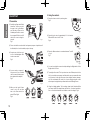
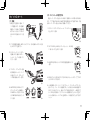
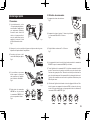
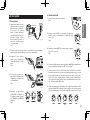
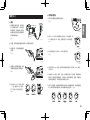
Quick Start
1. Connection
1) Carefully read “Important Safety
Instructions” before you place
the amp in the location where
you’ll be using it. Then use the
included power cable to connect
the rear panel AC inlet to an AC
outlet of the correct voltage for
your unit.
Fig. 1
2) Please note that the sound, and the low frequency response in particular, will
be affected by the location in which you place the amp.
3) Connect your electric bass gui
-
tar. Use a shielded guitar cable
to make connections.
Fig. 2
4) If you are using a compact ef
-
fects processor, use a shielded
cable to connect it between your
bass guitar and the amplifier.
Fig. 3
5) Make sure that each Volume
control is set to “0”, and then
turn on the Power switch, the
power LED will light.
Fig. 4
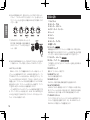
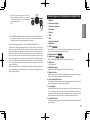
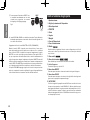
2. Using the controls
1) Raise the volume control of your bass guitar.
Fig. 5
2) Raise the Level control to approximately 11 o’clock and set
EQ and HUE controls at 12 o’clock.
Fig. 6
3) Raise the Master volume to somewhere between 7 and 12
o’clock.
Fig. 7
4) You can choose bright or normal mode by switching the Bright switch. Set the
Bright switch off for now.
5) Try using the Hue control. This is a passive tone control. When you turn it to the
left, the sound becomes warmer and fatter with a more pronounced bottom
end. If you turn it to the right, it becomes clearer, brighter and more transpar
-
ent. You can determine the overall color of your sound by using this control
without experiencing distortion problems that an active EQ might cause.
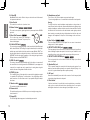
6) Using the 3-band equalizer: Try the settings shown in the illustration. When
you turn up the EQ, the output volume level will rise. If you don’t want distor
-
tion as a result, turn down the Level or Master control accordingly. Fig. 8

11
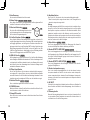
Fig. 9
ENGLISH
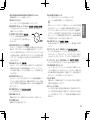
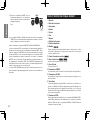
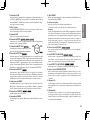
7) Try pushing in the Shape switch. You will in-
stantly get mid-scooped sound. This sound
enables slapping and popping bass styles.
Fig. 9
8) The SWX100 and SWX65 models have a Tweeter switch function. Turning it on
or off will add or decrease the high-end brightness and attack of your bass
strings.
Tips for using Master and Level controls (SWX100/65/35)
When the Level control is at a lower setting, the preamp will be cleaner and less
compressed. If you continue to raise the Level control, the signal will get more
compressed. The Master is a post- auto-compression circuit, while the Level con
-
trol is a pre-auto-compression circuitry. The Level simultaneously controls the
compression threshold as it changes volume. The Master controls preamp output
level to the power amp. Turning up the Level, EQ or Master controls together may
distort your bass sound. (This also depends on your bass guitar output level and
your style of playing.)
When you see the Auto-Comp LED flashing, the auto-compression circuitry is
strongly compressing the preamp signal to keep your sound un-distorted and the
level flat.
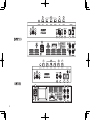
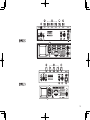
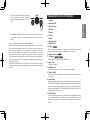
Names and Function of Each part
1. Cabinet
2. Speaker Grille
3. Speaker Driver
4. Tweeter
5. Chassis
6. Corner
7. Handle
8. Speaker Cable
9. Power Cable
10. Caster
This is a pop-in caster designed to fit tightly into the Caster Receiver to avoid
buzz and noise. Some effort may be required to insert or remove.
11. Caster Receiver
12. Tilt-up Bar
This flip-flop bar enables tilting of the cabinet face.
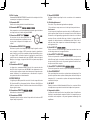
13. Input Jack
1/4” phone jack input.
14. Bright Switch
This enhances brightness of the input signal when it is pushed in.
15. Shape Switch
This enhances bottom and high-end by scooping mid-range frequencies when
it is engaged.
16. Auto-Comp
SWX’s pre-amplifier signal level is controlled by the Auto-Compression circuit.
The SWX35, 65 and 100 are equipped with a LED which flashes blue. When a
signal from pre-amp is high, the limiter circuit compress the signal and is indi
-
cated by the flashing blue LED. Though SWX20 does not have the LED, it is
equipped with this circuitry as well.
17. Level Control
This controls the level of the pre-amp. Hint: Balancing Level and Master controls
can create many different sound and tone textures. EQ, Bright switch and
Shape switch will also affect the amp volume level. Adjust the level using this
control.

12
ENGLISH
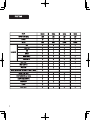
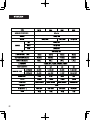
18. 3 Band EQ
Bass/Middle/Treble controls. Refer to the spec sheet at the end of this manual
for frequencies and levels.
19. Hue Control
This controls the overall color of your bass’ tone.
20. Master Control
This controls not only bass guitar signal level to power amp but also CD/MP3
gain level.
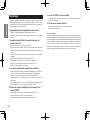
21. Direct Out Connector
This is a direct out connector for connecting to
your recorder or PA system. The polarity is as
shown in the diagram.
22. Pre/Post EQ Switch
This selects the point within the preamp circuit from which the Direct Out signal
will be taken. With the “PRE” setting, the signal is taken directly from the input,
and the amp controls will not affect the sound in any way. With the “POST” set
-
ting, the signal is taken from after the effect return, so that all controls other than
“VOLUME” will affect the signal. Regardless of this setting, the signal from the
CD input is never sent from DIRECT OUT.
23. GND Lift switch
The setting of this switch specifies whether pin 1 of the direct out connector will
be connected to the electrical ground of the SWX100 itself. If your equipment is
connected in a complex way and a ground loop is causing hum, using this
switch to disconnect the ground will reduce the hum.
24. CD/MP3 In jack
This is an RCA pin jack. It is designed to be connected to the headphone output
of a portable CD or MP3 player, or similar device. Use an RCA plug cable to
make connections. Use the volume control of your portable CD player to adjust
the volume.
25. Tweeter switch
This switches the built-in tweeter on/off.
26. Power switch
This switch turns the power on/off. When you are not using the amp, please
leave it turned off.
27. Power LED
This LED will light when amp power is activated by power switch.
28. Headphones out jack
This is a stereo 1/4" jack that outputs a monaural audio signal.
*
If you're using headphones, no sound will be heard from the internal speaker.
Warning
The SWX series bass amp's headphone output produces a large volume of
sound. Ensure that the volume has been turned down before beginning to play
using the headphones, and then slowly increase the volume until it has reached
the desired level. Note that the noise and distorted sound signals produced
when inserting or removing the plug at high volume levels will not only result
damage to the headphones, it may also result in damage to the user’s hear
-
ing.
29. Line Out jack
This is an output jack with a line level output. You can connect to an external
mixing console or similar equipment.
30. EFFECTS LOOP SEND jack
This is an output jack for an effects device. Connect it to the input of your effects
device. Although the input and output of this effect loop are suitable for rack-
mount effects, they can also be used with compact type effects processors.
31. EFFECTS LOOP RETURN jack
This is an input jack for an effects device. Connect the output of your effects
device to this input.
32. Speaker Out jack
This is a speaker output jack connected to the internal speaker system. If you
want to use another speaker system(s), use a speaker cable w/1/4” plug to con
-
nect to 4Ω or greater nominal impedance speaker system(s).
33. AC Input
Connect the included AC power cable to this connector. Use this amp only with
he input the voltage indicated on the panel
34. Fuse Holder
If the fuse has blown, it is possible that a serious problem has occurred inter-
nally, so please contact your dealer before replacing the fuse. Do not replace
with a higher value fuse as serious damage to your amplifier can occur.

13
ENGLISH
Troubleshooting
First check that your shielded guitar cable, speaker cable, and power cable are
connected correctly. If possible, use a tester to check the cable or try using an
alternate cable or amp to verify your cable’s condition.
1. The power supply cannot be switched on.
• Check that the power cable has been connected correctly.
• Try plugging it into a different socket and see if the same problem occurs.
2. The power supply can be switched on, but no sound is
heard.
• Check that the bass guitar has been connected correctly.
• Remove any external components connected to the effects loop and between
the bass guitar and the amplifier and check to see if any sound is heard.
• Use a different shielded cable and check to see if any sound is heard.
• Check to see if the volume on the bass guitar is set to “0”.
• Use a different bass guitar and see if any sound is heard.
• Check to see if the volume on the amplifier is set to “0”.
• Check to see if the headphones are connected.
3. Noise is heard.
• Check to see if anything in the immediate vicinity is resonating or banging
against the amplifier to produce the noise.
• Check to see if the plug cover on the shielded cable is loose.
• Make sure that the action (string height) of your bass guitar is set correctly.
• Use another bass guitar, effects or other external components, and cable to
see if the same noise is produced.
4. No sound when you connect a CD/MP3.
• Make sure that the volume of the CD/MP3 player is not turned to 0.
• Make sure that the cable is connected correctly.
• Try using another cable and see whether any sound is heard.
5. The CD/MP3 sounds wrong.
Does the cable you’re using have a stereo plug? Could you be using a monaural
plug?
6. No sound is produced in the headphones.
• Check that the headphones are connected correctly.
• Connect another set of headphones and see if sound is produced.
In case of defects
This product has passed exhaustive inspections before being shipped from the
factory. Ensure that the above procedures are carried out when a problem is
thought to exist. Contact your dealer in the unlikely event that an abnormality oc
-
curs during use. Also, ensure that the symptoms of the problem are explained in
detail when requesting repair in order to facilitate swift handling. Because of im
-
provements to this product, the specifications may change without notice.

14

15

16

17

18

19
ページが読み込まれています...
ページが読み込まれています...
ページが読み込まれています...
ページが読み込まれています...
ページが読み込まれています...
ページが読み込まれています...
ページが読み込まれています...
ページが読み込まれています...
ページが読み込まれています...
ページが読み込まれています...
ページが読み込まれています...
ページが読み込まれています...
ページが読み込まれています...
ページが読み込まれています...
ページが読み込まれています...
ページが読み込まれています...
ページが読み込まれています...
ページが読み込まれています...
ページが読み込まれています...
ページが読み込まれています...
ページが読み込まれています...
ページが読み込まれています...
ページが読み込まれています...
ページが読み込まれています...
ページが読み込まれています...
ページが読み込まれています...
ページが読み込まれています...
ページが読み込まれています...
ページが読み込まれています...
ページが読み込まれています...
ページが読み込まれています...
ページが読み込まれています...
ページが読み込まれています...
ページが読み込まれています...
ページが読み込まれています...
ページが読み込まれています...
ページが読み込まれています...
ページが読み込まれています...
ページが読み込まれています...
ページが読み込まれています...
ページが読み込まれています...
ページが読み込まれています...
ページが読み込まれています...
ページが読み込まれています...
-
 1
1
-
 2
2
-
 3
3
-
 4
4
-
 5
5
-
 6
6
-
 7
7
-
 8
8
-
 9
9
-
 10
10
-
 11
11
-
 12
12
-
 13
13
-
 14
14
-
 15
15
-
 16
16
-
 17
17
-
 18
18
-
 19
19
-
 20
20
-
 21
21
-
 22
22
-
 23
23
-
 24
24
-
 25
25
-
 26
26
-
 27
27
-
 28
28
-
 29
29
-
 30
30
-
 31
31
-
 32
32
-
 33
33
-
 34
34
-
 35
35
-
 36
36
-
 37
37
-
 38
38
-
 39
39
-
 40
40
-
 41
41
-
 42
42
-
 43
43
-
 44
44
-
 45
45
-
 46
46
-
 47
47
-
 48
48
-
 49
49
-
 50
50
-
 51
51
-
 52
52
-
 53
53
-
 54
54
-
 55
55
-
 56
56
-
 57
57
-
 58
58
-
 59
59
-
 60
60
-
 61
61
-
 62
62
-
 63
63
-
 64
64


他の言語で
- italiano: Ibanez SWX100/65/35/20 Guida utente
- español: Ibanez SWX100/65/35/20 Guía del usuario
- Deutsch: Ibanez SWX100/65/35/20 Benutzerhandbuch
- français: Ibanez SWX100/65/35/20 Mode d'emploi
- English: Ibanez SWX100/65/35/20 User guide