
DDJ-SB3
DJ Controller
Contrôleur pour DJ
DJ Controller
DJ Controller
DJ Controller
Controlador DJ
Controlador para DJ
DJ Контроллер
pioneerdj.com/support/
http://serato.com/
For FAQs and other support information for this product, visit the above site.
Concernant les questions les plus fréquemment posées et les autres informations de support à propos de ce
produit, veuillez vous rendre sur le site ci-dessus.
Besuchen Sie für FAQs und andere Support-Informationen die oben aufgeführte Website.
Per FAQ e altre informazioni di supporto per questo prodotto, visitare il sito sopra indicato.
Voor FAQ's en andere supportinformatie voor dit product, bezoek de bovengenoemde website.
Para consultar las preguntas frecuentes y otra información de soporte de este producto, visite el sitio de arriba.
Relativamente às FAQ e outras informações de apoio relacionadas com este produto, visite o site em cima.
Ответы на часто задаваемые вопросы и другую информацию о поддержке данного устройства см. на
приведенном выше веб-сайте.
Русский
PortuguêsEspañolNederlandsItalianoDeutschFrançaisEnglish
Operating Instructions (Quick Start Guide)
Mode d’emploi (Guide de démarrage rapide)
Bedienungsanleitung (Kurzanleitung)
Istruzioni per l’uso (Guida di avvio veloce)
Handleiding (Snelstartgids)
Manual de instrucciones (Guía de inicio rápido)
Manual de instruções (Guia de início rápido)
Инструкции по эксплуатации
(Краткое руководство пользователя)

2
En
WARNING
This equipment is not waterproof. To prevent a fire or shock
hazard, do not place any container filled with liquid near
this equipment (such as a vase or flower pot) or expose it to
dripping, splashing, rain or moisture.
D3-4-2-1-3_A1_En
WARNING
To prevent a fire hazard, do not place any naked flame
sources (such as a lighted candle) on the equipment.
D3-4-2-1-7a_A1_En
Operating Environment
Operating environment temperature and humidity:
+5 °C to +35 °C (+41 °F to +95 °F); less than 85 %RH
(cooling vents not blocked)
Do not install this unit in a poorly ventilated area, or in
locations exposed to high humidity or direct sunlight (or
strong artificial light).
D3-4-2-1-7c*_A2_En
When using this product, confirm the safety information
shown on the bottom of the unit.
D3-4-2-2-4_B1_En
WARNING
Store small parts out of the reach of children and infants. If
accidentally swallowed, contact a doctor immediately.
D41-6-4_A1_En
This product is for general household purposes. Any
failure due to use for other than household purposes
(such as long-term use for business purposes in a
restaurant or use in a car or ship) and which requires
repair will be charged for even during the warranty
period.
K041_A1_En
The graphical symbol placed on the product means
alternating current.
The graphical symbol
placed on the product means
direct current.
The graphical symbol
placed on the product means
Class II equipment.
For Europe and other areas
CAUTION
TO PREVENT THE RISK OF ELECTRIC SHOCK, DO NOT
REMOVE COVER (OR BACK). NO USER-SERVICEABLE
PARTS INSIDE. REFER SERVICING TO QUALIFIED SERVICE
PERSONNEL.
D3-4-2-1-1_B1_En
CAUTION
This product is evaluated in moderate and tropical
climate condition.
For Europe
If you want to dispose this product, do not mix it with general
household waste. There is a separate collection system for
used electronic products in accordance with legislation that
requires proper treatment, recovery and recycling.
Private households in the member states of the EU, in Switzerland and
Norway may return their used electronic products free of charge to
designated collection facilities or to a retailer (if you purchase a similar
new one).
For countries not mentioned above, please contact your local authorities
for the correct method of disposal.
By doing so you will ensure that your disposed product undergoes the
necessary treatment, recovery and recycling and thus prevent potential
negative effects on the environment and human health.
K058b_A1_En
For U.S.A. and other areas
NOTE:
This equipment has been tested and found to comply
with the limits for a Class B digital device, pursuant to
Part 15 of the FCC Rules. These limits are designed to
provide reasonable protection against harmful
interference in a residential installation. This equipment
generates, uses, and can radiate radio frequency energy
and, if not installed and used in accordance with the
instructions, may cause harmful interference to radio
communications. However, there is no guarantee that
interference will not occur in a particular installation. If
this equipment does cause harmful interference to radio
or television reception, which can be determined by
turning the equipment off and on, the user is encouraged
to try to correct the interference by one or more of the
following measures:
— Reorient or relocate the receiving antenna.
— Increase the separation between the equipment and
receiver.
— Connect the equipment into an outlet on a circuit
different from that to which the receiver is connected.
— Consult the dealer or an experienced radio/TV
technician for help.
D8-10-1-2_A1_En
Information to User
Alterations or modifications carried out without
appropriate authorization may invalidate the user’s right
to operate the equipment.
D8-10-2_A1_En
FEDERAL COMMUNICATIONS COMMISSION
DECLARATION OF CONFORMITY
This device complies with part 15 of the FCC Rules.
Operation is subject to the following two conditions: (1)
This device may not cause harmful interference, and (2)
this device must accept any interference received,
including interference that may cause undesired
operation.
Product Name:
Model Number:
Responsible Party Name:
DJ Controller
DDJ-SB3
PIONEER ELECTRONICS (USA) INC.
SERVICE SUPPORT DIVISION
Address: 2050 W. 190th Street, Suite 100, Torrance,
CA 90504, U.S.A.
Phone: 1-310-952-2915
URL: pioneerelectronics.com
D8-10-4*_C1_En

3
En
English
For U.S.A. and Canada
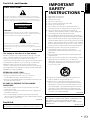
IMPORTANT
The lightning flash with arrowhead symbol, within an equilateral
triangle, is intended to alert the user to the presence of uninsulated
“dangerous voltage” within the product’s enclosure that may be of
sufficient magnitude to constitute a risk of electric shock to persons.
CAUTION
RISK OF ELECTRIC SHOCK
DO NOT OPEN
CAUTION:
TO PREVENT THE RISK OF ELECTRIC SHOCK, DO NOT REMOVE
COVER (OR BACK). NO USER-SERVICEABLE PARTS INSIDE. REFER
SERVICING TO QUALIFIED SERVICE PERSONNEL.
The exclamation point within an equilateral triangle is intended to
alert the user to the presence of important operating and
maintenance (servicing) instructions in the literature accompanying
the appliance.
D3-4-2-1-1b_A1_En
The Safety of Your Ears is in Your Hands
Get the most out of your equipment by playing it at a safe
level – a level that lets the sound come through clearly
without annoying blaring or distortion and, most
importantly, without affecting your sensitive hearing. Sound
can be deceiving. Over time, your hearing “comfort level”
adapts to higher volumes of sound, so what sounds
“normal” can actually be loud and harmful to your hearing.
Guard against this by setting your equipment at a safe level
BEFORE your hearing adapts.
ESTABLISH A SAFE LEVEL:
•Set your volume control at a low setting.
•Slowly increase the sound until you can hear it
comfortably and clearly, without distortion.
•Once you have established a comfortable sound level, set
the dial and leave it there.
BE SURE TO OBSERVE THE FOLLOWING
GUIDELINES:
•Do not turn up the volume so high that you can’t hear
what’s around you.
•Use caution or temporarily discontinue use in potentially
hazardous situations.
•Do not use headphones while operating a motorized
vehicle; the use of headphones may create a traffic hazard
and is illegal in many areas.
S001a_A1_En
For U.S.A.
CAUTION
This product is evaluated in moderate climate condition.
1) Read these instructions.
2) Keep these instructions.
3) Heed all warnings.
4) Follow all instructions.
5) Do not use this apparatus near water.
6) Clean only with dry cloth.
7) Do not block any ventilation openings. Install in
accordance with the manufacturer’s instructions.
8) Do not install near any heat sources such as
radiators, heat registers, stoves, or other apparatus
(including amplifiers) that produce heat.
9) Do not defeat the safety purpose of the polarized or
grounding-type plug. A polarized plug has two blades
with one wider than the other. A grounding type plug
has two blades and a third grounding prong. The wide
blade or the third prong are provided for your safety. If
the provided plug does not fit into your outlet, consult
an electrician for replacement of the obsolete outlet.
10) Protect the power cord from being walked on or
pinched particularly at plugs, convenience
receptacles, and the point where they exit from the
apparatus.
11) Only use attachments/accessories specified by the
manufacturer.
12) Use only with the cart, stand, tripod, bracket, or table
specified by the manufacturer, or sold with the
apparatus. When a cart is used, use caution when
moving the cart/apparatus combination to avoid
injury from tip-over.
13) Unplug this apparatus during lightning storms or
when unused for long periods of time.
14) Refer all servicing to qualified service personnel.
Servicing is required when the apparatus has been
damaged in any way, such as power-supply cord or
plug is damaged, liquid has been spilled or objects
have fallen into the apparatus, the apparatus has
been exposed to rain or moisture, does not operate
normally, or has been dropped.
D3-7-13-69_En
IMPORTANT NOTICE
THE MODEL NUMBER AND SERIAL NUMBER OF THIS
EQUIPMENT ARE ON THE REAR OR BOTTOM.
RECORD THESE NUMBERS ON PAGE 11 FOR FUTURE
REFERENCE.
D36-AP9-3*_A1_En
IMPORTANT
SAFETY
INSTRUCTIONS

4
En
Before start
How to read this guide
• Thank you for buying this Pioneer DJ product.
This guide provides a brief description of the procedures up until
connecting the unit to your computer and outputting audio. For the
detailed procedures, refer to the Operating Instructions.
Be sure to read both this guide and the Operating Instructions. Both
documents include important information that you must understand
before using this product.
After reading the instructions, store them in a safe place for future
reference.
— For instructions on acquiring the Operating Instructions, see
“Acquiring the manual” (p.4).
• In this guide, names of screens and menus displayed on the unit and
on the computer screen, as well as names of buttons and terminals,
etc., are indicated with brackets. (e.g. [f] button, [Files] panel,
[MASTER OUT] terminal)
• Please note that the screens and specifications of the software
described in this guide as well as the external appearance and
specifications of the hardware are currently under development and
may differ from the final specifications.
• Please note that depending on the operating system version, web
browser settings, etc., operation may differ from the procedures
described in this guide.
• This guide mainly explains on the function of the unit as a hardware.
For details on Serato DJ software, see the software manual supplied
with Serato DJ.
Features
This unit is an all-in-one DJ controller designed specifically for Serato’s
DJ software Serato DJ Lite.
Performance interfaces, such as “BIG JOG” or “PERFORMANCE PADS”,
are arranged comfortably to control functions included in “Serato DJ
Lite”. Complicated settings are not necessary, and DJ play can be started
soon after connecting the unit with a USB cable to a PC/Mac with
“Serato DJ Lite” installed.
What’s in the box
• USB cable
• Warranty (for some regions)
• Operating Instructions (Quick Start Guide) (this guide)
The included warranty is for the European region.
— For the North American region, the corresponding information is
provided on the last page of both the English and French versions
of the “Operating Instructions (Quick Start Guide).”
— For the Japanese region, the corresponding information is
provided on the back cover of the “Operating Instructions (Quick
Start Guide).”
Acquiring the manual
The various instructions are sometimes provided as files in PDF
format. Adobe
®
Reader
®
must be installed in order to view files in PDF
format.
Viewing the Latest Version of the
Operating Instructions
1 Launch a web browser on the computer and access
the Pioneer DJ site below.
pioneerdj.com
• To change the language of the screen, click the flag icon, or click the
GLOBAL icon on the bottom right of the screen and select a
language from the list.
2 Click [Support].
3 Click [Tutorials, manuals & documentation].
4 Click [DDJ-SB3] in the [DJ CONTROLLER] category.
5 Click the desired language from the list.
Downloading the Serato DJ Lite
software manual
1 Access the Serato site.
http://serato.com/
2 Click [Serato DJ Lite] from [PRODUCTS].
3 Click [DOWNLOAD SERATO DJ LITE].
4 Click [Manuals and Downloads].
5 Click the Serato DJ Lite software manual of the
required language.
About Serato DJ Lite
Serato DJ Lite is a DJ software application by Serato. DJ performances
are possible by connecting the computer on which this software is
installed to this unit.
Minimum operating environment
Supported
operating systems
CPU and required memory
macOS High Sierra 10.13,
macOS Sierra 10.12,
OS X 10.11
(latest updated)
Intel
®
processor, Core™ i3, i5, i7 1.07 GHz or better
4 GB or more of RAM
Windows
®
10 /
Windows
®
8.1 /
Windows
®
7
(latest service pack)
32 bit
Intel
®
processor, Core™ i3, i5, i7 1.07 GHz or better
4 GB or more of RAM
64 bit
Intel
®
processor, Core™ i3, i5, i7 1.07 GHz or better
4 GB or more of RAM
Others
USB port
A USB 2.0 port is required to connect the computer with
this unit.
Display resolution Resolution of 1 280 x 720 or greater
Internet connection
An Internet connection is required for registering the
“Serato.com” user account and downloading the
software.
• Operating System support assumes you are using the latest point
release for that version.
• Operation is not guaranteed on all computers, even if all the required
operating environment conditions indicated here are fulfilled.
• Depending on the computer’s power-saving settings, etc., the CPU
and hard disk may not provide sufficient processing capabilities. For
notebook computers in particular, make sure the computer is in the
proper conditions to provide constant high performance (for example
by keeping the AC power connected) when using Serato DJ Lite.
• Use of the Internet requires a separate contract with a provider
offering Internet services and payment of provider fees.
• For the latest information on the required operating environment and
compatibility as well as to acquire the latest operating system, refer
to “Software Info” under “DDJ-SB3” on the Pioneer DJ support site.
pioneerdj.com/support/
DDJ-SB3
DJ Controller
Contrôleur pour DJ
DJ Controller
DJ Controller
DJ Controller
Controlador DJ
Controlador para DJ
DJ Контроллер
pioneerdj.com/support/
http://serato.com/
For FAQs and other support information for this product, visit the above site.
Concernant les questions les plus fréquemment posées et les autres informations de support à propos de ce
produit, veuillez vous rendre sur le site ci-dessus.
Besuchen Sie für FAQs und andere Support-Informationen die oben aufgeführte Website.
Per FAQ e altre informazioni di supporto per questo prodotto, visitare il sito sopra indicato.
Voor FAQ's en andere supportinformatie voor dit product, bezoek de bovengenoemde website.
Para consultar las preguntas frecuentes y otra información de soporte de este producto, visite el sitio de arriba.
Relativamente às FAQ e outras informações de apoio relacionadas com este produto, visite o site em cima.
Ответы на часто задаваемые вопросы и другую информацию о поддержке данного устройства см. на
приведенном выше веб-сайте.
Русский
PortuguêsEspañolNederlandsItalianoDeutschFrançaisEnglish
Operating Instructions (Quick Start Guide)
Mode d’emploi (Guide de démarrage rapide)
Bedienungsanleitung (Kurzanleitung)
Istruzioni per l’uso (Guida di avvio veloce)
Handleiding (Snelstartgids)
Manual de instrucciones (Guía de inicio rápido)
Manual de instruções (Guia de início rápido)
Инструкции по эксплуатации
(Краткое руководство пользователя)

5
En
English
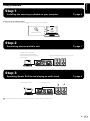
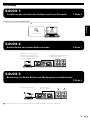
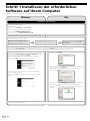
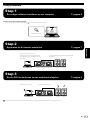
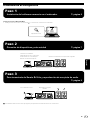
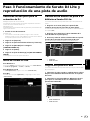
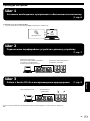
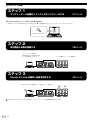
Setup procedure
Step 1
Installing the necessary software on your computer = page 6
Install Serato DJ Lite (Windows/Mac).
• Obtain Serato DJ Lite from the Serato site
and then install it on your computer.
http://serato.com/
Step 2
Connecting devices and this unit = page 7
Connect to your computer.
Be sure to use the USB cable
supplied with the unit for optimum
performance.
Connect the speakers with a built-in amplifier.
Step 3
Operating Serato DJ Lite and playing an audio track = page 8
Launch Serato DJ Lite. Play an audio track.
To obtain Serato DJ Lite, you need to separately register a user account on “Serato.com”.

6
En
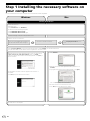
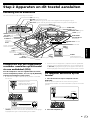
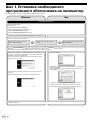
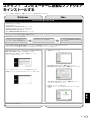
Step 1 Installing the necessary software on
your computer
Do not connect the unit to your computer until the installation has completed.
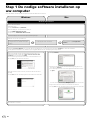
Mac
The installation is now complete.
The message of successful installation appears once installation is
completed.
Click [
Close
] to quit the Serato DJ Lite installer.
Read the terms of the license agreement carefully, and if you agree, select
[
I agree to the license terms and conditions
], then click [
Install
].
If you do not agree to the contents of the license agreement, click [
Close
] to
cancel installation.
Check [
Pioneer DJ DDJ-SB3
] for the model to be used and then click the [
Continue
] icon and download the file.
Unzip the downloaded file, then double-click the unzipped file to launch the installer.
Click [
Verify My Email Address
] in the
e-mail.
An e-mail is received from Serato.
Input your e-mail address and the password
you want to set and then select the region.
Create an account on “Serato.com”.
*The download page is subject to change without notice.
Access the Serato site.
http://serato.com/
Click [
Serato DJ Lite
] from [
PRODUCTS
].
The Serato DJ Lite download page* appears.
Click [
DOWNLOAD SERATO DJ LITE
].
Click [
DOWNLOAD SERATO DJ LITE
] again.
Installing Serato DJ Lite
Windows
1 Click [
Continue
].
2 Read the terms of the license agreement carefully, and then click
[
Continue
].
3 If you agree to the contents of the usage agreement, click [
Agree
].
If not, click [
Disagree
] to cancel installation.
4 Follow the instructions on the screen to install.
5 Click [
Close
] to quit the Serato DJ Lite installer.

7
En
English
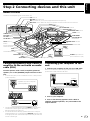
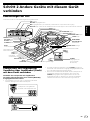
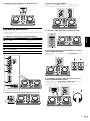
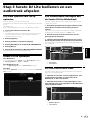
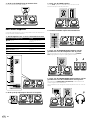
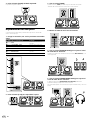
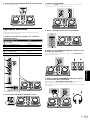
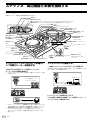
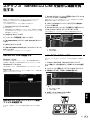
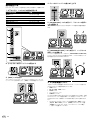
Step 2 Connecting devices and this unit
Names of Parts
For details, see the Operating Instructions of this unit.
USB terminal
MASTER output terminals
MIC input terminal (1/4” TS jack) *Supported unbalanced input only
MIC LEVEL control *When not using a microphone, turn the volume to the minimum level.
TEMPO slider
KEY LOCK button
FX LEVEL control
FX ON/OFF button
DECK switching
button
Jog dial
Pad mode select button
Performance pad
SHIFT button
SYNC button
CUE button
PLAY/PAUSE f button
LOOP beat change button
AUTO LOOP button
VINYL button
Deck 1
(left)
Deck 2
(right)
LOAD button
TRIM control
Rotary selector
EQ (HI/MID/LOW) controls
MASTER LEVEL control
HEADPHONE LEVEL control
FILTER control
HEADPHONES
CUE MASTER/1/2
select button
CHANNEL LEVEL indicator
Crossfader
Channel fader
PHONES output terminal
(3.5 mm stereo mini jack)
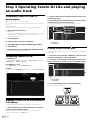
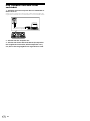
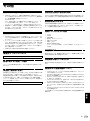
Connecting speakers with a built-in
amplifier to the unit with an audio
cable (RCA)
Connect speakers with a built-in amplifier, powered
speakers, etc. to the [MASTER] output terminals of this
unit.
• An audio cable (RCA) is not included with this unit. Please provide it
yourself separately.
Speakers with a built-in amplifier,
powered speakers, etc.
Earphones/headphones
• Connect earphones/headphones to the [PHONES] output terminal.
For details on connecting the input/output terminals, see the
Operating Instructions of this unit.
• Turn the volume of the device(s) (speakers with a built-in amplifier,
powered speakers, etc.) connected to the [MASTER] output terminals
to an appropriate level. Note that the output sound may be loud if the
volume is set too high.
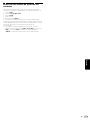
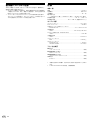
Connecting your computer to the
unit
1 Connect your computer to the unit via a USB cable.
Make a direct connection with the supplied USB cable for optimum
performance. A USB hub cannot be used.
USB cable (supplied)
Computer
2 Turn on your computer.
3 Turn on the device(s) (speakers with a built-in
amplifier, powered speakers, etc.) connected to the
output terminal.

8
En
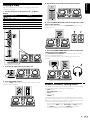
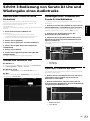
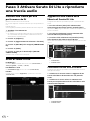
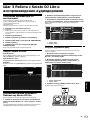
Step 3 Operating Serato DJ Lite and playing
an audio track
Obtaining a track for your DJ
performance
Obtain a track from your CD or the Internet.
For the supported formats, see the operating instructions for the Serato
DJ Lite.
http://serato.com/
A sample track can be obtained by following the procedure below.
1 Access the Pioneer DJ site.
pioneerdj.com
• To change the language of the screen, click the flag icon, or click the
GLOBAL icon on the bottom right of the screen and select a
language from the list.
2 Click [Support].
3 Click [Software & firmware updates].
4 Click [DDJ-SB3] in the [DJ CONTROLLER] category.
5 Click [Other].
6 Click [Download link] in [DDJ-SB3 SAMPLE TRACK].
The file of the sample track is downloaded.
Launching Serato DJ Lite
For Windows 7
From the Windows [Start] menu, click the [Serato DJ Lite] icon under
[All Programs] > [Serato] > [DJ Lite].
For Windows 8.1/10
From [Apps view], click the [Serato DJ Lite] icon.
For Mac
In Finder, open the [Applications] folder, then click the [Serato DJ Lite]
icon.
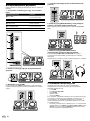
Files
Adding a track file to the Serato DJ
Lite library
The following describes the typical procedure for importing tracks.
1 Click the [Files] icon on the Serato DJ Lite software
screen to open the [Files] panel.
The contents of your computer or the peripheral connected to the
computer are displayed in the [Files] panel.
2 Click to select the track obtained from the tree view
in the [Files] panel.
3 Drag and drop the selected file to the [crates] panel
on the Serato DJ Lite software screen.
A crate is created and the tracks are added in the library panel.
a
b
a Files panel
b crates panel
Loading a track into the deck
The following describes the procedure for loading tracks into deck [1] as
an example.
1 Select the crate created in “Adding a track file to the
Serato DJ Lite library” in the crates panel.
2 Select the track saved in “Obtaining a track for your
DJ performance” in the library on the computer screen.
a
b
a Library panel
b crates panel
3 Press the [LOAD] button of the left side deck.
The track is loaded into the deck.

9
En
English
Playing a track
The following describes the procedure for outputting the channel 1
sound as an example.
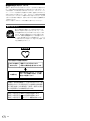
1 Set the positions of the controls, etc., as shown
below.
Names of controls, etc. Position
1 TRIM control
Turned fully counterclockwise
2 EQ (HI, MID, and LOW) controls
12 o’clock position
3 FILTER control
12 o’clock position
4 Channel fader
Minimum (lowest) position
5 MASTER LEVEL control
Turned fully counterclockwise
6 Crossfader
Center position
2 Press the [f] button to play the track.
3 Turn the [TRIM] control.
Adjust the [TRIM] control so that the channel level indicator’s orange
indicator lights at peak level.
4 Move the channel fader to the maximum level.
5 Turn the [MASTER LEVEL] control to adjust the audio
level of the speakers.
Adjust the audio level output from the [MASTER OUT] terminals to an
appropriate level.
6 Turn the [HEADPHONES LEVEL] control to adjust the
audio level of the headphones.
The [HEADPHONES CUE MASTER] select button must be set to ON to
monitor through the headphones.
It is recommended to set the control between the 9 and 10 o’clock
positions.
About the controls’ setting values
The setting values of the controls, etc., below are controlled individually
for the respective decks in the Serato DJ Lite software.
• TRIM control
• EQ (HI, MID, LOW) controls
• FILTER control
• Channel fader
• TEMPO slider
If the values controlled by Serato DJ Lite when the decks are switched
differ from the positions of this unit’s controls, faders, etc., the controls,
faders, etc., must be moved to the positions corresponding to the values
controlled by Serato DJ Lite before they will operate.
• The initial settings of decks 3 and 4 of Serato DJ Lite are the center
position for the [TRIM] control, [EQ (HI, MID, and LOW)] controls,
and [FILTER] control, ±0.0% for the [TEMPO] slider, and the
minimum (lowest) position for the channel fader.

10
En
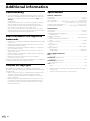
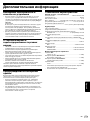
Additional information
Troubleshooting
• If you think that there is something wrong with this unit, check the
items in the “Troubleshooting” section on the Operating Instructions
of this unit, or access the Pioneer DJ site and check [FAQ] for the
[DDJ-SB3].
pioneerdj.com
Sometimes the problem may lie in another component. Inspect the
other components and electrical appliances being used. If the
problem cannot be rectified, ask your nearest Pioneer authorized
service center or your dealer to carry out repair work.
• This unit may not operate properly due to static electricity or other
external influences. In this case, proper operation may be restored by
unplugging the USB cable, then plugging it back in.
About trademarks and registered
trademarks
• “Pioneer DJ” is a trademark of PIONEER CORPORATION, and is used
under license.
• Windows is a registered trademark of Microsoft Corporation in the
United States and other countries.
• macOS, OS X and Finder are trademarks of Apple Inc., registered in
the U.S. and other countries.
• Intel and Intel Core are trademarks of Intel Corporation in the U.S.
and/or other countries.
• Adobe and Reader are trademarks of Adobe Systems Incorporated in
the U.S. and other countries.
• Serato DJ, Serato DJ Pro and Serato DJ Lite are registered
trademarks of Serato Limited.
The names of companies and products mentioned herein are trademarks
or registered trademarks of their respective owners.
Cautions on copyrights
Recordings you have made are for your personal enjoyment and
according to copyright laws may not be used without the consent of the
copyright holder.
• Music recorded from CDs, etc., is protected by the copyright laws of
individual countries and by international treaties. It is the full
responsibility of the person who has recorded the music to ensure
that it is used legally.
• When handling music downloaded from the Internet, etc., it is the
full responsibility of the person who has downloaded the music to
ensure that it is used in accordance with the contract concluded
with the download site.
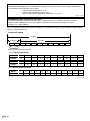
Specifications
General – Main Unit
Power supply .......................................................................................... DC 5 V
Rated current ....................................................................................... 500 mA
Main unit weight .........................................................................2.1 kg (4.6 lb)
Max. dimensions ................482.6 mm (W) × 58.5 mm (H) × 272.4 mm (D)
(19.0 in. (W) × 2.3 in. (H) × 10.7 in. (D))
Tolerable operating temperature .......................................... +5 °C to +35 °C
Tolerable operating humidity ........................5 % to 85 % (no condensation)
Audio Section
Sampling rate .....................................................................................44.1 kHz
D/A converter ......................................................................................... 24 bits
Rated output level/Load impedance
MASTER OUT .................................................................... 2.1Vrms/10kΩ
Frequency characteristic
USB ...................................................................................20 Hz to 20 kHz
S/N ratio (rated output, A-WEIGHTED)
USB ................................................................................................. 103 dB
Total harmonic distortion
USB ................................................................................................0.005 %
Input impedance
MIC ......................................................................................3kΩorhigher
Output impedance
MASTER OUT ..........................................................................1kΩorless
HEADPHONES ....................................................................... 10Ωorless
Input / Output terminals
MIC terminal
1/4” TS jack ......................................................................................... 1 set
MASTER OUT output terminal
RCA pin jack ....................................................................................... 1 set
HEADPHONES output terminal
3.5 mm stereo mini jack .................................................................... 1 set
USB terminal
B type .................................................................................................. 1 set
• The specifications and design of this product are subject to change
without notice.
• © 2018 Pioneer DJ Corporation. All rights reserved.


12
En
To register your product, find the nearest authorized service location, to
purchase replacement parts, operating instructions, or accessories,
please go to one of following URLs :
Pour enregistrer votre produit, trouver le service après-vente agréé le plus
proche et pour acheter des pièces de rechange, des modes d’emploi ou
des accessoires, reportez-vous aux URL suivantes :
In the USA/Aux Etats-Unis or In Canada/Aux Canada
http://www.pioneerelectronics.com
S018_B1_EnFr_PSV


2
Fr
Pour le Canada
AVERTISSEMENT
Cet appareil n’est pas étanche. Pour éviter les risques
d’incendie et de décharge électrique, ne placez près de
lui un récipient rempli d’eau, tel qu’un vase ou un pot
de fleurs, et ne l’exposez pas à des gouttes d’eau, des
éclaboussures, de la pluie ou de l’humidité.
D3-4-2-1-3_A1_Fr
AVERTISSEMENT
Pour éviter les risques d’incendie, ne placez aucune
flamme nue (telle qu’une bougie allumée) sur
l’appareil.
D3-4-2-1-7a_A1_Fr
Milieu de fonctionnement
Température et humidité du milieu de fonctionnement :
De +5 °C à +35 °C (de +41 °F à +95 °F) ; Humidité
relative inférieure à 85 % (orifices de ventilation non
obstrués)
N’installez pas l’appareil dans un endroit mal ventilé ou
un lieu soumis à une forte humidité ou en plein soleil
(ou à une forte lumière artificielle).
D3-4-2-1-7c*_A1_Fr
Lorsque vous utilisez ce produit, vérifiez les
informations concernant la sécurité sous l’appareil.
D3-4-2-2-4_B1_Fr
AVERTISSEMENT
Gardez les pièces de petite taille hors de la portée des
bébés et des enfants. En cas d’ingestion accidentelle,
veuillez contacter immédiatement un médecin.
D41-6-4_A1_Fr
Ce produit est destiné à une utilisation domestique
générale. Toute panne due à une utilisation autre qu'à
des fins privées (comme une utilisation à des fins
commerciales dans un restaurant, dans un autocar
ou sur un bateau) et qui nécessite une réparation
sera aux frais du client, même pendant la période de
garantie.
K041_A1_Fr
Pour l’Europe
Si vous souhaitez vous débarrasser de cet appareil, ne le
mettez pas à la poubelle avec vos ordures ménagères. Il
existe un système de collecte séparé pour les appareils
électroniques usagés, qui doivent être récupérés, traités
et recyclés conformément à la législation.
Les habitants des états membres de l’UE, de Suisse et de Norvège
peuvent retourner gratuitement leurs appareils électroniques
usagés aux centres de collecte agréés ou à un détaillant (si vous
rachetez un appareil similaire neuf).
Dans les pays qui ne sont pas mentionnés ci-dessus, veuillez
contacter les autorités locales pour savoir comment vous pouvez
vous débarrasser de vos appareils.
Vous garantirez ainsi que les appareils dont vous vous
débarrassez sont correctement récupérés, traités et recyclés et
préviendrez de cette façon les impacts néfastes possibles sur
l’environnement et la santé humaine.
K058b_A1_Fr
ATTENTION
POUR ÉVITER TOUT RISQUE D’ÉLECTROCUTION, NE
PAS ENLEVER LE COUVERCLE (NI LE PANNEAU
ARRIÈRE). AUCUNE PIÈCE RÉPARABLE PAR
L’UTILISATEUR NE SE TROUVE À L’INTÉRIEUR.
CONFIER TOUT ENTRETIEN À UN PERSONNEL
QUALIFIÉ UNIQUEMENT.
D3-4-2-1-1_B1_Fr
Ce point d’exclamation, placé dans un triangle équilatéral, a
pour but d’attirer l’attention de l’utilisateur sur la présence, dans
les documents qui accompagnent l’appareil, d’explications
importantes du point de vue de l’exploitation ou de l’entretien.
Ce symbole de l’éclair, placé dans un triangle équilatéral, a pour
but d’attirer l’attention de l’utilisateur sur la présence, à
l’intérieur du coffret de l’appareil, de “tensions dangereuses”
non isolées d’une grandeur suffisante pour représenter un
risque d’électrocution pour les êtres humains.
ATTENTION :
POUR ÉVITER TOUT RISQUE D’ÉLECTROCUTION, NE PAS
ENLEVER LE COUVERCLE (NI LE PANNEAU ARRIÈRE). AUCUNE
PIÈCE RÉPARABLE PAR L’UTILISATEUR NE SE TROUVE À
L’INTÉRIEUR. CONFIER TOUT ENTRETIEN À UN PERSONNEL
QUALIFIÉ UNIQUEMENT.
ATTENTION
DANGER D´ELECTROCUTION
NE PAS OUVRIR
IMPORTANT
D3-4-2-1-1b_A1_Fr
Le symbole graphique indiqué sur le produit
représente le courant alternatif.
Le symbole graphique indiqué sur le produit
représente le courant continu.
Le symbole graphique indiqué sur le produit
représente un équipement de Classe II.
D3-8-2-4_A1_Fr
ATTENTION
Ce produit a été testé dans des conditions de climats
tempéré et tropical.
D3-8-2-1-7a_A1_Fr
ATTENTION
Ce produit a été testé dans des conditions de climat
tempéré.
D3-8-2-1-7b_A1_Fr

3
Fr
Français
La protection de votre ouïe est entre vos
mains
Pour assurer le rendement optimal de votre matériel
et – plus important encore – la protection de votre ouïe,
réglez le volume à un niveau raisonnable. Pour ne pas
altérer votre sens de la perception, le son doit être clair
mais ne produire aucun vacarme et être exempt de
toute distorsion. Votre ouïe peut vous jouer des tours.
Avec le temps, votre système auditif peut en effet
s’adapter à des volumes supérieurs, et ce qui vous
semble un « niveau de confort normal » pourrait au
contraire être excessif et contribuer à endommager
votre ouïe de façon permanente. Le réglage de votre
matériel à un volume sécuritaire AVANT que votre ouïe
s’adapte vous permettra de mieux vous protéger.
CHOISISSEZ UN VOLUME SÉCURITAIRE:
• Réglez d’abord le volume à un niveau inférieur.
• Montez progressivement le volume jusqu’à un niveau
d’écoute confortable ; le son doit être clair et exempt
de distorsions.
• Une fois que le son est à un niveau confortable, ne
touchez plus au bouton du volume.
N’OUBLIEZ PAS DE RESPECTER LES
DIRECTIVES SUIVANTES:
• Lorsque vous montez le volume, assurez-vous de
pouvoir quand même entendre ce qui se passe
autour de vous.
• Faites très attention ou cessez temporairement
l’utilisation dans les situations pouvant s’avérer
dangereuses.
• N’utilisez pas des écouteurs ou un casque d’écoute
lorsque vous opérez un véhicule motorisé ; une telle
utilisation peut créer des dangers sur la route et est
illégale à de nombreux endroits.
S001a_A1_Fr
REMARQUE IMPORTANTE
LE NUMÉRO DE MODÈLE ET LE NUMÉRO DE SÉRIE
SE TROUVENT À L’ARRIÈRE OU SUR LE FOND DE
CET APPAREIL. NOTEZ CES NUMÉROS À LA PAGE
11 POUR VOUS Y RÉFÉRER ULTÉRIEUREMENT.
D36-AP9-3*_A1_Fr

4
Fr
Informations préliminaires
Comment lire ce guide
• Merci d’avoir acheté ce produit Pioneer DJ.
Ce guide décrit brièvement les procédures d’installation jusqu’au
branchement de l’appareil à votre ordinateur et à la sortie audio.
Pour consulter les procédures détaillées, reportez-vous au Mode
d’emploi.
Veuillez lire ce guide et le Mode d’emploi. Ces deux documents
contiennent des informations importantes que vous devez connaître
avant d’utiliser ce produit.
Une fois lus, conservez-les de façon à pouvoir vous y référer en cas
de nécessité.
— Concernant les instructions relatives à l’utilisation du Mode
d’emploi, veuillez vous rendre à la rubrique « Utiliser le manuel »
(p.4).
• Dans ce guide, les noms des écrans et des menus s’affichant sur
l’écran de l’appareil et sur celui de l’ordinateur, ainsi que les noms
de boutons et prises, etc. sont indiqués entre crochets. (Ex. bouton
[f], panneau [Files], prise [MASTER OUT])
• Veuillez noter que les écrans et les spécifications techniques du
logiciel décrits dans ce guide, ainsi que l’aspect externe et les
caractéristiques techniques du matériel sont en cours de
développement de sorte que les spécifications finales peuvent varier.
• Veuillez noter que selon la version du système d’exploitation, les
réglages du navigateur web, etc., le fonctionnement peut être
différent des marches à suivre indiquées dans ce guide.
• Ce guide donne principalement des explications sur le
fonctionnement du dispositif en tant qu’appareil. Si vous souhaitez
obtenir des informations sur le logiciel Serato DJ, consultez le
manuel du logiciel délivré avec Serato DJ.
Caractéristiques
Cet appareil est un contrôleur DJ tout-en-un destiné notamment au
logiciel DJ Serato DJ Lite de Serato.
Les interfaces des performances, telles que « BIG JOG » ou
« PERFORMANCE PADS », sont ordonnées simplement pour
commander les fonctions incluses dans « Serato DJ Lite ». Cela ne
requiert aucun paramètre compliqué, et le lecteur DJ peut démarrer dès
que l’appareil est relié à l’aide d’un câble USB au PC/Mac, avec « Serato
DJ Lite » installé.
Contenu du carton
d’emballage
• Câble USB
• Garantie (pour certaines régions)
• Mode d’emploi (Guide de démarrage rapide) (ce guide)
La garantie incluse est destinée à la région européenne.
— Pour la région nord-américaine, les informations
correspondantes se trouvent à la dernière page des versions
anglaises et françaises du « Mode d’emploi (Guide de démarrage
rapide) ».
— Pour la région japonaise, les informations correspondantes se
trouvent sur la couverture arrière du « Mode d’emploi (Guide de
démarrage rapide) ».
Utiliser le manuel
Les différentes instructions sont parfois fournies sous forme de
fichiers en format PDF. Vous devez installer Adobe
®
Reader
®
afin de
visualiser les fichiers en format PDF.
Lire la dernière version du Mode
d’emploi
1 Lancez votre navigateur web sur l’ordinateur et
accédez au site Pioneer DJ suivant:
pioneerdj.com
• Pour changer la langue de l’écran, veuillez cliquer sur l’icône
drapeau, ou sur l’icône GLOBAL en bas à droite de l’écran, puis
sélectionnez une langue dans la liste.
2 Cliquez sur [Aide].
3 Cliquez sur [Tutoriels, manuels & documentation].
4 Cliquez sur [DDJ-SB3] dans la catégorie
[CONTRÔLEUR DJ].
5 Cliquez sur la langue souhaitée à partir de la liste.
Télécharger le manuel du logiciel Serato
DJ Lite
1 Accédez au site Serato.
http://serato.com/
2 Cliquez sur [Serato DJ Lite] à partir de [PRODUCTS].
3 Cliquez sur [DOWNLOAD SERATO DJ LITE].
4 Cliquez sur [Manuals and Downloads].
5 Cliquez sur le manuel du logiciel Serato DJ Lite de la
langue souhaitée.
À propos de Serato DJ Lite
Serato DJ Lite est une application logicielle DJ de Serato. Vous pouvez
obtenir des Performances DJ en connectant l’ordinateur sur lequel le
logiciel est installé à cet appareil.
Environnement fonctionnel minimal
Systèmes
d’exploitation pris
en charge
Processeur et mémoire requise
macOS High Sierra 10.13,
macOS Sierra 10.12,
OS X 10.11
(dernière mise à jour)
Intel
®
processor, Core™ i3, i5, i7 1,07 GHz ou
supérieur
4 Go ou plus de RAM
Windows
®
10 /
Windows
®
8.1 /
Windows
®
7
(dernier Service Pack)
32 bits
Intel
®
processor, Core™ i3, i5, i7 1,07 GHz ou
supérieur
4 Go ou plus de RAM
64 bits
Intel
®
processor, Core™ i3, i5, i7 1,07 GHz ou
supérieur
4 Go ou plus de RAM
Divers
Port USB
Un port USB 2.0 est indispensable pour raccorder cet
ordinateur à cet appareil.
Résolution de l’écran Résolution de 1 280 × 720 ou plus
Connexion Internet
Une connexion Internet est nécessaire pour enregistrer
un compte utilisateur sur « Serato.com » et télécharger
le logiciel.
• L’assistance pour le système d’exploitation présuppose que vous
utilisez la toute dernière édition de cette version.
DDJ-SB3
DJ Controller
Contrôleur pour DJ
DJ Controller
DJ Controller
DJ Controller
Controlador DJ
Controlador para DJ
DJ Контроллер
pioneerdj.com/support/
http://serato.com/
For FAQs and other support information for this product, visit the above site.
Concernant les questions les plus fréquemment posées et les autres informations de support à propos de ce
produit, veuillez vous rendre sur le site ci-dessus.
Besuchen Sie für FAQs und andere Support-Informationen die oben aufgeführte Website.
Per FAQ e altre informazioni di supporto per questo prodotto, visitare il sito sopra indicato.
Voor FAQ's en andere supportinformatie voor dit product, bezoek de bovengenoemde website.
Para consultar las preguntas frecuentes y otra información de soporte de este producto, visite el sitio de arriba.
Relativamente às FAQ e outras informações de apoio relacionadas com este produto, visite o site em cima.
Ответы на часто задаваемые вопросы и другую информацию о поддержке данного устройства см. на
приведенном выше веб-сайте.
Русский
PortuguêsEspañolNederlandsItalianoDeutschFrançaisEnglish
Operating Instructions (Quick Start Guide)
Mode d’emploi (Guide de démarrage rapide)
Bedienungsanleitung (Kurzanleitung)
Istruzioni per l’uso (Guida di avvio veloce)
Handleiding (Snelstartgids)
Manual de instrucciones (Guía de inicio rápido)
Manual de instruções (Guia de início rápido)
Инструкции по эксплуатации
(Краткое руководство пользователя)

5
Fr
Français
• Le fonctionnement sur tous les ordinateurs n’est pas garanti, même
lorsque les conditions de fonctionnement mentionnées ci-dessus
sont remplies.
• Selon les réglages d’économie d’énergie de l’ordinateur, etc., la
capacité de traitement du processeur et du disque dur peut être
insuffisante. Pour les ordinateurs portables, assurez-vous que
l’ordinateur soit en état de fournir sa performance optimale (par
exemple, en laissant le cordon d’alimentation branché), si vous
utilisez Serato DJ Lite.
• L’emploi d’Internet exige la signature d’un contrat distinct avec un
fournisseur de services Internet et le paiement de droits.
• Si vous souhaitez obtenir les toutes dernières informations relatives à
l’environnement d’exploitation et à la compatibilité requis ainsi que
pour faire l’acquisition du dernier système d’exploitation, veuillez
vous référer à la rubrique « Software Info » sous « DDJ-SB3 » sur le
site d’assistance technique Pioneer DJ.
pioneerdj.com/support/

6
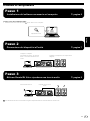
Fr
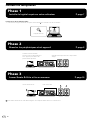
Procédure de configuration
Phase 1
Installer le logiciel requis sur votre ordinateur = page 7
Installez Serato DJ Lite (Windows/Mac).
• Procurez-vous le logiciel Serato DJ Lite à partir du site Serato
puis installez-le sur votre ordinateur.
http://serato.com/
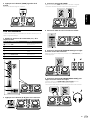
Phase 2
Brancher les périphériques et cet appareil = page 8
Branchez à votre ordinateur.
Veillez à utiliser le câble USB fourni
avec l’appareil pour obtenir des
performances optimales.
Branchez les haut-parleurs avec l’amplificateur
intégré.
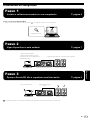
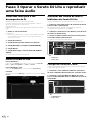
Phase 3
Lancer Serato DJ Lite et lire un morceau = page 10
Lancez Serato DJ Lite. Lisez un morceau.
Pour obtenir Serato DJ Lite, vous devez enregistrer un compte utilisateur distinct sur « Serato.com ».

7
Fr
Français
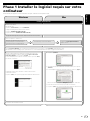
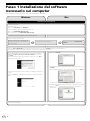
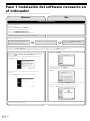
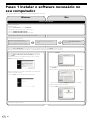
Phase 1 Installer le logiciel requis sur votre
ordinateur
Ne branchez pas l’appareil à votre ordinateur tant que l’installation n’est pas terminée.
Mac
L’installation est maintenant terminée.
Le message indiquant que l’installation a réussi s’affiche une fois
l’installation terminée.
Cliquez sur [
Close
] pour quitter le programme d’installation Serato DJ Lite.
Veuillez lire attentivement les clauses du contrat de licence, et si vous
acceptez les présentes conditions, sélectionnez [
I agree to the license
terms and conditions
], puis cliquez sur [
Install
].
Si vous n’acceptez pas le contenu du contrat de licence, cliquez sur [
Close
]
pour annuler l’installation.
Créez un compte sur « Serato.com ».
*La page de téléchargement peut faire l’objet de modifications sans préavis.
Accédez au site Serato.
http://serato.com/
Cliquez sur [
Serato DJ Lite
] à partir de [
PRODUCTS
].
La page de téléchargement Serato DJ Lite* s’affiche.
Cliquez sur [
DOWNLOAD SERATO DJ LITE
].
Cliquez à nouveau sur [
DOWNLOAD SERATO DJ LITE
].
Installer Serato DJ Lite
Windows
1 Cliquez sur [
Continue
].
2 Lisez attentivement les conditions du contrat de licence, puis cliquez sur
[
Continue
].
3 Si vous acceptez le contenu du contrat d’utilisation, cliquez sur [
Agree
].
Dans le cas contraire, cliquez sur [
Disagree
] pour annuler l’installation.
4 Suivez les instructions à l’écran pour procéder à l’installation.
5 Cliquez sur [
Close
] pour quitter le programme d’installation Serato DJ Lite.
Saisissez votre adresse électronique et le
mot de passe que vous souhaitez définir,
puis sélectionnez la zone géographique.
Cliquez sur [
Verify My Email Address
]
dans le courriel.
Vous avez reçu un courriel de Serato.
Cochez [
Pioneer DJ DDJ-SB3
] pour le modèle que vous devez utiliser, puis cliquez sur l’icône [
Continue
] et téléchargez le fichier.
Décompressez le fichier téléchargé, puis cliquez deux fois sur le fichier décompressé afin de lancer le programme d’installation.

8
Fr
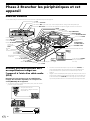
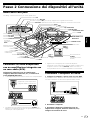
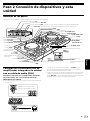
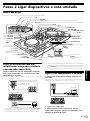
Phase 2 Brancher les périphériques et cet
appareil
Noms des éléments
Si vous souhaitez plus d’informations, veuillez consulter le Mode d’emploi de cet appareil.
Prise USB
Prise de sortie MASTER
Prise d’entrée MIC (jack TS de 1/4") *Prend uniquement en charge l’entrée asymétrique
Commande MIC LEVEL *Si vous n’utilisez pas de microphone, réglez le volume au minimum.
Curseur TEMPO
Bouton KEY LOCK
Commande FX LEVEL
Bouton FX ON/OFF
Bouton de
commutation
DECK
Molette
Jog
Bouton sélectionné
mode Pad
Performance pad
Bouton SHIFT
Bouton SYNC
Bouton CUE
Bouton f PLAY/PAUSE
Bouton pour changer le
rythme LOOP
Bouton AUTO LOOP
Bouton VINYL
Platine 1
(gauche)
Platine 2
(droite)
Bouton LOAD
Commande TRIM
Sélecteur rotatif
Commandes EQ (HI/MID/LOW)
Commande MASTER LEVEL
Commande HEADPHONE LEVEL
Commande FILTER
Sélectionnez le
bouton
HEADPHONES
CUE MASTER/1/2
Indicateur CHANNEL LEVEL
Crossfader
Fader de canal
Prise de sortie PHONES
(minijack stéréo de
3,5 mm)
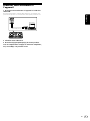
Brancher des hauts-parleurs avec
un amplificateur intégré sur
l’appareil à l’aide d’un câble audio
(RCA)
Branchez les hauts-parleurs avec un amplificateur
intégré, des enceintes amplifiées, etc. aux prises de
sortie [MASTER] de cet appareil.
• Cet appareil ne fournit pas de câble audio (RCA). Veuillez vous en
procurer un par vous-même.
Haut-parleurs avec un
amplificateur intégré, enceintes
amplifiées, etc.
Écouteurs/casques
• Branchez les écouteurs/casque à la prise de sortie [PHONES]. Si
vous souhaitez obtenir des informations sur le branchement aux
prises d’entrée/sortie, reportez-vous au Mode d’emploi de cet
appareil.
• Réglez le volume du/des périphérique(s) (les hauts-parleurs avec un
amplificateur intégré, les enceintes amplifiées, etc.) branché(s) aux
prises d’entrée/sortie [MASTER] au niveau approprié. Veuillez noter
que le son peut être très fort si le niveau sonore est réglé trop haut.
ページが読み込まれています...
ページが読み込まれています...
ページが読み込まれています...
ページが読み込まれています...
ページが読み込まれています...
ページが読み込まれています...
ページが読み込まれています...
ページが読み込まれています...
ページが読み込まれています...
ページが読み込まれています...
ページが読み込まれています...
ページが読み込まれています...
ページが読み込まれています...
ページが読み込まれています...
ページが読み込まれています...
ページが読み込まれています...
ページが読み込まれています...
ページが読み込まれています...
ページが読み込まれています...
ページが読み込まれています...
ページが読み込まれています...
ページが読み込まれています...
ページが読み込まれています...
ページが読み込まれています...
ページが読み込まれています...
ページが読み込まれています...
ページが読み込まれています...
ページが読み込まれています...
ページが読み込まれています...
ページが読み込まれています...
ページが読み込まれています...
ページが読み込まれています...
ページが読み込まれています...
ページが読み込まれています...
ページが読み込まれています...
ページが読み込まれています...
ページが読み込まれています...
ページが読み込まれています...
ページが読み込まれています...
ページが読み込まれています...
ページが読み込まれています...
ページが読み込まれています...
ページが読み込まれています...
ページが読み込まれています...
ページが読み込まれています...
ページが読み込まれています...
ページが読み込まれています...
ページが読み込まれています...
ページが読み込まれています...
ページが読み込まれています...
ページが読み込まれています...
ページが読み込まれています...
ページが読み込まれています...
ページが読み込まれています...
ページが読み込まれています...
ページが読み込まれています...
ページが読み込まれています...
ページが読み込まれています...
ページが読み込まれています...
ページが読み込まれています...
ページが読み込まれています...
ページが読み込まれています...
ページが読み込まれています...
ページが読み込まれています...
ページが読み込まれています...
ページが読み込まれています...
ページが読み込まれています...
ページが読み込まれています...
ページが読み込まれています...
ページが読み込まれています...
ページが読み込まれています...
ページが読み込まれています...
ページが読み込まれています...
ページが読み込まれています...
ページが読み込まれています...
ページが読み込まれています...
ページが読み込まれています...
ページが読み込まれています...
ページが読み込まれています...
ページが読み込まれています...
ページが読み込まれています...
ページが読み込まれています...
ページが読み込まれています...
ページが読み込まれています...
ページが読み込まれています...
ページが読み込まれています...
ページが読み込まれています...
ページが読み込まれています...
-
 1
1
-
 2
2
-
 3
3
-
 4
4
-
 5
5
-
 6
6
-
 7
7
-
 8
8
-
 9
9
-
 10
10
-
 11
11
-
 12
12
-
 13
13
-
 14
14
-
 15
15
-
 16
16
-
 17
17
-
 18
18
-
 19
19
-
 20
20
-
 21
21
-
 22
22
-
 23
23
-
 24
24
-
 25
25
-
 26
26
-
 27
27
-
 28
28
-
 29
29
-
 30
30
-
 31
31
-
 32
32
-
 33
33
-
 34
34
-
 35
35
-
 36
36
-
 37
37
-
 38
38
-
 39
39
-
 40
40
-
 41
41
-
 42
42
-
 43
43
-
 44
44
-
 45
45
-
 46
46
-
 47
47
-
 48
48
-
 49
49
-
 50
50
-
 51
51
-
 52
52
-
 53
53
-
 54
54
-
 55
55
-
 56
56
-
 57
57
-
 58
58
-
 59
59
-
 60
60
-
 61
61
-
 62
62
-
 63
63
-
 64
64
-
 65
65
-
 66
66
-
 67
67
-
 68
68
-
 69
69
-
 70
70
-
 71
71
-
 72
72
-
 73
73
-
 74
74
-
 75
75
-
 76
76
-
 77
77
-
 78
78
-
 79
79
-
 80
80
-
 81
81
-
 82
82
-
 83
83
-
 84
84
-
 85
85
-
 86
86
-
 87
87
-
 88
88
-
 89
89
-
 90
90
-
 91
91
-
 92
92
-
 93
93
-
 94
94
-
 95
95
-
 96
96
-
 97
97
-
 98
98
-
 99
99
-
 100
100
-
 101
101
-
 102
102
-
 103
103
-
 104
104
-
 105
105
-
 106
106
-
 107
107
-
 108
108


他の言語で
- italiano: Pioneer DDJ-SB3 Manuale utente
- español: Pioneer DDJ-SB3 Manual de usuario
- français: Pioneer DDJ-SB3 Manuel utilisateur
- português: Pioneer DDJ-SB3 Manual do usuário