
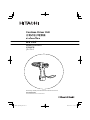
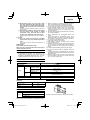
Cordless Driver Drill
สว่านไขควงไร้สาย
DS 7DF
Handling instructions
คู่มือการใช้งาน
Read through carefully and understand these instructions before use.
โปรดอ่านโดยละเอียดและทำความเข้าใจก่อนใช้งาน

2
12
34
56
7
1
1
2
2
3
4
5
6
7
!
0
0
@
$
#
%
^
*
&
)
q
w
w
(
1
9
8

English
ไทย
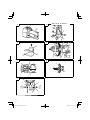
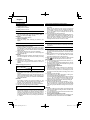
1
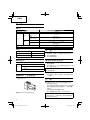
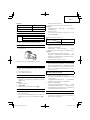
Rechargeable battery
แบตเตอรี
แบบรีชาร์จ
2
Latch
สลัก
3
Pull out
ดึงออก
4
Insert
เส
ี
ยบเข้า
5
Handle
มือจับ
6
Push
ดัน
7
Insert
เส
ี
ยบเข้า
8
Pilot lamp
ไฟแสดง
9
Hole for connecting the rechargeable
battery
ช่องสำหรับใส
่
แบตเตอรี
แบบรีชาร์จ
0
mark
เครื
องหมาย
!
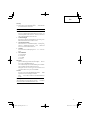
Clutch dial
ตัวเลื
อนควบคุมคลัตช์
@
Triangle mark
เครื
องหมายสามเหลี
ยม
#
Weak
แรงน้อย
$
Strong
แรงมาก
%
White line
เส
้
นส
ี
ขาว
^
Ring
วงแหวน
&
Sleeve
ปลอก
*
Tighten
ขันให้แน่น
(
Loosen
คลาย
)
Trigger switch
สวิทซ์ ไก
q
Selector button
ปุ่มเลือก
w
R
and
L
marks
R
L
เครื
องหมาย
R
และ
L
3

English
4
GENERAL SAFETY RULES
WARNING!
Read all instructions
Failure to follow all instructions listed below may result in
electric shock, fi re and/or serious injury.
The term “power tool” in all of the warnings listed below
refers to your mains operated (corded) power tool or battery
operated (cordless) power tool.
SAVE THESE INSTRUCTIONS
1) Work area
a) Keep work area clean and well lit.
Cluttered and dark areas invite accidents.
b) Do not operate power tools in explosive
atmospheres, such as in the presence of
fl ammable liquids, gases or dust.
Power tools create sparks which may ignite the dust
of fumes.
c) Keep children and bystanders away while
operating a power tool.
Distractions can cause you to lose control.
2)
Electrical safety
a) Power tool plugs must match the outlet.
Never modify the plug in any way.
Do not use any adapter plugs with earthed
(grounded) power tools.
Unmodifi ed plugs and matching outlets will reduce
risk of electric shock.
b) Avoid body contact with earthed or grounded
surfaces such as pipes, radiators, ranges and
refrigerators.
There is an increased risk of electric shock if your
body is earthed or grounded.
c) Do not expose power
tools to rain or wet
conditions.
Water entering a power tool will increase the risk of
electric shock.
d) Do not abuse the cord. Never use the cord for
carrying, pulling or unplugging the power tool.
Keep cord away from heat, oil, sharp edges or
moving parts.
Damaged or entangled cords increase the risk of
electric shock.
e) When operating a power tool outdoors, use an
extension cord suitable for outdoor
use.
Use of a cord suitable for outdoor use reduces the
risk of electric shock.
3) Personal safety
a) Stay alert, watch what you are doing and use
common sense when operating a power tool.
Do not use a power tool while you are tired
or under the infl uence of drugs, alcohol or
medication.
A moment of inattention while operating power tools
may result in serious personal injury.
b) Use safety equipment. Always wear eye
protection.
Safety equipment such as dust mask, non-skid
safety shoes, hard hat, or hearing protection used for
appropriate conditions will reduce personal injuries.
c) Avoid accidental starting. Ensure the switch is in
the off position before plugging in.
Carrying power tools with your fi nger on the switch or
plugging in power tools that have the switch on invites
accidents.
d) Remove any adjusting key or wrench before
turning the power tool on.
A wrench or a key left attached to a rotating part of the
power tool may result in personal injury.
e) Do not overreach. Keep proper footing and
balance at all times.
This enables better control of the power tool in
unexpected situations.
f) Dress properly. Do not wear
loose clothing or
jewellery. Keep your hair, clothing and gloves
away from moving parts.
Loose clothes, jewellery or long hair can be caught in
moving parts.
g) If devices are provided for the connection of
dust extraction and collection facilities, ensure
these are connected and properly used.
Use of these devices can reduce dust related
hazards.
4) Power tool use and care
a) Do not force the power tool. Use the
correct
power tool for your application.
The correct power tool will do the job better and safer
at the rate for which it was designed.
b) Do not use the power tool if the switch does not
turn it on and off .
Any power tool that cannot be controlled with the
switch is dangerous and must be repaired.
c) Disconnect the plug from the power source
before making any adjustments, changing
accessories, or storing power tools.
Such preventive safety measures reduce the risk of
starting the power tool accidentally.
d) Store idle power tools out
of the reach of children
and do not allow persons unfamiliar with the
power tool or these instructions to operate the
power tool.
Power tools are dangerous in the hands of untrained
users.
e) Maintain power tools. Check for misalignment or
binding of moving parts, breakage of parts and
any other condition that may aff ect the power
tools’
operation.
If damaged, have the power tool repaired before
use.
Many accidents are caused by poorly maintained
power tools.
f) Keep cutting tools sharp and clean.
Properly maintained cutting tools with sharp cutting
edges are less likely to bind and are easier to
control.
g) Use the power tool, accessories and tool bits
etc., in accordance with these instructions and
in the manner intended for the particular type
of power tool, taking into account the working
conditions
and the work to be performed.
Use of the power tool for operations diff erent from
intended could result in a hazardous situation.
5) Battery tool use and care
a) Ensure the switch is in the off position before
inserting battery pack.
Inserting the battery pack into power tools that have
the switch on invites accidents.
b) Recharge only with the charger specifi ed by the
manufacturer.
A charger that is suitable for one type of battery pack
may create a risk of fi re when used with another
battery pack.
c) Use power tools only with specifi cally designated
battery packs.
Use of any other battery packs may create a risk of
injury and fi re.

English
5
G
d) When battery pack is not in use, keep it away
from other metal objects like paper clips, coins,
keys, nails, screws, or other small metal objects
that can make a connection from one terminal to
another.
Shorting the battery terminals together may cause
burns or a fi re.
e) Under abusive conditions, liquid may be ejected
from the battery; avoid
contact. If contact
accidentally occurs, fl ush with water. If liquid
contacts eyes, additionally seek medical help.
Liquid ejected from the battery may cause irritation or
burns.
6) Service
a) Have your power tool serviced by a qualifi ed
repair person using only identical replacement
parts.
This will ensure that the safety of the power tool is
maintained.
PRECAUTION
Keep children and infi rm persons away.
When not in use, tools should be
stored out of reach of
children and infi rm persons.
PRECAUTIONS FOR CORDLESS DRIVER DRILL
1. Always charge the battery at a temperature of 10 –40°C.
A temperature of less than 10°C will result in over
charging which is dangerous. The battery cannot be
charged at a temperature higher than 40°C. The most
suitable temperature for charging is that of 20 – 25°C.
2. When one
charging is completed, leave the charger at
least 15 minutes before the next charging of battery.
Do not charge more than two batteries consecutively.
3. Do not charge the battery for more than 2 hours. The
battery will be fully charged in about 1 hour and charging
should be stopped when
1 hour has elapsed from
commencement. Disconnect the charger power cord
from the receptacle.
4. Do not allow foreign matter to enter the hole for connecting
the rechargeable battery.
5. Never disassemble the rechargeable battery and
charger.
6. Never short-circuit the rechargeable battery. Short-
circuiting the battery will cause a great electric
current
and overheat. It results in burn or damage to the battery.
7. Do not dispose of the battery in fi re.
If the battery is burnt, it may explode.
8. When drilling in wall, fl oor or ceiling, check for buried
electric power cord, etc.
9. Bring the battery to the shop from
which it was purchased
as soon as the post-charging battery life becomes too
short for practical use. Do not dispose of the exhausted
battery.
10. Using an exhausted battery will damage the charger.
11. Do not insert object into the air ventilation slots of the
charger.
Inserting metal objects or infl ammables
into the charger
air ventilation slots will result in electrical shock hazard or
damaged charger.
12. When mounting a bit into the keyless chuck, tighten the
sleeve adequately. If the sleeve is not tight, the bit may
slip or come off , causing injury.
SPECIFICATIONS
POWER TOOL
Model DS7DF
No-load speed 0 – 600/min
Capacity
Drilling
Wood
(Thickness 18 mm)
15 mm
Metal
(Thickness 1.6 mm)
Steel: 10 mm,
Aluminum: 10 mm
Driving
Machine screw 6 mm
Wood screw
5.1 mm (diameter) × 32 mm (length)
(Requires a pilot hole)
Rechargeable battery
EB712S (1.2 Ah): Ni-Cd 7.2 V
Weight
1.2 kg
CHARGER
Model UC7SD
Charging voltage 7.2 V
Weight 1.1 kg
STANDARD ACCESSORIES
DS7DF
1 Plus driver bit (No. 2 × 55L) .................... 1
2 Charger (UC7SD) .................................. 1
3 Plastic case ............................................ 1
Standard accessories are subject to change without notice.
OPTIONAL ACCESSORIES (sold separately)
1. Battery (EB712S)
Optional accessories are subject to change without notice.

English
6
APPLICATIONS
○ Driving and removing of machine screws, wood screws,
tapping screws, etc.
○ Drilling of various metals.
○ Drilling of various woods.
BATTERY REMOVAL/INSTALLATION
1. Battery removal
Hold the handle tightly and push the battery latch to
remove the battery (See Figs. 1 and 2).
CAUTION
Never short-circuit the battery.
2. Battery installation
Insert the battery while observing its direction (see
Fig. 2).
CHARGING
Before using the driver drill, charge the battery as follows.
1. Insert the battery into the charger.
Position the battery so that the nameplate faces toward
the nameplate of the charger and press in the battery
until it comes into contact with the bottom surface (See
Figs. 1 and 3).
2.
Connect the charger power cord to the receptacle.
Connecting the power cord will turn on the charger (the
pilot lamp lights up).
CAUTION
If the pilot lamp does not light up, pull out the power cord
from the receptacle and check the battery mounting
condition.
(1) Regarding recharging time
Depending on the
combination of the charger and
batteries, the charging time will become as shown in
Table 1.
Table 1 Charging time (At 20°C)
Charger
Battery
UC7SD
EB712S Approx. 50 min.
The battery charging time becomes longer when a
temperature is low or the voltage of the power source is
too low.
When the pilot lamp does not go off even if more than two
hours have elapsed after starting of the charging, stop
the charging and
contact your HITACHI AUTHORIZED
SERVICE CENTER.
CAUTION
If the battery is heated due to direct sunlight, etc., just
after operation, the charger pilot lamp may not light up. At
that time, cool the battery fi rst, then start charging.
3. Disconnect the charger power cord from the receptacle.
4. Hold the charger tight
and pull out the battery.
Regarding electric discharge in case of new batteries,
etc.
As the internal chemical substance of new batteries
and batteries that have not been used for an extended
period is not activated, the electric discharge might be
short when using them the fi rst and second time. This is
a temporary phenomenon, and
normal time required for
recharging will be restored by recharging the batteries
2 – 3 times.
How to make the batteries perform longer.
(1) Recharge the batteries before they become completely
exhausted.
When you feel that the power of the tool becomes
weaker, stop using the tool and recharge its battery. If
you continue to use the tool and exhaust the electric
current, the battery may be
damaged and its life will
become shorter.
(2) Avoid recharging at high temperatures.
A rechargeable battery will be hot immediately after use.
If such a battery is recharged immediately after use, its
internal chemical substance will deteriorate, and the
battery life will be shortened. Leave the battery and
recharge it after
it has been cooled for a while.
PRIOR TO OPERATION
1. Setting up and checking the work environment
Check if the work environment is suitable by following the
precautions.
HOW TO USE
1. Confi rm the clutch dial position (See Fig. 4)
The tighthening torque of this unit can be adjusted
according to the clutch dial position, at which the clutch
dial is set.
(1) When using this unit as a screwdriver, line up the one of
the numbers “1, 3, 5 …
22” on the clutch dial, or the white
dots with the triangle mark on the outer body.
(2) When using this unit as a drill, align the clutch dial drill
mark “
” with the triangle mark on the outer body.
CAUTION
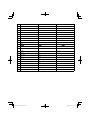
○ The clutch dial cannot be set between the numbers “1, 3,
5 … 22” or the white dots.
○ Do not use with the clutch dial numeral between “22” and
the white line at the middle of the drill mark. Doing so
may
cause damage (See Fig. 5).
2. Tightening torque adjustment
(1) Tightening torque
Tightening torque should correspond in its intensity to
the screw diameter. When too strong torque is used,
the screw head may be broken or be damaged. Be sure
to adjust the clutch dial position according to the screw
diameter.
(2) Tightening torque indication
The tightening torque diff ers depending on the type of
screw and the material being tightened.
The unit indicates the tightening torque with the numbers
“1, 3, 5 … 22” on the cluch dial, and the white dots. The
tightening torque at position “1” is
the weakest and the
torque is strongest at the highest number (See Fig. 4).
(3) Adjusting the tightening torque
Rotate the clutch dial and align the numbers “1, 3, 5 …
22” on the clutch dial, or the white dots with the triangle
mark on the outer body. Adjust the clutch
dial in the weak
or the strong torque direction according to the torque you
need.
CAUTION
○ The motor rotation may be locked to cease while the unit
is used as a drill. While operating the driver drill, take care
not to lock the motor.
○ Too long hammering may cause the
screw broken due to
excessive tightening force.
3. The scope and suggestions for uses
The usable scope for various types of work based on the
mechanical structure of this unit is shown in Table 2.

English
7
G
Table 2
Work Suggestions
Drilling
Wood
Use for drilling purpose.Steel
Aluminum
Driving
Machine screw Use the bit or socket matching the screw diameter.
Wood screw Use after drilling a pilot hole.
4. Mounting and dismounting of the bit.
(1) After inserting a driver bit, etc. into the keyless drill chuck,
fi rmly grasp the ring and tighten the sleeve by turning it
toward the right (in the clockwise direction as viewed
from the front) (See Fig. 6).
○ If the sleeve becomes loose
during operation, tighten it
further. The tightening force becomes stronger when the
sleeve is tightened additionally.
(2) Dismounting the bit
Firmly grasp the ring and loosen the sleeve by turning
it toward the left (in the counter-clockwise direction as
viewed from the front) (See Fig. 6).
CAUTION
○ When it is no
longer possible to loosen the sleeve, use a
vise or similar instrument to secure the bit. Set the clutch
mode between 1 and 10 and then turn the sleeve to the
loose side (left side) while operating the clutch. It should
be easy now to loosen the sleeve.
NOTE
○ There is
a plus driver bit on side of the main unit.
The bit can be removed by pulling it forward. After using
the bit, make sure to fi rmly attach it to the main body
again.
5. Confi rm that the battery is mounted correctly
6. Check the rotation direction
The bit
rotates clockwise (viewed from the rear side) by
pushing the R-side of the selector button. The L-side of the
selector button is pushed to turn the bit counterclockwise
(See Fig. 7). (The
and marks are provided on the
body.)
7. Switch operation
When the trigger switch is pulled, the tool rotates. When
the trigger is released, the tool stops.
○ The rotational speed of the drill can be controlled by
varying the amount that the trigger switch is pulled.
Speed is low when the
trigger switch is pulled slightly and
increases as the trigger switch is pulled more.
NOTE
○ A peep sound may be produced when the motor is about
to rotate; This is only a noise, not a machine failure.
MAINTENANCE AND INSPECTION
1. Inspecting the tool
Since use of as dull tool will degrade effi ciency and cause
possible motor malfunction, sharpen or replace the tool
as soon as abrasion is noted.
2. Inspecting the mounting screws
Regularly inspect all mounting screws and ensure that
they are properly tightened. Should any of the
screws be
loose, retighten them immediately. Failure to do so could
result in serious hazard.
3. Cleaning on the outside
When the driver drill is stained, wipe with a soft dry cloth
or a cloth moistened with soapy water. Do not use chloric
solvents, gasoline or paint thinner, as they melt
plastics.
4. Storage
Store the driver drill in a place in which the tempera ture
is less than 40°C and out of reach of children.
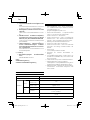
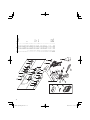
5. Service parts list
A : Item No.
B : Code No.
C : No. Used
D : Remarks
CAUTION
Repair, modifi cation and inspection of Hitachi
Power
Tools must be carried out by a Hitachi Authorized Service
Center.
This Parts List will be helpful if presented with the tool to
the Hitachi Authorized Service Center when requesting
repair or other maintenance.
In the operation and maintenance of power tools, the
safety regulations and standards prescribed in each
country must be observed.
MODIFICATIONS
Hitachi Power Tools are constantly being improved
and modifi ed to incorporate the latest technological
advancements.
Accordingly, some parts (i.e. code numbers and/or
design) may be changed without prior notice.
NOTE
Due to HITACHI’s continuing program of research and
development, the specifi cations herein are subject to change
without prior notice.

8

9
G

10
1
2
3
○
○
○

11
G
○
○
○
○

12
○
○
○
○
○

ไทย
13
G
กฎความปลอดภัยโดยทั
วไป
คำเตือน!
โปรดอ่านคำแนะนำทั
งหมด
ถ้าไม่ปฏิบัติตามคำแนะนำทั
งหมด อาจถูกไฟฟ้าดูด เกิดไฟไหม้ และ/
หรือบาดเจ็บสาหัสก็ได้
คำว่า "เครื
องมือไฟฟ้า" ในคำเตือนต่อไปนี
ทั
งหมดหมายถึงเครื
องมือที
คุณใช้งานกับปลั
กไฟฟ้า (มีสายไฟ) หรือใช้งานกับแบตเตอรี
( ไร้สาย)
โปรดปฏิบัติตามคำแนะนำต่อไปนี
1) พ
ื
นที
ทำงาน
a) รักษาพื
นที
ทำงานให้สะอาดและมีแสงสว่างเพียงพอ
ส
ิ
งที
เกะกะและความมืดทำให้เกิดอุบัติเหตุได้
b) อย่าใช
้
เครื
องมือไฟฟ้าในบรรยากาศที
อาจระเบิด เช
่
น
มีของเหลวไวไฟ แก๊สหรือฝุ่น
เครื
องมือไฟฟ้ าอาจเกิดประกายไฟที
อาจทำให้ฝุ่นและไอติดไฟ
ได้
c) ใช
้
งานเครื
องมือไฟฟ้
าให้ไกลจากเด็กและคนเฝ้าชม
คนที
วอกแวกทำให้คุณขาดสมาธิในการทำงานได้
2) ความปลอดภัยทางไฟฟ้ า
a) ปลั
กของเครื
องมือไฟฟ้ าต้องเหมาะกับเต้าเส
ี
ยบ
อย่าดัดแปลงปลั
ก
อย่าใช
้
ปลั
กของตัวปรับแรงดันไฟฟ้ ากับเครื
องมือไฟฟ้ าชนิด
ที
ต่อลงดิน
ปลั
กกับเต้าเส
ี
ยบที
ไม่พอดีกันอาจทำให้คุณถูกไฟฟ้ าด
ูด
b) อย่าให้ตัวคุณส
ั
มผัสกับพื
นผิวที
ต่อลงดิน เช
่
นท่อโลหะ
เครื
องทำความร้อน เตาอบ ตู้เย็น เป็นต้น
อาจถูกไฟฟ้ าดูดถ้าร่างกายของคุณต่อวงจรลงดิน
c) อย่าให้เครื
องมือไฟฟ้ าถูกกับนำฝนหรือความเปียกช
ื
น
นำที
เข้าไปในเครื
องมือไฟฟ้ าจะเพิ
มความเส
ี
ยงที
จะถู
กไฟฟ้ าดูด
d) อย่าใช
้
สายไฟฟ้ าในงานอื
น อย่าใช
้
สายเพื
อหิ
ว ดึงหรือ
เส
ี
ยบเครื
องมือไฟฟ้ า ให้สายไฟอยู่ห่างจากความร้อน นำมัน
ขอบแหลมคมหรือช
ิ
นส
่
วนที
เคลื
อนไหว
สายที
ชำรุดหรือตึงอาจทำให้คุณถูกไฟฟ้ าดูดได้ง่าย
e) เมื
อใช
้
งานเครื
องมือไฟฟ้ านอกอาคาร
ใช้สายพ่วงชนิดที
ใช้กับนอกอาคารเมื
อใช้สายที
เหมาะสมจะลด
ความเส
ี
ยงที
จะถูกไฟฟ้ าดูด
3) ความปลอดภัยส
่
วนบุคคล
a) ระวังตัว ดูส
ิ
งที
คุณกำลังทำ ใช
้
สามัญสำนึกเมื
อใช
้
เครื
องมือ
ไฟฟ้ า อย่าใช
้
เครื
องมือไฟฟ้ าเมื
อคุณอ่อนเพลียหรือกินยา
สุรา หรือยาเสพต
ิด
การขาดสติชั
วขณะเมื
อใช้เครื
องมือไฟฟ้ าอาจทำให้คุณบาดเจ็บ
สาหัส
b) ใช
้
อุปกรณ์นิรภัย สวมแว่นตาป้ องกันเสมอ
อุปกรณ์ป้ องกันเช่นหน้ากากกันฝุ่น รองเท้ากันลื
น หมวกนิรภัย
หรือจุกอุดหูที
เหมาะสมจะเลี
ยงการบาดเจ็บของร่างกายได้
c) ระวังเครื
องทำงานโดยไม่ตั
งใจ ให้สวิทซ
์
อยู่ในตำแหน่งปิด
ก่อนเส
ี
ยบปลั
ก
เมื
อจับเครื
องมือไฟฟ้ าเมื
อนิ
วอยู่ที
ตัวสวิทซ์ หรือเมื
อเส
ี
ยบปลั
ก
ขณะเปิดสวิทซ์ ไว้อาจทำให้เกิดอุบัติเหตุ
d) เอาสลักปรับแต่งหรือประแจออกก่อนเปิดสวิทซ
์
ไฟฟ้ า
สลักหรือประแจที
ติดกับส
่
วนหมุนของเครื
องมือไฟฟ้ าอาจทำให้
คุณบาดเจ็บได้
e) อย่าเอื
อมตัว ยืนให้มั
นและสมดุลตลอดเวลา
ทำให้ควบคุมเครื
องมือไฟฟ้ าได้ดีขึ
นเมื
อมีเหตุที
ไม่คาด น
f) แต่งตัวให้รัดกุม อย่าสวมเส
ื
อผ้าหลวมหรือใช
้
เครื
องประดับ
ให้ผม เส
ื
อผ้าและถุงมืออยู่ห่างจากช
ิ
นส
่
วนที
เคลื
อนที
เส
ื
อผ้าหลวม เครื
องประดับหรือผมยาวอาจถูกชิ
นส
่
วนหมุนรั
ง
เข้าไป
g) ถ้าออกแบบเครื
องมือไฟฟ้ าไว้ให้ต่อกับชุดดูดฝุ่นหรือเศษวัสดุ
ให้เช
ื
อมต่อและใช
้
งานอย่างถูกต้อง
เมื
อใช้กับชุดอุปกรณ์เหล่านี
จะลดอันตรายจากฝุ่น
4) การใช
้
และบำรุงรักษาเครื
องมือไฟฟ้ า
a) อย่าใช
้
เครื
องมือไฟฟ้ าโดยฝืนกำลัง ใช
้
เครื
องมือที
ถูกต้องกับ
งานของคุณ
เครื
องมือไฟฟ้ าที
ถูกต้องจะทำงานได้ดีกว่าและปลอดภัยกว่า
ในอัตราตามที
ออกแบบไว้แล้ว
b) อย่าใช
้
เครื
องมือไฟฟ้ าถ้าสวิทซ
์
ปิดเปิ
ดไม่ได้
เครื
องมือไฟฟ้ าที
ควบคุมด้วยสวิทซ์ไม่ได้จะมีอันตรายและต้อง
ซ่อม
c) ถอดปลั
กจากแหล่งไฟฟ้ าก่อนปรับแต่ง เปลี
ยนอะไหล่
หรือเก็บรักษา
มาตรการป้ องกันเช่นนี
จะลดความเส
ี
ยงของอุบัติเหตุที
เครื
องมือไฟฟ้ าจะเริ
มทำงานโดยไม่ได้ตั
งใจ
d)
เก็บเครื
องมือไฟฟ้ าให้ห่างจากเด็ก และอย่ายอมให้ผู้ที
ไม่เคย
ช
ิ
นกับเครื
องมือไฟฟ้ าหรือคำแนะนำเหล่านี
ให้ ใช
้
เครื
องมือ
ไฟฟ้ า
เครื
องมือไฟฟ้ าเป็นส
ิ
งที
มีอันตรายมากเมื
ออยู่ในมือของคนที
ไม่
ชำนาญ
e) บำรุงรักษาเครื
องมือไฟฟ้ า ตรวจด
ูศูนย์เคลื
อน ส
่
วนบิดงอ
ชำรุดหรือสภาพอื
นๆ ที
มีผลต่อการทำงานของเครื
องมือ
ไฟฟ้ า
หากชำรุด ให้ซ
่
อมแซมก่อนใช
้
งาน
อุบัติเหตุจำนวนมากเกิดจากเครื
องมือไฟฟ้ าที
บำรุงรักษา
ไม่ดีพอ
f) ให้เครื
องมือตัดมีความคมและสะอาด
เครื
องมือตัดที
บำรุงร
ักษาอย่างถูกต้องและมีขอบคมจะไม่ค่อย
บิดงอ และควบคุมได้ง่ายกว่า
g) ใช
้
เครื
องมือไฟฟ้ า ส
่
วนประกอบและปลายเครื
องมือตัดตาม
คำแนะนำเหล่านี
และตามที
ออกแบบไว้ โดยพิจารณาสภาพ
งานและส
ิ
งที
จะใช
้
งาน
ถ้าใช้เครื
องมือไฟฟ้ ากับงานที
ไม่ได้ออกแบบไว้อาจเกิดความ
เส
ี
ยหายได้
5) การดูแลรักษาและการใช
้
แบตเตอรี
a) ก่อนจะบรรจุก้อนแบตเตอรี
ควรตรวจสอบให้แน่ใจว่าสวิทซ
์
อยู่ที
ตำแหน่งปิด
การใส
่
ก้อนแบตเตอรี
ลงในเครื
องมือที
มีกระแสไฟฟ้ าไหลเวียน
จะทำให้เกิดอุบัติเหตุ

ไทย
14
รายละเอียดจำเพาะ
เครื
องมือไฟฟ้ า
รุ่น
DS7DF
ความเร็วอิสระ 0 – 600 /นาที
ประส
ิ
ทธิภาพ
การเจาะ
ไม้
(ความหนา 18 มม.)
15 มม.
โลหะ
(ความหนา 1.6 มม.)
เหล็ก: 10 มม.
อลูมิเนียม: 10 มม.
การขัน
สกรูสำหรับเครื
องจักร 6 มม.
สกรูสำหรับไม้
5.1 มม. (เส
้
นผ่านศูนย์กลาง) × 32 มม.
(ความยาว) (ต้องใช้รูนำ)
แบตเตอรี
แบบรีชาร์จ
EB712S (1.2 Ah): Ni-Cd (นิเกิล-แคดเมียม)
7.2 โวลท์
นำหนัก 1.2 กก.
b) ชาร์จแบตเตอรี
ซำโดยใช
้
เครื
องชาร์จตามที
ผู้ผลิตกำหนดไว้
เท่านั
น
หากนำเครื
องชาร์จที
เหมาะสำหรับใช้งานกับแบตเตอรี
ประเภท
อื
นมาใช้กับแบตเตอรี
อีกประเภท อาจทำให้เกิดไฟไหม้ ได้
c) ใช
้
เครื
องมือที
ต้องการกำลังไฟกับแบตเตอรี
ตามประเภทที
ได้
ระบุไว้เท่านั
น
การใช้แบตเตอรี
แบบอื
นอาจทำให้เกิดไฟไหม้
และการบาดเจ็บ
ได้
d) เมื
อไม่ใช
้
งานแบตเตอรี
ควรเก็บให้ห่างจากวัตถุที
เป็นโลหะ
เช
่
น คลิปหนีบกระดาษ เหรียญ กุญแจ ตะปู สกรู หรือวัตถุที
เป็นโลหะขนาดเล็กๆ ที
สามารถเช
ื
อมต่อขั
วต่อเข้าด้วยกันได้
การลัดวงจรขั
วต่อแบตเตอรี
เข้าด้วยกันอาจทำให้เก
ิดแผลไหม้
พุพองหรือไฟไหม้ได้
e) ภายใต้สภาวะที
เป็นอันตราย อาจมีของเหลวรั
วซ
ึ
มออกจาก
แบตเตอรี
ห้ามส
ั
มผัสกับของเหลวดังกล่าว หากส
ั
มผัสกับ
ของเหลวโดยบังเอิญ ให้ล้างออกด้วยนำสะอาด หากของเหลว
เข้าตา ควรรีบไปพบแพทย์
ของเหลวที
ไหลออกจากแบตเตอรี
อาจทำให้เกิดอาการระคาย
เคืองหรือแผลไหม้พุพองได้
6) การซ
่
อมบำรุง
a) ให้ช
่
างซ
่
อมที
ชำนาญเป็นผู้ซ
่
อม และเปลี
ยนอะไหล่ที
เป็น
ของแท้
ทำให้เครื
องมือไฟฟ้ ามีความปลอดภัย
คำเตือน
เก็บให้พ้นมือเด็กและผู้ไม่ชำนาญ
หากไม่ได้ ใช
้
ควรเก็บให้พ้นมือเด็กและผู้ ไม่ชำนาญ
ข้อควรระวังสำหรับสว่านไขควงไร้สาย
1. ชาร์จแบตเตอรี
ที
อุณหภูมิ 10-40°C ทุกครั
ง หากอุณหภูมิตำกว่า
10°C จะทำให้เกิดการชาร์จประจุเกิน ซึ
งเป็นอันตราย ห้ามชาร์จ
แบตเตอรี
ที
อุณหภูมิสูงกว่า 40°C
อุณหภูมิที
เหมาะสมที
สุดในการชาร์จคือ 20-25°C
2. เมื
อทำการชาร์จครั
งหนึ
งเสร็จส
ิ
นลง ควรปล่อยเครื
องชาร์จทิ
งไว้
ประมาณ 15 นาที ก่อนทำการชาร์จแบตเตอรี
ครั
งต่อไป
ห้ามชาร์จแบตเตอรี
มากกว่า 2 ก้อนต่อเนื
องกัน
3. ห้ามชาร์จแบตเตอรี
นานเกินกว่า 2 ชั
วโมง แบตเตอรี
จะชาร์จเต็ม
โดยใช้เวลาประมาณ 1 ชั
วโมง ดังนั
นจึงควรหยุดชาร์จเมื
อใช้เวลา
ชาร์จไปแล้ว 1 ชั
วโมง
ถอดสายไฟของเครื
องชาร์จออกจากเต้ารับ
4. อย่าให้มีวัตถุแปลกปลอมเข้าไปในช่องสำหรับใส
่
แบตเตอรี
5. ห้ามถอดแยกแบตเตอรี
แบบรีชาร์จ และเครื
องชาร์จ
6. ห้ามลัดวงจรแบตเตอรี
แบบรีชาร์จ การลัดวงจรแบตเตอรี
จะทำให้
เกิดกระแสไฟ และความร้อนสูง ซึ
งทำให้แบตเตอรี
ไหม้ หรือ
เส
ี
ยหายได้
7. ห้ามเผาแบตเตอรี
หากแบตเตอรี
ไหม้ อาจทำให้
เกิดการระเบิดได้
8. เมื
อเจาะที
ผนัง พื
น หรือเพดาน ให้ระวังสายไฟฟ้ า ฯลฯ
ที
งอยู่ด้วย
9. นำแบตเตอรี
ที
ซื
อมากลับไปยังร้านทันที หากชาร์จแบตเตอรี
และ
สามารถใช้งานแบตเตอรี
ได้เพียงช่วงส
ั
นๆ เท่านั
น ห้ามทิ
งแบตเตอรี
ที
คายประจุจนหมดแล้ว
10. การใช
้แบตเตอรี
ที
คายประจุหมดแล้ว จะทำให้เครื
องชาร์จเส
ี
ยหาย
11. ห้ามใส
่
วัตถุเข้าไปในช่องระบายอากาศของเครื
องชาร์จ
การใส
่
วัตถุที
เป็นโลหะ หรือวัตถุติดไฟได้เข้าไปในช่องระบายอากาศ
จะทำให้เกิดอันตรายจากไฟฟ้ าดูด หรือทำให้เครื
องชาร์จเส
ี
ยหาย
12. เมื
อใส
่
ดอกสว่านที
หัวจับ (แบบไม่มีกุญแจขัน)
แล้ว ขันปลอกให้แน่น
หากขันปลอกไม่แน่น ดอกสว่านอาจลื
น หรือหลุดออกมา ทำให้
เกิดการบาดเจ็บได้

ไทย
15
G
2. เส
ี
ยบปลั
กเครื
องชาร์จเข้ากับเต้ารับ
การเส
ี
ยบปลั
กจะเป็นการเปิดเครื
องชาร์จ ( ไฟแสดงจะสว่างขึ
น)
ข้อควรระวัง
หากไฟแสดงไม่สว่างขึ
น ให้ดึงปลั
กออก และตรวจดูการใส
่
แบตเตอรี
ให้ถูกต้อง
(1) ระยะเวลาในการชาร์จ
ระยะเวลาในการชาร์จจะขึ
นอยู่กับเครื
องชาร์จและแบตเตอรี
ดังที
แสดงไว้ในตารางที
1
ตารางที
1 ระยะเวลาในการชาร์จ (ที
20°C)
เครื
องชาร์จ
แบตเตอรี
UC7SD
EB712S ประมาณ 50 นาที
จะใช้เวลาในการชาร์จแบตเตอรี
นานขึ
นที
อุณหภูมิตำ หรือเมื
อแหล่ง
จ่ายไฟมีค่าแรงดันไฟฟ้ าตำเกินไป
หากไฟแสดงไม่ดับ แม้จะทำการชาร์จมากกว่า 2 ชั
วโมง
แล้วก็ตามให้หยุดชาร์จ และติดต่อศูนย์บริการฮิตาชิที
ได้รับอนุญาต
ข้อควรระวัง
หากแบตเตอร
ี
ร้อนเนื
องจากส
ั
มผัสกับแสงแดดโดยตรง ฯลฯ
หลังจากใช้งาน อาจทำให้ไฟแสดงของเครื
องชาร์จไม่สว่าง เมื
อเกิด
กรณีนี
ขึ
น ทิ
งแบตเตอรี
ให้เย็นลงก่อน จากนั
นจึงค่อยทำการชาร์จ
3. ถอดปลั
กเครื
องชาร์จออกจากเต้ารับ
4. จับเครื
องชาร์จให้มั
นคง และดึงแบตเตอรี
ออก
ในกรณีที
ชาร์จแบตเตอรี
ก้อนใหม่ ฯลฯ
เนื
องจากสารเคมีภายในแบตเตอรี
ก้อนใหม่ และแบตเตอรี
ที
ไม่ได้
ใช้งานเป็นเวลานานยังไม่พร้อมทำงาน กำลังไฟที
ได้จากแบตเตอรี
อาจมีค่าตำเมื
อใช้งานในครั
งแรกๆ ซึ
งถือเป็นปรากฏการณ์ที
เกิดขึ
น
ชั
วคราว แบตเตอรี
จะใช้ระยะเวลาในการชาร์จเป็นปกติ เมื
อผ่าน
การชาร์จแล้ว 2-3 ครั
ง
วิธีการยืดอายุการใช
้
งานของแบตเตอรี
(1) ชาร์จแบตเตอรี
ก่อนที
แบตเตอรี
จะคายประจุจนหมด
เมื
อท่านรู้ส
ึ
กว่าเครื
องมือมีกำลังอ่อนลง ให้หยุดใช้เครื
องมือและทำ
การชาร์จแบตเตอรี
หากท่านยังใช้เครื
องมือต่อไปจนเครื
องดับ แบตเตอรี
อาจได้รับ
ความเส
ี
ยหาย และอายุการใช้งานของแบตเตอรี
อาจส
ั
นลง
(2) หลี
กเลี
ยงการชาร์จที
อุณหภูมิสูง
แบตเตอรี
แบบรีชาร์จจะร้อนขึ
นทันทีหลังจากใช้งาน หากชาร์จ
แบตเตอรี
ดังกล่าวทันทีหลังจากใช้งาน จะทำให้สารเคมีภายใน
แบตเตอรี
เส
ื
อมสภาพ และอายุการใช้งานของแบตเตอรี
จะส
ั
นลง ทิ
ง
แบตเตอรี
ไว้ส
ั
กครู่ให้เย็นลงก่อนที
จะทำการชาร์จ
ก่อนการใช
้
งาน
1. จัดและตรวจสอบสภาพแวดล้อมในการทำงาน
ตรวจสอบสภาพแวดล้อมในการทำงานว่าเหมาะสมหรือไม่โดย
พิจารณาจากข้อควรระวังดังต่อไปนี
เครื
องชาร์จ
รุ่น
UC7SD
แรงดันไฟฟ้ าในการชาร์จ
7.2 โวลท์
นำหนัก
1.1 กก.
อุปกรณ์มาตรฐาน
DS7DF
1 หัวสว่านไขขวงพิเศษ (No. 2 × 55L) ..................1
2 เครื
องชาร์จ (UC7SD) .......................................1
3 กระเป๋ าพลาสติก ...............................................1
อาจเปลี
ยนแปลงอุปกรณ์มาตรฐานได้โดยไม่ต้องแจ้งล่วงหน้า
อุปกรณ์ประกอบ (แยกจำหน่าย)
1. แบตเตอรี
(EB712S)
อาจเปลี
ยนแปลงอุปกรณ์ประกอบได้โดยไม่ต้องแจ้งล่วงหน้า
การใช
้
งาน
○ การขัน และการถอดสกรูเครื
องจักร สกรูไม้ สกรูเกลียวปล่อย
ฯลฯ
○ การเจาะโลหะหลากหลายประเภท
○ การเจาะเนื
อไม้หลากหลายประเภท
การถอด/การใส
่
แบตเตอรี
1. การถอดแบตเตอรี
ถือมือจับให้แน่น และดันสลักล็อกแบตเตอรี
เพื
อถอดแบตเตอรี
ออก
(ดูรูปที
1 และ 2)
ข้อควรระวัง
ห้ามลัดวงจรแบตเตอรี
2. การใส
่
แบตเตอรี
ตรวจสอบขั
วของแบตเตอรี
ขณะใส
่
แบตเตอรี
(ดูรูปที
2)
การชาร์จ
ก่อนใช้งานสว่านไขควง ให้ทำการชาร์จแบตเตอรี
ดังนี
1. ใส
่
แบตเตอรี
ในเครื
องชาร์จ
จัดตำแหน่งของแบตเตอรี
โดยให้ป้ ายชื
อของแบตเตอรี
หันไปทาง
ป้ ายชื
อของเครื
องชาร์จ แล้วกดแบตเตอรี
เข้าไปจนสุด (ดูรูปที
1
และ 3)

ไทย
16
วิธีใช
้
1. ตรวจสอบตำแหน่งตัวเลื
อนควบคุมคลัตช
์
(ดูรูปที
4)
แรงขันของเครื
องนี
จะปรับตามตำแหน่งตัวเลื
อนควบคุมคลัตช์ที
ตั
ง
ไว้
(1) เมื
อใช้เครื
องนี
เป็นไขควง ปรับให้เครื
องหมายรูปสามเหลี
ยมที
อยู่ด้าน
นอกชี
ไปยังหมายเลขใดหมายเลขหนึ
งบนตัวเลื
อนควบคุมคลัตช์
"1, 3, 5...22" หรือไปยังจุดส
ี
ขาว
(2) เมื
อใช้เครื
องนี
เป็นสว่าน ปรับให้เครื
องหมายรูปสามเหลี
ยมที
อยู่
ด้านนอกตรงกับเครื
องหมายสว่าน
" "
ของตัวเลื
อนควบคุมคลัต
ช์
ข้อควรระวัง
○ ไม่สามารถตั
งตัวเลื
อนควบคุมคลัตช์ให้อยู่ระหว่างหมายเลข "1, 3,
5...22" หรือจุดส
ี
ขาวได้
○ ห้ ามใช้ งานเมื
อตั
งตัวเลื
อนควบคุ มคลัตช์ อยู่ระหว่ าง
หมายเลข "22" และแนวเส
้
นส
ี
ขาวที
กึ
งกลางเครื
องหมายสว่าน
เพราะอาจทำให้เกิดความเส
ี
ยหายขึ
นได้ (ดูรูปที
5)
2. การปรับแรงขัน
(1) แรงขัน
แรงขันควรจะมีแรงที
ส
ั
มพันธ์กับเส
้
นผ่านศูนย์กลางของสกรู
หากใช้แรงขันมากเกินไป
หัวสกรูอาจจะแตกหรือเส
ี
ยหายได้
โปรดปรับตำแหน่งตัวเลื
อนควบคุมคลัตช์ตามเส
้
นผ่านศูนย์กลาง
ของสกรู
(2) การแสดงแรงขัน
แรงขันจะแตกต่างกันออกไปตามประเภทของสกรูและวัสดุที
จะ
ถูกยึด
เครื
องจะแสดงแรงขันด้วยตัวเลข "1, 3, 5...22" บนตัวเลื
อนควบคุม
คลัตช์ และจุดส
ี
ขาว แรงขันที
ตำแหน่ง "1" เป็นแรงขันที
น้อยที
สุด
และแรงขันที
หมายเลขสูงสุดคือแรงขันที
มากที
สุด (ดูรูปที
4)
(3) การปรับแรงขัน
หมุนตัวเลื
อนควบคุมคลัตช์ และปรับให้เครื
องหมายสามเหลี
ยม
ที
อยู่ด้านนอกชี
ไปยังหมายเลข "1, 3, 5...22" บนตัวเลื
อนควบคุมคลัตช์
หรือชี
ไปยังจุดส
ี
ขาว ปรับตั
วเลื
อนควบคุมคลัตช์ ไปในทิศทางใช้
แรงน้อย หรือใช้แรงมากตามแรงขันที
ท่านต้องการ
ข้อควรระวัง
○ การหมุนของเครื
องอาจถูกล็อกให้หยุดหมุนในขณะที
ใช้เครื
องเป็น
สว่าน เมื
อใช้งานสว่านไขควง โปรดระวังอย่าล็อกมอเตอร์
○ การกระแทกเป็นเวลานานอาจทำให้สกรูแตกได้เนื
องจากได้รับ
แรงขันที
มากเกินไป
3. ขอบเขต และคำแนะนำในการใช
้
งาน
ขอบเขตงานหลายประเภทที
สามารถใช้งานได้ขึ
นอยู่กับโครงสร้าง
ทางกลไกของเครื
องนี
ที
แสดงไว้ ในตารางที
2
ตารางที
2
งาน คำแนะนำ
การเจาะ
ไม้
ใช้สำหรับการเจาะเหล็ก
อลูมิเนียม
การขัน
สกรูสำหรับเครื
องจักร ใช้หัวสว่าน หรือแหวนที
สอดคล้องกับเส
้
นผ่านศูนย์กลางของสกรู
สกรูสำหรับไม้ ใช้หลังจากเจาะช่องนำ
4. การประกอบและถอดหัวสว่าน
(1) หลังจากใส
่
หัวไขควง ฯลฯ ที
หัวจับ (แบบไม่มีกุญแจขัน) ให้จับแหวน
และขันปลอกให้แน่นโดยการหมุนไปทางขวามือ (ตามเข็
มนาฬ
ิ
กา
เมื
อมองจากด้านหน้า) (ดูรูปที
6)
○ หากปลอกคลายตัวระหว่างใช้งาน ให้หมุนให้แน่นขึ
นอีก ยิ
งขันปลอก
ให้แน่น จะยิ
งทำให้แรงขันสูงขึ
น
(2) การถอดหัวสว่าน
จับแหวนให้แน่น และคลายปลอกออกโดยการหมุนไปทางซ้ายมือ
(ทวนเข็มนาฬ
ิ
กาเมื
อมองจากด้านหน้า) (ดูรูปที
6)
ข้อควรระวัง
○ เมื
อไม่สามารถคลายปลอกได้แล้ว ให้ ใช้ปากกาหรืออุปกรณ์ที
ใกล้เคียงกันจับหัวสว่านไว้ ตั
งโหมดคลัตช์ให้อยู่ระหว่าง 1 และ 10
จากนั
นหมุนปลอกไปด้านคลาย (ด้านซ้าย) ในขณะที
ใช้คลัตช์ ซึ
งจะ
ทำให้คลายปลอกออกได้ง่าย
หมายเหตุ
○ ที
บริเวณด้านข้างของตัวเครื
องมือจะมีหัวสว่านปลายแฉกอยู่
สามารถถอดหัวสว่านนี
ได้ โดยการดึงไปข้างหน้า หลังจากใช้งานเสร็จ
ให้ ใส
่
หัวสว่านกลับเข้าที
5. ตรวจสอบการใส
่
แบตเตอรี
ให้ถูกต้อง
6. ตรวจสอบทิศทางการหมุน
หัวสว่านจะหมุนตามเข็มนาฬ
ิ
กา (เมื
อมองจากด้านหลัง) เมื
อกดปุ่ม
เลือกด้าน R กดปุ่มเลือกด้าน L เมื
อต้องการหมุนหัวสว่านทวนเข็ม
นาฬ
ิ
กา (ดูรูปที
7) (เครื
องหมาย
และ จะอยู่บน
ตัวเครื
อง)
7. การทำงานของสวิทซ
์
เมื
อกดสวิทซ์ ไก เครื
องมือจะหมุน และเมื
อปล่อยสวิทซ์เครื
องจะ
หยุดหมุน
○ สามารถควบคุมความเร็วในการหมุนของสว่านได้ โดยการดึงสวิทซ์
ไกขึ
นในระดับต่างๆ กัน เมื
อดึงสวิทซ์ขึ
นเล็กน้อย ความเร็วจะตำ
และเมื
อดึงสวิทซ์มากขึ
น ความเร็วก็จะเพิ
มขึ
นตามลำดับ

ไทย
17
G
หมายเหตุ
○ เมื
อมอเตอร์หมุนอาจจะทำให้เกิดเส
ี
ยงปี
บขึ
น ซึ
งเป็นเพียงเส
ี
ยง
รบกวนไม่ใช่ความผิดปกติของเครื
อง
การบำรุงรักษาและการตรวจสอบ
1. การตรวจสอบเครื
องมือ
เนื
องจากอุปกรณ์ทื
อจะทำให้ประส
ิ
ทธิภาพในการทำงานลดลง และ
อาจเป็นสาเหตุให้มอเตอร์ทำงานผิดปกติ ดังนั
นจึงควรลับหรือการ
เปลี
ยนเครื
องมือทันทีที
ส
ั
งเกตเห็นการส
ึ
กกร่อน
2. การตรวจสอบสกรูยึด
ให้ตรวจสอบสกรูยึดเสมอ และให้ขันไว้อย่างถูกต้อง ถ้าสกรูหลวม
ให้
ขันใหม่โดยทันที มิฉะนั
นอาจเกิดอันตรายมาก
3. การทำความสะอาดภายนอก
เมื
อสว่านไขควงสกปรก ให้เช็ดด้วยผ้านุ่มที
แห้ง หรือผ้าชุบนำสบู่
บิดหมาดๆ ห้ามใช้ตัวทำละลายคลอรีน นำมัน หรือทินเนอร์
เนื
องจากสารเหล่านี
จะทำให้พลาสติกละลาย
4. การจัดเก็บ
เก็บสว่านไขควงในสถานที
ซึ
งมีอุณหภูมิต
ำกว่า 40°C และห่างจาก
มือเด็ก
5. รายการอะไหล่ซ
่
อม
A: หมายเลขอะไหล่
B: หมายเลขรหัส
C: จำนวนทีี
ใช้
D: หมายเหตุ
ข้อควรระวัง
ศูนย์บริการที
ได้รับอนุญาตของฮิตาชิเท่านั
นเป็นผู้ซ่อม ดัดแปลง
และตรวจสอบเครื
องมือไฟฟ้ าของฮิตาชิ
รายการอะไหล่ซ่อมนี
จะเป็นประโยชน์เมื
อส
่
งให้ศูนย์บริการที
ได้รับ
อนุญาตของฮิตาชิเท่านั
นเพื
อแจ้งซ่อมหรือบำรุงรักษา
ต้องปฏิบัติตามระเบียบและมาตรฐานความปลอดภัยของแต่ละ
ประเทศในการใช้งานและบำรุงรักษาเครื
องมือไฟฟ้ า
การแก้ไข
มีการปรับปรุงและแก้ ไขเครื
องมือไฟฟ้ าของฮิตาชิเสมอ เพื
อให้
สอดคล้องกับความก้าวหน้าล่าสุดทางเทคโนโลยี
ดังนั
น
จึงอาจเปลี
ยนแปลงชิ
นส
่
วนบางอย่างได้โดยไม่ต้องแจ้ง
ล่วงหน้า
หมายเหตุ
เนื
องจากฮิตาชิมีแผนงานวิจัยและพัฒนาอย่างต่อเนื
อง รายละเอียด
จำเพาะนี
จึงอาจเปลี
ยนแปลงได้โดยไม่ต้องแจ้งล่วงหน้า

18
ABCD
1 321-932 1 M5×25
2 312-516 1 10TLRD-N
3 321-904 1
4 321-903 1
5 321-902 1
6 321-901 1
7 320-225 1
8 312-714 1
9 321-905 16 D4
10 321-906 1
11 321-907 3
12 321-908 1
13 321-909 3
14 312-704 1
15 321-910 1
16 315-817 3 D3×12
17 321-899 1 “3-16”
18 321-897 1
19 991-672 8 D3×16
20 ———— 1
21 321-896 1
22 306-041 1
23 306-040 1
24 321-898 1
25 321-871 1
26 318-237 1
27 ———— 1
28 315-141 1
29 306-952 1
30 ———— 1 EB712S
501 ———— 1 UC7SD
502 318-236 1 NO.2 55L
503 318-246 1

19

Hitachi Koki Co., Ltd.
906
Code No. C99121832 G
Printed in China
-
 1
1
-
 2
2
-
 3
3
-
 4
4
-
 5
5
-
 6
6
-
 7
7
-
 8
8
-
 9
9
-
 10
10
-
 11
11
-
 12
12
-
 13
13
-
 14
14
-
 15
15
-
 16
16
-
 17
17
-
 18
18
-
 19
19
-
 20
20


他の言語で
- English: Hikoki DS 7DF User manual
関連論文
その他のドキュメント
-
Hitachi DS 18 DJL Handling Instructions Manual
-
-
Hitachi DS 10DAL Handling Instructions Manual
-
Hitachi DV18DSFL Handling Instructions Manual
-
-
-