
X9
Quick Start Guide
V1.0

RU
IT
ES
DE
FR
KO
SC
TC
EN
1PB
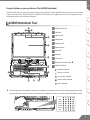
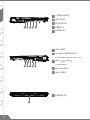
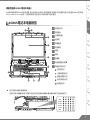
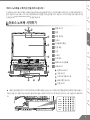
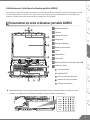
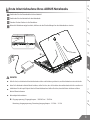
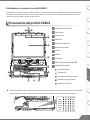
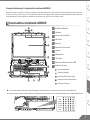
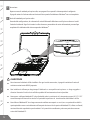
1Webcam Indicator
2Webcam
3Light sensor
4Microphone
5Display Panel
6Power Button
7Keyboard
8Speaker
9Touchpad
10 Battery Indicator Button
11 Status Indicators
Bluetooth Indicator
Wireless Indicator
Drive Activity Indicator
Battery Charge Indicator
Power Indicator
Press the right button of touchpad to check the remaining battery power.Right click to show the remaining power percentage.
As shown below, the battery life indicator is available when the laptop is shut down, in stand-by or hibernation.(Battery mode)
<10%
>90%
51-70%
71-90%
11-30%
31-50%
11 10 9
8
8
7
6
5
4
3
2
1
Congratulations on your purchase of the AORUS Notebook !
This Manual will help you to get started with setting up your notebook. For more detailed information, please visit our website
at http://www.aorus.com. All specications are subject to the manufacturer's conguration at the time of shipping and may
change without prior notice,written or otherwise.
AORUS Notebook Tour

RU
IT
ES
DE
FR
KO
SC
TC
EN
32
54321
1
5432
1
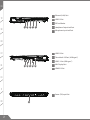
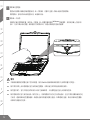
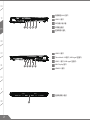
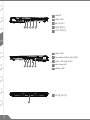
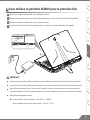
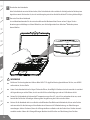
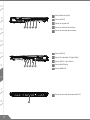
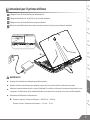
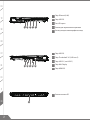
1Ethernet (LAN) Port
2USB 3.0 Port
3SD Card Reader
4Headphone Output Jack Port
5Microphone Input Jack Port
1USB 3.0 Port
2Thunderbolt 3.0 Port (USB type-C)
3USB 3.1 Port (USB type-C)
4Mini Display Port
5HDMI 2.0 Port
1Power (DC) Input Port

RU
IT
ES
DE
FR
KO
SC
TC
EN
32
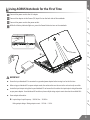
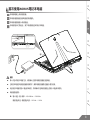
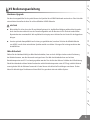
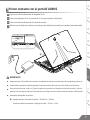
1Connect the power cord to the AC adapter.
2Connect the adapter to the Power (DC) Input Port on the back side of the notebook.
3Connect the power cord to the power outlet.
4While the Battery Indicator lights on, press the Power Button to turn on the notebook.
Using AORUS Notebook for the First Time
IMPORTANT
■
Ensure that your Notebook PC is connected to a grounded power adapter before turning it on for the rst time.
■
When using your Notebook PC on power adapter mode, the socket outlet must be near to the unit and easily accessible.
■
Locate the input/output rating label on your Notebook PC and ensure that it matches the input/output rating information
on your power adapter. Some Notebook PC models may have multiple rating output currents based on the available SKU.
■
Power adapter information:
Input voltage / Input frequency:100-240 Vac / 50-60 Hz
Rating output voltage / Rating output current:19.5 Vdc / 16.9 A
1
2
3
4

RU
IT
ES
DE
FR
KO
SC
TC
EN
54
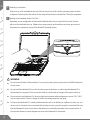
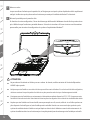
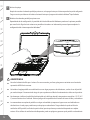
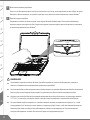
1Switching on the Power
A
fter you turn on the notebook for the very rst time, do not turn it o until the operating system has been
congured. Please note that the volume for the audio will not function until Windows® Setup has completed.
2Booting Up the notebook for the First Time
Depending on your conguration, the Microsoft® Windows® Boot Screen may be the rst screen that you
will see as the notebook starts up. Follow the on screen prompts and instructions and enter your personal
information to complete the setup of the Windows® Operating System.
WARNING
■Do not remove the built-in lithium battery. For any service needs, please contact your local AORUS Authorized
Service Center.
■Do not install the Notebook PC on a slant or a place prone to vibrations, or avoid using the Notebook PC in
that location for a long time.This increases the risk that a malfunction or damage to the product will occur.
■Do not store and use Notebook PC in direct sunlight or the location where temperatures exceed 112°F (45°C)
such as inside a vehicle.There is a danger of Lithium-ion battery expansion and aging.
■Do not use the Notebook PC in a badly ventilated location such as on bedding, on a pillow or cushion, etc, and
do not use it in a location such as room with oor heating as it may cause the computer to overheat.Take care
that the Notebook PC vents (on the side or the bottom) are not blocked especially in these environments. If
the vents are blocked, it may be dangerous and cause the Notebook PC to overheat.

RU
IT
ES
DE
FR
KO
SC
TC
EN
54
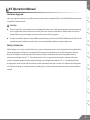
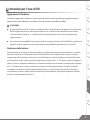
X9 Operation Manual
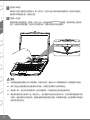
Hardware Upgrade
User may upgrade memory or carry X9 to nearest repair center to upgrade; Please visit AORUS ocial website for
compatible memory brands.
CAUTION
■Please ensure X9 is not powered on and unplugged to power source before the upgrade. Any damage during
user’s upgrade will not be covered by warranty, and user shall be responsible for related repair cost; hence
recommend to carry your laptop to nearest service center for the upgrade.
■In order to maintain optimum compatibility and performance, please visit AORUS ocial website FAQ for the
supported memory module manufacturers, avoid compatibility problems or poor performance.
Battery Protection
When battery is in use for a period of time (not connected to power source and in high performance mode),Mass
power discharging on battery in a short period of time may cause battery to run at high temprature and may
shorten its lifespan. in order to protect the battery's lifespan, the battery will not be chargeable when its
temperature is higher than 45 ° C. The mechanism for this is to protect the battery life. However, after user
connects to power adapter, battery stops discharging and temperatures below is 45 ° C, the battery will start
charging back to the source and to maintain normal operation.Command & Control is a software that integrates
a list of basic settings to a single interface, providing user a faster and better experience when customization is
needed.

RU
IT
ES
DE
FR
KO
SC
TC
EN
PB6
Appendix
Warranty & Service
Warranty and service and related information please refer to the warranty card or service website as the below link:
http://www.aorus.com
FAQ
FAQ (Frequent Asked Questions) please refer to the below link: http://www.aorus.com

RU
IT
ES
DE
FR
KO
SC
TC
EN
1PB
感謝您選擇AORUS筆記型電腦 !
為協助您順利使用AORUS筆記型電腦,我們特地設計此說明。如果您需要更多關於電腦功能,歡迎上AORUS官 方 網 站。
http://www.aorus.com查詢。產品實際規格以出貨為準,如有異動恕不另行通知。
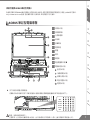
AORUS 筆記型電腦導覽
1視訊指示燈
2視訊攝影機
3光源感應器
4麥克風
5螢幕面板
6電源按鈕
7鍵盤
8喇叭
9觸控板
10 電池電量顯示鍵
11 電腦狀態指示燈
藍牙指示燈
無線網路指示燈
硬碟存取指示燈
電池充電指示燈
電源指示燈
按下右鍵可檢視電池剩餘電量。
在關機/待命/休眠模式時按下右鍵可透過指示燈號檢視電池剩餘電量(電量對照如下圖)(電池模式下)。
11 10 9
8
8
7
6
5
4
3
2
1
警語:使用過度恐傷害視力。
注意事項:(1) 使用30分鐘請休息10分鐘。 (2) 未滿2歲幼兒不看螢幕,2 歲以上每天看螢幕不要超過1小時。
<10%
>90%
51-70%
71-90%
11-30%
31-50%

RU
IT
ES
DE
FR
KO
SC
TC
EN
32
1乙太網路(LAN)連結埠
2USB 3.0 連結埠
3SD 記憶卡讀卡機
4耳機輸出插孔
5麥克風輸入插孔
1USB 3.0 連結埠
2Thunderbolt 3.0 連結埠(USB-C埠)
(以40 Gbps速度傳輸資料, 連結顯示器, 支援Power Delivery)
3USB 3.1 連結埠 (USB-C埠)
(以10 Gbps速度傳輸資料)
4Mini Display 連結埠
5HDMI 2.0 連結埠
1直流電源輸入插孔
54321
1
5432
1

RU
IT
ES
DE
FR
KO
SC
TC
EN
32
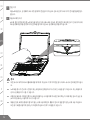
1將電源線接上電源轉換器。
2將電源轉換器連接到筆記型電腦的直流電源輸入插孔。
3將電源轉換器插入電源插座。
4待電源指示燈亮起後,按下電源按鈕啟動筆記型電腦。
首次使用AORUS筆記型電腦
重要
■
第一次啟動筆記型電腦之前,請先確認已經將電源變壓器連接至電腦。
■
當筆記型電腦在電源變壓器使用模式時,請將電源變壓器靠近插座以便於使用。
■
找出筆記型電腦的輸入/輸出頻率標籤,並請確認符合電源變壓器上的輸入/輸出頻率資訊。
■
電源變壓器資訊:
輸入電壓 / 輸入頻率:100-240 Vac / 50-60 Hz
額定輸出電壓 / 額定輸出電流:19.5 Vdc / 16.9 A
1
2
3
4

RU
IT
ES
DE
FR
KO
SC
TC
EN
54
1開啟筆記型電腦
電源指示燈會顯示機器是否為通電的狀態。第一次開機時,在還未完全進入作業系統前請勿強制關機。
開啟電源後,直到該作業系統配置完成前,音量無法設定。
2開始第一次使用
根據您的筆記型電腦配置,當您第一次開機,第一個畫面會是微軟Windows®啟動畫面,按照該螢幕上的提示和
指示,完成作業系統的配置。當軟體許可條款顯示時,請務必閱讀並同意後再繼續。
警告
■本機器設備配備的鋰電池為不可拆卸裝置,請交由AORUS授權專業維修服務中心移除裝置中的電池。
■請不要於斜面上或容易震動的地方使用筆記型電腦,以降低發生故障和產品損壞的風險。
■請勿置於車內、室內外陽光強烈或高於45度C之儲藏環境, 以免鋰電池發生老化或膨脹等危險。
■請於通風良好的地方使用此產品。請勿在床上、枕頭等通風不良的地方使用此產品,並且不要在有樓板暖氣的地
方使用,避免導致筆記型電腦過熱。請避免底部和側邊的通風孔阻塞。如果通風孔阻塞,會有 損害筆記型電腦
或導致內部過熱的危險。

RU
IT
ES
DE
FR
KO
SC
TC
EN
54
X9 操作說明
使用者升級硬體
消費者可自行打開背蓋升級模組,或是持機器至維修中心由維修人員協助升級;所支援的廠商模組,請至AORUS官網
FAQ參考。
注意
■ 升級前請確認已關機並移除電源線,由消費者自行升級過程中所造成的損毀或不相容性,皆不在保固條款內容
中,消費者需自行負擔維修費用及更換零件的費用;建議規格的升級可將機器帶至維修中心請人員協助。
■ 為維持最佳的相容性與效能,請至AORUS官網FAQ參考所支援的記憶體廠商模組,避免出現相容性或效能不佳的
問題。
電池保護機制
當電池長時間放電狀態( 未接變壓器電源, 而高效能使用) 時,短時間的大量放電可能會造成電池溫渡過高影 響電池正
常使用壽命,為保護電池使用壽命,當電池溫渡高於45 度C 時會無法充電,此為保護電池使用壽命 的機制。但使用
者將變壓器電源接上後,電池停止放電並溫度低於45 度C,電池才會開始回充電源並維持正常運作。

RU
IT
ES
DE
FR
KO
SC
TC
EN
PB6
附錄
保固及客服資訊
相關保固條款及客服資訊請參考隨貨所附之保固保證書或參考AORUS技術服務區網站。
http://www.aorus.com
FAQ
相關常見問題請參考AORUS 常見問題網站。http://www.aorus.com

RU
IT
ES
DE
FR
KO
SC
TC
EN
1PB
感谢您选择AORUS笔记本电脑 !
为协助您顺利使用AORUS笔记本电脑,我们特地设计此说明。如果您需要了解更多关于电脑的功能,欢迎登陆AORUS官方网站
http://www.aorus.com查询。产品实际规格以出货为准,如有异动恕不另行通知。
AORUS笔记本电脑导览
1视讯指示灯
2视讯镜头
3光源感应器
4麦克风
5屏幕面板
6电源按钮
7键盘
8喇叭
9触摸板
10 电池电量显示键
11 电脑状态指示灯
蓝牙指示灯
无线网路指示灯
硬盘读取指示灯
电池充电指示灯
电源指示灯
按下右键可检视电池剩余电量。
在关机/待机/休眠模式时按下右键可透过指示灯号检视电池剩余电量(电量对照如下图)(电池模式下)。
11 10 9
8
8
7
6
5
4
3
2
1
<10%
>90%
51-70%
71-90%
11-30%
31-50%

RU
IT
ES
DE
FR
KO
SC
TC
EN
32
1有线网络(LAN) 接口
2USB 3.0 接口
3SD 存储卡读卡器
4耳机输出插孔
5麦克风输入插孔
1USB 3.0 接口
2Thunderbolt 3.0 接口 (USB-typeC型接口)
3USB 3.1 接口 (USB-typeC型接口)
4Mini Display 接口
5HDMI 2.0 接口
1直流电源输入插孔
54321
1
5432
1

RU
IT
ES
DE
FR
KO
SC
TC
EN
32
1将电源线接上电源适配器。
2将电源适配器连接到电脑的电源插孔。
3将电源适配器插入电源插座。
4待电源指示灯亮起后,按下电源按钮启动笔记本电脑。
首次使用AORUS笔记本电脑
重要
■
第一次启动笔记本电脑之前,请先确认已经将电源适配器连接至电脑。
■
当笔记本电脑在电源适配器使用模式时,请将电源适配器靠近插座以便于使用。
■
找出笔记本电脑的输入/输出频率标签,并请确认符合电源适配器上的输入/输出频率资讯。
■
电源适配器资讯:
输入电压 / 输入频率:100-240 Vac / 50-60 Hz
额定输出电压 / 额定输出电流:19.5 Vdc / 16.9 A
1
2
3
4

RU
IT
ES
DE
FR
KO
SC
TC
EN
54
1开启笔记本电脑
电源指示灯会显示机器是否为通电的状态。第一次开机时,在还未完全进入操作系统前请勿强制关机。请注意开启电源后,
直到该操作系统配置完成前,音量无法设定。
2开始第一次使用
根据您的笔记本电脑配置,当您第一次开机,第一个画面会是微软Windows®启动画面,按照该屏幕上的提示和
指示,完成操作系统的配置。当软件许可条款显示时,请务必阅读并同意后再继续。
警告
■
本机器设备配备的锂电池为不可拆卸装置,如有任何问题,请交由AORUS授权维修服务中心移除装置中的电池。
■请勿于斜面上或容易震动的地方使用笔记本电脑,以降低发生故障和产品损坏的风险。
■请勿置于车内,室内外阳光强烈或高于45度之储藏环境,以免锂电池发生老化或膨胀等危险。
■请在通风良好的地方使用此产品。请勿在床上,枕头等通风不良的地方使用此产品,并且不要在有楼板暖气的地
方使用,避免导致笔记本电脑过热。请避免底部和侧边的通风孔阻塞。如果通风孔阻塞,会有损害笔记本电脑或
导致内部过热的危险。

RU
IT
ES
DE
FR
KO
SC
TC
EN
54
X9 操作说明
使用者升级硬件
用户可自行打开背盖升级硬件模块,或是将机器送至维修中心由维修人员协助升级;所支持的厂商模块,请至AORUS
官网FAQ参考。
注意
■升级前请确认已关机并已移除电源线,由消费者自行升级过程中所造成的损毁或不相容性,皆不在保修条款内容
中,消费者需自行负担维修费用及更换零件的费用;建议规格的升级可将机器带至维修中心请人员协助。
■为保持最佳的相容性与性能,请至AORUS官网FAQ参考所支持的内存以及硬盘厂商模块,避免出现不兼容或性能
不佳的问题。
电池保护机制
当电池长时间放电状态(未连接适配器电源,而高性能使用)时,短时间的大量放电可能会造成电池温渡过高影响电
池正常使用寿命,为保护电池使用寿命,当电池温渡高于45度时会无法充电,此为保护电池使用寿命的机制。但使用
者将适配器电源接上后,电池停止放电并温度低于45度,电池才会开始回充电源并维持正常运作。

RU
IT
ES
DE
FR
KO
SC
TC
EN
PB6
附录
保修及客服资讯
相关保修条款及客服资讯请参考随货所附之保修保证书,或参考AORUS技术服务区网站。
http://www.aorus.com
FAQ
相关常见问题请参考AORUS常见问题网站。http://www.aorus.com

RU
IT
ES
DE
FR
KO
SC
TC
EN
1PB
어로스 노트북을 구매 하신 것을 축하 드립니다 !
이 설명서는 당신이 새로 구매한 노트북을 처음 세팅 하는데 도움을 줄 것입니다. 마지막 제품의 스펙은 당신 의 구매 시점에 따라 다
를 수 있습니다. 이는 어로스 사가 사전 서면의 통보 없이 변경할 수 있는 권리를 가지고 있습니다. 보다 더 자세한 정보가 필요 하시면
저의 웹사이트http://www.aorus.com 을 방문 하십시오.
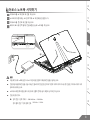
어로스 노트북 시작하기
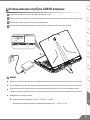
1웹캠 표시기
2웹캠
3광원 센서등
4마이크
5디스플레이 패널
6전원 버튼
7건반
8스피커
9터치 패드
10 배터리 표시 버튼
11 상태 표시기
블루투스 표시기
무선 표시기
드라이브 작동 표시 등
배터리 충전 표시 등
전원 표시기
배터리 잔여량을 확인 하기 위하여 터치패드 오른쪽의 버튼을 누르십시오. 터치패드 오른쪽을 클릭하면 배터리 잔량 표시를 나
타낼 수 있습니다. 아래 보이는 바와 같이, 배터리 표시등은 노트북이 꺼져 있거나, 대기혹은 수면 모드시 사용 가능합니다. (배터리 모
드)
11 10 9
8
8
7
6
5
4
3
2
1
<10%
>90%
51-70%
71-90%
11-30%
31-50%
ページが読み込まれています...
ページが読み込まれています...
ページが読み込まれています...
ページが読み込まれています...
ページが読み込まれています...
ページが読み込まれています...
ページが読み込まれています...
ページが読み込まれています...
ページが読み込まれています...
ページが読み込まれています...
ページが読み込まれています...
ページが読み込まれています...
ページが読み込まれています...
ページが読み込まれています...
ページが読み込まれています...
ページが読み込まれています...
ページが読み込まれています...
ページが読み込まれています...
ページが読み込まれています...
ページが読み込まれています...
ページが読み込まれています...
ページが読み込まれています...
ページが読み込まれています...
ページが読み込まれています...
ページが読み込まれています...
ページが読み込まれています...
ページが読み込まれています...
ページが読み込まれています...
ページが読み込まれています...
ページが読み込まれています...
ページが読み込まれています...
ページが読み込まれています...
ページが読み込まれています...
ページが読み込まれています...
ページが読み込まれています...
-
 1
1
-
 2
2
-
 3
3
-
 4
4
-
 5
5
-
 6
6
-
 7
7
-
 8
8
-
 9
9
-
 10
10
-
 11
11
-
 12
12
-
 13
13
-
 14
14
-
 15
15
-
 16
16
-
 17
17
-
 18
18
-
 19
19
-
 20
20
-
 21
21
-
 22
22
-
 23
23
-
 24
24
-
 25
25
-
 26
26
-
 27
27
-
 28
28
-
 29
29
-
 30
30
-
 31
31
-
 32
32
-
 33
33
-
 34
34
-
 35
35
-
 36
36
-
 37
37
-
 38
38
-
 39
39
-
 40
40
-
 41
41
-
 42
42
-
 43
43
-
 44
44
-
 45
45
-
 46
46
-
 47
47
-
 48
48
-
 49
49
-
 50
50
-
 51
51
-
 52
52
-
 53
53
-
 54
54
-
 55
55


他の言語で
- italiano: AORUS X9 DT Manuale del proprietario
- español: AORUS X9 DT El manual del propietario
- français: AORUS X9 DT Le manuel du propriétaire
その他のドキュメント
-
Gigabyte X5 v8 クイックスタートガイド
-
-
-
-
-
Gigabyte Z790 AORUS ELITE AX 取扱説明書
-
-
Gigabyte X570S AORUS ELITE 取扱説明書
-
Gigabyte B760M AORUS ELITE AX DDR4 取扱説明書
-
Gigabyte B660 AORUS MASTER 取扱説明書