
Register your
new device on
MyBosch now and
get free benefits:
bosch-home.com/
welcome
MMBH6P6BGB
VitaBoost
High performance blender
[en] Instruction manual
[ms] Arahan pengendalian
[zf] 使用說明書
[zh] 使用说明书
[ar]
High performance blender 3
Pengisar berprestasi tinggi 13
高速攪拌機 23
高速搅拌机 31
48


3
en
Intended use
Intended use
This appliance is intended for domestic use and the household
environment only. Use the appliance only for processing normal
amounts of food and for normal amounts of time for domestic use.
Do not exceed permitted maximum quantities (see “Recipes”).
This appliance is suitable for mixing liquid or semi-solid food, for
cutting or chopping raw fruit and vegetables, for puréeing food and
for chopping frozen food (such as fruit) or for crushing ice cubes.
The appliance must not be used for processing other substances
or objects.
Only use the appliance indoors at room temperature and up to
2000 m above sea level.
Important safety information
Read and follow the operating instructions carefully and keep for
later reference! Enclose these instructions when you give this
appliance to someone else.
If the instructions for correct use of the appliance are not observed,
the manufacturer’s liability for any resulting damage will be
excluded.
This appliance can be used by persons with reduced physical,
sensory or mental capabilities or lack of experience and/or
knowledge if they have been given supervision or instruction
concerning use of the appliance in a safe way and if they
understand the hazards involved. Keep children away from the
appliance and connecting cable and do not allow them to use the
appliance. Do not let children play with the appliance. Cleaning and
user maintenance must not be performed by children.
W Risk of electric shock and fire!
■ Connect and operate the appliance only in accordance with the
specifications on the rating plate. Do not use the appliance if the
power cord and/or appliance are damaged. Only our customer
service may repair the appliance, e.g. by replacing a damaged
power cord, in order to avoid hazards.
■ Never connect the appliance to timer switches or remote-
controllable sockets. Never leave the appliance unattended while
it is switched on!
■ Do not place the appliance on or near hot surfaces, e.g. hobs.
The power cord must not come into contact with hot parts or be
pulled across sharp edges.
■ Never immerse the base unit in water or place it in the
dishwasher. Do not steam-clean the appliance. Do not use the
appliance with damp hands.

4
en Important safety information
■ After each use, whenever the appliance is unsupervised, prior to
assembly, prior to disassembly, prior to cleaning and in the event
of an error, the appliance must always be disconnected from the
mains.
W Risk of injury!
■ Before replacing accessories or additional parts which move
during operation, the appliance must be switched off and
disconnected from the power supply.
■ Never reach into the attached blender! Never use the blender
without the lid in place.
■ Care should be taken when handling the sharp cutting blades,
emptying the container and during cleaning.
■ Before switching off, it is essential to turn the rotary selector in an
anticlockwise direction as far it will go (zero setting).
■ After switching off, the drive continues for a short time. Wait until
the drive has come to a standstill.
■ The appliance must be completely assembled before use.
W Risk of scalding!
■ Care should be taken when filling hot liquids. Sudden formation
of steam may cause the liquid to spurt out of the container.
■ You should always use one hand to hold the lid firmly in place
while you work, but don’t place your hand over the filling opening!
When you process hot ingredients in the jug, steam will escape
through the filling opening in the lid.
W Risk of suffocation!
Do not allow children to play with packaging material.
W Caution!
■ Check that there are no foreign objects in the blender jug. Do
not insert objects (e.g. knives, spoons) into the jug. Only use the
pusher provided with the lid on!
■ We recommend that the appliance is never switched on for longer
than is necessary to process the ingredients. Do not operate
at no-load.
W Important!
It is essential to clean the appliance thoroughly after each use or
after it has not been used for an extended period. X “Cleaning and
maintenance” see page 9

5
en
Contents
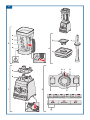
Overview
X Fig. A
1 Base unit / Motor block
a Cushion pad
b Drive
c Reset button (overload protection)
2 Control panel
a on/off switch
b Rotary selector with mark
c Status display (LED)
d min mark
e max mark
f Pulse button
g 6 (3)* programme selection buttons
with LEDs
3 Blender jug
a Container made of Tritan
b Scale
c Blender knife
d Handle
e Handle cover (removable)
4 Lid
a Opening for pusher / for adding more
ingredients
b Locking cap with scale
c Pusher
*Depending on the model
Before using the appliance
for the first time
Before the new appliance can be used,
it must be fully unpacked, cleaned and
checked.
Caution!
Never operate a damaged appliance!
■ Remove the base unit and all
accessories from the packaging and
dispose of all packing materials.
■ Check that all the parts are present and
examine them for obvious damage.
X Fig. A
■ Thoroughly clean and dry all parts
before using for the first time.
X “Cleaning and maintenance” see
page 9
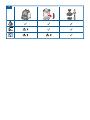
Symbols and markings
Symbol Meaning
Do not expose the blender
jug to temperatures above
80°C.
Warnings on the lid
■ Do not use the appliance
unless this cover is
correctly attached
■ Do not expose the blender
jug to temperatures above
80°C
Warning on the motor block
■ Do not operate without
the rubber pad
Congratulations on the purchase of
your new Bosch appliance. You can find
further information about our products
on our website.
Contents
Intended use ............................................... 3
Important safety information .......................3
Overview.....................................................5
Before using the appliance
for the first time ........................................... 5
Symbols and markings ...............................5
Parts and operating controls.......................6
Use .............................................................7
Automatic programmes ..............................8
Cleaning and maintenance ......................... 9
Safety systems .........................................10
Troubleshooting ........................................ 10
Recipes..................................................... 11
Disposal .................................................... 12
Guarantee.................................................12

6
en Parts and operating controls
Parts and operating controls
High-speed motor block
The blender is equipped with a high-
speed motor with a motor speed of up to
45000 revolutions per minute. This not
only provides particularly fast and fine
blending results but also makes it possible
to heat food. Using the Soup automatic
programme, for example, a hot soup can be
made from cold ingredients.
Note: At the max speed setting, the blender
runs at the highest speed when using the
Pulse button and with certain automatic
programmes. In order to prevent unwanted
heating of food, process the ingredients for
a shorter time or at a lower speed.
on/off switch
To switch the appliance on and off.
Status display
To display the appliance status and as
a mark for the zero setting of the rotary
selector.
Display
Display lights up: appliance is switched
on and ready for use
Display flashes:
– fault in the appliance
– Blender jug is not correctly positioned
or has become detached
– Rotary selector not at zero setting
when switched on
– after interruption of the power supply
– longer than 5½ minutes of continuous
operation (manual mode)
Rotary selector
For continuous adjustment of the blender
knife speed.
Settings
Zero setting (mark points to the status
display) = standstill
min Lowest speed
max Highest speed
Caution!
When the appliance automatically turns off
after 5½ minutes of continuous operation at
the max speed setting, only use the max
speed setting for another 1-2 minutes at
the most after turning the machine back on.
Otherwise, the food may heat up too much
and damage the container.
Notes:
– The status display flashes if the rotary
selector is not at the zero setting when
switched on, if the blender jug has
become detached, or if the electricity
supply has been interrupted. Turn the
rotary selector first to the zero setting
and then continue.
– The rotary selector setting does not
affect the use of the Pulse function.
Pulse button
For switching to the maximum speed
for a short time. The appliance works at
maximum speed while the Pulse button is
pressed.
Note: The function cannot be used while an
automatic programme is running.
Programme selection buttons
with LEDs
For selecting and starting automatic
programmes. X “Automatic programmes”
see page 8
All LEDs light up after switching on. The
selected programme will start after pressing
the button and the appliance will run
automatically.
Blender jug
For processing up to 2 litres of food. The
blender jug is made of Tritan. Tritan is an
unbreakable plastic with no discernable
taste or smell.
Caution!
Do not expose the blender jug to
temperatures above 80°C.
Lid with locking cap
To securely close the blender jug
during processing. To add chopped or
liquid ingredients, turn the locking cap
anticlockwise and remove.

7
en
Use
Pusher
To push ingredients that either stick to
the edge or do not blend well towards the
blender knife. To do so, turn the locking cap
anticlockwise, remove and place the pusher
into the opening. X “Using the pusher” see
page 8
Safety systems
The appliance has various safety systems.
X “Safety systems” see page 10
Use
W Risk of injury!
– Do not insert the mains plug until
all preparations for working with the
appliance are complete and the blender
jug has been correctly positioned on to
the base unit.
– Never put your hand in the blender jug
once it is in place, and always put the lid
on before using the appliance.
Note: The appliance will only work if the
blender jug has been correctly positioned.
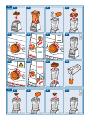
X Fig. B
1. Place the base unit onto a stable and
level work surface. Position the cushion
pad on to the base unit, observing the
recess.
Important: Never attach the blender jug
without the cushion pad.
2. Place the blender jug on to the cushion
pad. Make sure the blender jug is firmly
positioned on the appliance.
3. Put the desired ingredients into the
blender jug.
4. Put the lid with the locking cap in place
and press it firmly.
5. Turn the rotary selector in an
anticlockwise direction as far as it will go
(zero setting).
6. Plug the mains plug into the mains.
Switch on the appliance with the on/off
switch. All LEDs are lit.
7. Slowly turn the rotary switch clockwise
until the desired speed is reached. The
status LED lights up.
Note: Using the programme buttons
X “Automatic programmes” see
page 8.
8. Process the ingredients until the desired
consistency is achieved.
9. Turn the rotary selector in an
anticlockwise direction as far as it will go
(zero setting). Wait until the appliance
comes to a standstill.
10. Switch off the appliance with the on/off
switch. Disconnect the mains plug.
11. Remove the blender jug. Remove
the lid.
12. Pour the blended food into another
container.
Clean all parts. X “Cleaning and
maintenance” see page 9
Adding more ingredients
X Fig. C
1. Turn the locking cap in an anticlockwise
direction and remove.
2. Add more chopped or liquid ingredients
through the opening, remembering to
observe the maximum capacity.
3. Put on the locking cap and tighten it by
turning in a clockwise direction.
4. Process the ingredients until the desired
consistency is achieved.
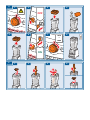
X Fig. D
Adding larger quantities:
1. Turn the rotary selector in an
anticlockwise direction as far as it will go
(zero setting). Wait until the appliance
comes to a standstill.
2. Switch off the appliance with the on/off
switch. Disconnect the mains plug.
W Risk of injury!
Never remove the lid while the appliance is
plugged in.
3. Remove the lid.
4. Add the extra ingredients.
5. Replace the lid.
6. Plug the mains plug into the mains.
Switch on the appliance with the on/off
switch. All LEDs are lit.

8
en Automatic programmes
7. Slowly turn the rotary switch clockwise
until the desired speed is reached. The
status LED lights up.
8. Process the ingredients until the desired
consistency is achieved.
Using the pusher
W Risk of injury!
Never use the pusher without the lid
attached!
X Fig. E
1. Turn the locking cap in an anticlockwise
direction and remove.
2. Place the pusher provided into the
opening.
3. Push the ingredients with the pusher
towards the blender knife by guiding the
pusher along the corners and sides of
the blending jug.
4. Then remove the pusher again
immediately. Put on the locking cap
and tighten it by turning in a clockwise
direction.
Note: Using the pusher can considerably
improve the quality of the blending result.
Using the Pulse function
■ With the appliance switched on, press
the Pulse button down and hold.
■ While the Pulse button is pressed, the
appliance will run at maximum speed.
■ Release the Pulse button. The
appliance will start again with the
previously selected speed.
Note: While an automatic programme is
running, the Pulse function cannot be used.
Automatic programmes
The appliance has 6 (3)* automatic
programmes (depending on the model).
After pressing the relevant button, the
programme selected starts and processes
the ingredients at preset speeds and
processing times. The programme ends
automatically after preparation.
The following programmes can be selected:
Programmes
Shake For fruit smoothies and
milkshakes with fresh
ingredients
Smoothie For green smoothies and
fruit smoothies with frozen
ingredients
Soup For preparing hot soups
Ice cream* For ice cream and sorbets
Sauce* For sauces and dips
Cleaning* Cleaning programme
*Depending on the model
Caution!
When the automatic programme Soup
has finished, do not restart the Soup
programme. Otherwise, the food may heat
up too much and damage the container.
Please note:
– Only use cold ingredients with the Soup
automatic programme. If hot ingredients
are added, the temperature increases
too much.
– An automatic programme can only be
started when the rotary selector is at the
zero setting.
– An automatic programme can be ended
at any time by repressing the relevant
programme selection button or by
switching off with the on/off switch.
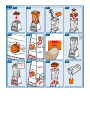
An example
Making a pear smoothie
(recipe X “Pear smoothie” see page 11)
X Fig. F
1. Place the base unit onto a stable and
level work surface. Position the cushion
pad on to the base unit, observing the
recess.
Important: Never attach the blender jug
without the cushion pad.
2. Place the blender jug on to the cushion
pad. Make sure the blender jug is firmly
positioned on the appliance.
3. Put the desired ingredients into the
blender jug.

9
en
Cleaning and maintenance
4. Put the lid with the locking cap in place
and press it firmly.
5. Turn the rotary selector in an
anticlockwise direction as far as it will go
(zero setting).
6. Plug the mains plug into the mains.
Switch on the appliance with the on/off
switch. All LEDs are lit.
7. Press the Shake programme selection
button. The LED on the button lights up.
8. The appliance processes the ingredients
automatically.
9. The appliance ends processing
automatically. All LEDs are lit.
10. Switch off the appliance with the on/off
switch. Disconnect the mains plug.
11. Remove the blender jug. Remove the
lid.
12. Pour the finished fruit smoothie into
glasses.
■ Clean all parts. X “Cleaning and
maintenance” see page 9
Cleaning and maintenance
The appliance and the individual parts used
must be thoroughly cleaned after each use.
W Risk of electric shock!
– Unplug the appliance before cleaning it.
– Never immerse the base unit in liquids
and do not clean in the dishwasher.
– Do not use a steam cleaner.
W Risk of injury!
Do not touch the blender blades with your
bare hands. Use a brush.
Caution!
– Do not use any cleaning agents
containing alcohol or spirits.
– Do not use any sharp, pointed or metal
objects.
– Do not use abrasive cloths or cleaning
agents.
Notes:
– Clean all parts immediately after use.
This will prevent residues from drying
on and possibly attacking the plastic
(e.g. essential oils in herbs).
– When processing food such as
carrots, the plastic parts may become
discoloured, but this can be removed
with a few drops of cooking oil.
– To make cleaning the blender jug easier,
remove the cover from the handle and
replace once dry.
In Fig. G, you will find a summary of how to
clean the individual parts.
“Cleaning” programme
For quick and easy cleaning.
■ Attach the empty blender jug on to the
appliance.
■ Fill it with 1.25 litres of warm water and
2 drops of washing-up liquid.
■ Put the lid with the locking cap in place
and press it firmly.
■ Switch the appliance on again and press
the Cleaning programme selection
button.
■ The appliance runs through automatic
pre-cleaning and ends the programme
automatically.
■ Switch off the appliance with the on/off
switch. Disconnect the mains plug.
■ Remove the blender jug, the lid with
locking cap and the cushion pad.
■ Rinse all parts thoroughly and clean
again if necessary.
■ Clean the base unit.

10
en Safety systems
Safety systems
Start lock-out and
automatic cut-out
The appliance can only be operated if the
blender jug has been correctly positioned
and if the rotary selector is turned to
the zero setting when switching on the
appliance or after an interruption in the
power supply. The appliance will switch off
automatically if the blender jug becomes
detached while it is running. The appliance
automatically switches off in manual mode
(speed min – max) after 5½ minutes of
continuous operation. X “Troubleshooting”
see page 10
Overload protection
The motor switches off automatically if the
appliance overheats. X “Troubleshooting”
see page 10
Note: When activating the overload
protection, a slightly strange smell may
occur. This is not a sign of malfunction.
Troubleshooting
W Risk of injury!
Before dealing with any faults, unplug the
mains plug.
Note: The appliance will no longer
switch on if there is an error in appliance
operation, if the electronic fuses trip or the
appliance has a defect. First try to eliminate
the problem which has occurred with
the help of the following information.
Caution!
If a fault cannot be eliminated, please
contact customer service.
Fault
Appliance fails to start up or switches off
while in use. The status display flashes.
Possible causes
– Blender jug is not correctly positioned,
has become detached or has been
removed.
– Rotary selector was not at the zero
setting when switching on or after an
interruption in power.
– The appliance was operating
continuously in manual mode (speed
min – max) for longer than 5½ minutes.
Remedy
■ Switch off the appliance with the on/off
switch.
■ Position the blender jug correctly.
■ Turn the rotary selector in an
anticlockwise direction as far as it will go
(zero setting).
■ Switch on the appliance with the on/off
switch. The status display lights up.
Fault
Appliance fails to start up or switches off
while in use.
Possible cause
The overload protection device is activated.
Remedy
■ Turn the rotary selector in an
anticlockwise direction as far as it will go
(zero setting).
■ Switch off the appliance with the on/off
switch. Disconnect the mains plug.
■ Remove the blender jug.
■ Leave the appliance to cool for approx.
15-20 minutes and then switch it on
again.
■ If the appliance does not start, turn the
appliance upside down. Press the reset
button on the bottom (X Fig. A - 1c).
■ If the reset button is blocked, leave the
appliance to cool again and try it again
later.

11
en
Recipes
Recipes
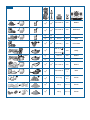
Notes:
– In Fig. H, you will find a table with other
application examples. Clean and chop
food before processing. Remove hard
components such as cores and peel.
– The recipes and application examples
can also be carried out without an
automatic programme. To do this, use
the rotary selector to increase the speed
from min to max and blend all the
ingredients until the desired consistency
is reached.
Pear smoothie
– 3 bananas
– 3 pears
– Juice of two oranges (approx. 200 ml)
– 100 ml cold water
■ Cut the washed pears and the peeled
bananas into pieces.
■ Add the ingredients to the blender jug
and put on the lid with the locking cap.
■ Press the Shake button.
■ After ending the automatic programme,
serve the smoothie immediately.
Tip: Pears can differ greatly in taste
depending on their variety. If you don’t
have any sweet pears, a smoothie can be
sweetened by adding two to four dates -
these give it a very mild sweetness that
harmonises perfectly with the rest of the
ingredients.
Berry and honey smoothie
– 400 g frozen raspberries / berry mixture
– 1 banana
– 500 ml milk
– 3 tbsp lemon juice
– 2 tbsp honey
■ Let the raspberries / berry mixture thaw.
■ Cut the peeled banana into pieces.
■ Add the ingredients to the blender jug
and put on the lid with the locking cap.
■ Press the Smoothie button.
■ After ending the automatic programme,
serve the smoothie immediately.
Fresh fruit-ginger smoothie
– 4 handfuls corn salad
– 2 pears
– 2 bananas
– 1 piece fresh ginger, (approx. 15 g)
– 10 ice cubes
– 200 ml cold water
■ Wash the corn salad thoroughly.
■ Cut the washed pears and the peeled
bananas into pieces.
■ Peel the ginger.
■ Add the ingredients to the blender jug
and put on the lid with the locking cap.
■ Press the Smoothie button.
■ After ending the automatic programme,
serve the smoothie immediately.
Raspberry ice cream
– 1 untreated lemon
– 150 g full-fat yoghurt
– 150 g icing sugar
– 600 g frozen blueberries
– 150 ml cold whole milk
■ Add the ingredients to the blender jug
and put on the lid with the locking cap.
■ Depending on the model: Press the
Ice Cream button and run the automatic
programme.
■ Or: Increase the speed slowly with
the rotary selector and blend all the
ingredients until a creamy consistency
has been achieved.
■ Pour the ice cream into another
container and put it into the freezer for a
while if a firmer consistency is desired.
Tip: The ice cream can also be made
with other frozen berries (e.g. raspberries,
strawberries or berry mixtures).

12
en Disposal
Green sauce
– One bunch each of parsley, borage,
sorrel, salad burnet, cress, chervil,
chives
– 2 tbsp water
– 460 g crème fraîche
– 230 g sour cream
– 1 tsp mustard
– 3 tbsp oil (e.g. walnut oil)
– 1 tbsp vinegar or lemon juice
– Salt and pepper
■ Wash and dry the herbs, remove the
hard stalks.
■ Add the ingredients to the blender jug
and put on the lid with the locking cap.
■ Depending on the model: Press the
Sauce button and run the automatic
programme.
■ Or: Increase the speed slowly with
the rotary selector and blend all the
ingredients until a creamy consistency
has been achieved.
■ Season the sauce and put in the fridge.
Tip: The sauce is a perfect accompaniment
to boiled eggs, potatoes and vegetables.
Pancake mixture
– 300 ml milk
– 100 g flour
– 2 small eggs
– 1 pinch salt
– 1 tsp oil (e.g. sunflower oil)
■ Add the ingredients to the blender jug
and put on the lid with the locking cap.
■ Set the rotary selector to max and blend
all the ingredients for 30-60 seconds.
■ Pour the pancake mixture in portions
into a hot and greased pan and fry.
Tomato soup
– 750 g fresh tomatoes or tinned tomatoes
– 2 red peppers
– 90 g cashew nuts
– 6 basil leaves
– Salt and pepper
■ Wash the fresh tomatoes and remove
the thick stem.
■ Add the ingredients to the blender jug
and put on the lid with the locking cap.
■ Press the Soup button and run the
automatic programme.
■ After ending the automatic programme,
season the hot soup and serve.
Note: If the soup is not hot enough once
the automatic programme has finished,
turn the rotary selector to max and mix for
another 1-2 minutes at the most.
Disposal
J
Dispose of packaging in an environ-
mentally-friendly manner. This
appliance is labelled in accordance
with European Directive 2012/19/EU
concerning used electrical and
electronic appliances (waste electrical
and electronic equipment – WEEE).
The guideline determines the frame-
work for the return and recycling
of used appliances as applicable
throughout the EU. Please ask your
specialist retailer about current
disposal facilities.
Guarantee
The guarantee conditions for this appliance
are as dened by our representative in the
country in which it is sold. Details regarding
these conditions can be obtained from
the dealer from whom the appliance was
purchased. The bill of sale or receipt must
be produced when making any claim under
the terms of this guarantee.
Changes reserved.

13
ms
Pengendalian mengikut peraturan
Pengendalian mengikut peraturan
Perkakas ini hanya sesuai untuk pengunaan di dalam rumah atau
persekitaran sepertinya. Penggunaan perkakas untuk memproses
kuantiti makanan yang biasa untuk kegunaan domestik. Jangan
melebih kuantiti tinggi yang dibenarkan (Lihat “Resipi”).
Perkakas ini sesuai untuk campur makanan cecair atau separa
pepejal, untuk kisar / cincang buah dan sayur mentah, untuk
memurikan makanan dan untuk kisar makanan beku (contohnya
buah) atau kiub ais. Perkakas ini tidak boleh digunakan untuk
memproses objek atau bahan yang lain.
Gunakan perkakas ini hanya di dalam bangunan pada suhu bilik dan
ketinggian sehingga 2000 m di atas paras laut.
Arahan keselamatan penting
Baca arahan pengendalian dengan teliti, patuhinya dan simpan!
Jika perkakas diberikan kepada pihak yang lain, sertakan bersama
manual ini.
Ketidakpatuhan terhadap arahan bagi penggunaan perkakas dengan
betul akan mengecualikan pengeluar dari liabiliti kerosakan yang
berlaku.
Perkakas ini boleh digunakan oleh orang dengan kekurangan
keupayaan fizikal, deria atau metal, atau kekurangan pengalaman
dan/atau pengetahuan dibawah selian atau telah dilatih mengikut
keselamatan pengendalian peralatan ini dan memahami kesan
bahayanya. Kanak-kanak hendaklah dijauhkan daripada perkakas
dan kabel penyambungan serta tidak dibenarkan mengendalikan
perkakas ini. Kanak-kanak tidak dibenarkan bermain dengan
perkakas ini. Kanak-kanak tidak dibenarkan untuk mencuci atau
menyelenggara perkakas ini.
W Bahaya kejutan elektrik dan kebakaran!
■ Sambung dan kendalikan perkakas hanya mengikut spesifikasi
pada plat kadaran. Hanya kendalikan sekiranya tiada tanda
kerosakan pada perkakas dan kord kuasa. Pembaikan pada
perkasas, seperti penukaran kord kuasa yang rosak, hanya boleh
dilakukan oleh servis pelanggan kami bagi mengelakkan bahaya.
■ Jangan sambungkan perkakas pada pemasa atau soket yang
dikawal dengan alat kawalan jauh. Sentiasa awasi perkakas
semasa menggunakannya!
■ Jangan letak perkakas di atas atau berdekatan dengan permukaan
panas, seperti plat panas. Jangan biarkan kord kuasa bersentuhan
dengan bahagian panas atau menariknya di atas bahagian sisi
yang tajam.

14
ms Arahan keselamatan penting
■ Jangan sesekali merendam unit asas ke dalam air atau mesin
basuh pinggan mangkuk. Jangan gunakan pembersih wap.
Jangan kendalikan perkakas dengan tangan yang basah.
■ Peralatan ini mestilah sentiasa dipisahkan dari punca kuasa
selepas setiap penggunaan,ketika tanpa penyeliaan, sebelum
pemasangan, penanggalan atau pembersihan dan kerosakan.
W Risiko kecederaan!
■ Sebelum menukar alat ganti atau tambah, yang bergerak semasa
pengendalian, perkakas mestilah dimatikan dan dipisahkan dari
punca kuasa.
■ Jangan sesekali mencapai ke dalam pengisar yang dipasang!
Jangan sesekali kendalikan pengisar tanpa pelindung.
■ Berhati-hati semasa mengendalikan pisau tajam, semasa
mengosongkan bekas dan semasa membersih.
■ Sebelum mematikan, putar pemilih putar hingga berhenti mengikut
arah lawan jam (kedudukan sifar).
■ Selepas dimatikan, pemacu bergerak untuk seketika. Tunggu
sehingga pemacu telah berhenti sepenuhnya.
■ Gunakan perkakas dalam keadaan dipasang sepenuhnya sahaja.
W Risiko lecur!
■ Berhati-hati semasa mengisi cecair panas. Pembentukan wap
secara tiba-tiba, boleh menyebabkan cecair keluar daripada
bekas.
■ Sentiasa pegang tudung semasa kerja dengan satu tangan. Pada
masa yang sama, jangan capai pembukaan pengisian semula!
Semasa memproses campuran panas, wap air keluar melalui
lubang pengisi pada penutup.
W Risiko lemas!
Jangan biarkan kanak-kanak bermain dengan bahan pembungkusan.
W Perhatian!
■ Pastikan bahawa tiada objek asing berada di dalam bekas
campuran. Jangan kendalikan objek (contohnya pisau, sudu) di
dalam bekas campuran. Gunakan penolak yang disediakan sahaja
apabila penutup dipasang!
■ Adalah dicadangkan supaya jangan sesekali tinggalkan
alat dihidupkan terlalu lama daripada yang diperlukan untuk
pemprosesan makanan. Jangan kendalikan dalam keadaan tanpa
beban.
W Penting!
Perkakas mestilah dibasuh dengan teliti selepas setiap penggunaan
atau selepas tidak menggunakannya untuk jangka waktu yang
panjang. X “Pembersihan dan penjagaan” lihat halaman 19

15
ms
Kandungan
Tahniah atas pembelian perkakas Bosch
baru anda. Anda boleh mendapatkan
maklumat lanjut tentang produk kami di
halaman web kami.
Kandungan
Pengendalian mengikut peraturan ............. 13
Arahan keselamatan penting ..................... 13
Sepintas lalu ............................................... 15
Sebelum penggunaan kali pertama ........... 15
Simbol dan penanda .................................. 15
Bahagian dan elemn operasi ..................... 16
Pengunaan ................................................. 17
Program automatik ..................................... 18
Pembersihan dan penjagaan ..................... 19
Sistem keselamatan ................................... 20
Bantuan sekiranya bermasalah ................. 20
Resipi ......................................................... 20
Arahan tentang pelupusan ......................... 22
Syarat-syarat waranti ................................. 22
4 Tudung
a Pembukaan untuk penolak / isian
penambahan
b Penutup penyukat dengan skala
c Penolak
* bergantung kepada model
Sebelum penggunaan kali
pertama
Sebelum perkakas baru boleh digunakan,
perkakas ini mestilah dikeluarkan
sepenuhnya, dibersihkan dan diperiksa.
Perhatian!
Jangan kendalikan perkakas yang rosak!
■ Keluarkan unit asas dan semua aksesori
daripada pembungkusan dan buang
bahan bungkusan yang ada.
■ Periksa kesempurnaan semua bahagian.
dan untuk kerosakan yang boleh dilihat.
X Rajah A
■ Sebelum penggunaan pertama,
basuh semua bahagian dengan teliti
dan keringkan. X “Pembersihan dan
penjagaan” lihat halaman 19
Simbol dan penanda
Simbol Maksud
Jangan dedahkan pengadun
kepada suhu melebihi 80°C.
Tanda amaran pada
penutup
■ Jangan gunakan peranti
ini tanpa meletakkan
penutup dengan betul
■ Jangan dedahkan
pengadun kepada suhu
melebihi 80 C.
Amaran pada blok enjin
■ Jangan gunakan tanpa
pelapik redaman
Sepintas lalu
X Rajah A
1 Unit asas / Blok enjin
a Pelapik redaman
b Pemacu
c Butang set semula (perlindungan
beban lampau)
2 Panel kawalan
a Suis hidup/mati on/off
b Pemilih putar dengan penanda
c Paparan status (LED)
d Penanda min
e Penanda max
f Butang Pulse
g 6 (3)* Butang pemilih program
dengan LED
3 Bekas pengadun
a Bekas daripada Tritan
b Skala
c Pisau pengadun
d Pemegang
e Penutup pemegang (boleh tanggal)

16
ms Bahagian dan elemn operasi
Perhatian!
Jika perkakas beroperasi secara berterusan
selepas 5½ minit pada tetapan kelajuan
max mati secara automatik, operasi pada
tetapan max paling lama 1-2 minit selepas
dihidupkan semula, kerana jika tidak, bahan
makanan boleh terlalu panas dan boleh
merosakkan bekas.
Nota:
– Jika pemilih putar tidak berada pada
posisi sifar semasa dihidupkan, bekas
pengadun longgar atau aliran kuasa
terganggu, paparan status menyala.
Putar pemilih putar ke posisi sifar terlebih
dahulu sebelum mengendalikannya.
– Tetapan pemilih putar tidak mempunyai
kesan ke atas penggunaan fungsi Pulse.
Butang Pulse
Untuk menghidupkan seketika pada putaran
paling tinggi. Perkakas beroperasi dengan
putaran paling tinggi selagi butang Pulse
ditekan.
Arahan: Fungsi ini tidak bleh digunakan jika
program automatik dipilih.
Butang pilihan program
dengan LED
Untuk memilih dan memulakan program
automatik. X “Program automatik” lihat
halaman 18
Selepas dihidupkan, semua LED menyala.
Dengan menekan satu butang, program
yang dipilih akan bermula dan perkakas
beroperasi secara automatik.
Bekas pengadun
Untuk memproses sehingga 2 liter bahan
makanan. Bekas pengadun adalah daripada
Tritan. Tritan adalah bahan sintetik yang
tidak boleh pecah, tiada rasa dan tiada bau.
Perhatian!
Jangan dedahkan pengadun kepada suhu
melebihi 80°C.
Tudung dengan penutup
Untuk menutup bekas pengadun semasa
memproses. Untuk menambah bahan
yang telah dipotong kecil atau cecair,
putar penutup ke arah lawan arah jam dan
tanggalkan.
Bahagian dan elemn operasi
Blok enjin berprestasi tinggi
Pengadun dilengkapi dengan motor
kelajuan tinggi dengan kelajuan sehingga
45000 pusingan per minit. Ini tidak hanya
memberikan hasil pengadunan yang
pantas dan baik, tetapi juga membolehkan
pemanasan makanan. Contohnya, sup
panas dihasilkan daripada bahan sejuk
dengan program automatik sup Soup.
Arahan: Pada tetapan kelajuan max,
semasa menggunakan butang Pulse dan
bagi program automatik tertentu, pengadun
berfungsi pada putaran tertinggi. Untuk
mengelakkan pemanasan bahan makanan
yang tidak diingini, proses bahan untuk
tempoh singkat atau pada putaran rendah.
Suis hidup/mati “on/off”
Untuk menghidupkan dan mematikan
perkakas.
Paparan status
Untuk memaparkan status perkakas dan
untuk menanda posisi sifar pemilih putar.
Paparan
Paparan menyala: Perkakas telah
dihidupkan dan sedia untuk operasi
Paparan berkerlip:
– Ralat dalam perkakas
– Bekas pengadun tidak dipasang
dengan betul atau menjadi longgar
– Pemilih putar tidak berada di posisi sifar
semasa dihidupkan
– selepas gangguan bekalan kuasa
– operasi berterusan lebih daripada
5½ minit (mod manual)
Pemilih putar
Untuk tetapan berterusan putaran pisau
pengadun.
Tetapan
Posisi sifar (Penanda dipapar pada
paparan status) = Berhenti
min Putaran paling rendah
max Putaran paling tinggi

17
ms
Pengunaan
Penolak
Untuk menolak bahan yang melekat di sisi
atau yang tidak diadun dengan sempurna
ke arah pisau pengadun. Kemudian putar
penutup melawan arah pusingan jam,
tanggalkan dan pasang penolak dalam
pembukaan. X “Gunakan penolak” lihat
halaman 18
Sistem keselamatan
Alat ini mempunyai sistem keselamatan
yang berbeza. X “Sistem keselamatan” lihat
halaman 20
Pengunaan
W Risiko kecederaan!
– Jangan memasukkan plag kluasa
sehingga semua persiapan untuk bekerja
dengan perkakas telah lengkap dan
bekas pengadun telah dipasang dengan
betul di atas unit asas.
– Jangan masukkan tangan ke dalam
bekas pengadun dan sentiasa kerja
dengan tudung yang dipasang.
Arahan: Kendalikan perkakas hanya apabila
bekas pengadun telah dipasang dengan
betul.
X Rajah B
1. Letakkan unit asas di atas kawasan
kerja yang mendatar dan stabil. Pasang
pelapik rendaman pada unit asas. Beri
perhatian pada reses.
Penting: Jangan sesekali pasang bekas
pengadun tanpa pelapik rendaman.
2. Pasang bekas pengadun di atas
pelapik rendaman. Pastikan yang bekas
pengadun telah dipasang dengan ketat.
3. Isi bekas pengadun dengan bahan yang
diingini.
4. Pasang tudung dengan penutup dan
tekan.
5. Putar pemilih putar sepenuhnya
mengikut arah lawan jam (posisi sifar).
6. Pasangkan plag. Hidupkan perkakas
dengan suis mati/hidup. Semua LED
menyala.
7. Putar pemilih putar dengan perlahan
mengikut arah pusingan jam sehingga
mencapai putaran yang dikehendaki.
LED status menyala.
Arahan: Penggunaan butang pemilih
program X “Program automatik” lihat
halaman 18.
8. Proses bahan selama mana campuran
yang diingini terhasil.
9. Putar pemilih putar sepenuhnya
mengikut arah lawan jam (posisi sifar).
Tunggu perkakas berhenti.
10. Matikan perkakas dengan suis hidup/
mati. Cabutkan plag.
11. Tanggalkan bekas pengadun.
Tanggalkan tudung.
12. Salurkan bahan campuran.
Bersihkan semua bahagian.
X “Pembersihan dan penjagaan” lihat
halaman 19
Menambah lebih banyak bahan
X Rajah C
1. Putarkan penutup mengikut arah lawan
jam dan tanggalkannya.
2. Isikan bahan yang dipotong kecil
atau cecair melalui pembukaan. Beri
perhatian kepada kapasiti maksimum.
3. Pasang penutup dan pusing mengikut
arah pusingan jam sehingga ketat.
4. Proses bahan selama mana campuran
yang diingini terhasil.
X Rajah D
Menambah kuantiti yang banyak:
1. Putar pemilih putar sepenuhnya
mengikut arah lawan jam (posisi sifar).
Tunggu perkakas berhenti.
2. Matikan perkakas dengan suis hidup/
mati. Cabutkan plag.
W Risiko kecederaan!
Jangan sesekali tanggalkan tudung semasa
perkakas dipasang.
3. Tanggalkan tudung.
4. Menambah lebih banyak bahan.
5. Pasangkan tudung semula.
6. Pasangkan plag. Hidupkan perkakas
dengan suis mati/hidup. Semua LED
menyala.

18
ms Program automatik
7. Putar pemilih putar dengan perlahan
mengikut arah pusingan jam sehingga
mencapai putaran yang dikehendaki.
LED status menyala.
8. Proses bahan selama mana campuran
yang diingini terhasil.
Gunakan penolak
W Risiko kecederaan!
Jangan sesekali menggunakan penolak
tanpa memasang tudung.
X Rajah E
1. Putarkan penutup mengikut arah lawan
jam dan tanggalkannya.
2. Pasang penolak yang dibekalkan ke
dalam pembukaan.
3. Tolak bahan dengan penutup ke arah
pisau pengadun. Kemudian arahkan
penolak pada bucu dan sepanjang
dinding bekas pengadun.
4. Seterusnya tanggalkan penolak serta-
merta. Pasang penutup dan pusing
mengikut arah pusingan jam sehingga
ketat.
Nota: Penggunaan penolak boleh
memperbaiki kualiti hasil adunan dengan
ketara.
Gunakan fungsi Pulse
■ Apabila perkakas dihidupkan, tekan
butang Pulse ke bawah dan tahan.
■ Selama mana butang Pulse ditahan,
perkakas beroperasi pada putaran
maksimum.
■ Lepaskan butang Pulse. Perkakas
kembali beroperasi pada putaran yang
telah dipilih sebelumnya.
Nota: Semasa program automatik
beroperasi, fungsi Pulse tidak boleh
digunakan.
Program automatik
Perkakas mempunyai lebih 6 (3)* program
automatik (bergantung kepada model).
Selepas menekan butang tertentu, program
yang dipilih mula dan mengadun bahan-
bahan pada kelajuan pratetap dan masa
mengadun. Program berhenti selepas
penyediaan secara automatik.
Program berikut boleh dipilih:
Program
Shake Untuk smoothie buahan dan
shake-susu dengan bahan
segar
Smoothie Untuk smoothie hijau dan
smoothie buahan dengan
bahan-bahan beku
Soup Untuk penyediaan sup panas
Ice Cream* Untuk ais krim dan serbat
Sauce* Untuk Sos dan celup
Cleaning* Program pembersihan
* bergantung kepada model
Perhatian!
Apabila program Soup telah tamat, jangan
mulakan semula program Soup, kerana
bahan makanan boleh menjadi terlalu panas
dan merosakkan bekas.
Nota:
– Gunakan program sup Soup hanya
dengan bahan sejuk. Jika bahan panas
ditambah, suhu akan meningkat terlalu
banyak.
– Program automatik hanya boleh
dimulakan jika pemilih putar berada pada
posisi sifar.
– Program automatik boleh dihentikan
pada bila-bila masa dengan menekan
butang pemilih program yang berkenaan
atau mematikan dengan suis hidup/mati.
Satu contoh
Menghasilkan Smoothie pear
(resipi X “Smoothie buah pear” lihat
halaman 21)
X Rajah F
1. Letakkan unit asas di atas kawasan
kerja yang mendatar dan stabil. Pasang
pelapik rendaman pada unit asas. Beri
perhatian pada reses.
Penting: Jangan sesekali pasang bekas
pengadun tanpa pelapik rendaman.
2. Pasang bekas pengadun di atas
pelapik rendaman. Pastikan yang bekas
pengadun telah dipasang dengan ketat.
3. Isi bekas pengadun dengan bahan yang
diingini.

19
ms
Pembersihan dan penjagaan
4. Pasang tudung dengan penutup dan
tekan.
5. Putar pemilih putar sepenuhnya
mengikut arah lawan jam (posisi sifar).
6. Pasangkan plag. Hidupkan perkakas
dengan suis mati/hidup. Semua LED
menyala.
7. Tekan butang pemilih program Shake.
Butang LED menyala.
8. Perkakas mengadun bahan secara
automatik.
9. Perkakas berhenti mengadun secara
automatik. Semua LED menyala.
10. Matikan perkakas dengan suis hidup/
mati. Cabutkan plag.
11. Tanggalkan bekas pengadun.
Tanggalkan tudung.
12. Masukkan smoothie buahan ke dalam
gelas.
■ Bersihkan semua bahagian.
X “Pembersihan dan penjagaan” lihat
halaman 19
Pembersihan dan penjagaan
Perkakas dan item yang digunakan mestilah
dibasuh dengan teliti selepas setiap
penggunaan.
W Risiko kejutan elektrik!
– Cabut plag sebelum membasuh.
– Jangan sesekali merendam unit asas
ke dalam cecair dan jangan mencuci di
dalam mesin basuh pinggan mangkuk.
– Jangan gunakan pembersih stim.
W Risiko kecederaan!
Jangan sesekali sentuh bilah dengan tangan
kosong! Gunakan berus.
Perhatian!
– Jangan gunakan alkohol atau agen
pembersih yang mengandungi spirit yang
melelas.
– Jangan menggunakan objek tajam,
berbucu atau metal.
– Jangan gunakan kain atau agen
pembersih yang melelas.
Nota:
– Bersihkan bahagian dengan segera
selepas digunakan. Sisa kering tidak
akan memberi kesan pada bahan sintetik
(contohnya melalui minyak pati dalam
herba).
– Bagi penyediaan, contohnya, lobak
merah, bahagian plastik berubah
warna dengan saput merah, ini boleh
dihilangkan dengan beberapa titis
minyak masak.
– Untuk pembersihan bekas pengadun
yang mudah, tanggalkan penutup
pemegang daripada pemegang dan
pasang semula selepas dikeringkan.
Anda dapat lihat gambaran keseluruhan
bagaimana untuk membersihkan bahagian
tertentu dalam Rajah G.
Program “Cleaning”
Untuk prapembersihan yang mudah dan
pantas.
■ Letakkan bekas pengadun yang kosong
di atas perkakas.
■ Isikan 1.25 Liter air suam dan 2 titis
bahan cuci.
■ Pasang tudung dengan penutup dan
tekan.
■ Hidupkan semula perkakas dan tekan
butang pemilih program Cleaning.
■ Perkakas akan memulakan
prapembersihan secara automatik
dan menghentikan program secara
automatik.
■ Matikan perkakas dengan suis hidup/
mati. Cabutkan plag.
■ Tanggalkan bekas pengadun, tudung
dengan penutup dan pelapik redaman.
■ Bilas dan bersihkan semua bahagian
betul-betul jika perlu.
■ Bersihkan unit asas.

20
ms Sistem keselamatan
Sistem keselamatan
Pelindung penghidupan /
pematian automatik
Perkakas hanya boleh beroperasi jika
bekas pengadun telah diletakkan dengan
betul dan pemilih putar diputarkan kepada
kedudukan sifar apabila dipasang pada
bekalan kuasa atau selepas bekalan kuasa
terganggu. Perkakas mati secara automatik,
jika bekas pengadun menjadi longgar.
Peranti dimatikan secara automatik dalam
mod manual (putaran min – max) selepas
5½ minit operasi berterusan. X “Bantuan
sekiranya bermasalah” lihat halaman 20
Pelindung beban lebih
Jika terlalu panas, enjin akan dimatikan
secara automatik. X “Bantuan sekiranya
bermasalah” lihat halaman 20
Nota: Dengan pengaktifan perlindungan
beban lampau, bau asing akan terbentuk. Ini
bukan tanda pincang tugas.
Bantuan sekiranya
bermasalah
W Risiko kecederaan!
Tanggalkan plag untuk menyelesaikan
gangguan.
Tip: Apabila ralat berlaku dalam operasi
peranti, pencetusan fius elektronik atau
kerosakan peranti, peranti tidak boleh
dihidupkan. Untuk membaiki gangguan, sila
cuba dahulu nasihat yang berikutnya.
Perhatian!
Jika kerosakan berterusan, sila hubungi
khidmat pelanggan.
Gangguan
Perkakas tidak boleh mula atau mati ketika
penggunaan. Paparan status berkerlip.
Sebab yang mungkin
– Bekas pengadun tidak dipasang dengan
betul, menjadi longgar atau ditanggalkan.
– Pemilih putar tidak berada dalam
kedudukan sifar semasa dihidupkan
atau selepas berlaku gangguan bekalan
kuasa.
– Perkakas berada dalam mod manual
(putaran min – max) lebih lama daripada
5½ minit dalam operasi berterusan.
Kemungkinan sebab
■ Matikan perkakas dengan suis hidup/mati.
■ Letakkan bekas pengadun dengan betul.
■ Putar pemilih putar sepenuhnya
mengikut arah lawan jam (posisi sifar).
■ Hidupkan perkakas dengan suis mati/
hidup. Paparan status menyala.
Gangguan
Perkakas tidak boleh mula atau mati ketika
penggunaan.
Sebab yang berkemungkinan
Pelindung beban lebih aktif.
Kemungkinan sebab
■ Putar pemilih putar sepenuhnya
mengikut arah lawan jam (posisi sifar).
■ Matikan perkakas dengan suis hidup/
mati. Cabutkan plag.
■ Tanggalkan bekas pengadun.
■ Biarkan perkakas sejuk selama
15-20 minit dan kemudian hidupkannya
semula.
■ Jika peranti tidak beroperasi, pusingkan
perkakas. Tekan butang set semula di
bahagian bawah (X Rajah A - 1c).
■ Jika butang set semula tersekat, biarkan
peranti sejuk dan cuba lagi sekali.
Resipi
Nota:
– Rajah H menunjukkan jadual dengan
contoh penggunaan lain. Basuh dan
kisar bahan makanan sebelum diproses.
Keluarkan bahan yang keras, seperti biji
dan kulit.
– Resipi dan contoh penggunaan
boleh juga digunakan tanpa program
automatik. Tingkatkan kelajuan dari
min hingga max dengan pemilih putar
dan adun kesemua bahan, sehingga
mencapai konsistensi yang diingini.
ページが読み込まれています...
ページが読み込まれています...
ページが読み込まれています...
ページが読み込まれています...
ページが読み込まれています...
ページが読み込まれています...
ページが読み込まれています...
ページが読み込まれています...
ページが読み込まれています...
ページが読み込まれています...
ページが読み込まれています...
ページが読み込まれています...
ページが読み込まれています...
ページが読み込まれています...
ページが読み込まれています...
ページが読み込まれています...
ページが読み込まれています...
ページが読み込まれています...
ページが読み込まれています...
ページが読み込まれています...
ページが読み込まれています...
ページが読み込まれています...
ページが読み込まれています...
ページが読み込まれています...
ページが読み込まれています...
ページが読み込まれています...
ページが読み込まれています...
ページが読み込まれています...
ページが読み込まれています...
ページが読み込まれています...
ページが読み込まれています...
ページが読み込まれています...
ページが読み込まれています...
ページが読み込まれています...
ページが読み込まれています...
ページが読み込まれています...
ページが読み込まれています...
ページが読み込まれています...
-
 1
1
-
 2
2
-
 3
3
-
 4
4
-
 5
5
-
 6
6
-
 7
7
-
 8
8
-
 9
9
-
 10
10
-
 11
11
-
 12
12
-
 13
13
-
 14
14
-
 15
15
-
 16
16
-
 17
17
-
 18
18
-
 19
19
-
 20
20
-
 21
21
-
 22
22
-
 23
23
-
 24
24
-
 25
25
-
 26
26
-
 27
27
-
 28
28
-
 29
29
-
 30
30
-
 31
31
-
 32
32
-
 33
33
-
 34
34
-
 35
35
-
 36
36
-
 37
37
-
 38
38
-
 39
39
-
 40
40
-
 41
41
-
 42
42
-
 43
43
-
 44
44
-
 45
45
-
 46
46
-
 47
47
-
 48
48
-
 49
49
-
 50
50
-
 51
51
-
 52
52
-
 53
53
-
 54
54
-
 55
55
-
 56
56
-
 57
57
-
 58
58


