
Aero
14
Italiano
Español
Français
Deutsch
Indonesia

English
1
English
PB
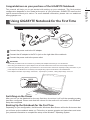
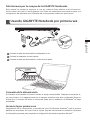
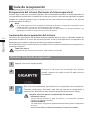
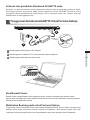
Congratulations on your purchase of the GIGABYTE Notebook.
This manual will help you to get started with setting up your notebook. The final product
conguration depends on the model at the point of your purchase. GIGABYTE reserves the
right to amend without prior notice. For more detailed information, please visit our website at
www.gigabyte.com
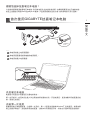
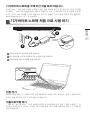
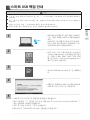
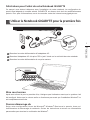
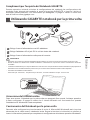
1 Connect the power cord to the AC adapter.
2 Connect the AC adapter to the DC-in jack on the right side of the notebook.
3 Connect the power cord to the power outlet.
Switching on the Power
After you turn on the Notebook for the very rst time, do not turn it off until the operating system
has been congured. Please note that the volume for the audio will not function until Windows
®
Setup has completed.
Booting Up the Notebook for the First Time
Depending on your conguration, the Microsoft
®
Windows
®
Boot Screen will be the rst screen that
you will see as the notebook starts up. Follow the on-screen prompts and instructions and enter
your personal information to complete the setup of the Windows
®
Operating System.
Using GIGABYTE Notebook for the First Time
1
2
3
USB
Charging
Port
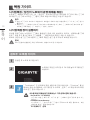
IMPORTANT
•
Ensure that your Notebook PC is connected to a grounded power adapter before turning it on for the rst time.
•
When using your Notebook PC on power adapter mode, the socket outlet must be near to the unit and easily accessible.
•
Locate the input/output rating label on your Notebook PC and ensure that it matches the input/output rating information on your
power adapter. Some Notebook PC models may have multiple rating output currents based on the available SKU.
•
Power adapter information: Input voltage: 100-240Vac ,- Input frequency: 50-60Hz ,- Rating output voltage: 19.5V,7.7A

English
3
English
2
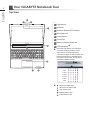
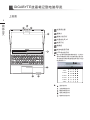
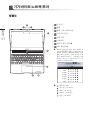
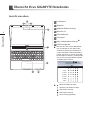
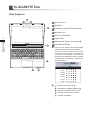
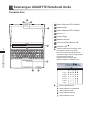
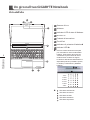
Top View
1 Light sensor
2 Webcam
3 Webcam Status LED Indicator
4 Microphone x2
5 Power Button
6 TouchPad
7 Battery Indicator Button
8
LED Indicators
Press the right button of touchpad to
check the remaining battery power.
Right-click to show the remaining
power percentage. As shown below, the
battery life indicator is available when
the laptop is shut down, in stand-by or
hibernation.(Battery mode)
1
2
<10%
11-30%
31-50%
51-70%
71-90%
>90%
Bluetooth Status LED
Wireless Lan Status LED
HDD Status LED
Battery Status LED
Power Status LED
Your GIGABYTE Notebook Tour
2
1 3
6
87
5
4

English
3
English
2
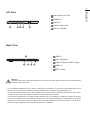
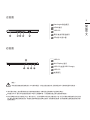
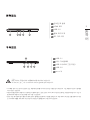
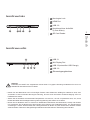
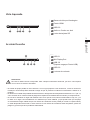
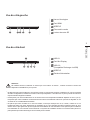
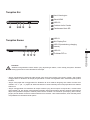
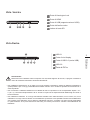
Left View
1 Kensington Lock Slot
2 HDMI Port
3 USB 3.0
4 Combo Audio Jack
5 SD Card Reader
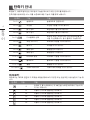
Right View
1 USB 3.1
2 Mini Displayport
3 USB 3.0(Support USB Charge)
4 USB 3.0
5
DC-in Jack
3 4
1
2 5
1 3
2
4 5
Warning:
DO NOT remove the built-in lithium battery. For any service needs, please contact your local GIGABYTE
Authorized Service Center.
•
Do not install the Notebook PC on a slant or a place prone to vibrations, or avoid using the Notebook PC in that
location for a long time.This increases the risk that a malfunction or damage to the product will occur.
•
Do not store and use Notebook PC in direct sunlight or the location where temperatures exceed 112°F (45°C) such
as inside a vehicle.There is a danger of Lithium-ion battery expansion and aging.
•
Do not use the Notebook PC in a badly ventilated location such as on bedding, on a pillow or cushion, etc, and do
not use it in a location such as room with oor heating as it may cause the computer to overheat.Take care that the
Notebook PC vents (on the side or the bottom) are not blocked especially in these environments. If the vents are
blocked, it may be dangerous and cause the Notebook PC to overheat.

English
5
English
4
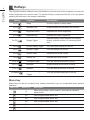
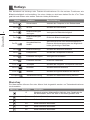
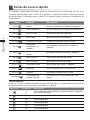
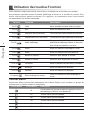
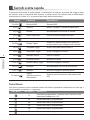
The computer employs hotkeys or key combinations to access most of the computer’s controls like
screen brightness and volume output. To activate hotkeys, press and hold the <Fn> key before
pressing the other key in the hotkey combination.
Hotkey
Function Description
Fn+F1 Sleep Put the computer in Sleep mode.
Fn+F2
Wireless LAN Enables/disable the Wireless LAN function.
Fn+F3
Brightness Down Decrease the screen brightness.
Fn+F4
Brightness Up Increase the screen brightness.
Fn+F5
Display Toggle
Switche display output between the display
screen, external monitor (if connected) and
both.
Fn+F6
Screen Display Toggle Turn the screen display on and off.
Fn+F7
Speaker Toggle Turn the speaker on and off.
Fn+F8
Volume Down Decrease the sound volume.
Fn+F9
Volume Up Increase the sound volume.
Fn+F10
Touchpad Toggle Turn the internal touchpad on and off.
Fn+F11
Bluetooth Enable/disable the Bluetooth function.
Fn+F12
Webcam Turn the internal webcam on and off.
Fn+Space
Keyboard Backlight
Toggle
Turn the keyboard backlight on and off.
Macro key
Macro keys can be set via Macro Hub, setting combination keys for complicated and/or general
operation.
Macro key Macro key Description
G
Macro group switch, press around 3 secconds as hardware
switch on/off.
G1 User Programmable Macro key
G2 User Programmable Macro key
G3 User Programmable Macro key
G4 User Programmable Macro key
G5 User Programmable Macro key
Hotkeys

English
5
English
4
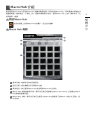
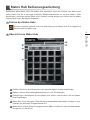
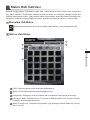
Welcome to use Macro Hub ! Macro Hub makes it much easier for you to control your Macro Key
. You can deal with complex key stroke combination by just one press on macro key, which brings
you benets both in work and game. Before using Macro Hub, please read following guide, thanks.
1
Launch Macro Hub
You can nd the shortcut of Macro Hub on desktop. Just double click it.
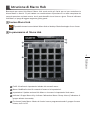
2
The overview of Macro Hub
4
5
1 3
2
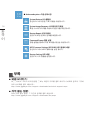
1 Proles: View your current macro command settings.
2
Macros: Edit macro command funtions anf settings.
3 Settings: Update Macro Hub version or renew macro hub settings.
4 Macro Key Group Indicators: Indicate the activated Macro Key Group (the atcivated
group indicator will light up)
5 Macro Key Function: Show the programmed Macro functions under the Macro Key
Group, from G1 to G5.
Macro Hub Instruction

English
7
English
6
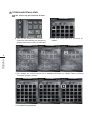
3
Using Macro Hub
1 Set Macro Key to basic function
a. Click the G button on the left-top of the keyboard to switch to the Macro Key group you
would like to use
b. Click the Macro Key function brick
c. Double-click the function you would like to use(ex. Media Player) in the Basic or Macros
function area.
d. Complete the setting

English
7
English
6
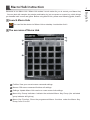
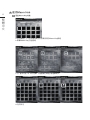
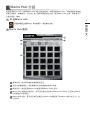
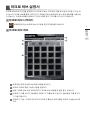
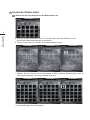
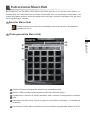
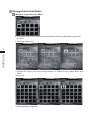
2 Edit macro command funtions anf settings.
a. Click "Macros" (you can set up to 100 sets of macro)
13
1
8
3
7
6
10
11
9
5
2
4
12
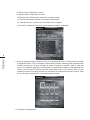
b. Overview of macro record panel (you can record your own macro here)
1. Start recording: Click when you’re about to record the macro
2. Pause key Switch: Enable/Disable Pause key to stop recording.
3. Macro Name: Set the name of this macro
4. Import icon: Set icon for this macro. You can use default icon or upload your own
icon
5. Record type: You can choose to record only mouse(or keyboard) movement, or
record both. You can also decide to or not to record mouse position.
6. Record interval: You can decide to or not to record the interval of each movement(or
You can set xed interval time between every movement)
7. Execution way: You can set the macro execution way (execution once, repeat
execution or repeat execution with deep press)
8. Export macro: Export your macro
9. Import macro: Import the macro
10. Delete all: Delete all movement in this macro

English
9
English
8
11. Delete selected: Delete selected movement
12. Movement list: it shows all movement you record
13. Exit: The system will inquire you if to save the recorded macro
c. Start to record macro: When you click start button, the macro engine will start to record
macro. All movement you made(mouse/keyboard) will be shown in the movement list.
You can decide to use “pause” key or mouse click on stop button to stop recording
based on your record range.Finishing recording: When you have done all movement,
click exit button. The Macro Engine will inquire you if you want to save the macro. Click
Yes then you can nish the record of your own macro.
d. Complete the setting.

English
9
English
8
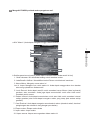
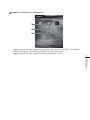
3 Edit "Settings" of Macro Hub
1
2
3
1. Software update: Update latest version of GIGABYTE Macro Hub
2. Clean memory: Erase current Macro Hub settings
3. Firmware Upgrade: Upgrade Macro Key rmware

English
11
English
10
GIGABYTE Smart Manager
You can activate GIGABYTE Smart Manager by double clicking on the shortcut icon on the
desktop if the machine you purchased has the operation system built-in. GIGABYTE Smart
Manager is an icon-based control interface, enabling users to intuitionally access common
system setup as well as GIGABYTE exclusive utilities. Please be noted that the GIGABYTE
Smart Manager interface, icons, utilities and software versions may vary based on the
purchased models. Please operate GIGABYTE Smart Manager according to the actual version
built-in.
GIGABYTE Software Application

English
11
English
10
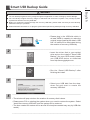
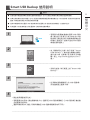
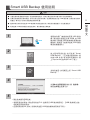
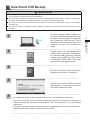
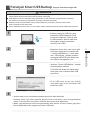
Smart USB Backup Guide
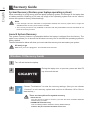
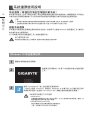
WARNING
●
You can backup original recovery image through this application in case of losing by device damage.
●
You can backup original recovery image to USB disk and restore the system if any storage system
replacement with the recovery USB disk.
●
Before you restore the system through the recovery USB disk, please make sure that you have already
made the backup of your data.
●
Please DO NOT shut down or un-plug the system when performing backup through recovery USB disk.
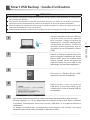
1
>20G
• Please plug in the USB disk which is
at least 20GB in capacity to make the
original image (backup the data in USB
rst. All data will be eliminated during
the creation of recovery USB disk)
2
• Insert the driver disk to your optical
drive and run the install of “Smart USB
Backup” (for none-ODD model, please
use USB ODD device or download
from http://www.gigabyte.com
3
• Run the “Smart USB Backup” after
nishing the install.
4
• Select your USB disk from the drop-
down list and start to create the
recovery USB disk.
5
• The window will pop out when the creation of recovery disk is done.
• Please press F12 on starting the system when you need to restore the system. Select
“boot from recovery USB disk” and the system will be restored.
• The time needed for restore will be around 30 mins(time needed may vary by USB disk
model) .

English
13
English
12
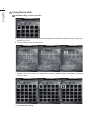
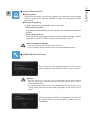
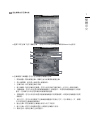
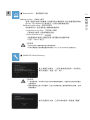
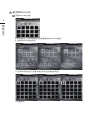
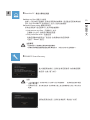
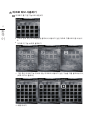
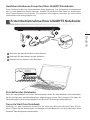
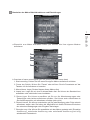
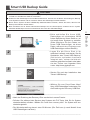
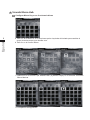
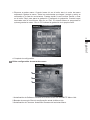
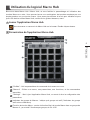
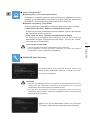
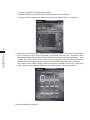
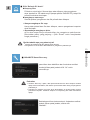
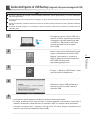
Windows 10 Recovery Guide
During the laptop turn on process, press and hold F9
key to launch the tool.
2
1
3
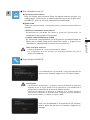
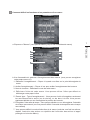
Turn off and restart the laptop.
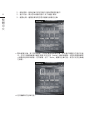
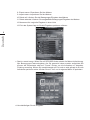
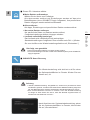
There are two options for system recovery
˙
Reset this PC
You can choose to keep or remove your files and then reinstalls Windows
without losing your les.
˙
GIGABYTE Smart Recovery
Your PC settings will be restored to factory default settings.
Caution: All personal data and les will be lost.
Choose “Troubleshoot” to enter the recovery settings. (Also you can choose
“Continue” to exit recovery system and continue to Windows 10 for files or
data backup.)
System Recovery (Restore your laptop operating system)
When something is going wrong with the laptop operating system, the storage of the laptop has
a hidden partition containing a full back up image of the operating system that can be used to
restore the system to factory default settings.
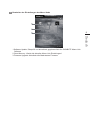
All ready to go
Make sure your PC is plugged in. This will take a few minutes.
Recovery Guide
Note
˙
If the storage has been switched or the partition deleted, the recovery option will no longer be
available and a recovery service will be needed.
˙
The recovery function is only available on devices with O/S preinstalled. Devices with DOS do not
have the recovery function.
Launch System Recovery
The system recovery feature is preinstalled before the laptop is shipped from the factory. The
option menu allows you to launch the Windows recovery tool to reinstall the operating system to
factory default.
The brief introduction below will show you how to start the recovery tool and restore your system.

English
13
English
12
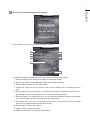
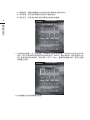
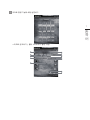
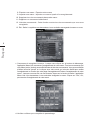
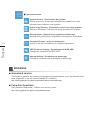
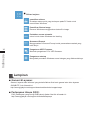
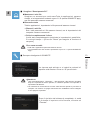
Here are what will happen
˙
All of your personal les and apps will be removed.
˙
Your PC settings will be restored to pure O/S (without GIGABYTE app) .
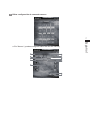
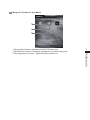
4
▓
Choose “Reset this PC”
Keep my les
Choose an account to continue.All apps will be removed, and settings
will back to pure O/S (without GIGABYTE app), but your personal les
will be kept.
Remove everything
All apps, setting and personal les will be removed.
Just remove my les
Only personal data and les will be removed, but computer settings will
be kept.
Fully clean the drive
The drive will be completely restored to factory default settings. It takes
more time. > [Click on “Reset” to execute recovery function.]
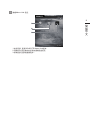
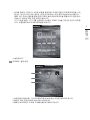
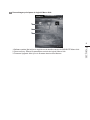
▓
GIGABYTE Smart Recovery
Caution
˙
Once the “Recovery” is selected, your personal data and les will be deleted
after the laptop starts restoring, and the operating system will be reset to
factory default settings.
˙
A progress indicator bar will show on the window when the recovery process is
running. Please make sure the AC-adapter is plugged in and do not turn off the
laptop.
The recovery will be activated and you will see the
option buttons on the window. Click on “Yes” to start it.
After the system recovery is completed, you will see
the option button on the window, please click on
“Shutdown”.

English
PB
English
14
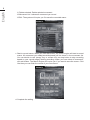
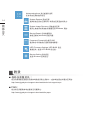
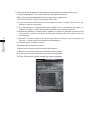
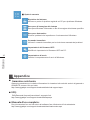
▓
Advanced options
System Restore
Use a restore point recorded on your PC to restore Windows.
System Image Recovery
Recover Windows using a specic system image le.
Startup Repair
Fix problems that keep Windows from loading.
Command Prompt
Use the Command Prompt for advanced trobleshooting.
UEFI Firmware Settings
Change settings in your PC’s UEFI rmware.
Startup Settings
Change Windows Startup behavior.
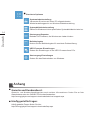
Warranty & Service:
Warranty and service and related information please refer to the warranty card or GIGABYTE
service website as the below link:
http://www.gigabyte.com/support-downloads/technical-support.aspx
FAQ:
FAQ (Frequent Asked Questions) please refer to the below link:
http://www.gigabyte.com/support-downloads/faq.aspx
Appendix

PB 1
感謝您選擇技嘉筆記型電腦 !
為協助您順利使用技嘉筆記型電腦,我們特地設計此快速安裝說明。如果您需要更多關於電腦功能,
歡迎上技嘉官方網站 www.gigabyte.tw查詢。產品實際規格以出貨為準,如有異動恕不另行通知。
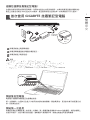
1 將電源線接上電源轉換器。
2 將電源轉換器連接到電腦的電源插孔。
3 將電源線插入電源插座。
開啟筆記型電腦
電源指示燈會顯示機器是否為通電的狀態。
第一次開機時,在還未完全進入作業系統前請勿強制關機。開啟電源後,直到該作業系統配置完成
前,音量無法設定。
開始第一次使用
根據您的筆記型電腦配置,當您第一次開機,第一個畫面會是微軟
Windows
®
啟動畫面,按照該螢幕上
的提示和指示,完成作業系統的配置。當軟體許可條款顯示時,請務必閱讀並同意後再繼續。
首次使用
GIGABYTE
技嘉筆記型電腦
1
2
3
USB
Charging
Port
重要
•第一次啟動筆記型電腦之前,請先確認已經將電源變壓器連接至電腦。
•找出筆記型電腦的輸入/輸出頻率標籤,並請確認符合電源變壓器上的輸入/輸出頻率資訊。
•當筆記型電腦在電源變壓器使用模式時,請將電源變壓器靠近插座以便於使用。
•電源變壓器資訊:輸入電壓:100-240Vac ,輸 入 頻 率:50-60Hz ,輸 出 電 壓 功 率:19.5V,7.7A

2 3
GIGABYTE
技嘉筆記型電腦導覽
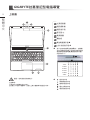
上視圖
1
光源感應器
2
視訊攝影機
3
視訊指示燈
4
麥克風 x2
5
電源開關
6
觸控板
7
電池電量顯示鍵
8
LED 狀態指示燈
按下右鍵可檢視電池剩餘電量
。
在關機/
待命/休眠模式時按下右鍵可透過指示燈
號檢視電池剩餘電量(電量對照如下圖)
(電池模式下)
1
2
<10%
11-30%
31-50%
51-70%
71-90%
>90%
藍牙指示燈
無線網路指示燈
硬碟存取指示燈
電池充電指示燈
電源狀態指示燈
2
1 3
6
87
5
4
警語:使用過度恐傷害視力。
注意事項:
(1)使用30分鐘請休息10分鐘。
(2) 2 歲以下幼兒不看螢幕, 2 歲以上每天看螢幕不要超過1小時。

2 3
左視圖
3 4
1
2 5
1
Kensington防盜鎖孔
2
HDMI 埠
3
USB 3.0
4
耳機/麥克風複合插孔
5
SD記憶卡讀卡機
1
USB 3.1
2
Mini Display 埠
3
USB 3.0(支援USB Charge
)
4
USB 3.0
5
電源插孔
1 3
2
4 5
右視圖
USB Charge 支援在電腦關機、睡眠狀態或休眠狀態仍可進行充電您的可攜式USB裝置
(可於Gigabyte Smart Manager軟體內選擇開啟/關閉此項功能)
警告:
本機器設備配備的鋰電池為不可拆卸裝置,請交由技嘉授權專業維修服務中心移除裝置中的電池。
• 請不要於斜面上或容易震動的地方使用筆記型電腦,以降低發生故障和產品損壞的風險。
• 請勿置於車內、室內外陽光強烈或高於45度C之儲藏環境, 以免鋰電池發生老化或膨脹等危險。
• 請於通風良好的地方使用此產品。請勿在床上、枕頭等通風不良的地方使用此產品,並且不要在有樓板暖氣的地方使
用,避免導致筆記型電腦過熱。請避免底部和側邊的通風孔阻塞。如果通風孔阻塞,會有損害筆記型電腦或導致內部
過 熱 的 危 險。

4 5
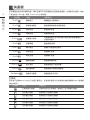
許多電腦的設定例如螢幕亮度、喇叭音量等可利用電腦的快速鍵直接調整。如需使用快速鍵,請依
下表先按住 <Fn> 鍵,再按下<F1>~<F12>等按鍵。
快速鍵 功能 功能敘述
Fn+F1
睡眠模式 讓電腦進入睡眠模式。
Fn+F2
無線區域網路 開啟/關閉無線區域網路裝置。
Fn+F3
減弱亮度 降低螢幕亮度。
Fn+F4
增強亮度 提高螢幕亮度。
Fn+F5
螢幕顯示切換
在電腦螢幕以及外接式顯示器之間切換影像輸出,
或者同時顯示。
Fn+F6
螢幕開關 開啟/關閉螢幕。
Fn+F7
喇叭靜音 將喇叭切換為靜音模式。
Fn+F8
減弱音量 降低喇叭音量。
Fn+F9
增大音量 提高喇叭音量。
Fn+F10
觸控板開關 開啟/關閉觸控板。
Fn+F11
藍牙通訊 開啟/關閉藍牙通訊裝置。
Fn+F12
視訊攝影機 開啟/關閉內建視訊攝影機。
Fn+Space
鍵盤背光開關 調整鍵盤背光亮度。
巨集鍵
使用者可透過Marco Hub自行定義巨集設定,並透過各種設定完成複雜的遊戲連續操作或一般電腦
操作的需求。
巨集鍵 功能 功能敘述
巨集群組切換鍵 切換所設定的巨集群組,壓按約三秒可開關巨集鍵。
自定義巨集鍵 使用者自行定義的巨集鍵
自定義巨集鍵 使用者自行定義的巨集鍵
自定義巨集鍵 使用者自行定義的巨集鍵
自定義巨集鍵 使用者自行定義的巨集鍵
自定義巨集鍵 使用者自行定義的巨集鍵
快速鍵

4 5
Macro Hub
介紹
歡迎使用Macro Hub ! 使用Macro Hub 能讓您輕鬆控制/存取您的Macro Key,同時要操作多鍵的功
能讓您輕鬆一鍵就搞定,不論在工作/遊戲中都能應付自如。使用Macro Hub 之前,請參考以下之
使用說明,謝謝
1
開啟Macro Hub
在您的桌面上找到Macro Hub的圖示,並且加以點擊
2
Macro Hub 概觀
4
5
1 3
2
1
基本功能:檢視你目前的巨集設定
2
自訂巨集:設定編輯自訂巨集指令功能
3
其他設定:前往更新Macro Hub或是清除Macro Hub之設定
4
Macro Key 群組啟動指示燈:顯示您目前已經啟動之Macro Key Group (已啟動之Macro
Key群組燈號會亮起)
5
Macro Key 功能:顯示您目前正在使用之Macro Key群組底下的Macro 功能 (共五個),從
G1到G5
ページが読み込まれています...
ページが読み込まれています...
ページが読み込まれています...
ページが読み込まれています...
ページが読み込まれています...
ページが読み込まれています...
ページが読み込まれています...
ページが読み込まれています...
ページが読み込まれています...
ページが読み込まれています...
ページが読み込まれています...
ページが読み込まれています...
ページが読み込まれています...
ページが読み込まれています...
ページが読み込まれています...
ページが読み込まれています...
ページが読み込まれています...
ページが読み込まれています...
ページが読み込まれています...
ページが読み込まれています...
ページが読み込まれています...
ページが読み込まれています...
ページが読み込まれています...
ページが読み込まれています...
ページが読み込まれています...
ページが読み込まれています...
ページが読み込まれています...
ページが読み込まれています...
ページが読み込まれています...
ページが読み込まれています...
ページが読み込まれています...
ページが読み込まれています...
ページが読み込まれています...
ページが読み込まれています...
ページが読み込まれています...
ページが読み込まれています...
ページが読み込まれています...
ページが読み込まれています...
ページが読み込まれています...
ページが読み込まれています...
ページが読み込まれています...
ページが読み込まれています...
ページが読み込まれています...
ページが読み込まれています...
ページが読み込まれています...
ページが読み込まれています...
ページが読み込まれています...
ページが読み込まれています...
ページが読み込まれています...
ページが読み込まれています...
ページが読み込まれています...
ページが読み込まれています...
ページが読み込まれています...
ページが読み込まれています...
ページが読み込まれています...
ページが読み込まれています...
ページが読み込まれています...
ページが読み込まれています...
ページが読み込まれています...
ページが読み込まれています...
ページが読み込まれています...
ページが読み込まれています...
ページが読み込まれています...
ページが読み込まれています...
ページが読み込まれています...
ページが読み込まれています...
ページが読み込まれています...
ページが読み込まれています...
ページが読み込まれています...
ページが読み込まれています...
ページが読み込まれています...
ページが読み込まれています...
ページが読み込まれています...
ページが読み込まれています...
ページが読み込まれています...
ページが読み込まれています...
ページが読み込まれています...
ページが読み込まれています...
ページが読み込まれています...
ページが読み込まれています...
ページが読み込まれています...
ページが読み込まれています...
ページが読み込まれています...
ページが読み込まれています...
ページが読み込まれています...
ページが読み込まれています...
ページが読み込まれています...
ページが読み込まれています...
ページが読み込まれています...
ページが読み込まれています...
ページが読み込まれています...
ページが読み込まれています...
ページが読み込まれています...
ページが読み込まれています...
ページが読み込まれています...
ページが読み込まれています...
ページが読み込まれています...
ページが読み込まれています...
ページが読み込まれています...
ページが読み込まれています...
ページが読み込まれています...
ページが読み込まれています...
ページが読み込まれています...
ページが読み込まれています...
ページが読み込まれています...
ページが読み込まれています...
ページが読み込まれています...
-
 1
1
-
 2
2
-
 3
3
-
 4
4
-
 5
5
-
 6
6
-
 7
7
-
 8
8
-
 9
9
-
 10
10
-
 11
11
-
 12
12
-
 13
13
-
 14
14
-
 15
15
-
 16
16
-
 17
17
-
 18
18
-
 19
19
-
 20
20
-
 21
21
-
 22
22
-
 23
23
-
 24
24
-
 25
25
-
 26
26
-
 27
27
-
 28
28
-
 29
29
-
 30
30
-
 31
31
-
 32
32
-
 33
33
-
 34
34
-
 35
35
-
 36
36
-
 37
37
-
 38
38
-
 39
39
-
 40
40
-
 41
41
-
 42
42
-
 43
43
-
 44
44
-
 45
45
-
 46
46
-
 47
47
-
 48
48
-
 49
49
-
 50
50
-
 51
51
-
 52
52
-
 53
53
-
 54
54
-
 55
55
-
 56
56
-
 57
57
-
 58
58
-
 59
59
-
 60
60
-
 61
61
-
 62
62
-
 63
63
-
 64
64
-
 65
65
-
 66
66
-
 67
67
-
 68
68
-
 69
69
-
 70
70
-
 71
71
-
 72
72
-
 73
73
-
 74
74
-
 75
75
-
 76
76
-
 77
77
-
 78
78
-
 79
79
-
 80
80
-
 81
81
-
 82
82
-
 83
83
-
 84
84
-
 85
85
-
 86
86
-
 87
87
-
 88
88
-
 89
89
-
 90
90
-
 91
91
-
 92
92
-
 93
93
-
 94
94
-
 95
95
-
 96
96
-
 97
97
-
 98
98
-
 99
99
-
 100
100
-
 101
101
-
 102
102
-
 103
103
-
 104
104
-
 105
105
-
 106
106
-
 107
107
-
 108
108
-
 109
109
-
 110
110
-
 111
111
-
 112
112
-
 113
113
-
 114
114
-
 115
115
-
 116
116
-
 117
117
-
 118
118
-
 119
119
-
 120
120
-
 121
121
-
 122
122
-
 123
123
-
 124
124
-
 125
125
-
 126
126
-
 127
127


