ページを読み込んでいます...

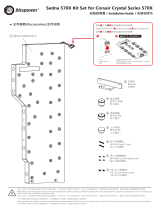
主件說明/Accessories/主件说明
Sedna 570X for Corsair 570X-PWM
注意,跑水前,請先確認所有零件已安裝在正確的位置上,在不開主機,單開水泵的情况下,進行24小時的跑水測試, 確保無漏水情况後再開主機,避免發生漏水而導致電腦零件的損壞。
注意,跑水前,请先确认所有零件已安装在正确的位置上,在不开主机,单开水泵的情况下,进行24小时的跑水测试, 确保无漏水情况后再开主机,避免发生漏水而导致电脑零件的损坏。
Before filling in the water, please make sure all the components are installed correctly. To prevent any leakage which may damage the PC components, please perform a 24-hour leaking test
with only the pump connected to the power supply .
本公司保留對產品的設計更改以及解釋的權力,如有更動恕不另行通知,產品顏色與配件以實物為準。
本公司保留对产品的设计更改以及解释的权力,如有更动恕不另行通知,产品颜色与配件以实物为准。
Bitspower reserves the right to change the product design and interpretations. These are subject to change without notice. Product colors and accessories are based on the actual product.
BPTA-WDP570X-R
1
支撐架
Bracket
支撑架
2
洩水接頭
TA-EXAIR
泄水接头
3
排氣接頭
BPTA-EFW
排气接头
4
M4 半圓頭螺絲
M4 Half-round head screw
M4 半圆头螺丝
7
M4 平頭螺絲
M4 Flat head screw
M4 平头螺丝
6
請接主版或其他設備的DRGB插槽。
Digital RGB PIN on motherboard or other equipment.
请接主版或其他设备的DRGB插槽。
主版
motherboard
主版
DRGB控制器(不包括)
DRGB Multi Function Controller(Not included)
DRGB控制器(不包括)
BPTA-DRGBMFC
止水接頭
TA-F06
止水接头
5
#6-32 平頭螺絲
#6-32 Flat head screw
#6-32 平头螺丝
8

S1馬達除了可由主機板供電外,亦可
透過轉接線由電源供應器直接供電。
Other then from the motherboard,
the S1 pump can be powered from
the power supply via a patch cord.
S1水泵除了可由主机板供电外,亦可
透过转接线由电源供应器直接供电。
供電與馬達/Power Supply and Pump/供电与马达
TA-EXAIR
建議將排氣接頭安裝於
水箱且在水位之上。
It is recommended to
install the air-exhaust
fitting on the reservoir,
above the water line.
建议将排气接头安装于
水箱且在水位之上。
Step 1
將按鈕按下即可排氣。
Press the button to
release the air.
将按钮按下即可排气。
BPTA-EFW
建議將洩水接頭安裝於
水冷系統的最低點。
It is recommended to install the water-exhaust
fitting at the lowest point of the water cooling
system.
建议将泄水接头安装于水冷系统的最低点。
Step 1
將洩水接頭上蓋旋起。
Unscrew the top of the water-exhaust fitting.
将泄水接头上盖旋起。
Step 2
換上洩水配件,旋入配件過程中即會逐漸洩
水,建議外接管線以利洩水。
Replace with the water-exhaust part. When
screwing in the part, water will start to
discharge, it is recommended to connect
tubing beforehand to control the water outflow.
换上泄水配件,旋入配件过程中即会逐渐泄
水,建议外接管线以利泄水。
安裝方式/Installation/安装方式 安裝方式/Installation/安装方式
TA-EXAIR BPTA-EFW
A 電源負極 -
B 電源正極 +
A Negative electrode -
B Positive electrode +
A 电源负极 -
B 电源正极 +
A B
S1水泵規格
額定電壓:12V DC
功 耗:17W
最大流量:960L/h
噪 音:40~45dBA
最高系統溫度:60℃
PWM:有
使用壽命:50,000小時
保 固:2 年
S1 Pump Spec.
Rated voltage:12V DC
Power consumption:17W
Maximum flow:960L/h
Noise:40~45dBA
Maximum system temperature:60℃
PWM:Yes
MTBF:50,000 hours
Warranty:2 years
S1水泵規格
额定电压:12V DC
功 耗:17W
最大流量:960L/h
噪 音:40~45dBA
最高系统温度:60℃
PWM:有
使用寿命:50,000小时
保 固:2 年
Sedna 570X for Corsair 570X-PWM
注意,跑水前,請先確認所有零件已安裝在正確的位置上,在不開主機,單開水泵的情况下,進行24小時的跑水測試, 確保無漏水情况後再開主機,避免發生漏水而導致電腦零件的損壞。
注意,跑水前,请先确认所有零件已安装在正确的位置上,在不开主机,单开水泵的情况下,进行24小时的跑水测试, 确保无漏水情况后再开主机,避免发生漏水而导致电脑零件的损坏。
Before filling in the water, please make sure all the components are installed correctly. To prevent any leakage which may damage the PC components, please perform a 24-hour leaking test
with only the pump connected to the power supply .
本公司保留對產品的設計更改以及解釋的權力,如有更動恕不另行通知,產品顏色與配件以實物為準。
本公司保留对产品的设计更改以及解释的权力,如有更动恕不另行通知,产品颜色与配件以实物为准。
Bitspower reserves the right to change the product design and interpretations. These are subject to change without notice. Product colors and accessories are based on the actual product.
大4PIN供電線材(不包括)
3PIN/4PIN transfer 4PIN(Not included)
大4PIN供电线材(不包括)

注水/Water/注水
注意:Bitspower建議消費者使用蒸餾水、純凈水,加入Bitspower的染劑作為水冷液使用;如客戶自行選購的水冷液導致電鍍層剝落、
水道堵塞、水泵轉動不正常、水箱管破裂或密封圈變型以致漏水等及其它不可抗力之問題時,消費者自行承擔相關產品責任。
未注水前,請勿啟動水泵電源。
注意:Bitspower 建议消费者使用蒸馏水、纯净水,加入Bitspower的染剂作为水冷液使用;如客户自行选购的水冷液导致电镀层剥落、
水道堵塞、水泵转动不正常、水箱管破裂或密封圈变型以致漏水等及其它不可抗力之问题时,消费者自行承担相关产品责任。
未注水前,请勿启动水泵电源。
Notice:
Bitspower recommends that consumers add the Bitspower dye to distilled water or purified water for their water-cooling
liquid. If the consumer chooses different water-cooling liquids, the resulting impurities may cause peeling of the coating
on some of the hardware, water channels blockage by built-up residue, improper operation of the water pump, water
tank tube breakage, and o-rings deformation leading to leakage. Any issues related to the use of inappropriate
water-cooling liquid will be the responsibility of the consumer.
Do not turn on the pump if the reservoir is empty.
-------產品保修規範------
質保期時效,送修的產品凡有以下狀況,不在保修
範圍內。
【CPU水冷頭】
1.冷頭自體螺絲,有拆裝痕跡,整套產品失保。
2.頂部的進出口,因為外力使用不當導致開裂。
【冷排】
1.因為外力使用不當導致冷排水道破裂漏水。
2.進出水孔因為外力使用不當導致開裂。
【接頭】
1.有器械夾持導致的損傷痕跡。
【水泵】
1.無水通電導致水泵燒毀。
2.底部pcb進水燒毀。
3.水箱底座與水泵不可拆解,一經拆解即不保固。
【風扇】
1.進水燒毀。
---Product Warranty Rules---
The warranty will be void if any of the situations below
happen.
【
CPU Water Block
】
- The CPU block and the screws in it has any trace of disassemble.
- The top plate inlet and outlet ports, due to improper use of
external forces, are cracked.
【
Radiator
】
- The fin of the radiator are broken or deformed due to improper
use of external forces.
- The inlet and outlet of the radiator are cracked due to improper
use of external forces.
【
Fitting
】
- There are signs of damage caused by instrument clamping on the
fittings.
【
PUMP
】
- Pump damage from pump operation without any liquid.
- Pump damage caused by water leak on the pump's PCB.
- Water tank has been separated from the pump.
【
Fan
】
- Fan damaged by water leak.
-------产品保修规范------
质保期时效,送修的产品凡有以下状况,不在保修
范围内。
【CPU水冷头】
1.冷头自体螺丝,有拆装痕迹,整套产品失保。
2.顶部的进出口,因为外力使用不当导致开裂。
【冷排】
1.因为外力使用不当导致冷排水道破裂漏水。
2.进出水孔因为外力使用不当导致开裂。
【接头】
1.有器械夹持导致的损伤痕迹。
【水泵】
1.无水通电导致水泵烧毁。
2.底部pcb进水烧毁。
3.水箱底座与水泵不可拆解,一经拆解即不保固。
【风扇】
1.进水烧毁。
選擇喜好的水冷濃縮液顏色,以純淨水調合,由”填水孔”注入至水箱九分滿,接著利用”24PIN跳
線開關”啟動電源,讓水路中的空氣集中至水箱排出,再依水量繼續添加至水箱九分滿左右即可。
(24PIN跳線開關用途:需無經主板開啟ATX電源時,使電源直接開啟供電。)
Choose your desired dye color and mix it with pure distilled water. Pour the water mix into the reservoir
via the water filling hole. Once the reservoir is 90% full, turn on the power supply for the pump to run
and let the air exit the loop. Turn off the power supply when the reservoir is near empty. Repeat until all
the air has exited the loop. (In order to power the pump only, connect the power switch connector to
the 24 pin cable of the power supply. This will allow the power supply to bypass the motherboard and
make the pump work alone.)
选择喜好的水冷浓缩液颜色,以纯净水调合,由”填水孔”注入至水箱九分满,接着利用”24PIN跳
线开关”启动电源,让水路中的空气集中至水箱排出,再依水量继续添加至水箱九分满左右即可。
(24PIN跳线开关用途:需无经主板开启ATX电源时, 使电源直接开启供电。)
Sedna 570X for Corsair 570X-PWM
注意,跑水前,請先確認所有零件已安裝在正確的位置上,在不開主機,單開水泵的情况下,進行24小時的跑水測試, 確保無漏水情况後再開主機,避免發生漏水而導致電腦零件的損壞。
注意,跑水前,请先确认所有零件已安装在正确的位置上,在不开主机,单开水泵的情况下,进行24小时的跑水测试, 确保无漏水情况后再开主机,避免发生漏水而导致电脑零件的损坏。
Before filling in the water, please make sure all the components are installed correctly. To prevent any leakage which may damage the PC components, please perform a 24-hour leaking test
with only the pump connected to the power supply .
本公司保留對產品的設計更改以及解釋的權力,如有更動恕不另行通知,產品顏色與配件以實物為準。
本公司保留对产品的设计更改以及解释的权力,如有更动恕不另行通知,产品颜色与配件以实物为准。
Bitspower reserves the right to change the product design and interpretations. These are subject to change without notice. Product colors and accessories are based on the actual product.

安裝方式/Installation/安装方式
注意,跑水前,請先確認所有零件已安裝在正確的位置上,在不開主機,單開水泵的情况下,進行24小時的跑水測試, 確保無漏水情况後再開主機,避免發生漏水而導致電腦零件的損壞。
注意,跑水前,请先确认所有零件已安装在正确的位置上,在不开主机,单开水泵的情况下,进行24小时的跑水测试, 确保无漏水情况后再开主机,避免发生漏水而导致电脑零件的损坏。
Before filling in the water, please make sure all the components are installed correctly. To prevent any leakage which may damage the PC components, please perform a 24-hour leaking test
with only the pump connected to the power supply .
本公司保留對產品的設計更改以及解釋的權力,如有更動恕不另行通知,產品顏色與配件以實物為準。
本公司保留对产品的设计更改以及解释的权力,如有更动恕不另行通知,产品颜色与配件以实物为准。
Bitspower reserves the right to change the product design and interpretations. These are subject to change without notice. Product colors and accessories are based on the actual product.
Corsiar 570X
(不包括/Not included /不包括)
步驟1/Step 1/步骤1 步驟2/Step 2/步骤2
步驟3/Step3/步骤3
Sedna 570X for Corsair 570X-PWM
V2/第二版
內部結構示意
Internal structure indication
内部结构示意
3×120 風扇支架
3×120 Fan bracket
3×120 风扇支架
2×120 風扇支架
2×120 Fan bracket
2×120 风扇支架
卸下手擰螺絲,抽出兩片風扇支架
Remove the hand screw and pull
out two fan brackets
卸下手拧螺丝,抽出两片风扇支架
2×120 風扇支架
2×120 Fan bracket
2×120 风扇支架
3×120 風扇支架
3×120 Fan bracket
3×120 风扇支架
對換兩片風扇支架安裝位置並鎖固螺絲
Replace the installation position of
two fan brackets and lock the screw
对换两片风扇支架安装位置并锁固螺丝
3×120 風扇支架
3×120 Fan bracket
3×120 风扇支架 2×120 風扇支架
2×120 Fan bracket
2×120 风扇支架
※注意:紅圈處手擰螺絲更換為#6-32平頭螺絲
※Note: Replace the hand screw at the red circle
with the flat head screw #6-32
※注意:红圈处手拧螺丝更换为#6-32平头螺丝
步驟4/Step4/步骤4
M4 平頭螺絲
M4 Flat head screw
M4 平头螺丝
支撐架
Bracket
支撑架
安裝支撐架
Install the bracket
安装支撑架

Sedna 570X for Corsair 570X-PWM
注意,跑水前,請先確認所有零件已安裝在正確的位置上,在不開主機,單開水泵的情况下,進行24小時的跑水測試, 確保無漏水情况後再開主機,避免發生漏水而導致電腦零件的損壞。
注意,跑水前,请先确认所有零件已安装在正确的位置上,在不开主机,单开水泵的情况下,进行24小时的跑水测试, 确保无漏水情况后再开主机,避免发生漏水而导致电脑零件的损坏。
Before filling in the water, please make sure all the components are installed correctly. To prevent any leakage which may damage the PC components, please perform a 24-hour leaking test
with only the pump connected to the power supply .
本公司保留對產品的設計更改以及解釋的權力,如有更動恕不另行通知,產品顏色與配件以實物為準。
本公司保留对产品的设计更改以及解释的权力,如有更动恕不另行通知,产品颜色与配件以实物为准。
Bitspower reserves the right to change the product design and interpretations. These are subject to change without notice. Product colors and accessories are based on the actual product.
安裝方式/Installation/安装方式
步驟5/Step 5/步骤5
水道板傾斜放入機殼內部,然後扶正
Tilt the waterway plate into the
chassis and straighten it
水道板倾斜放入机壳内部,然后扶正
步驟6/Step 6/步骤6
M4 半圓頭螺絲
M4 Half-round head screw
M4 半圆头螺丝
螺絲孔對準位置
Screw hole alignment position
螺丝孔对准位置
步驟7/Step 7/步骤7
M4 半圓頭螺絲
M4 Half-round head screw
M4 半圆头螺丝

建議安裝方式/Recommended installation method/建议安装方式
V3/第三版
注意,跑水前,請先確認所有零件已安裝在正確的位置上,在不開主機,單開水泵的情况下,進行24小時的跑水測試, 確保無漏水情况後再開主機,避免發生漏水而導致電腦零件的損壞。
注意,跑水前,请先确认所有零件已安装在正确的位置上,在不开主机,单开水泵的情况下,进行24小时的跑水测试, 确保无漏水情况后再开主机,避免发生漏水而导致电脑零件的损坏。
Before filling in the water, please make sure all the components are installed correctly. To prevent any leakage which may damage the PC components, please perform a 24-hour leaking test
with only the pump connected to the power supply .
本公司保留對產品的設計更改以及解釋的權力,如有更動恕不另行通知,產品顏色與配件以實物為準。
本公司保留对产品的设计更改以及解释的权力,如有更动恕不另行通知,产品颜色与配件以实物为准。
Bitspower reserves the right to change the product design and interpretations. These are subject to change without notice. Product colors and accessories are based on the actual product.
主件說明(需另購) / Accessories(additional purchases) / 主件说明(需另购)
BPTA-NLSS240-F2PBA
BPTA-CPUMS-DRGBB
BPTA-VG2080RDC
BPTA-FX2212D
TA-GFALP2231E
TA-DOTFH1420F
TA-90REG
BP-60RH
TA-F06I
BP-NCCLT14AC-L500J
BP-PFANMFHK
BPTA-DRGBMFC L
A
B
C
G
E
F
.... 2PCS
..... 1PCS
........... 1PCS
.................. 5PCS
................ 1PCS
............. 14PCS
............................. 6PCS
................................ 2PCS
................................ 2PCS
.... 6PCS
.................... 1PCS
.............. 1PCS
L
K
D
H
IJ
/