
2big Dock Thunderbolt
™
3
Professional RAID Storage
|
Dual Thunderbolt 3
|
USB 3.1
|
Docking Station
design by neil poulton
Quick Install Guide

2
1
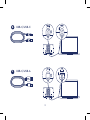
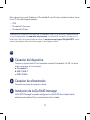
Connect Your Device
Connect your LaCie device to your computer using Thunderbolt 3 or USB. Do not use both
connections at the same time.
Thunderbolt 3
a

3
USB-C/USB-C
b
USB-C/USB-A
c

4
2
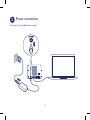
Power connection
Connect the included power supply.

5
3
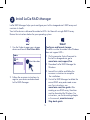
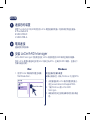
Install LaCie RAID Manager
LaCie RAID Manager helps you to configure your LaCie storage device’s RAID array and
maintain its health.
Your LaCie device is delivered formatted as HFS+ for Mac with a single RAID 0 array.
Review the instructions below for your operating system.
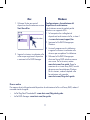
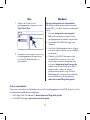
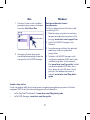
1. Use the Finder to open your storage
device and launch Start Here Mac.
Start Here Mac
LaCie
HD
2. Follow the onscreen instructions to
register your device and download
LaCie RAID Manager.
Configure and format storage:
The disks must be formatted since Windows
does not support HFS+.
1. On the computer that will connect to
the LaCie storage device, go to
www.lacie.com/support/lrm.
2. Download LaCie RAID Manager for
Windows.
3. Launch the installer and follow the
onscreen instructions to complete
the installation.
4. Use LaCie RAID Manager to delete the
current RAID array and create a new
one. For instructions, see
www.lacie.com/lrm-guide. After
creating a new RAID array, the drives
must be formatted for Windows. For
instructions, see the formatting chapter
in the manual, www.lacie.com/
2big-dock-guide.

6
Online resources
To learn more about managing your LaCie storage device and RAID array, see the online
user manuals below.
• LaCie 2big Dock Thunderbolt 3: www.lacie.com/2big-dock-guide
• LaCie RAID Manager: www.lacie.com/lrm-guide
Changing the RAID
For data redundancy, you can use LaCie RAID Manager to change the RAID array from the
default RAID 0 to RAID 1. For more information on how to change the RAID,
see www.lacie.com/lrm-guide.
After changing the RAID array, make certain to format the drives for your operating system.
For instructions on formatting, see the partitioning and formatting chapter in the user
manual: www.lacie.com/2big-dock-guide.
Problems connecting with Thunderbolt 3 on Windows
If the LaCie 2big Dock does not mount or is not detected by your PC, please go to
www.lacie.com/support/2bigDockTBT3 to download and install the 2big Dock
Thunderbolt 3 driver for Windows.
If you continue to have problems using Thunderbolt 3 with Windows, check with your PC
manufacturer for updates to the:
• BIOS
• Thunderbolt 3 firmware
• Thunderbolt 3 drivers
Review details of your 2big Dock Thunderbolt 3’s warranty by opening the LaCie Limited Warranty
Statement on your drive or go to www.lacie.com/warranty. To request warranty service, contact
an authorized LaCie service center or refer to www.lacie.com/support/2bigDockTBT3 for more
information regarding customer support within your jurisdiction.

7
FR
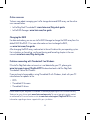
1
Connexion du périphérique
Connectez le périphérique LaCie à votre ordinateur via un port Thunderbolt 3 ou USB.
Ne pas utiliser ces deux connexions en même temps.
a : Thunderbolt 3
b : USB-C/USB-C
c : USB-C/USB-A
2
Branchement électrique
Raccordez le bloc d’alimentation fourni.
3
Installation de LaCie RAID Manager
Le logiciel LaCie RAID Manager vous aide à configurer la matrice RAID de votre
périphérique de stockage LaCie et à assurer son intégrité.
Le périphérique LaCie est formaté par défaut en HFS+ pour Mac avec une seule matrice
RAID 0. Pour tout complément d’informations sur votre système d’exploitation, référez-vous
aux instructions ci-dessous.

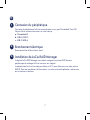
8
Mac Windows
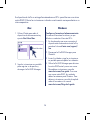
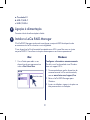
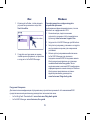
1. Ouvrez votre périphérique de
stockage à l’aide du Finder, puis
lancez Start here Mac.
Start Here Mac
LaCie
HD
2. Suivez les instructions qui s’affichent
à l’écran pour enregistrer votre
périphérique et télécharger LaCie
RAID Manager.
Configurer et formater le disque de
stockage :
Les disques doivent être formatés car
Windows ne prend pas en charge le format
HFS+.
1. Sur l’ordinateur auquel le périphérique de
stockage LaCie sera connecté, consultez
la page www.lacie.com/support/lrm.
2. Téléchargez LaCie RAID Manager pour
Windows.
3. Lancez le programme d’installation, puis
suivez les instructions qui s’affichent à
l’écran pour mener à bien la procédure
d’installation.
4. Utilisez le logiciel LaCie RAID Manager
pour effacer la matrice RAID existante
et en créer une nouvelle. Pour plus
d’informations, consultez la page
www.lacie.com/lrm-guide. Après
avoir créé une nouvelle matrice RAID,
les disques doivent être formatés pour
Windows. Pour plus d’informations,
reportez-vous au chapitre sur le formatage
dans le manuel (www.lacie.com/
2big-dock-guide).

9
Ressources en ligne
Pour tout complément d’informations sur la gestion de votre périphérique de stockage LaCie et sa
matrice RAID, consultez les manuels d’utilisation en ligne suivants :
• LaCie 2big Dock Thunderbolt 3 : www.lacie.com/2big-dock-guide
• LaCie RAID Manager : www.lacie.com/lrm-guide
Changer de niveau RAID
Afin d’assurer la redondance des données, utilisez le logiciel LaCie RAID Manager pour
modifier la matrice RAID et passer d’un RAID 0 par défaut à un RAID 1. Pour tout complément
d’informations sur le changement de niveau RAID, consultez la page www.lacie.com/lrm-guide.
Après avoir changé de niveau RAID, veillez à formater les disques selon le système d’exploitation
installé. Pour en savoir plus sur le formatage, reportez-vous au chapitre sur le partitionnement et le
formatage dans le manuel d’utilisation : www.lacie.com/2big-dock-guide.
Problèmes de connexion Thunderbolt 3 sous Windows
Si le disque LaCie 2big Dock n’est pas reconnu ou détecté par votre PC, rendez-vous sur la page
www.lacie.com/support/2bigDockTBT3 pour télécharger et installer le pilote 2big Dock
Thunderbolt 3 pour Windows.
Si les problèmes de connexion Thunderbolt 3 sous Windows persistent, adressez-vous au fabricant
de votre ordinateur pour obtenir des mises à jour :
• du BIOS,
• du firmware Thunderbolt 3,
• des pilotes Thunderbolt 3.
Pour connaître les conditions de garantie de votre 2big Dock Thunderbolt 3, ouvrez la déclaration de
garantie limitée LaCie sur votre disque ou consultez la page www.lacie.com/warranty. Pour toute
demande d’intervention sous garantie, contactez un centre de réparation agréé LaCie clientèle ou
consultez le site www.lacie.com/support/2bigDockTBT3 pour obtenir de plus amples informations
sur le support clientèle dont vous dépendez.

10
IT
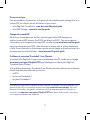
1
Collegare il dispositivo
Collegare il dispositivo LaCie al computer utilizzando la porta Thunderbolt 3 o USB.
Non utilizzare entrambe le connessioni nello stesso tempo.
a: Thunderbolt 3
b: USB-C/USB-C
c: USB-C/USB-A
2
Collegamento all’alimentazione
Collegare l’alimentatore incluso.
3
Installazione di LaCie RAID Manager
LaCie RAID Manager aiuta a configurare l’array RAID del dispositivo di archiviazione LaCie
e a mantenerne lo stato di salute.
Il dispositivo LaCie viene consegnato formattato nel formato HFS+ per Mac con un array
RAID 0 singolo. Consultare le istruzioni di seguito riportate per il sistema operativo.

11
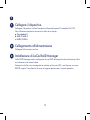
Mac Windows
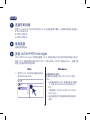
1. Utilizzare Finder per aprire il
dispositivo di archiviazione e avviare
Start Here Mac.
Start Here Mac
LaCie
HD
2. Seguire le istruzioni visualizzate sullo
schermo per registrare il dispositivo
e scaricare LaCie RAID Manager.
Configurazione e formattazione del
dispositivo di archiviazione:
I dischi devono essere formattati poiché
Windows non supporta HFS+.
1. Sul computer che si collegherà al
dispositivo di archiviazione LaCie, visitare il
sito www.lacie.com/support/lrm.
2. Scaricare LaCie RAID Manager per
Windows.
3. Avviare il programma di installazione
e seguire le istruzioni visualizzate sullo
schermo per completare l’installazione.
4. Utilizzare LaCie RAID Manager per
eliminare l’array RAID attuale e crearne
uno nuovo. Per le istruzioni, vedere
www.lacie.com/lrm-guide. Dopo la
creazione di un nuovo array RAID, le unità
devono essere formattate per Windows.
Per le istruzioni, vedere il capitolo sulla
formattazione nel manuale,
www.lacie.com/2big-dock-guide.
Risorse online
Per saperne di più sulla gestione del dispositivo di archiviazione LaCie e sull’array RAID, vedere il
manuale utente di seguito.
• LaCie 2big Dock Thunderbolt 3: www.lacie.com/2big-dock-guide
• LaCie RAID Manager: www.lacie.com/lrm-guide

12
Modifica del RAID
Per la ridondanza dei dati, è possibile utilizzare LaCie RAID Manager per modificare l’array RAID
da RAID 0 predefinito a RAID 1. Per ulteriori informazioni su come modificare il RAID, vedere
www.lacie.com/lrm-guide.
Dopo aver modificato l’array RAID, assicurarsi di formattare le unità per il sistema operativo. Per
istruzioni sulla formattazione, vedere il capitolo sulla suddivisione e formattazione del manuale
utente: www.lacie.com/2big-dock-guide.
Problemi durante il collegamento con Thunderbolt 3 su Windows
Se la 2big Dock di LaCie non si installa o non viene rilevata dal PC, consultare
www.lacie.com/support/2bigDockTBT3 e scaricare e installare il driver di 2big Dock
Thunderbolt 3 per Windows.
Se continuano a verificarsi problemi nell’utilizzo di Thunderbolt 3 con Windows, verificare gli
aggiornamenti per:
• IOS
• Firmware Thunderbolt 3
• Driver di Thunderbolt 3
Controllare i dettagli della garanzia del vostro 2big Dock Thunderbolt 3 aprendo la Garanzia
Limitata di LaCie Informativa presente sulla vostra unità o su www.lacie.com/warranty. Per
richiedere un servizio coperto da garanzia contattare un centro di assistenza autorizzato LaCie
o fare riferimento a www.lacie.com/support/2bigDockTBT3 per maggiori informazioni in
merito all’assistenza clienti presente nel vostro territorio.
DE
1
Gerät anschließen
Verbinden Sie das LaCie-Gerät über Thunderbolt 3 oder USB mit Ihrem Computer.
Verwenden Sie nicht beide Anschlüsse zugleich.

13
a: Thunderbolt 3
b: USB-C/USB-C
c: USB-C/USB-A
2
Stromanschluss
Schließen Sie das mitgelieferte Netzteil an.
3
Den LaCie RAID Manager installieren
LaCie RAID Manager unterstützt Sie bei der Konfiguration und Wartung des RAID-Arrays.
Das LaCie-Gerät wird für den Mac mit HFS+ vorformatiert und als einzelnes RAID 0-Array
ausgeliefert. Beachten Sie die folgenden Hinweise zu Ihrem Betriebssystem.
Mac Windows
1. Suchen Sie das Gerät im Finder und
starten Sie „Start Here Mac“.
Start Here Mac
LaCie
HD
Speicher konfigurieren und formatieren:
Die Festplatten müssen formatiert werden,
weil HFS+ von Windows nicht unterstützt wird.
1. Öffnen Sie auf dem Computer, mit dem
Sie das LaCie-Speichergerät verbinden
werden, www.lacie.com/support/lrm.
2. Laden Sie LaCie RAID Manager für
Windows herunter.
3. Starten Sie das Installationsprogramm
und folgen Sie den Anweisungen bis zum
Abschluss der Installation.

14
2. Registrieren Sie Ihr Gerät gemäß
den Anweisungen und laden Sie
LaCie RAID Manager herunter.
4. Verwenden Sie LaCie RAID Manager,
um das aktuelle RAID-Array zu löschen
und ein neues zu erstellen. Anweisungen
hierzu finden Sie unter www.lacie.com/
lrm-guide. Nachdem das neue
RAID-Array erstellt wurde, müssen die
Festplatten für Windows formatiert
werden. Anweisungen zur Formatierung
entnehmen Sie dem Handbuch unter
www.lacie.com/2big-dock-guide.
Online-Ressourcen
Weitere Informationen über das LaCie-Speichergerät und das RAID-Array finden Sie in der
Online-Benutzerdokumentation.
• LaCie 2big Dock Thunderbolt 3: www.lacie.com/2big-dock-guide
• LaCie RAID Manager: www.lacie.com/lrm-guide
Das RAID ändern
Wenn Sie Datenredundanz benötigen, können Sie im LaCie RAID Manager die RAID-
Konfiguration von RAID 0 in RAID 1 ändern. Weitere Informationen zur Änderung der RAID-
Konfiguration finden Sie unter www.lacie.com/lrm-guide.
Nach Änderung der RAID-Arraykonfiguration müssen Sie die Festplatte für Ihr Betriebssystem
formatieren. Anweisungen zur Formatierung finden Sie im Kapitel zur Partitionierung und
Formatierung im Benutzerhandbuch: www.lacie.com/2big-dock-guide.
Thunderbolt 3-Verbindungprobleme unter Windows
Wenn sich die LaCie 2big Dock nicht verbinden lässt oder von Ihrem Computer nicht erkannt wird,
beachten Sie bitte die Hinweise unter www.lacie.com/support/2bigDockTBT3 und laden Sie
den 2big Dock Thunderbolt 3-Treiber für Windows herunter und installieren Sie ihn.

15
Wenn danach immer noch Probleme mit Thunderbolt 3 unter Windows auftreten, beziehen Sie von
Ihrem PC-Hersteller folgende Updates:
• BIOS
• Thunderbolt 3-Firmware
• Thunderbolt 3-Treiber
Einzelheiten zur Garantie für Ihre 2big Dock Thunderbolt 3 finden Sie in der LaCie Garantieerklärung
zu Ihrer Festplatte oder auf www.lacie.com/warranty. Im Garantiefall wenden Sie sich bitte an ein
autorisiertes LaCie Servicecenter oder besuchen Sie www.lacie.com/support/2bigDockTBT3, wo Sie
weitere Informationen über den Kundensupport in Ihrer Region erhalten.
ES
1
Conexión del dispositivo
Conecte su dispositivo de LaCie al ordenador mediante Thunderbolt 3 o USB. No utilice
ambas conexiones al mismo tiempo.
a: Thunderbolt 3
b: USB-C/USB-C
c: USB-C/USB-A
2
Conexión de alimentación
Conecte la fuente de alimentación incluida.
3
Instalación de LaCie RAID Manager
LaCie RAID Manager le ayuda a configurar la matriz RAID de su dispositivo de
almacenamiento de LaCie y a mantenerlo en buen estado.

16
Su dispositivo de LaCie se entrega formateado como HFS+ para Mac con una única
matriz RAID 0. Revise las instrucciones incluidas a continuación correspondientes a su
sistema operativo.
Mac Windows
1. Utilice el Finder para abrir el
dispositivo de almacenamiento y
ejecute Start Here Mac.
Start Here Mac
LaCie
HD
2. Siga las instrucciones en pantalla
para registrar su dispositivo y
descargar LaCie RAID Manager.
Configure y formatee el almacenamiento:
Es necesario formatear los discos, ya que
Windows no admite el formato HFS+.
1. En el ordenador que vaya a conectar al
dispositivo de almacenamiento de LaCie,
acceda al sitio web lacie.com/support/
lrm.
2. Descargue LaCie RAID Manager para
Windows.
3. Inicie el instalador y siga las instrucciones
en pantalla para completar la instalación.
4. Utilice LaCie RAID Manager para eliminar
la matriz RAID actual y crear una nueva.
Para obtener instrucciones, consulte
www.lacie.com/lrm-guide. Tras crear
una nueva matriz RAID, las unidades
deben formatearse para Windows. Para
obtener instrucciones, consulte el capítulo
sobre el formateo en el manual
www.lacie.com/2big-dock-guide.

17
Recursos en línea
Para obtener más información sobre cómo gestionar el dispositivo de almacenamiento de LaCie y
la matriz RAID, consulte los manuales de usuario en línea indicados a continuación.
• LaCie 2big Dock Thunderbolt 3: www.lacie.com/2big-dock-guide
• LaCie RAID Manager: www.lacie.com/lrm-guide
Cambio de la matriz RAID
Para obtener redundancia de datos, puede utilizar LaCie RAID Manager para cambiar la matriz
RAID de RAID 0, la opción predeterminada, a RAID 1. Para obtener más información sobre cómo
cambiar la matriz RAID, consulte www.lacie.com/lrm-guide.
Tras cambiar la matriz RAID, asegúrese de formatear las unidades para su sistema operativo. Para
obtener instrucciones sobre cómo realizar el formateo, consulte el capítulo relativo a la creación
de particiones y el formateo de su manual de usuario: www.lacie.com/2big-dock-guide.
Problemas para establecer la conexión con Thunderbolt 3 en Windows
Si la unidad LaCie 2big Dock no se monta o si el ordenador no la detecta, acceda al sitio
web www.lacie.com/support/2bigDockTBT3 para descargar e instalar el controlador de
Thunderbolt 3 de la unidad 2big Dock para Windows.
Si sigue experimentando problemas para utilizar Thunderbolt 3 con Windows, consulte al
fabricante de su ordenador para obtener actualizaciones de:
• El BIOS
• El firmware de Thunderbolt 3
• Los controladores de Thunderbolt 3
Revise los detalles de la garantía de su 2big Dock Thunderbolt 3 abriendo la declaración de garantía
limitada de LaCie que se encuentra en su unidad o visite www.lacie.com/warranty. Para solicitar
servicio técnico bajo la garantía, póngase en contacto con un centro de servicio autorizado de LaCie
o visite www.lacie.com/support/2bigDockTBT3 si desea obtener más información sobre el servicio
técnico en su territorio.

18
NL
1
Uw apparaat aansluiten
Sluit uw LaCie-apparaat aan op uw computer met behulp van Thunderbolt 3 of USB.
Gebruik beide aansluitingen niet gelijktijdig.
a: Thunderbolt 3
b: USB-C/USB-C
c: USB-C/USB-A
2
Stroomaansluiting
Sluit de inbegrepen voedingskabel aan.
3
LaCie RAID Manager installeren
LaCie RAID Manager helpt u om de RAID-array van uw LaCie-opslagapparaat te
configureren en te onderhouden .
Uw LaCie-apparaat is geformatteerd als HFS+ voor Mac met één RAID 0-array. Bekijk
onderstaande instructies voor uw besturingssysteem.

19
Mac Windows
1. Gebruik de Finder om uw
opslagapparaat te openen en start
‘Start Here Mac’.
Start Here Mac
LaCie
HD
2. Volg de instructies op het scherm om
uw opslagapparaat te registreren
en de LaCie Raid Manager te
downloaden.
Opslag configureren en formatteren:
De schijven moeten geformatteerd worden,
omdat HFS+ niet door Windows ondersteund
wordt.
1. Ga naar www.lacie.com/support/
lrm op de computer die op het LaCie-
opslagapparaat zal worden aangesloten.
2. Download LaCie RAID Manager voor
Windows.
3. Start het installatieprogramma en volg de
instructies op het scherm om de installatie
te voltooien.
4. Gebruik LaCie RAID Manager om de
huidige RAID-array te wissen en een
nieuwe aan te maken. Raadpleeg voor
instructies www.lacie.com/lrm-guide.
Nadat u een nieuwe RAID-array heeft
aangemaakt, moeten de schijven
geformatteerd worden voor Windows.
Raadpleeg voor instructies het hoofdstuk
over formatteren in de handleiding:
www.lacie.com/2big-dock-guide.
Online hulpmiddelen
Voor meer informatie over het beheer van uw LaCie-opslagapparaat en de RAID-array, kunt u de
onderstaande handleidingen raadplegen.
• LaCie 2big Dock Thunderbolt 3: www.lacie.com/2big-dock-guide
• LaCie RAID Manager: www.lacie.com/lrm-guide

20
De RAID wijzigen
Bij overbodige data kunt u de LaCie RAID Manager gebruiken om de standaardinstelling RAID 0
te wijzigen naar RAID 1. Raadpleeg voor meer informatie over het wijzigen van de RAID
www.lacie.com/lrm-guide.
Nadat u de RAID-array heeft gewijzigd, moet u de schijven voor uw besturingssysteem
formatteren. Raadpleeg voor instructies over formatteren het hoofdstuk over het maken van
partities en formatteren in de gebruikershandleiding: www.lacie.com/2big-dock-guide.
Problemen bij verbinding maken met Thunderbolt 3 in Windows
Als LaCie 2big Dock niet start of niet wordt gedetecteerd door uw pc, gaat u naar
www.lacie.com/support/2bigDockTBT3 om het 2big Dock Thunderbolt 3-stuurprogramma
voor Windows te downloaden en te installeren.
Als u problemen blijft houden bij het gebruik van Thunderbolt 3 in combinatie met Windows,
controleer dan bij uw pc-fabrikant of er updates zijn voor de:
• BIOS
• Thunderbolt 3-firmware
• Thunderbolt 3-stuurprogramma’s
Meer informatie over de garantie op uw 2big Dock Thunderbolt 3 vindt u door de LaCie Limited
Garantieverklaring te openen op uw schijf of door naar www.lacie.com/warranty te gaan. Om de
garantieservice aan te vragen, kunt u contact opnemen met een erkend LaCie-servicecentrum of ga
naar www.lacie.com/support/2bigDockTBT3 voor meer informatie over klantenservice in uw regio.
PT
1
Ligar o dispositivo
Conecte o seu dispositivo LaCie ao seu computador usando o Thunderbolt 3 ou USB.
Não use as duas conexões ao mesmo tempo.
ページが読み込まれています...
ページが読み込まれています...
ページが読み込まれています...
ページが読み込まれています...
ページが読み込まれています...
ページが読み込まれています...
ページが読み込まれています...
ページが読み込まれています...
ページが読み込まれています...
ページが読み込まれています...
ページが読み込まれています...
ページが読み込まれています...
ページが読み込まれています...
ページが読み込まれています...
ページが読み込まれています...
ページが読み込まれています...
ページが読み込まれています...
ページが読み込まれています...
ページが読み込まれています...
ページが読み込まれています...
-
 1
1
-
 2
2
-
 3
3
-
 4
4
-
 5
5
-
 6
6
-
 7
7
-
 8
8
-
 9
9
-
 10
10
-
 11
11
-
 12
12
-
 13
13
-
 14
14
-
 15
15
-
 16
16
-
 17
17
-
 18
18
-
 19
19
-
 20
20
-
 21
21
-
 22
22
-
 23
23
-
 24
24
-
 25
25
-
 26
26
-
 27
27
-
 28
28
-
 29
29
-
 30
30
-
 31
31
-
 32
32
-
 33
33
-
 34
34
-
 35
35
-
 36
36
-
 37
37
-
 38
38
-
 39
39
-
 40
40


他の言語で
- italiano: LaCie 2big Guida d'installazione
- Deutsch: LaCie 2big Installationsanleitung
- português: LaCie 2big Guia de instalação
関連論文
-
LaCie LaCie d2 Professional クイックスタートガイド
-
-
LaCie 2big RAID クイックセットアップガイド
-
LaCie LaCie d2 Quadra USB 3 インストールガイド
-
-
LaCie 2big Thunderbolt 2 インストールガイド
-
-
-
-
LaCie 2big USB 3.0 ユーザーマニュアル