Acer G247HL 取扱説明書

カテゴリー
テレビ
タイプ
取扱説明書
LCD Monitor Quick Setup Guide
English
Acer LCD Monitor Quick Start Guide (QSG)
Important safety instructions
Please read the following instructions carefully.
1. To clean the LCD monitor screen: Be sure that your monitor is electrically rated to operate with the AC power available in your
location.
• Turn off the LCD monitor and unplug the power cord.
• Spray a non-solvent cleaning solution onto a rag and clean the screen gently.
2. Do not place the LCD monitor near a window. Exposing the monitor to rain, moisture or sunlight can severely damage it.
3. Do not apply pressure to the LCD screen. Excessive pressure may cause permanent damage to the display.
4. Do not remove the cover or attempt to service this unit yourself. An authorized technician should perform servicing of any
nature.
5. Store the LCD monitor in a room with a temperature of -20° to 60° C (-4° to140° F). Storing the LCD monitor outside this range
may result in permanent damage.
6. Immediately unplug your monitor and call an authorized technician if any of the following circumstances occur:
• Monitor-to-PC signal cable is frayed or damaged.
• Liquid spills onto the LCD monitor or the monitor is exposed to rain.
• The LCD monitor or case is damaged.
Attaching the monitor to the base
1. Remove the monitor base from the packaging and place it on a stable and level workspace.
2. Remove the monitor from the packaging.
3. Attach the monitor stand arm to the base.
• Ensure that the base is locked onto the monitor stand arm. (for selected models)
• Secure the base to the monitor stand arm by turning the white screw using the integrated tab or a suitable coin. (for
selected models)
Connecting Your Monitor to a Computer
1. Turn off your monitor and unplug your computer’s power cord.
2. 2-1 Connect Video Cable
a. Make sure both the monitor and computer are powered-OFF.
b. Connect the VGA video cable to the computer.
2-2 Connect Digital Cable (Only Dual-input model)
a. Make sure both the monitor and computer are powered-OFF.
b. Connect one end of the 24-pin DVI cable to the back of the monitor
and connect the other end to the computer's port.
2-3 Connect HDMI Cable (Only HDMI-input model)
a. Make sure both the monitor and computer are powered-OFF.
b. Connect the HDMI cable to the computer.
3. Connect the Audio Cable. (Only Audio-Input Model) (Optional)
4. Insert the monitor power cable into the power port at the back of the
monitor.
5. Plug the power cords of your computer and your monitor into a nearby
electrical outlet.
External Controls
No. Icon Item Description
1, 2
Power button/
indicator
Turns the monitor on/off.
Blue indicates power on. Amber indicates standby/power saving mode.
3, 4 Minus / plus
If the OSD is active, press the Minus or Plus button to toggle between the
OSD options.
5 OSD functions Press to view the OSD. Press again to enter a selection in the OSD.
6
Auto adjust
button / exit
If the OSD is active, press Auto to exit the OSD. Once the OSD is inactive,
press Auto and the monitor will automatically optimize the display position,
focus, and clock of your display.
7 Empowering key
Press the Empowering Key to open the Acer eColor Management OSD and
access the scenario modes.
2
D-Sub
DC
HDMI
DC-IN
VGA INDVI-D IN
AUDIO-IN
HDMI
DC IN
D-SubDVI
AUDIO-IN
HDMI
DC IN
D-SubDVI
HDMI
DVI
2 14 356
7
/
LCD Monitor Quick Setup Guide
English
Regulations and safety notices
FCC notice
This device has been tested and found to comply with the limits for a Class B digital device pursuant to Part 15
of the FCC rules. These limits are designed to provide reasonable protection against harmful interference in a
residential installation. This device generates, uses, and can radiate radio frequency energy and, if not installed
and used in accordance with the instructions, may cause harmful interference to radio communications.
However, there is no guarantee that interference will not occur in a particular installation. If this device does
cause harmful interference to radio or television reception, which can be determined by turning the device off
and on, the user is encouraged to try to correct the interference by one or more of the following measures:
Reorient or relocate the receiving antenna.
Increase the separation between the device and receiver.
Connect the device into an outlet on a circuit different from that to which the receiver is connected.
Consult the dealer or an experienced radio/television technician for help.
CE declaration of Conformity
Hereby, Acer Inc., declares that this LCD monitor is in compliance with the essential requirements and other
relevant provisions of EMC Directive 2004/108/EC, Low Voltage Directive 2006/95/EC, and RoHS Directive 2011/
65/EU and Directive 2009/125/EC with regard to establishing a framework for the setting of ecodesign
requirements for energy-related product.
Notice: Shielded cables
All connections to other computing devices must be made using shielded cables to maintain compliance with
EMC regulations.
Notice: Peripheral devices
Only peripherals (input/output devices, terminals, printers, etc.) certified to comply with the Class B limits may
be attached to this equipment. Operation with non-certified peripherals is likely to result in interference to
radio and TV reception.
Caution
Changes or modifications not expressly approved by the manufacturer could void the user authority, which is
granted by the Federal Communications Commission, to operate this product.
Operation conditions
This device complies with Part 15 of the FCC Rules. Operation is subject to the following two conditions: (1) this
device may not cause harmful interference, and (2) this device must accept any interference received, including
interference that may cause undesired operation.
Notice: Canadian users
This Class B digital apparatus complies with Canadian ICES-003.
Remarque à l'intention des utilisateurs canadiens
Cet appareil numérique de la classe B est conforme a la norme NMB-003 du Canada.
Disposal of Waste Equipment by Users in Private Household in the European Union
This symbol on the product or on its packaging indicates that this product must not be disposed of
with your other household waste. Instead, it is your responsibility to dispose of your waste
equipment by handing it over to a designated collection point for the recycling of waste electrical
and electronic equipment. The separate collection and recycling of your waste equipment at the
time of disposal will help to conserve natural resources and ensure that it is recycled in a manner
that protects human health and the environment. For more information about where you can
drop off your waste equipment for recycling, please contact your local city office, your household
waste disposal service or the shop where you purchased the product.
LCD Monitor Quick Setup Guide
English
SPECIFICATION
Find manuals and other documents for your Acer product on the official Acer support website.
LCD Panel Driving system TFT Color LCD
Size 24”W (61 cm)
Pixel pitch 0.276 mm (H) x 0.276 mm (V)
Brightness
250 cd/m
2
(Typical)
Contrast 100000000:1 Max (ACM)
Viewable angle 178° (H) 178° (V) (CR=10)
Response time 6 ms (G to G)
Panel Type VA
Video R,G, B Analog Interface
H-Frequency 30 kHz - 80 kHz
V-Frequency 55 - 75 Hz
Display Colors 16.7M Colors
Dot Clock 175 MHz
Max. Resolution 1920 x 1080 @ 60 Hz
Plug & Play VESA DDCCI/DDC2B
Power consumption (at 200 nits) On Mode 40W (typ.)
Sleep Mode 0.45W (typ.)
Off Mode 0.30W (typ.)
Input Connector D-Sub
DVI-D 24 pin (Only Dual-Input Model)
HDMI 19 pin (Only HDMI-Input Model)
Input Video Signal Analog: 0.7Vp-p (standard), 75 OHM, Positive
Digital signal (Only Dual-Input Model)
HDMI signal (Only HDMI-Input Model)(Optional)
Speakers 2W x 2 (Only Audio-Input Model)(Optional)
Maximum Screen Size Horizontal: 531.36 mm
Vertical: 298.89 mm
Power Source 100-240V, 50/60 Hz
Environmental Considerations Operating Temp: 0° to 40°C
Storage Temp: -20° to 60°C
Operating Humidity: 10% to 80%
Dimensions 546.4 (W) x 411.4 (H) x 185.7 (D) mm
Weight (N. W.) 3.05 kg Unit (net)
Mechanism spec Tilt: -5° to +15°
Swivel: No
Height adjustment: No
Pivot: No
Detachable foot stand: Yes (Detachable foot stand with screw release)
External Controls: Switch / Buttons Power Button
Left() /Right()
MENU/ENTER
Auto/ Exit
E(Empowering) Key
Functions Contrast
Brightness
Focus
Clock
H. Position
V. Position
(Warm) Color
(Cool) Color
RGB Color temperature
Language
OSD position. timeout
Auto configuration (only
Analog input model)
Wide mode (Full/Aspect)
ACM On/Off
Input signal Selection (only
Dual input model)
DDCCI On/Off
Display information
Reset
Exit
* All specifications are subject to change without notice.
Regulatory Compliance
UA.TR.002
ME61
MU.T0V00.002
4J.2EN01.011
¤ÙèÁ×Í¡ÒÃμÑ駤èÒÍÂèÒ§àÃçǢͧ¨ÍÀÒ¾ LCD
ä·Â
¤ÙèÁ×Í¡ÒÃãªé§Ò¹¨ÍáÍÅ«Õ´Õ Acer ©ºÑºÂèÍ (QSG)
¤Óá¹Ð¹Ó´éÒ¹¤ÇÒÁ»ÅÍ´ÀÑ·ÕèÊÓ¤Ñ
¡ÃسÒÍèÒ¹¤Óá¹Ð¹ÓμèÍ仹ÕéÍÂèÒ§¶Õè¶éǹ
1. ¡Ò÷ӤÇÒÁÊÐÍÒ´¨ÍáÍÅ«Õ´Õ: μÃǨÊͺãËéá¹èã¨ÇèÒ¨ÍÀÒ¾ÃкآéÍÁÙÅ´éҹ俿éÒ ÇèÒÊÒÁÒöãªé§Ò¹ä´é¡Ñºáç´Ñ¹ä¿¿éÒ AC ·ÕèãªéÍÂÙèã¹»ÃÐà·È¢Í§¤Ø³
• »Ô´¨ÍáÍÅ«Õ´ÕáÅжʹ»ÅÑê¡ä¿ÍÍ¡
• ©Õ´¹éÓÂÒ·Ó¤ÇÒÁÊÐÍÒ´·ÕèäÁèãªèÊÒÃÅÐÅÒÂŧº¹¼éÒáÅÐàªç´·Ó¤ÇÒÁÊÐÍҴ˹éÒ¨ÍàºÒæ
2. ÍÂèÒÇÒ§¨ÍáÍÅ«Õ´ÕäÇéã¡Åé˹éÒμèÒ§ ¡ÒÃãËé¨ÍÊÑÁ¼ÑʡѺ¹éÓ½¹ ¤ÇÒÁª×é¹ËÃ×ÍáʧᴴÊÒÁÒöÊÃéÒ§¤ÇÒÁàÊÕÂËÒÂÍÂèÒ§Ãعáç¡ÑºË¹éÒ¨Íä´é
3. ÍÂèÒÍÍ¡áç¡´º¹¨ÍáÍÅ«Õ´Õ¡Òö١áç¡´ÁÒ¡à¡Ô¹ä»ÍÒ¨·ÓãËéà¡Ô´¤ÇÒÁàÊÕÂËÒ·ÕèäÁèÍÒ¨«èÍÁá«Áä´é¡ÑºË¹éÒ¨Í
4. ÍÂèҶʹ½Ò¤ÃͺËÃ×;ÂÒÂÒÁá¡é䢨ÍáÍÅ«Õ´Õ´éÇÂμ¹àͧ ãËéªèÒ§¼ÙéàªÕèÂǪÒà»ç¹¼Ù
é´Óà¹Ô¹¡ÒÃá¡éä¢
5. à¡çº¨ÍáÍÅ«Õ´Õã¹Ëéͧ·ÕèÁÕÍسËÀÙÁÔ -20
°CÖ§ 60°C ͧÈÒà«Åà«ÕÂÊ (-4°FÖ§ 140°F ͧÈÒ¿Òàùäιì)
¡ÒÃà¡çºÃÑ¡ÉÒ¨ÍáÍūմչ͡à˹×ͨҡªèǧÍسËÀÙÁԴѧ¡ÅèÒÇÍÒ¨Ê觼ÅàÊÕÂËÒ·ÕèäÁèÍÒ¨«èÍÁá«Áä´é¡ÑºË¹éÒ¨Í
6. ¶Í´»ÅÑê¡Ë¹éҨͧ͢¤Ø³·Ñ¹·ÕáÅÐãËéªèÒ§¼ÙéàªÕèÂǪҷӡÒÃá¡éä¢ËÒ¡ÁÕʶҹ¡Òóìã´æ μèÍ仹Õéà¡Ô´¢Öé¹
• ÊÒÂà¤àºÔÅÊè§ÊÑ−−Ò³ÃÐËÇèÒ§¨ÍáÍūմաѺ¾Õ«ÕËÅØ´ÅØèÂËÃ×ÍàÊÕÂËÒÂ
• ¢Í§àËÅÇˡô¨ÍáÍÅ«Õ´ÕËÃ×ͨÍÊÑÁ¼ÑʡѺ¹éÓ½¹
• ¨ÍáÍÅ«Õ´ÕËÃ×ÍμÑÇà¤Ã×èͧ¢Í§¨ÍàÊÕÂËÒÂ
¡ÒÃμÔ´μÑ駨ÍáÊ´§¼Åà¢éҡѺ°Ò¹
1. á¡Ð°Ò¹¨ÍáÊ´§¼ÅÍÍ¡¨Ò¡¡ÅèͧáÅÐÇÒ§°Ò¹Å§º¹¾×é¹·ÕèÁÕÁÑ蹤§áÅÐàÃÕºàÊÁ͡ѹ
2. ¶Í´¨ÍáÊ´§¼ÅÍÍ¡¨Ò¡¡ÅèͧºÃèØ
3. μèèÍ¢ÒμÑ駨ÍáÊ´§¼Åà¢éҡѺ°Ò¹
μÃǨÊͺãËéá¹èã¨ÇèÒ°Ò¹¹Ñé¹Åçͤà¢éҡѺ¢ÒμÑ駨ÍáÊ´§¼ÅàÃÕºÃéÍÂáÅéÇ (ÊÓËÃѺºÒ§ÃØè¹)
• ÂÖ´°Ò¹à¢éҡѺ¢ÒμÑ駨ÍáÊ´§¼Å´éÇ¡ÒÃËÁعʡÃÙÊÕ¢ÒÇâ´Âãªéá¼è¹ÊÓËÃѺËÁع·ÕèãËéÁÒËÃ×ÍàËÃÕ·ÕèÁÕ¢¹Ò´àËÁÒÐÊÁ (ÊÓËÃѺºÒ§ÃØè¹)
¡ÒÃàª×èÍÁμèͨÍÀÒ¾¢Í§¤Ø³à¢éҡѺ¤ÍÁ¾ÔÇàμÍÃì
1. »Ô´à¤Ã×èͧ¤ÍÁ¾ÔÇàμÍÃì¢Í§¤Ø³áÅéǶʹÊÒÂ俢ͧà¤Ã×èͧ¤ÍÁ¾ÔÇàμÍÃì
2. 2-1 àª×èÍÁμèÍÊÒÂà¤àºÔÅÇÔ´ÕâÍ
a. μÃǨÊͺãËéá¹èã¨ÇèÒ·Ñ駨ÍÀÒ¾áÅФÍÁ¾ÔÇàμÍÃì»Ô´à¤Ã×èͧÍÂÙè
b. àª×èÍÁμèÍÊÒÂà¤àºÔÅ VGA ä»Âѧ¤ÍÁ¾ÔÇàμÍÃì
2-2 àª×èÍÁμèÍÊÒ´ԨÔμÍÅ (੾ÒÐÃØè¹ Dual-input)
a. μÃǨÊͺãËéá¹èã¨ÇèÒ·Ñ駨ÍÀÒ¾áÅФÍÁ¾ÔÇàμÍÃì»Ô´à¤ÃÍ×è§ÍÂÙè
b. àª×èÍÁμèÍ»ÅÒ´éҹ˹Ö觢ͧÊÒÂà¤àºÔÅ DVI 24 ¾Ô¹à¢éҡѺ´éÒ¹ËÅѧ¢Í§¨ÍÀÒ¾
áÅÐàª×èÍÁμèÍ»ÅÒÂÍÕ¡´éҹ˹Öè§ä»Âѧ¾ÍÃìμ¢Í§¤ÍÁ¾ÔÇàμÍÃì
2-3 àª×èÍÁμèÍÊÒ HDMI (੾ÒÐÃØè¹ HDMI-input)
a. μÃǨÊͺãË
éá¹èã¨ÇèÒ·Ñ駨ÍÀÒ¾áÅФÍÁ¾ÔÇàμÍÃì»Ô´à¤ÃÍ×è§ÍÂÙè
b. àª×èÍÁμèÍÊÒÂà¤àºÔÅ HDMI ä»Âѧ¤ÍÁ¾ÔÇàμÍÃì
3. àª×èÍÁμèÍÊÒÂà¤àºÔÅàÊÕ§ (੾ÒÐÃØè¹·ÕèÁÕÍÔ¹¾ØμàÊÕ§à·èÒ¹Ñé¹) (ÍØ»¡Ã³ì«×éÍà¾ÔèÁ)
4. àÊÕºÊÒÂä¿Á͹ÔàμÍÃìà¢éҡѺ¾ÍÃìμÊÒÂä¿·Õè´éÒ¹ËÅѧ¢Í§Á͹ÔàμÍÃì
5. àÊÕºÊÒÂ俢ͧ¤ÍÁ¾ÔÇàμÍÃìáÅÐÁ͹ÔàμÍÃì¢Í§¤Ø³à¢éҡѺàμéÒàÊÕº俿éÒ·ÕèÍÂÙèã¡Åé
¡ÒäǺ¤ØÁÀÒ¹͡
ËÁÒÂàÅ¢ äͤ͹ ÃÒ¡Òà ÃÒÂÅÐàÍÕ´
1, 2 »ØèÁ/Åѡɳìà»Ô´à¤Ã×èͧ
à»Ô´/»Ô´¨ÍÀÒ¾
ÊÕ¹éÓà§Ô¹ ËÁÒ¤ÇÒÁÇèÒà»Ô´à¤Ã×èͧ ÊÕàËÅ×ͧ ËÁÒ¶֧âËÁ ´Êáμ¹´ìºÒÂ/¡ÒûÃÐËÂÑ´¾Åѧ§Ò¹
3, 4 ź/ºÇ¡ ËÒ¡ OSD à»Ô´ãªé§Ò¹ÍÂÙèãËé¡´»ØèÁźËÃ×ͺǡà¾×èÍÊÅѺÃÐËÇèÒ§μÑÑÇàÅ×Í¡ OSD
2
D-Sub
DC
HDMI
DC-IN
VGA INDVI-D IN
AUDIO-IN
HDMI
DC IN
D-SubDVI
AUDIO-IN
HDMI
DC IN
D-SubDVI
HDMI
DVI
2 14 356
7
/
¤ÙèÁ×Í¡ÒÃμÑ駤èÒÍÂèÒ§àÃçǢͧ¨ÍÀÒ¾ LCD
ä·Â
¡®¢éͺѧ¤ÑºáÅлÃСÒÈ´éÒ¹¤ÇÒÁ»ÅÍ´ÀÑÂ
»ÃСÒÈ FCC
ÍØ»¡Ã³ì¹Õéä´éÃѺ¡Ò÷´Êͺ áÅоºÇèÒÊÍ´¤Åéͧ¡Ñº¢éͨӡѴÊÓËÃѺÍØ»¡Ã³ì´Ô¨ÔμÍŤÅÒÊ B «Öè§μç¡ÑºÊèǹ·Õè 15 ¢Í§¡®¢éͺѧ¤Ñº FCC ¢éÍ
¨Ó¡Ñ´àËÅèÒ¹Õéä´éÃѺ¡ÒÃÍ͡Ẻ à¾×èÍãËé¡Òûéͧ¡Ñ¹·ÕèÊÁàËμØÊÁ¼ÅμèÍ¡ÒÃú¡Ç¹·Õèà»ç¹ ÍѹμÃÒÂ㹡ÒÃμÔ´μÑ駺ÃÔàdz·Õè¾Ñ¡ÍÒÈÑ ÍØ»¡Ã³ì¹ÕéÊÃéÒ§ ãªé
áÅÐÊÒÁÒöá¼èÃѧÊÕ¾Åѧ§Ò¹¤ÇÒÁ¶ÕèÇÔ·ÂØ áÅжéÒäÁèä´é μÔ´μÑé§áÅÐãªéμÒÁ·ÕèÃкØã¹¢Ñé¹μ͹¡ÒÃãªé§Ò¹ ÍÒ¨¡èÍãËéà¡Ô´¡ÒÃú¡Ç¹·Õèà»ç¹ÍѹμÃÒ μèÍ¡ÒÃÊ×èÍÊÒ÷ҧÇÔ·ÂØ
ÍÂèÒ§äáçμÒÁ äÁè
ÁÕ¡ÒÃÃѺ»ÃСѹÇèÒ ¡ÒÃú¡Ç¹¨ÐäÁèà¡Ô´¢Öé¹ã¹¡ÒÃμÔ´μÑé§áºº¾ÔàÈÉ ¶éÒÍØ»¡Ã³ìà»ç¹ÊÒàËμØ ãËéà¡Ô´¡ÒÃú¡Ç¹·Õèà»ç¹ÍѹμÃÒ μèÍ¡ÒÃÃѺ¤Å×è¹ÇÔ·ÂØ
áÅÐâ·Ã·ÑÈ¹ì «Öè§ÊÒÁÒöÃкØä´éâ´Â¡ÒûԴáÅÐà»Ô´ÍØ»¡Ã³ì ¼Ùéãªé¤ÇþÂÒÂÒÁá¡é䢡ÒÃú¡Ç¹â´ÂãªéÇÔ¸Õ¡ÒÃ˹Öè§ËÃ×Í ËÅÒÂÇÔ¸Õ¡ÒÃμèÍ仹ÕéÃèÇÁ¡Ñ¹:
»ÃѺ·ÔÈ·Ò§ ËÃ×Íà»ÅÕè¹μÓá˹è§àÊÒÍÒ¡ÒÈÃѺÊÑ−−Ò³
à¾ÔèÁÃÐÂÐËèÒ§ÃÐËÇèÒ§ÍØ»¡Ã³ìáÅÐà¤Ã×èͧÃѺ
àª×èÍÁμèÍÍØ»¡Ã³ìã¹àμéÒàÊÕº俿éÒ·ÕèÁÕǧ¨Ãáμ¡μèÒ§¨Ò¡·Õèãªéàª×èÍÁμè͡Ѻà¤Ã×èͧÃѺÊÑ−−Ò³
»ÃÖ¡ÉÒμÑÇá·¹¨Ó˹èÒ ËÃ×ͪèҧ෤¹Ô¤ÇÔ·ÂØ/â·Ã·Ñȹì·ÕèÁÕ»ÃÐʺ¡Òóìà¾×èͤ͢ÇÒÁªèÇÂàËÅ×Í
¤íÒàμ×͹ : ÊÒ·ÕèÁÕ©¹Ç¹ËØéÁ
¡ÒÃàª×èÍÁμèÍ·Ñé§ËÁ´ä»ÂѧÍØ»¡Ã³ì¤ÍÁ¾ÔÇàμÍÃìÍ×è¹ μéͧ·Óâ´ÂãªéÊÒÂà¤àºÔÅ·ÕèÁÕ©¹Ç¹ËØéÁ à¾×èÍÃÑ¡ÉÒ¤ÇÒÁ ÊÍ´¤Åéͧ¡Ñº¡®¢éͺѧ¤Ñº EMC
¤íÒàμ×͹ : ÍØ»¡Ã³ìμè;èǧ
¤Ø³ÊÒÁÒöμèÍ੾ÒÐÍØ»¡Ã³ìμè;èǧ (ÍØ»¡Ã³ìÍÔ¹¾Øμ/àÍÒμì¾Øμ, à·ÍÃìÁÔ¹ÑÅ, à¤Ã×èͧ¾ÔÁ¾ì, ÏÅÏ) ·Õèä´éÃѺ¡ÒÃÃѺÃͧ μÒÁ¢éÍ¡Ó˹´¤ÅÒÊ B à¢éҡѺÍØ»¡Ã³ì¹Õéà·èÒ¹Ñé¹
¡Ò÷ӧҹ¡ÑºÍØ»¡Ã³ìμè;èǧ·ÕèäÁèä´éÃѺ¡ÒÃÃѺÃͧÁÑ¡à»ç¹¼ÅãËéà¡Ô´¡ÒÃú¡Ç¹¡Ñº¡ÒÃÃѺÊÑ−−Ò³ÇÔ·ÂØáÅÐ TV
¢éͤÇÃÃÐÇѧ
¡ÒÃà»ÅÕè¹á»Å§ ËÃ×Í´Ñ´á»Å§ã´æ ·ÕèäÁèä´éÃѺ¡ÒÃÃѺÃͧÍÂèÒ§ªÑ´á¨é§¨Ò¡¼Ùé¼ÅÔμ ÍÒ¨·ÓãËéÊÔ·¸Ôì㹡ÒÃãªé¼ÅÔμÀѳ±ì¹Õé¢Í§¼Ùéãªé «Öè§ä´éÃѺ¨Ò¡
¤³Ð¡ÃÃÁ¡ÒáÒÃÊ×èÍÊÒÃáË觪ÒμÔ¶×Íà»ç¹âÁ¦Ð
à§×è͹䢡Ò÷íÒ§Ò¹
ÍØ»¡Ã³ì¹ÕéÊÍ´¤Åéͧ¡ÑºÊèǹ·Õè 15 ¢Í§¡®¢éͺѧ¤Ñº FCC ¡Ò÷ӧҹà»ç¹ä»μÒÁà§×è͹ä¢Êͧ¢éÍμèÍ仹Õé: (1) ÍØ»¡Ã³ì¹ÕéμéͧäÁè¡èÍãËéà¡Ô´¡Òà ú¡Ç¹·Õèà»ç¹ÍѹμÃÒ áÅÐ
(2) ÍØ»¡Ã³ì¹Õéμéͧ·¹μèÍ¡ÒÃú¡Ç¹·Õèä´éÃѺ ÃÇÁ·Ñé§ ¡ÒÃú¡Ç¹·ÕèÍÒ¨¡èÍãËéà¡Ô´¡Ò÷ӧҹ·ÕèäÁè¾Ö§»ÃÐʧ¤ì ¤íÒàμ×͹ : ¼Ùéãªé§Ò¹ã¹á¤¹Ò´Ò
ÍØ»¡Ã³ì´Ô¨ÔμÍŤÅÒÊ B ¹Õé ÊÍ´¤Åéͧ¡ÑºÁÒμðҹ ICES-003 ¢Í§á¤¹Ò´Ò
Remarque l'intention des utilisateurs canadiens
Cet appareil numerique de la classe B est conforme a la norme NMB-003 du Canada.
¡ÒáíҨѴËÅÍ´ä¿
¡Ò÷Ôé§ÍØ»¡Ã³ì·ÕèàÊÕÂáÅéÇâ´Â¼Ùéãªé·ÑèÇä»ÀÒÂ㹺éÒ¹ÊèǹμÑÇã¹ÊËÀÒ¾ÂØâû
ÊÑÅѡɳì¹Õ麹¼ÅÔμÀѳ±ìËÃ×ͺ¹¡ÅèͧºÃèؼÅÔμÀѳ±ì à»ç¹¡ÒÃÃкØÇèÒμéͧäÁè·Ô駼ÅÔμÀѳ±ì¹Õé»Ð»¹¡Ñº¢Í§àÊÕ·ÑèÇä»ÀÒÂ㹺éÒ¹
¤Ø³ÁÕ˹éÒ·ÕèÃѺ¼Ô´ªÍºã¹¡Ò÷Ôé§ÍØ»¡Ã³ì·ÕèàÊÕÂáÅéÇâ´Â¡ÒùÓä»Êè§Âѧ¨Ø´à¡çºÃǺÃÇÁ·Õè¡Ó˹´äÇé ÊÓËÃѺ¡ÒÃÃÕä«à¤ÔÅÍØ»¡Ã³ìä¿¿éÒ
áÅÐÍÔàÅç¡·Ã͹ԡÊì·ÕèàÊÕÂáÅéÇ ¡ÒÃà¡çºá¡¨Ò¡¡Ñ¹ áÅСÒÃÃÕä«à¤ÔÅÍØ»¡Ã³ì·ÕèàÊÕÂáÅéÇã¹¢³Ð·Õè·Ôé§ ¨ÐªèÇÂ͹ØÃÑ¡Éì·ÃѾÂҡøÃÃÁªÒμÔ
áÅЪèÇÂãËéá¹èã¨ÇèÒÍØ»¡Ã³ì¶Ù¡¹Óä»ÃÕä«à¤ÔÅã¹ÅѡɳзÕèªèÇ»éͧ¡Ñ¹ÊØ¢ÀÒ¾¢Í§Á¹Ø
ÉÂìáÅÐÊÔè§áÇ´ÅéÍÁ ÊÓËÃѺ¢éÍÁÙÅà¾ÔèÁàμÔÁà¡ÕèÂÇ
¡ÑºÊ¶Ò¹·Õè«Ö觤سÊÒÁÒö¹ÓÍØ»¡Ã³ì·ÕèàÊÕÂáÅéÇä»·Ôé§à¾×èÍ·Ó¡ÒÃÃÕä«à¤ÔÅ â»Ã´μÔ´μèÍÊӹѡ§Ò¹·éͧ¶Ôè¹ ã¹»ÃÐà·È¢Í§¤Ø³, ºÃÔ¡ÒÃ
à¡çº¢Í§àÊÕÂÀÒÂ㹺éÒ¹¢Í§¤Ø³ ËÃ×ÍÃéÒ¹¤éÒ·Õè¤Ø³«×éͼÅÔμÀѳ±ìÁÒ
5¿Ñ§¡ìªÑ蹡Ò÷ӧҹ¢Í§ OSD ¡´à¾×èÍ´Ù OSD ¡´ÍÕ¡¤ÃÑé§à¾×èÍ·Ó¡ÒÃàÅ×Í¡μÑÑÇàÅ×Í¡ã¹ OSD
ØèÁ»ÃѺÍÑμâ¹ÁÑμÔÔ/ÍÍ¡
ËÒ¡ OSD à»Ô´ãªé§Ò¹ÍÂÙèãËé¡´ Auto à¾×èÍÍÍ¡¨Ò¡ OSD àÁ×èÍ OSD ¹Ñé¹»Ô´¡ÒÃãªé§Ò¹ÍÂÙèãËé¡´ Auto
áÅéǨÍáÊ´§¼Å¨Ð·Ó¡ÒûÃѺ¤èÒμÓá˹觡ÒÃáÊ´§¼Å â¿¡ÑÊ
áÅÐÊÑ−−Ò³¹ÒÌԡҢͧ¨ÍáÊ´§¼Å¢Í§¤Ø³¹Ñé¹ãËéàËÁÒÐÊÁ·ÕèÊØ´â´ÂÍÑμâ¹ÁÑμÔ
ØèÁ Empowering ¡´»ØèÁ Empowering à¾×èÍà»Ô´ OSD ¢Í§ Acer eColor Management áÅéÇà¢éÒãªé§Ò¹âËÁ´ÀÒ¾¨ÓÅͧ
ËÁÒÂàÅ¢ äͤ͹ ÃÒ¡Òà ÃÒÂÅÐàÍÕ´
¤ÙèÁ×Í¡ÒÃμÑ駤èÒÍÂèÒ§àÃçǢͧ¨ÍÀÒ¾ LCD
ä·Â
¢éÍÁÙŨÓà¾ÒÐ
¾º¤ÙèÁ×ÍáÅÐàÍ¡ÊÒÃÍ×è¹æ ÊÓËÃѺ¼ÅÔμÀѳ±ì Acer ¢Í§¤Ø³ä´éº¹àÇçºä«·ìÊÓËÃѺ¡ÒÃʹѺʹعÍÂèÒ§à»ç¹·Ò§¡Òâͧ Acer
¨ÍáÊ´§¼Å LCD Ãкº¡ÒÃáÊ´§¼Å LCD ¨ÍÊÕ TFT
¢¹Ò´ 24W (61 cm)
¢¹Ò´¾Ô¡à«Å 0.276 ÁÁ. (á¹Ç¹Í¹) x 0.276 ÁÁ. (á¹ÇμÑé§)
¤ÇÒÁÊÇèÒ§
250 cd/m
2
ÑèÇä»)
¤ÇÒÁ¤ÁªÑ´ 100000000:1 ÊÙ§ÊØ´ (ACM)
ÁØÁÁͧ¡ÒÃÃѺªÁ 178° (H) 178° (V) (CR=10)
ÃÐÂÐàÇÅÒμͺʹͧ 6 ÁÔÅÅÔÇÔ¹Ò·Õ (G to G)
ª¹Ô´Ë¹éÒ¨Í VA
ÇÔ´ÕâÍ ÍÔ¹àμÍÃì࿫͹ÒÅçÍ¡ R, G, B
¤ÇÒÁ¶Õèá¹Ç¹Í¹ 30 kHz - 80 kHz
¤ÇÒÁ¶Õèá¹ÇμÑé§ 55 - 75 Hz
¡ÒÃáÊ´§¼ÅÊÕ 16.7 ÅéÒ¹ÊÕ
ÊÑ−−Ò³¹ÒÌÔ¡Ò 175 MHz
¤ÇÒÁÅÐàÍÕ´ÊÙ§ÊØ´ 1920 x 1080 @ 60 Hz
»ÅÑê¡&à¾ÅÂì VESA DDCCI/DDC2B
¡ÒÃãªé¾Åѧ§Ò¹ (·Õè 200 nits) âËÁ´à»Ô´ãªé§Ò¹ 40W (·ÑèÇä»)
âËÁ´ÊÅÕ»0.45W (·ÑèÇä»)
âËÁ´»Ô´0.30W (·ÑèÇä»)
¢ÑéÇμèÍÍÔ¹¾Øμ D-Sub
DVI-D 24 ¾Ô¹ (੾ÒÐÃØè¹·ÕèÁÕÍÔ¹¾Øμà·èÒ¹Ñé¹)
HDMI 19 ¾Ô¹ (੾ÒÐÃع·ÕèÁÕÍÔ¹¾Øμ HDMI à·Ò¹Ñé¹)
ÊÑ−−Ò³ÇÔ´ÕâÍà¢éÒ͹ÒÅçÍ¡: 0.7Vp-p (ÁÒμðҹ), 75 âÍËìÁ,ºÇ¡
ÊÑ−−Ò³´Ô¨ÔμÍÅ(àξÒÐÃØè¹·ÕèÁÕÍÔ
¹¾Øμ¤Ùèà·èÒ¹Ñé¹)
ÊÑ−−Ò³ HDMI (੾ÒÐÃع·ÕèÁÕÍÔ¹¾Øμ HDMI à·Ò¹Ñé¹) (ÍØ»¡Ã³ì«×éÍà¾ÔèÁ)
ÅÓ⾧ 2W x 2 (੾ÒÐÃØè¹·ÕèÁÕÍÔ¹¾ØμàÊÕ§à·èÒ¹Ñé¹) (ÍØ»¡Ã³ì«×éÍà¾ÔèÁ)
¢¹Ò´Ë¹éÒ¨ÍÊÙ§ÊØ´ á¹Ç¹Í¹: 531.36 mm
á¹ÇμÑé§: 298.89 mm
áËÅ觾Åѧ§Ò¹ 100-240V, 50/60 Hz
¢é;ԨÒóÒà¡ÕèÂǡѺÊÔè§áÇ´ÅéÍÁ ÍسËÀÙÁÔ¢³Ð·Ó§Ò¹: 0°Ö§ 40°C
ÍسËÀÙÁÔ¢³Ðà¡çºÃÑ¡ÉÒ: -20°Ö§ 60°C
¤ÇÒÁª×é¹¢³Ð·Ó§Ò¹: 10% ¶Ö§ 80%
¢¹Ò´ 546.4 (¡) x 411.4 (Ê) x 185.7 (Å) ÁÁ.
¹éÓ˹ѡ (¹éÓ˹ѡÊØ·¸Ô) μÑÇà¤Ã×èͧ 3.05 ¡¡.(ÊØ·¸Ô)
¢ÑÍÁÙÅÍØ»¡Ã³ì ¡ÒÃàÍÕ§: -5°Ö§ +15°
᡹ËÁع: äÁèÁÕ
»Ã
ѺÃдѺ¤ÇÒÁÊÙ§: äÁèÁÕ
᡹ËÁع¾Ñº: äÁèÁÕ
¢ÒμÑé§áºº¶Í´ä´: ¢ÒμÑé§áºº¶Í´ä´é¾ÃéÍÁÊ¡ÃÙ»ÅèÍÂ
μÑǤǺ¤ØÁÀÒ¹͡: ÊÇÔμ«ìØèÁ»ØèÁ¾ÒÇàÇÍÃì »ØèÁÍÑμâ¹ÁÑμÔ/ÍÍ¡
«éÒÂ(
) /¢ÇÒ() »ØèÁ E (àÍçÁ¾ÒÇàÇÍÃìÃÔè§)
MENU/ENTER »ØèÁÍÔ¹¾Øμ
¿Ñ§¡ìªÑè¹ ¤ÇÒÁ¤ÁªÑ´
¤ÇÒÁÊÇèÒ§
â¿¡ÑÊ
¹ÒÌÔ¡Ò
μÓá˹è§á¹Ç¹Í¹
μÓá˹è§á¹ÇμÑé§
(ͺÍØè¹) ÊÕ
(àÂç¹) ÊÕ
ÍسËÀÙÁÔÊÕ RGB
ÀÒÉÒ
μÓáË¹è§ OSD ä·ÁìàÍÒμì
¡Ó˹´¤èÒÍÑμâ¹ÁÑμÔ©¾ÒÐ
ÃØè¹ÍÔ¹¾Øμ͹ÒÅçÍ¡à·èÒ¹Ñé¹)
âËÁ´äÇμì
ACM à»Ô´ / »Ô´
¡ÒÃàÅ×Í¡ÊÑ−−Ò³ÍÔ¹¾Øμ( ੾ÒÐ
ÃØè¹ÍÔ¹¾Øμ¤Ùèà·èÒ¹Ñé¹)
DDCCI à»Ô´ / »Ô´
¢éÍÁÙŨÍáÊ´§¼Å
ÃÕà«çμ
ÍÍ¡
* ¢éÍÁÙŨÓà¾ÒзÑé§ËÁ´·ÕèáÊ´§´éÒ¹ÅèÒ§ ÍÒ¨à»ÅÕè¹àà»Å§â´ÂäÁèμéͧá¨é§ãËé·ÃÒº
¤ÇÒÁÊÍ´¤Åéͧ¡ÑºÃÐàºÕº¢éͺѧ¤Ñº
UA.TR.002
ME61
Monitor LCD - Petunjuk Singkat Pemasangan
Bahasa Indonesia
Panduan Ringkas Acer LCD Monitor
Petunjuk penting tentang keselamatan
Baca petunjuk berikut dengan cermat.
1. Untuk membersihkan layar monitor LCD: Pastikan monitor dioperasikan dengan daya AC yang sesuai dengan tempat Anda.
• Matikan monitor LCD, lalu lepaskan kabel daya.
• Semprotkan cairan pembersih yang lembut pada kain, kemudian bersihkan layar secara perlahan.
2. Jangan letakkan monitor LCD di dekat jendela. Membiarkan monitor terkena hujan, uap air, atau sinar matahari dapat
menyebabkan kerusakan fatal.
3. Jangan tekan layar LCD Tekanan yang berlebihan dapat menyebabkan kerusakan permanen pada layar.
4. Jangan lepaskan penutup atau berupaya memperbaiki sendiri monitor ini. Setiap perbaikan harus dilakukan oleh teknisi
resmi.
5. Letakkan monitor LCD dalam ruangan dengan suhu -20º hingga 60º C (-4º hingga 140º F). Meletakkan monitor LCD di luar
rentang suhu tersebut dapat menyebabkan kerusakan permanen.
6. Segera lepaskan sambungan monitor, kemudian hubungi teknisi resmi jika terjadi kondisi sebagai berikut:
• Kabel sinyal monitor ke PC terbakar atau rusak.
• Monitor LCD terkena cairan atau atau monitor terkena hujan.
• Monitor LCD atau casing rusak.
Memasang monitor pada dudukan
1. Keluarkan dudukan monitor dari kemasannya dan letakkan di atas bidang yang stabil dan rata.
2. Keluarkan monitor dari kemasannya.
3. Pasang lengan penyangga monitor ke dudukan.
• Pastikan bahwa dudukan terkunci pada lengan penyangga monitor. (untuk model-model tertentu)
• Kencangkan dudukan ke lengan penyangga monitor dengan memutar sekrup putih menggunakan tab yang terpasang atau
koin yang cocok. (untuk model-model tertentu)
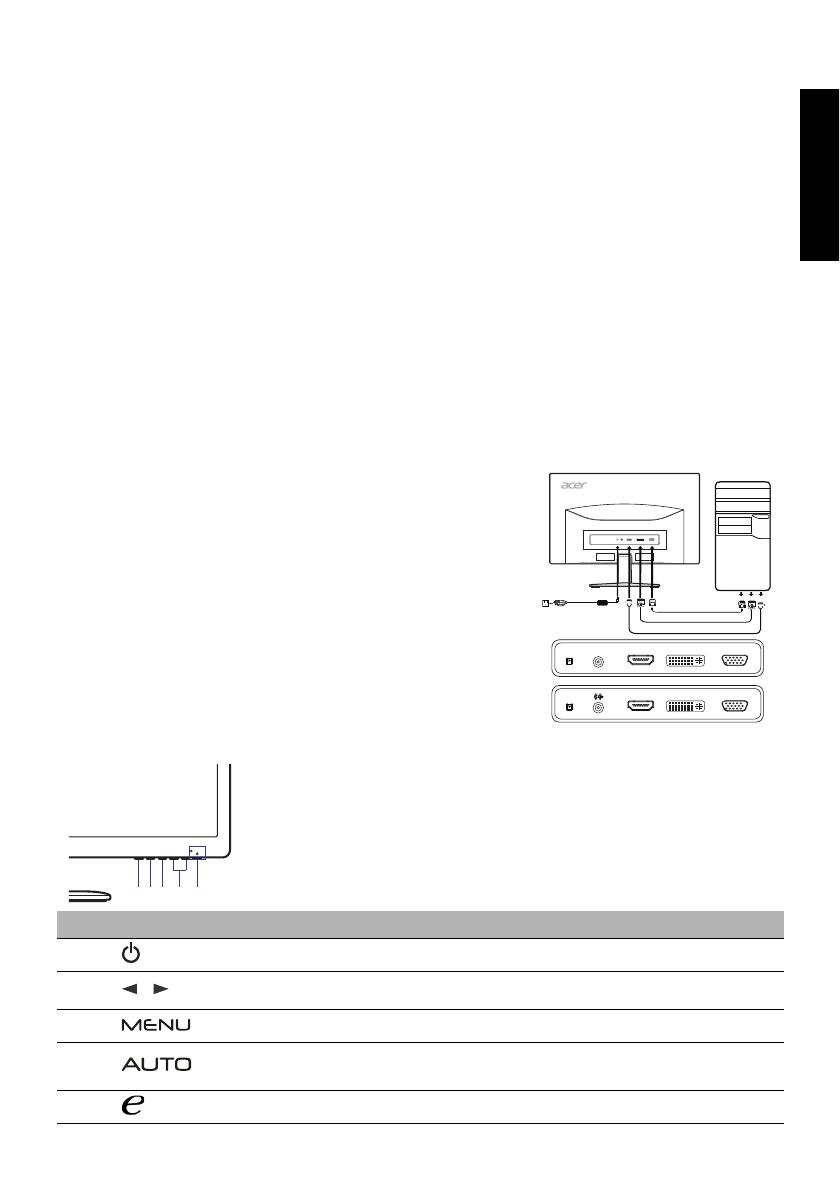
Menghubungkan Monitor ke Komputer
1. Matikan komputer dan cabut kabel daya komputer.
2. 2-1 Menghubungkan kabel video
a. Pastikan bahwa power layar monitor dan komputer dalam keadaan
mati.
b. Hubungkan kabel video ke komputer.
2-2 Menghubungkan kabel DVI (Model Dual-Input)
a. Pastikan bahwa power layar monitor dan komputer dalam keadaan
mati.
b. Hubungkan ujung kabel DVI 24-pin ke bagian belakang moni tor
dan hubungkan ujung lainnya ke port DVI komputer.
2-3 Hubungkan Kabel HDMI (Hanya model HDMI-Input)
a. Pastikan bahwa power layar monitor dan komputer dalamkeadaan
mati.
b. Sambungkan kabel HDMI ke komputer.
3. Sambungkan Kabel Audio. (Hanya untuk Model-Input-Audio) (Opsional)
4. Sambungkan kabel daya monitor ke port daya di bagian belakang monitor.
5. Sambungkan kabel daya komputer dan monitor ke stopkontak yang terdekat.
Kontrol eksternal
NO. Ikon Item Keterangan
1, 2
Tombol/indikator daya
Menghidupkan dan mematikan monitor. Biru menunjukkan daya hidup
Kuning menunjukkan mode siaga/hemat daya.
3, 4 Minus / plus
Jika OSD aktif, tekan tombol Minus atau Plus untuk menggantiganti
pilihan OSD tersebut.
5
Fungsi OSD
Tekan untuk melihat fungsi OSD. Tekan lagi untuk memasukkan pilihan
pada OSD.
6
Tombol Pengaturan
Otomatis/Keluar
Jika OSD (Menu Pada Layar) aktif, tekan Auto untuk keluar dari OSD.
Setelah OSD tidak aktif, tekan Auto dan monitor secara otomatis akan
mengoptimalkan posisi tampilan, fokus, dan jam tampilan.
7
Empowering Key
Tekan tombol Empowering Key untuk membuka OSD Acer eColor
Management dan mengakses mode skenario.
2
D-Sub
DC
HDMI
DC-IN
VGA INDVI-D IN
AUDIO-IN
HDMI
DC IN
D-SubDVI
AUDIO-IN
HDMI
DC IN
D-SubDVI
HDMI
DVI
2 14 356
7
/
Monitor LCD - Petunjuk Singkat Pemasangan
Bahasa Indonesia
SPESIFIKASI
Cari manual dan dokumen lainnya untuk produk Acer Anda di situs web dukungan Acer resmi.
Panel LCD
Sistem drive LCD TFT Berwarna
Ukuran 24"W (61 cm)
Pitch piksel 0,276 mm (H) x 0,276 mm (V)
Kecerahan
250 cd/m
2
(Normal)
Kontras 100000000:1 Maksimum (ACM)
Sudut tampilan 178° (H) 178° (V) (CR=10)
Waktu respons 6 ms (G to G)
Jenis Panel VA
Video Antarmuka Analog R, G, B
Frekuensi H 30 kHz - 80 kHz
Frekuensi V 55 - 75 Hz
Warna Layar 16,7M Warna
Dot Clock 175 MHz
Resolusi Maksimum 1920 x 1080 @ 60 Hz
Plug & Play VESA DDCCI/DDC2B
Pemakaian daya (pada 200 nits)
Mode Hidup 40W (typ.)
Mode Tidur 0,45W (typ.)
Mode Nonaktif 0,30W (typ.)
Konektor Input
D-Sub
DVI-D 24 pin (Hanya Model Input Ganda)
HDMI 19 pin (Hanya Model HDMI-Input)
Sinyal Video Input
Analog: 0,7V p-p (standar), 75 OHM, Positif
Sinyal digital (Hanya Model Input Ganda)
Sinyal HDMI (Hanya Model HDMI-Input) (Opsional)
Speakers 2W x 2 (Hanya untuk Model-Input-Audio)(Opsional)
Ukuran Layar Maksimum
Horizontal: 531,36 mm
Vertikal: 298,89 mm
Catu Daya 100-240V, 50/60 Hz
Informasi Tentang Lingkungan
Suhu Pengoperasian: 0°C hingga 40°C
Suhu Penyimpanan: -20°C hingga 60°C
Kelembaban Pengoperasian: 10% hingga 80%
Dimensi 546,4 (P) x 411,4 (T) x 185,7 (L) mm
Berat (N. W.) Unit 3,05 kg (bersih)
Spesifikasi mekanisme
Miring: -5° hingga +15°
Putar: Tidak
Penyesuaian ketinggian: Tidak
Rotasi: Tidak
Dudukan kaki yang dapat dilepas: Dudukan kaki yang dapat dilepas dengan sekrup
pelepas
Kontrol Eksternal:
Sakelar/Tombol
Tombol Daya
Kiri(
)/Kanan ()
MENU/ENTER
Otomatis/Keluar
E(Empowering) Key
Fungsi
Kontras
Kecerahan
Fokus
Jam
Posisi H.
Posisi V.
(Hangat) Warna
(Dingin) Warna
Temperatur Warna RGB
Bahasa
Posisi OSD. batas waktu
Konfigurasi otomatis (hanya
model input Analog)
Mode lebar (Penuh/Aspek)
ACM Aktif/Tidak
Aktif Pilihan sinyal Input (hanya
model input Ganda)
DDCCI Aktif/Tidak
Aktif lnformasi layar
Atur Ulang
Keluar
* Semua spesifikasi dapat berubah tanpa pemberitahuan sebelumnya.
Kesesuaian Terhadap Peraturan
UA.TR.002
ME61
LCD モニ - クイックットアップ
日本語
Acer LCD モニター   セッ イド QSG
このAcer LCD お買 す。 使用 「本書」
ル」 お読 安全 使用 い。
使用 注意事項
使用 る前 本書 「安全 注意」 お読
使いいただく ために 「ユ ズマニ ださ ズマニ アル
「使用上 注意事項」 確認 上、 安全 使用 い。
「保証書」 本書 大切 保管 い。
使用中 不具合 症状発生 場合 使用 中止 弊社
ご連 い。
ユー 入手方法
環境保全 観点 電子化 ユー ルの 提供
ル」 公式 す。
公式 ル」 該当製品 選択
ルの 内容 予告 更新 変更 る場合 す。 了承 い。
質問、 不明点等 弊社 連絡 い。
安全 注意
記載 る内容 危害、 財産等 損害 防止 事項 す。
理解 安全 使用 い。
本書 危険 度合 や程度 記号 説明 す。
死亡 や重傷 重大 な結果
い内容 す。
死亡 や重傷 重大 な結果
恐れがる内容で
傷害 や家屋 家財 損害
内容 す。
危険
警告
注意
LCD モニ - クイックットアップ
日本語
安全 注意
異常、 故障 使用 中止 電源
煙が出た、 臭が る、 な音がる。
画像表示 い、 い。
内部 液体、 異物
変形、 変色、 溶解 見受
損傷、 損壊
◎電
じる、折、加・改、重、挟、鋭、足
損傷 切断 利用 い。
や布 い、 い、 い。
電源 確実に み、 足配線 い。
電源 定期的 い。
長期間使用 い場合 電源 い。
水などの液体やの発生す 物の近 で使用し いで
高温 多湿 場所 (浴室 車内 使用 い。
温度変化の い場所 加熱機器等) 使用 い。
の手の届く 囲で使用し いで
本機器内部 金属 や燃 異物 い。
不安定な場所 設置 い。
お客様 る、 修理、 分解、 改造、 行為絶対 い。
免責事項
地震、 自然災害、 火災、 第三者 行為、 事故、 お客様 故意 過失、 誤用、 他異常 条件下
使用 損害 当社一切責任
記載内容 損害 当社一切 責任
接続機器 組合 誤動作 動作不能、 誤操作 損害 当社一切責任
本製品 使用中、 使用不能 付随的 な損害 当社一切責任
警告
LCD モニ - クイックットアップ
日本語
LCD 特性 特記事項
以下 症状 LCD 特性 起因 故障 不具合 了承 い。
•LCD 非常 精密度 い技術 製造 画面の 一部 点灯 い画素 や、 常時点灯 る画素
が存 る場合が す。
表示 る画像 画面 多少 発生 る場合
•LCD 長時間静止画 表示 場合、 残像 す。
他、 詳細事項 ユー ル」 参照 い。
付属品 確認
注意 付属品 製品 す。
詳細 公式 ムペ
注意 電源 付属 利用 い。 本機器以外 製品 流用 や、 市販電源 代用
わないで
台座
1.) 梱包箱 本体 台座、 脚部 い。
2.) 台座を 水平 安定 場所 い。
3.) 本体 脚部 み、 脚部 台座 す。
んでく
モニターパソ ンをする
1. コンをオ、電 さい
2. 2-1 ビデオそを接しま
a. モニター ューター ださ
b. ビデオ ンピューターにしま
2-2 DVI 接続 す。 ル入力 ル)
a. モニター ューター ださ
b. 24 ピン DVI ルの一方端を 面に う一の端
をコンピュータの DVI ポー
2-3 HDMI ケー ルの接 (HDMI- 入力 )
a. モニター ューター ださ
b. HDMI ケー ルを に接続し
3. オー ルを接続し オー オ入 ルの み) (オショ
4. 電源 背面 電源 挿入
5. ピュ モニコー ドを、 のコ ンセントに差
注意 1 複数 VGA 本製品 同時 接続 い。 正常 表示
モニター本
台座、 脚部
電源
(日本国内用)
オー
ケー
(オプショ ン)
アナロ
ケー
(オプショ ン)
DVI
ケー
(オプショ ン)
HDMI
ケー
(オプショ ン)
クイックット
アッ
2
D-Sub
DC
HDMI
DC-IN
VGA INDVI-D IN
AUDIO-IN
HDMI
DC IN
D-SubDVI
AUDIO-IN
HDMI
DC IN
D-SubDVI
HDMI
DVI
LCD モニ - クイックットアップ
日本語
制御 説明
1   内蔵 み機能     各機能 詳細 ル」
本書の 内容 一部、 転載 お断
本書の 内容 予告 変更 す。
本書の 内容 一誤 等、 お気 弊社 連絡
1
電源 電源
2
電源
ステ LED
ステ LED 青色点灯 場合 電源 正常稼働中 状態 す。
黄色点灯 状態 す。
3 7
ショ イコ
OSD メニタン
どの 押し も、 が表示さ
指定 機能起動
OSD 起動時、 表示 指示 実行 す。
3
Input
音量調節  
方向
表示 時、 「入力切替機能」 実行 す。
「音量調節」 選択 す。 1
OSD 起動時、 表示 方向移動 方向 す。
4
音量調節
音量調節  
方向
表示 時、 「音量調節」 す。 1
「音量調節」 選択 す。 1
OSD 起動時、 表示 方向移動 方向 す。
5
OSD 表示 時、 OSD メニ ます
6 AUTO
表示 時、 「自動調節機能」 実行 す。
7
e ボタ ショ イコ ンを表た時 eDisplay Management 機能」 起動 す。
LCD モニ - クイックットアップ
日本語
仕様
Acer 製品 説明書 Acer 公式 サイトかだけます
LCD パネル
駆動
TFT カラ LCD
サイ
24"W 61 cm
ピク
0.276 mm (水平 x 0.276 mm (垂直
輝度 250 cd/m
2
(標準
コントラ
100000000:1 最大値 ACM
可視角度
178°( 178°( )(CR=10
レスポンスタ
6 ms (G to G)
パネル
VA
ビデオ
R, G, B ァナログ ンターフェ
H- 周波数
30 kHz-80 kHz
V- 周波数
55 - 75 Hz
表示
16.7 百萬色
ドッ
175 MHz
最高解像度
1920 x 1080 @ 60 Hz
プラグ & プレ
VESA DDCCI/DDC2B
消費電 200 場合)
オン
40W typ.
スリープモード
0.45W typ.
オフ / スタ バィ
モー
0.30W typ.
入カ ネク
D-Sub
DVI-D 24 ピン モデルのみ
HDMI 19 ピン(HDMI- 入カ ルの )
入力 信号
アナ口グ: 0.7Vp-p (標準 , 75 OHM, 幅極
ル信号 ル入 み)
HDMI 信号 (HDMI- 入カ ルの )( ォプ
)
スピ ーカ 2W x 2 (オ ディ オ入力モ ルの み)
最大画面
水平 531.36 mm
垂直 298.89 mm
電源
100-240V, 50/60 Hz
設置環境
操作温度 0°C ~ 40°C
保存用温度 -20°C ~ 60°C
操作湿度 10% ~ 80%
寸法
546.4 (幅 x 411.4 (高 x 185.7 (奥行 mm
重量 N.W. 3.05 本体 (正量
機械の 仕様
傾き -5°~
+15°
回転
高さ調
旋回
取リ 外し可能フ 取リ 外し可能なフ ( ネジ取り外し )
外部
スィ / ボタ
電源
左( / 右(
消音 / 入力
自動 / 終了
E Empowering 一キ
機能
コントラ
輝度
フォーカス
クロ
水平位置
垂直位置
(暖
(冷
RGB 色温度
言語
OSD 意図。
自動設定
入カ
ヮィード / ァスぺクト)
ACM オン / 才フ
信号選択
入カ
DDCCI オン / オフ
表示情報
リッセ
終了
* 仕様 将来予告 変更
法規制の 遵守
UA.TR.002
ME61
ENERGY STAR
®
Acer’s ENERGY STAR qualified products save you money by reducing energy
costs and helps protect the environment without sacrificing features or
performance. Acer is proud to offer our customers products with the ENERGY
STAR mark.
What is ENERGY STAR?
Products that are ENERGY STAR qualified use less energy and prevent
greenhouse gas emissions by meeting strict energy efficiency guidelines set by the
U.S. Environmental Protection Agency. Acer is committed to offer products and
services worldwide that help customers save money, conserve energy and improve
the quality of our environment. The more energy we can save through energy
efficiency, the more we reduce greenhouse gases and the risks of climate change.
More information refers to http://www.energystar.gov or http://www.energystar.gov/
powermangement
Acer ENERGY STAR qualified products:
• Produce less heat and reduce cooling loads, and warmer climates.
• Automatically go into “display sleep” and “computer sleep” mode after 15 and 30
minute of inactivity respectively.
• Wake the monitor when it is in Active Off mode, move the mouse or press any
keyboard key.
• Computers will save more than 80% energy at “sleep” mode.
ENERGY STAR and the ENERGY STAR mark are registered U.S. marks
LCD Monitor Quick Setup Guide
English
Acer LCD Monitor Quick Start Guide (QSG)
Important safety instructions
Please read the following instructions carefully.
1. To clean the LCD monitor screen: Be sure that your monitor is electrically rated to operate with the AC power available in your
location.
• Turn off the LCD monitor and unplug the power cord.
• Spray a non-solvent cleaning solution onto a rag and clean the screen gently.
2. Do not place the LCD monitor near a window. Exposing the monitor to rain, moisture or sunlight can severely damage it.
3. Do not apply pressure to the LCD screen. Excessive pressure may cause permanent damage to the display.
4. Do not remove the cover or attempt to service this unit yourself. An authorized technician should perform servicing of any
nature.
5. Store the LCD monitor in a room with a temperature of -20° to 60° C (-4° to140° F). Storing the LCD monitor outside this range
may result in permanent damage.
6. Immediately unplug your monitor and call an authorized technician if any of the following circumstances occur:
• Monitor-to-PC signal cable is frayed or damaged.
• Liquid spills onto the LCD monitor or the monitor is exposed to rain.
• The LCD monitor or case is damaged.
Attaching the monitor to the base
1. Remove the monitor base from the packaging and place it on a stable and level workspace.
2. Remove the monitor from the packaging.
3. Attach the monitor stand arm to the base.
• Ensure that the base is locked onto the monitor stand arm. (for selected models)
• Secure the base to the monitor stand arm by turning the white screw using the integrated tab or a suitable coin. (for
selected models)
Connecting Your Monitor to a Computer
1. Turn off your monitor and unplug your computer’s power cord.
2. 2-1 Connect Video Cable
a. Make sure both the monitor and computer are powered-OFF.
b. Connect the VGA video cable to the computer.
2-2 Connect Digital Cable (Only Dual-input model)
a. Make sure both the monitor and computer are powered-OFF.
b. Connect one end of the 24-pin DVI cable to the back of the monitor
and connect the other end to the computer's port.
2-3 Connect HDMI Cable (Only HDMI-input model)
a. Make sure both the monitor and computer are powered-OFF.
b. Connect the HDMI cable to the computer.
3. Connect the Audio Cable. (Only Audio-Input Model) (Optional)
4. Insert the monitor power cable into the power port at the back of the
monitor.
5. Plug the power cords of your computer and your monitor into a nearby
electrical outlet.
External Controls
No. Icon Item Description
1, 2
Power button/
indicator
Turns the monitor on/off.
Blue indicates power on. Amber indicates standby/power saving mode.
3, 4 Minus / plus
If the OSD is active, press the Minus or Plus button to toggle between the
OSD options.
5 OSD functions Press to view the OSD. Press again to enter a selection in the OSD.
6
Auto adjust
button / exit
If the OSD is active, press Auto to exit the OSD. Once the OSD is inactive,
press Auto and the monitor will automatically optimize the display position,
focus, and clock of your display.
7 Empowering key
Press the Empowering Key to open the Acer eColor Management OSD and
access the scenario modes.
2
D-Sub
DC
HDMI
DC-IN
VGA INDVI-D IN
AUDIO-IN
HDMI
DC IN
D-SubDVI
AUDIO-IN
HDMI
DC IN
D-SubDVI
HDMI
DVI
2 14 356
7
/
LCD Monitor Quick Setup Guide
English
Regulations and safety notices
FCC notice
This device has been tested and found to comply with the limits for a Class B digital device pursuant to Part 15
of the FCC rules. These limits are designed to provide reasonable protection against harmful interference in a
residential installation. This device generates, uses, and can radiate radio frequency energy and, if not installed
and used in accordance with the instructions, may cause harmful interference to radio communications.
However, there is no guarantee that interference will not occur in a particular installation. If this device does
cause harmful interference to radio or television reception, which can be determined by turning the device off
and on, the user is encouraged to try to correct the interference by one or more of the following measures:
Reorient or relocate the receiving antenna.
Increase the separation between the device and receiver.
Connect the device into an outlet on a circuit different from that to which the receiver is connected.
Consult the dealer or an experienced radio/television technician for help.
CE declaration of Conformity
Hereby, Acer Inc., declares that this LCD monitor is in compliance with the essential requirements and other
relevant provisions of EMC Directive 2004/108/EC, Low Voltage Directive 2006/95/EC, and RoHS Directive 2011/
65/EU and Directive 2009/125/EC with regard to establishing a framework for the setting of ecodesign
requirements for energy-related product.
Notice: Shielded cables
All connections to other computing devices must be made using shielded cables to maintain compliance with
EMC regulations.
Notice: Peripheral devices
Only peripherals (input/output devices, terminals, printers, etc.) certified to comply with the Class B limits may
be attached to this equipment. Operation with non-certified peripherals is likely to result in interference to
radio and TV reception.
Caution
Changes or modifications not expressly approved by the manufacturer could void the user authority, which is
granted by the Federal Communications Commission, to operate this product.
Operation conditions
This device complies with Part 15 of the FCC Rules. Operation is subject to the following two conditions: (1) this
device may not cause harmful interference, and (2) this device must accept any interference received, including
interference that may cause undesired operation.
Notice: Canadian users
This Class B digital apparatus complies with Canadian ICES-003.
Remarque à l'intention des utilisateurs canadiens
Cet appareil numérique de la classe B est conforme a la norme NMB-003 du Canada.
Disposal of Waste Equipment by Users in Private Household in the European Union
This symbol on the product or on its packaging indicates that this product must not be disposed of
with your other household waste. Instead, it is your responsibility to dispose of your waste
equipment by handing it over to a designated collection point for the recycling of waste electrical
and electronic equipment. The separate collection and recycling of your waste equipment at the
time of disposal will help to conserve natural resources and ensure that it is recycled in a manner
that protects human health and the environment. For more information about where you can
drop off your waste equipment for recycling, please contact your local city office, your household
waste disposal service or the shop where you purchased the product.
LCD Monitor Quick Setup Guide
English
SPECIFICATION
Find manuals and other documents for your Acer product on the official Acer support website.
MU.T0V00.004 4J.2EN01.031
LCD Panel Driving system TFT Color LCD
Size 24”W (61 cm)
Pixel pitch 0.276 mm (H) x 0.276 mm (V)
Brightness
250 cd/m
2
(Typical)
Contrast 100000000:1 Max (ACM)
Viewable angle 178° (H) 178° (V) (CR=10)
Response time 6 ms (G to G)
Panel Type VA
Video R,G, B Analog Interface
H-Frequency 30 kHz - 80 kHz
V-Frequency 55 - 75 Hz
Display Colors 16.7M Colors
Dot Clock 175 MHz
Max. Resolution 1920 x 1080 @ 60 Hz
Plug & Play VESA DDCCI/DDC2B
Power consumption (at 200 nits) On Mode 40W (typ.)
Sleep Mode 0.45W (typ.)
Off Mode 0.30W (typ.)
Input Connector D-Sub
DVI-D 24 pin (Only Dual-Input Model)
HDMI 19 pin (Only HDMI-Input Model)
Input Video Signal Analog: 0.7Vp-p (standard), 75 OHM, Positive
Digital signal (Only Dual-Input Model)
HDMI signal (Only HDMI-Input Model)(Optional)
Speakers 2W x 2 (Only Audio-Input Model)(Optional)
Maximum Screen Size Horizontal: 531.36 mm
Vertical: 298.89 mm
Power Source 100-240V, 50/60 Hz
Environmental Considerations Operating Temp: 0° to 40°C
Storage Temp: -20° to 60°C
Operating Humidity: 10% to 80%
Dimensions 546.4 (W) x 411.4 (H) x 185.7 (D) mm
Weight (N. W.) 3.05 kg Unit (net)
Mechanism spec Tilt: -5° to +15°
Swivel: No
Height adjustment: No
Pivot: No
Detachable foot stand: Yes (Detachable foot stand with screw release)
External Controls: Switch / Buttons Power Button
Left() /Right()
MENU/ENTER
Auto/ Exit
E(Empowering) Key
Functions Contrast
Brightness
Focus
Clock
H. Position
V. Position
(Warm) Color
(Cool) Color
RGB Color temperature
Language
OSD position. timeout
Auto configuration (only
Analog input model)
Wide mode (Full/Aspect)
ACM On/Off
Input signal Selection (only
Dual input model)
DDCCI On/Off
Display information
Reset
Exit
* All specifications are subject to change without notice.
Regulatory Compliance
UA.TR.002
ME61
  • Page 1 1
  • Page 2 2
  • Page 3 3
  • Page 4 4
  • Page 5 5
  • Page 6 6
  • Page 7 7
  • Page 8 8
  • Page 9 9
  • Page 10 10
  • Page 11 11
  • Page 12 12
  • Page 13 13
  • Page 14 14
  • Page 15 15
  • Page 16 16
  • Page 17 17
  • Page 18 18
  • Page 19 19
  • Page 20 20
  • Page 21 21
  • Page 22 22
  • Page 23 23
  • Page 24 24
  • Page 25 25
  • Page 26 26
  • Page 27 27
  • Page 28 28
  • Page 29 29
  • Page 30 30
  • Page 31 31
  • Page 32 32
  • Page 33 33
  • Page 34 34
  • Page 35 35
  • Page 36 36
  • Page 37 37
  • Page 38 38
  • Page 39 39
  • Page 40 40
  • Page 41 41
  • Page 42 42
  • Page 43 43
  • Page 44 44
  • Page 45 45
  • Page 46 46
  • Page 47 47
  • Page 48 48
  • Page 49 49
  • Page 50 50
  • Page 51 51
  • Page 52 52
  • Page 53 53
  • Page 54 54
  • Page 55 55
  • Page 56 56
  • Page 57 57
  • Page 58 58
  • Page 59 59
  • Page 60 60
  • Page 61 61
  • Page 62 62
  • Page 63 63
  • Page 64 64

Acer G247HL 取扱説明書

カテゴリー
テレビ
タイプ
取扱説明書