Holux Portable Automobile Navigation System Quick Manual
- タイプ
- Quick Manual

Portable Automobile Navigation System
Quick Guide
Registered info:
HOLUX and GPSmile are trademarks of HOLUX
Technology, Inc.
All other trademarks belong to registered companies.
Note:
The contents of this manual will be modified without
further notice.
The operation temperature for the product is
between -10℃~50℃.
Operating or recharging in an environment with a
temperature over 45℃ might cause the system to stop
functioning. However, this should be considered a
normal phenomenon. Please do not operate under
extreme temperatures.
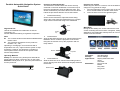
Operating Methods
Startup: For first time use, please press and hold the
power button for about 2 second to turn on the power.
Shutdown: While power is on, press the power button to
turn the power off.
Using the In-Vehicle Bracket
The included in-vehicle bracket set can be securely
suctioned on the front windshield, or secured on top of
the glove compartment using the adhesive plate. This
device will effectively secure the GPS unit in the vehicle.
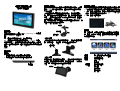
Follow the procedures below to secure the bracket:
1. Install bracket fixing
Screw can be loosened to adjust the bracket fixing.
Secure the screw when the bracket fixing is in a proper
angle. Suction the bracket fixing to the windshield.
2. Install bracket
Align the bracket fixing with the in-vehicle bracket as the
illustration shown. Insert the projection of the socket
fixing into the mortise. Pull up the projection until it is
firmly seated.
3. Install GPS unit
Slide the GPS into the in-vehicle bracket fitting holes to
secure. Gently push down until the unit is tightly fixed with
the bracket.
Using the car charger
While using the device in a vehicle, use the included car
charger for long periods of usage.
1. Plug the small plug into the power jack on the rear of
the in-vehicle bracket or left side of the device.
2. Insert the other end into the cigarette lighter.
Main Menu
During the first startup, the screen will show the main
screen consisting of three functions: navigation, settings,
applications and multimedia. Directly select an icon on the
screen to use the function.
Navigation
Start Navigation
Settings
Device Settings
Applications
Display GPS information
Game
Calculator
Multimedia
Play music file
EBook
Play video
Play photo
Suction
cup
screw
Projection
Mortise
Release button
ON/ OFF
screw

可攜式汽車導航系統
可攜式汽車導航系統可攜式汽車導航系統
可攜式汽車導航系統
快速入門指南
快速入門指南快速入門指南
快速入門指南
註冊資訊
註冊資訊註冊資訊
註冊資訊
HOLUX 和 GPSmile 是 HOLUX Technology, Inc.的商標。
所有其他商標屬於各註冊公司。
註
註註
註:
::
:
若修改本手冊的內容,恕不事先通知。
本產品的適當操作溫度範圍在-10℃到 50℃之間。
在溫度超過 50℃的環境中操作或充電可能導致系統無法
作用。但這是正常現象。請勿在極端溫度的環境中操作本
產品。
操作方法
操作方法操作方法
操作方法
開
開開
開關
關關
關機
機機
機
1. 按住電源按鈕約兩秒時間以開啟電源。
2. 電源開啟時,按下電源按鈕可關閉電源。
使用車內安裝架
使用車內安裝架使用車內安裝架
使用車內安裝架
隨附的車內安裝架可以牢牢地安裝在前擋風玻璃上。此裝
置能將 GPS 有效固定在車內。請依下列步驟固定安裝架:
1. 支架安裝
將吸盤垂直放到汽車前面的擋風玻璃上,用力壓緊車架,
另一手將底座上的撥動裝置轉向另一邊,就完成了車架的
安裝。將車架的螺絲鬆開,上下左右轉動支架桿,調整到
合適的角度後,再鎖緊螺絲。
註: 取下車架時,先把底座上的撥動裝置恢復到原位,把
吸盤上的塑膠凸點往外拉即可。
2. 背夾安裝
將背夾固定點與支架杆凸起點對齊放入,押扣到底聽到響
聲,即完成扣入。取出時,反方向推出背夾即可。
3. 主機安裝
先把主機放入背夾底部的凸槽中,將主機向背夾扳手位方
向押扣,聽到響聲即完成安裝。要取下主機時,將扳手位
後壓,另一手把主機向上取出就完成操作。
使用車用充電器
使用車用充電器使用車用充電器
使用車用充電器
要在車內長時間使用本裝置時,請使用隨附的車用充電器。
1. 將小插頭插入車用固定架後端或裝置左側的電源插孔。
2. 將另一端插入點菸器中。車用充電器的電源指示燈會亮
綠色,表示本裝置正在引用電力
3. 將另一端插入點菸器中。
主選單
主選單主選單
主選單
第一次開機時,螢幕上會顯示以下四種功能的主畫面:導
航、設置、應用及多媒體;請直接選擇螢幕上的圖示,便
可使用該項功能。
導航
導航導航
導航 載入導航程式和導航畫面
設定
設定設定
設定 系統設定
應用
應用應用
應用 顯示衛星資訊
遊戲
計算器
多媒體
多媒體多媒體
多媒體 播放音樂檔案
電子書
播放影片
播放圖像
電源開關
電源開關電源開關
電源開關
撥動裝置
塑膠凸點
扳手位
支架桿
螺絲
螺絲
固定點
-
 1
1
-
 2
2

