
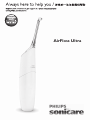
AirFloss Ultra
Question?
有疑问?
Contact Philips
请联系飞利浦


1


6
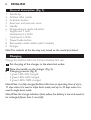
Introduction
Congratulations on your purchase and welcome to Philips! To fully benet
from the support that Philips offers, register your appliance at
www.philips.com/welcome.
Use AirFloss Ultra with your favorite mouthwash as part of your oral care
routine. In addition to brushing, AirFloss Ultra helps reduce the plaque in
between teeth in order to improve your gum health.
Important
Read this user manual carefully before you use the appliance and save it
for future reference.
Danger
- Keep the charger away from water. Do not place or store it over or
near water contained in a bathtub, washbasin, etc. Do not immerse
the charger in water or any other liquid. After cleaning, make sure the
charger is completely dry before you connect it to the mains.
Warning
- The mains cord cannot be replaced. If the mains cord is damaged,
discard the charger. Always have the charger replaced with one of the
original type in order to avoid a hazard.
- Use only charger type HX6100 provided with the AirFloss Ultra to
recharge the battery.
- If the appliance is damaged in any way (AirFloss Ultra nozzle,
handle and/or charger), stop using it.
- This appliance contains no serviceable parts. If the appliance is
damaged, contact the Consumer Care Centre in your country
(see chapter ‘Guarantee and support’).
- Do not use the charger outdoors or near heated surfaces.
- This appliance is not intended for use by persons (including children)
with reduced physical, sensory or mental capabilities, or lack of
experience and knowledge, unless they have been given supervision
or instruction concerning use of the appliance by a person
responsible for their safety.
- Children should be supervised to ensure that they do not play with
the appliance.
ENGLISH

Caution
- Consult your dentist before you use this appliance if you have had
recent oral or gum surgery, suffer from an ongoing dental condition,
had extensive dental work in the previous 2 months, or have
suspected issues with your dental work (lings, crowns, etc.).
- Consult your dentist if excessive bleeding occurs after using this
appliance or if bleeding continues to occur after 4 weeks of use.
- If you have medical concerns, consult your doctor before you use
this appliance.
- This Philips appliance complies with the safety standards for
electromagnetic devices. If you have a pacemaker or other implanted
device, contact your physician or the appliance manufacturer of
the implanted appliance prior to use.
- Do not use attachments other than the ones recommended by
the manufacturer.
- Do not exert excessive pressure on the nozzle tip of the nozzle.
- To avoid physical injury, do not ll the reservoir with hot water.
Do not put foreign objects in the reservoir.
- Only use the AirFloss Ultra for its intended purpose as described
in this user manual.
- To avoid physical injury, do not direct the spray under the tongue
or into the ear, nose, eye or other sensitive area.
- Do not clean the AirFloss Ultra nozzle, the handle, the charger,
the water reservoir and its cover in the dishwasher or a microwave.
- To avoid an ingestion hazard, do not put isopropyl alcohol or other
cleaning uids in the reservoir.
- The AirFloss Ultra is a personal care appliance and is not intended
for use on multiple patients in a dental practice or institution.
Electromagnetic elds (EMF)
This Philips appliance complies with all applicable standards and
regulations regarding exposure to electromagnetic elds.
ENGLISH 7

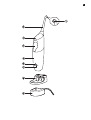
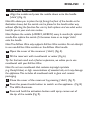
General description (Fig. 1)
1 Nozzle tip
2 AirFloss Ultra nozzle
3 Activation button
4 Reservoir and reservoir cover
5 Handle
6 Charge & burst mode indicators
- Single burst: 1 LED
- Double burst: 2 LEDs
- Triple burst: 3 LEDs
7 Power/mode button
8 Removable nozzle holder (select models)
9 Charger
Note: The contents of the box may vary based on the model purchased.
Charging
Charge the AirFloss Ultra for 24 hours before rst use.
1 Put the plug of the charger in the electrical outlet.
2 Place the handle on the charger (Fig. 2).
, Charging process: (Fig. 3)
- 1 green LED: 33% charged.
- 2 green LEDs: 66% charged.
- 3 green LEDS: 100% charged.
Note: When it is fully charged, AirFloss Ultra has an operating time of up to
11 days when it is used in triple burst mode, and up to 33 days when it is
used in single burst mode.
Note: When the charge indicators ash yellow, the battery is low and needs to
be recharged (fewer than 3 uses left).
ENGLISH8

Preparing for use
1 Align the nozzle and press the nozzle down onto the handle
(‘click’) (Fig. 4).
Note: We advise you to place the tip facing the front of the handle as the
illustration shows, but the nozzle can be placed in the handle either way
without affecting the function. You can try both options and use what works
best for you in your oral care routine.
Note: Replace the nozzle (HX8032, HX8033) every 6 months for optimal
results. Also replace the nozzle if it becomes loose or no longer ‘clicks’
onto the handle.
Note: The AirFloss Ultra only supports AirFloss Ultra nozzles. Do not attempt
to use non-AirFloss Ultra nozzles on the AirFloss Ultra handle.
2 Open the cover of the reservoir (‘click’) (Fig. 5).
3 Fill the reservoir with mouthwash or water (Fig. 6).
Tip: For the best result and a fresher experience, we advise you to use
mouthwash with your AirFloss Ultra.
Note: Do not use mouthwash that contains isopropyl myristate
(e.g. Dentyl Active) or high concentrations of essential oils, as it may damage
the appliance. This includes all mouthwash sold in glass and ceramic
packaging.
4 Close the cover of the reservoir by pressing (‘click’) (Fig. 7).
5 Press the power/mode button to switch on the appliance. (Fig. 8)
, The LEDs illuminate.
6 Press and hold the activation button until spray comes out of
the tip of the nozzle (Fig. 9).
ENGLISH 9

Using the appliance
1 Make sure the AirFloss Ultra is switched on. If it is off, press and
release the power/mode button to switch on the appliance. (Fig. 8)
, You can change the modes to have the desired amounts of bursts
each time you press the activation button. For optimal results, use
the triple burst mode (the default setting) from both the outside
and inside of your teeth.
, To change modes, press the power/mode button to cycle through
the modes until you reach your desired mode. The LEDs show
the selected mode:
- Single burst: 1 LED (Fig. 10)
- Double burst: 2 LEDs (Fig. 11)
- Triple burst: 3 LEDs (Fig. 12)
Note: The AirFloss Ultra remembers what mode was selected last and it is
ready for the next use. If your AirFloss Ultra becomes fully drained of power,
it will go back to the triple burst default mode once it has been recharged.
2 Place the nozzle tip between two teeth at your gum line. Slightly
close your lips over the nozzle when it is in place, to avoid
splashing (Fig. 13).
3 Press the activation button to deliver 1-3 bursts (depending on
the selected mode) of air and micro-droplets of mouthwash or
water between the teeth. (Fig. 14)
4 Slide the nozzle tip along the gum line until you feel it settle
between the next two teeth.
5 Continue this procedure for all spaces between your teeth,
including behind your back teeth (Fig. 15).
Note: Rell the reservoir as needed.
ENGLISH10

Auto-burst function
Hold the activation button to deliver bursts continuously,
approximately one second between set of bursts.
1 To switch off the AirFloss Ultra, press and hold the power/mode
button for one second.
Automatic shut-off function
The AirFloss Ultra automatically switches off if it has not been used for
one minute.
Cleaning
If the AirFloss Ultra becomes clogged, or to clean the inside of the
AirFloss, ll the reservoir with warm water and press the activation
button until the reservoir is empty.
Do not clean the nozzle, handle or charger in the dishwasher.
Do not use cleaning agents to clean the appliance. The formulation or
strength of some agents may damage the appliance.
Handle and nozzle
1 Remove the AirFloss Ultra nozzle from the handle. Rinse the nozzle
after each use to eliminate the residue left in it (Fig. 16).
2 Open the reservoir and rinse it under a faucet to eliminate
residue (Fig. 17).
Tip: You can also use a cotton swab to wipe the reservoir and remove
the remaining residue.
Note: Do not immerse the handle in water.
Note: Failure to remove residue from the nozzle or reservoir may result in an
unhygienic condition.
3 Wipe the entire surface of the handle with a damp cloth (Fig. 18).
ENGLISH 11

Charger
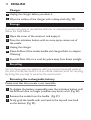
1 Unplug the charger before you clean it.
2 Wipe the surface of the charger with a damp cloth (Fig. 19).
Storage
If you are not going to use AirFloss Ultra for an extended period of time,
follow the steps below.
1 Open the cover of the reservoir and empty it.
2 Press the activation button until no more spray comes out of
the nozzle.
3 Unplug the charger.
4 Clean AirFloss Ultra nozzle, handle and charger. Refer to chapter
‘Cleaning’.
5 Store AirFloss Ultra in a cool, dry place away from direct sunlight.
Recycling
Do not throw away the appliance with the normal household waste at
the end of its life, but hand it in at an ofcial collection point for recycling.
By doing this, you help to preserve the environment.
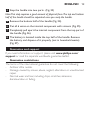
Removing the rechargeable battery
Please note that this process is not reversible.
1 To deplete the battery, repeatedly press the activation button until
the AirFloss Ultra no longer produces any bursts of air (Fig. 20).
2 Remove the nozzle from the handle. (Fig. 21)
3 Firmly grab the handle with one hand at the top and one hand
on the bottom (Fig. 22).
ENGLISH12

4 Snap the handle into two parts. (Fig. 23)
Note: This step requires a good amount of physical force. The top and bottom
half of the handle should be separated once you snap the handle.
5 Remove the bottom half of the handle (Fig. 24).
6 Cut all 6 wires on the internal component with scissors (Fig. 25).
7 Completely pull apart the internal component from the top part of
the handle (Fig. 26).
8 The battery is located inside the top half of the handle. Remove
the battery and dispose of it properly (not in household waste)
(Fig. 27).
Guarantee and support
If you need information or support, please visit www.philips.com/
support or read the separate worldwide guarantee leaet.
Guarantee restrictions
The terms of the international guarantee do not cover the following:
- AirFloss Ultra nozzle.
- Damage caused by misuse, abuse, neglect, alterations or unauthorised
repair.
- Normal wear and tear, including chips, scratches, abrasions,
discolouration or fading.
ENGLISH 13

14
簡介
恭喜您購買本產品並歡迎加入飛利浦!請於 www.philips.com/
welcome 註冊您的產品,以善用飛利浦提供的支援。
搭配您喜愛的漱口水使用 AirFloss 極致款來進行您的口腔保健程序。
除了刷牙之外,AirFloss 極致款也有助於減少齒縫間的牙菌斑,
強化牙齦健康。
重要事項
在使用本產品前,請先仔細閱讀本使用手冊,並保留使用手冊以
供日後參考。
危險
- 請勿讓充電器沾到水。請勿放置或存放於盛水的澡盆、
洗臉盆等區域的上方或附近。請勿將充電器浸入水中或其他液
體中。完成清潔程序後,請先確定充電器已完全乾燥,
再連接到主電源。
警示
- 電線無法更換。如果電線損壞,請棄置充電器。請務必以原型
號的充電器更換,以免發生危險。
- 僅使用 AirFloss 極致款隨附的充電器 (機型 HX6100)
為電池充電。
- 如果產品有任何機件受損 (AirFloss 極致款噴嘴、握柄和/或充
電器),請停止使用產品。
- 本產品不含可維修部分;萬一損壞,請與您所在國家/地區的客
戶服務中心聯繫 (請參閱「保固與支援」單元)。
- 充電器不可在室外或高熱表面附近使用。
- 本產品不適合供下列人士 (包括兒童) 使用:身體官能或心智能
力退化者,或是經驗與使用知識缺乏者。他們需要有負責其安
全的人員在旁監督,或指示產品的使用方法,方可使用。
- 請勿讓孩童使用本產品或將本產品當成玩具。
警告
- 如果您的口腔或牙齦動過手術、長期受牙科問題所苦,
或在過去 2 個月內進行大規模的牙齒矯正,或對您的牙齒矯正
(補牙、裝牙套等) 有疑慮,請在使用本產品前諮詢您的牙醫。
繁體中文

- 如果您在使用本產品後有出血狀況,或出血狀況延續超過
4 星期,請向您的牙醫諮詢。
- 若您有醫療方面的顧慮,使用本產品之前請先諮詢您的醫師。
- 此飛利浦產品符合電磁裝置之安全標準。若您裝有心律調節器或
其他植入裝置,使用前請詢問您的醫師或植入裝置的製造商。
- 請勿使用非製造商推薦的配件。
- 請勿對噴嘴噴頭過度施力。
- 若要避免受傷,請勿以熱水填充集水槽。請勿將異物放入集
水槽。
- 請依照本使用手冊的指示使用 AirFloss 極致款,勿另作他用。
- 若要避免受傷,請勿直接朝舌頭下噴水,或噴進耳朵、鼻子、
眼睛或其他敏感部位。
- 請勿使用洗碗機或微波爐清潔 AirFloss 極致款噴嘴、握柄、
充電器、集水槽和其蓋子。
- 若要避免誤食的危險,請勿將異丙醇或其他清潔液放入集水槽。
- AirFloss 極致款為個人保健用品,不宜在牙醫診所或醫療機構
供多名病患使用。
電磁波 (EMF)
本飛利浦產品符合所有電磁波暴露的相關適用標準和法規。
一般說明 (圖 1)
1 噴嘴噴頭
2 AirFloss 極致款噴嘴
3 啟動按鈕
4 集水槽和集水槽蓋
5 握柄
6 充電與噴洗模式指示燈
- 單次噴洗:1 個 LED 燈
- 兩次噴洗:2 個 LED 燈
- 三次噴洗:3 個 LED 燈
7 電源/模式按鈕
8 可拆式噴嘴固定座 (特定機型)
9 充電器
注意: 包裝內容視購買型號而定。
繁體中文 15

充電
第一次使用 AirFloss 極致款前請先充電 24 小時。
1 將充電器插頭插入電器插座。
2 將握柄放到充電器上。 (圖 2)
, 充電程序: (圖 3)
- 1 個綠色 LED 燈:已充電 33%。
- 2 個綠色 LED 燈:已充電 66%。
- 3 個綠色 LED 燈:已充電 100%。
注意: 完全充飽電時,AirFloss 極致款的操作時間在三次噴洗模
式下可達 11 天,在單次噴洗模式下可達 33 天。
注意: 若充電指示燈閃爍黃燈,則表示電池電力不足且需要充電
(僅能再使用 3 次以下)。
使用前準備
1 對準噴嘴,將噴嘴按到握柄上 (會聽見「喀噠」一聲)。 (圖 4)
注意: 建議讓噴嘴朝向握柄的正面 (如圖所示),但其實握柄的任
一側皆可,並不會影響噴嘴功能。您可以兩種都試試看,再選擇
最適合您口腔保健例行程序的方式。
注意: 為獲得最佳成效,請每 6 個月更換噴嘴 (HX8032,
HX8033)。若噴嘴鬆脫或無法再壓上握柄,也應更換噴嘴。
注意: AirFloss 極致款僅支援 AirFloss 極致款噴嘴。請勿嘗試將
非 AirFloss 極致款噴嘴裝上 AirFloss 極致款握柄使用。
2 打開集水槽的蓋子 (會聽見「喀噠」一聲)。 (圖 5)
3 在集水槽內裝滿漱口水或水。 (圖 6)
提示: 為獲得最佳效果以及更清新振奮的產品體驗,建議您以漱
口水搭配 AirFloss 極致款使用。
注意: 請勿使用含有十四酸異丙酯 (例如:Dentyl Active) 或高濃
度精油的漱口水,以防損壞產品。這包括所有以玻璃或陶瓷包裝
的市售漱口水。
繁體中文16

4 按壓集水槽蓋以關上蓋子 (會聽見「喀噠」一聲)。 (圖 7)
5 按下電源/模式按鈕,開啟產品電源。 (圖 8)
, LED 燈隨即亮起。
6 按住啟動按鈕直到水從噴嘴的噴頭噴出。 (圖 9)
使用本產品
1 請確定 AirFloss 極致款的電源已開啟。如果電源關閉,請先按
下電源/模式按鈕然後放開,即可開啟產品電源。 (圖 8)
, 您可變更模式以決定每次按下啟動按鈕後的理想噴量。欲達最
佳效果,請由牙齒內外側使用三次噴洗模式 (預設設定)。
, 如要變更模式,請按下電源/模式按鈕,即可循環切換各種模
式,直到選定想要的模式。所選模式會以 LED 燈號顯示:
- 單次噴洗:1 個 LED 燈 (圖 10)
- 兩次噴洗:2 個 LED 燈 (圖 11)
- 三次噴洗:3 個 LED 燈 (圖 12)
注意: AirFloss 極致款會記憶上次選擇的模式以供下次使用。
如果 AirFloss 極致款的電力完全耗盡,在重新充電之後會回復預
設的三次噴洗模式。
2 請將噴嘴噴頭置於齒間的牙齦線。噴嘴就定位時將嘴唇稍微蓋
住噴嘴,以避免飛濺。 (圖 13)
3 按下啟動按鈕,對齒縫噴出 1 至 3 次 (依所選模式而定)
空氣和漱口水或水的微小液滴。 (圖 14)
4 將噴嘴噴頭沿著牙齦線滑過,直到您覺得已停在下兩顆牙齒間
為止。
5 在臼齒後方等所有牙齒間隙重複相同動作。 (圖 15)
注意: 如有需要請為集水槽加水。
繁體中文 17

自動噴洗功能
按住啟動按鈕以進行連續噴洗,每組噴洗的間隔約一秒。
1 如要關閉 AirFloss 極致款電源,請按住電源/模式按鈕 1 秒。
自動斷電功能
如果 AirFloss 極致款持續 1 分鐘未使用,電源會自動關閉。
清潔
如果 AirFloss 極致款阻塞,或是要清潔 AirFloss 內部,請在集水
槽注入溫水,然後按下啟動按鈕直到集水槽的水用完。
請勿將噴嘴、握柄或充電器放入洗碗機清洗。
請勿使用清潔劑來清潔本產品。某些清潔劑的配方或強度可能會
損壞產品。
握柄與噴嘴
1 將 AirFloss 極致款噴嘴從握柄取下。每次使用後請沖洗噴嘴以
去除上方的殘留物。 (圖 16)
2 打開集水槽並置於水龍頭下沖洗,以去除殘留物。 (圖 17)
提示: 您也可以使用棉花棒擦拭集水槽並去除殘留物。
注意: 請勿將握柄浸泡在水中。
注意: 如未妥善去除噴嘴或集水槽的殘留物,可能引發衛生問題。
3 用濕布擦拭整個握柄的表面。 (圖 18)
充電器
1 進行清潔前,請先拔離充電器電源。
2 用濕布擦拭整個充電器的表面。 (圖 19)
繁體中文18

收納
如果您將長時間不使用 AirFloss 極致款,請遵照下列步驟操作。
1 打開集水槽的蓋子並將集水槽倒空。
2 按下啟動按鈕,直到再也沒有水從噴嘴噴出。
3 將充電器的插頭拔掉。
4 清潔 AirFloss 極致款噴嘴、握柄、充電器。請參閱「清潔」
單元。
5 將 AirFloss 極致款存放在遠離陽光直射的涼爽乾燥處。
回收
本產品使用壽命結束時,請勿與一般家庭廢棄物一併丟棄。
請將本產品送至政府指定的回收站,此舉能為環保盡一份心力。
取出充電式電池
請注意,本程序是不可回復的。
1 若要將電池的電力完全耗盡。請重複按下啟動按鈕,
直到 AirFloss 極致款不再噴出任何空氣。 (圖 20)
2 將握柄上的噴嘴拆下。 (圖 21)
3 用力握住握柄,一手握在上方,另一手握在下方。 (圖 22)
4 將握柄折成兩半。 (圖 23)
注意: 此步驟需要大量體力。握柄的上半部和下半部應在您拆折
時分開。
5 將握柄下半部拆下。 (圖 24)
6 用剪刀將連接內部零件的 6 條電線全部剪斷。 (圖 25)
7 將內部零件從握柄上部徹底拆除。 (圖 26)
8 電池位於握柄上半部。取出電池並以正確方式丟棄 (請勿與一
般家庭廢棄物一併丟棄)。 (圖 27)
繁體中文 19

保固與支援
如果您需要資訊或支援,請造訪:www.philips.com/support,
或另行參閱全球保證書。
保固限制
下列項目不在全球保固範圍內:
- AirFloss 極致款噴嘴。
- 因不當使用、濫用、疏忽、改裝或未經授權的維修所造成之損
害。
- 一般磨損與破損,包括剝落、刮痕、磨損、變色或褪色。
繁體中文20
ページが読み込まれています...
ページが読み込まれています...
ページが読み込まれています...
ページが読み込まれています...
ページが読み込まれています...
ページが読み込まれています...
ページが読み込まれています...
ページが読み込まれています...
ページが読み込まれています...
ページが読み込まれています...
ページが読み込まれています...
ページが読み込まれています...
-
 1
1
-
 2
2
-
 3
3
-
 4
4
-
 5
5
-
 6
6
-
 7
7
-
 8
8
-
 9
9
-
 10
10
-
 11
11
-
 12
12
-
 13
13
-
 14
14
-
 15
15
-
 16
16
-
 17
17
-
 18
18
-
 19
19
-
 20
20
-
 21
21
-
 22
22
-
 23
23
-
 24
24
-
 25
25
-
 26
26
-
 27
27
-
 28
28
-
 29
29
-
 30
30
-
 31
31
-
 32
32


他の言語で
- English: Saeco HX8331/01 Owner's manual
その他のドキュメント
-
Sonicare HX8111/02 Product Datasheet
-
-
Philips 42PFL5300/T3 ユーザーマニュアル
-
-
-
-
-
-
-
Sonicare HX8211/02 ユーザーマニュアル